Dell PowerEdge Express Flash PCIe SSD: instruction
Class: Computer Hardware
Type:
Manual for Dell PowerEdge Express Flash PCIe SSD
Table of contents
- Deploying the Dell PowerEdge Express Flash PCIe SSD Setting Up Your PCIe SSD
- Using PCIe SSDs in a Windows or Linux-Based System Servicing Your PCIe SSD Removing a PCIe SSD from the System
- Figure 1-1. Removing and Installing a PCIe SSD in a Device From or Into the System
- Installing a PCIe SSD Device in the System
Deploying the Dell PowerEdge Express Flash PCIe
SSD
CAUTION:
Many repairs may only be done by a certified service technician. You
should only perform troubleshooting and simple repairs as authorized in your product
documentation, or as directed by the online or telephone service and support team.
Damage due to servicing that is not authorized by Dell is not covered by your warranty.
Read and follow the safety instructions that came with the system.
NOTE:
For information on removing and reinstalling system parts, see the system-
specific Owner’s Manual at support.dell.com/manuals.
This document discusses a set of high level instructions on how to get started
and manage your Dell PowerEdge Express Flash Peripheral Component
Interconnect Express (PCIe) Solid State Device (SSD).
Setting Up Your PCIe SSD
All Dell PowerEdge Express Flash PCIe SSDs connect to the system board
through the PCIe SSD backplane. The backplane is mounted on the front-
chassis assembly of the system. PCIe SSD devices are supplied in device carriers
that are compatible with the PCIe SSD device bays.
CAUTION:
To ensure that you have the correct configuration for the PCIe SSD, see the
platform-specific Owner’s Manual at support.dell.com/manuals.
When you ordered the PCIe SSD with your system, with an operating system
pre-installed, the PCIe SSD is already configured and ready for use. If you are
installing a new operating system, follow the steps below:
1
Install the operating system on a storage device other than the PCIe SSD.
2
Install the PCIe SSD driver for your operating system.
NOTE:
To ensure that you have the current version of the driver, download the latest
Windows driver from support.dell.com.
• In Windows, install the driver by using the Dell Update Package (DUP).
• In Linux, install the driver by using the command:
rpm -ihv
<
driver rpm
package name
>.
rpm
.
2012–01
3
Reboot the system for the driver update to take effect.
Your device is now ready for use.
NOTE:
Dell OpenManage Server Administrator is required for device status LED to
operate correctly.
Using PCIe SSDs in a Windows or Linux-Based System
In Microsoft Windows-based systems, you can configure the PCIe SSD for use
from the Disk Management tool under the Storage section in the Server Manager.
In Linux-based systems, you can configure the PCIe SSD from the partitioning
tool by specifying or selecting the device name. The device name for PCIe SSDs
is /dev/rssdx, where x is the letter corresponding to each PCIe SSD in the system
(for example: /dev/rssda).
Use OpenManage Server Adminstrator in Windows or Linux for managing and
performing PCIe SSD related tasks.
Servicing Your PCIe SSD
Dell PowerEdge Express Flash PCIe SSDs support orderly hot swap allowing you
to add or remove a device without halting or rebooting the system in which the
devices are installed.
Removing a PCIe SSD from the System
If you need to remove or replace your PCIe SSD, you may remove the PCIe SSD
from the running system, through an orderly removal operation. This operation is
supported in Windows and Linux.
If you are removing a PCIe SSD from a system which is running, proceed to
step 1. Otherwise, skip to step 2.
CAUTION:
To prevent data loss, it is mandatory that you prepare the device for
removal before physically removing the device.
1
Use the
Prepare to Remove
task in the OpenManage Server Administrator to
safely remove a PCIe SSD from the system. This task causes the status LEDs
on the device to blink.
WARNING:
The identify LED pattern (blink operation) is the same LED pattern as prepare
for removal. When you initiate a prepare to remove operation, ensure that your PCIe SSD is
no longer accessible by the system before you physically remove the PCIe SSD.

You can safely remove the device from the operating system under the following
conditions after you use the Prepare to Remove task:
• The PCIe SSD is blinking the prepare for removal LED pattern.
• The PCIe SSD is no longer accessible by the operating system.
2
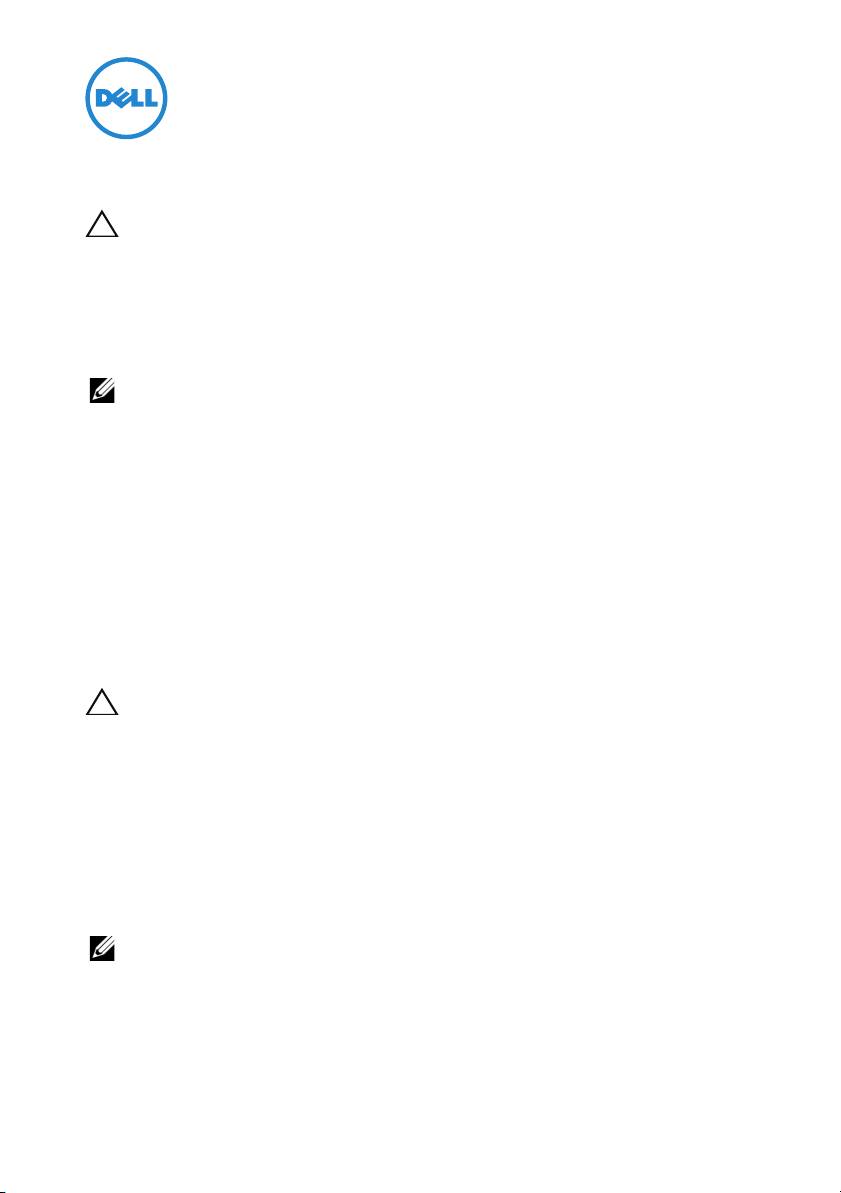
Press the release button on the front of the device carrier and open the device
carrier release handle, to release the PCIe SSD. See Figure 1-1.
3
Slide out the PCIe SSD.
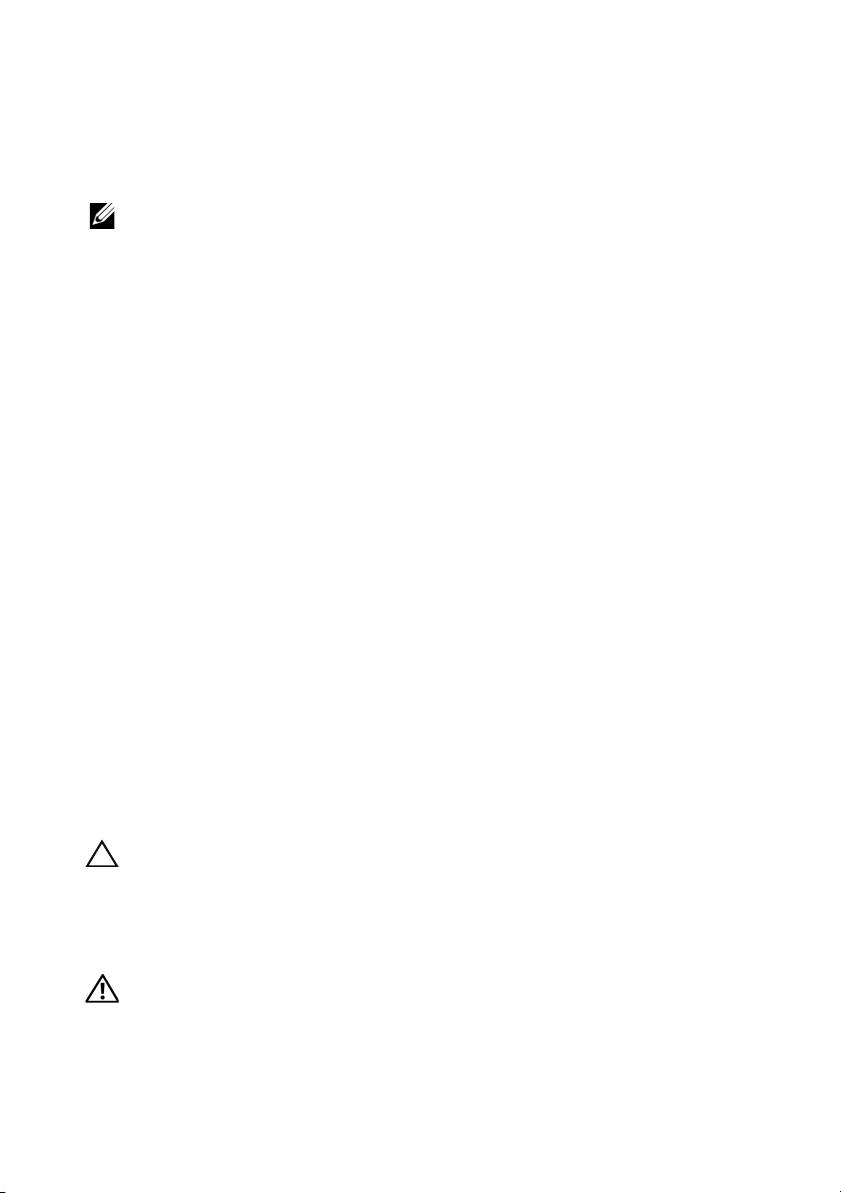
Figure 1-1. Removing and Installing a PCIe SSD in a Device From or Into the System
1 release button 2 PCIe SSD slot
3 top of the device 4 PCIe SSD carrier handle
2
1
3
4

Installing a PCIe SSD Device in the System
When installing a PCIe SSD device, ensure that the adjacent devices are fully
installed. Inserting a PCIe SSD device carrier and attempting to lock its lever
next to a partially installed carrier can damage the partially installed carrier's
shield spring, making it unusable.
1
Press the release button on the front of the PCIe SSD device carrier and open
the handle.
2
Slide the PCIe SSD device carrier into the PCIe SSD device bay until the
carrier contacts the backplane.
3
Close the PCIe SSD device carrier handle to lock the device in place. See
Figure 1-1.
___________________________
Information in this publication is subject to change without notice.
© 2012 Dell Inc. All rights reserved.
Reproduction of these materials in any manner whatsoever without the written permission of Dell Inc. is
strictly forbidden.
Trademarks used in this text: Dell™, the DELL logo, Dell Precision™, OptiPlex™, Latitude™,
PowerEdge™, PowerVault™, PowerConnect™, OpenManage™, EqualLogic™, KACE™,
®
®
®
®
FlexAddress™ and Vostro™ are trademarks of Dell Inc. Intel
, Pentium
, Xeon
, Core™ and Celeron
®
are registered trademarks of Intel Corporation in the U.S. and other countries. AMD
is a registered
trademark and AMD Opteron™, AMD Phenom™, and AMD Sempron™ are trademarks of Advanced
®
®
®
®
®
Micro Devices, Inc. Microsoft
, Windows
, Windows Server
, MS-DOS
and Windows Vista
are either
trademarks or registered trademarks of Microsoft Corporation in the United States and/or other countries.
®
®
Red Hat Enterprise Linux
and Enterprise Linux
are registered trademarks of Red Hat, Inc. in the United
®
States and/or other countries. Novell
is a registered trademark and SUSE ™ is a trademark of Novell Inc.
®
in the United States and other countries. Oracle
is a registered trademark of Oracle Corporation and/or
®
®
®
®
its affiliates. Citrix
, Xen
, XenServer
and XenMotion
are either registered trademarks or trademarks
®
®
®
of Citrix Systems, Inc. in the United States and/or other countries. VMware
, Virtual SMP
, vMotion
,
®
®
vCenter
, and vSphere
are registered trademarks or trademarks of VMWare, Inc. in the United States or
other countries.
Other trademarks and trade names may be used in this publication to refer to either the entities claiming
the marks and names or their products. Dell Inc. disclaims any proprietary interest in trademarks and trade
names other than its own.
2012–01 A00
部署 Dell PowerEdge Express Flash PCIe SSD
小心:
多数维修只能由经认证的维修技术人员进行。您只能根据产品说明文件
中的授权,或者在联机或电话服务和支持小组的指导下,进行故障排除和简单
的维修。未经 Dell 授权的维修所造成的损坏不在保修范围之内。请阅读并遵循
系统附带的安全说明。
注:
有关卸除和重新安装系统部件的信息,请参阅特定于系统的
Owner's Manual (用户手册),它位于 support.dell.com/manuals。
本文档讨论一系列有关如何开始使用和管理 Dell PowerEdge Express
Flash PCI Express (PCIe) 固态硬盘 (SSD) 的提纲挈领的说明。
设置 PCIe SSD
所有 Dell PowerEdge Express Flash PCIe SSD 均通过 PCIe SSD 背板连接到
系统主板。背板安装在系统的前端底架组件上。 PCIe SSD 设备在兼容
PCIe SSD 设备托架的设备托盘中提供。
小心:
为了确保正确配置 PCIe SSD,请参阅特定于平台的 Owner's Manual
(用户手册),它位于 support.dell.com/manuals。
如果您是随系统一起订购的
PCIe SSD
,并且预装了操作系统,那么
PCIe SSD
已经过配置并可随时使用。如果您是在安装新的操作系统,请遵循以下步骤:
1
在
PCIe SSD
以外的存储设备上安装操作系统。
2
为操作系统安装
PCIe SSD
驱动程序。
注:
为了确保您拥有最新版本的驱动程序,请从 support.dell.com 下载最新的
Windows 驱动程序。
•
在
Windows
中,通过使用
Dell Update Package (DUP)
安装驱动程序。
• 在 Linux 中,通过使用命令:rpm -ihv < 驱动程序 rpm 程序包
名称 >.rpm 来安装驱动程序。
3
重新引导系统以使驱动程序更新生效。
您的设备现已准备就绪可供使用。
注:
需要 Dell OpenManage Server Administrator 才能使设备状态 LED 指示灯
正常工作。
2012 – 01
在基于 Windows 或 Linux 系统中使用 PCIe SSD
在基于 Microsoft Windows 的系统中,您可以从 Server Manager (服务器管
理器)中 Storage (存储)部分下方的 Disk Management (磁盘管理)工具
内配置 PCIe SSD 以供使用。
在基于 Linux 的系统中,您可以从分区工具中通过指定或选择设备名称来
配置 PCIe SSD。 PCIe SSD 的设备名称为 /dev/rssdx,其中 x 是与系统中每
个 PCIe SSD 对应的字母 (例如:/dev/rssda)。
在
Windows
或
Linux
中使用
OpenManage Server Adminstrator
来管理和执行与
PCIe SSD
相关的任务。
维护 PCIe SSD
Dell PowerEdge Express Flash PCIe SSD 支持按顺序的热交换操作,允许您添
加或移除设备,而不必停止或重新引导安装该设备的系统。
从系统中移除 PCIe SSD
如果需要移除或更换 PCIe SSD,您可以通过按顺序的移除操作,从正在
运行的系统中移除 PCIe SSD。此操作在 Windows 和 Linux 中均受支持。
如果您要从正在运行的系统中移除 PCIe SSD,请继续步骤 1。否则,请跳
至步骤 2。
小心:
为了防止数据丢失,在实际移除设备之前,必须使设备做好移除准备。
1 在 OpenManage Server Administrator 中,使用 Prepare to Remove(准备
移除)任务从系统中安全地移除 PCIe SSD。该任务会导致设备上的状
态 LED 指示灯闪烁。
警告:
LED 识别模式 (闪烁操作)与准备移除的 LED 模式相同。当您发起准备移
除操作时,请确保在实际移除 PCIe SSD 之前,系统不再能够访问 PCIe SSD。
在以下情况下,您可以在使用 Prepare to Remove (准备移除)任务后从操作
系统中安全地移除设备:
• PCIe SSD
正在闪烁准备移除
LED
模式。
•
操作系统不再能够访问
PCIe SSD
。
2 按下设备托盘正面的释放按钮,然后打开设备托盘释放手柄以释放
PCIe SSD。请参阅图 1-1。
3
滑出
PCIe SSD
。
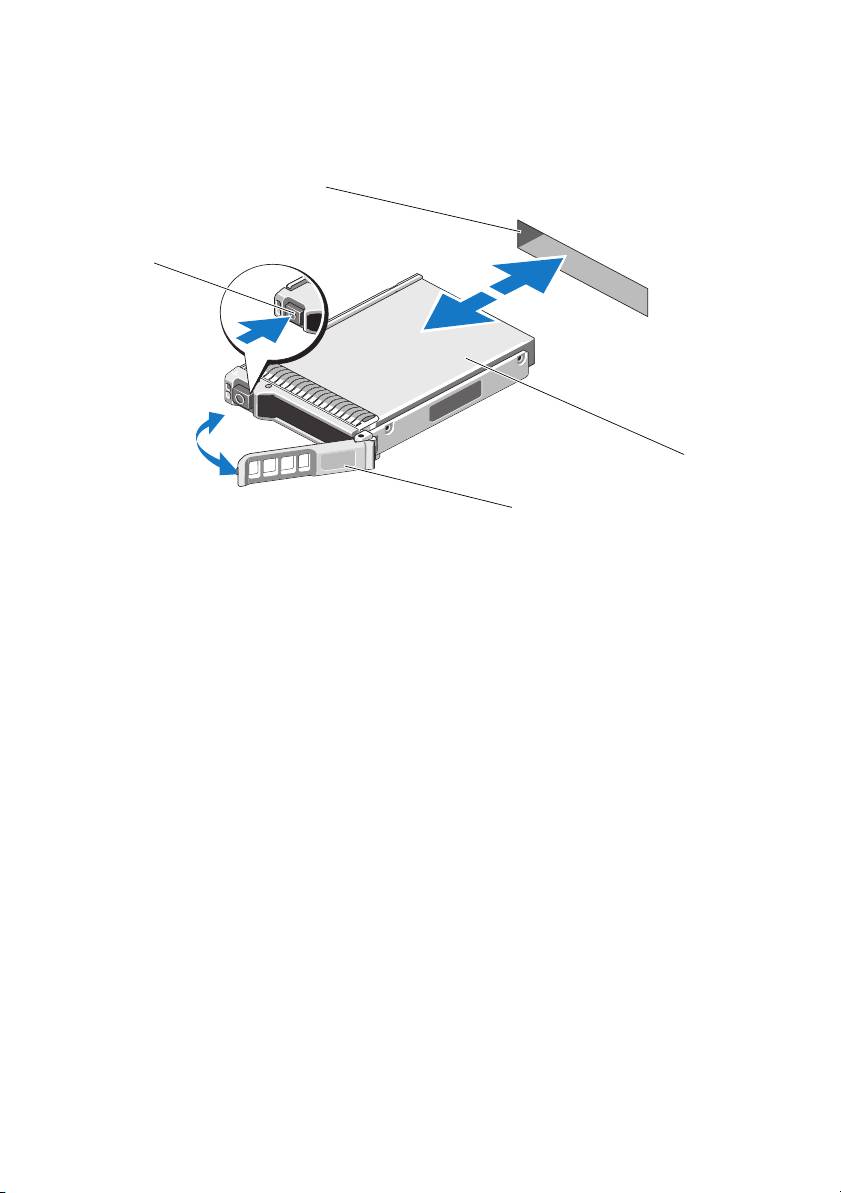
图 1-1. 在系统中移除和安装设备中的 PCIe SSD
1
释放按钮
2
PCIe SSD 插槽
3
设备顶部
4
PCIe SSD 托盘手柄
在系统中安装 PCIe SSD 设备
在安装 PCIe SSD 设备时,请确保相邻的设备已完全安装到位。如果相邻的
托盘未安装到位,则插入 PCIe SSD 设备托盘并尝试锁定其旁边的手柄可能
会损坏未安装到位托盘的保护弹簧,使其无法使用。
1
按下
PCIe SSD
设备托盘正面的释放按钮,然后打开手柄。
2
将
PCIe SSD
设备托盘滑入到
PCIe SSD
设备托架中,直至托盘接触背板。
3
关上
PCIe SSD
设备托盘手柄以将设备锁定到位。请参阅图
1-1
。
2
1
3
4

___________________________
本文中的信息如有更改,恕不另行通知。
© 2012 Dell Inc. 版权所有,翻印必究。
未经 Dell Inc. 书面许可,严禁以任何形式复制这些材料。
本文中所使用的商标:
Dell™
、
DELL
徽标、
Dell Precision™
、
OptiPlex™
、
Latitude™
、
PowerEdge™
、
PowerVault™
、
PowerConnect™
、
OpenManage™
、
EqualLogic™
、
KACE™
、
®
®
®
®
FlexAddress™
和
Vo s t r o ™
是
Dell Inc.
的商标。
Intel
、
Pentium
、
Xeon
、
Core™
和
Celeron
均为
®
Intel Corporation
在美国
和其他国家
/
地区的注册商标。
AMD
是
Advanced Micro Devices, Inc.
的
注册商标,
AMD Opteron™
、
AMD Phenom™
和
AMD Sempron™
是
Advanced Micro Devices, Inc.
®
®
®
®
®
的商标。
Microsoft
、
Windows
、
Windows Server
、
MS-DOS
和
Windows Vista
是
Microsoft
®
Corporation
在美国和
/
或其他国家
/
地区的商标或注册商标。
Red Hat Enterprise Linux
和
®
®
Enterprise Linux
是
Red Hat, Inc.
在美国和
/
或其他国家
/
地区的注册商标。
Novell
和
SUSE™
分
®
别是
Novell Inc.
在美国和其他国家
/
地区的注册商标和商标。
Oracle
是
Oracle Corporation
和
/
或
®
®
®
®
其子公司的注册商标。
Citrix
、
Xen
、
XenServer
和
XenMotion
是
Citrix Systems, Inc.
在美国和
/
®
®
®
®
®
或其他国家或地区的注册商标或商标。
VMware
、
Virtual SMP
、
vMotion
、
vCenter
和
vSphere
是
VMWare, Inc.
在美国或其他国家或地区的商标或注册商标。
本出版物中可能使用其他商标和商品名称来指拥有相应商标和商品名称的公司或其产品。
Dell Inc. 对不属于自己的商标和商品名称不拥有任何所有权。
2012
–
01 A00
部署 Dell PowerEdge Express Flash PCIe SSD
警示:
許多維修工作僅限由獲得認證的技術服務人員完成。您只能依照產品說
明文件中的授權說明,或在線上或電話服務和支援團隊的指導下,執行故障排
除和簡單的維修。未經 Dell 授權的維修若造成損壞,不在保固範圍之內。請閱
讀並遵循系統隨附的安全說明。
註:
如需卸下與重新安裝系統零件的資訊,請參閱 support.dell.com/manuals 上
系統專屬的 《擁有者手冊》。
這份文件就如何開始使用及管理 Dell PowerEdge Express Flash Peripheral
Component Interconnect Express (PCIe) 固態裝置 (SSD) 提供進階說明。
設定 PCIe SSD
所有 Dell PowerEdge Express Flash PCIe SSD 是經由 PCIe SSD 背板連接主機
板。背板裝載於系統的前底架組件。與 PCIe SSD 裝置支架相容的裝置機座
隨附 PCIe SSD 裝置。
警示:
若要確保 PCIe SSD 組態正確無誤,請參閱平台專屬的 《擁有者手冊》,
網址是 support.dell.com/manuals。
您隨預安裝作業系統之系統訂購的 PCIe SSD,PCIe SSD 已經設定且備妥可
供使用。如果您要安裝新的作業系統,請遵循以下步驟:
1
在
PCIe SSD
以外的儲存裝置安裝作業系統。
2
為系統安裝
PCIe SSD
驅動程式。
註:
若要確定驅動程式是最新版本,請從 support.dell.com 下載最新的 Windows
驅動程式。
•
在
Windows
中,使用
Dell Update Package (DUP)
安裝驅動程式。
•
在
Linux
中,使用這個命令安裝驅動程式:
rpm -ihv
<
driver rpm
package name
>.
rpm
。
3
重新啟動系統,驅動程式更新才會生效。
您的裝置現在可供使用。
註:
裝置狀態 LED 指示燈必須有 Dell OpenManage Server Administrator 才能運作
正確無誤。
2012 – 01

在 Windows 或 Linux 系統中使用 PCIe SSD
在 Microsoft Windows 系統中,您可以在 Server Manager ( 伺服器管理員 ) 之
Storage ( 儲存裝置 ) 部分下的 Disk Management Tool ( 磁碟管理工具 ) 設定要
使用的 PCIe SSD。
在 Linux 系統中,您可以指定或選取裝置名稱,從分割工具設定 PCIe SSD。
PCIe SSD 的裝置名稱是 /dev/rssdx,其中 x 是對應系統中每個 PCIe SSD 的字
母 ( 例如:/dev/rssda)。
在 Windows 或 Linux 中使用 OpenManage Server Adminstrator 管理與執行
PCIe SSD 相關工作。
維修 PCIe SSD
Dell PowerEdge Express Flash PCIe SSD 支援循序熱插拔,不用暫停或重新啟
動裝置安裝所在的系統,便可新增或移除裝置。
從系統移除 PCIe SSD
如果您必須移除或更換 PCIe SSD,可以從執行中系統,透過循序移除作業移
除 PCIe SSD。Windows 與 Linux 都支援這項作業。
如果要從執行中的系統卸下 PCIe SSD,請繼續執行步驟 1。否則請跳至
步驟 2。
警示:
您必須先將裝置為卸下做好準備,才能實際卸下裝置,以免資料遺失。
1
使用
OpenManage Server Administrator
中的準備卸下工作,才能從系統安
全卸下
PCIe SSD
。這項工作會導致裝置上的狀態
LED
閃爍。
警告:
LED 識別指示燈樣式 ( 閃爍作業 ) 的 LED 指示燈樣式與卸下的準備相同。
起始準備卸下作業時,先確定系統不再存取 PCIe SSD,再實際卸下 PCIe SSD。
使用準備卸下工作後,您可以在下列狀態從作業系統安全卸下裝置:
• PCIe SSD
正在閃爍準備卸下
LED
指示燈樣式。
•
作業系統不再存取
PCIe SSD
。
2
按下裝置機座前方的釋放按鈕,然後開啟裝置機座釋放手柄,釋放
PCIe
SSD
。請參閱圖
1-1
。
3
推出
PCIe SSD
。

圖 1-1. 在裝置從系統卸下或安裝 PCIe SSD
1
釋放按鈕
2
PCIe SSD 插槽
3
裝置最上方
4
PCIe SSD 機座手柄
在系統安裝 PCIe SSD 裝置
安裝 PCIe SSD 裝置時,確定鄰近裝置已完全安裝。插入 PCIe SSD 裝置機
座,並嘗試鎖定部分安裝機座旁的拉桿,可能損及部分安裝機座的護蓋彈
簧,導致它不穩定。
1
按下
PCIe SSD
裝置機座前方的釋放按鈕,然後開啟手柄。
2
將
PCIe SSD
裝置機座推入
PCIe SSD
裝置支架,一直到機座碰到背板
為止。
3
關上
PCIe SSD
裝置機座手柄,將裝置鎖定在固定位置。請參閱圖
1-1
。
2
1
3
4

___________________________
本出版品中的資訊如有變更,恕不另行通知。
©
2012 Dell Inc. 版權所有,翻印必究。
未經 Dell Inc. 的書面許可,嚴格禁止以任何形式複製這些內容。
本文中使用的商標:
Dell™
、
DELL
徽標、
Dell Precision™
、
OptiPlex™
、
Latitude™
、
PowerEdge™
、
PowerVault™
、
PowerConnect™
、
OpenManage™
、
EqualLogic™
、
KACE™
、
®
®
®
®
FlexAddress™
和
Vo s t r o ™
是
Dell Inc.
的商標。
Intel
、
Pentium
、
Xeon
、
Core™
和
Celeron
®
是
Intel Corporation
在美國
及其他國家
/
地區的商標或註冊商標。
AMD
是
Advanced Micro
Devices, Inc.
的註冊商標,而
AMD Opteron™
、
AMD Phenom™
及
AMD Sempron™
是
Advanced
®
®
®
®
Micro Devices, Inc.
的商標。
Microsoft
、
Windows
、
Windows Server
、
MS-DOS
及
Windows
®
Vista
是
Microsoft Corporation
在美國及
/
或其他國家
/
地區的商標或註冊商標。
Red Hat Enterprise
®
®
®
Linux
及
Enterprise Linux
為
Red Hat, Inc.
在美國及
/
或其他國家的註冊商標。
Novell
是
®
Novell Inc.
的註冊商標,
SUSE™
是
Novell Inc.
在美國及
/
或其他國家
/
地區的商標。
Oracle
是
®
®
®
®
Oracle Corporation
及
/
或其子公司的註冊商標。
Citrix
、
Xen
、
XenServer
和
XenMotion
是
®
®
Citrix Systems, Inc.
在美國及
/
或其他國家
/
地區的商標或註冊商標。
VMware
、
Virtual SMP
、
®
®
®
vMotion
、
vCenter
和
vSphere
是
VMWare, Inc.
在美國及
/
或其他國家
/
地區的商標或註冊商標。
本出版品中使用的其他商標及商品名稱,係指擁有這些商標及商品名稱的公司或其製造的產品。
Dell Inc. 對本公司之外的商標和產品名稱不擁有任何所有權。
2012 – 01 A00
Déploiement du périphérique SSD PCIe Express
Flash Dell PowerEdge
PRÉCAUTION :
la plupart des réparations ne peuvent être effectuées que par un
technicien de maintenance agréé. N'effectuez que les opérations de dépannage et les
petites réparations autorisées par la documentation de votre produit et suivez les
instructions fournies en ligne ou par téléphone par l'équipe de maintenance et
d'assistance technique. Tout dommage causé par une réparation non autorisée par
Dell est exclu de votre garantie. Lisez et respectez les consignes de sécurité fournies
avec le système.
REMARQUE :
pour en savoir plus sur le retrait et la réinstallation d'éléments
du système, consultez le Manuel du propriétaire qui se trouve sur le site
support.dell.com/manuals.
Ce document offre un ensemble d'instructions avancées concernant la mise
en route et la gestion de votre périphérique SSD (Solid State Device) PCIe
(Peripheral Component Interconnect Express) Express Flash Dell PowerEdge.
Configuration de votre SSD PCIe
Tous les périphériques SSD PCIe Dell Express Flash Dell PowerEdge se connectent
à la carte système via le fond de panier SSD PCIe. Le fond de panier est monté sur
l'ensemble du châssis avant du système. Les périphériques SSD PCIe sont fournis
dans des supports de périphérique compatibles avec les baies de périphérique
SSD PCIe.
PRÉCAUTION :
pour vous assurer que vous disposez de la bonne configuration
SSD PCIe, consultez le Manuel du propriétaire de cette plateforme à l'adresse
support.dell.com/manuals.
Si vous avez commandé le SSD PCIe avec votre système, avec un système
d'exploitation pré-installé, le SSD PCIe est déjà configuré et prêt à être utilisé.
Si vous êtes en train d'installer un nouveau système d'exploitation, procédez
comme suit :
1
Installez le système d'exploitation dans un périphérique de stockage autre
que le SSD PCIe.
01–2012

2
Installez le pilote SSD PCIe correspondant à votre système d'exploitation.
REMARQUE :
pour vous assurer que vous disposez du pilote le plus récent,
téléchargez le dernier pilote Windows depuis le site support.dell.com.
• Sous Windows, installez le pilote à l'aide du DUP (Dell Update Package -
Progiciel de mise à jour Dell).
• Sous Linux, installez le pilote à l'aide de la commande suivante :
rpm -ihv
<
nom du progiciel rpm du pilote
>.
rpm
.
3
Redémarrez le système pour que la mise à jour du pilote prenne effet.
Votre périphérique est maintenant prêt à être utilisé.
REMARQUE :
Dell OpenManage Server Administrator est nécessaire au bon
fonctionnement du voyant d'état du périphérique.
Utilisation de périphériques SSD PCIe dans un système Windows ou Linux
Dans un système Microsoft Windows, vous pouvez configurer le SSD PCIe pour
une utilisation depuis l'outil Disk Management (Gestion des disques) de la section
Storage (Stockage) de Server Manager (Gestionnaire de serveurs).
Dans un système Linux, vous pouvez configurer le SSD PCIe depuis l'outil de
partitionnement en indiquant ou sélectionnant le nom du périphérique. Le nom
des périphériques SSD PCIe est au format suivant : /dev/rssdx, où x est la lettre
correspondant à chaque SSD PCIe du système (par exemple : /dev/rssda).
Utilisez OpenManage Server Administrator sous Windows ou Linux pour gérer
les SSD PCIe et effectuer des tâches relatives à ces périphériques.
Entretien de votre SSD PCIe
Les SSD PCIe Express Flash Dell PowerEdge prennent en charge le remplacement
à chaud ordonné, ce qui vous permet d'ajouter ou de retirer un périphérique sans
interrompre ou redémarrer le système dans lequel les périphériques se trouvent
.
Retrait d'un périphérique SSD PCIe du système
Si vous avez besoin de retirer ou remplacer votre SSD PCIe, retirez-le du système
alors que celui-ci est sous tension via une opération de retrait ordonné. Cette
opération est prise en charge sous Windows et Linux.
Si vous retirez un SSD PCIe d'un système en cours de fonctionnement, passez
à l’étape 1. Sinon, procédez à l’étape 2.
PRÉCAUTION :
pour éviter toute perte de données, vous devez préparer le
périphérique au retrait avant de le retirer physiquement.
1
Utilisez la tâche
Prepare to Remove
(Préparation au retrait) d'OpenManage
Server Administrator pour retirer le SSD PCIe du système en toute sécurité.
Cette tâche fait clignoter les voyants du périphérique.
AVERTISSEMENT :
la séquence d'identification effectuée par les voyants (opération de
clignotement) est identique à celle effectuée pour la préparation au retrait. Lorsque vous
initialisez une opération de préparation au retrait, assurez-vous que le système ne peut
plus accéder au SSD PCIe avant le retrait physique de celui-ci.
Vous pouvez retirer le périphérique du système d'exploitation en toute sécurité
si les conditions suivantes sont présentes, une fois la tâche de Préparation au
retrait effectuée :
• Le SSD PCIe clignote selon la séquence de voyants correspondant à la
préparation au retrait.
• Le système d'exploitation ne peut plus accéder au SSD PCIe.
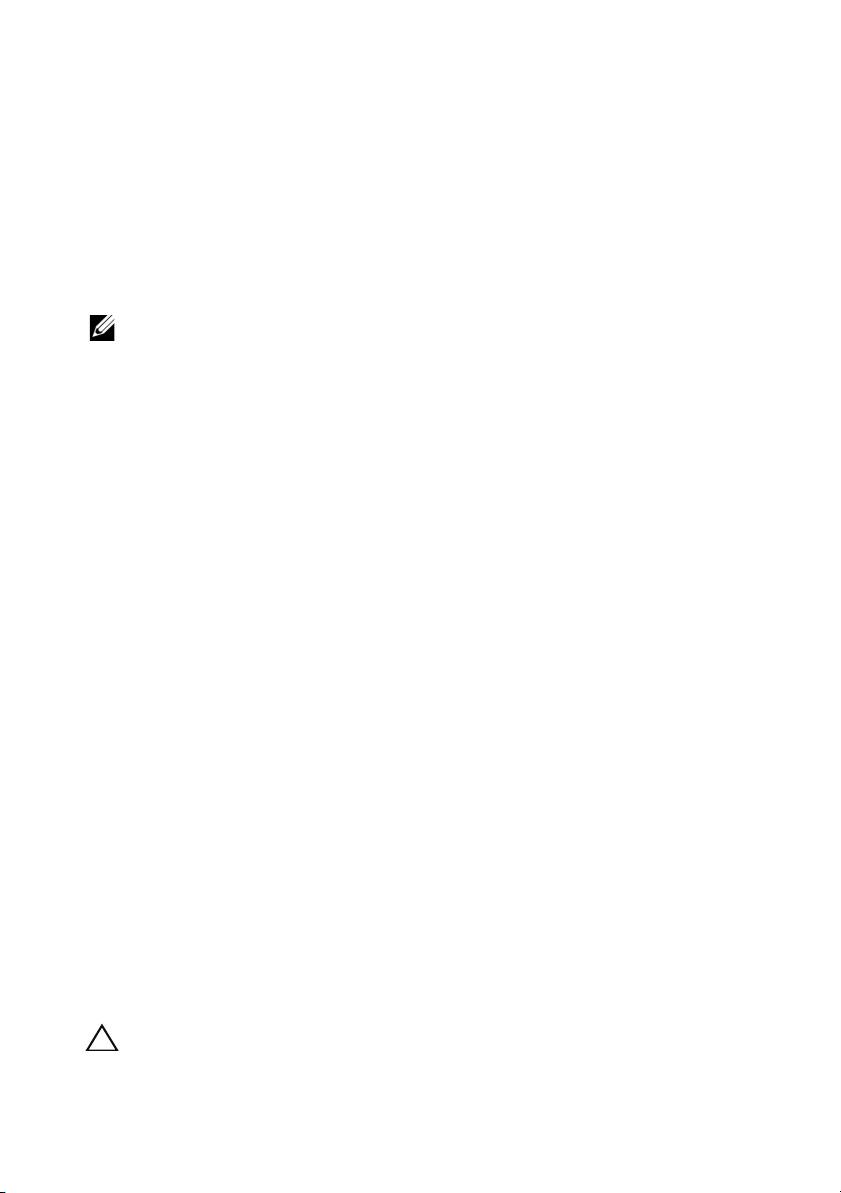
2
Appuyez sur le bouton de dégagement situé à l'avant du support du
périphérique et tournez la poignée de dégagement de ce dernier pour éjecter
le SSD PCIe. Voir la figure 1-1.
3
Sortez le SSD PCIe en le faisant glisser.

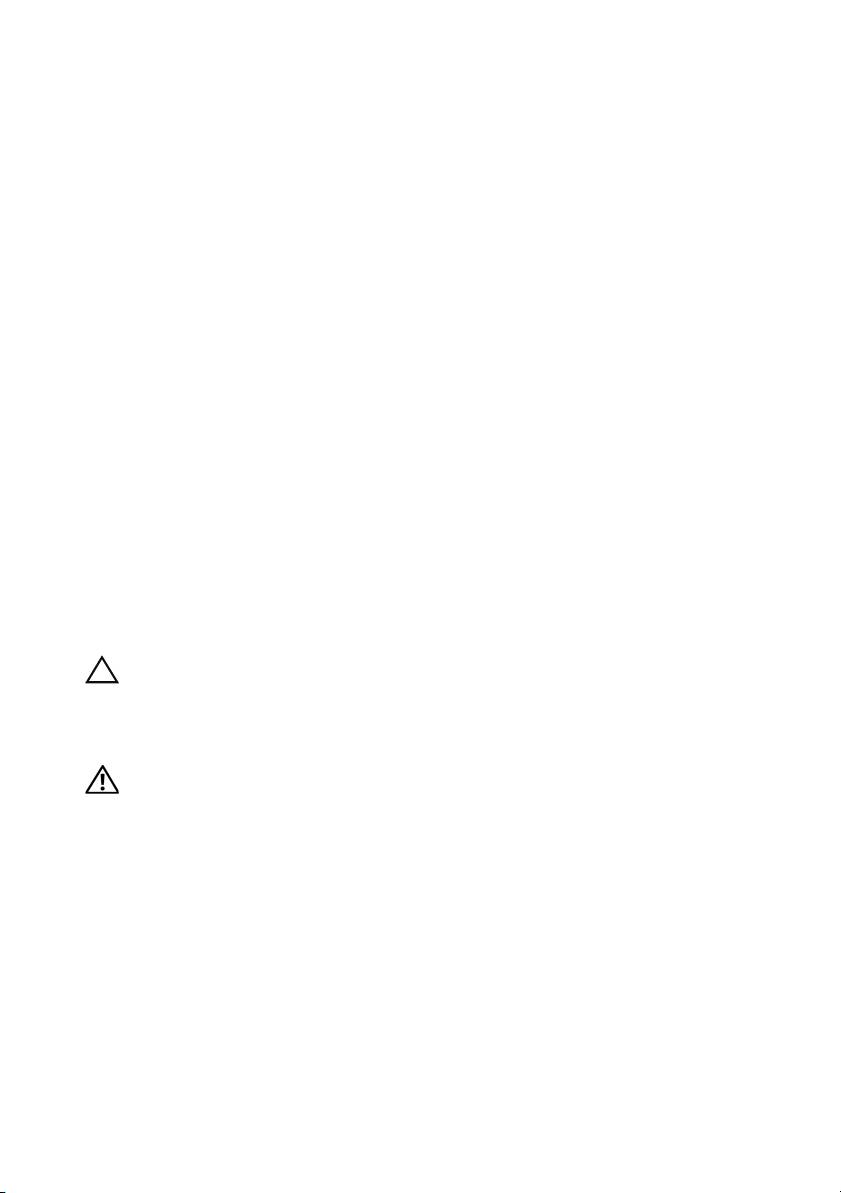
Figure 1-1. Retrait et installation d'un SSD PCIe dans un périphérique du système
1 bouton de dégagement 2 emplacement de SSD PCIe
3 haut du périphérique 4 poignée du support SSD PCIe
Installation d'un périphérique SSD PCIe dans le système
Lors de l'installation d'un périphérique SSD PCIe, assurez-vous que les
périphériques adjacents sont pleinement installés. Si vous insérez un support
de périphérique SSD PCIe et tentez d'en verrouiller le levier alors qu'un support
voisin n'est que partiellement installé, vous risquez d'endommager le ressort
de protection de ce dernier et de le rendre inutilisable.
1
Appuyez sur le bouton de dégagement situé à l'avant du support
de périphérique SSD PCIe puis tournez la poignée.
2
Faites glisser le support de périphérique SSD PCIe dans la baie
correspondante jusqu'à ce que le support entre en contact avec le fond de
panier.
3
Fermez la poignée du support de périphérique SSD PCIe pour verrouiller
le périphérique en place. Voir la figure 1-1.
2
1
3
4

___________________________
Les informations que contient cette publication sont sujettes à modification sans préavis.
© 2012 Dell Inc. Tous droits réservés.
La reproduction de ce document, de quelque manière que ce soit, sans l'autorisation écrite de Dell Inc.
est strictement interdite.
Marques utilisées dans ce document : Dell™, le logo DELL, Dell Precision™, OptiPlex™, Latitude™,
PowerEdge™, PowerVault™, PowerConnect™, OpenManage™, EqualLogic™, KACE™, FlexAddress™
®
®
®
®
et Vostro™ sont des marques de Dell Inc. Intel
, Pentium
, Xeon
, Core™ et Celeron
sont des marques
®
déposées d'Intel Corporation aux États-Unis et dans d'autres pays. AMD
est une marque déposée et
AMD Opteron™, AMD Phenom™ et AMD Sempron™ sont des marques d'Advanced Micro Devices, Inc.
®
®
®
®
®
Microsoft
, Windows
, Windows Server
, MS-DOS
et Windows Vista
sont des marques ou des marques
®
déposées de Microsoft Corporation aux États-Unis et/ou d'autres pays. Red Hat Enterprise Linux
et
®
Enterprise Linux
sont des marques déposées de Red Hat, Inc. aux États-Unis et/ou dans d'autres
®
pays. Novell
est une marque déposée et SUSE™ est une marque de Novell Inc. aux États-Unis et dans
®
®
®
d'autres pays. Oracle
est une marque déposée d'Oracle Corporation et/ou de ses filiales. Citrix
, Xen
,
®
®
XenServer
et XenMotion
sont des marques ou des marques déposées de Citrix Systems, Inc. aux
®
®
®
®
®
États-Unis et/ou dans d'autres pays. VMware
, Virtual SMP
, vMotion
, vCenter
et vSphere
sont
des marques déposées ou des marques de VMWare, Inc. aux États-Unis ou dans d'autres pays.
D'autres marques et noms commerciaux peuvent être utilisés dans cette publication pour faire référence
aux entités revendiquant la propriété de ces marques ou de ces noms de produits. Dell Inc. rejette tout
intérêt exclusif dans les marques et les noms commerciaux autres que les siens.
01–2012 A00

Einsatz des Dell PowerEdge Express Flash PCIe SSD
VORSICHTSHINWEIS:
Manche Reparaturarbeiten dürfen nur von qualifizierten
Servicetechnikern durchgeführt werden. Fehlerbehebungsmaßnahmen oder einfache
Reparaturen sollten Sie nur dann selbst vornehmen, wenn dies mit der Produktdoku-
mentation im Einklang steht oder Sie vom Team des Online- oder Telefonsupports dazu
aufgefordert werden. Schäden durch nicht von Dell genehmigte Wartungsver-suche
werden nicht durch die Garantie abgedeckt. Lesen und befolgen Sie die zu-sammen
mit dem System gelieferten Sicherheitshinweise.
ANMERKUNG:
Informationen zum Entfernen und neu Installieren der System-
komponenten finden Sie im Benutzerhandbuch zum System auf der Dell Support-
Website unter support.dell.com/manuals.
Dieses Dokument behandelt einen Satz von höheren Anweisungen über die
ersten Schritte und die Verwaltung Ihres Dell PowerEdge Express Flash
Peripheral Component Interconnect Express (PCIe) Solid State Device (SSD).
Einrichten Ihres PCIe SSD
Alle Dell PowerEdge Express Flash PCIe SSDs werden über die PCIe SSD-
Rückwandplatine mit der Systemplatine verbunden. Die Rückwandplatine wird am
Vorderteil des Systemgehäuses angebracht. PCIe SSD-Geräte werden in
Geräte-
trägern bereitgestellt, die mit den PCIe SSD-Gerätebuchten kompatibel sind.
VORSICHTSHINWEIS:
Um sicherzustellen, dass Sie die richtige Konfiguration für
das PCIe SSD haben, ziehen Sie das plattformspezifische Benutzerhandbuch unter
support.dell.com/manuals zu Rate.
Als Sie das PCIe SSD mit Ihrem System bestellten, mit einem vorinstallierten
Betriebssystem, war das PCIe SSD bereits konfiguriert und einsatzbereit.
Befolgen Sie zur Installation eines neuen Betriebssystems die folgenden Schritte:
1
Installieren Sie das Betriebssystem auf einem anderem Speichergerät und
nicht auf dem PCIe SSD.
2
Installieren Sie den PCIe SSD-Treiber für Ihr Betriebssystem.
ANMERKUNG:
Um sicherzustellen, dass Sie die aktuelle Version des Treibers haben,
laden Sie den neuesten Windows-Treiber von support.dell.com herunter.
2012–01
• In Windows installieren Sie den Treiber mit dem Dell-Aktuali-
sierungspaket (Dell Update Package, DUP).
• In Linux installieren Sie den Treiber mit dem Befehl:
rpm -ihv
<
driver rpm package name
>.
rpm
.
3
Starten Sie das System neu, um die Treiberaktualisierung zu übernehmen.
Das Gerät ist jetzt betriebsbereit.
ANMERKUNG:
Dell OpenManage Server Administrator ist erforderlich, damit das
Gerätestatus-LED ordnungsgemäß funktioniert.
Verwenden von PCIe SSDs in einem Windows- oder Linux-basierten System
In Microsoft Windows-basierten Systemen können Sie das PCIe SSD zum
Einsatz vom Festplattenverwaltungs-Tool unter dem Abschnitt Speicher im
Server Manager konfigurieren.
In Linux-basierten Systemen können Sie das PCIe SSD vom Partitionierungs-
Tool aus konfigurieren, indem Sie den Gerätenamen angeben oder auswählen.
Der Gerätename für PCIe SSDs ist /dev/rssdx, wobei x der Buchstabe ist, der
jeweils dem PCIe SSD im System entspricht (zum Beispiel: /dev/rssda).
Verwenden Sie OpenManage Server Adminstrator in Windows oder Linux zur
Verwaltung und Ausführung von Tasks im Zusammenhang mit PCIe SSD.
Wartung Ihres PCIe SSD
Dell PowerEdge Express Flash PCIe SSDs unterstützen ordnungsgemäße
Hot-Swaps, was es Ihnen ermöglicht, ein Gerät hinzuzufügen oder zu entfernen,
ohne das System, in dem die Geräte installiert sind, anzuhalten oder neu
zu starten.
Entfernen eines PCIe SSD aus dem System
Wenn Sie Ihr PCIe SSD entfernen oder ersetzen müssen, können Sie das
PCIe SSD aus dem laufenden System entfernen, und zwar durch einen
ordnungsgemäßen Entfernungsvorgang. Dieser Vorgang wird in Windows und
Linux unterstützt.
Falls Sie ein PCIe SSD aus einem laufenden System entfernen, gehen Sie zu
Schritt 1. Andernfalls fahren Sie jetzt mit Schritt 2 fort.
VORSICHTSHINWEIS:
Um den Datenverlust zu vermeiden, ist es obligatorisch, das
Gerät auf die Entfernung vorzubereiten, bevor Sie das Gerät physisch entfernen.
- 1
- 2
