Dell Precision 350: instruction
Class: Household, kitchen appliances, electronics and equipment
Type: Computer
Manual for Dell Precision 350
Table of contents
- Notes, Notices, and Cautions Abbreviations and Acronyms
- Contents
- Finding Information for Your Computer What Are You Looking For? Find it Here
- What Are You Looking For? Find it Here
- What Are You Looking For? Find it Here
- What Are You Looking For? Find it Here
- Setting Up Your Dell Precision™ 350 Computer Connect the keyboard and the mouse
- Connect the modem or the network cable
- Connect the monitor
- For single- and dual-monitor capable cards with a single connector
- For dual-monitor capable cards with 1 DVI and 1 VGA connector For dual-monitor capable cards with 2 DVI connectors
- Connect the speakers
- Connect the power cables and turn on the computer and monitor
- Install additional software or devices To access the User’s Guide from your hard drive: To access the User’s Guide from the CD: To access the User’s Guide from the Dell Support Site:
- Opening the Computer Cover
- 18 Setup and Quick Reference Guide
- Inside Your Computer
- Solving Problems Resolving Software and Hardware Incompatibilities Microsoft Windows XP To check for conflicts on a computer running Windows XP: To use the Windows XP Hardware Troubleshooter: Windows 2000
- Using System Restore in Windows XP Creating a Restore Point
- Restoring the Computer to an Earlier Operating State Using the Last Known Good Configuration in Windows 2000
- Other Options to Help Resolve Additional Device or Software Conflicts When to Use the Dell Diagnostics Starting the Dell Diagnostics
- Starting the Dell Diagnostics From Your Hard Drive Starting the Dell Diagnostics From the Drivers and Utilities CD
- Dell Diagnostics Main Menu Option Function Tab Function
- Beep Codes Error Messages Diagnostic Lights
- Light Pattern Problem Description Suggested Resolution
- Light Pattern Problem Description Suggested Resolution
- Light Pattern Problem Description Suggested Resolution
- Light Pattern Problem Description Suggested Resolution Frequently Asked Questions How Do I... Solution Where to Find Additional Information
- How Do I... Solution Where to Find Additional Information

Dell Precision™ 350 Workstation
Setup and Quick
Reference Guide
www.dell.com | support.dell.com

Notes, Notices, and Cautions
NOTE: A NOTE indicates important information that helps you make better
use of your computer.
NOTICE: A NOTICE indicates either potential damage to hardware or loss of
data and tells you how to avoid the problem.
CAUTION: A CAUTION indicates a potential for property damage,
personal injury, or death.
Abbreviations and Acronyms
For a complete list of abbreviations and acronyms, see the “Glossary” in the
User’s Guide.
If you purchased a Dell™ n Series computer, any references in this
®
®
document to Microsoft
Windows
operating systems are not applicable.
____________________
Information in this document is subject to change without notice.
© 2002 Dell Computer Corporation. All rights reserved.
Reproduction in any manner whatsoever without the written permission of Dell Computer
Corporation is strictly forbidden.
Trademarks used in this text: Dell, the DELL logo, and Dell Precision are trademarks of Dell
Computer Corporation; Microsoft and Windows are registered trademarks of Microsoft Corporation.
Other trademarks and trade names may be used in this document to refer to either the entities claiming
the marks and names or their products. Dell Computer Corporation disclaims any proprietary interest
in trademarks and trade names other than its own.
December 2002 P /N 6T342 Rev. A01

Contents
Finding Information for Your Computer . . . . . . . . . . . . . . 5
Connect the keyboard and the mouse
. . . . . . . . . . . . . . 9
Connect the modem or the network cable
. . . . . . . . . . . . 10
Connect the monitor
. . . . . . . . . . . . . . . . . . . . . . . 11
Connect the speakers
. . . . . . . . . . . . . . . . . . . . . . 14
Connect the power cables and turn on the computer
and monitor
. . . . . . . . . . . . . . . . . . . . . . . . . . . 15
Install additional software or devices
. . . . . . . . . . . . . . 16
Opening the Computer Cover
. . . . . . . . . . . . . . . . . . . 17
Inside Your Computer
. . . . . . . . . . . . . . . . . . . . . . . 19
Solving Problems
. . . . . . . . . . . . . . . . . . . . . . . . . . 20
Resolving Software and Hardware Incompatibilities
. . . . . . . 20
Using System Restore in Windows XP
. . . . . . . . . . . . . . 21
Using the Last Known Good Configuration in
Windows 2000
. . . . . . . . . . . . . . . . . . . . . . . . . 22
When to Use the Dell Diagnostics
. . . . . . . . . . . . . . . . 23
Starting the Dell Diagnostics
. . . . . . . . . . . . . . . . . . 23
Beep Codes
. . . . . . . . . . . . . . . . . . . . . . . . . . . 26
Error Messages
. . . . . . . . . . . . . . . . . . . . . . . . . 26
Diagnostic Lights
. . . . . . . . . . . . . . . . . . . . . . . . 26
Frequently Asked Questions
. . . . . . . . . . . . . . . . . . . . 30
Contents 3

4 Contents
Finding Information for Your Computer
The following table lists the resources that Dell provides as support tools.
Additional resources may be shipped with your computer.
What Are You Looking For? Find it Here
• A diagnostic program for my computer
Drivers and Utilities CD (also known as the
• Drivers for my computer
ResourceCD)
• My computer documentation
• My device documentation
You can use this CD to access documentation, reinstall drivers, or run
diagnostics tools.
• How to set up my computer
Setup and Quick Reference Guide
• Troubleshooting information
• Tools and utilities
Setup and Quick Reference Guide 5
What Are You Looking For? Find it Here
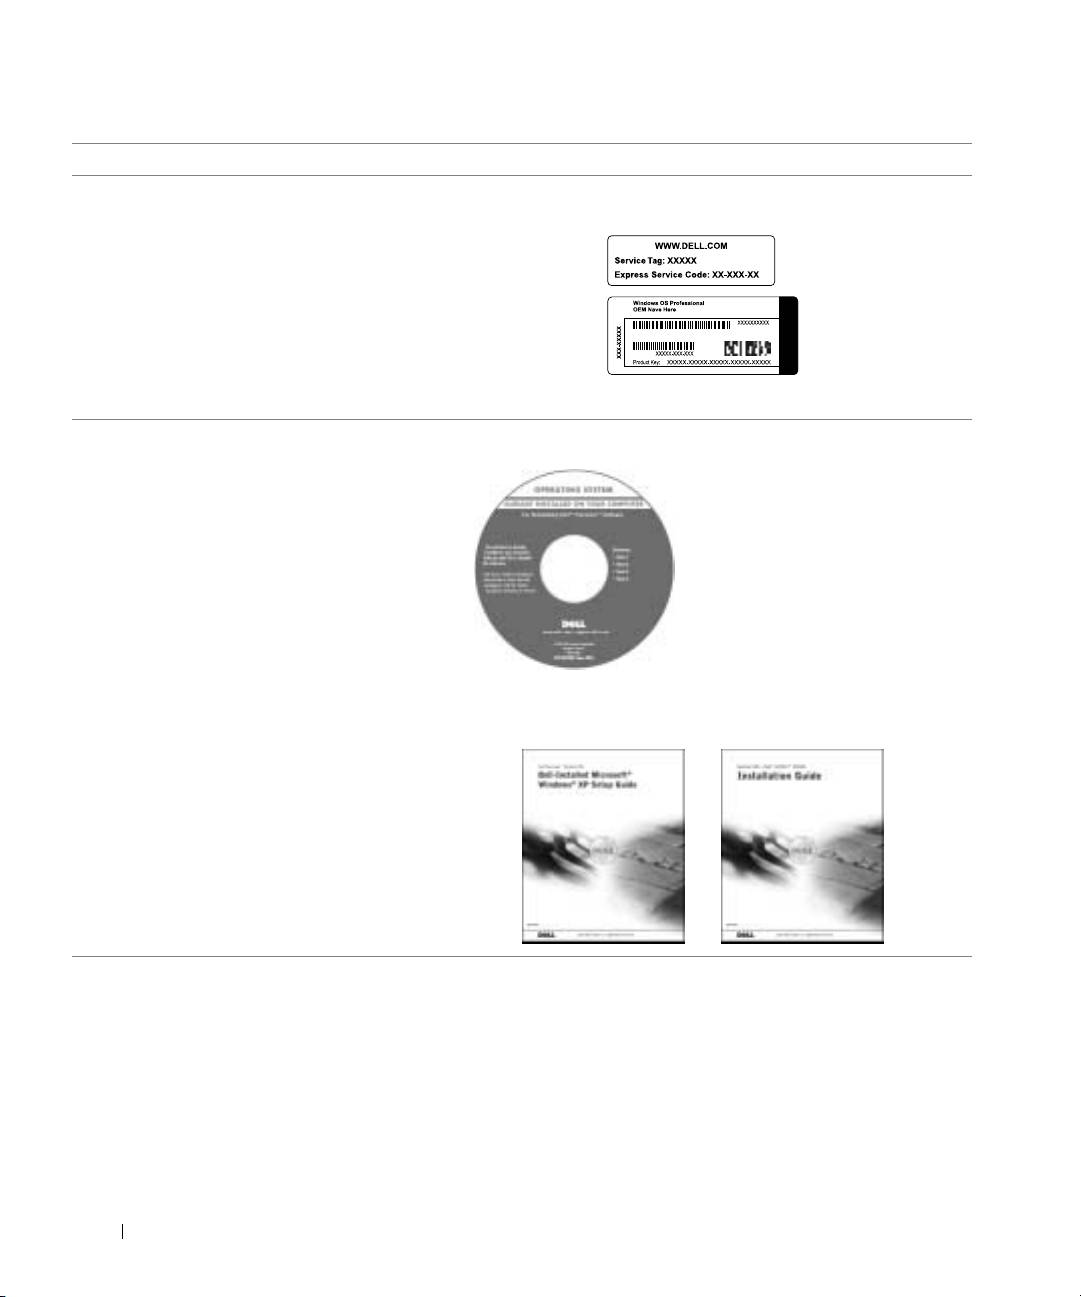
• Express Service Code and Service Tag
Express Service Code and Product Key
®
®
• Microsoft
Windows
License Label
The labels are located on your computer under the front-panel door.
• How to reinstall my operating system Operating System CD and Installation Guide
www.dell.com | support.dell.com
If you reinstall your operating system, use the Drivers and Utilities CD
to reinstall drivers for the devices that came with your computer.
6 Setup and Quick Reference Guide

What Are You Looking For? Find it Here
• How to remove and replace parts
User’s Guide Icon
• Technical specifications
• How to configure system settings
• How to troubleshoot and solve problems
To access the electronic documentation stored on your hard drive:
If you are using Microsoft Windows 2000, double-click the User’s
Guides icon on your desktop. If you are using Windows XP, click the
Start button and click Help and Support.
• Location of connectors on the system board System Information Label
This label is located on the inside of your computer cover.
• Latest drivers for my computer
Dell Support Website — support.dell.com
• Answers to technical service and support
The Dell Support website at support.dell.com provides several online
questions
tools, including:
• Online discussions with other users and
• Knowledge Base — Hints, tips, and online courses
technical support
• Customer Forum — Online discussion with other Dell customers
• Documentation for my computer including
• Upgrades — Upgrade information for components, such as memory,
the Service Manual
the hard drive, and the operating system
• Customer Care — Contact information, order status, warranty, and
repair information
• Downloads — Drivers, patches, and software updates
• Reference — Computer documentation, product specifications, and
white papers
Setup and Quick Reference Guide 7

What Are You Looking For? Find it Here
• Service call status
Dell Premier Support Website —
• Top technical issues for my computer
premiersupport.dell.com
• Frequently asked questions
The Dell Premier Support website is customized for corporate,
• File downloads
government, and education customers. This website may not be
available in all regions.
• Details on my computer’s configuration
• Service contract for my computer
• Warranty Information System Information Guide
www.dell.com | support.dell.com
• How to use Windows XP
Windows XP Help and Support Center
• Documentation for my computer and
1 Click the Start button and click Help and Support.
devices
2 Type a word or phrase that describes your problem and click the
arrow icon.
3 Click the topic that describes your problem.
4 Follow the instructions shown on the screen.
8 Setup and Quick Reference Guide
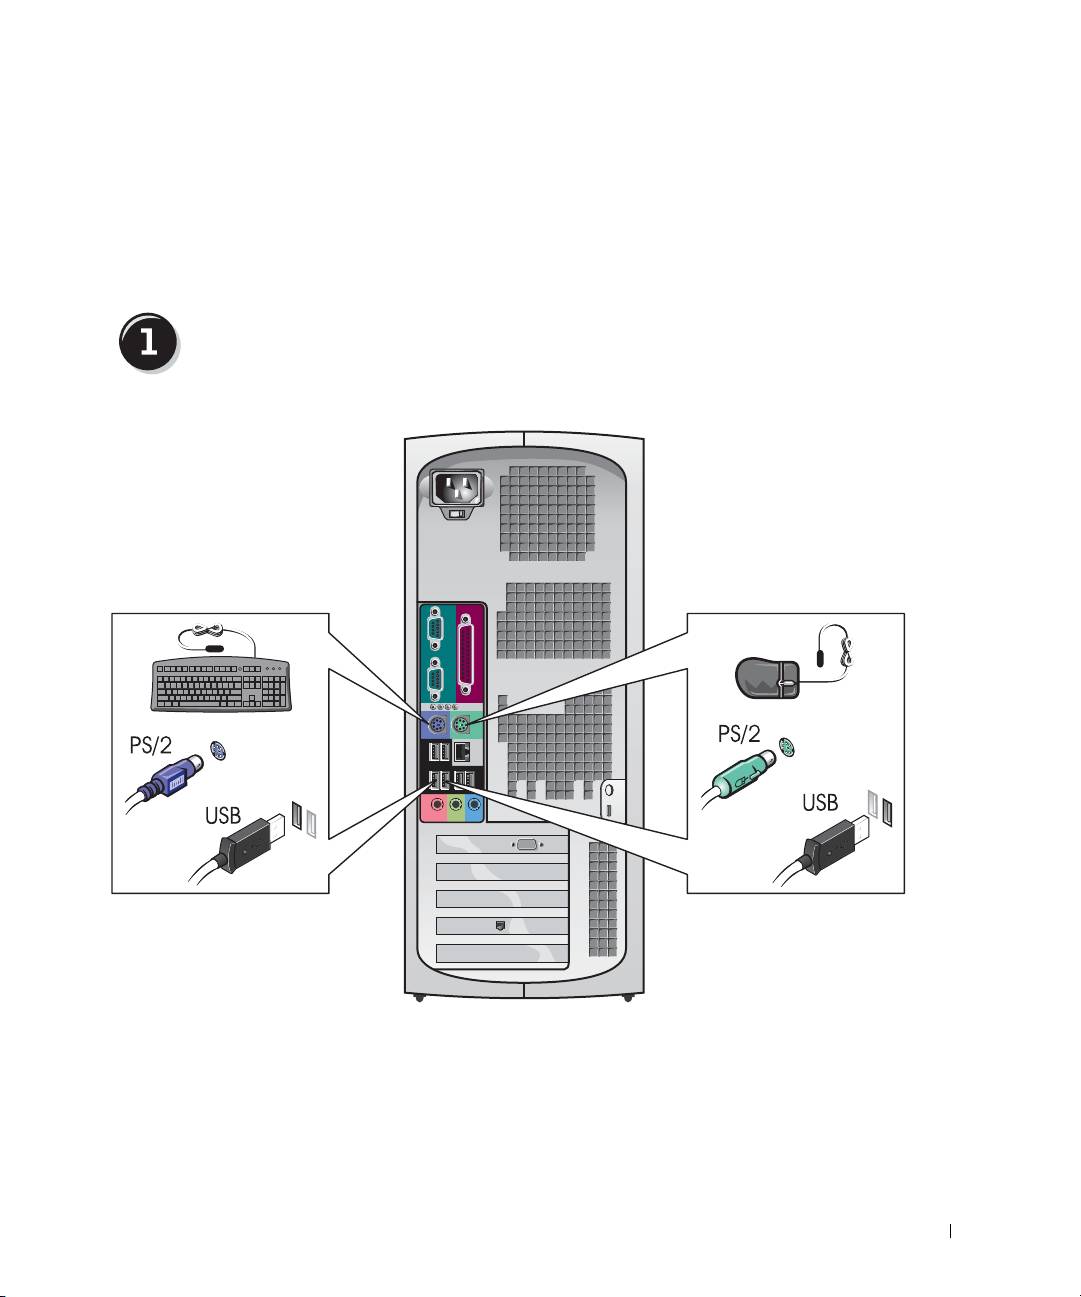
Setting Up Your Dell Precision™ 350
Computer
You must complete all steps to properly set up your computer.
Connect the keyboard and the mouse
Setup and Quick Reference Guide 9
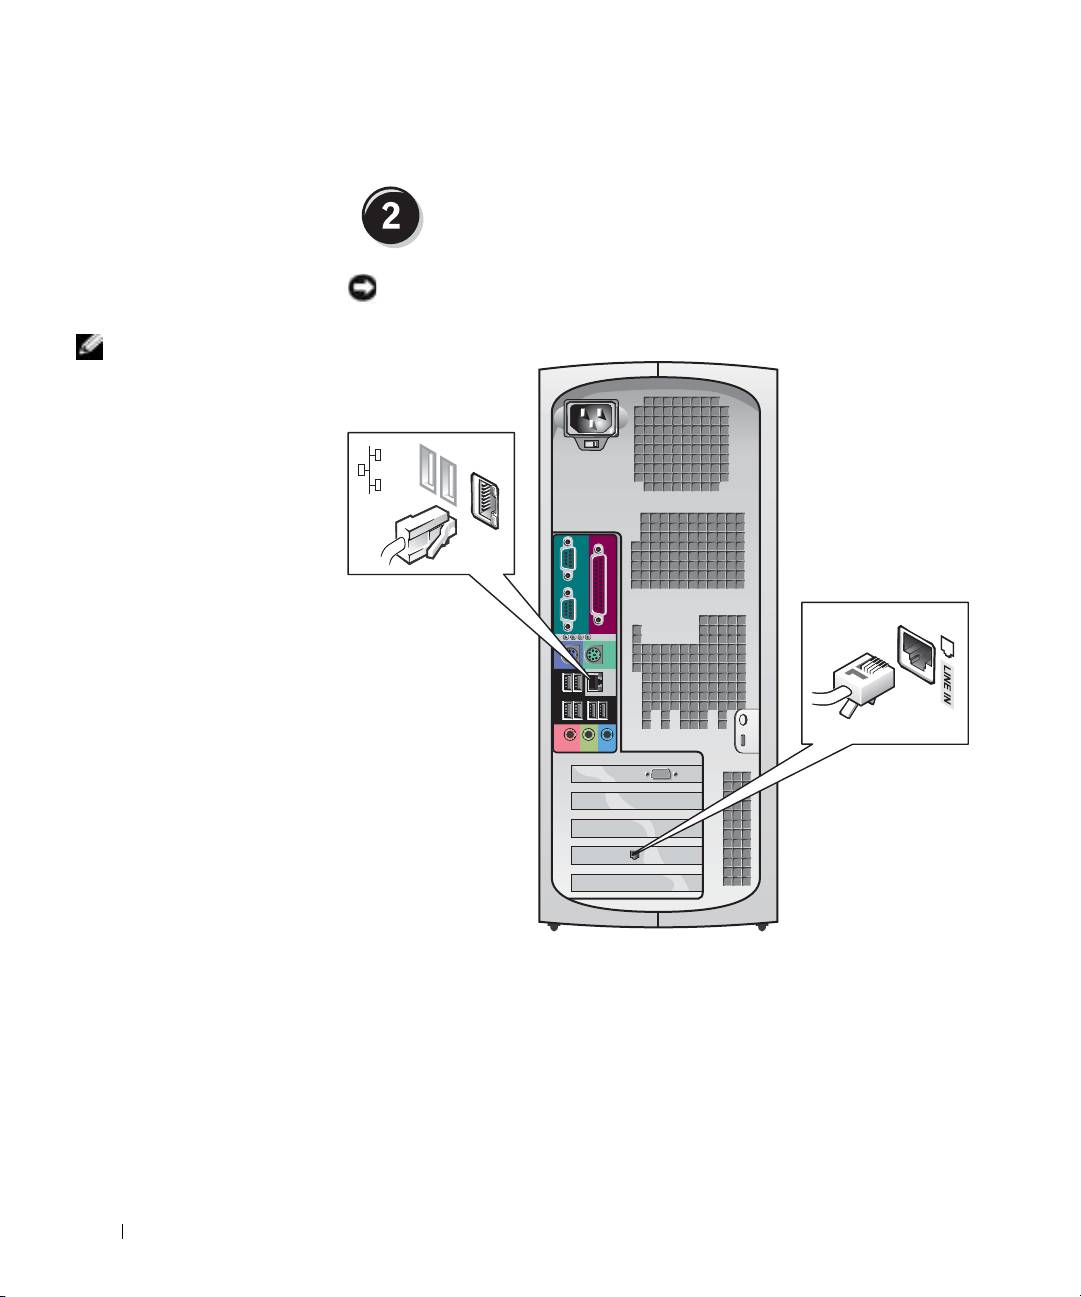
Connect the modem or the network cable
NOTICE: Do not connect a modem cable to the network adapter. Voltage
from telephone communications can damage the network adapter.
NOTE: If your computer
has a network card
installed, connect the
network cable to the card.
www.dell.com | support.dell.com
10 Setup and Quick Reference Guide
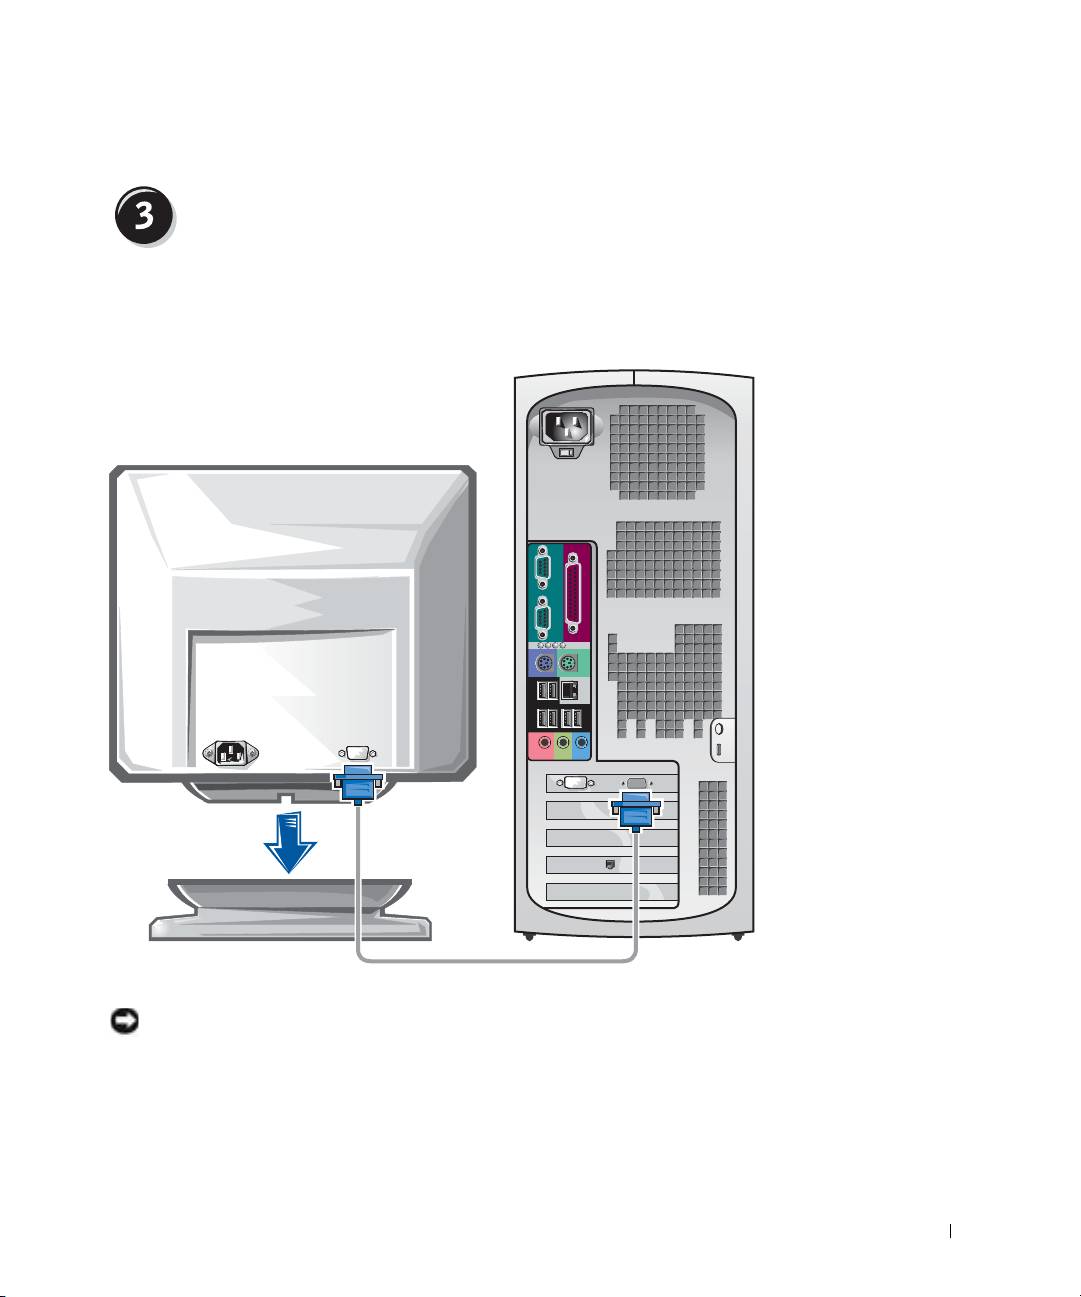
Connect the monitor
Depending on your graphics card, you can connect your monitor in various
ways.
A B C D
NOTICE: Your computer may require the use of the provided adapter or cable
to connect to your monitor.
Setup and Quick Reference Guide 11
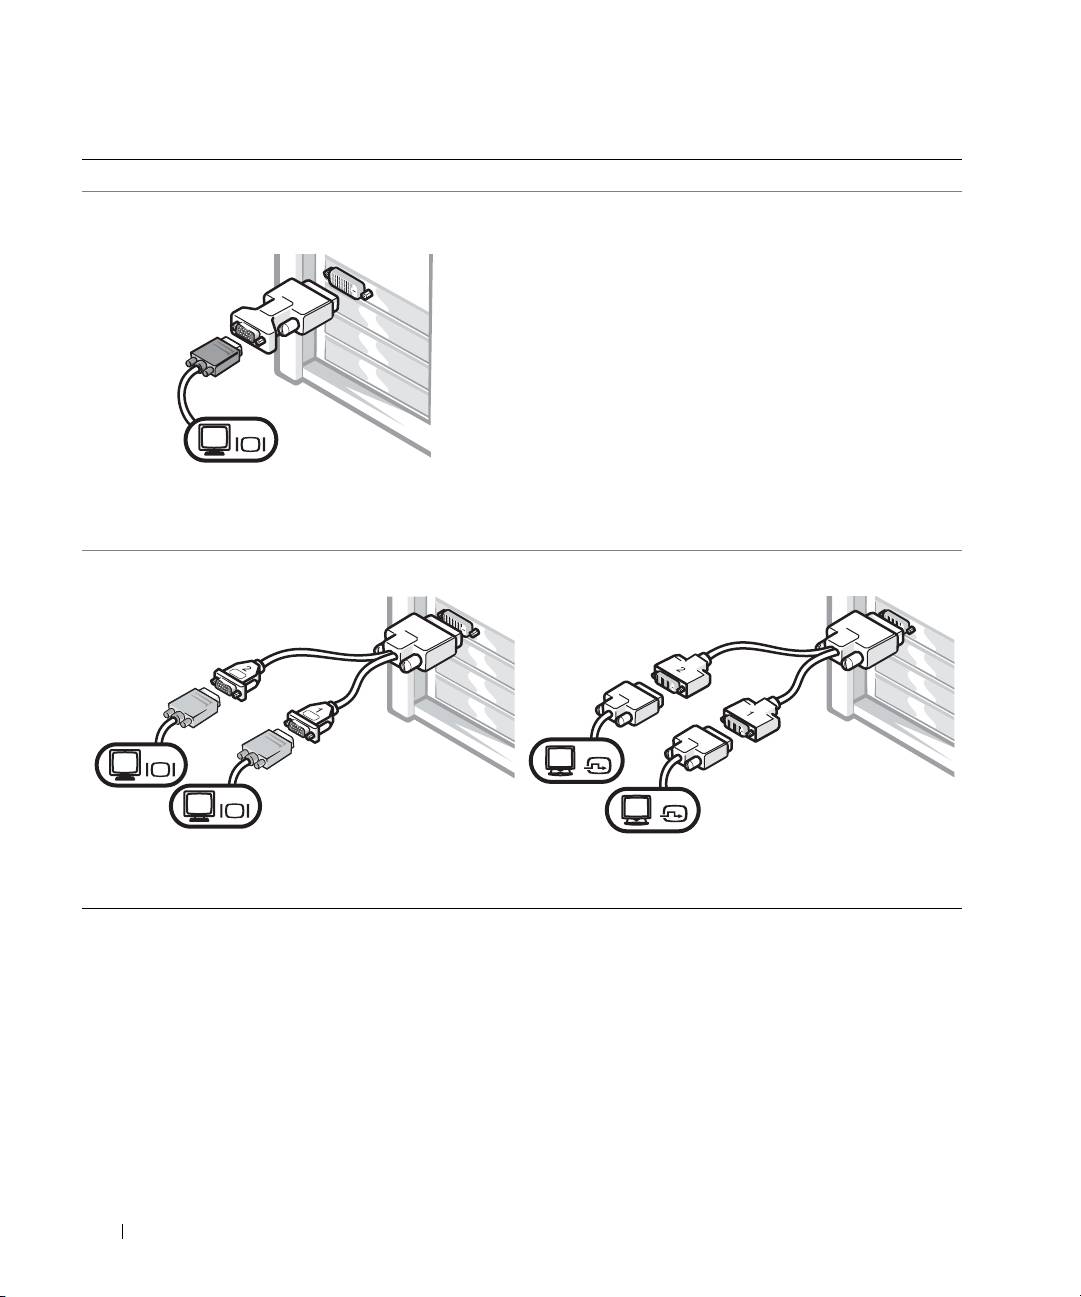
For single- and dual-monitor capable cards with a single connector
VGA Adapter
VGA
www.dell.com | support.dell.com
• Use the VGA adapter when you have a single
monitor graphics card and you want to connect to a
VGA monitor.
Dual VGA Y Cable Adapter
Dual DVI Y Cable Adapter
VGA
DVI
VGA
DVI
• Use the appropriate Y cable when your graphics card
• Use the appropriate Y cable when your graphics card
has a single connector and you want to connect to
has a single connector and you want to connect to
one or two VGA monitors.
one or two DVI monitors.
The dual-monitor cable is color coded; the blue connector is for the primary
monitor, and the black connector is for the secondary monitor. To enable
dual-monitor support, both monitors must be attached when the computer
starts.
12 Setup and Quick Reference Guide

For dual-monitor capable cards with 1 DVI and 1 VGA connector
Single DVI/Single VGA
Dual VGA With VGA Adapter
DVI
VGA
VGA
VGA
• Use the appropriate connector when you connect to
• Use the VGA adapter when you want to connect to
one or two monitors.
two VGA monitors.
For dual-monitor capable cards with 2 DVI connectors
Dual DVI
Dual DVI With One VGA Adapter
Dual DVI With Two VGA Adapters
DVI
DVI
DVI
VGA
VGA
VGA
• Use the DVI connectors to
• Use the VGA adapter to connect
• Use two VGA adapters to
connect to one or two DVI
a VGA monitor to one DVI
connect two VGA monitors to
monitors.
connector.
the DVI connectors.
Setup and Quick Reference Guide 13
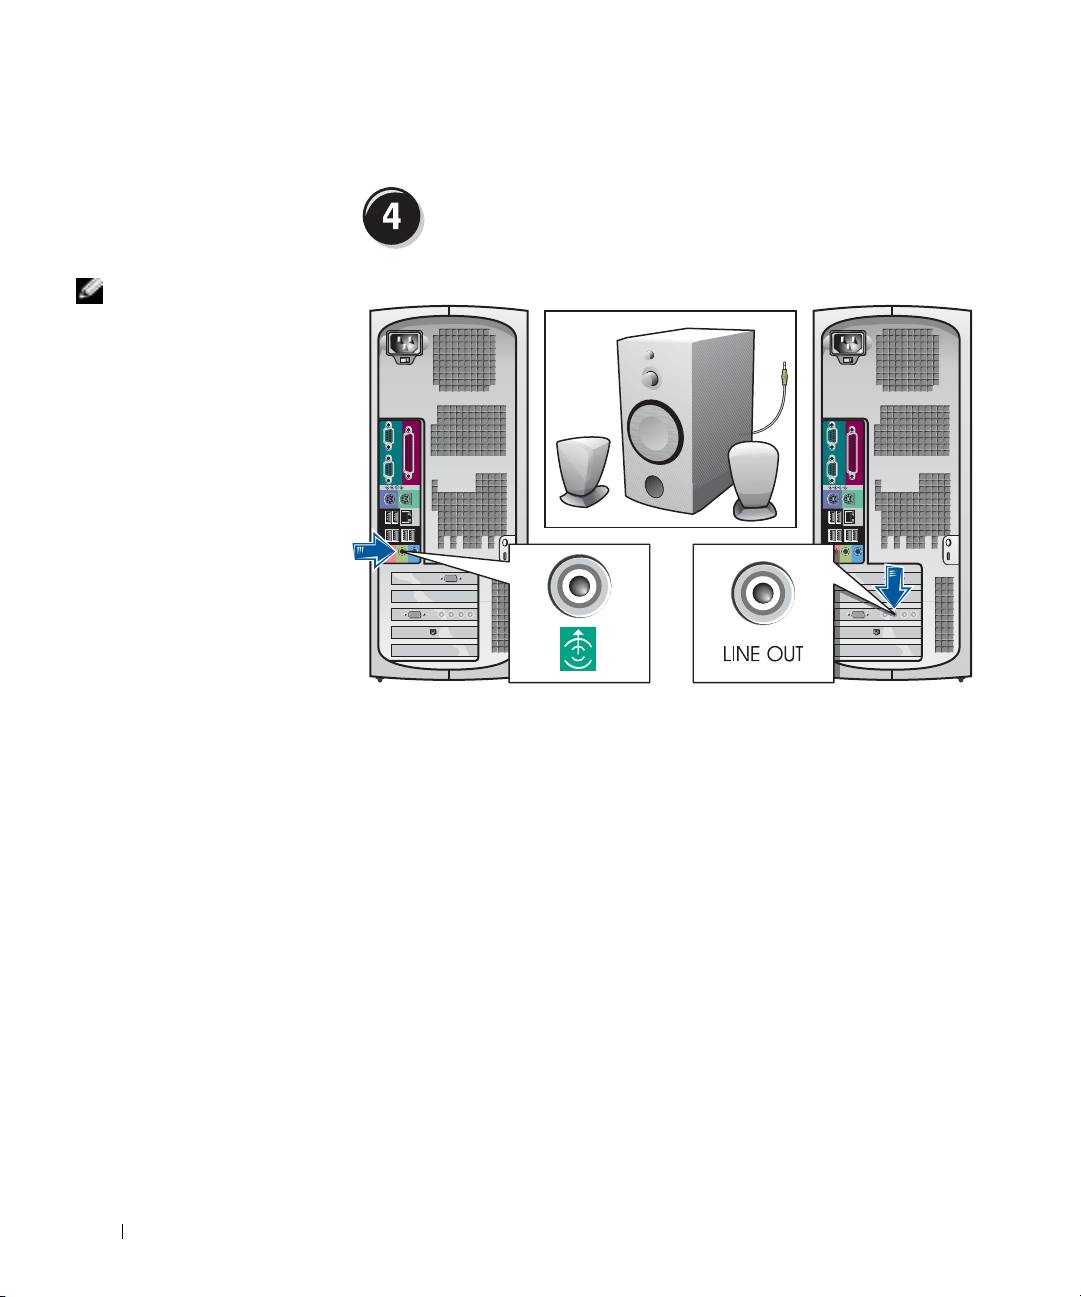
Connect the speakers
NOTE: If your computer
has an audio card
installed, connect the
speakers to the card.
www.dell.com | support.dell.com
14 Setup and Quick Reference Guide
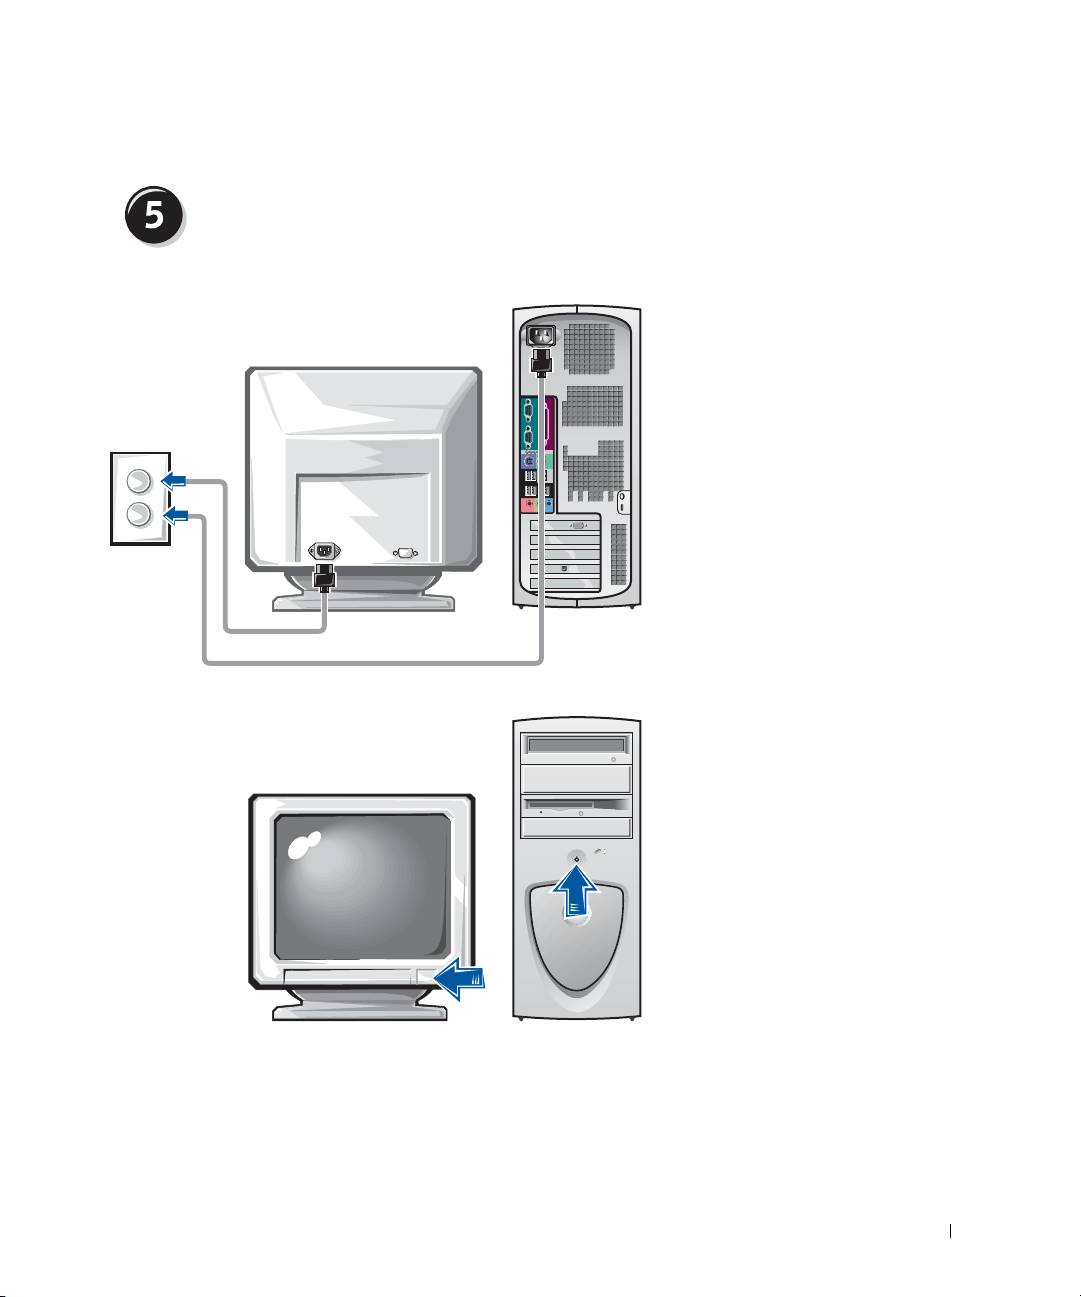
Connect the power cables and turn on the
computer and monitor
Setup and Quick Reference Guide 15

Install additional software or devices
Before you install any devices or software that did not ship with your
computer, read the documentation that came with the software or device or
contact the vendor to verify that the software or device is compatible with
your computer and operating system.
Congratulations! You have completed the setup for your
www.dell.com | support.dell.com
computer.
For more information about your computer, including removing and
replacing parts, diagnostics and troubleshooting tools, access the User’s
Guide from your hard drive, the Drivers and Utilities CD, or the Dell
Support website.
To access the User’s Guide from your hard drive:
If you have Windows 2000, double-click the User’s Guides icon.
If you have Windows XP, click the Start button and click Help and
Support.
To access the User’s Guide from the CD:
1 Insert the Drivers and Utilities CD into the drive.
If you are using the Drivers and Utilities CD for the first time, the
ResourceCD Installation window opens to inform you that the CD is
about to begin installation.
2 Click OK to continue, and then respond to the prompts offered by the
installation program.
3 Click Next at the Welcome Dell System Owner screen.
To access the User’s Guide from the Dell Support Site:
1 Go to www.support.dell.com.
2 Follow the prompts on the website that ask for information about your
computer.
16 Setup and Quick Reference Guide

3 At the Dell Support website home page, click Reference, click User’s
Guides, click Systems, and then select your Dell Precision computer.
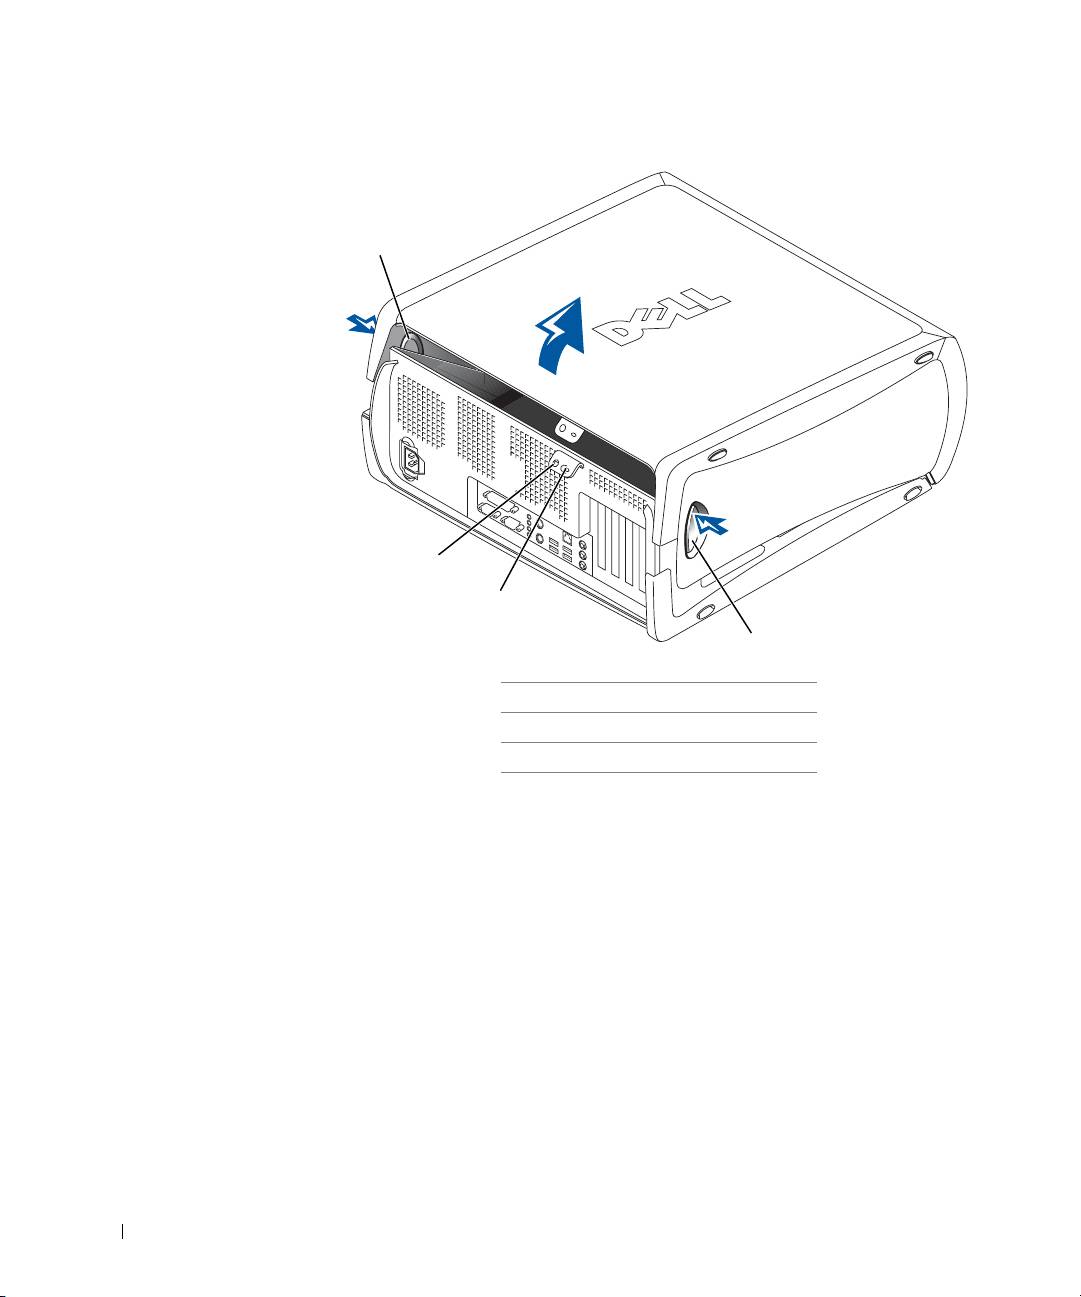
Opening the Computer Cover
CAUTION: Before you begin any of the procedures in this section,
follow the safety instructions in the System Information Guide.
1
Shut down the computer through the Start menu.
2 Ensure that your computer and attached devices are turned off. If your
computer and attached devices did not automatically turn off when
you shut down your computer, turn them off now.
NOTICE: To disconnect a network cable, first unplug the cable from your
computer and then unplug it from the network wall jack.
3
Disconnect any telephone or telecommunication lines from the
computer.
4 Disconnect your computer and all attached devices from electrical
outlets, and then press the power button to ground the system board.
5 If you have installed a padlock through the padlock ring on the back
panel, remove the padlock.
CAUTION: To guard against electrical shock, always unplug your
computer from the electrical outlet before opening the cover.
6
Lay the computer on its side as shown in the illustration.
NOTICE: Ensure that sufficient space exists to support the open cover—at
least 30 cm (1 ft) of desktop space.
7
Open the computer cover:
a Facing the back of the computer, press the release button on the
right side of the computer with one hand while pulling up on the
top of the cover with the other hand.
b Press the release button on the left side of the computer with one
hand while pulling up on the top of the cover with the other hand.
c Hold the bottom of the computer with one hand, and then pull
open the cover with the other hand.
Setup and Quick Reference Guide 17
1
www.dell.com | support.dell.com
2
3
1
1 release buttons (2)
2 padlock ring
3 security cable slot
18 Setup and Quick Reference Guide
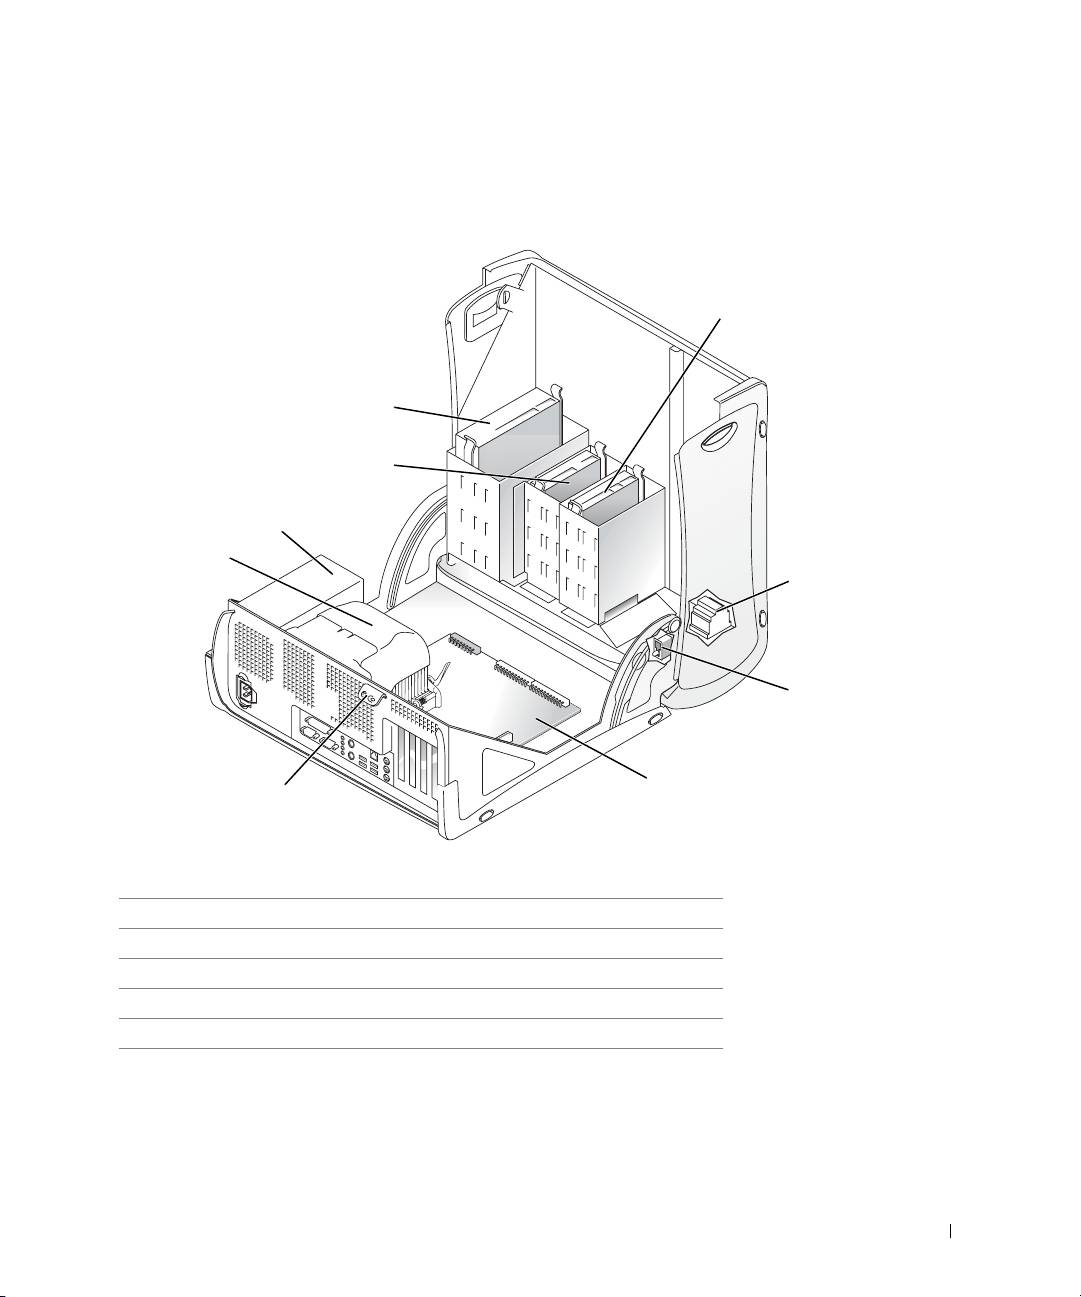
Inside Your Computer
1
9
8
7
6
2
3
5
4
1 hard drive 6 heat sink and blower assembly
2 internal speaker 7 power supply
3 chassis intrusion switch 8 floppy drive
4 system board 9 CD/DVD drive
5 padlock ring
Setup and Quick Reference Guide 19

Solving Problems
Resolving Software and Hardware Incompatibilities
®
®
Microsoft
Windows
XP
Windows XP IRQ conflicts occur if a device either is not detected during
the operating system setup or is detected but incorrectly configured.
To check for conflicts on a computer running Windows XP:
1 Click the Start button and click Control Panel.
www.dell.com | support.dell.com
2 Click Performance and Maintenance and click System.
3 Click the Hardware tab and click Device Manager.
4 In the Device Manager list, check for conflicts with the other devices.
Conflicts are indicated by a yellow exclamation point (
!) beside the
conflicting device or a red
X if the device has been disabled.
5 Double-click any conflict to display the Properties window.
If an IRQ conflict exists, the Device status area in the Properties
window reports the cards or devices that share the device's IRQ.
6 Resolve conflicts by reconfiguring the devices or removing the devices
from the Device Manager.
To use the Windows XP Hardware Troubleshooter:
1 Click the Start button and click Help and Support.
2 Type hardware troubleshooter in the Search field, and click the
arrow to start the search.
3 Click Hardware Troubleshooter in the Search Results list.
4 In the Hardware Troubleshooter list, click I need to resolve a hardware
conflict on my computer, and then click Next.
Windows 2000
To check for conflicts on a computer running Windows 2000:
1 Click the Start button, point to Settings, and then click Control
Panel.
2 In the Control Panel window, double-click System.
20 Setup and Quick Reference Guide
