Dell Precision 350 – page 2
Manual for Dell Precision 350
Table of contents
- Notes, Notices, and Cautions Abbreviations and Acronyms
- Contents
- Finding Information for Your Computer What Are You Looking For? Find it Here
- What Are You Looking For? Find it Here
- What Are You Looking For? Find it Here
- What Are You Looking For? Find it Here
- Setting Up Your Dell Precision™ 350 Computer Connect the keyboard and the mouse
- Connect the modem or the network cable
- Connect the monitor
- For single- and dual-monitor capable cards with a single connector
- For dual-monitor capable cards with 1 DVI and 1 VGA connector For dual-monitor capable cards with 2 DVI connectors
- Connect the speakers
- Connect the power cables and turn on the computer and monitor
- Install additional software or devices To access the User’s Guide from your hard drive: To access the User’s Guide from the CD: To access the User’s Guide from the Dell Support Site:
- Opening the Computer Cover
- 18 Setup and Quick Reference Guide
- Inside Your Computer
- Solving Problems Resolving Software and Hardware Incompatibilities Microsoft Windows XP To check for conflicts on a computer running Windows XP: To use the Windows XP Hardware Troubleshooter: Windows 2000
- Using System Restore in Windows XP Creating a Restore Point
- Restoring the Computer to an Earlier Operating State Using the Last Known Good Configuration in Windows 2000
- Other Options to Help Resolve Additional Device or Software Conflicts When to Use the Dell Diagnostics Starting the Dell Diagnostics
- Starting the Dell Diagnostics From Your Hard Drive Starting the Dell Diagnostics From the Drivers and Utilities CD
- Dell Diagnostics Main Menu Option Function Tab Function
- Beep Codes Error Messages Diagnostic Lights
- Light Pattern Problem Description Suggested Resolution
- Light Pattern Problem Description Suggested Resolution
- Light Pattern Problem Description Suggested Resolution
- Light Pattern Problem Description Suggested Resolution Frequently Asked Questions How Do I... Solution Where to Find Additional Information
- How Do I... Solution Where to Find Additional Information

3 Click the Hardware tab.
4 Click Device Manager.
5 Click View and click Resources by connection.
6 Double-click Interrupt request (IRQ) to view the IRQ assignments.
Conflicts are indicated by a yellow exclamation point (
!) beside the
conflicting device or a red
X if the device has been disabled.
7 Double-click any conflict to display the Properties window.
If an IRQ conflict exists, the Device status area in the Properties
window reports the cards or devices that share the device's IRQ.
8 Resolve conflicts by reconfiguring the devices or removing the devices
from the Device Manager.
To use the Windows 2000 Hardware Troubleshooter:
1 Click the Start button and click Help.
2 Click Troubleshooting and Maintenance on the Contents tab, click
Windows 2000 troubleshooters, and then click Hardware.
3 In the Hardware Troubleshooter list, click I need to resolve a hardware
conflict on my computer, and then click Next.
Using System Restore in Windows XP
The Windows XP operating system provides System Restore to allow you to
return your computer to an earlier operating state (without affecting data
files) if changes to the hardware, software, or other system settings have left
the computer in an undesirable operating state. See "Windows XP Help and
Support Center" on page 8 for additional information on using System
Restore.
NOTICE: Back up your data files regularly. System Restore does not monitor
your data files or recover them.
Creating a Restore Point
1 Click the Start button and click Help and Support.
2 Click System Restore.
3 Follow the instructions on the screen.
Setup and Quick Reference Guide 21

Restoring the Computer to an Earlier Operating State
NOTICE: Before you restore the computer to an earlier operating state, save
and close all open files and close all open programs. Do not alter, open, or
delete any files or programs until the system restoration is complete.
1
Click the Start button, point to All Programs→ Accessories→ System
Tools, and then click System Restore.
2 Ensure that Restore my computer to an earlier time is selected, and
then click Next.
3 Click a calendar date to which you want to restore your computer.
The Select a Restore Point screen provides a calendar that allows you
www.dell.com | support.dell.com
to see and select restore points. All calendar dates with available
restore points appear in bold.
4 Select a restore point and click Next.
If a calendar date has only one restore point, then that restore point is
automatically selected. If two or more restore points are available, click
the restore point that you prefer.
5 Click Next.
The Restoration Complete screen appears after System Restore
finishes collecting data, and then the computer automatically restarts.
6 After the computer restarts, click OK.
To change the restore point, you can either repeat the steps using a
different restore point, or you can undo the restoration.
Using the Last Known Good Configuration in Windows 2000
1 Restart your computer and press <F8> when the message Please
select the operating system to start
appears.
2 Highlight Last Known Good Setting, press <Enter>, press <L>, and
then select your operating system when prompted.
22 Setup and Quick Reference Guide

Other Options to Help Resolve Additional Device or Software Conflicts
NOTICE: The following processes erase all of the information on your hard
drive.
• If the previous procedures did not work, run a low-level format of your
hard drive.
See your operating system installation guide for more information.
• Reinstall your operating system using the operating system installation
guide and operating system CD.
When to Use the Dell Diagnostics
If you experience a problem with your computer, perform the checks in
"Solving Problems" in your User’s Guide and run the Dell Diagnostics before
you contact Dell for technical assistance. Running the Dell Diagnostics may
help you resolve the problem without contacting Dell. If you do contact
Dell, the test results can provide important information for Dell's service
and support personnel.
The Dell Diagnostics allows you to:
• Perform express, extended, or custom tests on one or all devices
• Select tests based on a symptom of the problem you are having
• Choose how many times a test is run
• Display test results
• Suspend testing if an error is detected
• Access online help information that describes the tests and devices
• Receive status messages that tell you whether tests completed
successfully
• Receive error messages if problems are detected
Starting the Dell Diagnostics
It is recommended that you print these procedures before you begin.
NOTICE: Only use the Dell Diagnostics to test your Dell™ computer. Using
this program with other computers can result in error messages.
Enter system setup, review your computer’s configuration information, and
ensure that the device you want to test displays in system setup and is
active.
Setup and Quick Reference Guide 23

Start the Dell Diagnostics from either your hard drive or from the Drivers
and Utilities CD (also known as the ResourceCD).
Starting the Dell Diagnostics From Your Hard Drive
1 Shut down and restart the computer.
2 When the DELL logo appears, press <F12> immediately.
NOTE: If you receive a
If you wait too long and the Windows logo appears, continue to wait
message stating that no
until you see the Windows desktop. Then shut down your computer
Diagnostics utility
through the Start menu and try again.
partition has been found,
follow the instructions to
3 When the boot device list appears, highlight Boot to Utility Partition
www.dell.com | support.dell.com
run the Dell Diagnostics
and press <Enter>.
from your Drivers and
4 When the Dell Diagnostics Main Menu appears, select the test you
Utilities CD.
want to run.
Starting the Dell Diagnostics From the Drivers and Utilities CD
1 Insert the Drivers and Utilities CD into the CD drive.
2 Shut down and restart the computer.
When the DELL logo appears, press <F12> immediately.
If you wait too long and the Windows logo appears, continue to wait
until you see the Windows desktop. Then shut down your computer
through the Start menu and try again
NOTE: This feature
3 When the boot device list appears, highlight IDE CD-ROM Device
changes the boot sequence
and press <Enter>.
for one time only. On the
4 Select the IDE CD-ROM Device option from the CD boot menu.
next start-up, the
computer boots according
5 Select the Boot from CD-ROM option from the menu that appears.
to the devices specified in
system setup.
6 Type 1 to start the ResourceCD menu.
7 Type 2 to start the Dell Diagnostics.
8 Select Run the 32 Bit Dell Diagnostics from the numbered list. If
multiple versions are listed, select the version appropriate for your
platform.
9 When the Dell Diagnostics Main Menu appears, select the test you
want to run.
24 Setup and Quick Reference Guide

Dell Diagnostics Main Menu
1 After the Dell Diagnostics loads and the Main Menu screen appears,
click the button for the option you want.
NOTE: The Service Tag
Option Function
for your computer is
located at the top of each
Express
Performs a quick test of devices. This test typically takes 10
test screen.
Test
to 20 minutes and requires no interaction on your part.
Run Express Test first to increase the possibility of tracing
the problem quickly.
Extended
Performs a thorough check of devices. This test typically
Test
takes an hour or more and requires you to answer questions
periodically.
Custom
Tests a specific device. You can customize the tests you
Test
want to run.
Symptom
Lists the most common symptoms encountered and allows
Tre e
you to select a test based on the symptom of the problem
you are having.
2
If a problem is encountered during a test, a message displaying the
error code and a description of the problem appear. Write down the
error code and problem description and follow the instructions on the
screen.
If you cannot resolve the error condition, contact Dell.
3 If you run a test from the Custom Test or Symptom Tree option, click
the applicable tab described in the following table for more
information.
Tab Function
Results Displays the results of the test and any error conditions
encountered.
Errors Displays error conditions encountered, error codes, and
problem description.
Help Describes the test and may indicate requirements for
running the test.
Setup and Quick Reference Guide 25

Configuration Displays your hardware configuration for the selected
device.
The Dell Diagnostics obtains your configuration
information for all devices from system setup, memory,
and various internal tests and displays it in the device
list in the left pane of the screen. The device list may
not display the names of all the components installed on
your computer or all devices attached to your computer.
Parameters Allows you to customize the test by changing the test
settings.
4 When the tests are completed, if you are running the Dell Diagnostics
www.dell.com | support.dell.com
from the Drivers and Utilities CD, remove the CD.
5 Close the test screen to return to the Main Menu screen. To exit the
Dell Diagnostics and restart the computer, close the Main Menu
screen.
Beep Codes
Your computer might emit a series of beeps that identify a problem. One
possible series (code 1-3-1) consists of one beep, a burst of three beeps, and
then one beep. This series tell you that the computer encountered a
memory problem.
If a beep code is emitted, write it down and look it up under "Beep Codes"
in the User’s Guide.
Error Messages
NOTE: If the message is
If an error occurs during start-up, a message may be displayed on the
not listed, see the
monitor identifying the problem. See "Error Messages" in the User’s Guide
documentation for either
for suggestions on resolving any problems.
the operating system or
the program that was
running when the message
Diagnostic Lights
appeared.
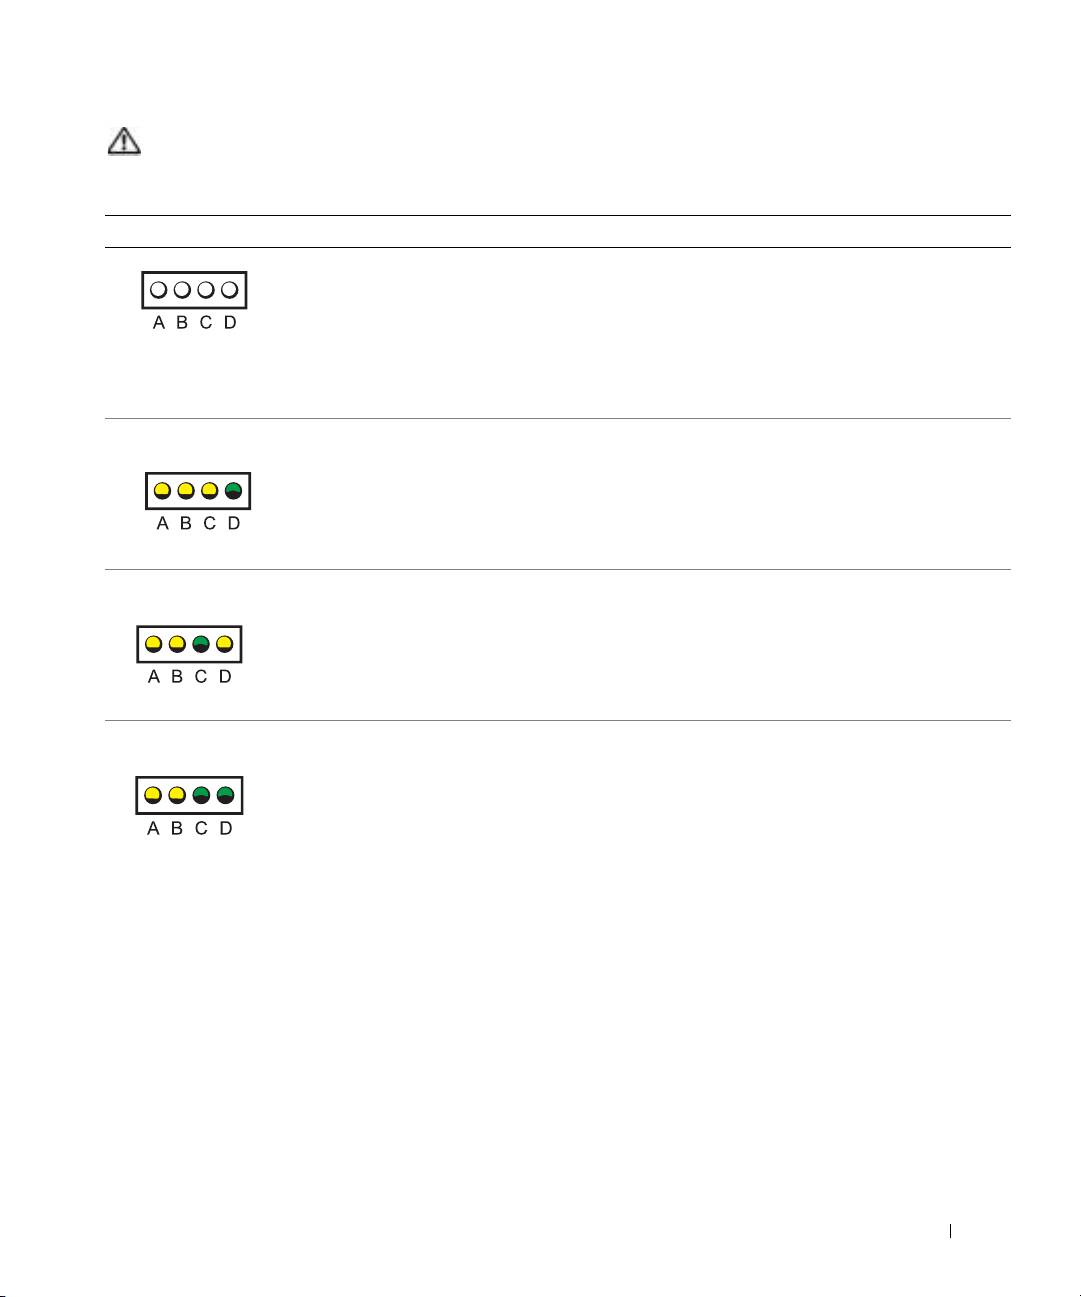
To help you troubleshoot a problem, your computer is equipped with four
lights on the back panel labeled "A," "B," "C," and "D". These lights can be
yellow or green. When the computer starts normally, the lights flash. After
the computer starts, the lights remain green. If the computer malfunctions,
the color and sequence of the lights identify the problem.
26 Setup and Quick Reference Guide
CAUTION: Before you begin any of the procedures in this section,
follow the safety instructions in the System Information Guide.
Light Pattern Problem Description Suggested Resolution
Normal off condition or
Verify that the computer power cable is plugged into the
possible power failure.
computer and a working electrical outlet. Press the power
button.
Possible BIOS failure; the
Run the BIOS Recovery utility, wait for recovery
YYYG
computer is in the
completion, and then restart the computer.
recovery mode.
Possible microprocessor
Reinstall the microprocessor, and restart the computer.
YYGY
failure.
Memory modules are
Remove and reinstall all memory modules and CRIMMs.
YYGG
detected, but a memory
Ensure that all the connector tabs are locked. Restart the
failure has occurred.
computer.
Install the memory modules in memory connectors
RIMM 1 (located closest to the microprocessor) and
RIMM 2 and ensure that, if no additional memory is
used, CRIMMs are installed in memory connectors
RIMM 3 and RIMM 4.
If you installed memory modules in memory connectors
RIMM3 and RIMM4 that were not purchased from Dell,
remove the modules and replace them with the
CRIMMs that were originally installed in your computer.
If available, install Dell memory of the same type into
your computer.
If the problem persists, contact Dell.
Setup and Quick Reference Guide 27
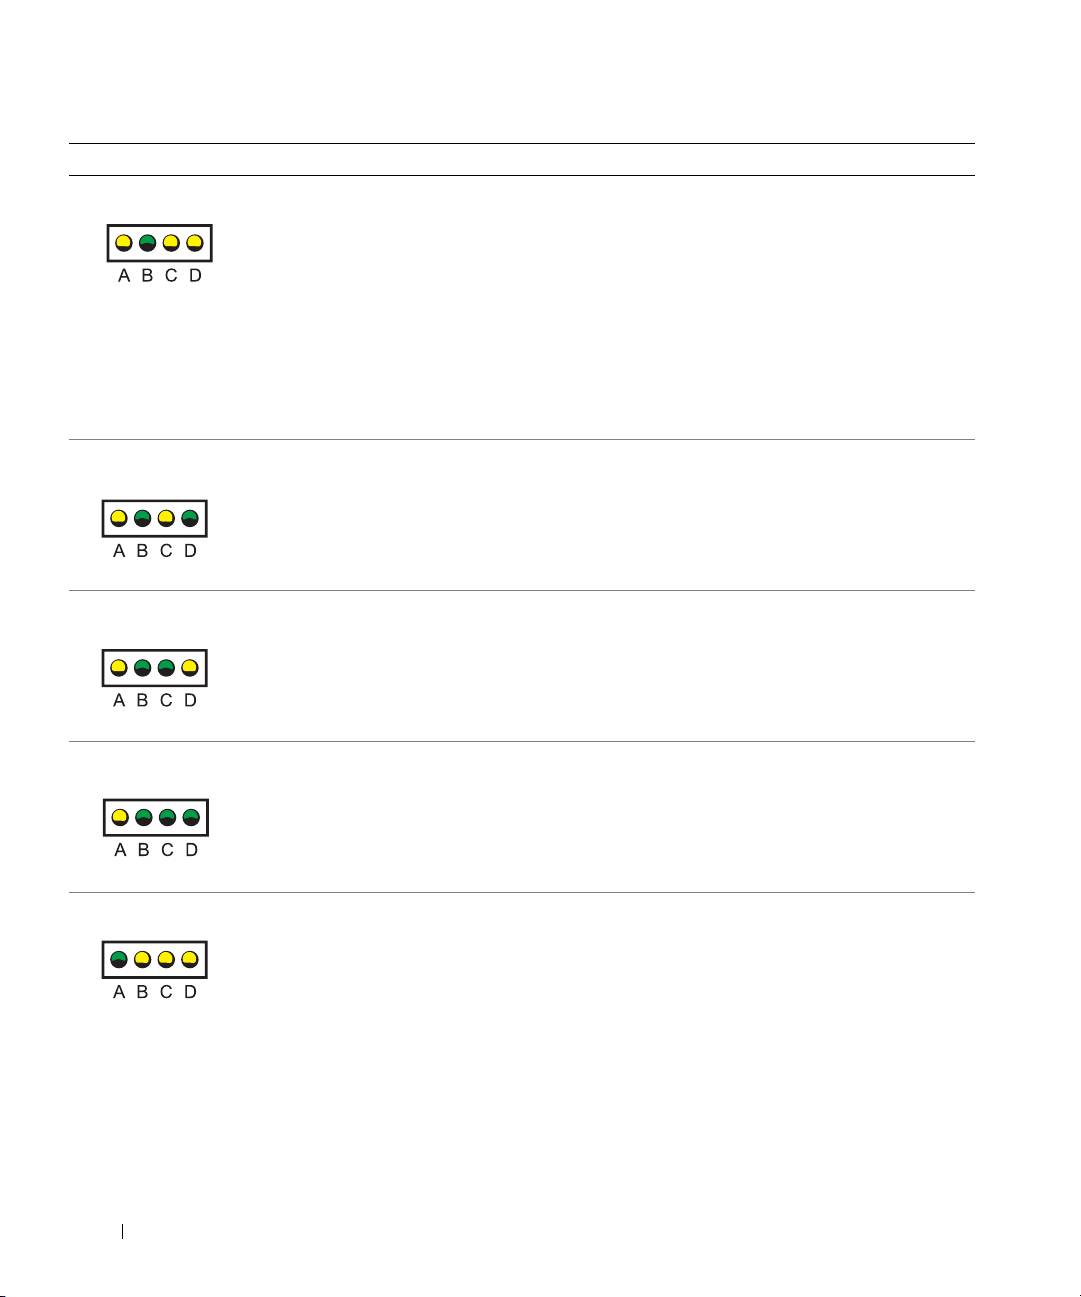
Light Pattern Problem Description Suggested Resolution
Possible expansion card
1 Determine if a conflict exists by removing a card (not
YGYY
failure.
the video card) and then restarting the computer.
2 If the problem persists, reinstall the card that you
removed, remove a different card, and then restart the
computer.
3 Repeat this process for each card. If the computer
starts normally, troubleshoot the last card removed
from the computer for resource conflicts (see
"Resolving Software and Hardware Incompatibilities"
in your User’s Guide).
4 If the problem persists, contact Dell.
www.dell.com | support.dell.com
Possible video card failure
If the computer has a video card, remove the card and
YGYG
or bad on-board video.
reinstall it.
If the problem persists or the computer has integrated
video, contact Dell.
Possible floppy or hard
Check all power and data cable connections, and then
YGGY
drive failure.
restart the computer.
Possible USB failure. Reinstall all USB devices, check cable connections, and
YGGG
then restart the computer.
No memory modules are
Reinstall all memory modules and then restart the
GYYY
installed.
computer.
If the problem persists, contact Dell.
28 Setup and Quick Reference Guide
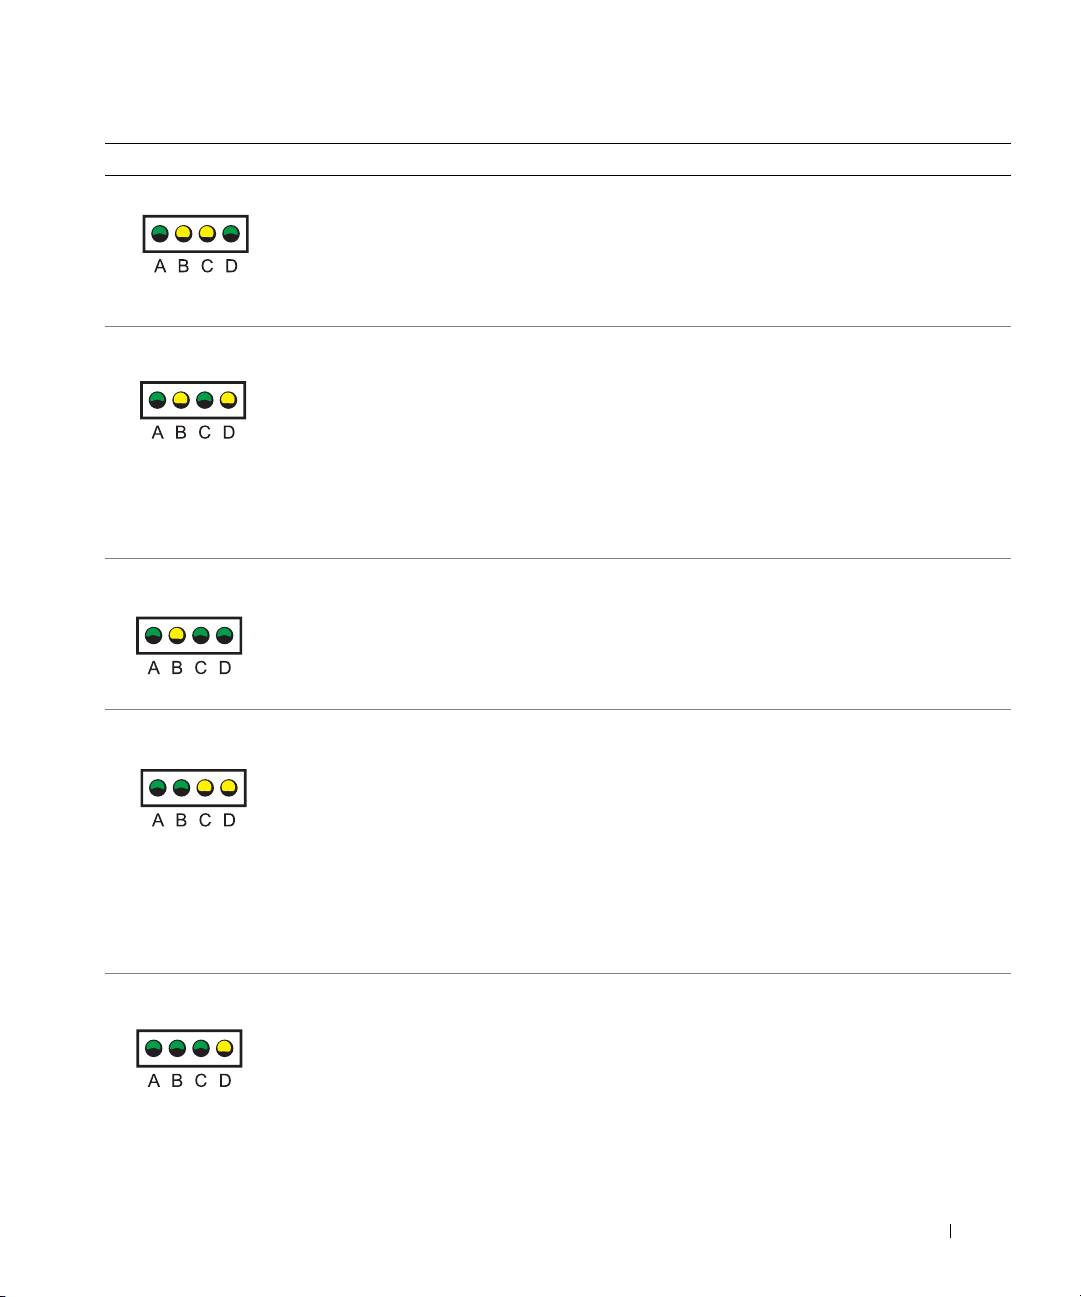
Light Pattern Problem Description Suggested Resolution
Possible system board
Perform the procedures in "System Board Problems" in
GYYG
failure.
your User’s Guide.
If the problem persists, contact Dell.
Memory modules are
Ensure that there are no special memory
GYGY
detected, but a memory
module/memory connector placement requirements (see
configuration or
"Memory" in your User’s Guide).
compatibility error exists.
Verify that the memory modules that you are installing
are compatible with your computer (see "Memory" in
your User’s Guide).
Reinstall the memory modules and then restart the
computer.
If the problem persists, contact Dell.
Possible system board
Perform the procedure in "System Board Problems" and
GYGG
resource and/or hardware
see "Resolving Software and Hardware Incompatibilities"
failure.
in your User’s Guide.
If the problem persists, contact Dell.
Possible expansion card
1 Determine if a conflict exists by removing a card (not
GGYY
failure.
the video card) and then restarting the computer.
2 If the problem persists, reinstall the card that you
removed, remove a different card, and then restart the
computer.
3 Repeat this process for each card. If the computer
starts normally, troubleshoot the last card removed
from the computer for resource conflicts (see
"Resolving Software and Hardware Incompatibilities"
in your User’s Guide).
4 If the problem persists, contact Dell.
Other failures has
Ensure that the cables are properly connected from the
GGGY
occurred.
hard drive, CD drive, and DVD drive to the system
board.
If the problem persists, contact Dell.
Setup and Quick Reference Guide 29

Light Pattern Problem Description Suggested Resolution
Normal operating
None.
GGGG
condition after POST.
If a computer problem occurs that you are unable to resolve through the
steps in this section or the procedures in "Finding Solutions" in your User’s
Guide, complete the following steps before you contact Dell:
www.dell.com | support.dell.com
1 Write a detailed description of the error, beep code, or diagnostic light
problem.
2 Record your Express Service Code and Service Tag.
3 Contact Dell from the same location as your computer.
Frequently Asked Questions
How Do I... Solution Where to Find Additional
Information
Set up my computer to use two
If your computer has the required
monitors?
graphics card to support dual-
monitor setup, then look in your
box for a Y-cable. The cable has a
single connector on one end (plug
this connector into the back panel)
and branches into two connectors
(plug these connectors into the
monitor cables). See "Connect the
monitor" on page 11.
Connect my monitor when the
If your graphics card has a DVI
Contact Dell Technical Support
monitor cable connector doesn’t
connector but your monitor has a
for more information.
seem to fit the connector on the
VGA connector, then you need to
back of my computer?
use an adapter. An adapter should
be included in the box.
30 Setup and Quick Reference Guide

How Do I... Solution Where to Find Additional
Information
Connect my speakers? If you have a sound card installed,
See the documentation that came
connect the speakers to the
with your speakers for more
connectors on the card. See
information.
"Connect the speakers" on page 14.
Find the right connectors for my
Your Dell Precision 350 computer
See the front and back view
USB devices?
has eight USB connectors (two on
graphics of your computer in your
the front and six on the back).
User’s Guide. For help with
locating your User’s Guide see
"Finding Information for Your
Computer" on page 5.
Locate information about the
Yo u r User’s Guide has a
Go to the Dell Support website
hardware and other technical
specifications table that provides
and use one of the following
specifications for my computer?
more detailed information about
support tools: read white papers on
your computer and the hardware.
the latest technology or
To locate your User’s Guide, see
communicate with other Dell users
"Finding Information for Your
at the Dell forum chat room.
Computer" on page 5.
Find documentation for my
The following documentation is
If you lose your documentation, it
computer?
available for your computer:
is available on the Dell Support
• User’s Guide
website at support.dell.com.
• Setup and Quick Reference
Guide
• System Information Guide
• System Information Label
• Service Manual
To locate these documents,
see "Finding Information for Your
Computer" on page 5.
Setup and Quick Reference Guide 31

www.dell.com | support.dell.com
32 Setup and Quick Reference Guide

Komputer Dell Precision™ 350 Workstation
Informator o systemie
i konfiguracji
www.dell.com | support.euro.dell.com

Uwagi, przypomnienia i ostrzeżenia
UWAGA: Sekcja UWAGA wskazuje wan informacj, pozwalajc lepiej
wykorzystać posiadany system komputerowy.
PRZYPOMNIENIE: Sekcja PRZYPOMNIENIE informuje o sytuacjach,
w których wystpuje ryzyko uszkodzenia sprztu lub utraty danych
i przedstawia sposoby uniknicia problemu.
OSTROŻNIE: Sekcja OSTROŻNIE informuje o sytuacjach,
w których występuje ryzyko uszkodzenia sprzętu,
uszkodzenia ciała lub śmierci.
Skróty i skrótowce
Pełna lista skrótów i skrótowców znajduje si w sekcji „Słowniczek”
w
Przewodniku uytkownika
.
Jeli zakupiono komputer firmy Dell™ z serii
n
, adne odniesienia do systemu
operacyjnego Microsoft
Windows
zawarte w tym dokumencie nie maj
zastosowania.
____________________
Informacje zawarte w tym dokumencie mogą ulec zmianie bez uprzedzenia.
© 2002 Dell Computer Corporation. Wszelkie prawa zastrzeżone.
Powielanie w jakikolwiek sposób bez pisemnego zezwolenia od firmy Dell Computer Corporation
jest surowo zabronione.
Znaki towarowe użyte w tekście: Dell, logo DELL i Dell Precision są znakami towarowymi firmy
Dell Computer Corporation; Microsoft i Windows są zastrzeżonymi znakami towarowymi firmy
Microsoft Corporation.
Tekst może zawierać także inne znaki towarowe i nazwy towarowe, odnoszące się do podmiotów
posiadających prawa do tych znaków i nazw lub do ich produktów. Firma Dell Computer Corporation
nie rości sobie praw do jakichkolwiek znaków towarowych i nazw towarowych, których nie jest
prawnym właścicielem.
Grudzień 2002 N/K 6T342 Wersja A01

Spis treści
Wyszukiwanie informacji na temat komputera . . . . . . . . 37
Podłcz klawiatur i mysz
. . . . . . . . . . . . . . . . . . . 42
Podłcz modem lub kabel sieciowy
. . . . . . . . . . . . . . 43
Podłcz monitor
. . . . . . . . . . . . . . . . . . . . . . . 44
Podłcz głoniki
. . . . . . . . . . . . . . . . . . . . . . . 47
Podłcz kable zasilania i włcz komputer oraz monitor
. . . . . 48
Zainstaluj dodatkowe oprogramowanie lub urzdzenia
. . . . . 49
Otwieranie obudowy komputera
. . . . . . . . . . . . . . . . 50
Wnętrze komputera
. . . . . . . . . . . . . . . . . . . . . . . 52
Rozwiązywanie problemów
. . . . . . . . . . . . . . . . . . . 53
Rozwizywanie problemów dotyczcych niezgodnoci
oprogramowania i sprztu
. . . . . . . . . . . . . . . . . . . 53
Korzystanie z funkcji System Restore (Przywracanie systemu)
w systemie Windows XP
. . . . . . . . . . . . . . . . . . . . 55
Korzystanie z funkcji Last Known Good Configuration (Ostatnia
znana dobra konfiguracja) w systemie Windows 2000
. . . . . 56
Kiedy uywać programu Dell Diagnostics
. . . . . . . . . . . . 57
Uruchamianie programu Dell Diagnostics
. . . . . . . . . . . . 58
Kody dwikowe
. . . . . . . . . . . . . . . . . . . . . . . 61
Komunikaty o błdach
. . . . . . . . . . . . . . . . . . . . 61
Lampki diagnostyczne
. . . . . . . . . . . . . . . . . . . . . 61
Często zadawane pytania
. . . . . . . . . . . . . . . . . . . 66
Spis treci 35

36 Spis treci
Wyszukiwanie informacji na temat
komputera
Ponisza tabela przedstawia zasoby udostpniane przez firm Dell
jako narzdzia pomocy. Dodatkowe zasoby mog być dostarczone
zkomputerem uytkownika.
Szukane informacje Znajdziesz je tutaj
• Program diagnostyczny dla komputera
Dysk CD Drivers and Utilities (nazywany także
• Sterowniki dla komputera
dyskiem ResourceCD)
•Dokumentacja komputera
• Dokumentacja urzdze
Tego dysku CD mona uyć w celu uzyskania dostpu do dokumentacji,
ponownego zainstalowania sterowników lub uruchomienia narzdzi
diagnostycznych.
•Jak skonfigurować komputer
Informator o systemie i konfiguracji
• Informacje dotyczce rozwizywania
problemów
• Narzdzia i programy narzdziowe
Informator o systemie i konfiguracji 37
Szukane informacje Znajdziesz je tutaj
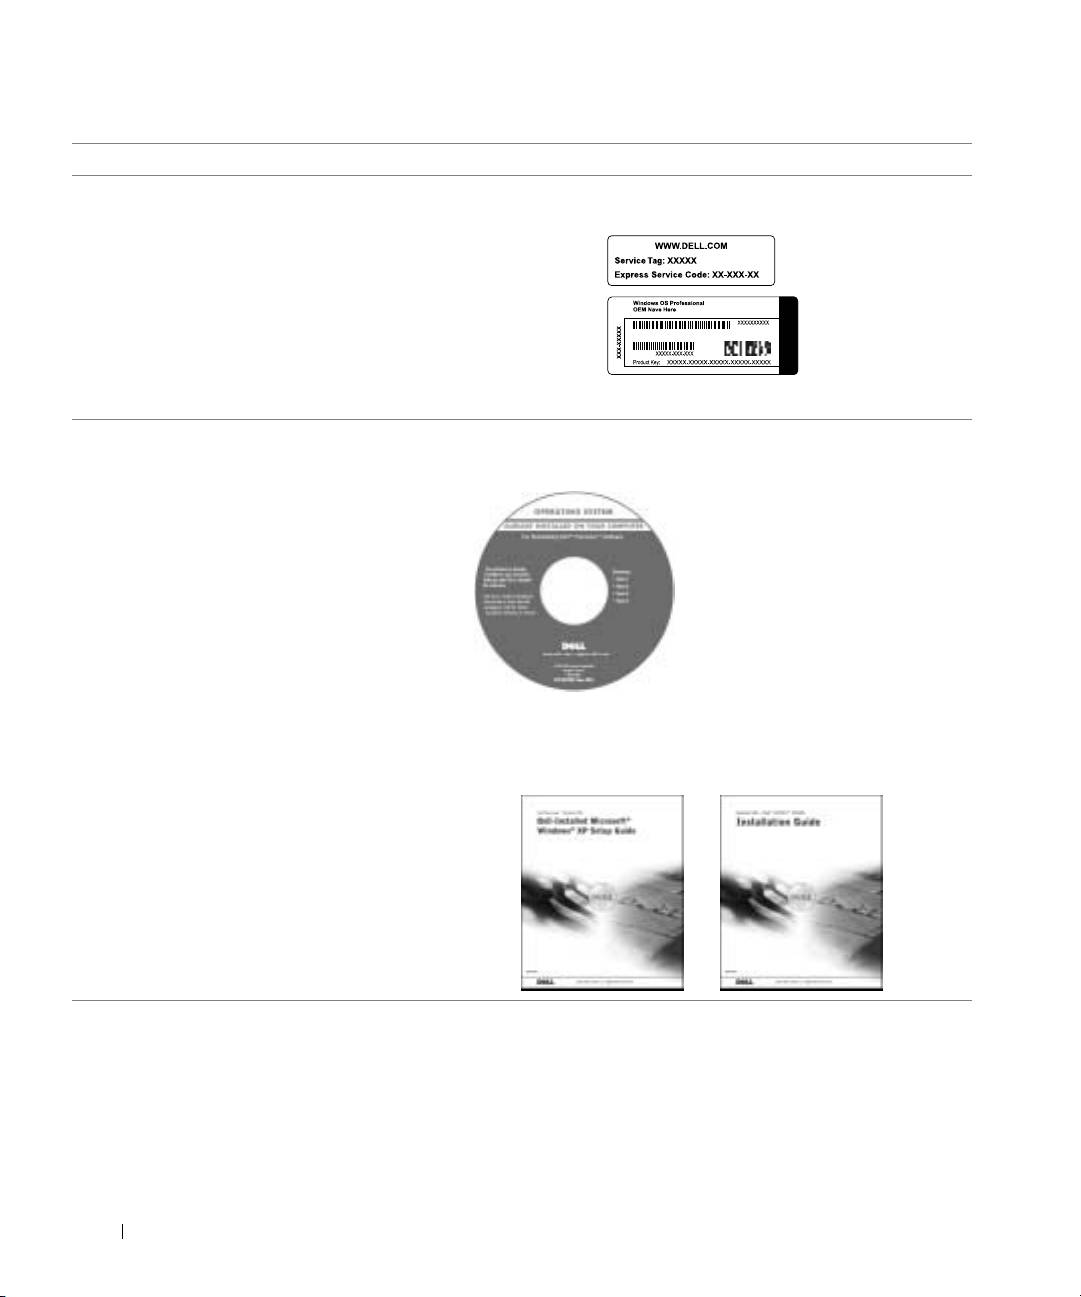
• Kod ekspresowej obsługi i znacznik usługi
Kod ekspresowej obsługi i klucz produktu
•Etykieta licencji Microsoft
Windows
Etykiety znajduj si na komputerze, pod klapk panelu przedniego.
• Jak ponownie zainstalować system
Dysk CD z systemem operacyjnym i przewodnik
operacyjny
instalacji
www.dell.com | support.euro.dell.com
Po dokonaniu ponownej instalacji systemu operacyjnego naley uyć
dysku CD
Drivers and Utilities
w celu ponownego zainstalowania
sterowników urzdze dostarczonych wraz z komputerem.
38 Informator o systemie i konfiguracji

Szukane informacje Znajdziesz je tutaj
• Jak wyjmować i wymieniać podzespoły
Ikona przewodnika użytkownika
• Parametry techniczne
• Jak konfigurować ustawienia systemowe
•Jak rozwizywać problemy
Aby uzyskać dostp do dokumentacji elektronicznej znajdujcej si na
dysku twardym:
Jeli korzystasz z systemu Microsoft Windows 2000
, kliknij dwukrotnie
ikon User’s Guides (Przewodniki uytkownika) na pulpicie.
Jeli
korzystasz z systemu Windows XP
, kliknij przycisk Start i kliknij pozycj
Help and Support (Pomoc i obsługa techniczna).
• Lokalizacja złczy na płycie systemowej Etykieta z informacjami o systemie
Ta etykieta znajduje si na wewntrznej stronie obudowy komputera.
Informator o systemie i konfiguracji 39

Szukane informacje Znajdziesz je tutaj
• Najnowsze sterowniki dla komputera
Witryna sieci Web pomocy technicznej firmy
• Odpowiedzi na pytania dotyczce obsługi
D el l — support.euro.dell.com
technicznej i pomocy
Witryna pomocy technicznej firmy Dell znajdujca si pod adresem
• Dyskusje online z innymi uytkownikami
support.euro.dell.com zawiera kilka narzdzi online. S to midzy
i pomoc techniczna
innymi:
• Dokumentacja komputera zawierajca
• Knowledge Base – Baza wiedzy zawierajca wskazówki, porady
Podrcznik serwisowy
ikursy online
• Customer Forum – Forum klientów umoliwiajce dyskusje online
z innymi klientami firmy Dell
• Upgrades – Informacje dotyczce uaktualnie podzespołów,
na przykład pamici, dysku twardego i systemu operacyjnego
• Customer Care – Obsługa klienta udostpniajca informacje
kontaktowe, o stanie zamówienia, gwarancyjne i dotyczce napraw
www.dell.com | support.euro.dell.com
• Downloads – Pliki do pobrania zawierajce sterowniki, poprawki
i uaktualnienia oprogramowania
• Reference – Materiały referencyjne zawierajce dokumentacj
komputera, dane techniczne produktu i informacje kontaktowe
• Status zlecenia serwisowego
Witryna sieci Web Dell Premier Support —
• Główne zagadnienia techniczne dotyczce
premiersupport.dell.com
komputera
Witryna sieci Web Premier Support firmy Dell jest dostosowana dla
•Czsto zadawane pytania
klientów korporacyjnych, rzdowych i edukacyjnych. Ta witryna moe
• Pliki do pobrania
nie być dostpna we wszystkich regionach.
• Szczegóły konfiguracji komputera
• Umowa serwisowa dotyczca komputera
• Informacje dotyczce gwarancji Przewodnik z informacjami o systemie
40 Informator o systemie i konfiguracji
