Dell Latitude XT3 (Mid 2011): instruction
Class: Computer equipment, hardware, accessories
Type: Laptop/Notebook Computer
Manual for Dell Latitude XT3 (Mid 2011)
Table of contents
- Notes, Cautions, and Warnings
- Media Base Top and Right View Back and Left View
- Before Docking or Undocking Your Tablet-PC from the Media Base Before Docking or Undocking Your Tablet-PC
- Docking Your Tablet-PC to the Media Base
- Undocking Your Tablet-PC From the Media Base Removing and Installing the Optical Drive From the Media Base
- Removing the Optical Drive Installing the Optical Drive Media Base Specifications Physical Ports and Connectors
- Finding More Information and Resources

Dell Latitude XT3 medijska baza
Multimediální základna Dell Latitude XT3
Βάση μέσων Dell Latitude XT3
Dell Latitude XT3 Media Base
Stacja bazowa Dell Latitude XT3
Baza pentru suporturi optice Dell Latitude XT3
Ñòûêîâî÷íàÿ ñòàíöèÿ Dell Latitude XT3 MediaBase
Dell Latitude XT3 postolje za laptop računa
r
Dell Latitude XT3 Media Base
Mediálna základňa Dell Latitude XT3
Medijska osnova Dell Latitude XT3
Dell Latitude XT3 Ortam Tabanı
Dell ﻦﻣ Latitude XT3 ﺯﺍﺮﻃ ﻲﺣﻮﻠﻟﺍ ﺮﺗﻮﻴﺒﻤﻜﻟﺍ ﻂﺋﺎﺳﻭ ﺓﺪﻋﺎﻗ


Dell Latitude XT3 Media Base
Regulatory Mode: K01S
Regulatory Type: K01S001

Notes, Cautions, and Warnings
NOTE: A NOTE indicates important information that helps you make better use of your
computer.
CAUTION: A CAUTION indicates either potential damage to hardware or loss of data
and tells you how to avoid the problem.
WARNING: A WARNING indicates a potential for property damage, personal injury,
or death.
____________________
Information in this document is subject to change without notice.
© 2011 Dell Inc. All rights reserved.
Reproduction of these materials in any manner whatsoever without the written permission of Dell Inc.
is strictly forbidden.
Trademarks used in this text: Dell™, the DELL logo, and Latitude™ are trademarks of Dell Inc.
Microsoft®, Windows®, and Windows Vista® are registered trademarks of Microsoft Corporation in the
U.S. and other countries.
Other trademarks and trade names may be used in this publication to refer to either the entities claiming
the marks and names or their products. Dell Inc. disclaims any proprietary interest in trademarks and trade
names other than its own.
2011 - 05 P/N MK8V0 Rev. A00
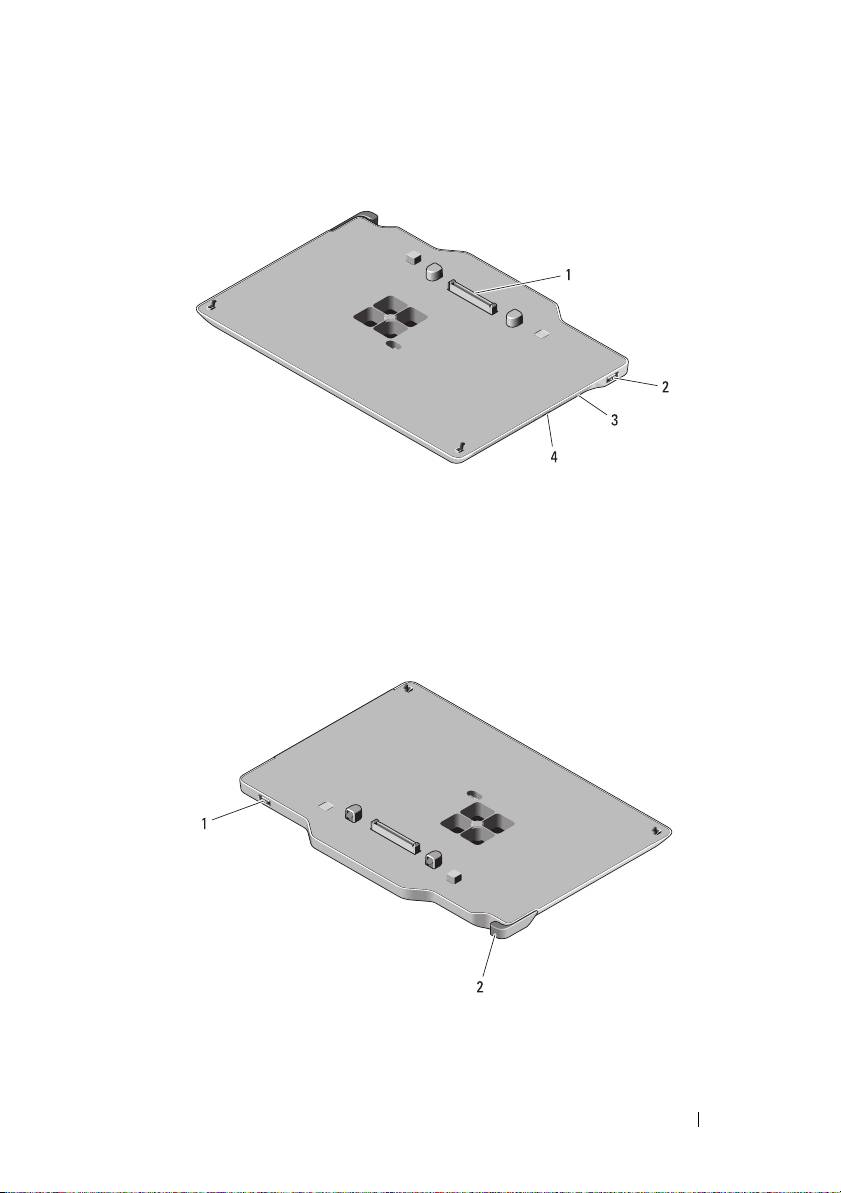
Media Base
Top and Right View
1 docking connector 2 USB connector
3 optical drive 4 optical drive eject button
Back and Left View
1 USB connector 2 Tablet-PC release lever
Media Base 3

Before Docking or Undocking Your Tablet-PC
from the Media Base
WARNING: If you are using a multiple-outlet power strip, use caution when you
plug the AC adapter power cable into the power strip. Some power strips may
allow you to insert the connector incorrectly. Incorrect insertion of the power
connector could result in permanent damage to your media base as well as
electric shock and/or fire. Ensure that you insert the ground prong of the power
plug into the mating ground contact of the power strip.
CAUTION: Use the Latitude™ XT3 media base with your Latitude XT3 only. If you
use a media base from earlier models of Dell computers you may damage the
media base or the Tablet-PC.
CAUTION: If the Tablet-PC does not have a charged battery in the battery bay, you
must shut down the Tablet-PC through the Windows pí~êí menu and then undock
the Tablet-PC. If you undock the Tablet-PC without a battery before shutting it
down, you will lose data and the Tablet-PC may not recover normal operation for
several minutes.
Before Docking or Undocking Your Tablet-PC
NOTE: If you re-install the operating system, complete the setup before docking the
Tablet-PC to the media base.
• Save and close any open files, and exit any open programs.
• Set your Tablet-PC power management settings to ensure that the
Tablet-PC does not enter sleep, standby, or hibernate mode when you
close (lower) the display:
a
Click the Windows
Power
icon
in the Notification area to display
the
Power
icon pop-up window.
b
Click
More power options
.
c
Under the
When I close the lid
drop-down menu, select
Do nothing.
4 Media Base

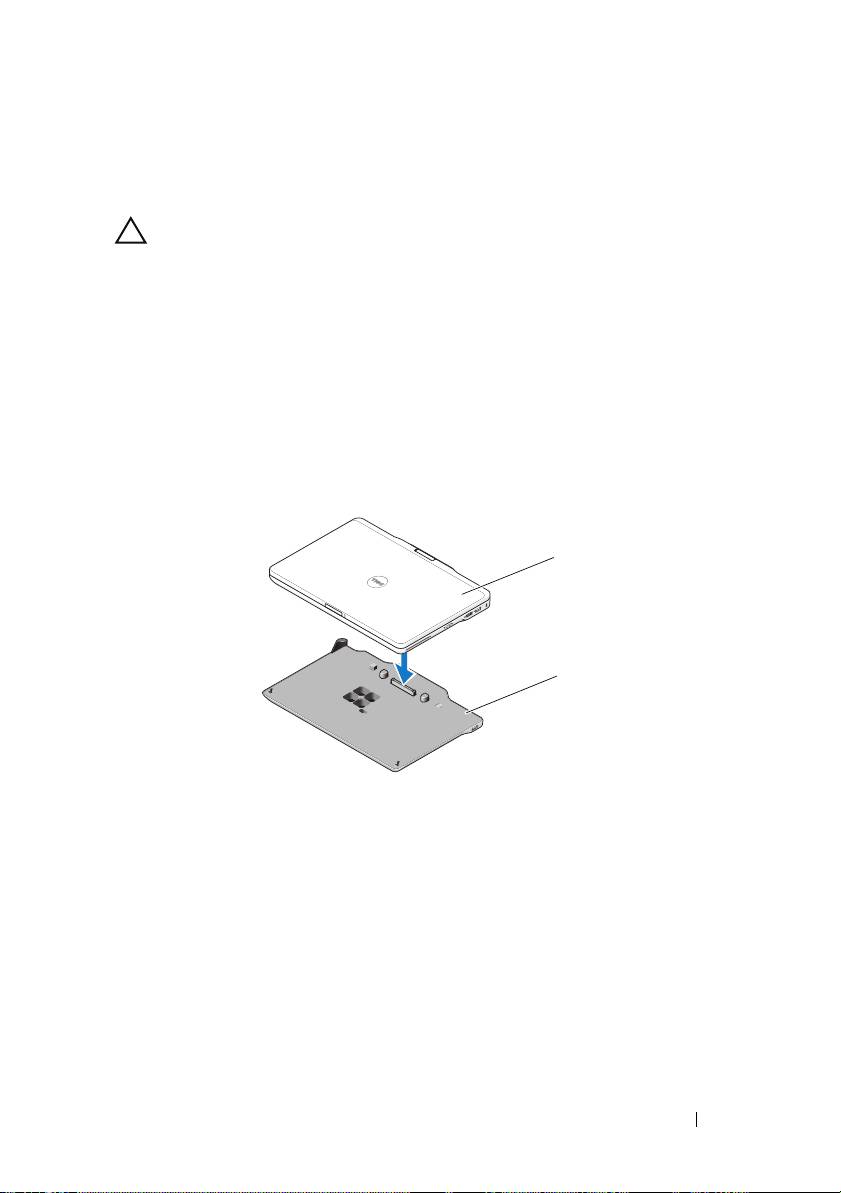
Docking Your Tablet-PC to the Media Base
CAUTION: If you are docking your Tablet-PC for the first time, complete the steps
in "Before Docking or Undocking Your Tablet-PC from the Media Base" on page 4,
before your proceed.
1
Follow the procedures in "Before Docking or Undocking Your Tablet-PC
from the Media Base" on page 4.
2
If this is the first time it is being docked to the media base, ensure that
your Tablet-PC is turned off .
3
Align the back of the Tablet-PC with the back of the media base, and lower
the Tablet-PC onto the media base.
1
2
1 Tablet-PC 2 media base
4
Press the Tablet-PC onto the media base until it clicks and the Tablet-PC
is firmly seated.
5
Turn on the Tablet-PC.
The operating system recognizes the media base.
Media Base 5
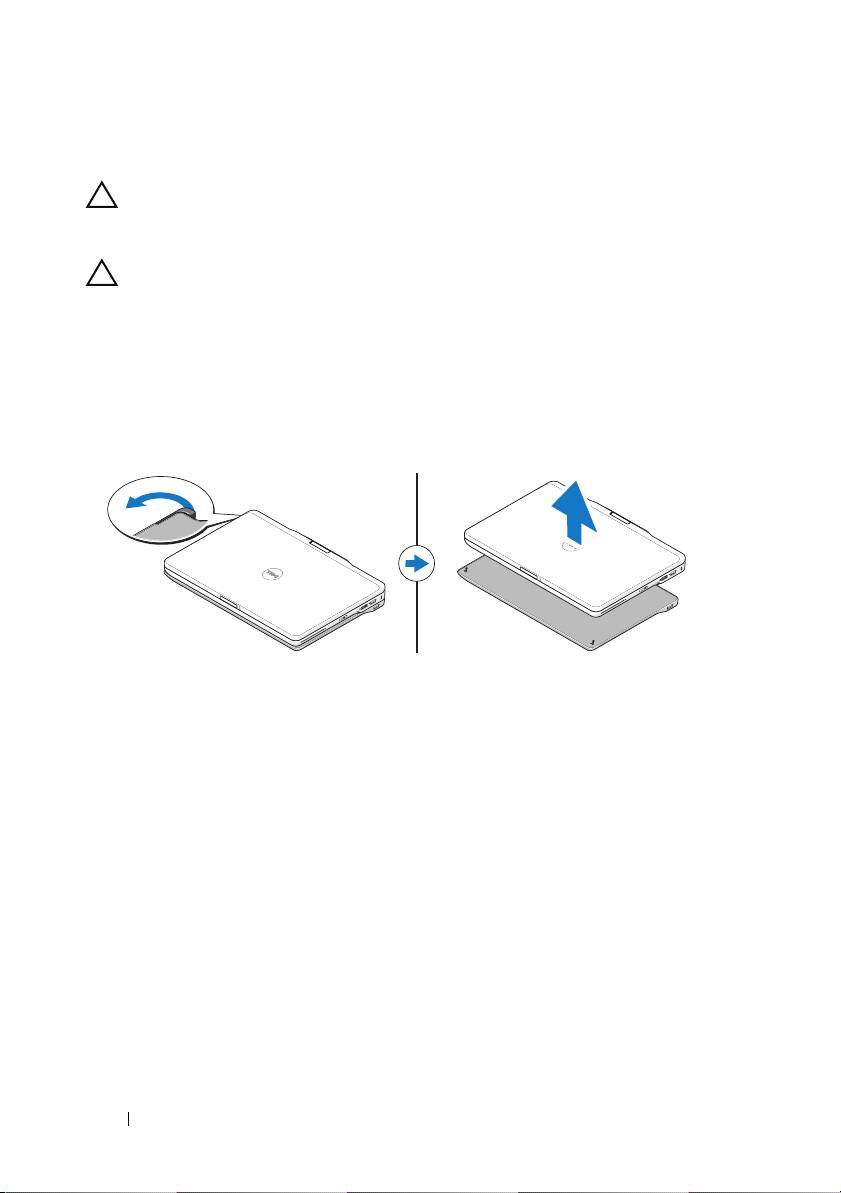
Undocking Your Tablet-PC From the Media Base
CAUTION: Never undock the Tablet-PC without first preparing the Tablet-PC for
undocking. If you undock before preparing the Tablet-PC, you will lose data and
the Tablet-PC may not recover normal operation for several minutes, if at all.
CAUTION: If the Tablet-PC does not have a charged battery in the battery bay, you
must shut down the Tablet-PC through the Windows pí~êí menu and then undock
the Tablet-PC. If you undock the Tablet-PC without a battery before shutting it
down, you will lose data and the Tablet-PC may not recover normal operation for
several minutes.
1
Follow the procedures in "Before Docking or Undocking Your Tablet-PC
from the Media Base" on page 4.
2
Pull the Tablet-PC release lever forward to release the Tablet-PC from the
media base.
3
Lift the Tablet-PC up and slide it out towards the back of the media base.
Removing and Installing the Optical Drive From
the Media Base
Prior to removing or installing the optical drive from the media base, always
perform the following:
1
Save and close any open files or programs, and turn off the Tablet-PC.
2
Undock the media base (see "Undocking Your Tablet-PC From the Media
Base" on page 6).
6 Media Base

Removing the Optical Drive
To remove the optical drive:
1
Remove the screw that secures the optical drive to the media base.
2
Use your screwdriver to slide the drive out of the media bay.
Installing the Optical Drive
To install the optical drive:
1
Insert the optical drive into the media bay on the media base.
2
Replace the securing screw that holds the optical drive in place.
Media Base Specifications
Physical
Height:
Without feet
14.75 mm (0.58 inch)
With feet
16.25 mm (0.64 inch)
Width 292.40 mm (11.51 inches)
Depth 191.50 mm (7.54 inches)
Weight 530 g (1.7 lbs)
Ports and Connectors
USB two 4-pin USB-2.0 compliant connector
Docking 144-pin connector
Media Base 7

Finding More Information and Resources
See the safety and regulatory publications that shipped with your computer and the regulatory
compliance website at www.dell.com/regulatory_compliance for more information on:
• Safety best practices
• Warranty
• Terms and Conditions
• Regulatory certification
• Ergonomics
End User License Agreement
8 Media Base

Dell Latitude XT3 medijska baza
Regulatorni način: K01S
Regulatorna vrsta: K01S001

Napomene, oprezi i upozorenja
NAPOMENA: NAPOMENA ukazuje na važne informacije koje vam pomažu
da koristite svoje računalo na bolji način.
OPREZ: OBAVIJEST označava moguće oštećenje hardvera ili gubitak
podataka i otkriva kako izbjeći neki problem.
UPOZORENJE: UPOZORENJE naznačuje moguće oštećenje imovine,
tjelesne povrede ili smrt.
____________________
Informacije navedene u ovom dokumentu podložne su promjeni bez prethodne obavijesti.
© 2011 Dell Inc. Sva prava pridržana.
Bilo kakvo umnožavanje ovih materijala bez pismenog dopuštenja tvrtke Dell Inc. strogo je zabranjeno.
Zaštitni znakovi koji se koriste u ovom tekstu: Dell™, logotip DELL i Latitude™ su zaštitni znakovi tvrtke
Dell Inc. Microsoft®, Windows® i Windows Vista® su registrirani zaštitni znakovi tvrtke Microsoft
Corporation u SAD-u. i ostalim zemljama.
Ostali zaštitni znakovi i zaštitni nazivi koji se koriste u ovom dokumentu označavaju entitete koji su vlasnici
znakova ili naziva svojih proizvoda. Tvrtka Dell Inc. odriče se bilo kakvih vlasničkih interesa za navedene
trgovačke znakove i trgovačke nazive, osim vlastitih.
2011 - 05 P/N MK8V0 Rev. A00

Medijska podloga
Pogled odozgo i s desne strane
1 priključak za spajanje 2 USB priključak
3 optički pogon 4 gumb za otvaranje optičkog pogona
Pogled sa stražnje i lijeve strane
1 USB priključak 2 Ručica kojom se oslobađa Tablet PC
Medijska podloga 11
Prije spajanja ili odvajanja Tablet PC-a na
Medijsku podlogu
UPOZORENJE: Ako koristite provodnik kabela napajanja s više
izlaza, budite oprezni prilikom priključivanja kabela AC adaptera u
provodnik kabela napajanja. Kod nekih provodnika kabela napajanja
priključak se može umetnuti neispravno. Neispravno umetanje
priključka napajanja može uzrokovati trajno oštećenje medijske
podloge, kao i električni udar i/ili požar. Zubac uzemljenja priključka
napajanja svakako umetnite u odgovarajući utor za uzemljenje na
provodniku kabela napajanja.
OPREZ: Medijsku podlogu Latitude™ XT3 koristite samo uz Latitude
XT3. Ako koristite medijsku podlogu starijih modela Dell računala,
možete oštetiti medijsku podlogu ili Tablet PC.
OPREZ: Ako Tablet PC nema napunjenu bateriju u utoru bateriju,
Tablet PC morate isključiti putem Windows izbornika Start, a zatim ga
odvojiti od podloge. Ako Tablet PC odvojite bez baterije prije
isključivanja, izgubit ćete podatke, a Tablet PC možda nekoliko minuta
neće moći nastaviti s radom.
Prije spajanja ili odvajanja Tablet PC-a
NAPOMENA: Ako ponovno instalirate operacijski sustav, dovršite
postavljanje prije spajanja Tablet-PC-a na medijsku podlogu.
•
Spremite i zatvorite sve otvorene datoteke te zatvorite sve otvorene
programe.
•
Odredite postavke upravljanja napajanjem Tablet PC-a tako da Tablet PC ne
uđe u stanje mirovanja ili hibernacije kada zatvorite (spustite) zaslon:
a
Kliknite Windows ikonu
Napajanje
u području obavijesti kako biste
prikazali skočni prozor ikone
Napajanje
.
b
Kliknite
Dodatne mogućnosti napajanja
.
c
Na padajućem izborniku
Kad spustim poklopac
odaberite
Ništa
.
12 Medijska podloga
Priključivanje Tablet PC-a na medijsku
podlogu
OPREZ: Ako prvi put priključujete Tablet PC, prije nego što nastavite
obavite postupke opisane u odjeljku "Prije spajanja ili odvajanja
Tablet PC-a na Medijsku podlogu" na stranici 12.
1
Slijedite upute u "Prije spajanja ili odvajanja Tablet PC-a na Medijsku
podlogu" na stranici 12.
2
Ako je ovo prvo priključivanje na medijsku podlogu, provjerite je li Tablet
PC isključen.
3
Poravnajte stražnju stranu Tablet PC-a sa stražnjom stranom medijske
podloge i spustite Tablet PC na medijsku podlogu.
1
2
1 Tablet PC 2 medijska podloga
4
Pritisnite Tablet PC na medijsku podlogu dok ne začujete "klik" i dok Tablet
PC ne bude dobro učvršćen.
5
Uključite Tablet PC.
Operacijski sustav prepoznaje medijsku podlogu.
Medijska podloga 13

Odvajanje Tablet PC-a od medijske
podloge
OPREZ: Prije odvajanja Tablet PC-a, uvijek ga prethodno pripremite.
Ako odvajanje obavite bez pripreme, izgubit ćete podatke, a Tablet PC
možda neće nekoliko minuta ili uopće nastaviti s radom.
OPREZ: Ako Tablet PC nema napunjenu bateriju u utoru bateriju,
Tablet PC morate isključiti putem Windows izbornika Start, a zatim ga
odvojiti od podloge. Ako Tablet PC odvojite bez baterije prije
isključivanja, izgubit ćete podatke, a Tablet PC možda nekoliko minuta
neće moći nastaviti s radom.
1
Slijedite upute u "Prije spajanja ili odvajanja Tablet PC-a na Medijsku
podlogu" na stranici 12.
2
Povucite ručicu za oslobađanje Tablet PC-a kako biste odvojili Tablet PC od
medijske podloge.
3
Podignite Tablet-PC i gurnite ga prema stražnjem dijelu medijske baze.
Uklanjanje i instaliranje optičkog pogona
na medijsku podlogu
Prije uklanjanja ili postavljanja optičkog pogona na medijsku bazu, uvijek
učinite sljedeće:
1
Spremite i zatvorite sve otvorene datoteke i programe te isključite Tablet PC.
2
Odvojite medijsku podlogu (pogledajte "Odvajanje Tablet PC-a od medijske
podloge" na stranici 14).
14 Medijska podloga

Uklanjanje optičkog pogona
Za uklanjanje optičkog pogona:
1
Uklonite vijak koji učvršćuje optički pogon za medijsku podlogu.
2
Upotrijebite odvijač kako biste pogon izvukli iz medijskog utora.
Ugradnja optičkog pogona
Za postavljanje optičkog pogona:
1
Umetnite optički pogon u utor za medije na medijskoj podlozi.
2
Zamijenite vijak za učvršćivanje koji pridržava optički pogon.
Tehničke karakteristike medijske podloge
Fizičke karakteristike
Visina:
Bez nožica
14,75 mm (0,58 inča)
S nožicama
16,25 mm (0,64 inča)
Širina 292,40 mm (11,51 inča)
Dubina 191,50 mm (7,54 inča)
Masa 530 g (1,7 lbs)
Ulazi i priključci
USB dva priključka kompatibilna s 4-pinskim USB 2.0
Ležaj 144-pinski priključak
Medijska podloga 15

Traženje dodatnih informacija i resursa
Pogledajte sigurnosne i regulatorne dokumente koji su isporučeni s vašim računalom i web-mjesto
za usklađenost sa zakonskim odredbama na www.dell.com/regulatory_compliance za dodatne
informacije o:
• Najboljim načinima zaštite
• Jamstvu
• Uvjetima i odredbama
• Pravnoj certifikaciji
• Ergonomiji
Licencnom ugovoru s krajnjim korisnikom (EULA)
16 Medijska podloga

Multimediální základna Dell Latitude
XT3
Číslo modelu: K01S
Typ modelu: K01S001

Poznámky, upozornění a varování
POZNÁMKA: POZNÁMKA označuje důležité informace, které pomáhají
lepšímu využití počítače.
UPOZORNĚNÍ: UPOZORNĚNÍ označuje nebezpečí poškození hardwaru
nebo ztráty dat a popisuje, jak se lze problému vyhnout.
VAROVÁNÍ: VAROVÁNÍ označuje potenciální nebezpečí poškození
majetku, úrazu nebo smrti.
____________________
Informace v tomto dokumentu se mohou bez předchozího upozornění změnit.
© 2011 Dell Inc. Všechna práva vyhrazena.
Jakákoli reprodukce těchto materiálů bez písemného povolení společnosti Dell Inc. je přísně zakázána.
Ochranné známky použité v tomto textu: Dell™, logo DELL a Latitude™ jsou ochranné známky
společnosti Dell Inc. Microsoft®, Windows® a Windows Vista® jsou registrované ochranné známky
společnosti Microsoft Corporation v USA a dalších zemích.
Ostatní ochranné známky a obchodní názvy mohou být v tomto dokumentu použity také v souvislosti
s právními subjekty, které si na tyto ochranné známky a názvy svých produktů činí nárok. Společnost Dell
Inc. se zříká všech vlastnických nároků na ochranné známky a obchodní značky jiné než vlastní.
2011 - 05 P/N MK8V0 Rev. A00
