Dell PowerEdge 6950: instruction
Class: Computer Hardware
Type:
Manual for Dell PowerEdge 6950
Table of contents
- Notes, Notices, and Cautions
- System Features
- Supported Operating Systems Other Information You May Need Obtaining Technical Assistance
- Installation and Configuration Unpacking the System
- Installing the System in a Rack Connecting the Keyboard, Mouse, and Monitor
- Connecting the System and Monitor Power Cables Turning on the System and Monitor
- Complete the 0perating System Setup Technical Specifications Processor Expansion Bus Memory Drives
- Connectors Video Power
- Physical Environmental

Dell™ PowerEdge™ 6950 Systems
Getting Started With
Your System
Začínáme se systémem
Guide de mise en route
Erste Schritte mit dem System
Τα πρώτα βήµατα Με το σύστηµά σας
Rozpoczęcie pracy z systemem
Начало работы с системой
Procedimientos iniciales con el sistema
Model EMMA
www.dell.com | support.dell.com


Dell™ PowerEdge™ 6950 Systems
Getting Started With
Your System
Model EMMA
www.dell.com | support.dell.com

Notes, Notices, and Cautions
NOTE: A NOTE indicates important information that helps you make better use of your computer.
NOTICE: A NOTICE indicates either potential damage to hardware or loss of data and tells you how to avoid
the problem.
CAUTION: A CAUTION indicates a potential for property damage, personal injury, or death.
_________________
Information in this document is subject to change without notice.
© 2006 Dell Inc. All rights reserved.
Reproduction in any manner whatsoever without the written permission of Dell Inc. is strictly forbidden.
Trademarks used in this text: Dell, the DELL logo, PowerEdge, and Dell OpenManage are trademarks of Dell Inc.; AMD, AMD Opteron,
and combinations thereof are trademarks of Advanced Micro Devices, Inc.; Microsoft, Windows, and Windows Server are registered trademarks
of Microsoft Corporation; Red Hat is a registered trademark of Red Hat, Inc.; SUSE is a registered trademark of Novell, Inc. in the United
States and other countries.
Other trademarks and trade names may be used in this document to refer to either the entities claiming the marks and names or their products.
Dell Inc. disclaims any proprietary interest in trademarks and trade names other than its own.
Model EMMA
August 2006 P/N FP397 Rev. A00

System Features
The major hardware and software features of your system include:
• Two or four dual-core AMD Opteron™ 8000 Series processors.
• A minimum of 2 GB (dual-processor systems) or 4 GB (four-processor systems) of 667-MHz registered
DDR-II memory modules. Memory is upgradable to a maximum of 64 GB (four-processor systems)
by installing combinations of 512-MB, 1-GB, 2-GB, or 4-GB memory modules in the sixteen memory
module sockets on the system board. (128 GB of memory will be supported when 8 GB memory
modules are available.)
• Support for up to five 3.5-inch hot-plug SAS hard drives.
• An optional internal 1.44-MB, 3.5-inch diskette drive.
• An optional internal slim-line optical drive.
• An optional external USB diskette drive.
• An optional external USB optical drive.
• Two hot-pluggable, 1570-W power supplies in an 1 + 1 redundant configuration. The power supplies
support an input voltage range of 100 V to 208 V.
• Four hot-pluggable system cooling fans.
The system board includes the following features:
•
Two x8 lane-width PCI-Express (PCIe) expansion slots and six x4 lane-width PCIe slots.
(One x4 lane-width slot is occupied by the SAS controller card.) Four expansion slots (two x8 slots
and two x4 slots) support full-length expansion cards.
• Two integrated Gb Ethernet NICs, capable of supporting 10-Mbps, 100-Mbps, and 1000-Mbps data
rates. Each NIC also supports TCP/IP offload engine (TOE) functionality.
• Four USB 2.0-compliant connectors (two on the front panel and two on the back panel), capable
of supporting a diskette drive, an optical drive, a keyboard, a mouse, or a USB flash drive.
• Systems management circuitry that monitors operation of the system fans as well as critical system
voltages and temperatures. The systems management circuitry works in conjunction with the systems
management software.
• Standard Baseboard Management Controller (BMC) with serial access.
• An optional remote access controller (RAC) card for remote systems management.
•
An integrated VGA-compatible video subsystem based on an integrated
ATI RN50 33-MHz PCI
video controller. The video subsystem includes 16 MB of graphics memory and supports various 2D
graphics video modes. Maximum resolution is 1600x1280 with 65,536 colors. (
When the optional
RAC is installed, the integrated video subsystem is disabled and the video controller on the RAC is
used instead.)
Getting Started With Your System 3

• Front-panel support for a video connector, two USB connectors, and a 1x5 LCD panel for system ID
and error messaging.
• Back-panel connectors including one serial, one video, two USB, and two NIC connectors.
• System ID button on the front and back panels.
For more information about specific features, see "Technical Specifications" on page 8.
Supported Operating Systems
Your system supports the following operating systems:
®
®
• Microsoft
Windows Server
2003 R2 Standard and Enterprise Editions
• Microsoft Windows Server 2003 Standard and Enterprise x64 Editions
®
•Red Hat
Enterprise Linux AS for x86-64
®
•SUSE
Linux Enterprise Server 10 (when available)
Other Information You May Need
CAUTION: The Product Information Guide provides important safety and regulatory information. Warranty
information may be included within this document or as a separate document.
• The
Rack Installation Guide
or
Rack Installation Instructions
included with your rack solution
describes how to install your system into a rack.
• The
Hardware Owner’s Manual
provides information about system features and describes how to
troubleshoot the system and install or replace system components. This document may be found on
the CDs that came with your system or at
support.dell.com
.
• CDs included with your system provide documentation and tools for configuring and managing your
system.
• Updates are sometimes included with the system to describe changes to the system, software, and/or
documentation.
NOTE: Always check for updates on support.dell.com and read the updates first because they often
supersede information in other documents.
• Release notes or readme files may be included to provide last-minute updates to the system or
documentation or advanced technical reference material intended for experienced users or
technicians.
Obtaining Technical Assistance
If you do not understand a procedure in this guide or if the system does not perform as expected, see
your Hardware Owner’s Manual.
Dell Enterprise Training and Certification is available; see www.dell.com/training for more information.
This service may not be offered in all locations.
4 Getting Started With Your System
Installation and Configuration
CAUTION: Before performing the following procedure, read and follow the safety instructions and important
regulatory information in your Product Information Guide.
This section describes the steps to set up your system for the first time.
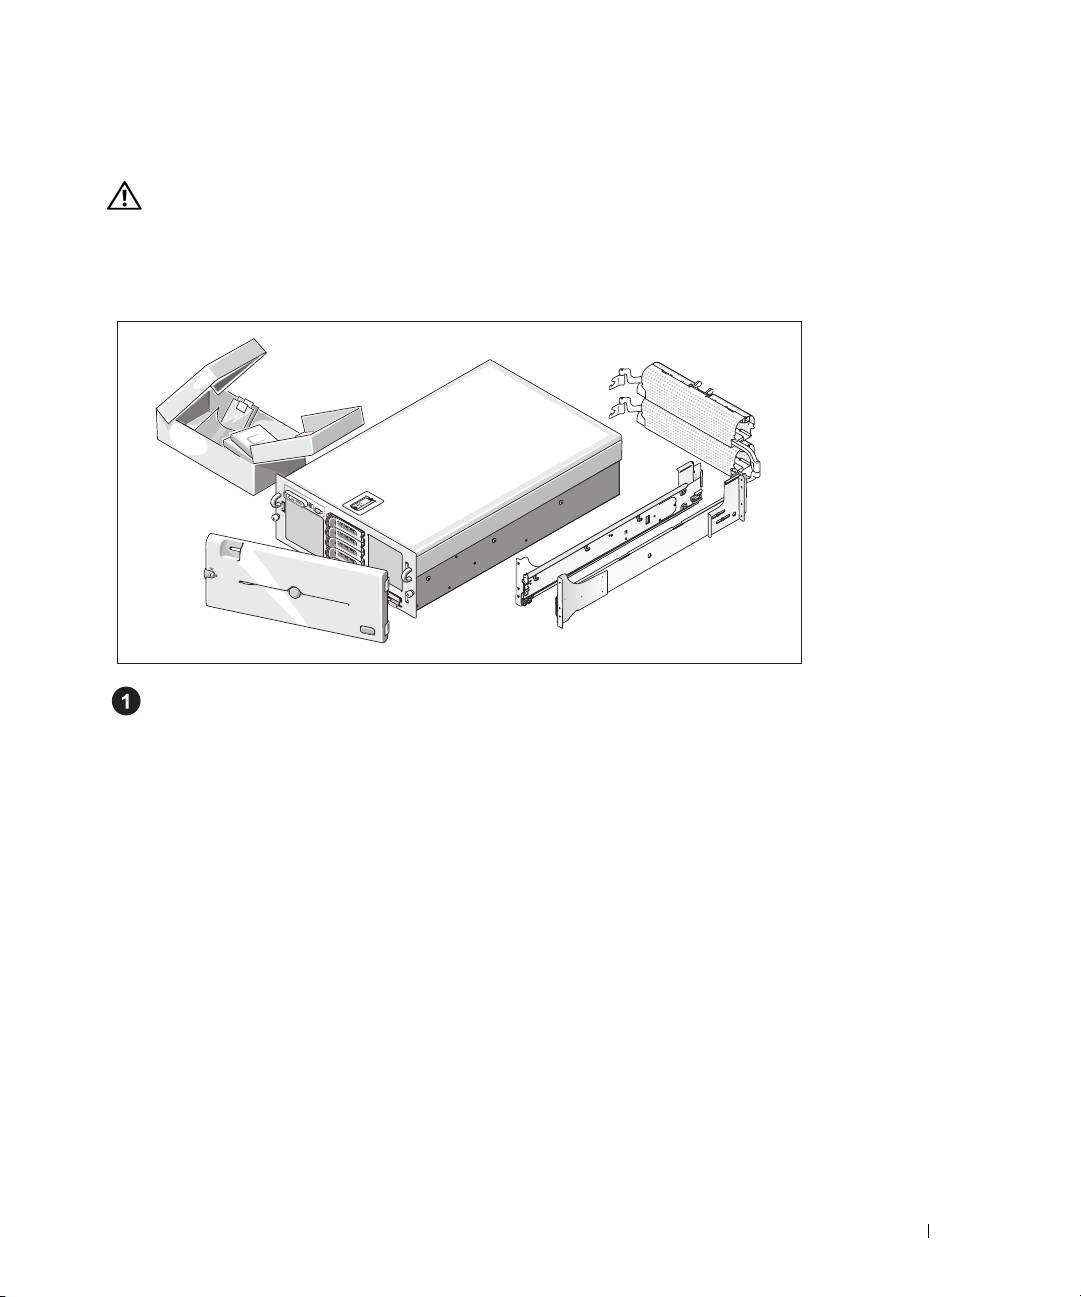
Unpacking the System
Unpack your system and identify each item.(Your system may not include the optional rack kit
and bezel shown here.)
Keep all shipping materials in case you need them later.
Getting Started With Your System 5
Installing the System in a Rack
Install the system in the rack once you have read the "Safety Instructions" located in the rack
installation documentation for your system.
See your rack installation documentation for instructions on installing your system in a rack.
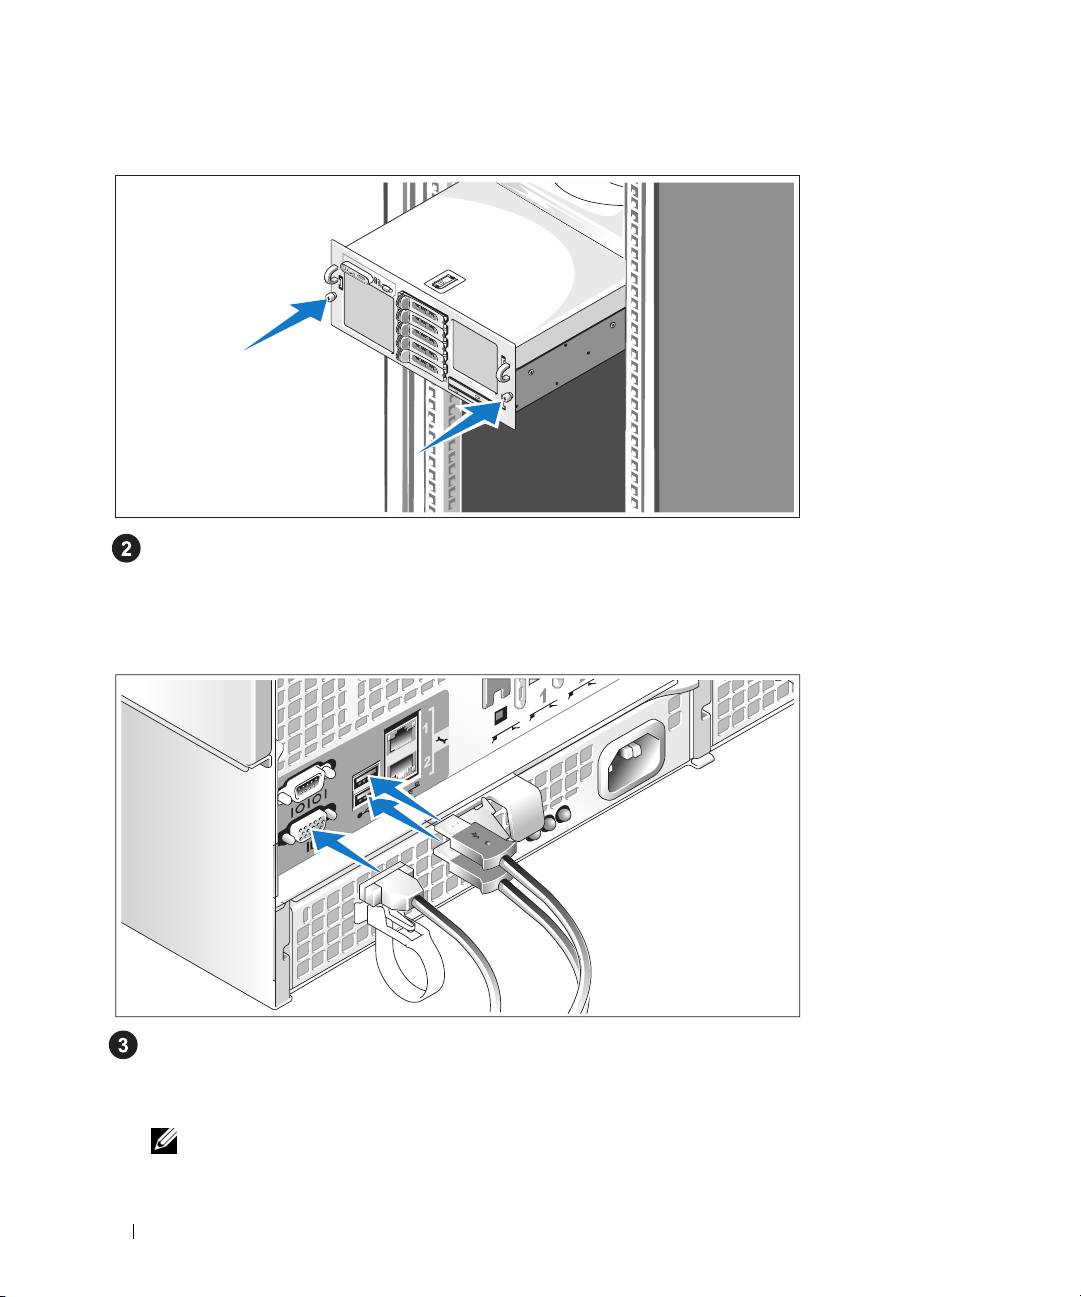
Connecting the Keyboard, Mouse, and Monitor
Connect the keyboard, mouse, and monitor (optional).
The connectors on the back of your system have icons indicating which cable to plug into each
connector. Be sure to tighten the screws (if any) on the monitor's cable connector.
NOTE: If you simultaneously connect two monitors to the system, using the front and rear video connections,
the video will default to the front since only one display can operate at a time.
6 Getting Started With Your System
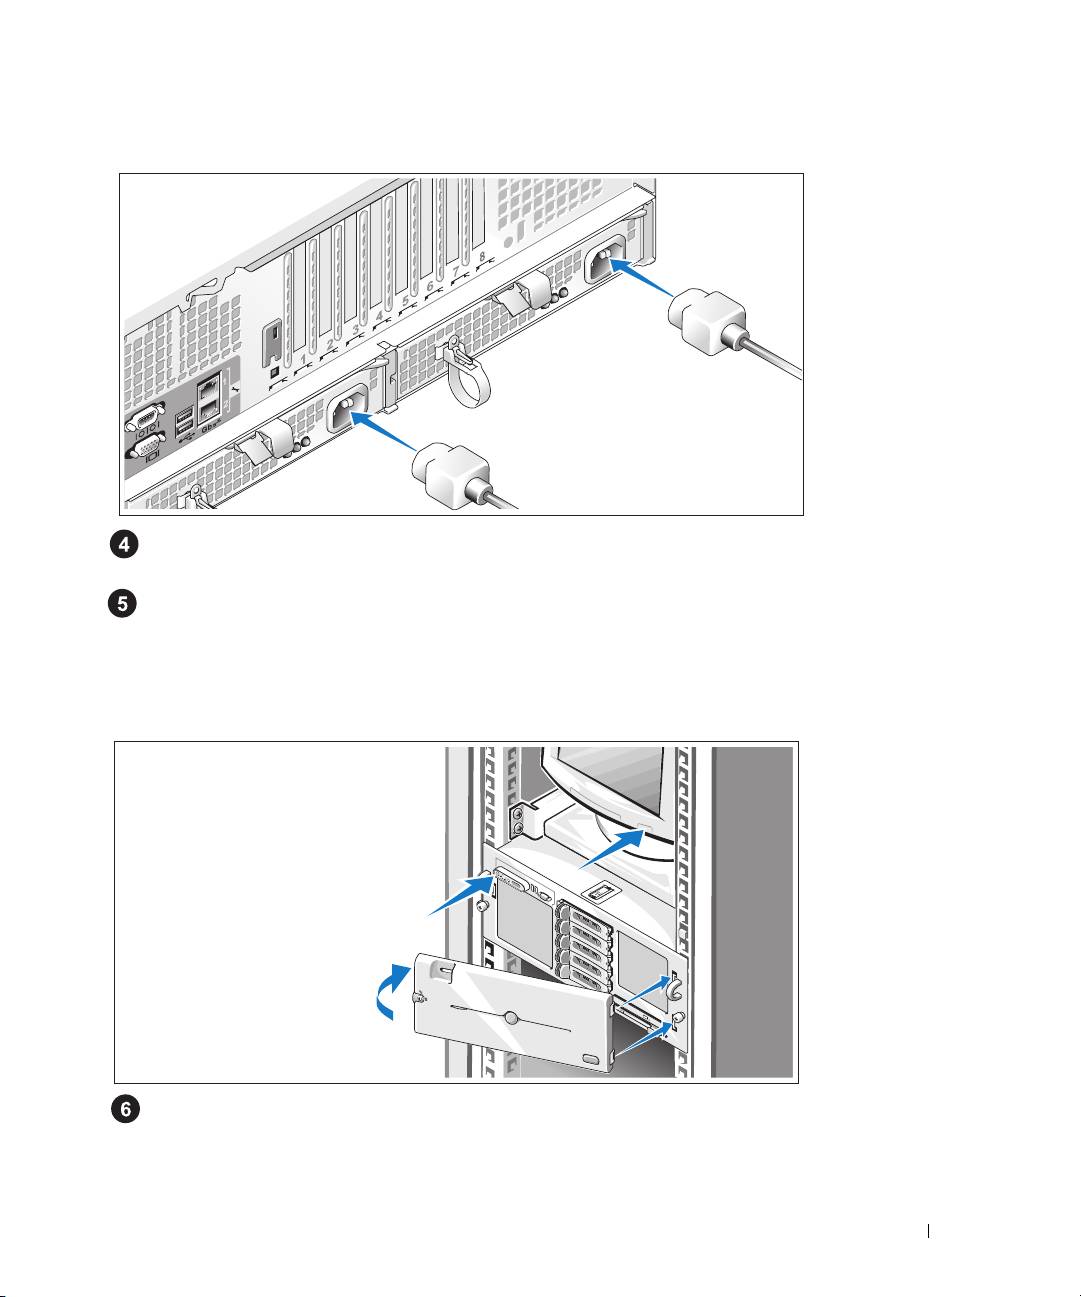
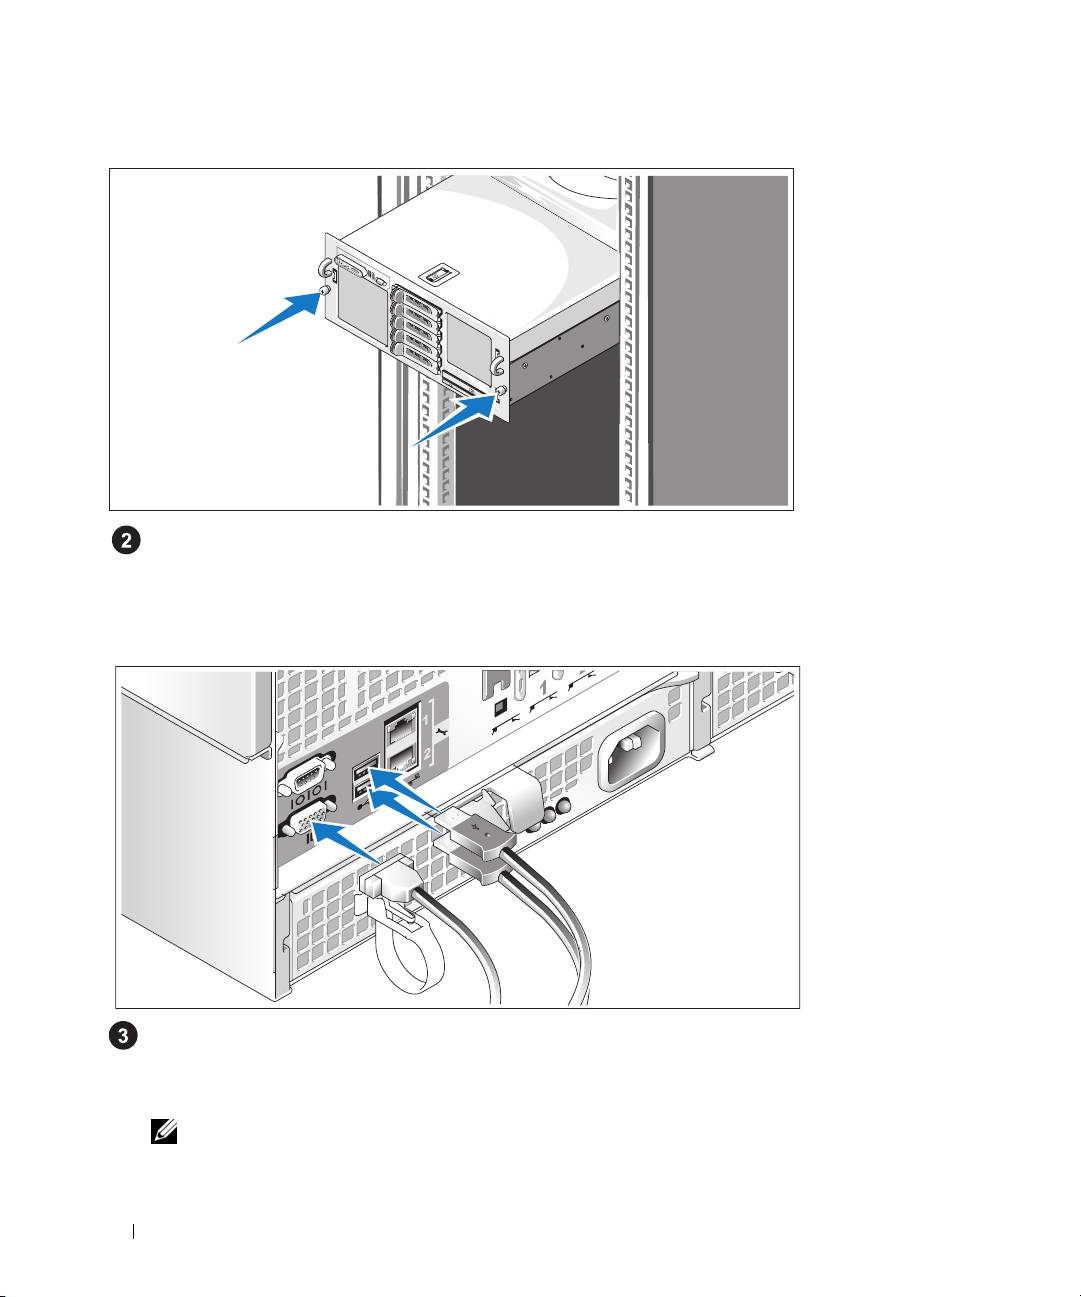
Connecting the System and Monitor Power Cables
Connect the monitor's power cable to the monitor (optional). Connect the system’s power cables
to the system.
Plug the other end of the power cables into a grounded electrical outlet or a separate power source
such as an uninterrupted power supply (UPS) or a power distribution unit (PDU). If possible, connect
the power supplies to two different 110V power sources or two different 220V power sources,
depending on the power supplies used.
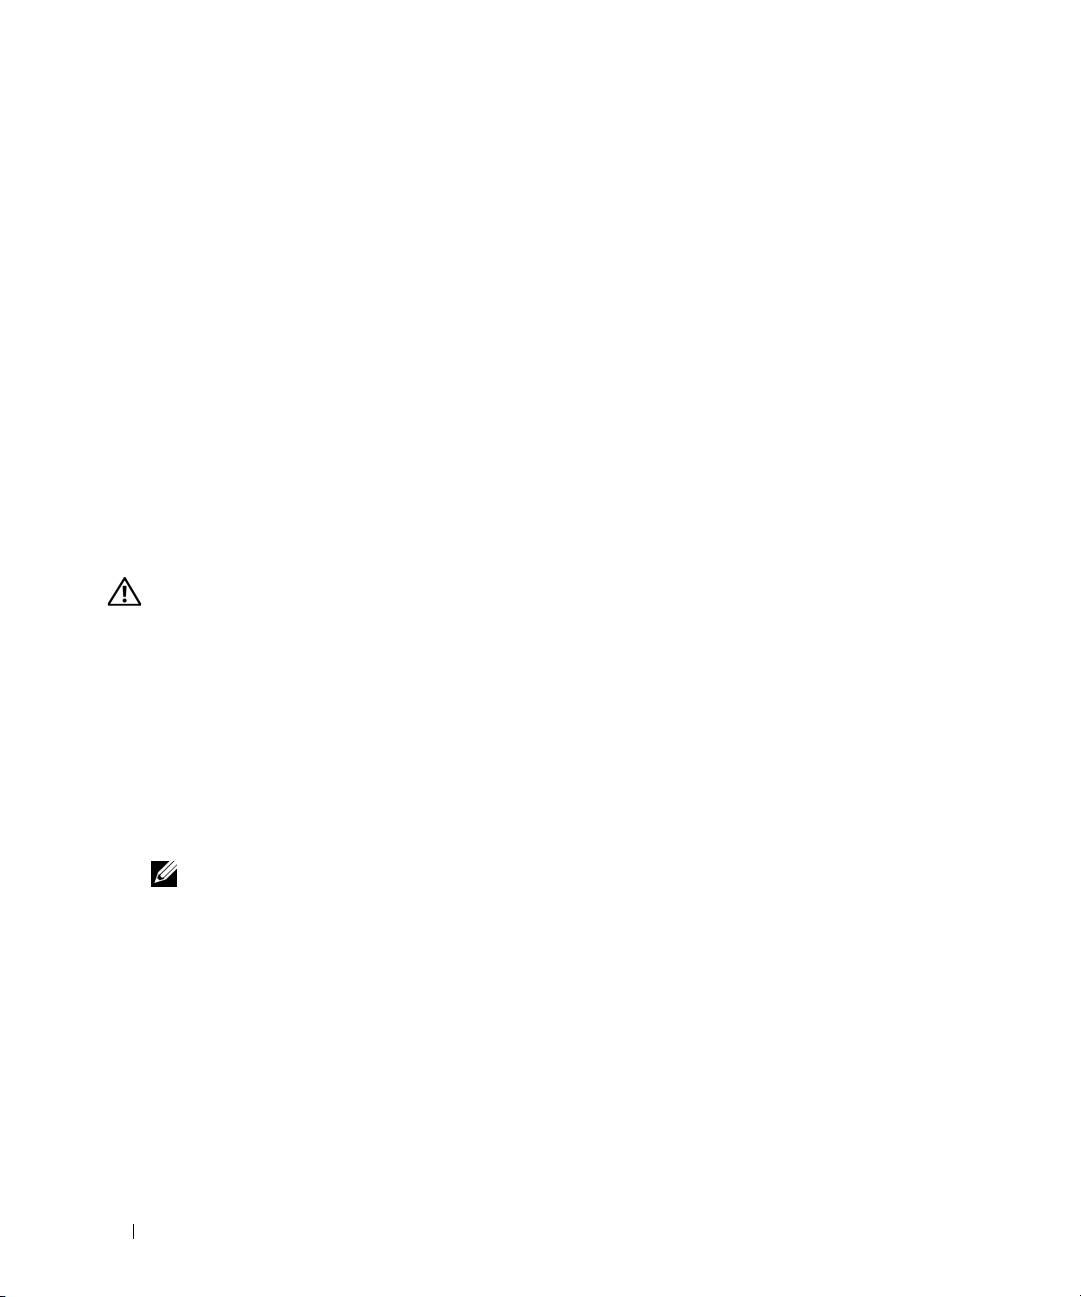
Turning on the System and Monitor
Press the power button on the system and the monitor (optional). The power indicators should light.
Adjust the monitor's controls until the displayed image is satisfactory.
If you have purchased the optional system bezel, install it after turning on the system.
Getting Started With Your System 7

Complete the 0perating System Setup
If you purchased a preinstalled operating system, see the operating system documentation that ships
with your system. To install an operating system for the first time, see the Quick Installation Guide.
Be sure the operating system is installed before installing hardware or software not purchased with
the system.
Technical Specifications
Processor
Processor type Either two or four dual-core AMD Opteron™ 8000 Series
processors
Expansion Bus
Bus type PCIe
Expansion slots
Bandwidth
Two x8 lane-width
slots,
six x4 lane-width
slots
(One x4 slot is reserved for use by the SAS controller card)
Size
Two full-length and four half-length x4 lane-width slots
Two full-length x8 lane-width slots
Memory
Architecture 667-MHz registered DDR-II memory modules
Memory module sockets Sixteen 240-pin
Memory module capacities 512 MB, 1 GB, 2 GB, 4 GB, (8 GB when available)
Minimum RAM 2 GB (two processors) or 4 GB (four processors)
Maximum RAM 32 GB (two processors) or 64 GB (four processors)
(128 GB when 8 GB memory modules are available)
Drives
Hard drives Up to five 3.5-inch hot-plug SAS internal drives
Optical drive One optional slimline CD-ROM, DVD-ROM/CD-RW
combination, or DVD-ROM
NOTE: DVD devices are data only
8 Getting Started With Your System

Connectors
Back Panel
NIC
Two RJ-45 (for integrated 1-GB NICs)
Serial
9-pin, DTE, 16550-compatible
USB
Two 4-pin, USB 2.0 compliant
Video
15-pin VGA
Front Panel
Video
15-pin VGA
USB
Two 4-pin, USB 2.0 compliant
Video
Video type ATI RN50 video controller; VGA connector
Video memory 16 MB
Resolution Maximum 2D graphics resolution: 1600 x 1280,
65,536 colors
Power
AC power supply (per power supply)
Wattage
100-180VAC input: Output 12V/76.5A, 3.3Vsb/4A
Maximum 930W
180-264VAC input: Output 12V/129.5A, 3.3Vsb/5A
Maximum 1570W
Voltage
Input 100-240VAC, 12-8A, 47-63Hz
Heat dissipation
3171 BTU/hr (maximum)
Maximum inrush current
Under typical line conditions and over the entire system
ambient operating range, the inrush current may reach 55A
per power supply for 10 ms or less and 35A per power
supply for up to 150 ms.
Batteries
System battery
CR 2032 3.0-V lithium coin cell
Getting Started With Your System 9

Physical
Height 17.3 cm (6.8 in)
Width 44.7 cm (17.6 in)
Depth 70.1 cm (27.6 in)
Weight (maximum configuration) 37 kg (82 lb)
Environmental
NOTE: For additional information about environmental measurements for specific system configurations,
see www.dell.com/environmental_datasheets
Temperature
Operating
10° to 35°C (50° to 95°F)
Storage
–40° to 65°C (–40° to 149°F)
Relative humidity
Operating
20% to 80% (noncondensing) with a maximum humidity
gradation of 10% per hour
Storage
5% to 95% (noncondensing)
Maximum vibration
Operating
0.26 Grms (10 to 350 Hz)
Storage
1.54 Grms (10 to 250 Hz)
Maximum shock
Operating
One shock pulse in the positive z axis (one pulse on each
side of the system) of 41 G for up to 2 ms
Storage
Six consecutively executed shock pulses in the positive and
negative x, y, and z axes (one pulse on each side of the
system) of 71 G for up to 2 ms
Altitude
Operating
–16 to 3048 m (–50 to 10,000 ft)
Storage
–16 to 10,600 m (–50 to 35,000 ft)
10 Getting Started With Your System

Dell™ PowerEdge™ 6950 Systems
Začínáme se systémem
Model EMMA
www.dell.com | support.dell.com

Poznámky, upozornění a varování
POZNÁMKA: POZNÁMKA označuje důležitou informaci, s jejíž pomocí lépe využijete svůj počítač.
UPOZORNĚNÍ: UPOZORNĚNÍ poukazuje na možnost poškození hardwaru nebo ztráty dat a poskytuje
návod, jak se danému problému vyhnout.
POZOR: Výstraha („POZOR“) poukazuje na riziko poškození majetku, poranìní nebo smrtelného úrazu.
_________________
Informace obsažené v tomto dokumentu podléhají změnám bez předchozího upozornění.
© 2006 Dell Inc. Všechna práva vyhrazena.
Jakákoli reprodukce tohoto dokumentu je bez písemného souhlasu společnosti Dell Inc. přísně zakázána.
Ochranné známky použité v tomto textu: Dell, logo DELL, PowerEdge a Dell OpenManage jsou ochranné známky společnosti Dell Inc.; AMD,
AMD Opteron a jejich kombinace jsou ochranné známky společnosti Advanced Micro Devices, Inc.; Microsoft, Windows a Windows Server
jsou registrované ochranné známky společnosti Microsoft Corporation; Red Hat je registrovaná ochranná známka společnosti Red Hat, Inc.;
SUSE je registrovaná ochranná známka společnosti Novell, Inc. ve Spojených státech amerických a ostatních zemích.
V tomto dokumentu mohou být použity další ochranné známky a obchodní názvy odkazující na subjekty, kterým tyto známky či názvy patří,
nebo na jejich výrobky. Společnost Dell Inc. se zříká jakýchkoli vlastnických zájmů o jiné než vlastní ochranné známky a obchodní názvy.
Model EMMA
Srpen 2006 P/N FP397 Rev. A00

Systémové funkce
Hlavní hardwarové a softwarové funkce systému jsou:
•
Dva nebo čtyři dvoujádrové procesory řady AMD Opteron™ 8000.
•
Minimálně 2 GB (systémy se dvěma procesory) nebo 4 GB (systémy se čtyřmi procesory) registrované
paměti DDR-II s frekvencí 667 MHz. Pamět’ je možné rozšířit na max. 64 GB (systémy se čtyřmi
procesory) instalací kombinací příslušných pamět’ových modulů o velikostech 512 MB, 1 GB, 2 GB nebo
4 GB do šestnácti pamět’ových slotů na systémové desce. (Podpora 128 GB paměti v případě, že jsou k
dispozici pamět’ové moduly 8 GB.)
•
Podpora až pěti 3,5 palcových hot-plug SAS pevných disků.
•
Volitelná interní disketová mechanika 1,44-MB, 3,5 palce.
•
Volitelná slim-line optická mechanika.
•
Volitelná externí USB disketová mechanika.
•
Volitelná externí USB optická mechanika.
•
Dva hot-plug napájecí zdroje 1570 W v konfiguraci 1 + 1 záložní. Napájecí zdroje podporují vstupní
napětí v rozsahu 100 V až 208 V.
•
Čtyři hot-plug chladicí ventilátory.
Systémová deska má následující funkce:
•
Dva rozšiřovací sloty PCI Express (PCIe) x8 lane a šest slotů PCIe x4 lane. (Jeden slot x4 lane je obsazen
kartou řadiče SAS.) Čtyři rozšiřovací sloty (dva sloty x8 a dva sloty x4) podporují celodélkové rozšiřovací
karty.
•
Dvě integrované sít’ové karty Gigabit Ethernet podporující datový přenos rychlostí 10 Mbps, 100 Mbps
a 1000 Mbps. Každá sít’ová karta podporuje rovněž funkci TCP/IP offload engine (TOE).
•
Čtyři konektory USB 2.0 (dva na předním a dva na zadním panelu) podporující disketovou mechaniku,
optickou mechaniku, klávesnici, myš nebo USB flash disk.
•
Okruhy systémové správy monitorující funkci systémových ventilátorů a kritická napětí a teploty
v systému. Okruhy systémové správy spolupracují se softwarem systémové správy.
•
Standardní BMC (baseboard managment controller) se sériovým přístupem.
•
Volitelná karta ovladače pro vzdálený přístup (RAC) umožňující vzdálenou správu systému.
•
Integrovaný VGA kompatibilní grafický subsystém založený na integrovaném grafickém adaptéru
ATI
RN50 33 MHz PCI
. Grafický subsystém zahrnuje 16 MB grafické paměti a podporuje různé 2D
grafické režimy. Maximální rozlišení je 1600 x 1280 při 65536 barvách. (
Je-li nainstalována volitelná
karta RAC, je integrovaný grafický subsystém neaktivní. Místo něho je požíván grafický adaptér
na RAC.)
Začínáme se systémem 13
•
Přední panel - video a dva USB konektory, 1x5 LCD panel pro zobrazení ID systému a chybových
hlášení.
•
Konektory na zadním panelu - jeden sériový port, jeden video, dva USB a dva sít’ové konektory.
•
Tlačítko ID systému na předním a zadním panelu.
Pro více informací o specifických funkcích viz „Technická specifikace” na str. 18.
Podporované operační systémy
Váš systém podporuje následující operační systémy:
®
®
•
Microsoft
Windows Server
2003 R2 Standard Edition a Enterprise Edition
•
Microsoft Windows Server 2003 Standard Edition a Enterprise x64 Edition
®
•
Red Hat
Enterprise Linux AS pro x86-64
®
•
SUSE
Linux Enterprise Server 10 (je-li k dispozici)
Další užitečné informace
POZOR: Informační příručka produktu obsahuje důležité bezpečnostní a právní informace.
Informace o záruce je součástí tohoto dokumentu nebo je přiložena samostatně.
•
Příručka pro instalaci do stojanu
nebo
Pokyny pro instalaci do stojanu
dodané s vaším stojanovým
systémem popisují instalaci vašeho systému do stojanu.
•
Uživatelská příručka k hardwaru
obsahuje informaci o funkcích systému a popisuje řešení problémů
se systémem a instalaci nebo výměnu systémových komponent. Tento dokument můžete nalézt na CD
nosičích, které byly dodány s vaším systémem, nebo na adrese
support.dell.com
.
•
CD dodaná se systémem obsahují dokumentaci a nástroje pro konfiguraci a správu vašeho systému.
•
S počítačem jsou případně dodány také aktualizace, které popisují změny v počítači, softwaru a/nebo
v dokumentaci.
POZNÁMKA: Vždy nejprve zkontrolujte a pročtěte aktualizace uvedené na adrese
support.dell.com, protože tyto aktualizace často nahrazují informace v ostatních dokumentech.
•
Poznámky a soubory „readme“ mohou být také součástí dodávky a obsahují poslední aktualizace k
systému nebo dokumentaci, příp. rozšířené technické materiály určené zkušeným uživatelům a technikům.
Odborná pomoc
Nerozumíte-li některému z postupů popsaných v této příručce nebo nepracuje-li systém podle očekávání,
nahlédněte do
Uživatelské příručky k hardwaru
.
Společnosti Dell rovněž nabízí trénink a certifikaci (Dell Enterprise Training and Certification); pro více
informací navštivte
www.dell.com/training
. Tato služba nemusí být nabízena ve všech regionech.
14 Začínáme se systémem

Instalace a konfigurace
POZOR: Před provedením následujícího postupu si pročtěte a postupujte podle
bezpečnostních pokynů a důležitých předpisů uvedených v Informační příručce produktu.
V této části jsou popsány kroky, které je nutné provést při první instalaci vašeho systému.
Rozbalení systému
Rozbalte systém a identifikujte jeho jednotlivé součásti. (Váš systém nemusí
obsahovat znázorněnou volitelnou soupravu pro instalaci do stojanu nebo čelní kryt.)
Veškerý obalový materiál uschovejte pro případ pozdější potřeby.
Začínáme se systémem 15
Instalace systému do stojanu
Nejprve si přečtěte „Bezpečnostní pokyny“ uvedené v instalační dokumentaci k systému,
potom proveďte instalaci systému do stojanu.
Pokyny pro instalaci systému do stojanu naleznete v dokumentaci pro instalování stojanu.
Připojení klávesnice, myši a monitoru
Připojte klávesnici, myš a monitor (volitelné).
Konektory na zadní straně systému mají ikony znázorňující, který kabel připojit ke kterému konektoru.
Zajistěte, aby šrouby na konektoru kabelu monitoru byly dobře dotaženy (je-li jimi konektor vybaven).
POZNÁMKA: Jestliže k systému připojíte současně dva monitory, s použitím předního i zadního
videokonektoru, pak je výchozím monitor připojený vpředu, protože v jednom okamžiku může být
aktivní pouze jeden monitor.
16 Začínáme se systémem

Připojení napájecích kabelů systému a monitoru
Zapojte napájecí kabel monitoru do monitoru (volitelný). Zapojte napájecí kabel systému do systému.
Poté zasuňte druhý konec napájecích kabelů do uzemněné elektrické zásuvky nebo je připojte k
samostatnému zdroji napájení, například k UPS (Uninterruptible Power Supply - zdroj nepřerušitelného
napájení) nebo jednotce rozvaděče (PDU). Je-li to možné, připojte napájecí zdroje ke dvěma různým
zdrojům proudu 110 V nebo dvěma různým zdrojům proudu 220 V, v závislosti na použitých napájecích
zdrojích.
Zapnutí systému a monitoru
Stiskněte vypínač na systému a na monitoru (volitelný). Kontrolky napájení by se měly rozsvítit.
Nastavte ovladače monitoru tak, aby byl výsledný obraz uspokojivý.
Jestliže jste zakoupili volitelný čelní kryt, nainstalujte jej po zapnutí systému.
Začínáme se systémem 17

Dokončení nastavení operačního systému
Jestliže jste zakoupili systém s předinstalovaným operačním systémem, nahlédněte do dokumentace k
operačnímu systému, která byla se systémem dodána. Pokyny k první instalaci operačního systému viz
Příručka rychlé instalace
. Dříve než začnete s instalací hardwaru či softwaru, který nebyl zakoupen společně
se systémem, se ujistěte, že máte nainstalovaný operační systém.
Technická specifikace
Procesor
Typ procesoru dva nebo čtyři dvoujádrové procesory řady
AMD Opteron™ 8000
Rozšiřovací sběrnice
Typ sběrnice PCIe
Rozšiřovací sloty
Šířka pásma
dva
sloty x8 lane,
šest
slotů x4 lane
(jeden slot x4 je rezervován pro použití karty řadiče SAS)
Ve li kos t
dva celodélkové a čtyři polodélkové sloty x4 lane
dva celodélkové sloty x8 lane
Pamět’
Architektura registrované pamět’ové moduly DDR-II 667 MHz
Sloty pro pamět’ové moduly šestnáct 240-pin
Kapacity pamět’ových modulů 512 MB, 1 GB, 2 GB, 4 GB, (8 GB je-li k dispozici)
Min. RAM 2 GB (dva procesory) nebo 4 GB (čtyři procesory)
Max. RAM 32 GB (dva procesory) nebo 64 GB (čtyři procesory)
(128 GB jsou-li k dispozici pamět’ové moduly 8 GB)
Disky
Pevné disky až pět 3,5 palcových hot-plug SAS interních disků
Optické mechaniky jedna volitelná slim-line CD-ROM, DVD-ROM/CD-RW
nebo DVD-ROM mechanika
POZNÁMKA: DVD zařízení jsou určena pouze
pro data
18 Začínáme se systémem
