Dell PowerEdge C410X: instruction
Class: Household, kitchen appliances, electronics and equipment
Type: Computer
Manual for Dell PowerEdge C410X
Table of contents
- Notes, Cautions, and Warnings
- Restricted Access Location Installation and Configuration Unpack your system
- Installing the Rails and System in a Rack
- Follow these instructions to install the rails into a rack: 3. Push the system into the sliding rails until the locking latch clicks into place.
- 4. Install the system into the rack.
- Connecting iPass Cables Connecting Power Cables
- Turning On the System Other Information You May Need Firmware Updates
- NOM Information (Mexico Only) Technical Specifications System Specifications 1. Chassis
- 2. Front I/O Board 3. FAN Module 4. Power Supply BTU Specifications
- Environmental Specifications

Dell PowerEdge C410x
Getting Started
With Your System
Začínáme se systémem
Guide de mise en route du système
Erste Schritte mit dem System
Τα πρώτα βήματα με το σύστημά σας
Rozpoczęcie pracy z systemem
Начало работы с системой
Introducción al sistema
Sisteminizi Kullanmaya Başlarken
תכרעמה םע הדובעה תליחת


Dell PowerEdge C410x
Getting Started
With Your System
Notes, Cautions, and Warnings
READ THIS IMPORTANT SAFETY INFORMATION SECTION. RETAIN THIS MANUAL FOR REFERENCE. READ THIS
SECTION BEFORE SERVICING.
NOTE: A NOTE indicates important information that helps you make better use of your computer.
CAUTION: A CAUTION indicates potential damage to hardware or loss of data if instructions are not
followed.
WARNING: A WARNING indicates a potential for property damage, personal injury, or death.
Information in this publication is subject to change without notice.
© 2010- 2012 Dell Inc. All rights reserved.
Reproduction of these materials in any manner whatsoever without the written permission of Dell Inc. is strictly
forbidden.
Trademarks used in this text: Dell™, the DELL logo, and PowerEdge™ are trademarks of Dell Inc.
Other trademarks and trade names may be used in this publication to refer to either the entities claiming the
marks and names or their products. Dell Inc. disclaims any proprietary interest in trademarks and trade names
other than its own.
Regulatory Model B02S
March 2012 P/N 4W4XK Rev. A01

CAUTION: To reduce the risk of electric shock, this system should only be serviced by
qualified service personnel.
Restricted Access Location
The Dell PowerEdge C410X system is intended for installation only in restricted access locations as defined in
Cl. 1.2.7.3 of IEC 60950-1: 2001.
1.2.7.3 RESTRICTED ACCESS LOCATION: A location for equipment where both of the following paragraphs
apply:
Access can only be gained by SERVICE PERSONS or by USERS who have been instructed about the
reasons for the restrictions applied to the location and about any precautions that shall be taken.
Access is through the use of a TOOL or lock and key, or other means of security, and is controlled by
the authority responsible for the location.
CAUTION: To prevent the system PSUs from overloading and to ensure the optimum system
performance and stability, always follow the table below for PSU and GPGPU configuration.
Minimum PSU Quantity Maximum GPGPU Quantity
1 4
2 8
3 16
The fourth PSU is redundant.
Installation and Configuration
WARNING: Before performing the following procedure, review the safety instructions that
came with the system.
Unpack your system
Unpack your system and check that the following items are included.
One Dell PowerEdge C410X system chassis
Dell PowerEdge C410x Getting Started Guide
Safety, Environmental, and Regulatory Information (SERI)
Warranty and Support Information (WSI) or End User License Agreement (EULA)
Contact Dell if some items are missing or appear damaged.
3
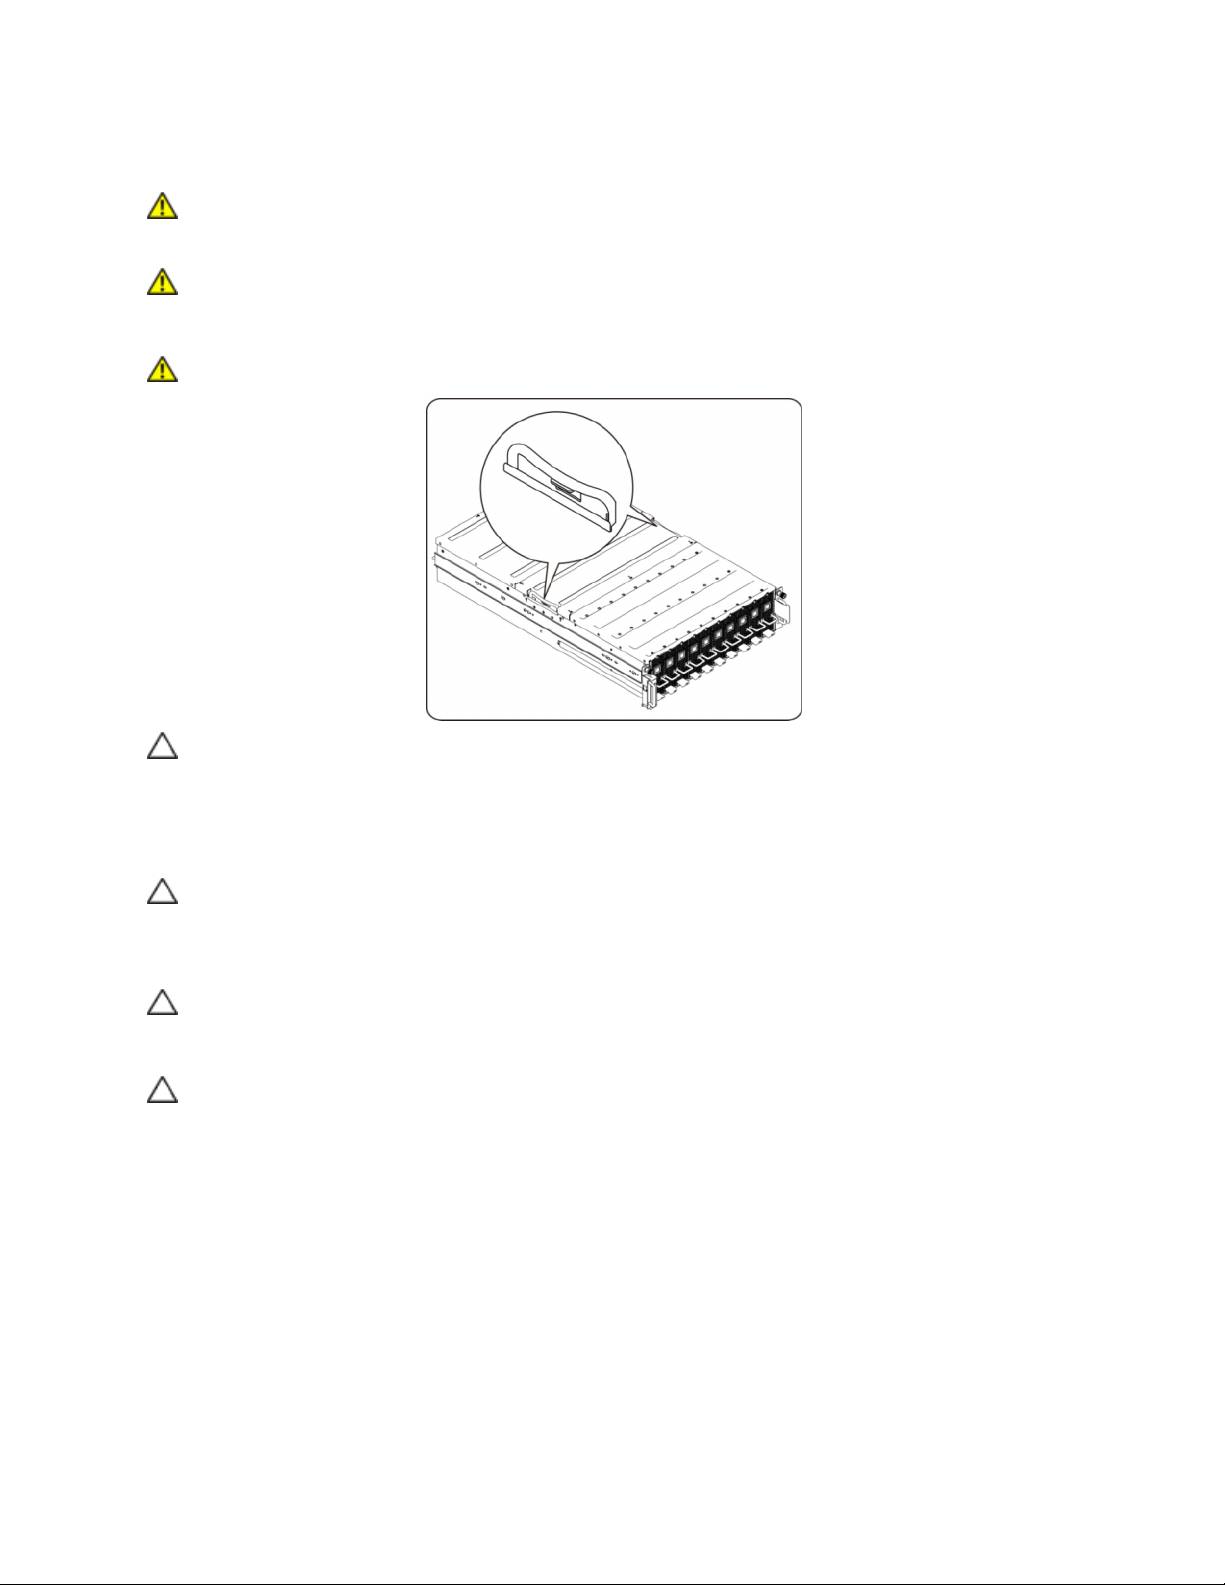
Installing the Rails and System in a Rack
WARNING: Whenever you need to lift the system, get others to assist you. To avoid injury, do
not attempt to lift the system by yourself.
WARNING: The system is not fixed to the rack or mounted to the rails. To avoid personal injury
or damage to the system, you must adequately support the system rack during installation
and removal.
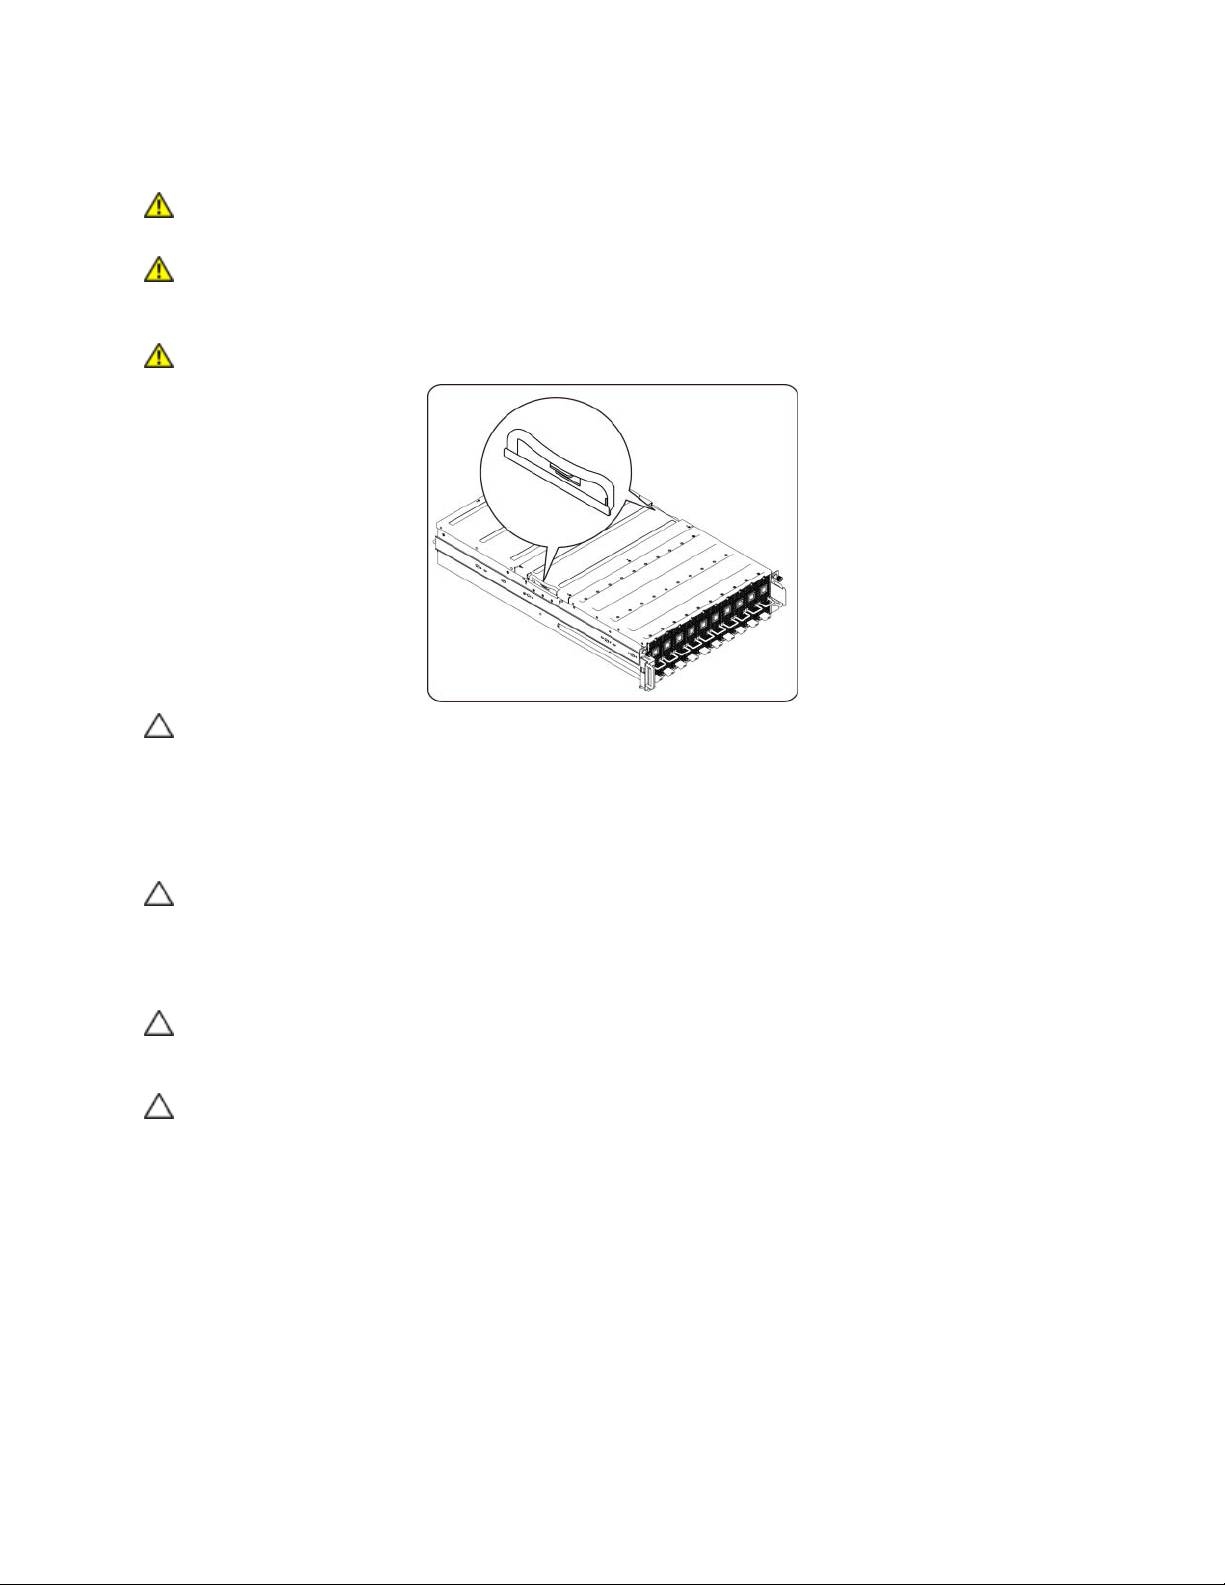
WARNING: Whenever you need to lift the system, use the handles as shown in the illustration.
CAUTION: Before installing systems in a rack, install front and side stabilizers on stand-alone
(single) racks or the front stabilizers on racks joined with other racks.
Failure to install stabilizers properly before installing systems in a rack could cause the rack
to tip over, potentially resulting in bodily injury under certain circumstances. Therefore,
always install the stabilizers before installing components in the rack.
CAUTION: Many repairs may only be done by a certified service technician. You should only
perform troubleshooting and simple repairs as authorized in your product documentations.
Damage due to servicing that is not authorized by Dell is not covered by your warranty. Read
and follow the safety instructions that came with the product.
CAUTION: After installing system/components in a rack, never pull more than one component
out of the rack on its slide assemblies at one time. The weight of more than one extended
component could cause the rack to tip over and may result in serious injury.
CAUTION: Due to the height and weight of the rack, a minimum of two people should
accomplish this task.
4
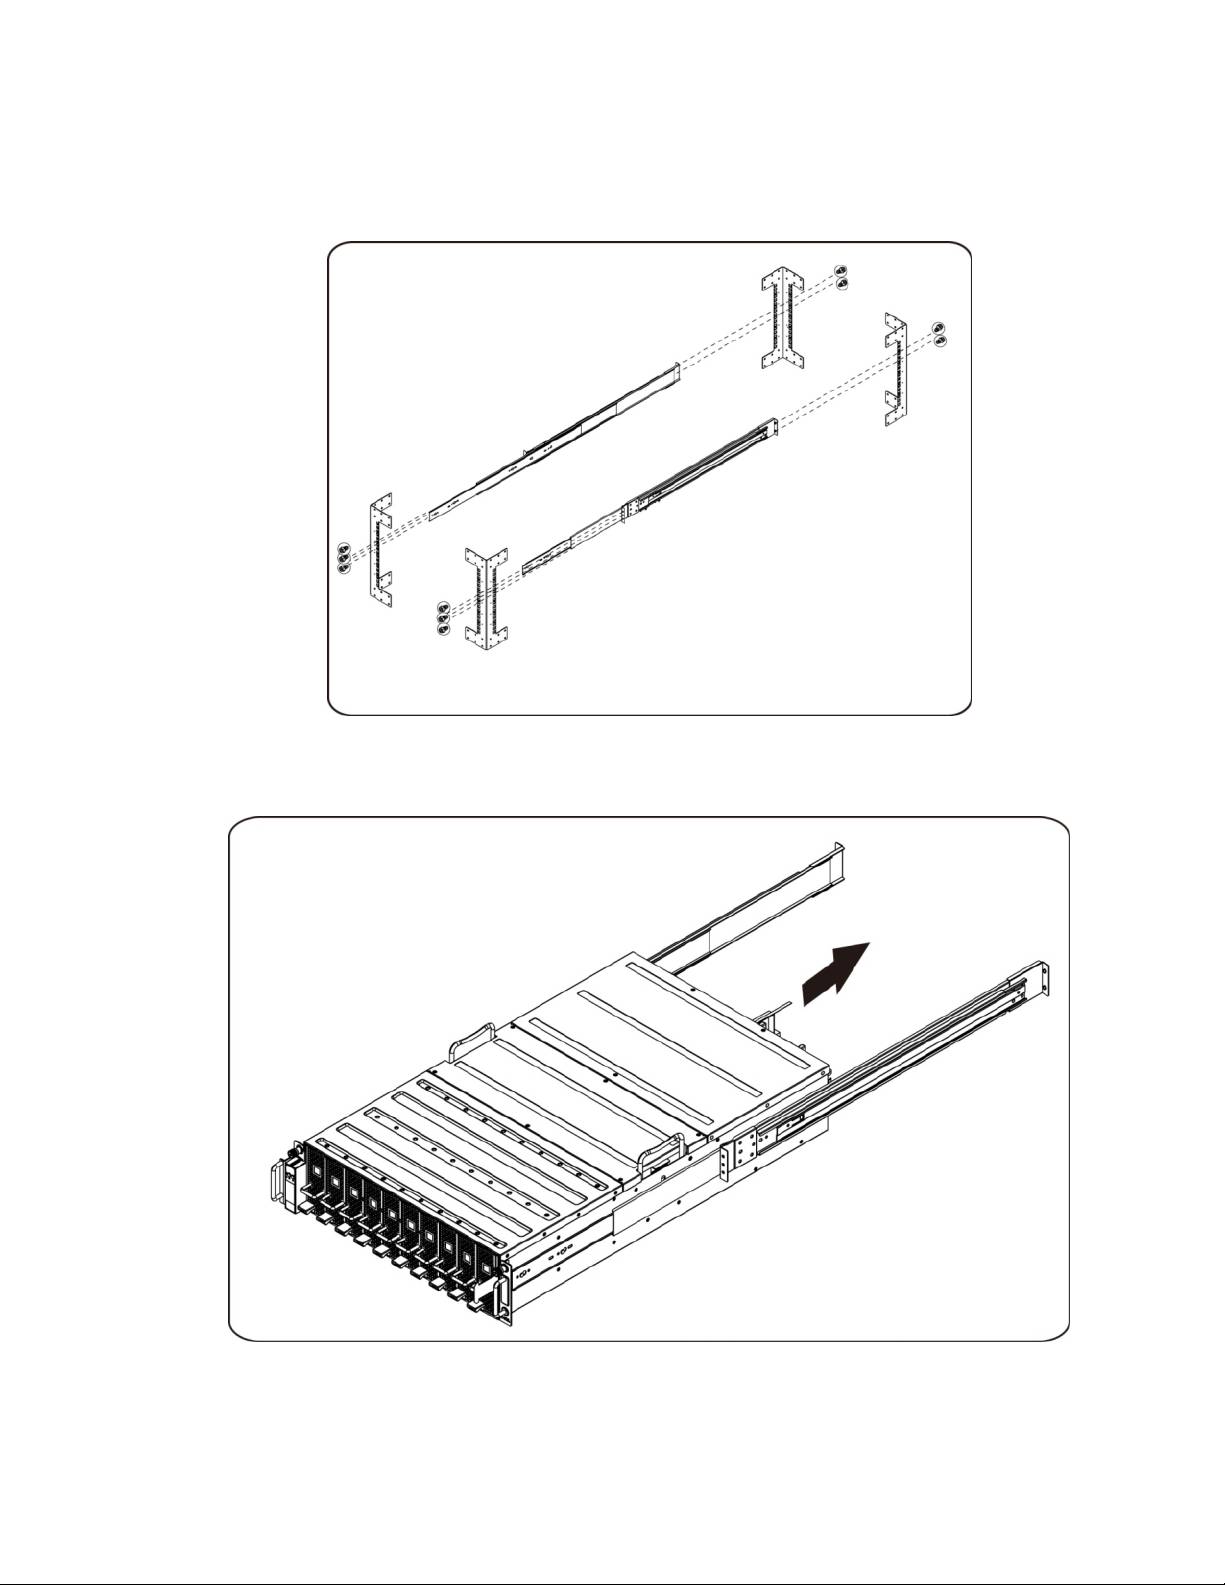
Follow these instructions to install the rails into a rack:
1. Install the sliding rails into the rack.
2. Align the inner rails with the sliding rails of the rack.
3. Push the system into the sliding rails until the locking latch clicks into place.
5

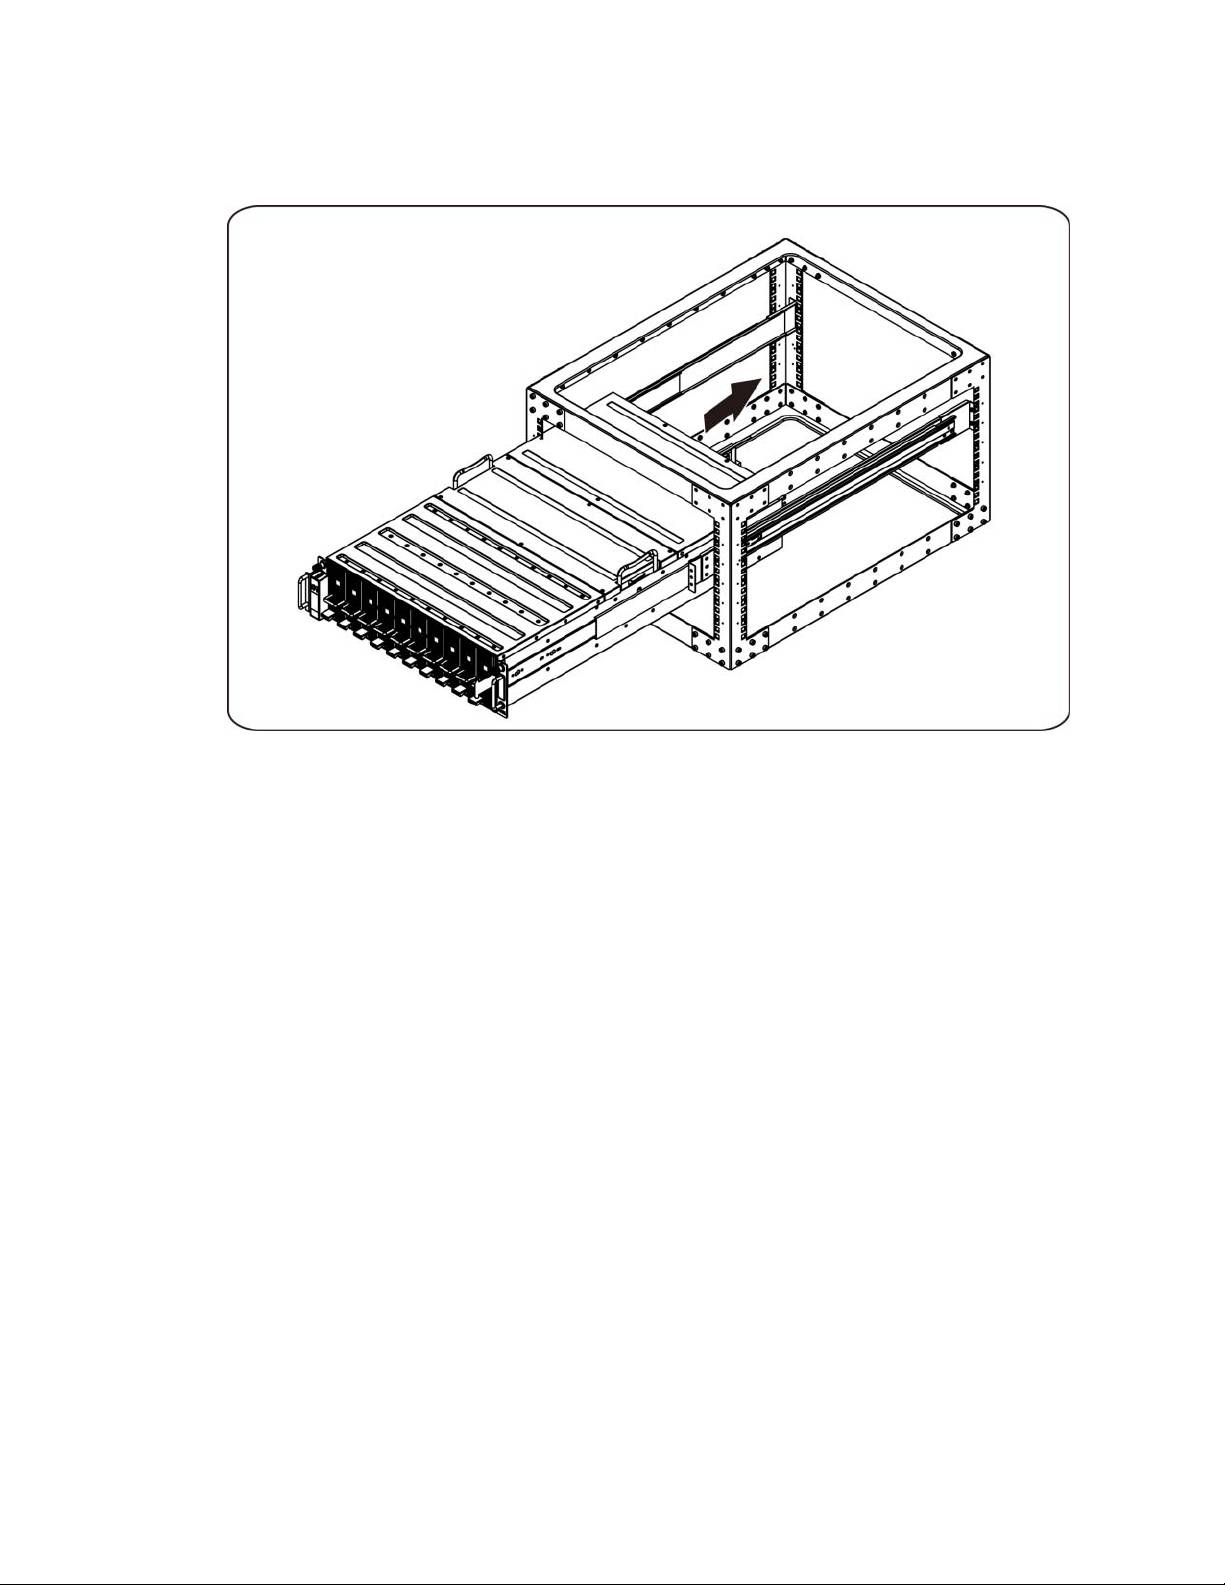
4. Install the system into the rack.
6
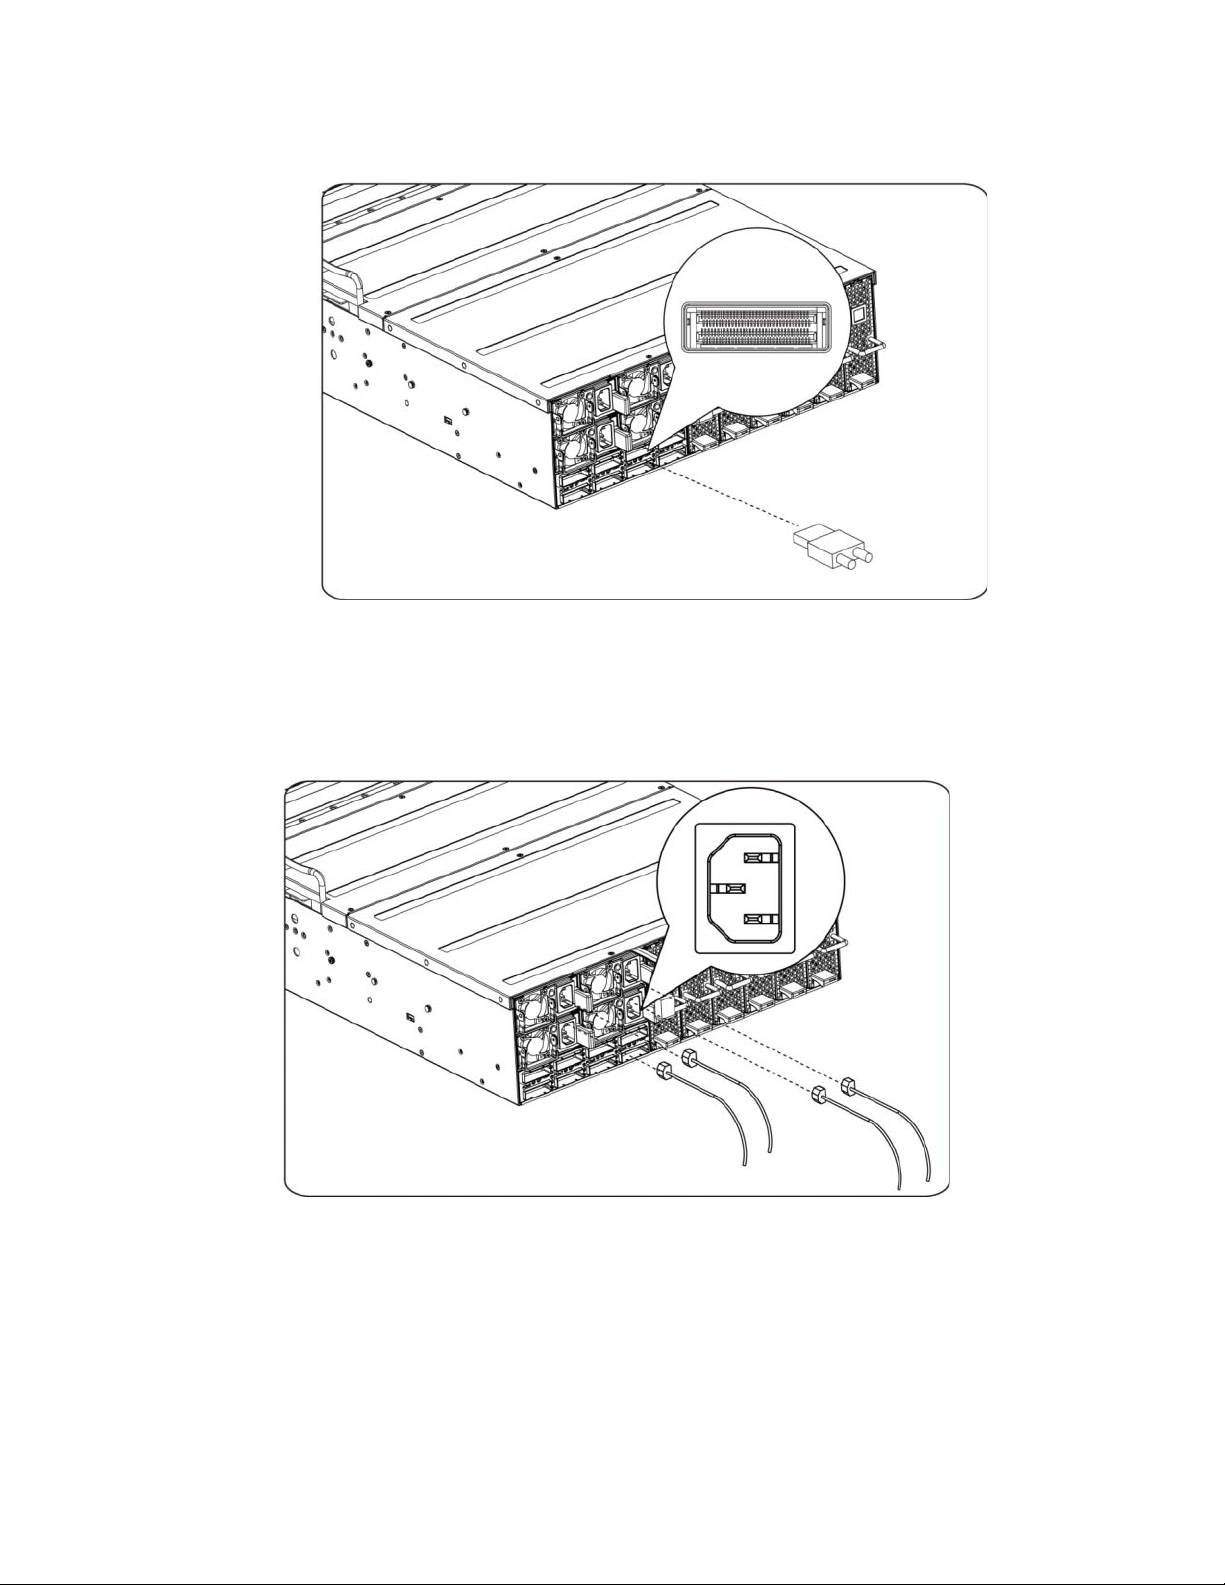
Connecting iPass Cables
Connecting Power Cables
Connect the system's power cable to the system. Plug the other end of the power cables into a
grounded electrical outlet or a separate power source such as an uninterrupted power supply or a
power distribution unit.
7
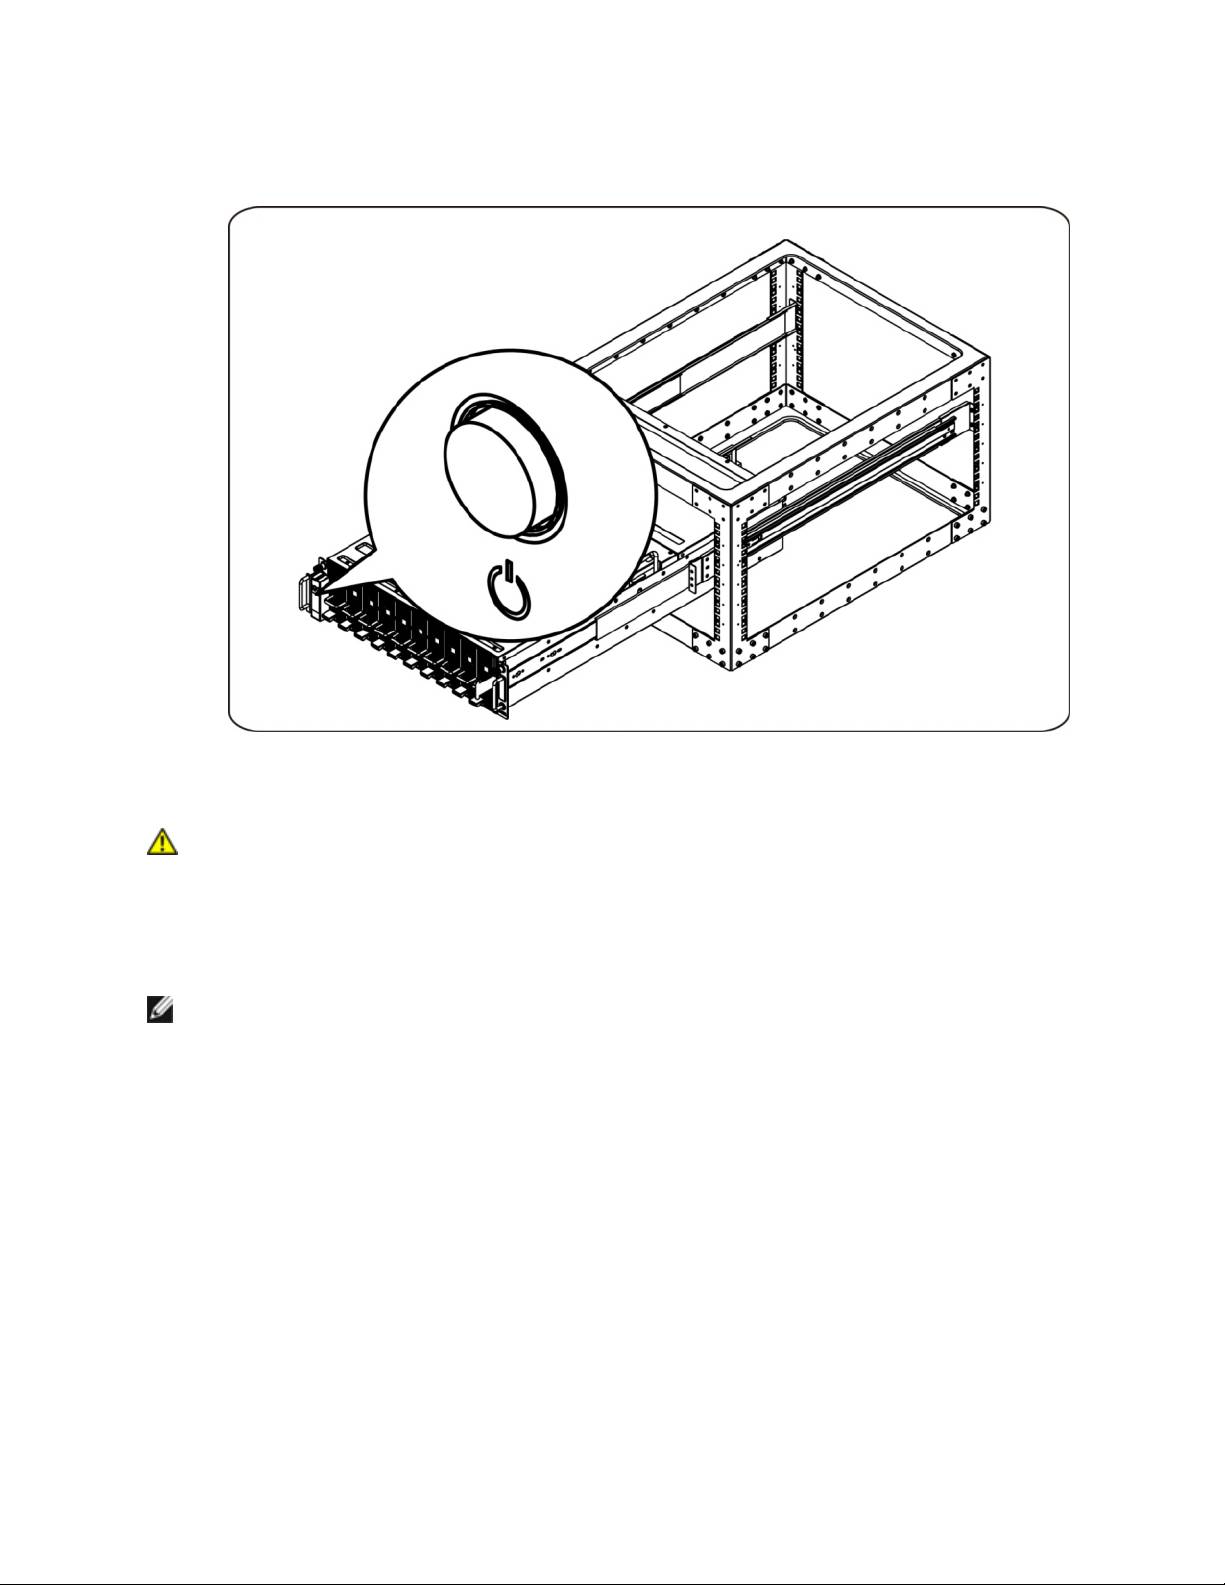
Turning On the System
Press the power button on the system. The power indicators should light.
Other Information You May Need
WARNING: See the safety and regulatory information that shipped with your system. Warranty
information may be included within this document or as a separate document.
The Hardware Owner's Manual provides information about system features and describes how to
troubleshoot the system and install or replace system components. This document is available online at
support.dell.com/manuals.
NOTE: Always check updates on support.dell.com/manuals and read the updates first because they
often supersede information in other documents.
Firmware Updates
When setting up the C410x for the first installation or when upgrading GPGPUs it is highly recommended
that the latest revision of the BMC firmware be used. The latest BMC firmware can be downloaded from
support.dell.com. The download package includes a document with instructions for flashing the BMC
firmware using the C410x WebUI. Additional information about the C410x WebUI and configuration
options is included in the Hardware Owner’s Manual. This document is available online at
support.dell.com/manuals.
8
NOM Information (Mexico Only)
The following information is provided on the device described in this document in compliance with the
requirements of the official Mexican standards (NOM):
Importer: Dell Inc. de México, S.A. de C.V
Paseo de la Reforma 2620-11° Piso
Col. Lomas Altas
11950 México, D.F.
Model Number: B02S
Supply voltage: 200-240 VCA
Frequency: 50/60 Hz
Current Consumption 9.6 A (for each power inlet)
Technical Specifications
System Specifications
1. Chassis
Form Factor
3U
L = 750mm
Size (LxWxH)
W = 440mm
H = 130.5mm
Total of 16 PCI Express individual modules per chassis.
Servicing one module does not affect other modules in the chassis.
PCI Card Access
(F/R/I)
Front of Chassis = 10 Modules
Back of Chassis = 6 Modules
Eight 92 mm x 38 mm
N+1 Redundancy
Fans
Hot Swappable Fans
BMC notification of system fan failure
Removal or insertion of PCI Module does not require any change in operation of the
Serviceability
chassis or other PCI Modules installed within the chassis.
LED Indicators
Power LED, System Status LED, ID LED, Fan LED
9
2. Front I/O Board
Power Button
Power button with LED
Service ID
Service ID button with LED
Button
- Power LED indicates current system power ON/OFF/Fail status.
LED
- Service ID LED indicates system in service.
Functionality
- System Status LED indicates current system status (for example, FAN fail).
Temperature
Indicates system ambient temperature for FAN speed control usage.
Sensor
3. FAN Module
FAN
Size: 92 mm x 38 mm
7+1 Redundancy
Hot Plug,
Redundant
Hot Swappable Fans
4. Power Supply
PSU Module
1400W * 4 PSUs
Input Voltage
200-240VAC
Type (AC/DC)
AC
Redundancy
N+1 redundancy required for total chassis load.
BTU Specifications
Specification Value
Power Supply Voltage Range
200V - 240Vac
Power Supply
Four
Power Supply BTU
14334.6 BTU/hr
Power Supply: Power (W)
4200
10
PCI Slots
16
Drives
16 GPGPU
Drives Type
NVIDIA GPGPU
Processor: Sockets
N/A
Processor Cores
N/A
Weight (kg) : Empty
30 kg (only chassis)
Weight (kg) : Typical
45 kg (L6 system)
Weight (kg) : Loaded
56 kg (full system)
Weight (Ibs) : Empty
66 lbs (only chassis)
Weight (Ibs) : Typical
99 lbs (L6 system)
Weight (Ibs) : Loaded
123 lbs (full system)
Environmental Specifications
Specification Value
Operating : 10°C to 35°C
Temperature range
Non-Operating : -40°C to -60°C
Operating : 20–80% RH
Humidity (non-condensing)
Non-Operating : 20–95% RH
11

12

Dell PowerEdge C410x
Začínáme
se systémem
Poznámky a upozornění
PŘEČTĚTE SI TENTO ODDÍL S DŮLEŽITÝMI BEZPEČNOSTNÍMI INFORMACEMI. USCHOVEJTE TUTO PŘÍRUČKU
PRO BUDOUCÍ POTŘEBY. TENTO ODDÍL SI PŘEČTĚTE PŘED JAKÝMKOLI SERVISNÍM ZÁSAHEM.
POZNÁMKA: POZNÁMKA označuje důležitou informaci, s jejíž pomocí lépe využijete svůj počítač.
UPOZORNĚNÍ: UPOZORNĚNÍ poukazuje na možnost poškození hardwaru nebo ztráty dat v případě
nedodržení pokynů.
VAROVÁNÍ: VAROVÁNÍ upozorňuje na potenciální nebezpečí poškození majetku, úrazu nebo smrti.
Informace v této publikaci se mohou bez předchozího upozornění změnit.
© 2010–2012 Dell Inc. Všechna práva vyhrazena.
Jakákoliv reprodukce těchto materiálů bez písemného povolení společnosti Dell Inc. je přísně zakázána.
Ochranné známky použité v tomto textu: Dell™, logo DELL a PowerEdge™ jsou ochranné známky společnosti
Dell Inc.
V této publikaci mohou být použity další ochranné známky a obchodní názvy s odkazem na společnosti vlastnící
tyto známky a názvy nebo na jejich produkty. Společnost Dell Inc. nemá vlastnické zájmy vůči ochranným
známkám a obchodním názvům jiným než svým vlastním.
Regulatorní model B02S
Březen 2012 Č. dílu 4W4XK Rev. A01
UPOZORNĚNÍ: V zájmu ochrany před potenciálním úrazem elektrickým proudem by měli
servis tohoto systému provádět pouze kvalifikovaní servisní pracovníci.
Umístění s omezeným přístupem
Systém Dell PowerEdge C410X je určen k instalaci pouze na místa s omezeným přístupem, jak jsou definována
v čl. 1.2.7.3 normy IEC 60950-1: 2001.
1.2.7.3 UMÍSTĚNÍ S OMEZENÝM PŘÍSTUPEM: Umístění zařízení, pro které platí oba následující odstavce:
Přístup mohou získat pouze SERVISNÍ PRACOVNÍCI nebo UŽIVATELÉ, kteří byli poučeni o důvodech
omezení platných pro umístění a o veškerých bezpečnostních opatřeních, jež je nutné dodržovat.
Přístup je poskytován za použití NÁSTROJE nebo zámku a klíče nebo je jinak zabezpečen a je řízen
představitelem zodpovědným za toto umístění.
UPOZORNĚNÍ: Chcete-li zabránit přetížení zdrojů napájení systému a zajistit optimální výkon a
stabilitu systému, je třeba vždy dodržovat následující tabulku podporovaných konfigurací
zdrojů napájení a grafických procesorů.
Minimální počet zdrojů napájení Maximální počet grafických procesorů
1 4
2 8
3 16
Čtvrtý zdroj napájení je záložní.
Instalace a konfigurace
VAROVÁNÍ: Před provedením následujícího postupu si pročtěte bezpečnostní pokyny, které
byly dodány se systémem.
Rozbalení systému
Rozbalte systém a zkontrolujte, zda byly dodány následující položky.
Jedno šasi systému Dell PowerEdge C410X
Příručka Začínáme se systémem Dell PowerEdge C410x
Informace o bezpečnosti, prostředí a předpisech (SERI)
Informace o záruce a podpoře (WSI) nebo Licenční smlouva s koncovým uživatelem (EULA)
Pokud některé položky chybí nebo jsou poškozeny, kontaktujte společnost Dell.
15
Instalace kolejniček a systému do stojanu
VAROVÁNÍ: Při každém zvedání systému požádejte o asistenci. Systém nezvedejte sami,
vyvarujete se tak možného zranění.
VAROVÁNÍ: Systém není připevněn ke stojanu ani ke kolejničkám. Chcete-li předejít možnosti
zranění osob nebo poškození systému, je třeba systém během instalace do stojanu a vyjímání
ze stojanu dostatečně stabilizovat.
VAROVÁNÍ: Při každém zvedání systému použijte rukojeti, jak je znázorněno na obrázku.
UPOZORNĚNÍ: Před instalací systémů do stojanu nainstalujte přední a boční stabilizátory
(na samostatně stojících stojanech) nebo přední stabilizátor (na vzájemně spojených
stojanech).
Pokud před instalací systémů nenainstalujete do stojanu stabilizátory, může dojít k převrhnutí
stojanu, což může za určitých okolností vést k tělesnému úrazu. Proto před instalací
komponent do stojanu vždy instalujte stabilizátory.
UPOZORNĚNÍ: Mnohé opravy může provádět pouze certifikovaný servisní technik. Sami byste
měli provádět pouze odstraňování problémů a jednoduché opravy, ke kterým vás opravňuje
dokumentace k produktu. Na škody způsobené servisem, který nebyl autorizován společností
Dell, se nevztahuje záruka. Přečtěte si bezpečnostní pokyny dodané se systémem a řiďte se
jimi.
UPOZORNĚNÍ: Po instalaci systému nebo komponent do stojanu nikdy nevysouvejte ze
stojanu současně více než jednu komponentu. Hmotnost více než jedné vysunuté komponenty
by mohla způsobit převrácení stojanu a eventuálně i vážný úraz.
UPOZORNĚNÍ: Vzhledem k výšce a hmotnosti stojanu by se této úlohy měly ujmout nejméně
dvě osoby.
16

Nainstalujte kolejničky do stojanu podle těchto pokynů:
1. Nainstalujte výsuvné kolejničky do stojanu.
2. Zarovnejte vnitřní kolejničky s výsuvnými kolejničkami ve stojanu.
3. Zatlačte systém do výsuvných kolejniček, dokud nezaklapne zamykací západka.
17
4. Nainstalujte systém do stojanu.
18
