Dell PowerEdge RAID Controller H800: instruction
Class: Computer Hardware
Type:
Manual for Dell PowerEdge RAID Controller H800
Table of contents
- Deploying the Dell™ PERC Adapter Removing the PERC Adapter Installing the PERC Adapter
- Figure 1-1. Removing and Installing the PERC Adapter Replacing the BBU on a PERC 5/i, PERC 6/i, PERC H700, or PERC H800
- Replacing the TBBU on a PERC 5/E, PERC 6/E, PERC H700, or PERC H800 Figure 1-2. Removing and Installing the Battery and Battery Cable on the DIMM
- Managing Preserved Cache
Deploying the Dell™ PERC Adapter
CAUTION: Many repairs may only be done by a certified service technician.
You should only perform troubleshooting and simple repairs as authorized in
your product documentation, or as directed by the online or telephone service and
support team. Damage due to servicing that is not authorized by Dell is not covered
by your warranty. Read and follow the safety instructions that came with the system.
NOTE: For information on removing and reinstalling system parts, see the system's
Hardware Owner's Manual at support.dell.com/manuals.
NOTE: For more information on your storage controller and a detailed set of
instructions, see the relevant storage controller documentation at
support.dell.com/manuals.
This document provides a set of high level installation and removal instructions
for your Dell PowerEdge™ RAID Controllers (PERC) and battery.
Removing the PERC Adapter
1
Ensure that there is no preserved cache on the PERC adapter. See "Managing
Preserved Cache" on page 4.
2
Perform a controlled shutdown of the system and attached peripherals.
3
Disconnect the system from the electrical outlet and remove the system cover.
4
Remove the storage controller from the system's PCI-E slot. See Figure 1-1.
Installing the PERC Adapter
1
Perform a controlled shutdown of the system and attached peripherals.
2
Disconnect the system from the electrical outlet and remove the system cover.
3
Install the storage controller in the appropriate PCI-E slot and connect all
the cables to the storage controller. See Figure 1-1.
4
Replace the system cover.
5
Reconnect the system to its electrical outlet and turn the system on,
including any attached peripherals.
February 2010

Figure 1-1. Removing and Installing the PERC Adapter
3
2
1
4
1 PCI-E slot 2 PERC adapter
3 DIMM 4 tabs (2)
Replacing the BBU on a PERC 5/i, PERC 6/i, PERC H700, or PERC H800
1
Ensure that there is no preserved cache on the PERC adapter. See "Managing
Preserved Cache" on page 4.
2
Perform a controlled shutdown of the system and attached peripherals.
3
Disconnect the system from the electrical outlet and remove the system cover.
4
Remove the Battery Backup Unit (BBU) from the plastic mounting shroud
in your system and disconnect the battery cable.
5
Re-connect the BBU to the controller by inserting the end of the battery cable
into the connector on the controller.
Replacing the TBBU on a PERC 5/E, PERC 6/E, PERC H700, or PERC H800
NOTE: The Transportable Battery Backup Unit (TBBU) on the storage controller
consists of a DIMM and a BBU.
1
Ensure that there is no preserved cache on the PERC adapter. See "Managing
Preserved Cache" on page 4.
2
Perform a controlled shutdown of the system and attached peripherals.
3
Disconnect the system from the electrical outlet and remove the system cover.
4
Remove the storage controller from the system. Press down on the tabs at each
edge of the DIMM slot and lift the TBBU assembly off the storage controller.
See Figure 1-1.
5
Disconnect the battery cable from both ends and press out on the battery clips
rotating the battery out of the DIMM. See Figure 1-2.
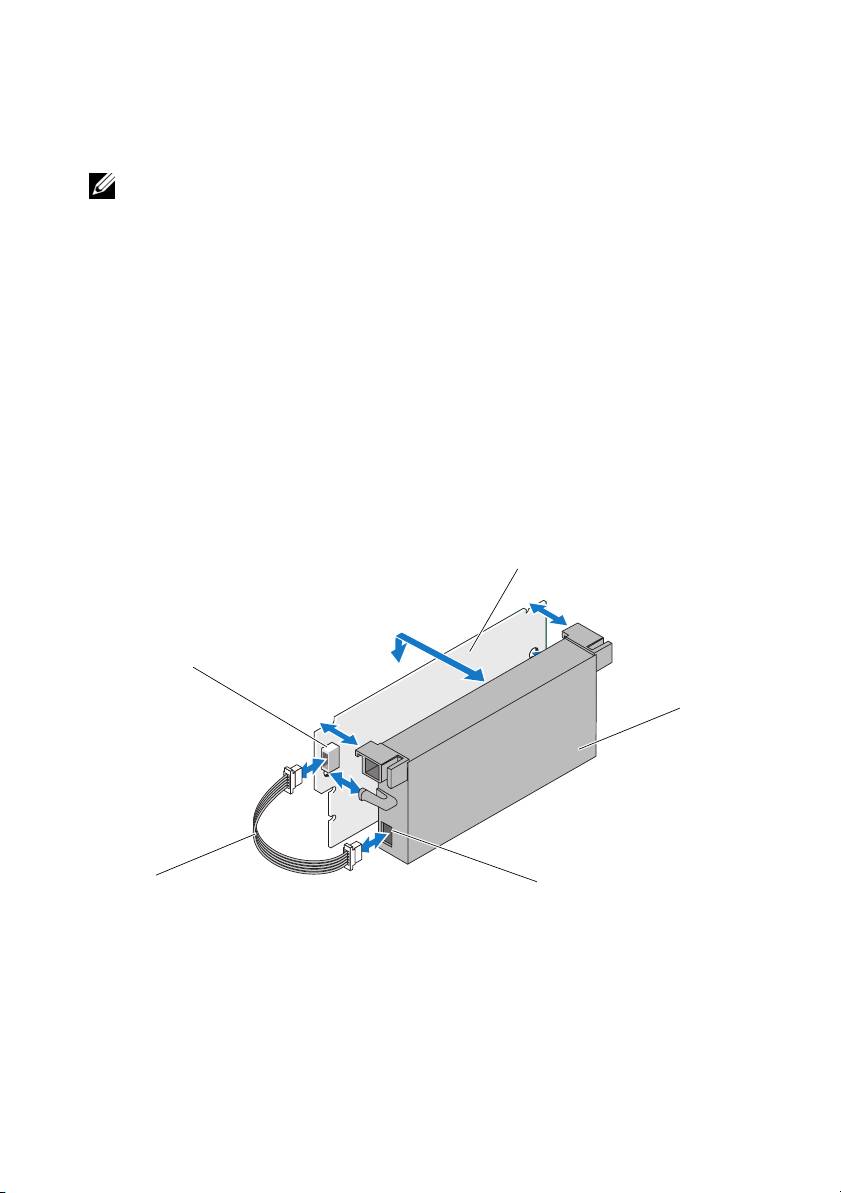
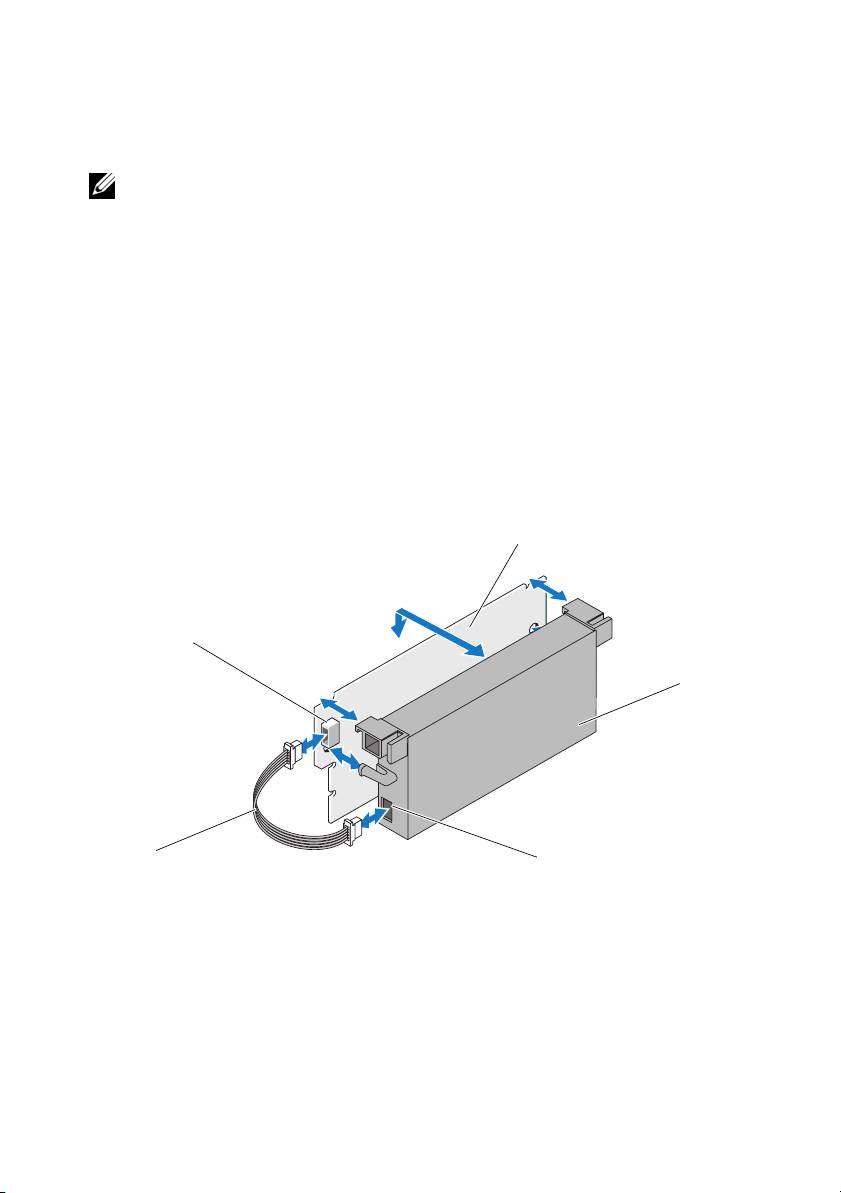
Figure 1-2. Removing and Installing the Battery and Battery Cable on the DIMM
3
2
4
1
5
1 battery cable 2 connector on the DIMM 3 DIMM
4 battery 5 connector on the battery
6
Unpack the new TBBU and follow all antistatic procedures.
7
Insert one end of the battery cable into the connector on the DIMM and the
other end into the connector on the new battery.
8
Place the top edge of the battery over the top edge of the DIMM so that the
arms on the side of the battery fit into their sockets on the DIMM.
See Figure 1-2.
9
Align the keyed edge of the DIMM to the physical divider on the memory
socket to avoid damage to the module.
10
Insert the DIMM in the memory socket. Apply a constant, downward pressure
on both ends or on the middle of the DIMM until the retention clips fall in
the allotted slots on either side of the DIMM. See Figure 1-2.
Managing Preserved Cache
If a virtual disk becomes offline or is deleted because of missing physical disks,
the controller preserves the dirty cache from the virtual disk. The preserved dirty
cache, known as pinned cache, is preserved until you import the virtual disk or
discard the cache.
CAUTION: If there are any foreign configurations, it is strongly advised that you
import the foreign configuration before you discard the preserved cache. Otherwise,
you lose data that belongs to the foreign configuration.
1
Turn on the system.
2
Press <Ctrl>< R> when prompted by the BIOS screen.
If there is only one controller, the
Virtual Disk Management
screen for that
controller is displayed. If there is more than one controller, the
Main Menu
is
displayed. The
Main Menu
lists the RAID controllers. Use the arrow keys to
select the RAID controller, and press <Enter> to access the management
menus for the controller.
3
On the
Virtual Disk Management
screen, use the arrow keys to highlight the
Controller
field. Press <F2> to display the menu and select
Manage
Preserved Cache
. The
Manage Preserved Cache
screen displays the affected
virtual disks.
NOTE: If there is no preserved cache, the Manage Preserved Cache option is
disabled and no further action is required. Exit the configuration utility.
4
You can choose to discard the cache on the
Manage Preserved Cache
screen.
For more information about importing and preserving the cache contents, see the
Dell PowerEdge RAID Controller (PERC) H700 and H800 documentation at
support.dell.com/manuals.

____________________
Information in this document is subject to change without notice.
© 2010 Dell Inc. All rights reserved. Printed in the U.S.A.
Reproduction of these materials in any manner whatsoever without the written permission of Dell Inc.
is strictly forbidden.
Trademarks used in this text: Dell, the DELL logo, and PowerEdge are trademarks of Dell Inc.
Other trademarks and trade names may be used in this document to refer to either the entities claiming the
marks and names or their products. Dell Inc. disclaims any proprietary interest in trademarks and trade
names other than its own.


部署 Dell™ PERC 适配器
警告 : 多数维修只能由经认证的维修技术人员进行。您只能根据产品说明文件
中的授权,或者在联机或电话服务和支持小组的指导下,进行故障排除和简单
的维修。未经 Dell 授权的维修所造成的损坏不在保修范围之内。请阅读并遵循
系统附带的安全说明。
注 : 有关卸除和重新安装系统部件的信息,请参阅系统的 Hardware Owner's
Manual (硬件用户手册),它位于 support.dell.com/manuals。
注 : 有关存储控制器的更多信息和详细的指令集,请参阅在
support.dell.com/manuals 上的相关存储控制器的说明文件。
此说明文件提供一组用于 Dell PowerEdge™ RAID Controllers (PERC) 和电池
的高级安装和卸除指令
。
卸下 PERC 适配器
1
请确保在
PERC
适配器上没有保留的高速缓存。请参阅第
4
页上的 “管理
保留的高速缓存”。
2
执行系统和连接的外围设备的控制性关闭。
3
断开系统与电源插座的连接并卸下系统护盖。
4
从系统的
PCI-E
插槽卸除存储控制器。请参阅图
1-1
。
安装 PERC 适配器
1
执行系统和连接的外围设备的控制性关闭。
2
断开系统与电源插座的连接并卸下系统护盖。
3
在相应的
PCI-E
插槽安装存储控制器并将所有电缆连接至存储控制器。请
参阅图
1-1
。
4
装回系统护盖。
5
将系统重新连接至电源插座,并打开系统 (包括所有连接的外围设备)。
2010 年 2 月

图 1-1. 卸除和安装 PERC 适配器
3
2
1
4
1
PCI-E 插槽
2
PERC 适配器
3 DIMM 4
卡舌 (2 个)
装回在 PERC 5/i、 PERC 6/i、 PERC H700 或 PERC H800 上的 BBU
1
请确保在
PERC
适配器上没有保留的高速缓存。请参阅第
4
页上的 “管理
保留的高速缓存”。
2
执行系统和连接的外围设备的控制性关闭。
3
断开系统与电源插座的连接并卸下系统护盖。
4
从系统的塑料安装护盖卸除电池备份单元
(BBU)
并断开电池电缆。
5
通过将电池电缆的一端插入到控制器上的连接器重新将
BBU
连接至控制器。
装回 PERC 5/E、 PERC 6/E 、 PERC H700 或 PERC H800 上的 TBBU
注 : 存储控制器上的 Transportable Battery Backup Unit (TBBU 便携式电池备份单
元 ) 包括 DIMM 和 BBU。
1
请确保在
PERC
适配器上没有保留的高速缓存。请参阅第
4
页上的 “管理
保留的高速缓存”。
2
执行系统和连接的外围设备的控制性关闭。
3
断开系统与电源插座的连接并卸下系统护盖。
4
从系统卸除存储控制器。按下在
DIMM
插槽上每边的卡舌将
TBBU
部件
从存储控制器提出。请参阅图
1-1
。
5
将电池电缆两端都断开连接并按电池夹子将电池从
DIMM
旋转取出。请
参阅图
1-2
。
图 1-2. 在 DIMM 上卸除和安装电池和电池电缆
3
2
4
1
5
1
电池电缆
2
DIMM 上的连接器
3 DIMM
4
电池
5
电池上的连接器
6
打开
TBBU
包装,并遵循所有的防静电步骤。
7
将电池电缆的一端插入
DIMM
上的连接器,将另一端插入新电池上的连
接器。

8
将电池的顶部边缘放在
DIMM
的顶部边缘之上,以便电池一侧的支臂可
装入
DIMM
上的插槽中。请参阅图
1-2
。
9
将
DIMM
的键槽边缘与内存插槽上的物理隔板对齐,以避免损坏模块。
10
将
DIMM
插入内存插槽中。在
DIMM
两侧或中间均匀地向下施加压力,
直至固定夹插入
DIMM
任一侧上分配的插槽中。请参阅图
1-2
。
管理保留的高速缓存
如果虚拟磁盘脱机或由于物理磁盘丢失被删除,则控制器会保留虚拟磁盘的
已占用高速缓存。保留的已占用高速缓存也称为已驻留高速缓存,它会一直
保留到您导入虚拟磁盘或放弃高速缓存为止。
警告 : 如果存在任何外部配置,强烈建议您在放弃保留高速缓存之前导入外部
配置。否则,可能会丢失属于外部配置的数据。
1
打开系统电源。
2
请在出现
BIOS
屏幕提示时按
<Ctrl><R>
组合键。
如果仅有一个控制器,则显示该控制器的
Virtual Disk Management
(虚
拟磁盘管理)屏幕。如果有多台控制器,则会显示主菜单。该主菜单列出
RAID
控制器。使用箭头键选择
RAID
控制器,然后按
<Enter>
键访问控
制器的管理菜单。
3
在
Virtual Disk Management
(虚拟磁盘管理)屏幕,使用箭头键高亮度
显示控制器字段。按
<F2>
键显示该菜单并选择
Manage Preserved Cache
(管理保留的高速缓存)。
Manage Preserved Cache
(管理保留的高速缓
存)屏幕显示受影响的虚拟磁盘。
注 : 如果没有保留的高速缓存,Manage Preserved Cache(管理保留的高速
缓存)选项被禁用并且无需进一步操作。退出配置公用程序。
4
您可以在
Manage Preserved Cache
(管理保留的高速缓存)屏幕上选择放
弃高速缓存。
有关导入和保留高速缓存内容的更多信息,请参阅 support.dell.com/manuals
上的 Dell PowerEdge RAID Controller (PERC) H700 和 H800 说明文件。

____________________
本说明文件中的信息如有更改,恕不另行通知。
© 2010 Dell Inc. 版权所有,翻印必究。美国印制。
未经 Dell Inc. 书面许可,严禁以任何形式复制这些材料。
本文中使用的商标:Dell、 DELL 徽标和 PowerEdge 是 Dell Inc. 的注册商标。
本说明文件中述及的其它商标和产品名称是指拥有相应商标和产品名称的公司或其制造的产品。
Dell Inc. 对其它公司的商标和产品名称不拥有任何所有权。


部署 Dell™ PERC 控制器
警示: 許多維修工作僅限由獲得認證的技術服務人員完成。僅限依照產品說明
文件中的授權,或在線上或電話服務和支援團隊的指導下,才能執行故障排除
和簡單的維修。未經 Dell 授權的維修若造成損壞,不在保固範圍之內。請閱讀
並遵循系統隨附的安全說明。
註: 如需卸下與重新安裝系統零件的資訊,請參閱 support.dell.com/manuals 上
的系統 Hardware Owner's Manual
( 硬體擁有者手冊 )。
註:
如需儲存控制器的更多相關資訊與詳細說明,請參閱
support.dell.com/manuals
上相關的儲存控制器說明文件。
本文件提供 Dell PowerEdge™ RAID 控制器 (PERC) 與電池的高階安裝與卸下
說明。
卸下 PERC 配接器
1
請確定
PERC
配接器上沒有保留的快取資料。請參閱第
4
頁的 「管理保留
的快取資料」。
2
將系統與連接的週邊裝置關機。
3
拔下電源插座上的系統纜線,然後卸下系統蓋。
4
從系統的
PCI-E
插槽卸下儲存控制器。請參閱圖
1-1
。
安裝 PERC 配接器
1
將系統與連接的週邊裝置關機。
2
拔下電源插座上的系統纜線,然後卸下系統蓋。
3
將儲存控制器安裝於合適的
PCI-E
插槽,並將所有纜線接上儲存控制器。
請參閱圖
1-1
。
4
裝回系統蓋。
5
將電腦重新接上電源插座,然後啟動電腦以及所有連接的周邊裝置。
2010 年 2 月
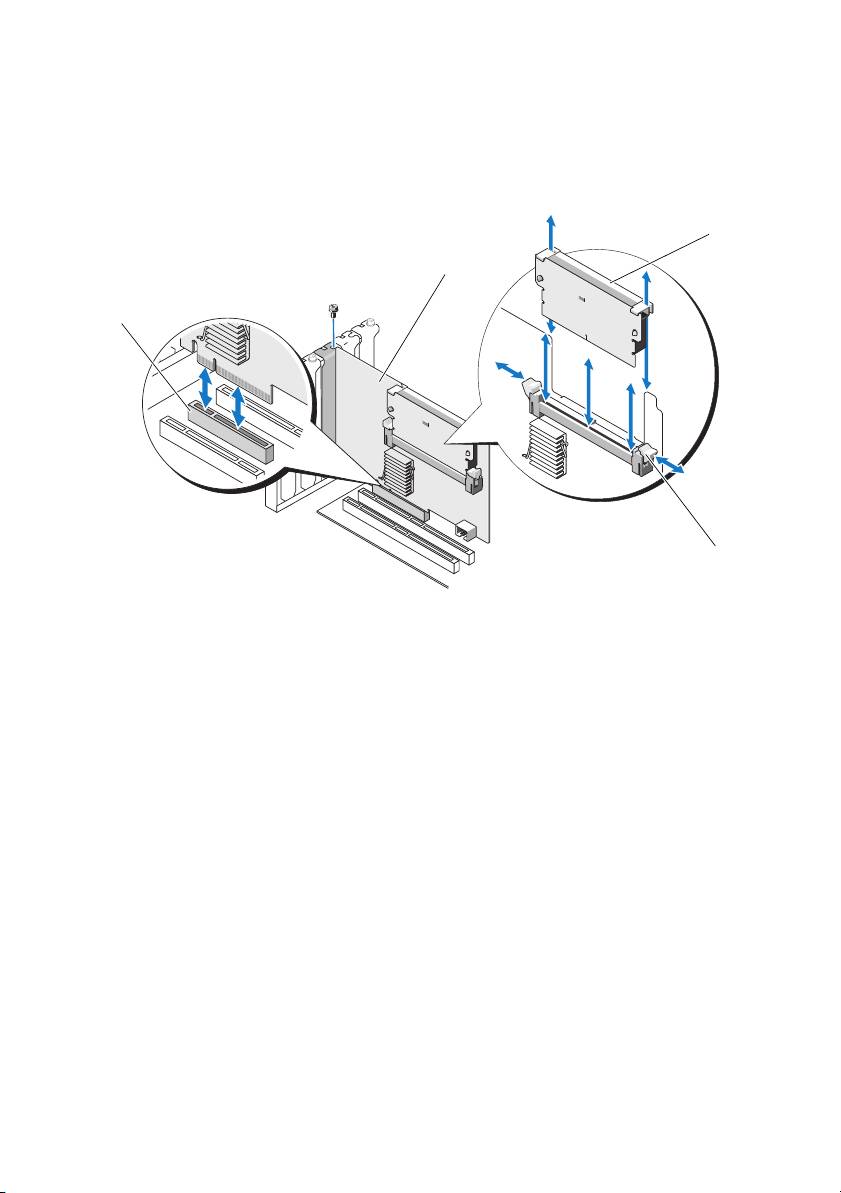
圖 1-1. 卸下與安裝 PERC 配接器
3
2
1
4
1
PCI-E 插槽
2
PERC 配接器
3 DIMM 4
彈片 (2 個 )
更換 PERC 5/i、PERC 6/i、PERC H700 或 PERC H800 上的 BBU
1
請確定
PERC
配接器上沒有保留的快取資料。請參閱第
4
頁的 「管理保留
的快取資料」。
2
將系統與連接的週邊裝置關機。
3
拔下電源插座上的系統纜線,然後卸下系統蓋。
4
請從系統中的塑膠安裝護罩卸下備援電池組
(BBU)
並拔下電池纜線。
5
將電池纜線的一端插入控制器上的連接器,重新將
BBU
連接至控制器。

更換 PERC 5/E、PERC 6/E、PERC H700 或 PERC H800 上的 TBBU
註: 儲存控制器上的可轉換備援電池組 (Transportable Battery Backup Unit,
TBBU) 包含 DIMM 與 BBU。
1
請確定
PERC
配接器上沒有保留的快取資料。請參閱第
4
頁的 「管理保留
的快取資料」。
2
將系統與連接的週邊裝置關機。
3
拔下電源插座上的系統纜線,然後卸下系統蓋。
4
從系統卸下儲存控制器。按下
DIMM
插槽每個邊緣的彈片,並從儲存控
制器掀起
TBBU
組件。請參閱圖
1-1
。
5
從兩端拔下電池纜線,並將電池固定片壓下,將電池自
DIMM
旋出。請
參閱圖
1-2
。
圖 1-2. 卸下並安裝 DIMM 上的電池與電池纜線
3
2
4
1
5
1
電池纜線
2
DIMM 上的連接器
3 DIMM
4
電池
5
電池上的連接器
6
打開新
TBBU
的包裝,依照所有的防靜電程序進行。
7
將電池纜線一端插入
DIMM
上的連接器,並將另一端插入新電池的連接器。
8
將電池的上緣置於
DIMM
的上緣,使電池的側桿卡入
DIMM
上的插座。
請參閱圖
1-2
。
9
將
DIMM
鍵緣與記憶體插槽上的實體分隔線對齊,以避免損壞模組。
10
將
DIMM
插入記憶體插槽。在
DIMM
兩端或中間施持續下壓,直至固定
夾裝入
DIMM
模組兩端所分配的插槽中。請參閱圖
1-2
。
管理保留的快取資料
如果虛擬磁碟因遺失實體磁碟而離線或被刪除,控制器會保留虛擬磁碟的變
更快取資料。此保留的變更快取資料稱為固定快取資料,會保留直至匯入虛
擬磁碟或捨棄快取資料為止。
警示: 如果有任何外來組態,強烈建議您在捨棄保留的快取資料之前匯入外來
組態。否則會遺失屬於外部組態的資料。
1
開啟系統。
2
啟動時,請在出現
BIOS
畫面提示時,按
<Ctrl><R>
。
如果只有一組控制器,會顯示此控制器的
Virtual Disk Management
(
虛擬
磁碟管理
)
畫面。如果不只一組控制器,將先顯示
Main Menu
(
主選單
)
畫面。
Main Menu
(
主選單
)
會列出
RAID
控制器。使用方向鍵選取要
RAID
控制器,再按
<Enter>
鍵存取該控制器的管理選單。
3
在
Virtual Disk Management
(
虛擬磁碟管理
)
畫面上,使用方向鍵將
Controller
(
控制器
)
欄位反白顯示。按下
<F2>
鍵顯示選單並且選取
Manage Preserved Cache
(
管理保留的快取資料
)
。
Manage Preserved
Cache
(
管理保留的快取資料
)
畫面顯示受影響的虛擬磁碟。
註: 如果沒有保留的快取資料,Manage Preserved Cache ( 管理保留的快取
資料 ) 選項會停用並且不需要進一步動作。離開組態公用程式。
4
您可以選擇捨棄
Manage Preserved Cache
(
管理保留的快取資料
)
螢幕上的
快取資料。
關於匯入與保留快取內容的更多資訊,請參閱位於
support.dell.com/manuals
上的 Dell PowerEdge RAID 控制器 (PERC) H700 與 H800 說明文件。

____________________
本文件中的資訊如有變更,恕不另行通知。
© 2010 Dell Inc. 版權所有,翻印必究。美國印製。
未經 Dell Inc. 的書面許可,嚴格禁止以任何形式複製這些材料。
本文中使用的商標:Dell、DELL 標誌和 PowerEdge 是 Dell Inc. 的商標。
本文件中述及的其他商標和商業名稱可能指擁有相應商標和名稱的公司實體或其產品。Dell Inc.
對本公司之外的商標和產品名稱不擁有任何所有權。

Déploiement de l'adaptateur PERC Dell™
PRÉCAUTION : la plupart des réparations ne peuvent être effectuées que par un
technicien de maintenance agréé. N'effectuez que les opérations de dépannage et les
petites réparations autorisées par la documentation de votre produit et suivez les
instructions fournies en ligne ou par téléphone par l'équipe de maintenance et
d'assistance technique. Tout dommage causé par une réparation non autorisée par
Dell est exclu de votre garantie. Lisez et respectez les consignes de sécurité fournies
avec le système.
REMARQUE : pour plus d'informations sur le retrait et la réinstallation d'éléments du
système, consultez le Manuel du propriétaire du matériel sur le site
support.dell.com/manuals.
REMARQUE : pour plus d'informations sur votre contrôleur de stockage et un
ensemble détaillé d'instructions, consultez la documentation pertinente sur le site
support.dell.com/manuals.
Ce document comprend un ensemble d'instructions de haut niveau relatives à
l'installation et au retrait de vos contrôleurs RAID Dell™ PowerEdge™ (PERC)
et de la batterie.
Retrait de l'adaptateur PERC
1
Assurez-vous de l'absence de tout cache préservé sur l'adaptateur PERC.
Voir
« Gestion du cache préservé » à la page 4.
2
Effectuez un arrêt contrôlé du système et des périphériques connectés.
3
Débranchez le système de la prise électrique et ouvrez le capot.
4
Retirez le contrôleur de stockage du logement PCI-E du système.
Voir
Figure 1-1.
Installation de l'adaptateur PERC
1
Effectuez un arrêt contrôlé du système et des périphériques connectés.
2
Débranchez le système de la prise électrique et ouvrez le capot.
3
Installer le contrôleur de stockage dans le logement PCI-E adéquat et
branchez tous les câbles au contrôleur de stockage. Voir
Figure 1-1.
4
Remettez le capot en place.
5
Rebranchez le système sur la prise secteur et allumez-le, ainsi que les
périphériques qui y sont connectés.
Février 2010

Figure 1-1. Retrait et installation de l'adaptateur PERC
3
2
1
4
1 logement PCI-E 2 adaptateur PERC
3 DIMM 4 pattes (2)
Réinstallation de la BBU sur un PERC 5/i, PERC 6/i ou PERC H700
1
Assurez-vous de l'absence de tout cache préservé sur l'adaptateur PERC.
Voir
« Gestion du cache préservé » à la page 4.
2
Effectuez un arrêt contrôlé du système et des périphériques connectés.
3
Débranchez le système de la prise électrique et ouvrez le capot.
4
Retirez l'unité de batterie de secours (BBU) du carénage à monture plastique
de votre système et débranchez le câble de batterie.
5
Rebranchez la BBU au contrôleur en insérant l'extrémité du câble de batterie
dans le connecteur situé sur le contrôleur.
