Sony KDL-26 L4000 – page 8
Manual for Sony KDL-26 L4000
Table of contents
13
GB
Wat
chi
ng T
V
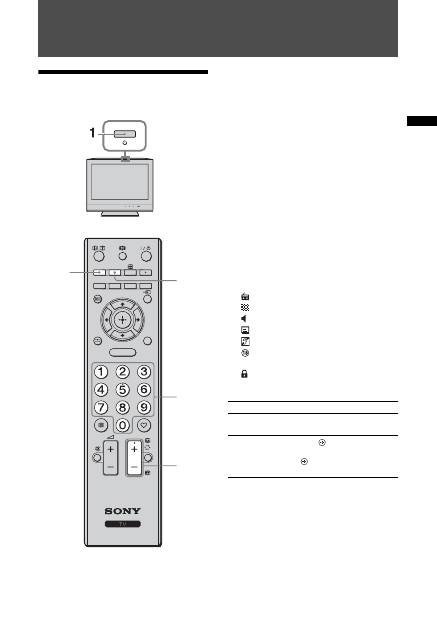
Watching TV Watching TV
1
Press
1
on the top edge of the TV to turn
on the TV.
When the TV is in standby mode (the
1
(standby) indicator on the TV front panel is red),
press
"/1
on the remote to turn on the TV.
2
Press DIGITAL to switch to digital mode,
or ANALOG to switch to analogue mode.
The channels available vary depending on the
mode.
3
Press the number buttons or PROG +/- to
select a TV channel.
To select channel numbers 10 and above using
the number buttons, press the second and third
digits in quick succession.
To select a digital channel using the Digital
Electronic Programme Guide (EPG), see
page 15.
In digital mode
An information banner appears briefly. The
following icons may be indicated on the banner.
Additional operations
RETURN
PROG
TOOLS
AUDIO
ANALOG
DIGITAL
GUIDE
MENU
3
2
2
3
: Radio service
: Scrambled/Subscription service
:
Multiple audio languages available
: Subtitles available
: Subtitles available for the hearing impaired
: Recommended minimum age for current
programme (from 4 to 18 years)
:
Parental Lock
To
Do this
Adjust the volume
Press
2
+ (increase)/
- (decrease).
Access the
Programme index
table (in analogue
mode only)
Press
. To select an analogue
channel, press
F
/
f
, then press
.
14
GB
To access Text
Press
/
. Each time you press
/
, the display
changes cyclically as follows:
Text
t
Text over the TV picture (mix mode)
t
No
Text (exit the Text service)
To select a page, press the number buttons or
/
.
To reveal hidden information, press
.
z
When four coloured items appear at the bottom of the Text
page, Fastext is available. Fastext allows you to access
pages quickly and easily. Press the corresponding coloured
button to access the page.
Picture Freeze
Freezes the TV picture (e.g. to make a note of a
telephone number or recipe).
1
Press
on the remote control.
2
Press
again to return to normal TV
mode.
z
Not available for
Component,
HDMI1,
HDMI2 and
PC input.
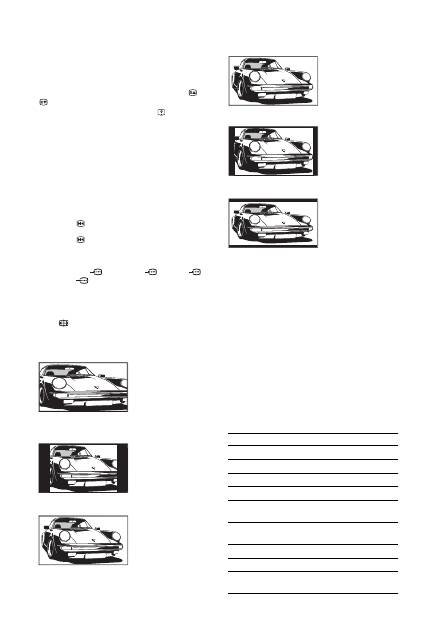
To change the screen format manually to
suit the broadcast
Press
repeatedly to select the desired screen
format.
* Parts of the top and bottom of the picture may be cut off.
~
• Depending on the signal, some screen formats may not
be selectable.
• Some characters and/or letters at the top and the bottom
of the picture may not be visible in “Smart”.
z
You can adjust the vertical position of the picture when
selecting “Smart”, “Zoom” or “14/9”. Press
F
/
f
to move
up or down (e.g. to read subtitles).
Using the Tools menu
Press TOOLS to display the following options when
viewing a TV programme.
Smart
*
Displays
conventional 4:3
broadcasts with an
imitation wide screen
effect. The 4:3 picture
is stretched to fill the
screen.
4/3
Displays
conventional 4:3
broadcasts (e.g. non-
wide screen TV) in
the correct
proportions.
Wide
Displays wide screen
(16:9) broadcasts in
the correct
proportions.
Zoom
*
Displays
cinemascopic (letter
box format)
broadcasts in the
correct proportions.
14/9
*
Displays 14:9
broadcasts in the
correct proportions.
As a result, black
border areas are
visible on the screen.
Subtitle
*
Displays
cinemascopic (letter
box format)
broadcasts with
subtitles on the
screen.
Auto
• “Screen Format” is set to “Auto”, automatically changes
the screen format to suit the broadcast signal.
• “Auto” is available for PAL and SECAM signals only.
Options
Description
Close
Closes the Tools menu.
Picture Mode
See page 21.
Sound Effect
See page 23.
Speaker
See page 23.
Audio Language (in
digital mode only)
See page 30.
Subtitle Setting (in
digital mode only)
See page 30.
Sleep Timer
See page 25.
Power Saving
See page 24.
System Information (in
digital mode only)
Displays the system
information screen.
15
GB
Wat
chi
ng T
V
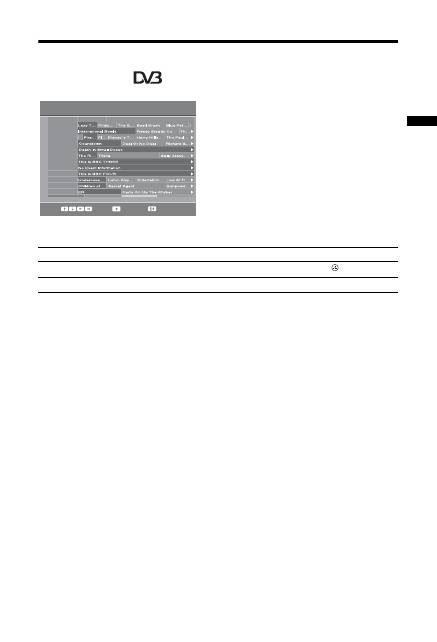
Checking the Digital Electronic Programme Guide (EPG) *
1
In digital mode, press GUIDE.
2
Perform the desired operation as shown
in the following table or displayed on the
screen.
~
Programme information will only be displayed if the TV
station is transmitting it.
* This function may not be available in some countries/regions.
~
If an age restriction for programmes has been selected, a message asking for a PIN code will appear on the screen. For details,
see “Parental Lock” on page 30.
Digital Electronic Programme Guide (EPG)
Select:
Tune:
Options:
Today
Previous
Next
+1 day
15:30 16:00
16:30
17:00
BBC ONE
BBC TWO
ITV 1
Channel 4
five
ITV 2
BBC THREE
Teletext
BBC FOUR
Sky Travel
UKTV History
More 4
001
002
003
004
005
006
007
009
010
011
012
013
Fri 3 Nov 15:39
To
Do this
Watch a programme
Press
F
/
f
/
G
/
g
to select the programme, then press
.
Turn off the EPG
Press GUIDE.
16
GB
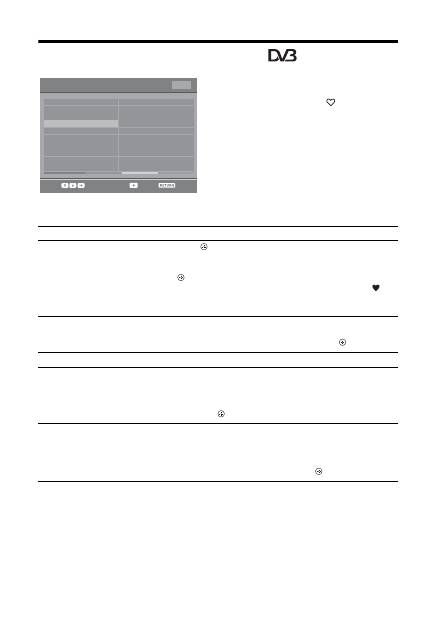
Using the Digital Favourite list *
The Favourite feature allows you to specify up to
four lists of your favourite programmes.
1
In digital mode, press
.
2
Perform the desired operation as shown
in the following table or displayed on the
screen.
* This function may not be available in some countries/regions.
Select:
Store favourite
Back:
Favourite Set-up
Enter programme number
---
Previous
Next
Favourites 2
001
002
003
004
005
006
007
008
009
010
TV3
33
3/24
K3/300
TVE1
TVE2
24H TVE
CLAN TVE
TELEDEPORTE
VEO
011
012
013
014
015
016
017
018
019
020
SETenVEO
Tienda en VEO
NET TV
CUATRO
CNN+
40 LATINO
la Sexta
Telecinco
T5 Estrellas
T5 Sport
Favourites 1
Digital Favourite list
To
Do this
Create your Favourite list for the first
time
1
Press
to select “Yes”.
2
Press the yellow button to select the Favourite list.
3
Press
F
/
f
to select the channel you want to add, then press
.
Channels that are stored in the Favourite list are indicated by a
symbol.
4
Press RETURN to finish setting up.
Watch a channel
1
Press the yellow button to navigate through your Favourite
lists.
2
Press
F
/
f
to select the channel, then press
.
Turn off the Favourite list
Press RETURN.
Add or remove channels in the
currently edited Favourite list
1
Press the blue button.
2
Press the yellow button to select the Favourite list you want to
edit.
3
Press
F
/
f
to select the channel you want to add or remove,
then press
.
Remove all channels from the current
Favourite list
1
Press the blue button.
2
Press the yellow button to select the Favourite list you want to
edit.
3
Press the blue button.
4
Press
G
/
g
to select “Yes”, then press
to confirm.
17
GB
Usi
ng Opt
io
nal
Equi
pment
Using Optional Equipment Connecting optional equipment
You can connect a wide range of optional equipment to your TV. Connecting cables are not supplied.
AV
3
PC IN
COMPONENT IN
1
AV1
AV2
2
Video game
equipment/
DVC
camcorder
Headphones
DVD player
with
component
output
DVD recorder
Decoder
VCR
Video game
equipment
DVD player
Decoder
PC
PC (HDMI output)
Blu-ray disc player
Digital video camera
DVD player
Hi-Fi audio
equipment
CAM card

18
GB
Viewing pictures from connected equipment
Turn on the connected equipment, then
perform one of the following operation.
For an auto-tuned VCR (page 7)
In analogue mode, press PROG +/-, or the number
buttons, to select the video channel.
For other connected equipment
Press
to display the connected equipment list.
Press
F
/
f
to select the desired input source, then
press
. (The highlighted item is selected if two
seconds pass without any operation after pressing
F
/
f
.)
Additional operations
Using the Tools menu
Press TOOLS to display the following options when
viewing pictures from connected equipment.
Symbol on the
screen
Description
AV1/
AV1/
AV1
To see the equipment connected to
A
.
AV2/
AV2/
AV2
To see the equipment connected to
B
.
Component
To see the equipment connected to
C
.
HDMI1
HDMI IN 1*.
To see the equipment connected to
D
.
HDMI2
HDMI IN 2*.
To see the equipment connected to
E
.
If the equipment has a DVI socket,
connect the DVI socket to the HDMI
IN 2 socket through a DVI-HDMI
adaptor interface (not supplied), and
connect the equipment’s audio out
sockets to the audio in sockets in the
HDMI IN 2 sockets.
*
~
• Be sure to use only an HDMI cable that bears the HDMI
logo.
• When HDMI control compatible equipment is
connected, communication with the connected
equipment is supported. Refer to page 19 to set up this
communication.
AV3
To see the equipment connected to
H
.
PC
To see the equipment connected to
G
.
z
It is recommended to use a PC
cable with ferrites like the
“Connector, D-sub 15” (ref. 1-793-
504-11, available in Sony Service
Centre), or equivalent.
To connect
Do this
Headphones
I
Connect to the
i
socket to listen to
sound from the TV on headphones.
Conditional
Access Module
(CAM)
J
To use Pay Per View services.
For details, refer to the instruction
manual supplied with your CAM. To
use the CAM, remove the “dummy”
card from the CAM slot. Turn off
the TV when inserting your CAM
into the CAM slot. When you do not
use the CAM, we recommend that
the “dummy” card be inserted and
kept in the CAM slot.
~
CAM is not supported in some
countries/regions. Check with your
authorized dealer.
Hi-Fi audio
equipment
F
Connect to the audio output sockets
to listen to the sound from the
TV on Hi-Fi audio equipment.
To
Do this
Return to normal
TV mode
Press DIGITAL or ANALOG.
Access the Digital
Favourites (in
digital mode only)
Press .
For details, see page 16.
Options
Description
Close
Closes the Tools menu.
Picture Mode (except
PC input mode)
See page 21.
Display Mode (in PC
input mode only)
See page 21.
Sound Effect
See page 23.
Speaker
See page 23.
Symbol on the
screen
Description

19
GB
Usi
ng Opt
io
nal
Equi
pment
Using control for HDMI
The control for HDMI function enables the TV to
communicate with the connected equipment that is
compatible with the function, using HDMI CEC
(Consumer Electronics Control). For example, by
connecting Sony equipment that is compatible with
control for HDMI (with HDMI cables), you can
control them together.
Be sure to connect the equipment correctly, and
make the necessary settings.
To make the control for HDMI settings
The control for HDMI settings must be set on both
the TV side and connected equipment side. See
“
HDMI Set-up” on page 27 for the TV side settings.
For settings on the connected equipment, refer to the
operating instructions for that equipment.
Control for HDMI functions
• Turns the connected equipment off interlocked
with the TV.
• Turns the TV on interlocked with the connected
equipment and automatically switches the input to
the equipment when the equipment starts to play.
Horizontal Shift (in
PC input mode only)
See page 24.
Vertical Shift (in PC
input mode only)
See page 24.
Sleep Timer (except
PC input mode)
See page 25.
Power Saving
See page 24.
Options
Description
20
GB
Using MENU Functions Navigating through menus
“MENU” allows you to enjoy various convenient
features of this TV. You can easily select channels or
inputs sources and change the settings for your TV.
1
Press MENU.
2
Press
F
/
f
to select an option, then press
.
To exit the menu, press MENU.
1
Digital Favourites
*
Displays the Favourite list (page 16).
2
Analogue
Returns to the last viewed analogue channel.
3
Digital
*
Returns to the last viewed digital channel.
4
Digital EPG
*
Displays the Digital Electronic Programme
Guide (EPG) (page 15).
5
External Inputs
Selects equipment connected to your TV.
• To watch the desired external input, select
the input source, then press
.
6
Settings
Displays the “Settings” menu where most of
the advanced settings and adjustments are
performed.
1
Press
F
/
f
to select a menu icon,
then press
.
2
Press
F
/
f
/
G
/
g
to select an option or
adjust a setting, then press
.
For details about settings, see page 21 to 30.
~
The options you can adjust vary depending on the
situation. Unavailable options are greyed out or
not displayed.
* This function may not be available in some
countries/regions.
RETURN
TOOLS
AUDIO
ANALOG
DIGITAL
GUIDE
MENU
2
1
Digital Favourites
Analogue
Digital
Digital EPG
External Inputs
Settings
Select:
Enter:
Exit:
MENU

21
GB
Usi
ng MENU
Func
ti
ons
Picture Adjustment menu
You can select the options listed below on the “Picture
Adjustment” menu. To select options in “Settings”, see
“Navigating through menus” (page 20).
Picture Mode
Display Mode
(only in PC
mode)
Selects the picture mode except for PC input source.
“Vivid”:
For enhanced picture contrast and sharpness.
“Standard”:
For standard picture. Recommended for home entertainment.
“Cinema”:
For viewing film-based content. Most suitable for viewing in a theatre-
like environment. This picture setting was developed in collaboration with Sony
Pictures Entertainment to faithfully reproduce movies as intended by their creators.
Selects the display mode for PC input source.
“Video”:
For video images.
“Text”:
For text, charts or tables.
Backlight
Adjusts the brightness of the backlight.
Contrast
Increases or decreases picture contrast.
Brightness
Brightens or darkens the picture.
Colour
Increases or decreases colour intensity.
Hue
Increases or decreases the green tones and red tones.
z
“Hue” can only be adjusted for an NTSC colour signal (e.g., U.S.A. video tapes).
Sharpness
Sharpens or softens the picture.
Colour Tone
Adjusts the whiteness of the picture.
“Cool”:
Gives the white colours a blue tint.
“Neutral”:
Gives the white colours a neutral tint.
“Warm”:
Gives the white colours a red tint.
z
“Warm” can not be selected when you set “Picture Mode” to “Vivid”.
Select:
Back:
Enter:
Exit:
Standard
5
Max
50
50
0
15
Warm
Medium
Medium
Picture Mode
Backlight
Contrast
Brightness
Colour
Hue
Sharpness
Colour Tone
Noise Reduction
MPEG Noise Reduction
Reset
Picture Adjustment
Continued

22
GB
~
“Brightness”, “Colour”, “Hue” and “Sharpness” are not available when “Picture Mode” is set to “Vivid” or when “Display
Mode” is set to “text”.
Noise Reduction
Reduces the picture noise (snowy picture) in a weak broadcast signal.
“High/Medium/Low”:
Modifies the effect of the noise reduction.
“Off”:
Turns off the “Noise Reduction” feature.
MPEG Noise
Reduction
Reduces the picture noise in MPEG-compressed video.
Reset
Resets all “Picture Adjustment” settings except “Picture Mode” and “Display Mode”
(only in PC mode) to the factory settings.

23
GB
Usi
ng MENU
Func
ti
ons
Sound Adjustment menu
~
“Sound Effect”, “Surround”, “Treble”, “Bass”, “Balance”, “Reset” and “Auto Volume” are not available when “Speaker” is
set to “Audio System”.
You can select the options listed below on the “Sound
Adjustment” menu. To select options in “Settings”, see
“Navigating through menus” (page 20).
Sound Effect
Selects the sound mode.
“Standard”:
Enhances clarity, detail, and sound presence.
“Dynamic”:
Intensifies clarity and sound presence for better intelligibility and
musical realism.
“Clear Voice”:
Makes voice sound clearer.
Surround
Selects the surround mode.
“Surround”:
For surround sound (for stereo programmes only).
“Simulated Stereo”:
Adds a surround-like effect to mono programs.
“Off”:
For normal stereo or mono reception.
Treble
Adjusts higher-pitched sounds.
Bass
Adjusts lower-pitched sounds.
Balance
Emphasizes left or right speaker balance.
Reset
Resets all the “Sound Adjustment” settings to the factory settings.
Dual Sound
Selects the sound from the speaker for a stereo or bilingual broadcast.
“Stereo”
,
“Mono”:
For a stereo broadcast.
“A”/“B”/“Mono”:
For a bilingual broadcast, select “A” for sound channel 1, “B”
for sound channel 2, or “Mono” for a mono channel, if available.
z
If you select other equipment connected to the TV, set “Dual Sound” to “Stereo”, “A” or “B”.
Auto Volume
Keeps a constant volume level even when volume level gaps occur (e.g., adverts tend
to be louder than programmes).
Speaker
Turns on/off the TV’s internal speakers.
“TV Speaker”:
The TV speakers are turned on in order to listen to the TV’s sound
through the TV speakers.
“Audio System”:
The TV speakers are turned off in order to listen to the TV’s sound
only through your external audio equipment connected to the audio output sockets.
Sound Effect
Surround
Treble
Bass
Balance
Reset
Dual Sound
Auto Volume
Speaker
Sound Effect
Surround
Treble
Bass
Balance
Reset
Dual Sound
Auto Volume
Speaker
Standard
Off
0
0
0
Mono
On
TV Speaker
Select:
Back:
Enter:
Exit:
Sound Adjustment
24
GB
Features menu
You can select the options listed below on the “Features”
menu. To select options in “Settings”, see “Navigating
through menus” (page 20).
Screen
Screen
(only in PC
mode)
Changes the screen format.
Screen Format
For details about the screen format, see page 14.
z
“Auto” is available for PAL and SECAM signals only.
“Normal”:
Displays the picture in its original size.
“Full”:
Enlarges the picture to fill the display area.
Power Saving
Selects the power saving mode to reduce the power consumption of the TV.
“Standard”:
Default settings.
“Reduce”:
Reduces the power consumption of the TV.
“Picture Off”:
Switches off the picture. You can listen to the sound with the picture
off.
RGB Centre
Adjusts the horizontal picture position so that the picture is in the middle of the
screen.
z
This option is only available if an RGB source has been connected to the Scarts connectors
/
/
AV1
or
/
/
AV2
on the rear of the TV.
PC Adjustment
Customizes the TV screen as a PC monitor.
z
This option is only available if a PC signal is received.
“Phase”:
Adjusts the screen when a part of a displayed text or image is not clear.
“Pitch”:
Enlarges or shrinkes the screen size horizontally.
“Horizontal Shift”:
Moves the screen to the left or to the right.
“Vertical Shift”:
Moves the screen up or down.
“Power Saving”:
When this is set to “On,” turns to standby mode if no PC signal is
received. To return to the TV, press
?
/
1
.
“Reset”:
Resets to the factory settings.
Screen
Power Saving
Timer
Standard
Select:
Back:
Enter:
Exit:
Features

25
GB
Usi
ng MENU
Func
ti
ons
Timer
Sets the timer to turn off the TV.
Sleep Timer
Sets a period of time after which the TV automatically switches itself into standby
mode.
When the “Sleep Timer” is activated, the
(Sleep Timer) indicator on the TV
front panel lights up in orange.
z
• When you turn off the TV and turn it on again, “Sleep Timer” is reset to “Off”.
• A notification message appears on the screen one minute before the TV switches to standby
mode.
26
GB
Set-up menu
You can select the options listed below on the “Set-up”
menu. To select options in “Settings”, see “Navigating
through menus” (page 20).
Auto Start-up
Starts the initial set-up to select the language, country/region and location, and tune
in all available digital and analogue channels. Usually, you do not need to do this
operation because the language and country/region will have been selected and
channels already tuned when the TV was first installed (page 7). However, this
option allows you to repeat the process (e.g., to retune the TV after moving house).
Language
Selects the language in which the menus are displayed.
Auto Tuning
(Only in
analogue mode)
Tunes in all the available analogue channels.
Usually you do not need to do this operation because the channels are already tuned
when the TV was first installed (page 7). However, this option allows you to repeat
the process (e.g., to retune the TV after moving house, or to search for new channels
that have been launched by broadcasters).
Programme
Sorting
(Only in
analogue mode)
Changes the order in which the analogue channels are stored on the TV.
1
Press
F
/
f
to select the channel you want to move to a new position,
then press
g
.
2
Press
F
/
f
to select the new position for your channel, then press
.
AV Preset
Assigns a name to any equipment connected to the side and rear sockets. The name
will be displayed briefly on the screen when the equipment is selected. You can skip
an input source that is not connected to any equipment.
1
Press
F
/
f
to select the desired input source, then press
.
2
Press
F
/
f
to select the desired option below, then press
.
•
AV1 (or AV2/AV3/HDMI1/HDMI2/Component/PC), VIDEO, DVD, CABLE,
GAME, CAM, SAT
: Uses one of the preset labels to assign a name to connected
equipment.
• “Edit”: Creates your own label.
1
Press
F
/
f
to select the desired letter or number (“_” for a blank
space), then press
g
.
If you input a wrong character
Press
G
/
g
to select the wrong character. Then, press
F
/
f
to select the correct
character.
2
Repeat the procedure in step 1 until the name is completed, then
press .
Auto Start-up
Language
Auto Tuning
Programme Sorting
English
AV Preset
HDMI Set-up
Sound Offset
Manual Programme Preset
Digital Set-up
Select:
Back:
Enter:
Exit:
Set-up

27
GB
Usi
ng MENU
Func
ti
ons
HDMI Set-up
Allows the TV to communicate with equipment that is compatible with the control
for HDMI function, and connected to the HDMI sockets of the TV. Note that
communication settings must also be made on the connected equipment.
“Control for HDMI”:
Sets whether or not to link the operations of the TV and the
connected equipment that is compatible with control for HDMI.
“Auto Devices Off”:
When this is set to “On”, the connected equipment that is
compatible with control for HDMI turns off when you switch the TV to standby
mode using the remote.
“Auto TV On”:
When this is set to “On”, the TV turns on when you turn on the
connected equipment that is compatible with control for HDMI.
“Device List Update”:
Creates or updates the “HDMI Device List”. Up to 11
compatible equipment items can be connected, and up to 5 equipment items can be
connected to a single socket. Be sure to update the “HDMI Device List” when you
change the connections or settings.
“HDMI Device List”:
Displays a list of connected equipment that is compatible
with control for HDMI.
Sound Offset
Sets an independent volume level to each equipment connected to the TV.
Manual
Programme
Preset
(Only in
analogue mode)
Changes the available analogue channel setting.
Press
F
/
f
to select the programme number you want to modify. Then, press
.
System
Presets programme channels manually.
1
Press
F
/
f
to select “System”, then press
.
2
Press
F
/
f
to select one of the following TV broadcast systems, then
press
G
.
B/G: For western European countries/regions
D/K: For eastern European countries/regions
L: For France
I: For the United Kingdom
~
Depending on the country/region selected for “Country” (page 6), this option may not be
available.
Channel
1
Press
F
/
f
to select “Channel”, then press
.
2
Press
F
/
f
to select “S” (for cable channels) or “C” (for terrestrial
channels), then press
g
.
3
Tune the channels as follows:
If you do not know the channel number (frequency)
Press
F
/
f
to search for the next available channel. When a channel has been found,
the search will stop. To continue searching, press
F
/
f
.
If you know the channel number (frequency)
Press the number buttons to enter the channel number of the broadcast you want or
your VCR channel number.
4
Press
to jump to “Confirm”, then press
.
Repeat the procedure above to preset other channels manually.
Label
Assigns a name of your choice, up to five letters or numbers, to the selected channel.
AFT
Allows you to fine-tune the selected programme number manually if you feel that a
slight tuning adjustment will improve the picture quality.
Continued

28
GB
Audio Filter
Improves the sound for individual channels in the case of distortion in mono
broadcasts. Sometimes a non-standard broadcast signal can cause sound distortion or
intermittent sound muting when watching mono programmes.
If you do not experience any sound distortion, we recommend that you leave this
option set to the factory setting “Off”.
~
“Audio Filter” is not available when “System” is set to “L”.
Skip
Skips unused analogue channels when you press PROG +/- to select channels. (You
can still select a skipped channel using the number buttons.)
Confirm
Saves changes made to the “
Manual Programme Preset
” settings.

29
GB
Usi
ng MENU
Func
ti
ons
Digital Set-up menu
You can select the options listed below on the “Digital
Set-up” menu. Then press
F
/
f
to select the “Digital
Tuning” or “Digital Set-up”. To select options in
“Settings”, see “Navigating through menus” (page 20).
~
Some functions may not be available in some countries/regions.
Digital Tuning
Digital Auto Tuning
Tunes in the available digital channels.
This option allows you to retune the TV after moving house, or to search for new
channels that have been launched by broadcasters. Press
.
Programme List Edit
Removes any unwanted digital channels stored on the TV, and changes the order of
the digital channels stored on the TV.
1
Press
F
/
f
to select the channel you want to remove or move to a new
position.
Press the number buttons to enter the known three-digit programme number of the
broadcast you want.
2
Remove or change the order of the digital channels as follows:
To remove the digital channel
Press
. After a confirmation message appears, press
G
to select “Yes”, then press
.
To change the order of the digital channels
Press
g
, then press
F
/
f
to select the new position for the channel and press
G
.
3
Press RETURN.
Digital Manual Tuning
Tunes the digital channels manually.
1
Press the number button to select the channel number you want to
manually tune, then press
F
/
f
to tune the channel.
2
When the available channels are found, press
to store programmes.
Repeat the above procedure to manually tune other channels.
Auto Start-up
Language
Auto Tuning
Programme Sorting
English
AV Preset
HDMI Set-up
Sound Offset
Manual Programme Preset
Digital Set-up
Select:
Back:
Enter:
Exit:
Set-up

30
GB
Digital Set-up
Subtitle Set-up
“Subtitle Setting”:
When “For Hard Of Hearing” is selected, some visual aids may
also be displayed with the subtitles (if TV channels broadcast such information).
“Subtitle Language”:
Selects which language subtitles are displayed in.
Audio Set-up
“Audio Type”:
Switches to broadcast for the hearing impaired when “For Hard Of
Hearing” is selected.
“Audio Language”:
Selects the language used for a programme. Some digital
channels may broadcast several audio languages for a programme.
“Audio Description”:
Provides audio description (narration) of visual information
if TV channels broadcast such information.
“Mixing Level”:
Adjusts the TV main audio and Audio Description output levels.
z
This option is only available when “Audio Description” is set to “On”.
Banner Mode
“Basic”:
Displays programme information with a digital banner.
“Full”:
Displays programme information with a digital banner, and displays detailed
programme information below that banner.
Parental Lock
Sets an age restriction for programmes. Any programme that exceeds the age
restriction can only be watched after a PIN Code is entered correctly.
1
Press the number buttons to enter your existing PIN code.
If you have not previously set a PIN, a PIN code entry screen appears. Follow the
instructions of “PIN Code” below.
2
Press
F
/
f
to select the age restriction or “None” (for unrestricted
watching), then press
.
3
Press RETURN.
PIN Code
To set your PIN for the first time
1
Press the number buttons to enter the new PIN code.
2
Press RETURN.
To change your PIN
1
Press the number buttons to enter your existing PIN code.
2
Press the number buttons to enter the new PIN code.
3
Press RETURN.
z
PIN code 9999 is always accepted.
Technical Set-up
“Auto Service Update”:
Enables the TV to detect and store new digital services as
they become available.
“Software Download”:
Enables the TV to automatically receive software updates,
free through your existing aerial (when issued). Sony recommends that this option is
set to “On” at all times. If you do not want your software to be updated, set this option
to “Off”.
“System Information”:
Displays the current software version and the signal level.
“Time Zone”:
Allows you to manually select the time zone you are in, if it is not the
same as the default time zone setting for your country/region.
“Auto DST”:
Sets whether or not to automatically switch between summer time and
winter time.
• “On”: Automatically switches between summer time and winter time according to the
calendar.
• “Off”: The time is displayed according to the time difference set by “Time Zone”.
CA Module Set-up
Allows you to access a pay TV service once you obtain a Conditional Access Module (CAM)
and a view card. See page 17 for the location of the
(PCMCIA) socket.
31
GB
A
d
d
iti
on
a
l I
n
fo
rm
a
tio
n
Additional Information Specifications
*
1
AV1 outputs available only analogue TV.
*
2
AV2 outputs watching screen (except PC, HDMI1,2, Component 1080i).
*
3
Specified standby power is reached after the TV finishes necessary internal processes.
Design and specifications are subject to change without notice.
Model name
KDL-32L40xx
System
Panel System
LCD (Liquid Crystal Display) Panel
TV System
Depending on your country/region selection
Analogue: B/G/H, D/K, L, I
Digital: DVB-T
Colour/Video System
Analogue: PAL, SECAM, NTSC 3.58, 4.43 (only Video In)
Digital: MPEG-2 MP@ML
Channel Coverage
Analogue: 48.25 - 855.25 MHz
Digital: VHF Band III (177.5 - 226.5 MHz)/UHF E21 - E69 (474 - 858 MHz)
Sound Output
10 W + 10 W (RMS)
Input/Output jacks
Aerial
75 ohm external terminal for VHF/UHF
/
/
AV1*
1
21-pin scart connector including audio/video input, RGB input, S-Video input, and Analog TV
audio/video output.
/
/
AV2*
2
21-pin scart connector including audio/video input, RGB input, S-Video input, and audio/video
output.
COMPONENT IN
Supported formats: 1080i, 720p, 576p, 576i, 480p, 480i
Y: 1 Vp-p, 75 ohms, 0.3V negative sync/P
B
/C
B
: 0.7 Vp-p, 75 ohms/
P
R
/C
R
: 0.7 Vp-p, 75 ohms
COMPONENT IN
Audio input (phono jacks)
HDMI IN 1, 2
Video: 1080i, 720p, 576p, 576i, 480p, 480i
Audio: Two channel linear PCM
32, 44.1 and 48 kHz, 16, 20 and 24 bits
PC (see table)
Analogue audio (minijack) (HDMI IN 2 only)
AV3
Video input (phono jack)
AV3
Audio input (phono jacks)
Audio output (Left/Right) (phono jacks)
PC IN
PC Input (15 Dsub) (see page 32)
G: 0.7 Vp-p, 75 ohms, non Sync on Green/B: 0.7 Vp-p, 75 ohms, non Sync on Green/
R: 0.7 Vp-p, 75 ohms, non Sync on Green
PC audio input (minijack)
i
Headphones jack
CAM (Conditional Access Module) slot
Power and others
Power Requirements
220–240 V AC, 50 Hz
Screen Size
32 inches (Approx. 81.3 cm measured diagonally)
Display Resolution
1,366 dots (horizontal) × 768 lines (vertical)
Power Consumption
155 W
Standby Power Consumption*
3
0.5 W or less
Dimensions
(w × h × d)
(with stand)
Approx. 80.7 × 58.5 × 24.2 cm
(without stand)
Approx. 80.7 × 54.8 × 10.1 cm
Mass
(with stand)
Approx. 15.0 kg
(without stand)
Approx. 13.0 kg
Supplied Accessories
Refer to “1: Checking the accessories” on page 4.
Optional Accessories
SU-WL500 Wall-Mount Bracket/SU-FL300M TV stand

32
GB
PC Input Signal Reference Chart for PC IN
• This TV’s PC input does not support Sync on Green or Composite Sync.
• This TV’s PC input does not support interlaced signals.
• This TV’s PC input supports signals in the above chart with a 60 Hz vertical frequency.
PC Input Signal Reference Chart for HDMI IN 1, 2
Signals
Horizontal (Pixel)
Vertical (Line)
Horizontal
frequency
(kHz)
Vertical
frequency (Hz)
Standard
VGA
640
480
31.5
60
VGA
SVGA
800
600
37.9
60
VESA Guidelines
XGA
1024
768
48.4
60
VESA Guidelines
WXGA
1280
768
47.8
60
VESA
Signals
Horizontal (Pixel)
Vertical (Line)
Horizontal
frequency
(kHz)
Vertical
frequency (Hz)
Standard
VGA
640
480
31.5
60
VGA
SVGA
800
600
37.9
60
VESA Guidelines
XGA
1024
768
48.4
60
VESA Guidelines
WXGA
1280
768
47.4
60
VESA
WXGA
1280
768
47.8
60
VESA
WXGA
1360
768
47.7
60
VESA
