Sony CDX-GT50UI: Setting the clock Attaching the front panel Detaching the front panel
Setting the clock Attaching the front panel Detaching the front panel: Sony CDX-GT50UI
Table of contents
- Table of Contents
- Welcome ! Resetting the unit Preparing the card remote commander
- Setting the clock Attaching the front panel Detaching the front panel
- Location of controls and basic operations Main unit
- wg Number buttons 7
- CD Radio Storing and receiving stations Display items Storing automatically — BTM Storing manually Repeat and shuffle play Receiving the stored stations Tuning automatically
- Setting AF and TA RDS Overview Display items
- Playing back USB devices Selecting PTY Display items Setting CT
- Listening to music on a Mass Storage Class type audio device Playing back iPod Playing tracks Listening to music on “Walkman” (ATRAC Audio Device)
- Repeat and shuffle Play Scan Selecting Album, Artist or Playlist
- Changing the sound settings Adjusting setup items — SET Adjusting the sound characteristics — BAL/FAD/SUB Customizing the equalizer curve — EQ3
- Using optional equipment Auxiliary audio equipment CD/MD changer
- Precautions Notes on discs
- About USB devices Playback order of MP3/WMA/AAC files
- About MP3 files About ATRAC files About WMA files About iPod About AAC files
- Cleaning the connectors Maintenance Replacing the lithium battery of the card remote commander Removing the unit Fuse replacement
- Specifications
- CD/MD playback Troubleshooting General Radio reception
- RDS USB playback Error displays/Messages
Setting the clock
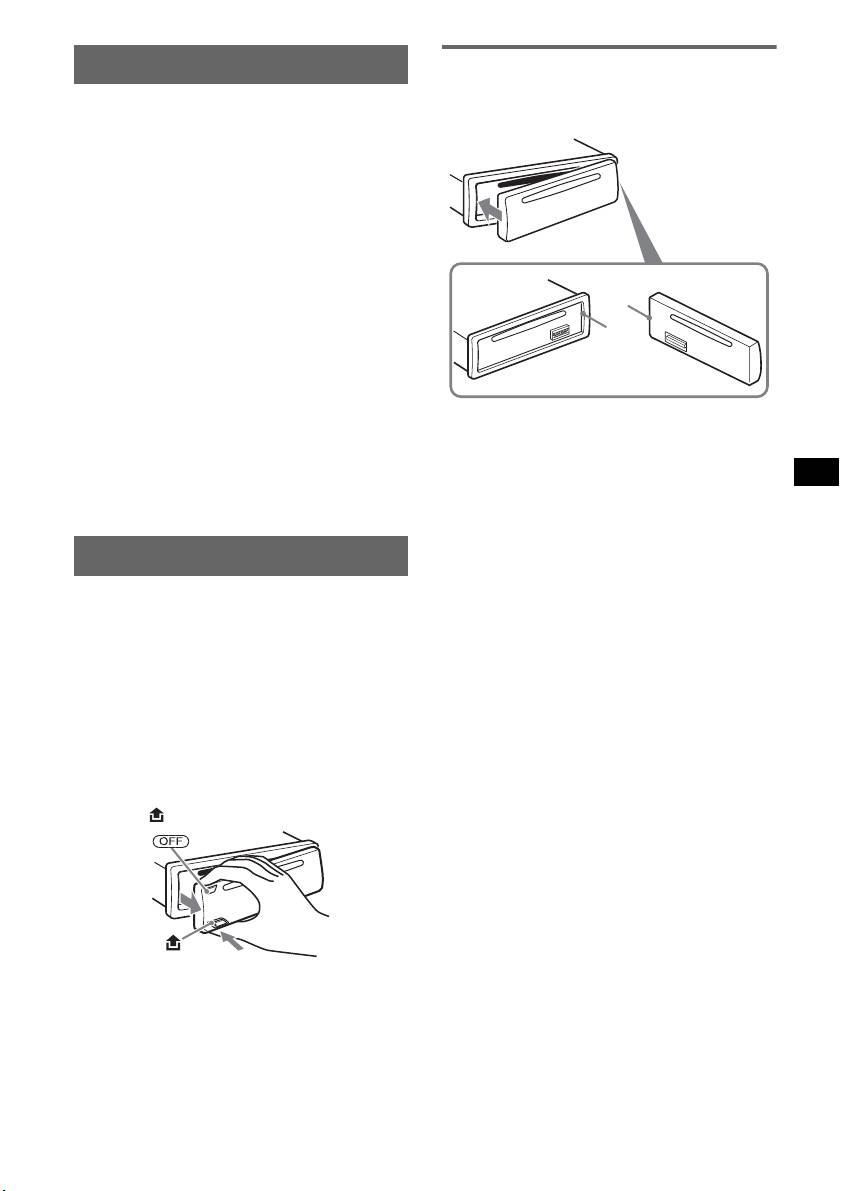
Attaching the front panel
Engage part A of the front panel with part B of
The clock uses a 24-hour digital indication.
the unit, as illustrated, and push the left side into
position until it clicks.
1 Press and hold the select button.
The setup display appears.
2 Press the select button repeatedly
until “CLOCK-ADJ” appears.
3 Press (SEEK) +.
The hour indication flashes.
4 Rotate the volume control dial to set
the hour and minute.
To move the digital indication, press (SEEK)
A
–/+.
B
5 Press the select button.
The setup is complete and the clock starts.
To display the clock, press (DSPL). Press
(DSPL) again to return to the previous display.
Note
With the card remote commander
Do not put anything on the inner surface of the front
In step 4, to set the hour and minute, press M or m.
panel.
Tip
You can set the clock automatically with the RDS
feature (
page 10).
Detaching the front panel
You can detach the front panel of this unit to
prevent theft.
Caution alarm
If you turn the ignition switch to the OFF
position without detaching the front panel, the
caution alarm will sound for a few seconds.
The alarm will only sound if the built-in
amplifier is used.
1 Press (OFF).
The unit is turned off.
2 Press , then pull it off towards you.
Notes
• Do not drop or put excessive pressure on the front
panel and display window.
• Do not subject the front panel to heat/high
temperature or moisture. Avoid leaving it in a parked
car or on a dashboard/rear tray.
• If the front panel is detached without turning off the
switch during playback by a USB device, data may
be damaged.
5


