Yamaha A12: Installing the speakers
Installing the speakers: Yamaha A12
Installing the speakers
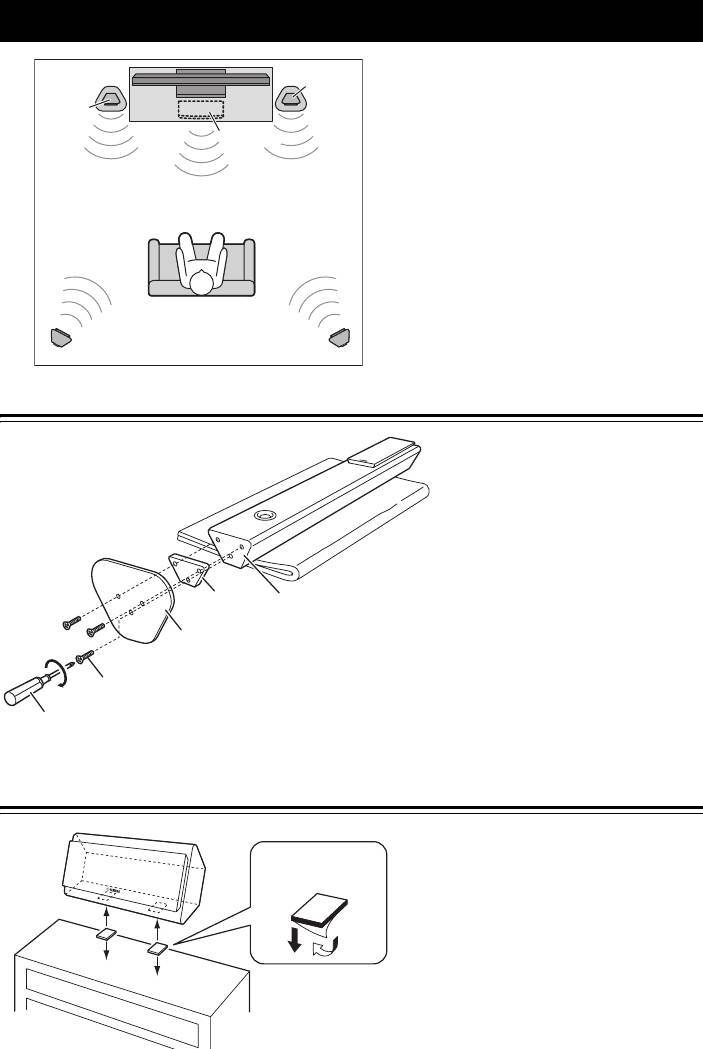
Before you connect the speakers, place each
speaker in its respective location. Speaker
Front
Front
positioning is very important as it affects the
left
right
overall sound quality of the system. Place the
Center
speakers in locations that will optimize the
sound quality at your listening position. Refer
to the illustration.
Note
• The speakers feature a magnetically
shielded design. However, there is still a
chance that placing them too close to a
CRT-type TV set might impair picture
color. Should this happen, move the
speakers away from the TV set.
Surround left
Surround right
Installing the front speakers
Place the two front speakers on the left and
right sides of the TV, facing directly forward.
■ Attaching the speaker stands
Lay the front speaker (with the front side up)
on the floor and then attach the adaptor and
base to the speaker by using the supplied
screws.
Adaptor
Bottom of the
front speaker
Notes
Base
• When moving the front speaker, be sure to
have another person to support it.
Screw
• When laying the front speaker, use a blanket
or cushion to avoid scratches on the floor.
Philips driver
• Tighten the screws firmly so that the front
speaker never gets shaky.
Installing the center speaker
Place the center speaker centrally between the
front speakers, facing directly forward.
Fastener
Peel of the seal.
When placing it on a flat surface (TV rack,
etc), affix the supplied fasteners to bottom of
the speaker as shown left.
When wall-mounting it, see “Wall-mounting
the speakers” (page 4).
Note
• Wipe the surface clean before affixing the
TV rack, etc
fasteners. If the surface is dirty, oily or wet,
adhesive strength is weakened and the
speaker may fall.
3 En
Installing the speakers
English
Installing the surround speakers
(A) Bottom
Place the left and right surround speakers
behind your listening position, facing slightly
inward.
When placing them on a flat surface (hard
floor, etc), affix the supplied non-skid pads to
the corners of the bottom of the speaker as
shown left (Fig. A). The pads will prevent the
Non-skid pad
speaker from moving around.
When wall-mounting them, affix the supplied
non-skid pads to the lower corners of the back
of the speaker as shown left
(B) Back
(Fig. B). For details, see “Wall-mounting the
speakers”.
Non-skid
pad
Wall-mounting the speakers
You can mount the center and surround
Surround speaker
Wall/wall support
speakers on the wall as follows.
26 mm (1")
1 Install screws into a solid wall or wall
support as shown left. Use 3.5 to 4 mm
3 mm
(1/8") diameter self-tapping screws.
(1/8")
2 Hang each speaker by its keyhole slots
Minimum
onto the protruding screws.
20 mm (3/4")
Note
• Make sure the shaft of the screw is seated in
the narrow part of the keyhole slot.
Center speaker
Otherwise, the speaker may fall.
245 mm
(9-5/8")
Warnings
• Each speaker weighs 1.8 kg (4.0 lbs.). Do not mount the speakers on thin plywood or on a wall with a soft surface
material. Otherwise, the screws may pull out of the surface and the speakers may fall, possibly damaging the speakers
or causing personal injury.
• Do not affix the speakers to a wall using nails, adhesives, or unstable hardware. Long-term use and vibration may
cause the speakers to fall.
• To avoid accidents resulting from tripping over loose speaker cables, affix the cables to the wall.
• Mount the speakers in a wall location that will be unlikely to result in injury to an individual’s head.
• When using speaker brackets (commercially available) to mount the speakers on the wall or ceiling, we strongly
recommend using safety wire (may be supplied with the bracket) between the speaker and bracket to prevent the
speaker from falling.
• If you are not sure of a safe way to install these speakers, consult a professional installer or a building contractor.
4 En
Оглавление
- Precautions
- Package contents
- Installing the speakers
- Connecting the speakers
- Précautions
- Contenu de l’emballage
- Installation des enceintes
- Connexion des enceintes
- Fiche technique
- Vorsichtsmaßnahmen
- Lieferumfang
- Lautsprecher aufbauen
- Lautsprecher anschließen
- Technische Daten
- Precauciones
- Contenido del paquete
- Instalación de los altavoces
- Conexión de los altavoces
- Especificaciones
- Меры предосторожности
- Содержимое упаковки
- Установка колонок
- Подключение колонок
- Технические характеристики
- 注意事项
- 包装套件
- 安装扬声器
- 连接扬声器
- 规格


