JVC KS-F525: OTHER MAIN FUNCTIONS
OTHER MAIN FUNCTIONS: JVC KS-F525
OTHER MAIN FUNCTIONS
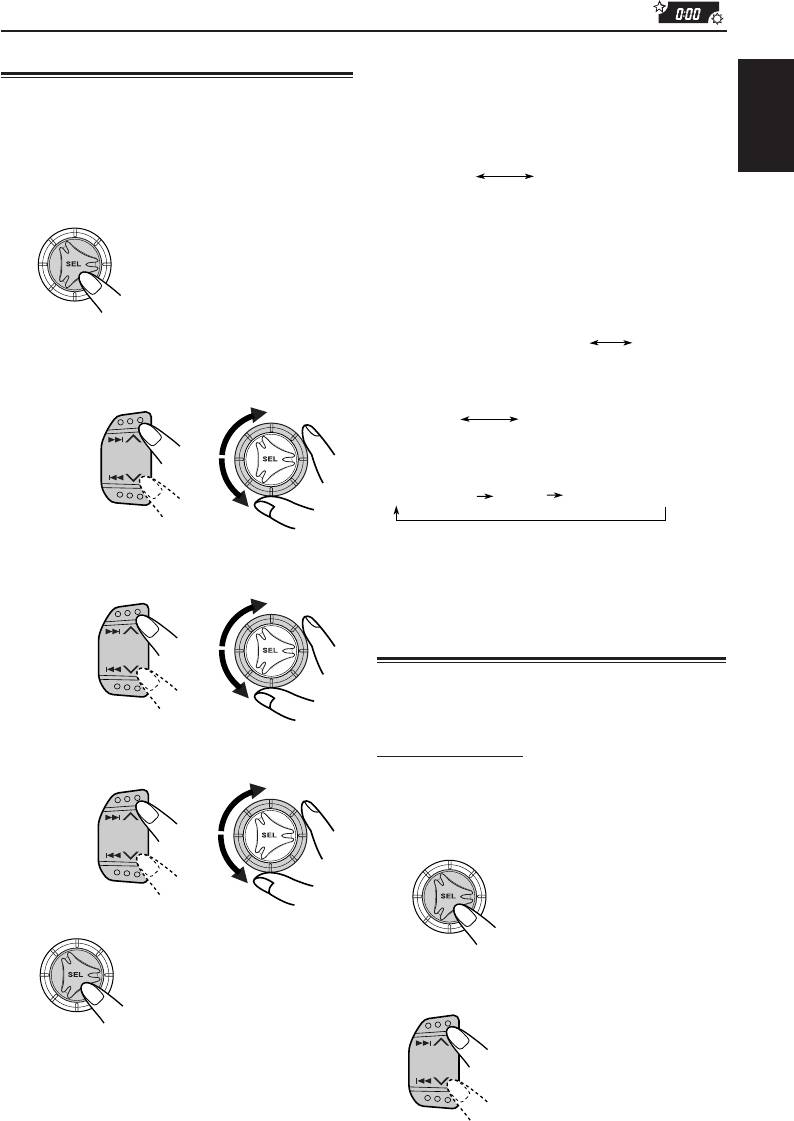
To check the current clock time or change the
Setting the clock
display mode
Press DISP (display) repeatedly. Each time you
You can also set the clock system to either 24 hours
press the button, the display mode changes as
or 12 hours.
follows:
1
Press and hold SEL (select) for more
• During tuner operation:
ENGLISH
than 2 seconds so that one of the PSM
ClockFrequency
items appears on the display.
Notes:
(See page 24.)
* For the indication change during RDS operation,
see page 14.
* For the indication change during DAB operation,
see page 31.
• During tape operation:
2
Set the hour.
ClockPlay mode (tape direction)
1 Select “CLOCK H (hour)” if not shown on
• During external component operation:
the display.
(Only for KS-FX725R)
2 Adjust the hour.
LINE IN
Clock
1
2
• During CD changer operation:
(Only for KS-FX725R)
Disc number
Clock
Elapsed playing time
3
Set the minute.
• During power off:
1 Select “CLOCK M (minute).”
The power turns on, the clock time is shown for
2 Adjust the minute.
5 seconds, then the power turns off.
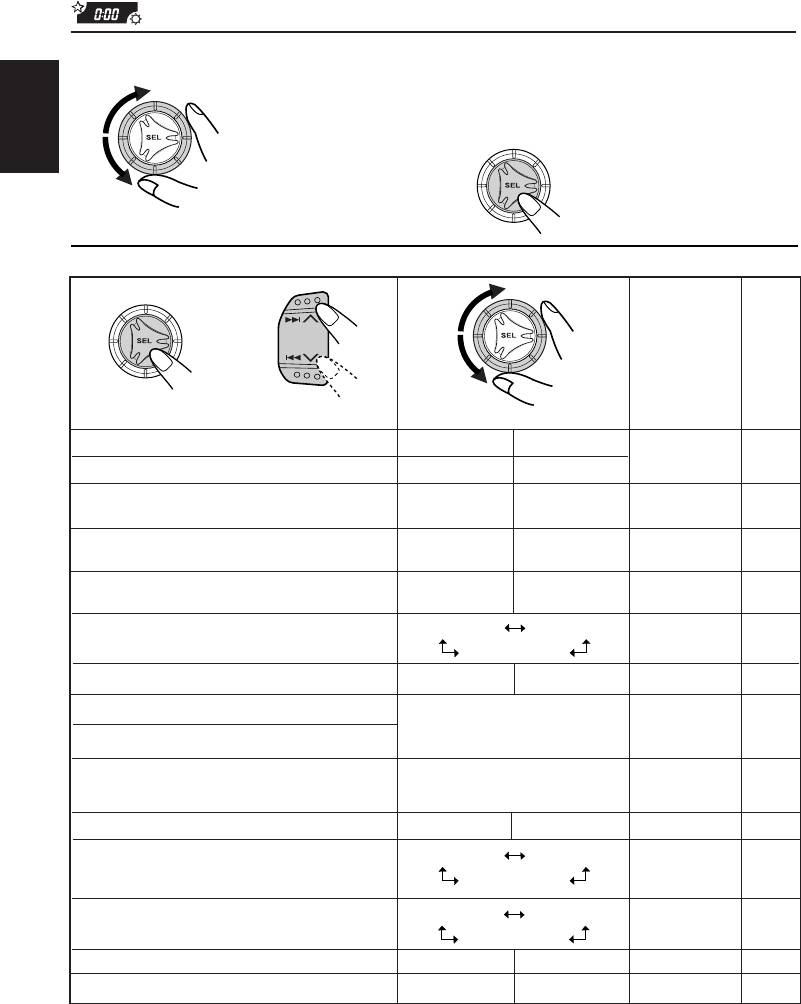
Changing the general settings
1
2
(PSM)
You can change the items listed on the next page
by using the PSM (Preferred Setting Mode) control.
4
Set the clock system.
Basic Procedure
1 Select “24H/12H.”
2 Select “24H” or “12H.”
1
Press and hold SEL (select) for more
12
than 2 seconds so that one of the PSM
items appears on the display.
(See page 24.)
5
Press SEL (select) to finish the setting.
2
Select the PSM item you want to
adjust. (See page 24.)
23
EN23-26KS-FX725R_F525[EE]f.pm5 7/12/01, 9:53 AM23
3
Adjust the PSM item selected.
4
Repeat steps 2 and 3 to adjust the
other PSM items if necessary.
5
Press SEL (select) to finish the setting.
ENGLISH
Preferred Setting Mode (PSM) items
1
2
3
Factory-
See
Set.
preset
page
settings
Counter-
Hold.
clockwiseSelect.
Clockwise
CLOCK H Hour adjustment
Back
Advance
230:00
CLOCK M Minute adjustment
Back
Advance
SCM LINK Sound control
LINK OFF
LINK ON
LINK ON
21, 25
memory linkage
24H/ 12H* 24/12-hour time
12H
24H24H
23
display
AUTO ADJ* Automatic clock
OFF
ON
ON
14
setting
PS NAME
FREQ
DISPMODE* Display mode
PS NAME
14
CLOCK
TIME DISC
DISC 25
CH DISP* Changer display
PTY STBY* PTY standby
29 programme types
NEWS
12
(see page 12, 13 and 15.)
PTY SRCH PTY search
TA VOL* Traffic announcement
VOL 00 – VOL 50
VOL 20 14
volume
P-SEARCH* Programme search
ONOFF OFF
13
AUDIO 1
AUDIO 2
LEVEL Level display
AUDIO 2
25
OFF
OFF
MUTING 1
TEL Telephone muting
OFF 25
MUTING 2
B. SKIP Blank skip
ONOFF
OFF
18
EXT IN** External component
LINE INCHANGER
CHANGER
25
• Press SEL (select) to finish the setting.
* Only for KS-FX725R
**Only for KS-FX725R and displayed only when one of the following sources is selected – FM, AM and
Tape.
24
EN23-26KS-FX725R_F525[EE]f.pm5 7/12/01, 9:53 AM24

To cancel Advanced SCM – SCM LINK
To select the telephone muting – TEL
You can cancel the Advanced SCM (Sound Control
This mode is used when a cellular phone system is
Memory), and unlink the sound modes and the
connected. Depending on the phone system used,
playback sources.
select either “MUTING 1” or “MUTING 2,” whichever
When shipped from the factory, a different sound
mutes the sounds from this unit.
ENGLISH
mode can be stored in memory for each source so
When shipped from the factory, this mode is
that you can change the sound modes simply by
deactivated.
changing the sources.
• MUTING 1: Select this if this setting can mute
• LINK ON: Advanced SCM (different sound
the sounds.
modes for different sources).
• MUTING 2: Select this if this setting can mute
• LINK OFF: Conventional SCM (one sound
the sounds.
mode for all sources).
• OFF: Cancels the telephone muting.
To select the changer display – CH DISP
To select the external component to use
(only for KS-FX725R)
– EXT IN (only for KS-FX725R)
You can change the initial indication on the display
You can connect the external component to the CD
either to disc number or to elapsed playing time, while
changer jack on the rear using the Line Input Adaptor
using the CD changer.
KS-U57 (not supplied).
When shipped from the factory, “DISC” is selected.
To use the external component as the playback
source through this unit, you need to select which
• DISC: Shows the disc number and track
component – CD changer or external component –
number.
to use.
• TIME: Shows the elapsed playing time.
When shipped from the factory, CD changer is
selected as the external component.
To select the level meter – LEVEL
• LINE IN: To use the external component other
than CD changer.
You can select the level display according to your
• CHANGER: To use the CD changer.
preference.
When shipped from the factory, “AUDIO 2” is
Note:
selected.
For connecting the Line Input Adaptor KS-U57 and the
external component, refer to the Installation/Connection
• AUDIO 1:
Level meter illuminates from bottom
Manual (separate volume).
to top.
• AUDIO 2:
Alternates level meter (moves from
bottom to top) and illumination
display.
• OFF:
Erases the audio level indicator.
25
EN23-26KS-FX725R_F525[EE]f.pm5 7/12/01, 9:53 AM25
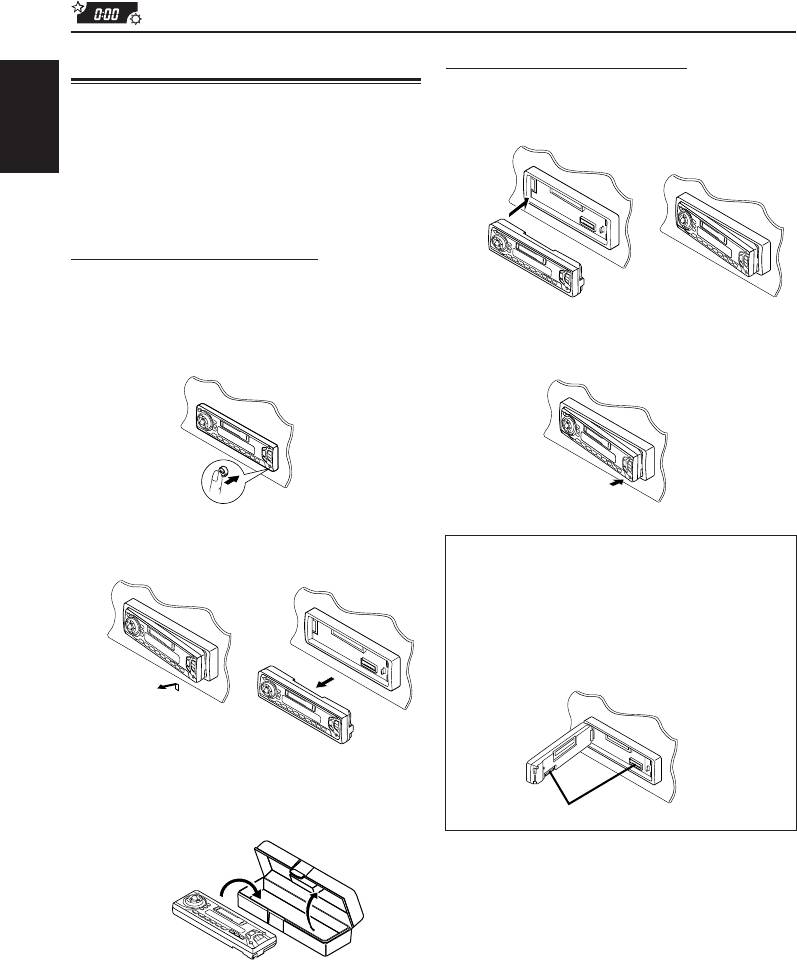
Attaching the control panel
Detaching the control panel
1
Insert the left side of the control panel
You can detach the contol panel when leaving the
car.
into the groove on the panel holder.
When detaching or attaching the control panel,
ENGLISH
be careful not to damage the connectors on the
back of the control panel and on the panel holder.
Detaching the control panel
Before detaching the control panel, be sure to turn
off the power.
2
Press the right side of the control
1
Unlock the control panel.
panel to fix it to the panel holder.
2
Lift and pull the control panel out of
Note on cleaning the connectors:
the unit.
If you frequently detach the control panel, the
connectors will deteriorate.
To minimize this possibility, periodically wipe the
connectors with a cotton swab or cloth moistened
with alcohol, being careful not to damage the
connectors.
3
Put the detached control panel into the
provided case.
Connectors
26
EN23-26KS-FX725R_F525[EE]f.pm5 7/12/01, 9:53 AM26
Оглавление
- CONTENTS
- LOCATION OF THE BUTTONS
- LOCATION OF THE BUTTONS
- BASIC OPERATIONS
- RADIO BASIC OPERATIONS
- RDS OPERATIONS
- TAPE OPERATIONS
- SOUND ADJUSTMENTS
- OTHER MAIN FUNCTIONS
- CD CHANGER OPERATIONS
- EXTERNAL COMPONENT OPERATIONS
- DAB TUNER OPERATIONS
- TROUBLESHOOTING
- MAINTENANCE
- SPECIFICATIONS
- СОДЕРЖАНИЕ
- РАСПОЛОЖЕНИЕ КНОПОК
- РАСПОЛОЖЕНИЕ КНОПОК
- ОСНОВНЫЕ ОПЕРАЦИИ
- ОСНОВНЫЕ ОПЕРАЦИИ С РАДИОПРИЕМНИКОМ
- ОПЕРАЦИИ С RDS
- ОПЕРАЦИИ С МАГНИТОФОНОМ
- НАСТРОЙКА ЗВУКА
- ДРУГИЕ ГЛАВНЫЕ ФУНКЦИИ
- ОПЕРАЦИИ С ПРОИГРЫВАТЕЛЕМ- АВТОМАТОМ КОМПАКТ-ДИСКОВ
- ОПЕРАЦИИ С ВНЕШНИМИ КОМПОНЕНТАМИ
- ОПЕРАЦИИ С ТЮНЕРОМ DAB
- ВЫЯВЛЕНИЕ НЕИСПРАВНОСТЕЙ
- ТЕХНИЧЕСКОЕ ОБСЛУЖИВАНИЕ
- ТЕХНИЧЕСКИЕ ХАРАКТЕРИСТИКИ
- Having TROUBLE with operation? Please reset your unit


