Sony HVL-MT24AM – page 3
Manual for Sony HVL-MT24AM
Table of contents
Modeling flash
You can try continuous ash to check for shadows on the subject before shooting.
e ash will re for two seconds at a rate of 40 ashes per second.
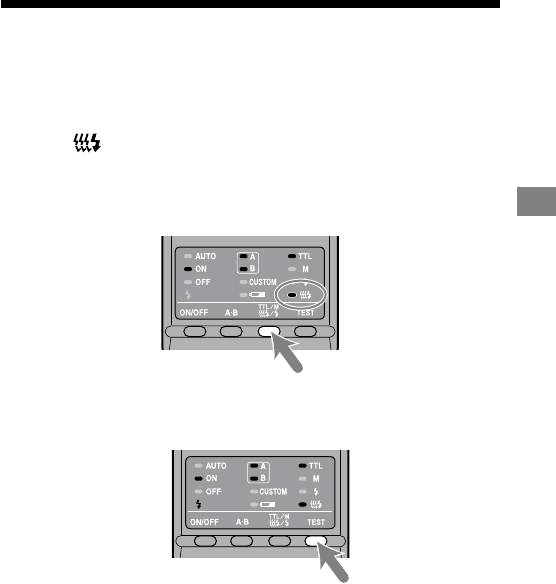
1 Press the TTL/M/Test button to turn on the modeling-flash
lamp .
Each time the TTL/M/Test button is pressed to change the TTL and M lamp
be sure to check that the appropriate lamp is on. (See page 33 for the display
sequence.)
Detailed operations
2 Press the TEST button (test/modeling flash button) .
Do not press the shutter button while the ash is in use.
e strength of shadows will dier from that during actual photography.
When using the ash in a bright place or outdoors or when using a bounce
ash, shadows are lighter so verication is more dicult.
41
HVL-MT24AM_GB 2-889-493-01 (1)
42
HVL-MT24AM_GB 2-889-493-01 (1)
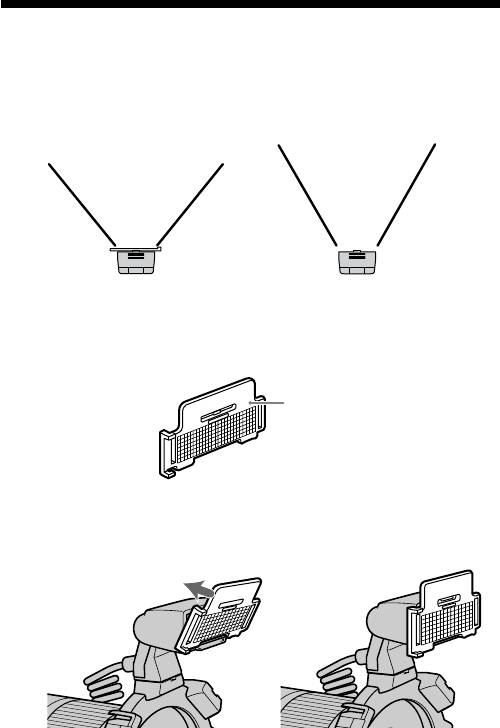
Wide panel
e twin ash unit has a coverage of 60° horizontally and 45° vertically (equivalent
to a lens with a 35mm focal length). By attaching the wide panel, the angles are
increased to 78° horizontally and 60° vertically (equivalent to a lens with a 24mm
focal length).
With wide panel
Without wide panel
Attaching the wide panel
1 Check the front side of the wide panel.
Front side
2 Align the lower edge of the wide panel to the projection on
the side of the flashtube and press the wide panel.
Press the wide panel until it clicks into place.

Removing the wide panel
Hold the top tab of the wide panel and remove it forwards
while pressing downward slightly.
Detailed operations
e ash output is reduced when using the wide panel. See page 28 for TTL ash
metering and page 38 for manual ash metering.
43
HVL-MT24AM_GB 2-889-493-01 (1)
44
HVL-MT24AM_GB 2-889-493-01 (1)
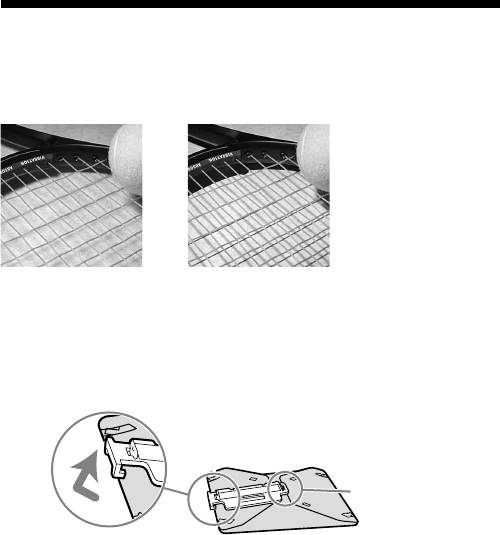
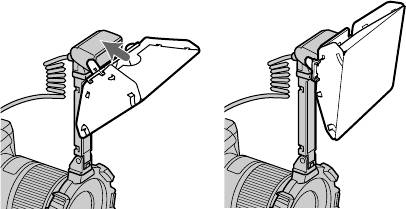
Diffuser
Strong shadows can be soened by attaching the diuser to the ashtube. Always
use the diuser with an arm to prevent it appearing in the image.
Example:
With diffuser Without diffuser
Using the diffuser
1 Unclip the panel from the diffuser.
This side cannot be
detached.
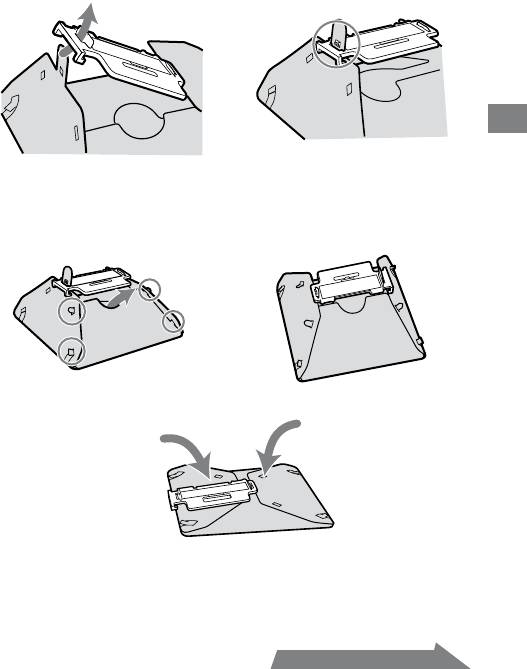
2 As illustration, slide the tab through the slot near the clip.
The dimple above the slot should slide fit into the hole in
the tab.
Detailed operations
3 Place the four side tabs into the slot on the side of the
diffuser.
On the other side, in the same way, place the four side tabs into the slots.
If it is dicult to assemble the diuser, fold it up and try again.
Note
Do not force or pull hard on the diuser. Do not fold the diuser inside out.
45
HVL-MT24AM_GB 2-889-493-01 (1)
Continued on the next page
46
HVL-MT24AM_GB 2-889-493-01 (1)
4 While holding the diffuser by its panel’s top tab, press it
against the face of the twin flash unit.
Press the diuser until it clicks into place.
Notes on using the diffuser
If the arm is set at the 60° position and used with a wide angle lens, the diuser
may appear in the image. It is recommended that you always use the diuser
with the arm set at the 90° position.
e ash output is reduced when using the diuser. See page 28 for TTL ash
metering, or page 38 for manual ash metering.

Removing the diffuser
1 Remove the diffuser while holding its panel’s top tab.
Detailed operations
2 Pull the tab off the dimple as illustration. The diffuser can
now be easily removed.
3 Refold the diffuser and secure it by clipping the panel to it.
47
HVL-MT24AM_GB 2-889-493-01 (1)
48
HVL-MT24AM_GB 2-889-493-01 (1)
Custom setting
e various ash settings can be changed as necessary.
e following three items may be changed.
Time to auto power o (4 minutes/15 minutes/60 minutes/None)
Recording modes in which manual ash may be set
(M mode only/All modes)
Manual-ash power-level steps (1EV increments / 1/2EV increments)
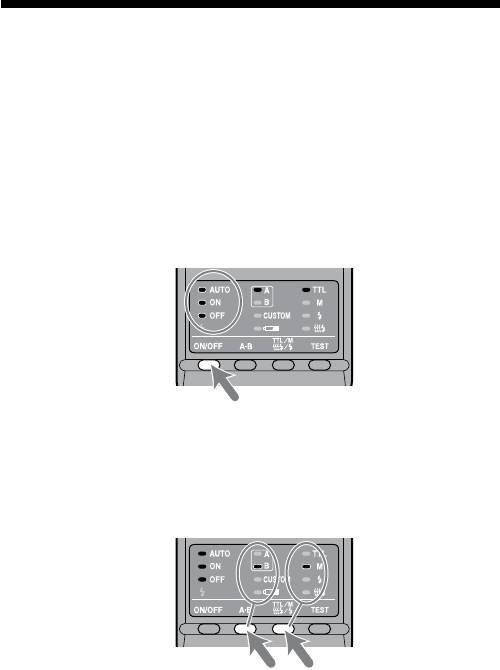
1 Press the flash ON/OFF button for three seconds.
e auto lamp, ash-ON lamp and ash-OFF lamp all come on together, and
the item (time to auto power o) is displayed.
2 Press the A-B button (twin-flash A-B selection button) to
select the item, and press the TTL/M/Test button to select
the desired setting.
Each time the A-B button is pressed, the above three items appear on the
control panel (see following page).
Detailed operations
49
HVL-MT24AM_GB 2-889-493-01 (1)
Continued on the next page
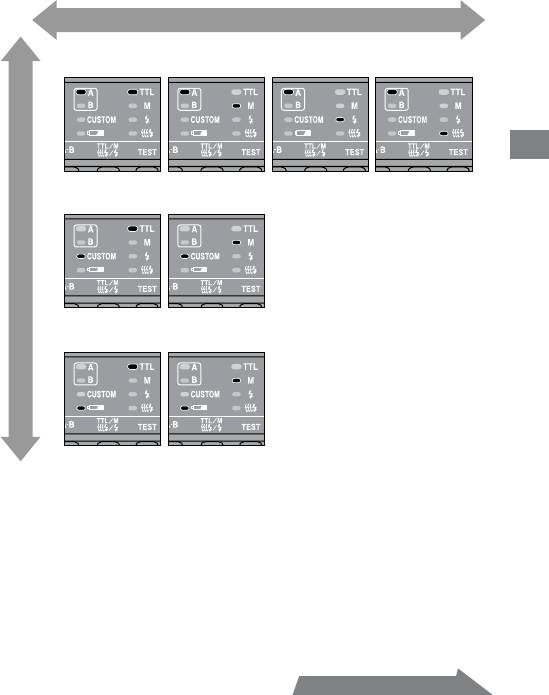
Select using the TTL/M/Test button
1.Time to auto power off
Select using the A-B button
4 minutes 15 minutes
60 minutes None
2. Recording modes in which manual flash may be set
M mode only All modes
3. Manual-flash power-level steps
1EV increments 1/2EV increments
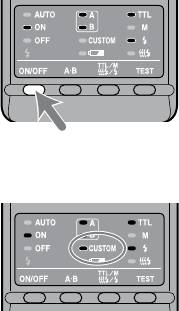
3 After making your selections, press the flash ON/OFF
button to return to exit the custom mode.
When a setting other than the default setting is selected in custom mode,
the custom lamp on the control panel comes on.
When “All modes” is selected (see 2. Recording modes in which manual
ash may be set), manual ash may be used in all recording modes.*
* e proper exposure may not be obtained in modes other than M mode.
Using M mode is therefore recommended.
If “1/2 EV steps” is selected in item 3, use the gray power values provided
on the lower scale of the manual-ash-control dials. e half-stop values
are not written on the scale.
e power values are1/1, 1/1.4, 1/2, 1/2.8, 1/4, 1/5.6, and 1/8.
e selected settings are maintained even when the ash unit is turned o
or the battery removed.
50
HVL-MT24AM_GB 2-889-493-01 (1)
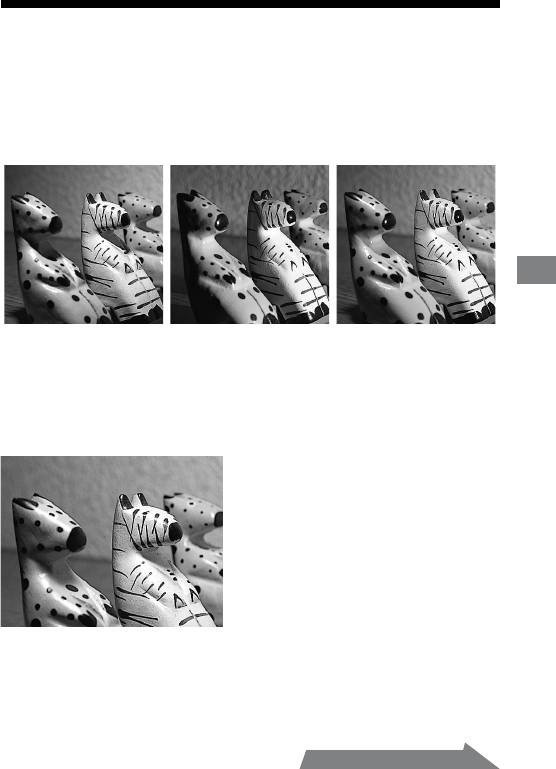
Examples of macro twin flash
photography
By using this macro twin ash, you can change the position and angle of the twin
ash unit to achieve more expressive lighting.
Example:
Additional Information
Top light only Side light only Top and side light
Strong shadows of the subjects can be soened by using the diuser attached to the
ashtube (p. 44).
Example:
Top light with diffuser
51
HVL-MT24AM_GB 2-889-493-01 (1)
Continued on the next page
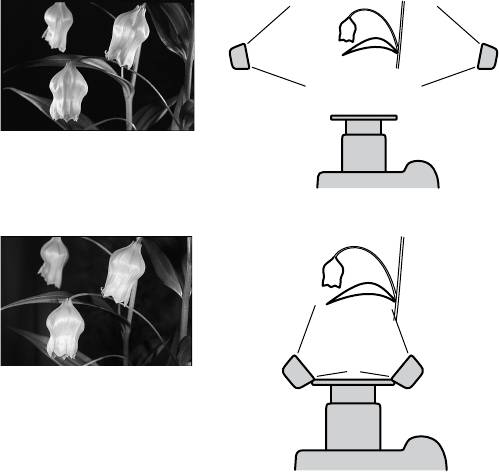
Two twin flash shooting with arms
To accent detail and give depth, illuminate the subject from the sides using the
arms.
Example:
With arms from the sides
Without arms from the front
52
HVL-MT24AM_GB 2-889-493-01 (1)
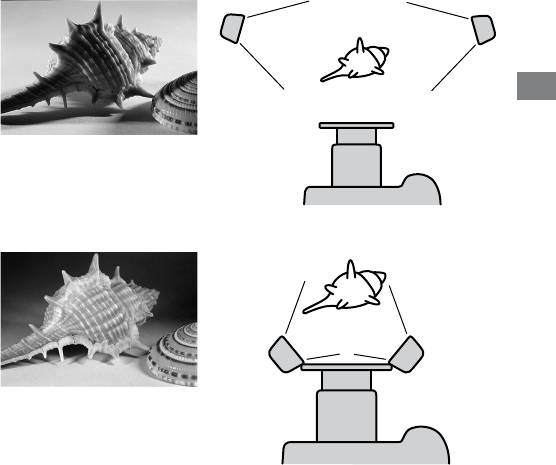
Note
If a close-up subject is illuminated from the side using an arm, strong shadows may
occur. Strong ash illumination from behind the subject can cause aring.
is condition is particularly likely to occur with a 50mm F2.8 Macro lens with
ashtubes mounted on arms.
Example:
With arms from the sides
Additional Information
Without arms from the front
53
HVL-MT24AM_GB 2-889-493-01 (1)
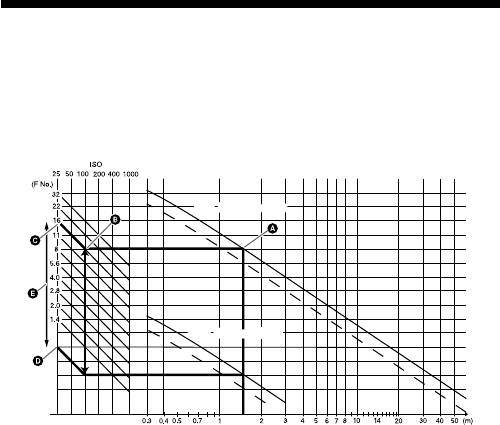
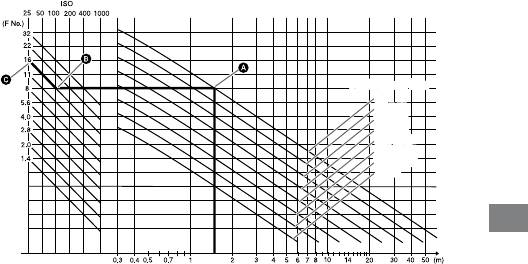
Aperture range graph
e aperture range for macro lenses is displayed on page 26 (TTL), and page 34
(Manual ash). e aperture ranges described here are for lenses other than macro
lenses, or when the subject distance is large.
TTL flash metering
54
HVL-MT24AM_GB 2-889-493-01 (1)
Min. Aperture lines
Min. Aperture lines
Max. Aperture lines
Max. Aperture lines
Aperture
Flash-subject
distance
e following explains how to obtain the aperture range using the two twin ash
units with a 1.5 m ash-to-subject distance and at ISO 100.
1 Draw a vertical line upwards from the ash-to-subject distance until it reaches
the minimum aperture line ().
2 Draw a horizontal line lewards from until it reaches the vertical ISO line
corresponding to the camera used ().
3 Draw a diagonal line from upwards and lewards. e result indicates the
minimum aperture that will provide the proper exposure ().
4 e maximum aperture can be obtained in the same way by using the maximum
aperture line ().e results of both calculations will give the usable aperture
range for obtaining the proper exposure ().
In this case, the proper exposure can be obtained by setting the camera’s aperture
from maximum to f/16.
e dotted lines are employed when only one twin ash unit is used.
Manual flash metering
Additional Information
55
HVL-MT24AM_GB 2-889-493-01 (1)
Aperture
Flash power lineFlash power line
1/1
1/1
1/2 (1/1)
1/2 (1/1)
1/4 (1/2)
1/4 (1/2)
1/8 (1/4)
1/8 (1/4)
1/16 (1/8)
1/16 (1/8)
1/32 (1/16)
1/32 (1/16)
1/64 (1/32)
1/64 (1/32)
(1/64)
(1/64)
Flash-subject
distance
e following explains how to obtain the aperture using the two twin ash units
with a power level of 1/1 at 1.5 m ash-to-subject distance and at ISO 100.
1 Draw a vertical line upwards from the ash-to-subject distance until it reaches
the ash power line that corresponds to the set power level ().
2 Draw a horizontal line lewards from until it reaches the vertical ISO line
corresponding to the camera used ().
3 Draw a diagonal line from upwards and lewards. e result indicates the
aperture that will provide the proper exposure ().
In this case, the proper exposure can be obtained by setting the camera’s aperture
to f/16.
e gures in parenthesis are employed when only one twin ash unit is used.

Compatibility with other products
Lens
49 mm and 55 mm adaptor rings are supplied.
Lenses whose barrels rotate when auto-focusing cannot be used.
When a wide angle lens is used, part of the holder may appear in the image. Do
not use lenses whose focal length is shorter than 24 mm. If the focal length is
between 24 mm and 27 mm, contact an authorized Sony dealer.
If using a lter at a focal length of less than 50 mm, part of the holder may
appear in the image.
56
HVL-MT24AM_GB 2-889-493-01 (1)
Notes on use
While shooting
is ash unit generates strong light, so it should not be used directly in front of
the eyes.
Batteries
Do not store the macro ash controller with the alkaline batteries inside it.
Leakage from the batteries may damage the battery chamber.
Depending on the temperature or storage conditions, the battery level displayed
may be lower than the actual battery capacity. e displayed battery level is
restored to the correct value aer the ash has been used a few times. When
Additional Information
lamp blinks to indicate that the ash cannot be used, pressing the ash
ON/OFF button a number of times may result in restoration of the correct
battery level display. If the battery level is still not restored, replace the battery.
When using lithium batteries, if the batteries become hot due to high
temperature or continuous use, lamp may blink and the ash may not
work for a while. Wait for the batteries to cool down before using the ash again.
Nickel-metal hydride batteries can lose power suddenly. If lamp starts
blinking or the ash can no longer be used while taking pictures, change or
recharge the batteries.
e ash frequency and number of ashes provided by new batteries may
vary from the values shown in the table, depending on the time elapsed since
manufacture of the batteries.
57
HVL-MT24AM_GB 2-889-493-01 (1)
Continued on the next page

Temperature
e ash unit may be used over a temperature range of 0 °C to 40 °C.
Do not expose the ash unit to extremely high temperatures (e.g. in direct
sunlight inside a vehicle) or high humidity.
To prevent condensation forming on the ash, place it in a sealed plastic bag
when bringing it from a cold environment into a warm environment. Allow it to
reach room temperature before removing it from the bag.
Battery capacity decreases at colder temperatures. Keep your camera and spare
batteries in a warm inside pocket when shooting in cold weather. lamp
may light on even when there is some power le in the batteries in cold weather.
Batteries will regain some of their capacity when warmed to normal operating
temperature.
is ash unit is not waterproof. Be careful not to bring it into contact with
water or sand when using it at the seashore, for example. Contact with water,
sand, dust, or salt may result in a malfunction.
Maintenance
Remove this unit from the camera. Clean the ash with a dry so cloth. If the
ash has been in contact with sand, wiping will damage the surface, and it should
therefore be cleaned gently using a blower. In the event of stubborn stains, use a
cloth lightly dampened with a mild detergent solution, and then wipe the unit clean
with a dry so cloth. Never use strong solvents, such as thinner or benzene, as
these damage the surface nish.
58
HVL-MT24AM_GB 2-889-493-01 (1)

Specifications
Guide number
Normal ash (ISO 100)
Power
Wide
1 tube 2 tubes
Diuser
level
panel
1/1 17 24 11 7
1/2 12 17 8 5
1/4 8.5 12 5.6 3.5
1/8 6 8.5 4 2.5
1/16 4.2 6 2.8 1.8
1/32 3 4.2 2 1.3
Additional Information
1/64 2.1 3 1.4 0.9
Wide panel and diuser is for one tube.
Frequency/Repetition
Nickel-
Alkaline Lithium
hydride
(1550 mAh)
Frequency (sec) 0.2~6 0.2~6 0.2~5
Repetition (times) 200~4000 500~10000 150~3000
Repetition is the approximate number of times that are possible
before a new battery is completely dead.
Flash coverage
Flash
Twin
Wide
Diuser
coverage
ash
panel
Vertical 45° 60° 90°
Horizontal 60° 78° 90°
59
HVL-MT24AM_GB 2-889-493-01 (1)
Continued on the next page
Continuous ash performance
40 ashes at 5 ashes per second
(Power level 1/32, nickel-metal hydride battery)
Flash control Flash control using pre-ash, TTL direct metering,
Manual ash
Dimension (Approx.)
Macro ash controller
68 × 123 × 91 mm (2 3/4 × 4 7/8 × 3 5/8 in.) (w × h × d)
Twin ash unit
43 × 41 × 37 mm (1 3/4 × 1 5/8 × 1 1/2 in.) (w × h × d)
Mass (Approx.) Macro ash controller 235 g (8.3 oz.) (without batteries)
Twin ash unit 33 g (1.2 oz.) (per twin ash unit)
Operating temperature
0 °C to 40 °C (32 °F to 104 °F)
Included items Macro ash controller (1), Twin ash unit (2), Holder (1),
Arm (2), Adaptor ring ø 49mm (1),
Adaptor ring ø 55mm (1), Wide panel (2), Diuser (2),
Cord reel (2), Controller case (1), Flash case (1),
Set of printed documentation
Functions in these operating instructions depend on testing conditions at our rm.
Design and specications are subject to change without notice.
60
HVL-MT24AM_GB 2-889-493-01 (1)
