Sony HVL-MT24AM – page 2
Manual for Sony HVL-MT24AM
Table of contents
Auto power ON/OFF
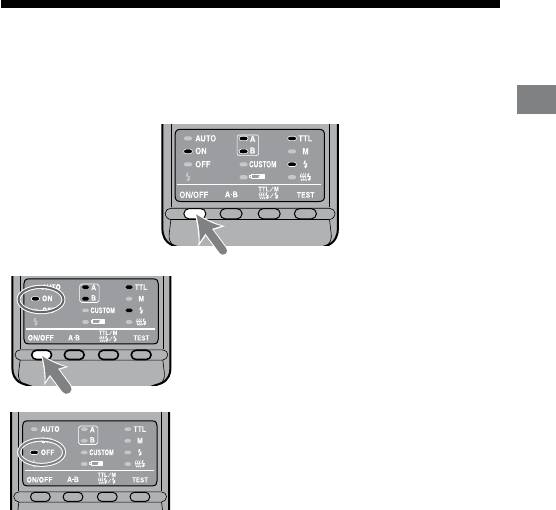
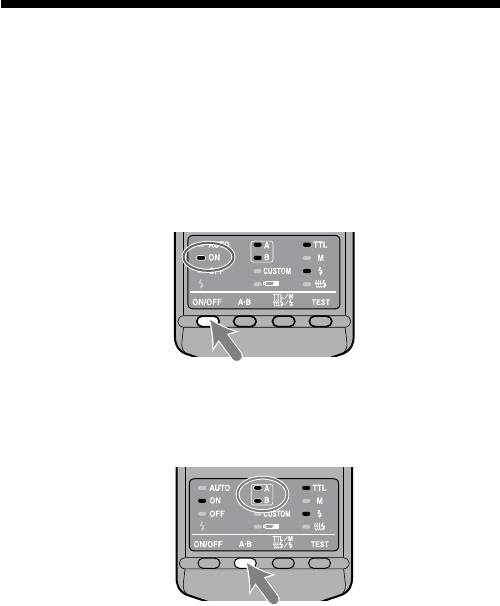
Press the flash ON/OFF button on the back of the macro flash
controller.
Power of the macro ash controller comes on.
Preparations
When the power of the macro ash controller
is turned on, the ash-ON lamp on the control
panel comes on.
If you press the ash ON/OFF button while the
macro ash controller is turned on, the macro
ash controller switches o and the ash-OFF
lamp on the control panel comes on.
e ash-OFF lamp goes out aer about 10
seconds.
Auto power off
If the camera or macro ash controller is not used for four minutes, the power
switches o and control panel indicators disappear automatically to save the
batteries.
You can disable auto power o or change the auto power o time by changing
the customized settings (p. 48).
21
HVL-MT24AM_GB 2-889-493-01 (1)

Basic flash modes (A mode/M mode)
Camera’s exposure mode should be set to either A (aperture priority) mode*
1
, or M
(manual) mode*
2
.
In general close-up photography, the depth-of-eld*
3
must be quite shallow,
which usually requires a smaller aperture when shooting. It is therefore better to
select A or M mode, which enable you to select the aperture.
Using a macro lens is also recommended.
In this section, the basic ash operation in A or M mode with TTL metering (TTL
lamp on) is described.
e following instructions from the next page assume that you are using one of
the following cameras and macro lenses.
Camera: A camera with A (aperture priority) mode or M (manual) mode.
Lens: 50mm F2.8 Macro
100mm F2.8 Macro
If you photograph in P mode, refer to page 30. If using a dierent lens, see the
aperture range graph on page 54.
*
1
A mode: In A mode, you select the aperture and the camera
automatically sets the shutter speed required for proper
exposure.
*
2
M mode: You can select both aperture and shutter speed. You can select a
shutter speed that is slower than the camera’s sync speed.
*
3
Depth-of-eld: e range behind and in front of the subject that is sharply
focused. In close-up photography, this range is shallower and
the out-of-focus range is wider.
22
HVL-MT24AM_GB 2-889-493-01 (1)

1 Set the POWER switch of the camera to ON and select A or
M mode.
2 Press the flash ON/OFF button to turn on the flash-ON
lamp on the control panel.
Basics
3 Focus your subject and check the magnification ratio.
You can check the magnication ratio with the magnication ratio scale on
the lens. (e location of the magnication ratio scale diers depending on
the lens.)
4 When using M mode, select a shutter speed.
You cannot select the shutter speed faster than the camera’s sync speed.
5 Select the aperture.
To nd the correct aperture number, refer to pages 26 to 29.
23
HVL-MT24AM_GB 2-889-493-01 (1)
Continued on the next page
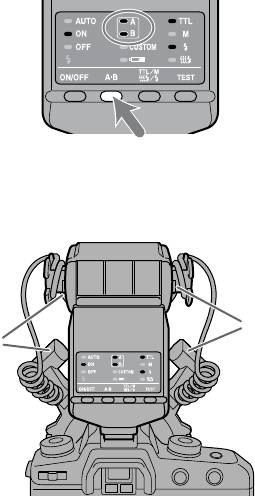
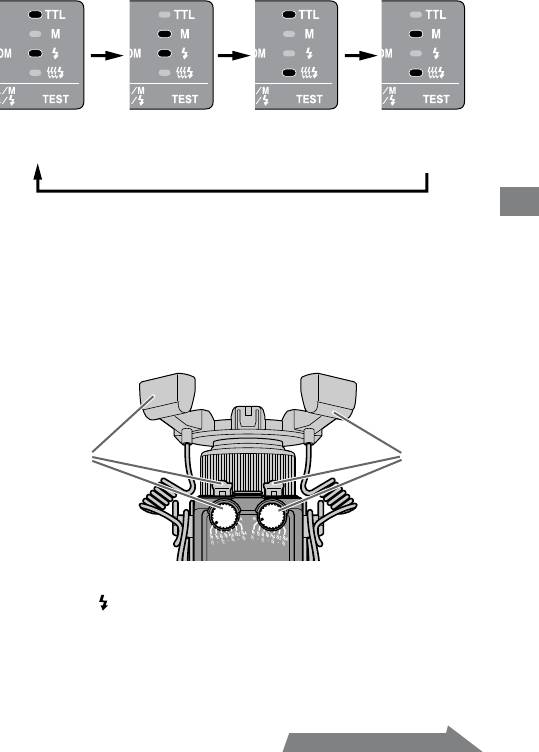
6 Select the flash.
Press the A-B button on the back of the macro ash controller to turn on the
twin ash A lamp, twin ash B lamp or both twin ash lamps. (e lit lamps
indicate which ash will go o.)
As viewed from the rear (control panel side), the A ash is connected to the le
side socket and the B ash to the right side socket.
For the eect of selecting the ash, see from page 51 to 53.
B flash
A flash
24
HVL-MT24AM_GB 2-889-493-01 (1)
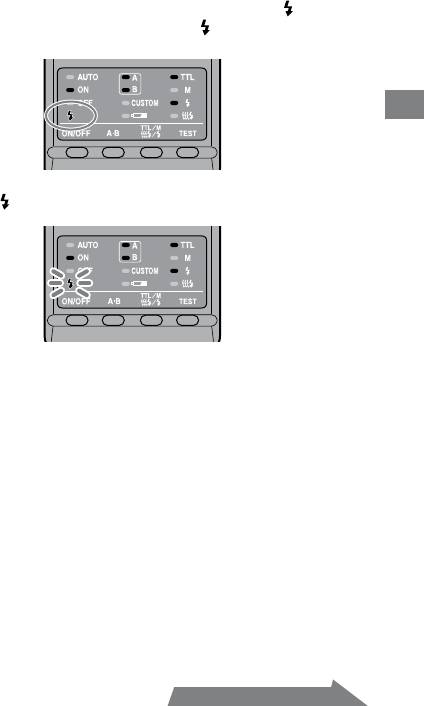
7 When the macro flash controller is charged, press the
shutter button to take a photo.
e macro ash controller is charged when the ash-ready lamp on the
control panel of the macro ash controller and the indicator in the camera
viewnder are both on.
Basics
When the correct exposure has been obtained for the photo just taken, the
ash-ready lamp on the control panel blinks.
e photo will be under-exposed if taken before charging is complete.
e use of a tripod or remote cord is recommended to reduce camera shake.
A camera-to-subject distance of less than 0.5m, and a magnication ratio of
more than 0.15X (greater than 1:7), are recommended to get the best results
from the macro ash units.
Always turn o the macro ash controller if the twin ash unit is not connected.
If the twin ash unit is not attached, but the controller is on, the camera ash
sync will be in eect and the resulting ambient exposures will be incorrect.
e camera’s AF illuminator is blocked by the adaptor ring or twin ash unit and
cannot be used for focusing.
25
HVL-MT24AM_GB 2-889-493-01 (1)
Continued on the next page
Selecting Apertures in TTL Flash
e following tables show values when ISO 100 is used without the wide panel
or diuser. For other ISO speeds, or if you use the wide panel or diuser, adjust
the aperture settings according to the tables on page 28.
e aperture ranges given in the tables are calculated values. e actual lens will
have its own usable aperture range.
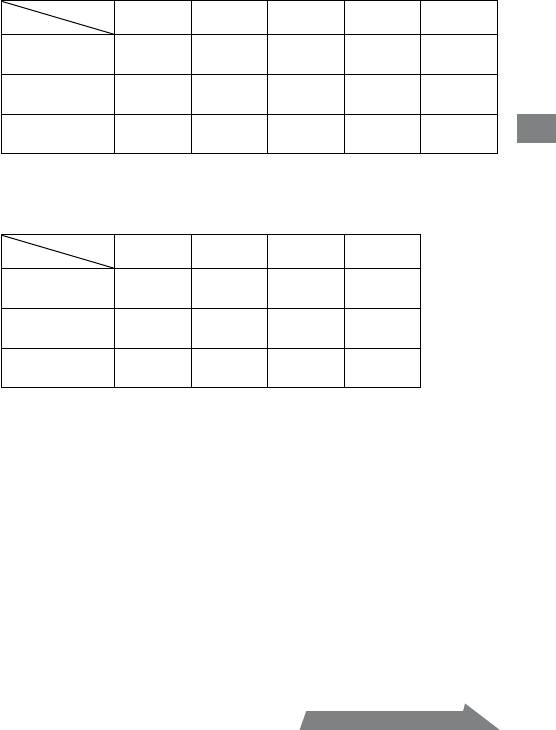
Example: Using a 50mm F2.8 Macro lens when ISO 100, with a pair of
twin flash units with no arm, at a magnification ratio of 1:1
e range of acceptable apertures is calculated to be from f/4 to
f/90 (refer to the following table).
However, the lens aperture range is f/2.8 to f/32, so the actual
range possible with this lens is f/4 to f/32.
e following tables show data for certain lenses and magnication ratios. For
other lenses and magnication ratios, see page 54.
26
HVL-MT24AM_GB 2-889-493-01 (1)
Basics
27
HVL-MT24AM_GB 2-889-493-01 (1)
Continued on the next page
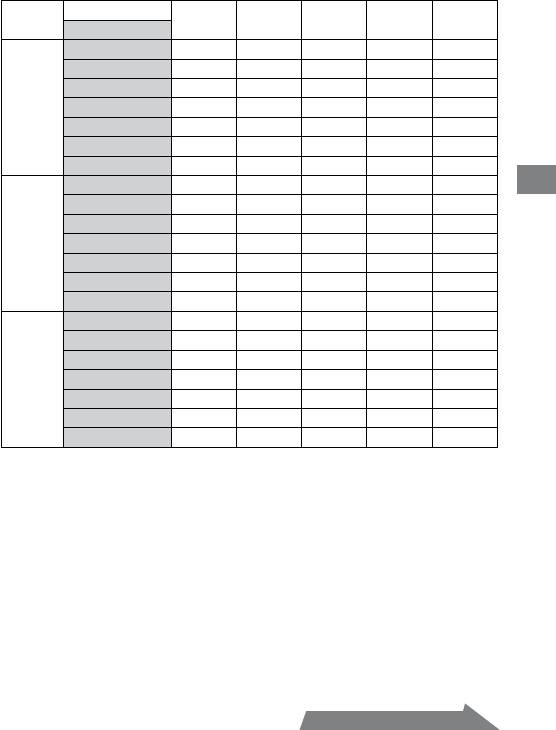
50mm F2.8 Macro (Lens aperture range : f/2.8 - f/32)
Magnication
ratio
1:1 1:1.5 1:2 1:3 1:4
4 ~ 90
5.6 ~ 128
8 ~ 180
5.6 ~ 128
4.5 ~ 108
Without arm
2.8 ~ 64
4 ~ 90
5.6 ~ 128
4 ~ 90
3.5 ~ 76
Arm (short)
2.4 ~ 54
2.8 ~ 64
4 ~ 90
4 ~ 90
4.5 ~ 108
60° position
1.7 ~ 38
2 ~ 45
2.8 ~ 64
2.8 ~ 64
3.5 ~ 76
Arm (long)
1.4 ~ 32
1.4 ~ 32
2 ~ 45
2.4 ~ 54
2.8 ~ 64
90° position
1 ~ 22
1 ~ 22
1.4 ~ 32
1.7 ~ 38
2 ~ 45
Upper set of numbers is for two twin ash units.
Lower set is for one twin ash unit.
100mm F2.8 Macro (Lens aperture range : f/2.8 - f/32)
Magnication
ratio
1:1 1:1.5 1:2 1:3
3.5 ~ 76
3.5 ~ 76
2.8 ~ 64
2.4 ~ 54
Without arm
2.4 ~ 54
2.4 ~ 54
2 ~ 45
1.7 ~ 38
Arm (short)
2 ~ 45
2.8 ~ 64
2.8 ~ 64
2.8 ~ 64
60° position
1.4 ~ 32
2 ~ 45
2 ~ 45
2 ~ 45
Arm (long)
1.2 ~ 27
1.7 ~ 38
2 ~ 45
2 ~ 45
90° position
0.85 ~ 19
1.2 ~ 27
1.4 ~ 32
1.4 ~ 32
Upper set of numbers is for two twin ash units.
Lower set is for one twin ash unit.
When using other than ISO 100, or when using the wide panel
or diffuser
An additional adjustment must be applied to the previous tables.
Without wide
With wide panel
With diuser
panel or diuser
(Exposure adjustment)
(Exposure adjustment)
(Exposure adjustment)
ISO 25 +2 Stop +3.5 Stop +4.5 Stop
ISO 50 +1 Stop +2.5 Stop +3.5 Stop
ISO 100 No change +1.5 Stop +2.5 Stop
ISO 200 –1 Stop +0.5 Stop +1.5 Stop
ISO 400 –2 Stop –0.5 Stop +0.5 Stop
ISO 800 –3 Stop –1.5 Stop –0.5 Stop
ISO 1600 –4 Stop –2.5 Stop –1.5 Stop
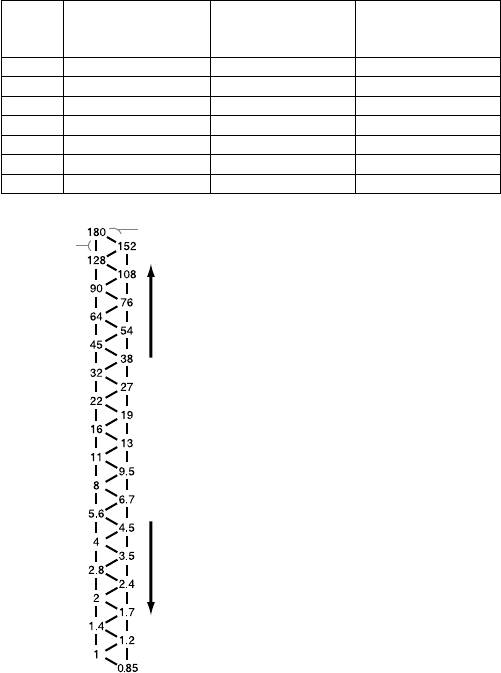
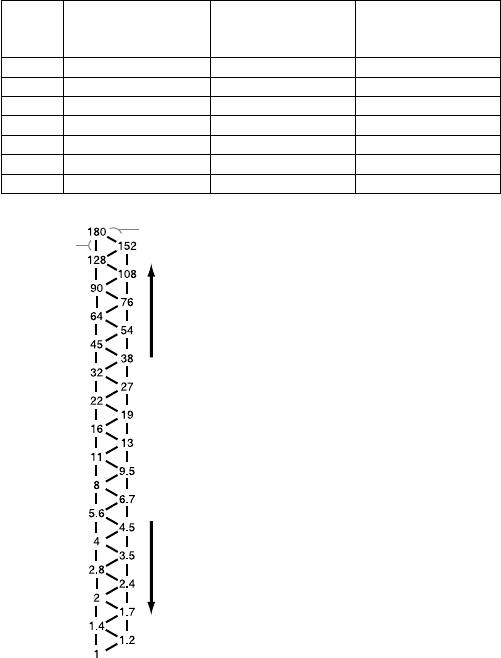
f/stop scale
a half-stop
Using the f/stop scale
a full-stop
Decrease exposure Increase exposure
Using the f/stop scale at the le, moving
one step vertically is equal to a full-stop
change. Moving one step diagonally is
equal to a half-stop change.
Half a stop is basic for setting the
aperture in this step. When using a
0.3 stop setting camera, adjust the
aperture by a value as close as possible
to a value in the above table and use
the aperture around the f/stop scale.
For precise photography, bracketing is
recommended.
Example:
Starting at f/8, if you decrease the
exposure by a full stop, you get f/11.
If you increase by half a stop, you get
f/6.7.
28
HVL-MT24AM_GB 2-889-493-01 (1)

Selecting the aperture when using other than ISO 100, or
when using the wide panel or diffuser
1 Check the calculated acceptable aperture range under the same
condition with ISO 100 by using the table on page 27.
2 Check the additional adjustment when using other than ISO 100 or
when using the wide panel or diffuser by using the table on page 28.
3 Check the calculated acceptable aperture range by using the f/stop scale
using the results of step1 and step2.
4 Apply the result of step3 to the actual aperture range for this particular
Basics
lens and select the usable range for satisfactorily results.
Example: Using a 50mm F2.8 Macro lens, two twin flash units, no arm,
magnification ratio of 1:2, and ISO 200
1 Check the calculated acceptable aperture range when using a 50mm F2.8 Macro
lens, two twin ash units, no arm, magnication ratio of 1:2, and ISO 100.
f/8 - f/180 (refer to the table on page 27)
2 Check the additional adjustment when using ISO 200 and diuser by using the
table on page 28.
Increase the aperture by +1.5 stops (refer to the table on page 28).
3 e aperture increased by +1.5 stops from f/8 is equal to f/4.5, and the aperture
increased by +1.5 stops from f/180 is equal to f/108.
4 e actual aperture range for a 50mm F2.8 Macro lens is f/2.8 - f/32, so the
upper limit of the adjusted f/4.5 - f/108 range, i.e. f/108, is beyond the range that
can be set. e usable range for satisfactorily results is therefore f/4.5 - f/32.
29
HVL-MT24AM_GB 2-889-493-01 (1)
Program auto flash (The basics)
e procedure for P mode, including subject program selection, is the same as that
for A or M mode, except that the aperture is set automatically.
1 Set the POWER switch of the camera to ON and select P
mode.
2 Press the flash ON/OFF button to turn on flash-ON lamp on
the control panel.
3 Focus your subject and check the magnification ratio.
4 Select the flash.
5 When the macro flash controller is charged, press the
shutter button to take a photo.
30
HVL-MT24AM_GB 2-889-493-01 (1)
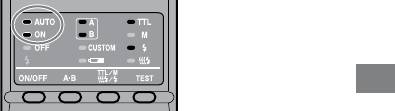
With some cameras, the ash will re automatically in P mode. In this case, the
auto lamp on the macro ash unit comes on and the ash may not re if the
surrounding conditions are bright.
Basics
e P mode ash program is designed for general subjects, not macro subjects.
When taking macro photos, the depth-of-eld may be very shallow. If the
aperture selected by the camera is outside the allowable range, the proper
exposure cannot be obtained (p. 26 - 29).
31
HVL-MT24AM_GB 2-889-493-01 (1)
32
HVL-MT24AM_GB 2-889-493-01 (1)
Manual flash (M)
Normal TTL ash metering automatically adjusts the ash intensity to provide
the proper exposure for the subject. Manual ash provides a xed ash intensity
irrespective of the brightness of the subject and the camera setting.
In manual ash mode, the maximum ash power is when the manual ash
control is set to 1/1. Each step of the ash power level corresponds to one
aperture stop. Changing the setting by one stop, for example from 1/1 to 1/2, is
equivalent to decreasing the aperture one stop, for example from f/4 to f/5.6.
Manual ash can only be used when the camera is in the M mode. In other
modes, TTL measuring is automatically selected.
As manual ash is not aected by the reectivity of the subject, it is convenient
for use with subjects with extremely high or low reectivity.
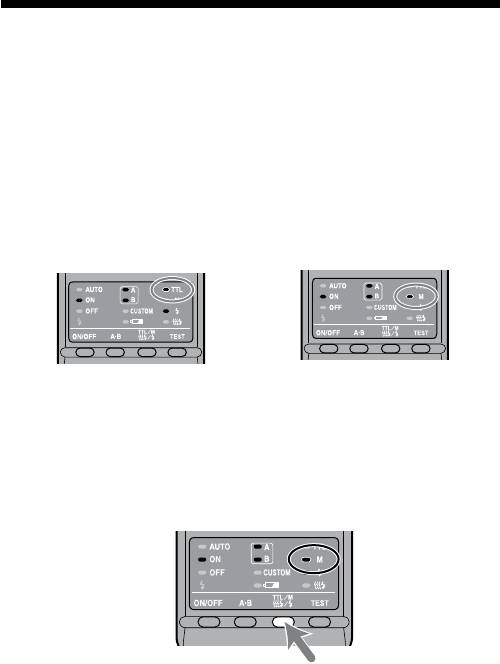
TTL flash metering Manual flash metering
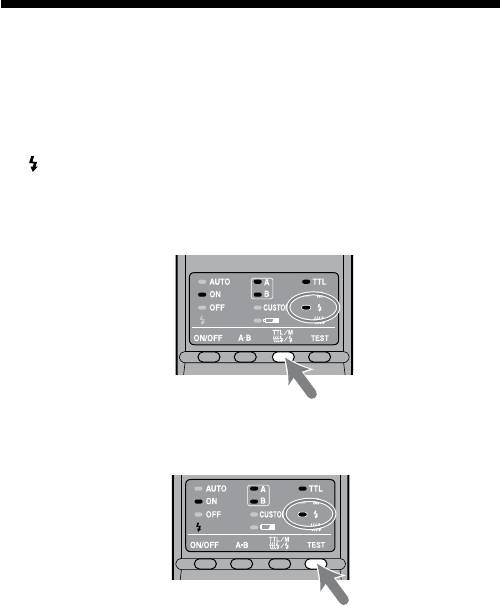
1 Select M mode on the camera.
2 Press the TTL/M/Test button to light on the M (manual-
flash control) lamp.
e modes change in the following order. (Test ash (p. 40), Modeling ash
(p. 41))
TTL flash
Manual flash
TTL flash
Manual flash
Test flash
Test flash
Modeling flash
Modeling flash
Detailed operations
3 Select shutter speed and aperture (p. 34 - 39).
4 Turn the appropriate manual-flash-control dial and select
the desired power level (p. 34 - 39).
When viewed from the rear (control panel side), the manual-ash-control
dial for twin ash A is on the le, and that for twin ash B is on the right.
You can select any power level setting on the upper scale from 1/1 to 1/64.
A flash B flash
In manual ash mode, if a proper exposure has been obtained, the ash-
ready lamp will not blink on the control panel aer a photo is taken.
Using customized functions, manual ash may be selected without setting
the camera in M mode. e size of the steps on the manual-ash-control
dials can also be changed from full-stop increments to half-stop increments
(p. 48).
33
HVL-MT24AM_GB 2-889-493-01 (1)
Continued on the next page
34
HVL-MT24AM_GB 2-889-493-01 (1)
Selecting apertures and power level in
manual flash
e following tables show the values when ISO 100 is used without the wide
panel or diuser. For other ISO speeds, or if you use the wide panel or diuser,
adjust the aperture settings according to the table on page 38. When using the
twin ash units, the data assumes that the power lever is the same for both units.
If they are set at dierent power levels, see page 37.
e aperture values given in the tables are calculated values. e actual lens will
have its own usable aperture range.
Example: Using a 50mm F2.8 Macro lens when ISO 100, with a pair
of twin flash units with no arm, power level of 1/1, and a
magnification ratio of 1:1
e aperture is calculated at f/90 (refer to the following table).
However, the smallest actual aperture possible with this lens is
f/32.
erefore, if you set the power level to 1/1, the picture will be
overexposed.
But if you set the power level to 1/8, you will get a correct
exposure at f/32.
ese following tables show the apertures where the proper exposure of the
illuminated area is obtained. Actual exposure varies according to the subject’s
shape or position (p. 53). Test photographs or bracketing is recommended
especially when the subject is illuminated from side or behind.
e following tables show data for certain lenses and magnication ratios. For
other lenses and magnication ratios, see page 55.
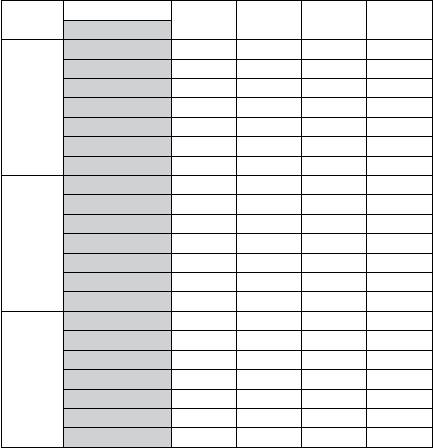
50mm F2.8 Macro (Lens aperture range: f/2.8 - f/32)
Magnication ratio
1:1 1:1.5 1:2 1:3 1:4
Power level
1/1 90 (64) 128 (90) 180 (128) 128 (90) 108 (76)
1/2 64 (45) 90 (64) 128 (90) 90 (64) 76 (54)
1/4 45 (32) 64 (45) 90 (64) 64 (45) 54 (38)
Without
1/8 32 (22) 45 (32) 64 (45) 45 (32) 38 (27)
arm
1/16 22 (16) 32 (22) 45 (32) 32 (22) 27 (19)
1/32 16 (11) 22 (16) 32 (22) 22 (16) 19 (13)
1/64 11 (8) 16 (11) 22 (16) 16 (11) 13 (9.5)
1/1 54 (38) 64 (45) 90 (64) 90 (64) 108 (76)
Detailed operations
1/2 38 (27) 45 (32) 64 (45) 64 (45) 76 (54)
Arm
1/4 27 (19) 32 (22) 45 (32) 45 (32) 54 (38)
(short)
1/8 19 (13) 22 (16) 32 (22) 32 (22) 38 (27)
60°
1/16 13 (9.5) 16 (11) 22 (16) 22 (16) 27 (19)
position
1/32 9.5 (6.7) 11 (8) 16 (11) 16 (11) 19 (13)
1/64 6.7 (4.5) 8 (5.6) 11 (8) 11 (8) 13 (9.5)
1/1 32 (22) 32 (22) 45 (32) 54 (38) 64 (45)
1/2 22 (16) 22 (16) 32 (22) 38 (27) 45 (32)
Arm
1/4 16 (11) 16 (11) 22 (16) 27 (19) 32 (22)
(long)
1/8 11 (8) 11 (8) 16 (11) 19 (13) 22 (16)
90°
1/16 8 (5.6) 8 (5.6) 11 (8) 13 (9.5) 16 (11)
position
1/32 5.6 (4) 5.6 (4) 8 (5.6) 9.5 (6.7) 11 (8)
1/64 4 (2.8) 4 (2.8) 5.6 (4) 6.7 (4.5) 8 (5.6)
Use aperture values inside ( ) when only one twin ash unit is used.
35
HVL-MT24AM_GB 2-889-493-01 (1)
Continued on the next page
36
HVL-MT24AM_GB 2-889-493-01 (1)
100mm F2.8 Macro (Lens aperture range: f/2.8 - f/32)
Magnication ratio
1:1 1:1.5 1:2 1:3
Power level
1/1 76 (54) 76 (54) 64 (45) 54 (38)
1/2 54 (38) 54 (38) 45 (32) 38 (27)
1/4 38 (27) 38 (27) 32 (22) 27 (19)
Without
1/8 27 (19) 27 (19) 22 (16) 19 (13)
arm
1/16 19 (13) 19 (13) 16 (11) 13 (9.5)
1/32 13 (9.5) 13 (9.5) 11 (8) 9.5 (6.7)
1/64 9.5 (6.7) 9.5 (6.7) 8 (5.6) 6.7 (4.5)
1/1 45 (32) 64 (45) 64 (45) 64 (45)
1/2 32 (22) 45 (32) 45 (32) 45 (32)
Arm
1/4 22 (16) 32 (22) 32 (22) 32 (22)
(short)
1/8 16 (11) 22 (16) 22 (16) 22 (16)
60°
1/16 11 (8) 16 (11) 16 (11) 16 (11)
position
1/32 8 (5.6) 11 (8) 11 (8) 11 (8)
1/64 5.6 (4) 8 (5.6) 8 (5.6) 8 (5.6)
1/1 27 (19) 38 (27) 45 (32) 45 (32)
1/2 19 (13) 27 (19) 32 (22) 32 (22)
Arm
1/4 13 (9.5) 19 (13) 22 (16) 22 (16)
(long)
1/8 9.5 (6.7) 13 (9.5) 16 (11) 16 (11)
90°
1/16 6.7 (4.5) 9.5 (6.7) 11 (8) 11 (8)
position
1/32 4.5 (3.5) 6.7 (4.5) 8 (5.6) 8 (5.6)
1/64 3.5 (2.4) 4.5 (3.5) 5.6 (4) 5.6 (4)
Use aperture values inside ( ) when only one twin ash unit is used.
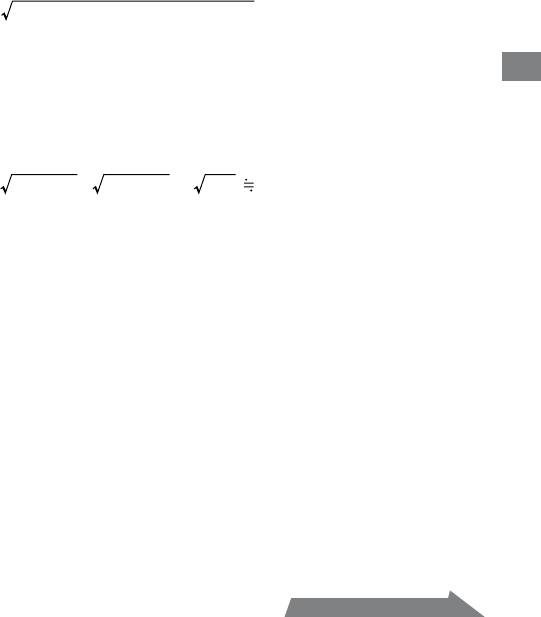
When twin flash units are at different power level settings
e values given in the preceding tables for the twin ash units assume that both
twin ash units are set at the same ash level.
When they are set to dierent ash power levels, the aperture needed for correct
exposure can be calculated using the following equation:
Aperture*
2
2
=
(A ash aperture)
+ (B ash aperture)
Example:
Using a 100mm F2.8 Macro lens with a pair of twin flash units with no
arm, “A” flash is set at a power level of 1/8, “B” flash unit is set at 1/16, and
Detailed operations
the magnification ratio is 1:1
e A ash aperture set at a power level of 1/8 is f/19 and the B ash aperture set
at a power level of 1/16 is f/13 (refer to the table on 36 page).
Apply these results in the above equation.
37
HVL-MT24AM_GB 2-889-493-01 (1)
2
2
19
+ 13
= 361 + 169 = 530 22
erefore, in the above example, an aperture setting of f/22 will give proper
exposure.
* When both twin ash units are used.
Continued on the next page
38
HVL-MT24AM_GB 2-889-493-01 (1)
When using other than ISO 100, or when using the wide panel
or diffuser
An additional adjustment must be applied to the previous tables.
Without wide
With wide panel
With diuser
panel or diuser
(Exposure adjustment)
(Exposure adjustment)
(Exposure adjustment)
ISO 25 +2 Stop +3.5 Stop +4.5 Stop
ISO 50 +1 Stop +2.5 Stop +3.5 Stop
ISO 100 No change +1.5 Stop +2.5 Stop
ISO 200 –1 Stop +0.5 Stop +1.5 Stop
ISO 400 –2 Stop –0.5 Stop +0.5 Stop
ISO 800 –3 Stop –1.5 Stop –0.5 Stop
ISO 1600 –4 Stop –2.5 Stop –1.5 Stop
f/stop scale
a half-stop
Using the f/stop scale
a full-stop
Decrease exposure Increase exposure
Using the f/stop scale at the le, moving
one step vertically is equal to a full-stop
change. Moving one step diagonally is
equal to a half-stop change.
Half a stop is basic for setting the
aperture in this step. When using a
0.3 stop setting camera, adjust the
aperture by a value as close as possible
to a value in the above table and use
the aperture around the f/stop scale.
For precise photography, bracketing is
recommended.
Example:
Starting at f/8, if you decrease the
exposure by a full stop, you get f/11.
If you increase by half a stop, you get
f/6.7.

Selecting the aperture when using other than ISO 100, or
when using the wide panel or diffuser
1
Check the calculated acceptable aperture under the same condition with
ISO 100 by using the table on pages 35 and 36.
2
Check the additional adjustment when using other than ISO 100 or
when using the wide panel or diffuser by using the table on page 38.
3
Select the calculated acceptable aperture by using the f/stop scale using
the results of step1 and step2.
Example: Using a 100mm F2.8 Macro lens, two twin flash units, no arm, a
power level of 1/4, magnification ratio of 1:1, ISO 200 with the
Detailed operations
diffuser
1 Check the calculated acceptable aperture when using a 100mm F2.8 Macro lens,
two twin ash units, no arm, a power level of 1/4, magnication ratio of 1:1, and
ISO 100.
f/38 (refer to the table on page 36)
2 Check the additional adjustment when using ISO 200 and diuser by using the
table on page 38.
Increase the aperture by +1.5 stops (refer to the table on page 38).
3 e aperture increased by +1.5 stops from f/38 is equal to f/22.
39
HVL-MT24AM_GB 2-889-493-01 (1)
40
HVL-MT24AM_GB 2-889-493-01 (1)
Test flash
You can try one test ash before shooting. Use test ash mode when using a ash
meter in manual-ash mode.
1 Press the TTL/M/Test button to turn on the test-flash lamp
.
Each time the TTL/M/Test button is pressed to change the TTL and M lamp
be sure to check that the appropriate lamp is on. (See page 33 for the display
sequence.)
2 Press the TEST button (test/modeling flash button) .
With TTL ash metering, the test ash will re at full power when the
TEST button is pressed.
In manual ash mode, the test ash will re at the selected power level
when the TEST button is pressed. When using a ash meter, use manual
ash mode.
