Sharp R-870B: INSTALLATION INSTRUCTIONS
INSTALLATION INSTRUCTIONS: Sharp R-870B
E – 3
INSTALLATION INSTRUCTIONS
1. Remove all packing materials from the oven cavity. Check the unit for any damage, such as a
misaliged door, damaged gaskets around the door or dents inside the oven cavity or on the door. If
there is any damage, please do not operate the oven until it has been checked by a SERVICE CENTRE
APPROVED BY SHARP and repaired, if necessary.
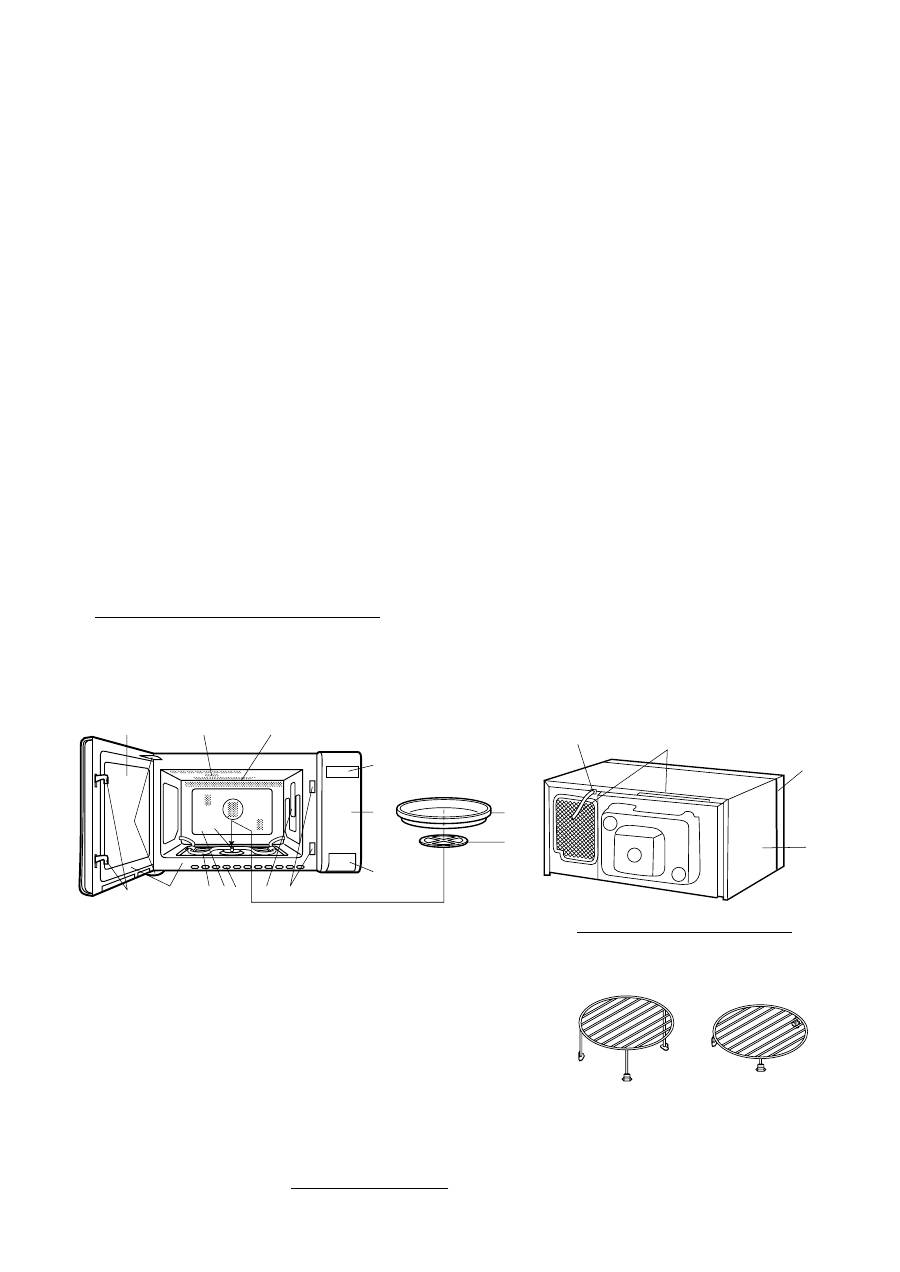
2. Accessories provided
1) Turntable
4) High rack
7) Cook book (Russian)
2) Turntable support
5) Cook book (for microwave cooking)
8) Operation manual
3) Low rack
6) Cook book (for convection cooking)
3. Since the door may become hot during cooking, and in order to avoid its accidental touch, the oven
should be placed at least 80 cm or more above floor. You should also keep Children away from the
door to prevent them burning themselves.
4. Ensure that the bottom heater is in the lowest position as shown in the OVEN DIAGRAM below (never
touch or move the bottom heater while it is hot). Then fit the turntable support to the turntable motor
shaft on the floor of the oven cavity. And place the turntable on the turntable support. Make sure the
turntable and turntable support are centrally located and locked together. NEVER operate the oven
without the turntable support and turntable.
5. The oven should not be installed in any area where excessive heat and steam are generated, for
example, next to a conventional oven unit.
The oven should be installed so as not to block ventilation openings.
Allow at least 40 cm on top of the oven for free air space. This oven is not designed to be built-in to
a wall or cabinet.
6. Neither the manufacturer nor the distributors can accept any liability for damage to the machine or
personal injury for failure to observe the correct electrical connecting procedure.
The A.C. voltage must be single phase 220V, 50Hz.
7. THIS APPLIANCE MUST BE EARTHED.
1. Oven lamp
(It will light during the cooking)
2. Top grill heater
(top heater)
3. See through door
4. Door hinges
5. Door safety latches
6. Door seals and sealing surfaces
7. Bottom grill heater
(bottom heater)
8.Oven cavity
Metal racks——High and low
The racks are for Grill, Mix,
Convection and recommended
automatic operations.
9.Turntable motor shaft
10.Ventilation openings
11.Waveguide cover
12.Door open button
13.Touch control panel
14.Digital readout
15.Power supply cord
16.Outer cabinet
17.Turntable
18.Turntable support
19.Ventilation slit
OVEN DIAGRAM
2
1
3
4
5
5
9
D
C
B
G
E
F
0
H
6
780 A
I
WARNING:
The accessories will become very hot whenever the top heater, bottom heater or convection symbols
are lighted in the display and use thick oven gloves when putting/removing the food or turntable from
the oven to PREVENT BURNS.
Оглавление
- VTHS GHTLJCNJHJÖZJCNB
- JCJ>ST ERFPFZBY
- BZCNHERWBY GJ ECNFZJDRT
- HF>JNF C CTZCJHZJQ GFZTKM* EGHFDKTZBY
- 1 2 3 4 5 6 7 8 9 0
- 1
- 2
- JCJ>ST ERFPFZBY
- 1
- 1
- 3
- 23
- 2
- 34
- 1
- 23
- 2 1
- FDNJVFNBXTCRBT JGTHFWBB
- 1
- ÜP-3 ÜP-3ÜP-3 ÜP-3ÜP-3
- 12
- HTWTGNS LJVFIZTQ GBWWS
- 12
- FU-1 FU-1FU-1 FU-1FU-1
- 1
- FÖ-1FÖ-1FÖ-1FÖ-1FÖ-1
- 13
- AB-2AB-3AB-1
- 1
- H-1H-1H-1H-1H-1H-3H-3H-3H-3H-3
- 1 2
- 1
- G-2
- 1
- 43265
- 3
- 1
- EÜJL PF GTXM*
- NTÜZBXTCRBT ÜFHFRNTHBCNBRB
- WARNING
- SPECIAL NOTES
- INSTALLATION INSTRUCTIONS
- OPERATION OF TOUCH CONTROL PANEL
- 1 2 3 4 5 6 7 8 9 0
- 112
- 1
- MANUAL OPERATIONS
- 2
- 213
- 3
- 1 23
- 2
- 1
- 1
- 23
- 5
- AUTOMATIC OPERATIONS
- 3
- 2
- HOMEMADE PIZZA RECIPES
- 2
- 2
- 2314
- Auto Bake Recipe
- 1
- 1
- 21
- SENSOR STEAM MENU RECIPES (Meat)
- 1
- 1
- 3
- 1
- 14
- CARE AND CLEANING
- SPECIFICATIONS


