Sharp R-870B: 1
1: Sharp R-870B

E – 35
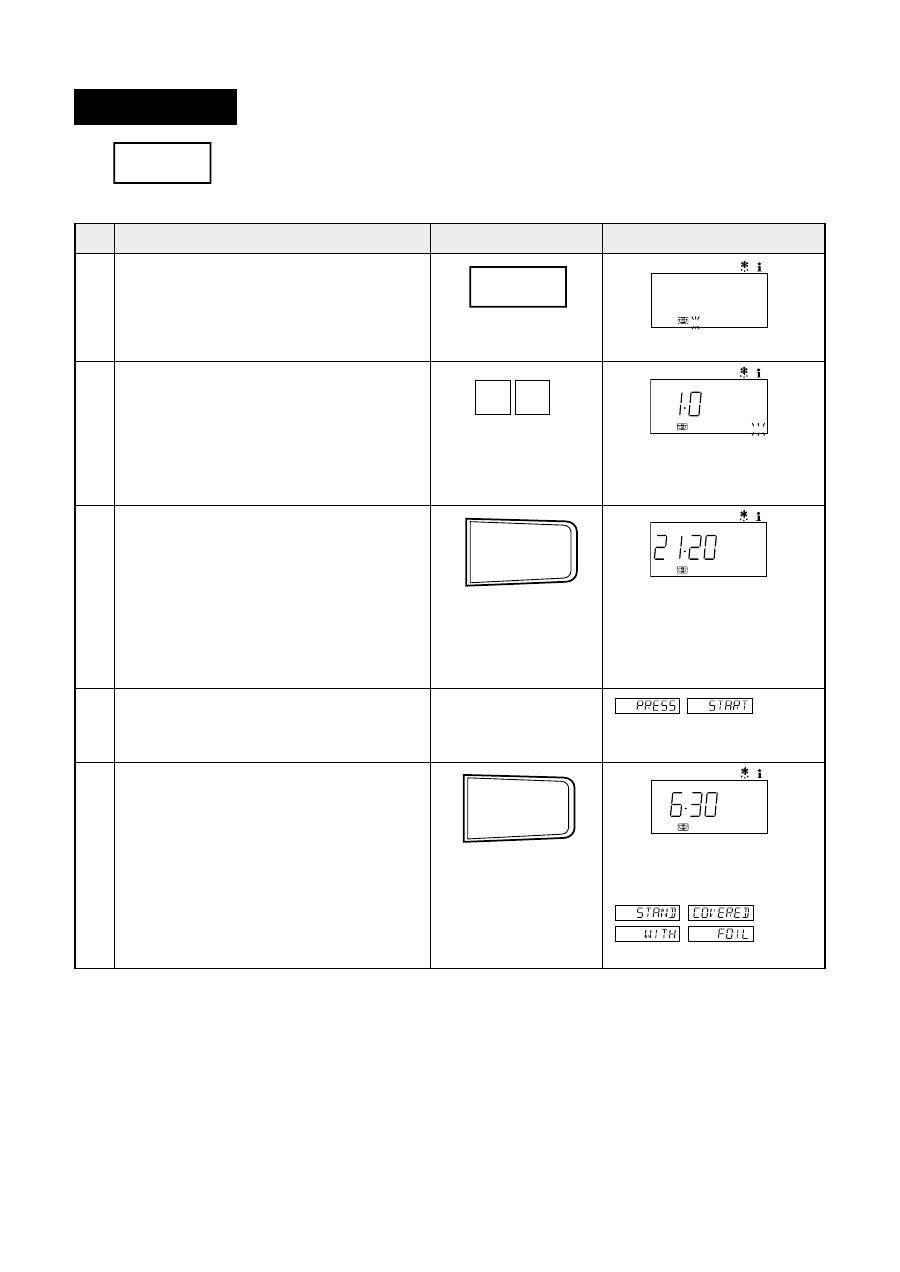
Easy Defrost
The Easy Defrost feature allows you to defrost meats by entering weight.
* Suppose you want to defrost 1.0 kg of Chicken Pieces. (Round off to nearest 0.1 kg)
Step
Procedure
Pad Order
Display
1
will be
displayed repeatedly.
Open the door. Turn over the chicken
pieces.
Close the door.
Press the INSTANT COOK/START pad.
0
1
KG stops flashing and re-
mains on display.
COOK will flash on and off.
Press the INSTANT COOK/START pad.
Press number pads to enter weight.
Press the EASY DEFROST pad .
2
EASY DEFROST
GHJCNFY
HFPVJHJPRF
When the cooking time
reaches zero, audible
signal will sound and
will be
displayed repeatedly.
The oven will "beep" about
2/3 of the way through the
defrost time and will stop.
TURN OVER will flash on
and off.
5 3
EASY DEFROST
GHJCNFY
HFPVJHJPRF
INSTANT COOK/START
>SCNHJT
GHBUJNJDKTZBT/
GECR
KG
AUTO
COOK
DEFROST HELP
RU
FDNJ
GHBUJN.
AUTO
COOK
DEFROST HELP
FDNJ
GHBUJN.
INSTANT COOK/START
>SCNHJT
GHBUJNJDKTZBT/
GECR
AUTO
COOK
DEFROST HELP
FDNJ
GHBUJN.
KG will flash on and off.
KG
AUTO
DEFROST HELP
RU
FDNJ
4

E – 36
Food not listed in the Guide can be defrosted manually using M.LOW power level.
NOTE
1. When freezing minced meat, shape it into flat even sizes.
2. For chicken pieces, steaks and chops, freeze separately in single flat layers and if necessary
interleave with freezer plastic to separate layers. This will ensure even defrosting.
3. It is also a good idea to label the packs with the correct weights.
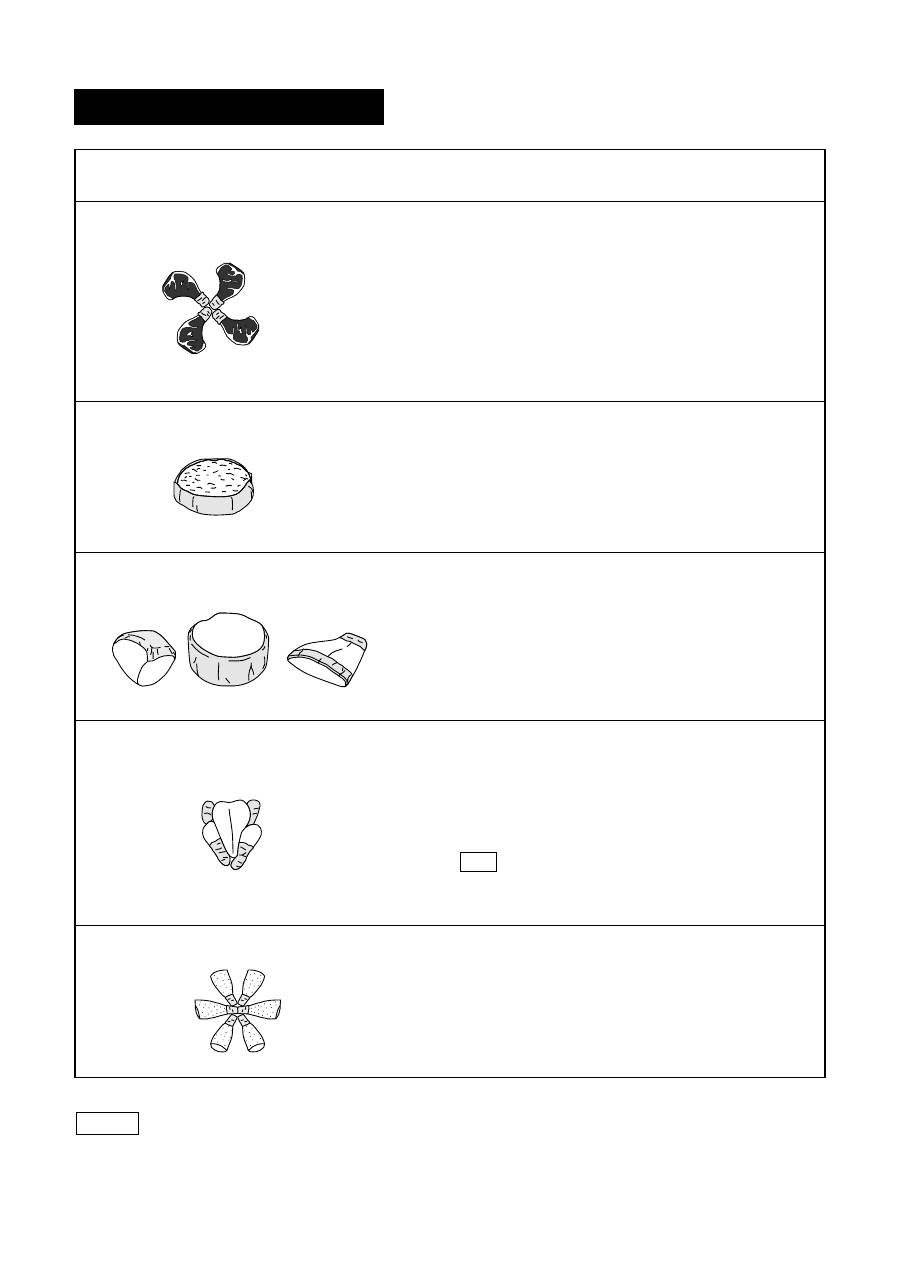
Steaks
Chops
Minced Meat
Beef/Pork
Roast Meat
Beef/Pork/Lamb
Poultry
Chicken Pieces
Easy Defrost Menu Guide
QUANTITY
(MIN. – MAX.)
PROCEDURE
MENU
0.1 - 2.0 kg
0.1 - 2.0 kg
0.5 - 2.0 kg
1.0 - 2.0 kg
0.1 - 2.0 kg
• Shield thin end of chops or steaks with foil.
• Position the food with thinner parts in the centre in a
single layer on the defrost rack.
If pieces are stuck together, try to separate as soon
as possible.
• When oven has stopped, remove defrosted pieces,
turn over and shield the warm portions.
• Press start to continue defrosting.
• After defrost time, stand covered with aluminium foil
for 5-30 minutes.
• Place frozen minced meat on a defrost rack. Shield
edges.
• When oven has stopped, remove defrosted portions,
turn over and shield edges with foil strips.
• Press start to continue defrosting.
• After defrost time, stand covered with aluminium foil
for 5-30 minutes.
• Shield the edge with foil strips about 2.5cm wide.
• Place joint with lean side face upwards (if possible)
on the defrost rack.
• When oven has stopped, turn over and shield the
warm portions.
• Press start to continue defrosting.
• After defrost time, stand covered with aluminium foil
for 10-30 minutes.
• Remove from original wrapper.
• Place breast side down on the defrost rack.
• When oven has stopped, turn over and shield the
warm portions such as wings and leg tips with foil.
• Press start to continue defrosting.
• After defrost time, stand covered with aluminium foil
for 15-60 minutes.
N.B. After standing run under cold water to remove
giblets if necessary.
• Place chicken pieces on the defrost rack.
• When oven has stopped, remove defrosted pieces,
turn over and shield the warm portions.
• Press start to continue defrosting.
• After defrost time, stand covered with aluminium foil
for 5-30 minutes.
Оглавление
- VTHS GHTLJCNJHJÖZJCNB
- JCJ>ST ERFPFZBY
- BZCNHERWBY GJ ECNFZJDRT
- HF>JNF C CTZCJHZJQ GFZTKM* EGHFDKTZBY
- 1 2 3 4 5 6 7 8 9 0
- 1
- 2
- JCJ>ST ERFPFZBY
- 1
- 1
- 3
- 23
- 2
- 34
- 1
- 23
- 2 1
- FDNJVFNBXTCRBT JGTHFWBB
- 1
- ÜP-3 ÜP-3ÜP-3 ÜP-3ÜP-3
- 12
- HTWTGNS LJVFIZTQ GBWWS
- 12
- FU-1 FU-1FU-1 FU-1FU-1
- 1
- FÖ-1FÖ-1FÖ-1FÖ-1FÖ-1
- 13
- AB-2AB-3AB-1
- 1
- H-1H-1H-1H-1H-1H-3H-3H-3H-3H-3
- 1 2
- 1
- G-2
- 1
- 43265
- 3
- 1
- EÜJL PF GTXM*
- NTÜZBXTCRBT ÜFHFRNTHBCNBRB
- WARNING
- SPECIAL NOTES
- INSTALLATION INSTRUCTIONS
- OPERATION OF TOUCH CONTROL PANEL
- 1 2 3 4 5 6 7 8 9 0
- 112
- 1
- MANUAL OPERATIONS
- 2
- 213
- 3
- 1 23
- 2
- 1
- 1
- 23
- 5
- AUTOMATIC OPERATIONS
- 3
- 2
- HOMEMADE PIZZA RECIPES
- 2
- 2
- 2314
- Auto Bake Recipe
- 1
- 1
- 21
- SENSOR STEAM MENU RECIPES (Meat)
- 1
- 1
- 3
- 1
- 14
- CARE AND CLEANING
- SPECIFICATIONS


