JVC KD-G117: ~
~ : JVC KD-G117
Sound adjustments
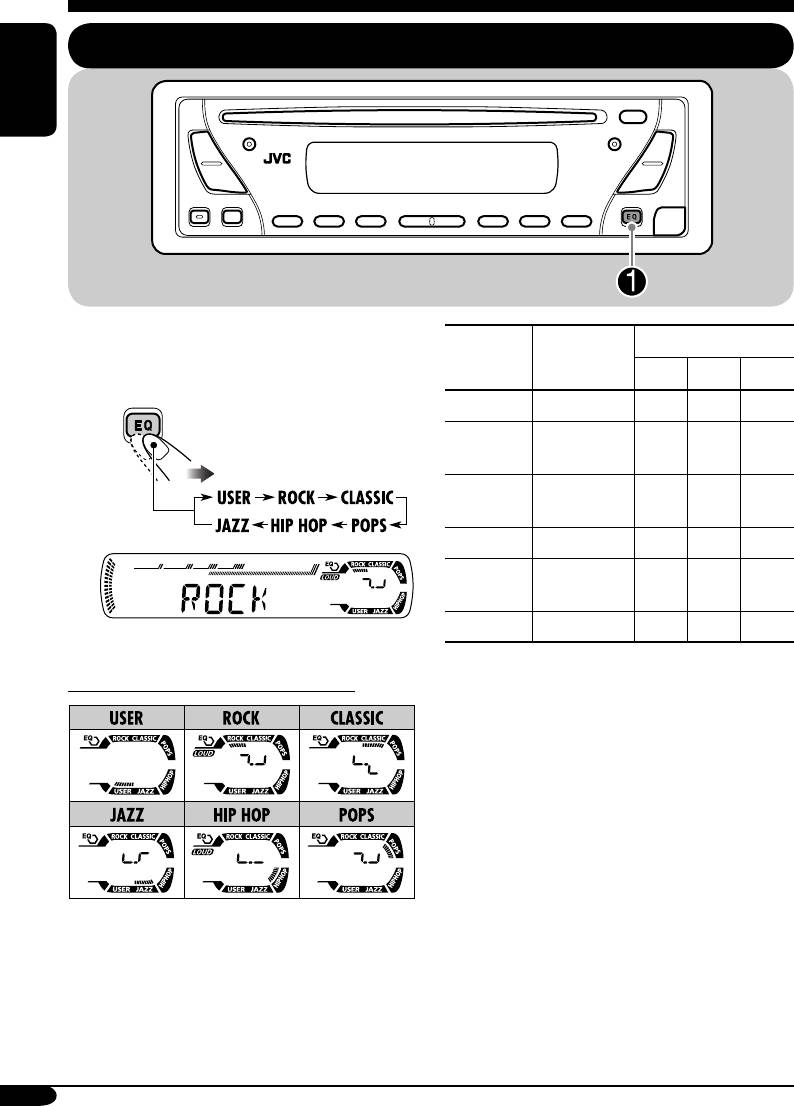
Selecting preset sound modes (C-EQ: custom equalizer)
ENGLISH
You can select a preset sound mode suitable to
Preset values
the music genre.
Indication For:
1
2
3
BAS
*
TRE
*
LOUD
*
USER (Flat sound) 00 00 OFF
~
ROCK Rock or
+03 +01 ON
disco music
CLASSIC Classical
+01 –02 OFF
music
POPS Light music +04 +01 OFF
HIP HOP Funk or rap
+02 00 ON
music
JAZZ Jazz music +02 +03 OFF
Ex.: When “ROCK” is selected
1
*
BAS: Bass
Indication pattern for each sound mode:
2
*
TRE: Treble
3
*
LOUD: Loudness
12
EN12-15_KD-G117[EE]f.indd 12 10/20/04, 2:55:01 PM
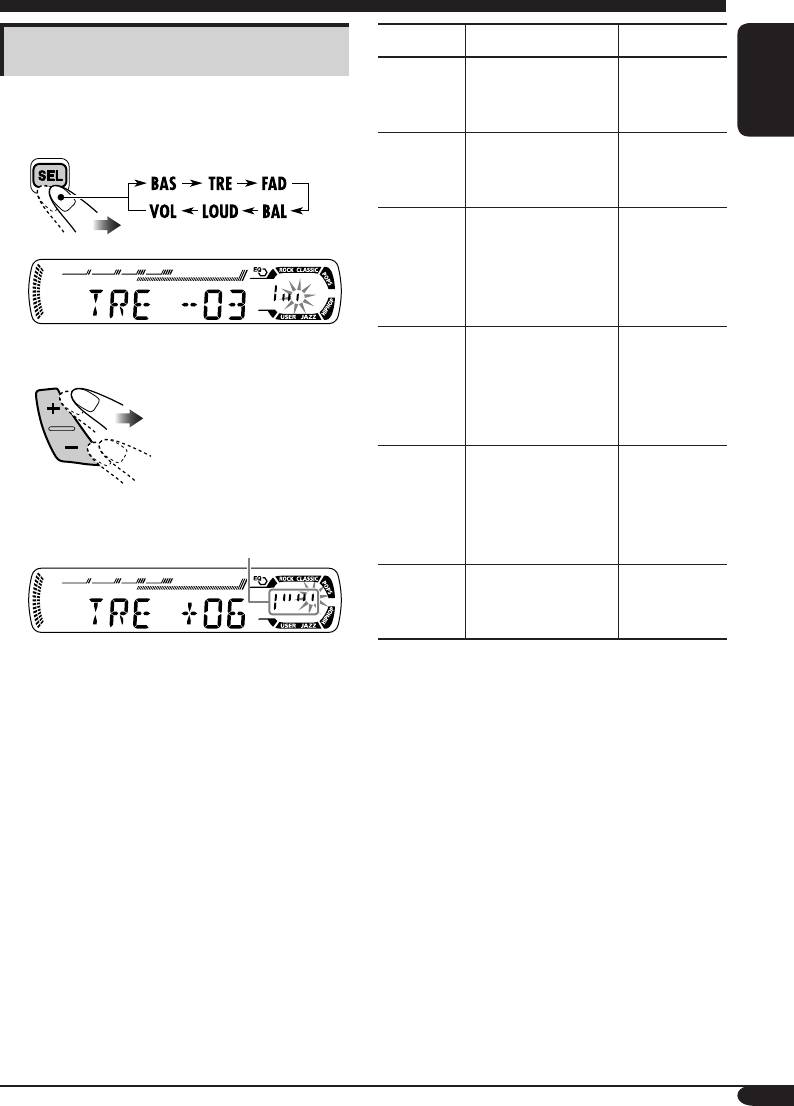
Indication To do: Range
Adjusting the sound
1
BAS*
Adjust the bass. –06 (min.)
You can adjust the sound characteristics to your
(bass)
to
preference.
+06 (max.)
ENGLISH
1
TRE*
Adjust the treble. –06 (min.)
1
(treble)
to
+06 (max.)
2
FAD*
Adjust the front
R06 (Rear
(fader)
and rear speaker
only)
balance.
to
F06 (Front
only)
Ex.: When “TRE” is selected
BAL
Adjust the left
L06 (Left
(balance)
and right speaker
only)
2
balance.
to
R06 (Right
only)
1
LOUD*
Boost low and
LOUD ON
(loudness)
high frequencies
J
to produce a well-
LOUD OFF
Indication pattern changes as
balanced sound at
you adjust the level.
low volume level.
3
VOL*
Adjust the volume. 00 (min.) to
(volume)
30 or 50
4
(max.)*
1
*
When you adjust the bass, treble, or
loudness, the adjustment you have made is
stored for the currently selected sound mode
(C-EQ) including “USER.”
2
*
If you are using a two-speaker system, set
the fader level to “00.”
3
*
Normally the +/– buttons work as the volume
control. So you do not have to select “VOL”
to adjust the volume level.
4
*
Depending on the amplifier gain control
setting. (See page 14 for details.)
13
EN12-15_KD-G117[EE]f.indd 13 10/11/04, 4:34:03 PM
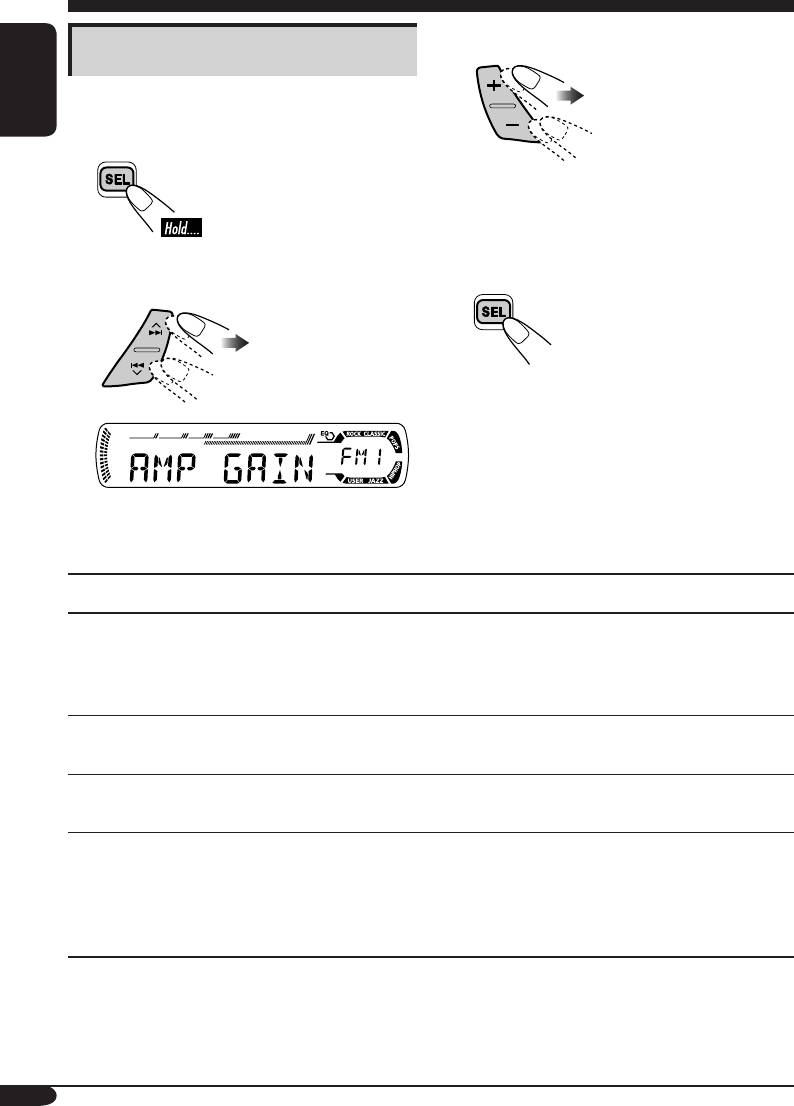
General settings — PSM
3 Adjust the PSM item selected.
Basic procedure
You can change PSM (Preferred Setting Mode)
items listed on the table that follows.
ENGLISH
1
4 Repeat steps 2 and 3 to adjust the
other PSM items if necessary.
5 Finish the procedure.
2
Select a PSM item.
Ex.: When you select “AMP GAIN”
Indications Selectable settings, [reference page]
DEMO
DEMO ON: [Initial]; Display demonstration will be activated
Display demonstration
automatically if no operation is done for about
20 seconds, [7].
DEMO OFF: Cancels.
CLOCK H
0 – 23, [7]
Hour adjustment
[Initial: 0 (0:00)]
CLOCK M
00 – 59, [7]
Minute adjustment
[Initial: 00 (0:00)]
AMP GAIN
You can change the maximum volume level of this receiver.
Amplifier gain control
LOW PWR: VOL 00 – VOL 30 (Select this if the maximum
power of the speaker is less than 50 W to prevent
them from damaging the speaker.)
HIGH PWR: [Initial]; VOL 00 – VOL 50
14
EN12-15_KD-G117[EE]f.indd 14 10/11/04, 4:34:04 PM
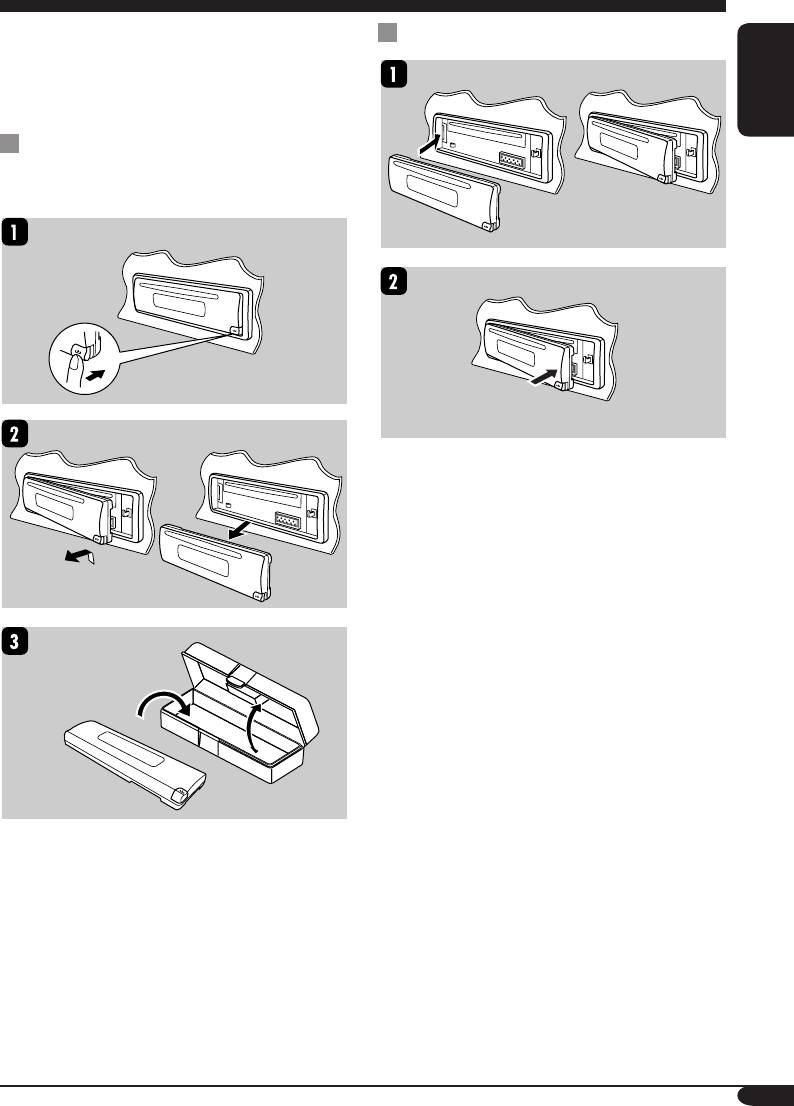
Detaching the control panel
When detaching or attaching the control panel,
Attaching the control panel
be careful not to damage the connectors on
the back of the control panel and on the panel
holder.
ENGLISH
Detaching the control panel
Before detaching the control panel, be sure to
turn off the power.
15
EN12-15_KD-G117[EE]f.indd 15 10/11/04, 4:34:04 PM
Maintenance
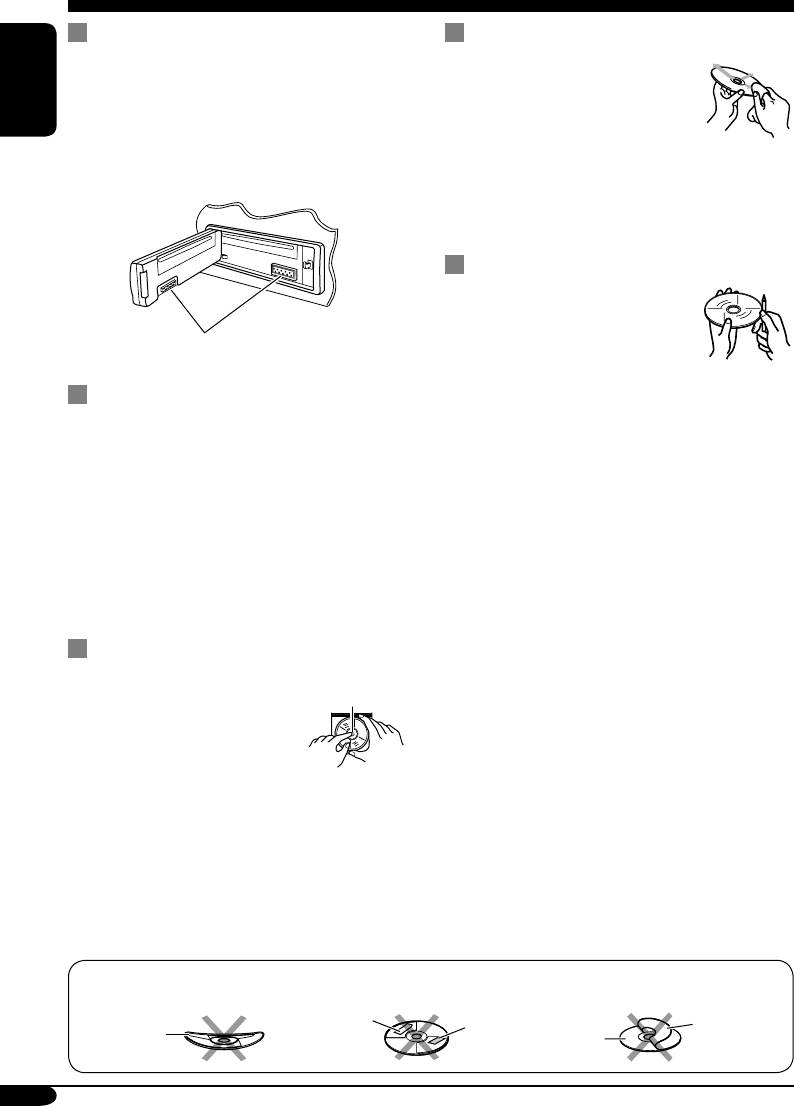
How to clean the connectors
To keep discs clean
Frequent detachment will deteriorate the
A dirty disc may not play correctly.
connectors.
If a disc does become dirty, wipe
To minimize this possibility, periodically wipe
it with a soft cloth in a straight line
ENGLISH
the connectors with a cotton swab or cloth
from center to edge.
moistened with alcohol, being careful not to
• Do not use any solvent (for
damage the connectors.
example, conventional record cleaner, spray,
thinner, benzine, etc.) to clean discs.
To play new discs
New discs may have some rough
spots around the inner and outer
edges. If such a disc is used, this
Connector
receiver may reject the disc.
To remove these rough spots, rub the edges
Moisture condensation
with a pencil or ball-point pen, etc.
Moisture may condense on the lens inside the
CD player in the following cases:
• After starting the heater in the car.
• If it becomes very humid inside the car.
Should this occur, the CD player may
malfunction. In this case, eject the disc and
leave the receiver turned on for a few hours
until the moisture evaporates.
How to handle discs
When removing a disc from
Center holder
its case, press down the center
holder of the case and lift the
disc out, holding it by the
edges.
• Always hold the disc by the edges. Do not
touch its recording surface.
When storing a disc into its case, gently insert
the disc around the center holder (with the
printed surface facing up).
• Make sure to store discs into the cases after
use.
Do not use the following discs:
Sticker
Sticker
Stick-on
Warped
residue
Disc
label
disc
16
EN16-19_KD-G117[EE]f.indd 16 10/20/04, 2:55:47 PM
More about this receiver
• Some CD-Rs or CD-RWs may not play
Basic operations
back on this receiver because of their disc
Turning off the power
characteristics, and for the following causes:
• If you turn off the power while listening to a
– Discs are dirty or scratched.
disc, disc play will start from where playback
– Moisture condensation occurs on the lens
ENGLISH
has been stopped previously, next time you
inside the receiver.
turn on the power.
– The pickup lens inside the receiver is dirty.
– CD-R or CD-RW on which the files are
written with “Packet Write” method.
Tuner operations
– There are improper recording conditions
Storing stations in memory
(missing data, etc.) or media conditions
• During SSM search...
(stain, scratch, warp, etc.).
– All previously stored stations are erased and
• CD-RWs may require a longer readout time
stations are stored newly.
since the reflectance of CD-RWs is lower
– Received stations are preset in No. 1 (lowest
than that of regular CDs.
frequency) to No. 6 (highest frequency).
• Do not use the following CD-Rs or CD-RWs:
– When SSM is over, the station stored in
– Discs with stickers, labels, or protective seal
No. 1 will be automatically tuned in.
stuck to the surface.
• When storing a station manually, a previously
– Discs on which labels can be directly
preset station is erased when a new station is
printed by an ink jet printer.
stored in the same preset number.
Using these discs under high temperatures or
high humidities may cause malfunctions or
damages to discs.
Disc operations
General
Changing the source
• This receiver has been designed to reproduce
• If you change the source, playback also stops
CDs, and CD-Rs (Recordable)/ CD-RWs
(without ejecting the disc).
(Rewritable) in audio CD (CD-DA) format.
Next time you select “CD” for the playback
• When a disc has been loaded, selecting “CD”
source, disc play starts from where it has been
for the playback source starts disc play.
stopped previously.
Inserting a disc
Ejecting a disc
• When a disc is inserted upside down, the disc
• If the ejected disc is not removed within
automatically ejects.
15 seconds, the disc is automatically inserted
• Do not insert 8 cm discs (single CD) and
again into the loading slot to prevent it from
unusual shape discs (heart, flower, etc.) into
dust. (Disc will not play this time.)
the loading slot.
General settings—PSM
Playing a CD-R or CD-RW
• If you change the “AMP GAIN” setting from
• Use only “finalized” CD-Rs or CD-RWs.
“HIGH PWR” to “LOW PWR” while the
• This receiver can play back multi-session
volume level is set higher than “VOL 30,” the
discs; however, unclosed sessions will be
receiver automatically changes the volume
skipped while playing.
level to “VOL 30.”
17
EN16-19_KD-G117[EE]f.indd 17 10/20/04, 2:56:14 PM
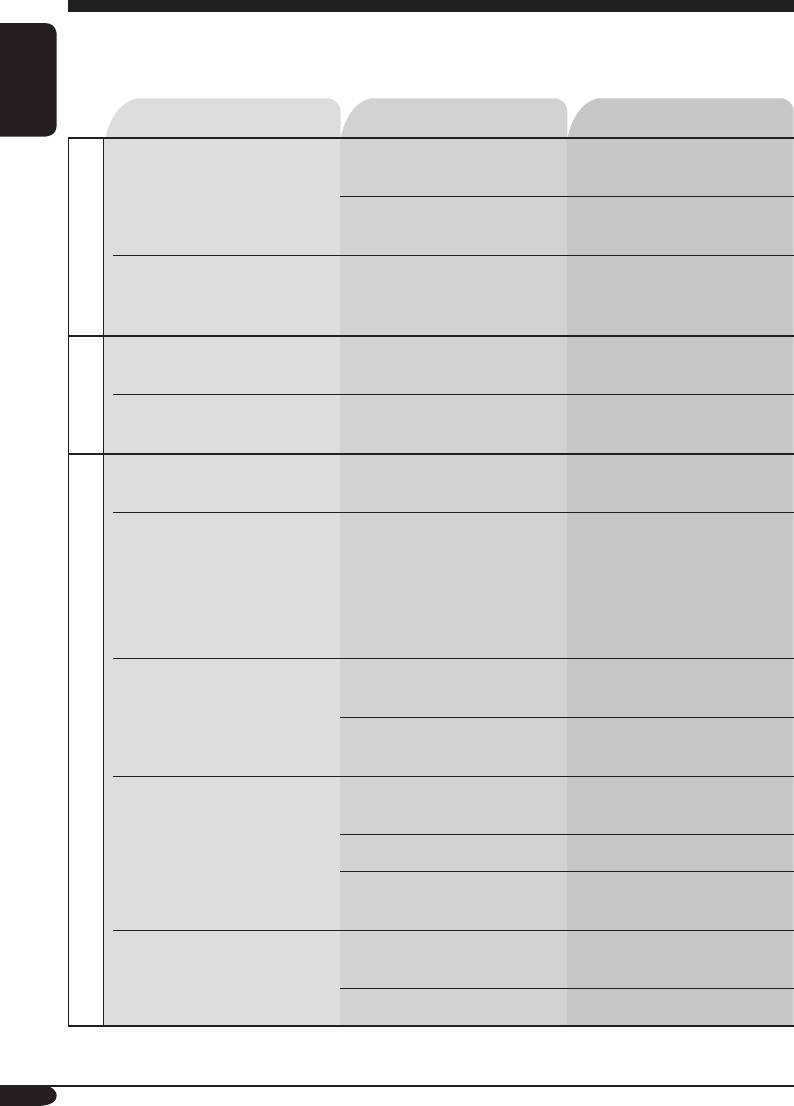
Troubleshooting
What appears to be trouble is not always serious. Check the following points before calling a service
center.
ENGLISH
Symptoms Causes Remedies
• Sound cannot be heard
The volume level is set to
Adjust it to the optimum
from the speakers.
the minimum level.
level.
Connections are incorrect. Check the cords and
connections.
General
• This receiver does not
The built-in microcomputer
Reset the receiver (see page
work at all.
may have functioned
2).
incorrectly due to noise, etc.
• SSM automatic presetting
Signals are too weak. Store stations manually.
does not work.
FM/AM
• Static noise while listening
The aerial is not connected
Connect the aerial firmly.
to the radio.
firmly.
• Disc automatically ejects. Disc is inserted upside
Insert the disc correctly.
down.
• CD-R/CD-RW cannot be
CD-R/CD-RW is not
• Insert a finalized CD-R/
played back.
finalized.
CD-RW.
• Tracks on the CD-R/
• Finalize the CD-R/
CD-RW cannot be
CD-RW with the
skipped.
component which you
used for recording.
• Disc can be neither played
Disc is locked. Unlock the disc (see page
back nor ejected.
11).
The CD player may have
Eject the disc forcibly (see
functioned incorrectly.
page 2).
Disc playback
• Disc sound is sometimes
You are driving on rough
Stop playback while driving
interrupted.
roads.
on rough roads.
Disc is scratched. Change the disc.
Connections are incorrect. Check the cords and
connections.
• “NO DISC” appears on the
No disc is in the loading
Insert a disc into the loading
display.
slot.
slot.
Disc is inserted incorrectly. Insert the disc correctly.
18
EN16-19_KD-G117[EE]f.indd 18 10/11/04, 4:34:14 PM

Specifications
AUDIO AMPLIFIER SECTION
CD PLAYER SECTION
Maximum Power Output:
Type: Compact disc player
Front: 50 W per channel
Signal Detection System: Non-contact optical
Rear: 50 W per channel
pickup (semiconductor laser)
ENGLISH
Continuous Power Output (RMS):
Number of channels: 2 channels (stereo)
Front: 19 W per channel into 4 Ω, 40 Hz
Frequency Response: 5 Hz to 20 000 Hz
to 20 000 Hz at no more than 0.8%
Dynamic Range: 96 dB
total harmonic distortion.
Signal-to-Noise Ratio: 98 dB
Rear: 19 W per channel into 4 Ω, 40 Hz
Wow and Flutter: Less than measurable limit
to 20 000 Hz at no more than 0.8%
total harmonic distortion.
Load Impedance: 4 Ω (4 Ω to 8 Ω allowance)
GENERAL
Tone Control Range:
Power Requirement:
Bass: ±10 dB at 100 Hz
Operating Voltage:
Treble: ±10 dB at 10 kHz
DC 14.4 V (11 V to 16 V allowance)
Frequency Response: 40 Hz to 20 000 Hz
Grounding System: Negative ground
Signal-to-Noise Ratio: 70 dB
Allowable Operating Temperature:
Line-Out Level/Impedance:
0°C to +40°C
2.0 V/20 kΩ load (full scale)
Dimensions (W × H × D):
Output Impedance: 1 kΩ
Installation Size (approx.):
182 mm × 52 mm × 150 mm
Panel Size (approx.):
TUNER SECTION
188 mm × 58 mm × 11 mm
Frequency Range:
Mass (approx.):
FM1/FM2: 87.5 MHz to 108.0 MHz
1.3 kg (excluding accessories)
FM3: 65.00 MHz to 74.00 MHz
AM: (MW) 522 kHz to 1 620 kHz
(LW) 144 kHz to 279 kHz
Design and specifications are subject to change
[FM Tuner]
without notice.
Usable Sensitivity: 11.3 dBf (1.0 µV/75 Ω)
50 dB Quieting Sensitivity:
16.3 dBf (1.8 µV/75 Ω)
Alternate Channel Selectivity (400 kHz): 65 dB
Frequency Response: 40 Hz to 15 000 Hz
Stereo Separation: 30 dB
Capture Ratio: 1.5 dB
[MW Tuner]
Sensitivity: 20 µV
Selectivity: 35 dB
[LW Tuner]
Sensitivity: 50 µV
19
EN16-19_KD-G117[EE]f.indd 19 10/14/04, 2:35:17 PM
Благодарим Вас за приобретение изделия JVC.
Перед тем, как приступать к эксплуатации, пожалуйста, внимательно прочитайте все
инструкции с тем, чтобы полностью изучить и обеспечить оптимальную работу этого
устройства.
ВАЖНО ДЛЯ ЛАЗЕРНОЙ АППАРАТУРЫ
1. ЛАЗЕРНАЯ АППАРАТУРА КЛАССА 1
2. ПРЕДУПРЕЖДЕНИЕ: Не открывайте верхнюю крышку. Внутри устройства нет
частей, которые пользователь может отремонтировать. Ремонт должен осуществляться
РУCCKИЙ
квалифицированным обслуживающим персоналом.
3. ПРЕДУПРЕЖДЕНИЕ: Видимое и невидимое лазерное излучение при открытом
устройстве, отказе или нарушении блокировки. Избегайте прямого воздействия
излучения.
4. ЭТИКЕТКА: ПРЕДУПРЕЖДАЮЩАЯ ЭТИКЕТКА, РАЗМЕЩЕННАЯ НА НАРУЖНОЙ
СТОРОНЕ УСТРОЙСТВА.
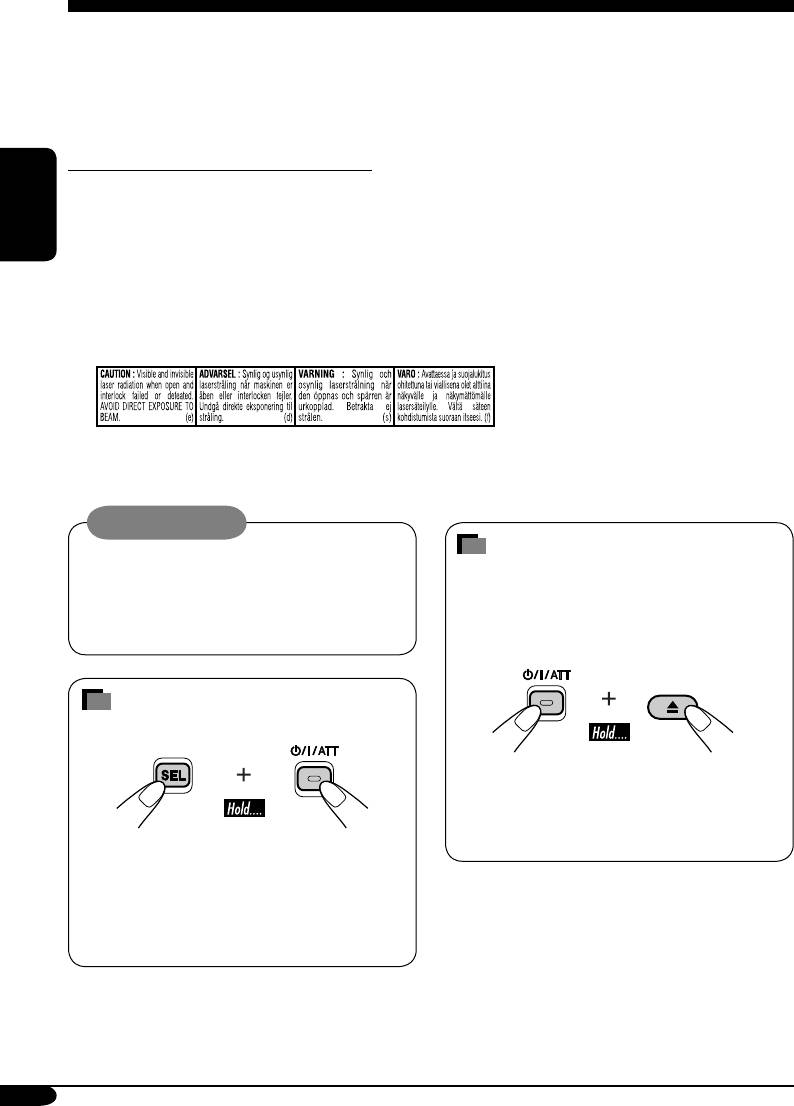
Предупреждение:
Если приемник используется во время
Принудительное извлечение
поездки на автомобиле, следует, не
диска
отвлекаясь, следить за дорогой, иначе
Если диск не распознается приемником
может произойти дорожно-транспортное
или не извлекается, извлеките диск
происшествие.
следующим образом.
Как перенастроить Ваше
устройство
• Если это не поможет, попробуйте
перенастроить приемник.
• Будьте осторожны, не уроните диск при
извлечении.
• При этом перезапустится
микропроцессор. Запрограммированные
настройки будут также удалены.
• Если диск загружен, он будет извлечен.
Будьте осторожны, не уроните диск.
2
RU02-05_KD-G117[EE]f.indd 2 22/10/04, 11:54:11 AM

Содержание
Как перенастроить Ваше устройство
... 2
Настройки звучания.................... 12
Принудительное извлечение диска.... 2
Выбор запрограммированных режимов
Как пользоваться данным
звучания (C-EQ: настраиваемый
руководством..................................... 4
эквалайзер)............................................... 12
Как пользоваться кнопкой MODE..... 4
Настройка звучания ............................. 13
Панель управления — KD-G117... 5
Общие настройки — PSM........... 14
Расположение кнопок.......................... 5
Стандартная процедура ....................... 14
Начало работы............................. 6
Отсоединение панели
Основные операции .................................... 6
РУCCKИЙ
управления................................ 15
Отмена демонстрации функций
дисплея................................................ 7
Обслуживание ............................. 16
Настройка часов.................................... 7
Дополнительная информация
Операции с радиоприемником
... 8
о приемнике .............................. 17
Прослушивание радио ................................ 8
Сохранение радиостанций .................. 9
Устранение проблем................... 18
Прослушивание запрограммированной
радиостанции
...................................... 9
Технические характеристики.... 19
Операции с дисками ................... 10
Воспроизведение диска ............................. 10
Выбор режимов воспроизведения..... 11
*Для Вашей безопасности....
*Температура внутри автомобиля....
• Не повышайте слишком сильно
Если Вы припарковали Ваш автомобиль на
громкость, поскольку в результате этого
длительное время в жаркую или холодную
заглушаются внешние звуки, что делает
погоду, перед тем, как включать это
опасным управление автомобилем.
устройство, подождите до тех пор, пока
• Остановите автомобиль перед тем, как
температура в автомобиле не придет в
выполнять любые сложные операции.
норму.
3
RU02-05_KD-G117[EE]f.indd 3 22/10/04, 11:44:19 AM
Как пользоваться данным
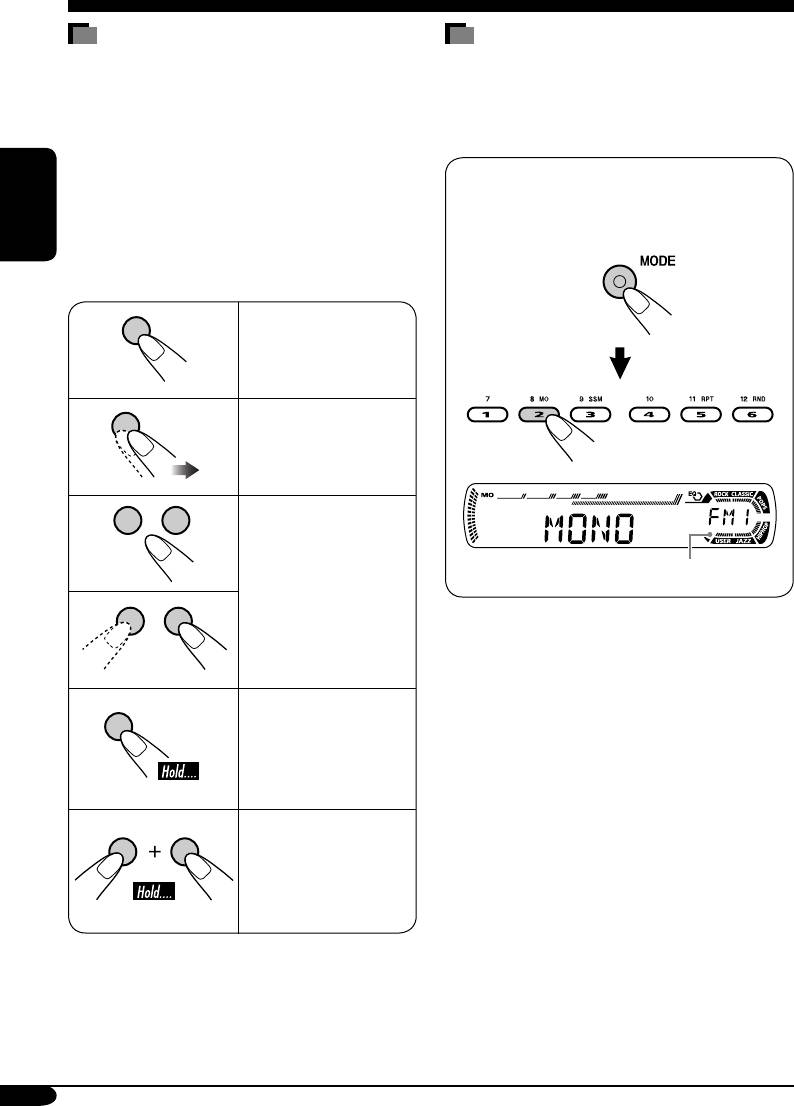
Как пользоваться кнопкой MODE
руководством
При нажатии кнопки MODE приемник
Для того, чтобы сделать объяснения
переходит в режим настройки функций,
простыми и понятными, используются
после чего нумерованные кнопки работают
следующие методы:
как кнопки различных функций.
• Некоторые советы и примечания
приведены в разделе “Дополнительная
Пример: Нумерованная кнопка 2
информация о приемнике” (см. стр. 17).
работает как кнопка МО
• Операции, выполняемые с
(монофонический).
использованием кнопок, в основном,
РУCCKИЙ
описаны с помощью иллюстраций,
например:
Нажать
кратковременно.
Нажать
неоднократно.
Индикатор обратного отсчета времени
Нажать любую из
указанных.
Чтобы снова вернуть первоначальные
функции этих кнопок после нажатия
кнопки MODE, подождите 5 секунд, не
нажимая кнопок, пока режим функций не
Нажать и
будет сброшен.
удерживать
• Повторное нажатие кнопки MODE также
до получения
сбрасывает режим функций.
необходимого
результата.
Нажмите и
удерживайте
нажатыми
обе кнопки
одновременно.
4
RU02-05_KD-G117[EE]f.indd 4 22/10/04, 11:54:29 AM
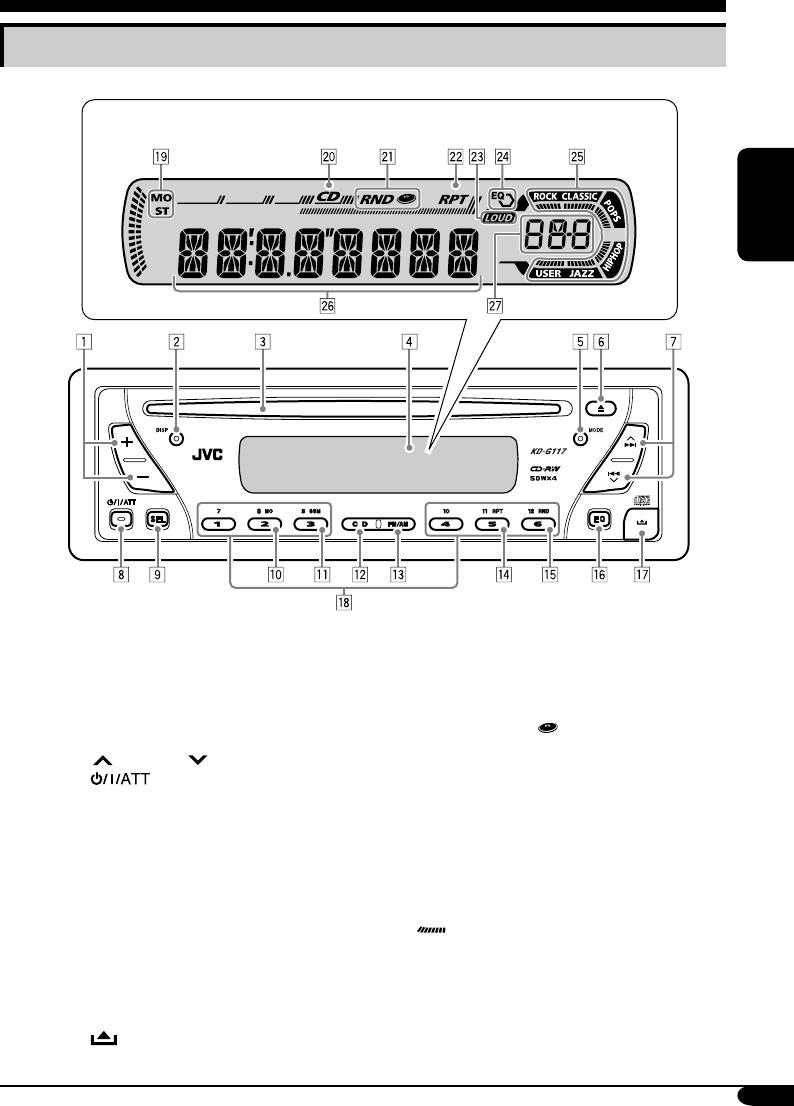
Панель управления — KD-G117
Расположение кнопок
Окно дисплея
РУCCKИЙ
1 Кнопки +/–
Окно дисплея
2 Кнопка DISP (дисплей)
o Индикаторы приема тюнера
3 Загрузочный отсек
MO (монофонический), ST (стерео)
4 Окно дисплея
; Индикатор CD
5 Кнопка MODE
a Индикатор RND
(произвольное
6 Кнопка 0 (извлечение)
воспроизведение)
7 Кнопки
¢/4
s Индикатор RPT (повторное
8 Кнопка
(резервный/работающий
воспроизведение)
/аттенюатор)
d Индикатор LOUD (громкость)
9 Кнопка SEL (выбор)
f Индикатор EQ (эквалайзер)
p Кнопка MO (монофонический)
g Индикаторы режимов звучания (C-EQ:
q Кнопка SSM (Strong-station Sequential
настраиваемый эквалайзер)
Memory—последовательная память для
ROCK, CLASSIC, POPS, HIP HOP, JAZZ,
радиостанций с устойчивым сигналом)
USER
w Кнопка CD
•
также работает как индикатор
e Кнопка FM/AM
обратного отсчета времени.
r Кнопка RPT (повторное
h Основной дисплей
воспроизведение)
j Отображение источника
t Кнопка RND (произвольное)
Индикатор уровня громкости
y Кнопка EQ (эквалайзер)
u Кнопка
(снятие панели управления)
i Нумерованные кнопки
5
RU02-05_KD-G117[EE]f.indd 5 22/10/04, 11:44:20 AM


