Dell Inspiron 14z N411z: Media-Card Reader Board
Media-Card Reader Board: Dell Inspiron 14z N411z
18
Media-Card Reader Board
WARNING: Before working inside your computer, read the safety information
that shipped with your computer. For additional safety best practices information,
see the Regulatory Compliance Homepage at dell.com/regulatory_compliance.
CAUTION: Only a certified service technician should perform repairs on your
computer. Damage due to servicing that is not authorized by Dell is not covered by
your warranty.
CAUTION: To avoid electrostatic discharge, ground yourself by using a wrist
grounding strap or by periodically touching an unpainted metal surface (such as a
connector on your computer).
CAUTION: To help prevent damage to the system board, remove the main battery
(see "Removing the Battery" on page 13) before working inside the computer.
Removing the Media-Card Reader Board
1
Follow the instructions in "Before You Begin" on page 9.
2
Remove the battery. See "Removing the Battery" on page 13.
3
Remove the module cover. See "Removing the Module Cover" on page 15.
4
Follow the instructions from step 4 to step 5 in "Removing the Optical
Drive" on page 23.
5
Remove the keyboard. See "Removing the Keyboard" on page 31.
6
Remove the palm-rest assembly. See "Removing the Palm-Rest Assembly"
on page 35.
7
Lift the securing latches and disconnect the media-card reader board cable
from the connectors on the system board and the media-card reader board.
8
Remove the screw that secures the media-card reader board to the
computer base.
Media-Card Reader Board 83
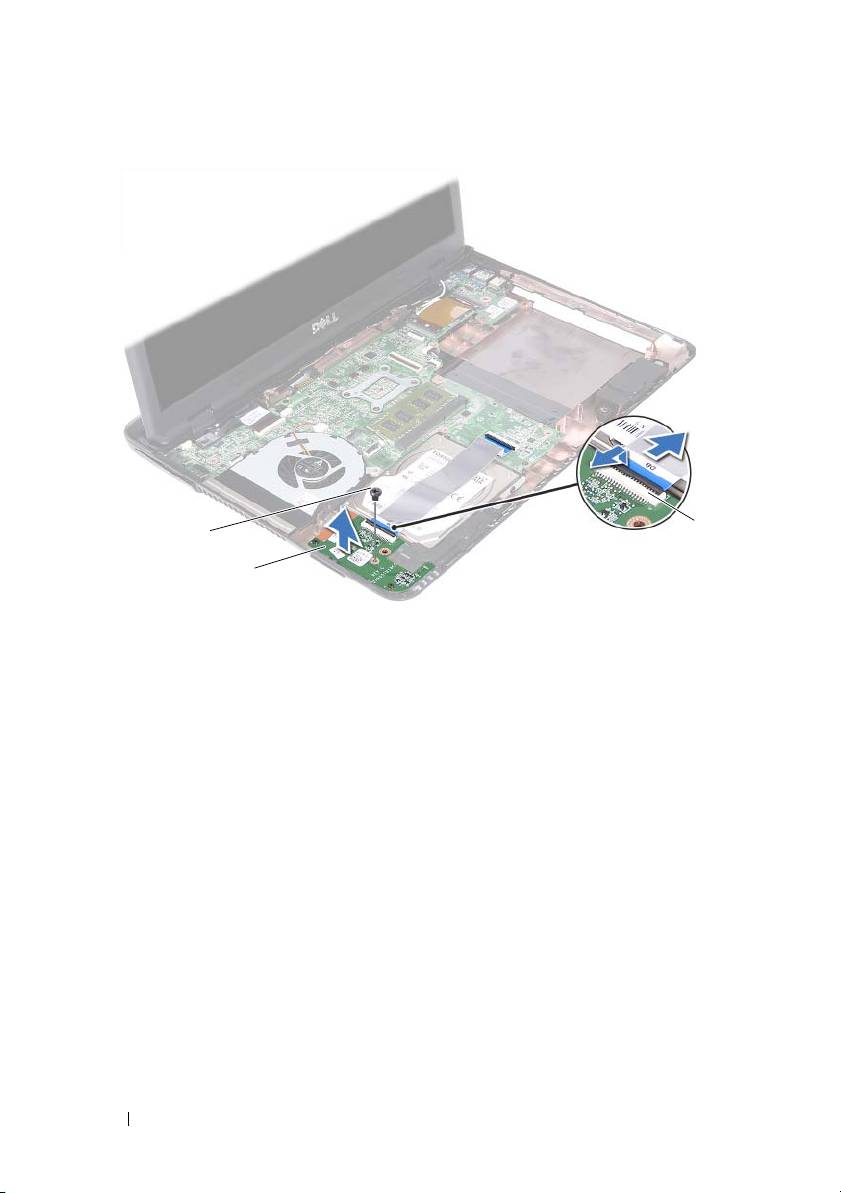
1 screw 2 media-card reader board
3 media-card reader board cable connectors (2)
9
Lift the media-card reader board away from the computer base.
Replacing the Media-Card Reader Board
1
Follow the instructions in "Before You Begin" on page 9.
2
Align the media-card reader board with the alignment poles on the
computer base.
3
Replace the screw that secures the media-card reader board to the
computer base.
4
Slide the cable into the connectors on the system board and the media-
card reader board, and then press down the securing latches.
5
Replace the palm-rest assembly. See "Replacing the Palm-Rest Assembly"
on page 38.
84 Media-Card Reader Board
3
1
2

6
Replace the keyboard. See "Replacing the Keyboard" on page 33.
7
Follow the instructions from step 5 to step 6 in "Replacing the Optical
Drive" on page 25.
8
Replace the module cover. See "Replacing the Module Cover" on page 16.
9
Replace the battery. See "Replacing the Battery" on page 14.
CAUTION: Before turning on the computer, replace all screws and ensure that no
stray screws remain inside the computer. Failure to do so may result in damage to
the computer.
Media-Card Reader Board 85

86 Media-Card Reader Board
Оглавление
- Contents
- Before You Begin
- Battery
- Module Cover
- Coin-Cell Battery
- Hard-Drive Assembly
- Optical Drive
- Memory Module(s)
- Keyboard
- Palm-Rest Assembly
- Wireless Mini-Card
- Display
- DC-in Connector Assembly
- USB Board
- Camera Module
- Thermal Fan
- System Board
- Heat-Sink Assembly
- Media-Card Reader Board
- Speakers
- System Setup
- Flashing the BIOS
