Dell Inspiron 14z N411z: Memory Module(s)
Memory Module(s): Dell Inspiron 14z N411z
7
Memory Module(s)
WARNING: Before working inside your computer, read the safety information
that shipped with your computer. For additional safety best practices information,
see the Regulatory Compliance Homepage at dell.com/regulatory_compliance.
CAUTION: Only a certified service technician should perform repairs on your
computer. Damage due to servicing that is not authorized by Dell is not covered by
your warranty.
CAUTION: To avoid electrostatic discharge, ground yourself by using a wrist
grounding strap or by periodically touching an unpainted metal surface (such as a
connector on your computer).
CAUTION: To help prevent damage to the system board, remove the main battery
(see "Removing the Battery" on page 13) before working inside the computer.
Upgrading System Memory
Your computer supports up to two memory-module connectors. You can
access DIMM B connector by removing the module cover at the bottom of
your computer. You can access DIMM A connector by removing the palm-rest
assembly.
You can increase your computer memory by installing memory modules on
the system board. For information on the memory supported by your
computer, see the Comprehensive Specifications for your computer model at
support.dell.com/manuals.
NOTE: Memory modules purchased from Dell are covered under your
computer warranty.
NOTE: If you ordered one memory module with your system, it is installed in the
DIMM A connector.
Removing the Memory Module(s)
1
Follow the instructions in "Before You Begin" on page 9.
2
Remove the battery. See "Removing the Battery" on page 13.
3
Remove the module cover. See "Removing the Module Cover" on page 15.
Memory 27
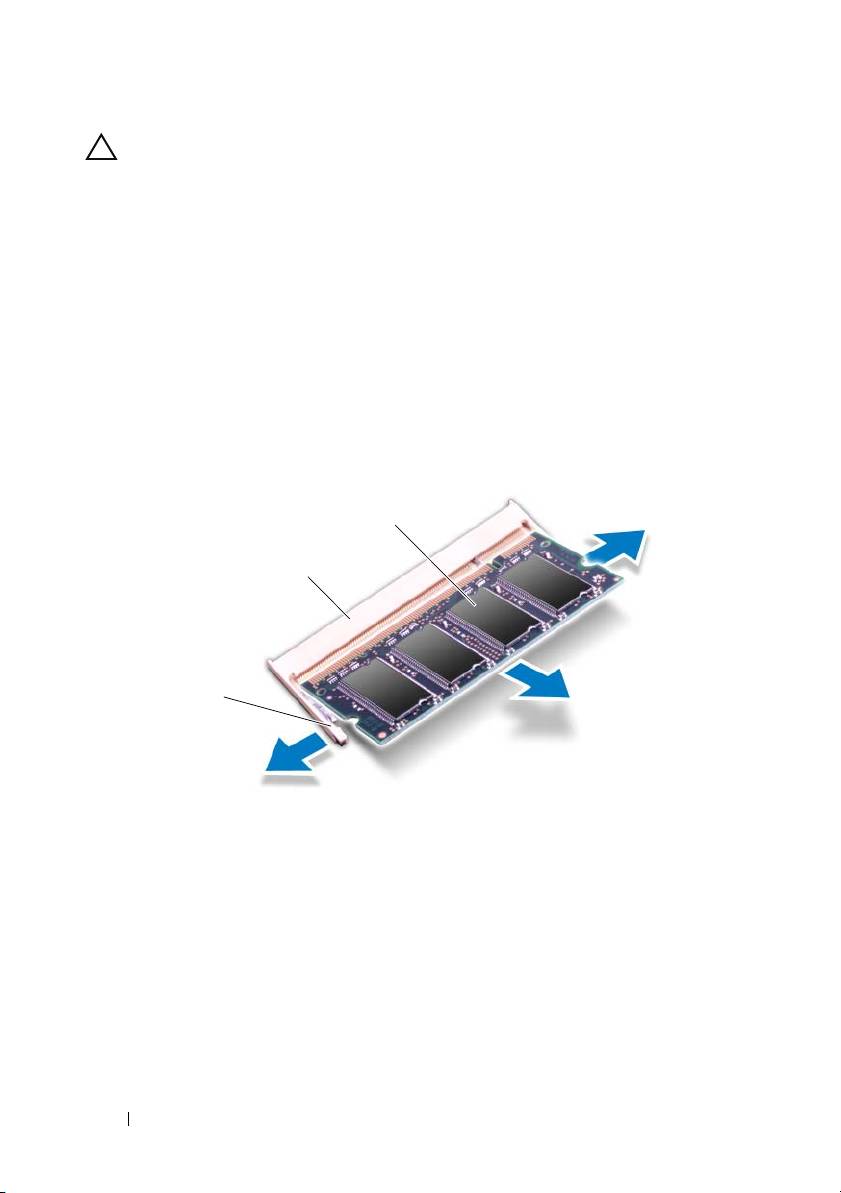
CAUTION: To prevent damage to the memory-module connector, do not use tools
to spread the memory module securing clips.
4
To remove the memory module from the DIMM B connector, go to step 5.
To remove the memory module from the DIMM A connector:
a
Turn the computer over.
b
Remove the keyboard. See "Removing the Keyboard" on page 31.
5
Use your fingertips to carefully spread apart the securing clips on each end
of the memory-module connector until the memory module pops up.
1 securing clips (2) 2 memory-module connector
3 memory module
6
Remove the memory module from the memory-module connector.
Replacing the Memory Module(s)
1
Follow the instructions in "Before You Begin" on page 9.
28 Memory
3
2
1
2
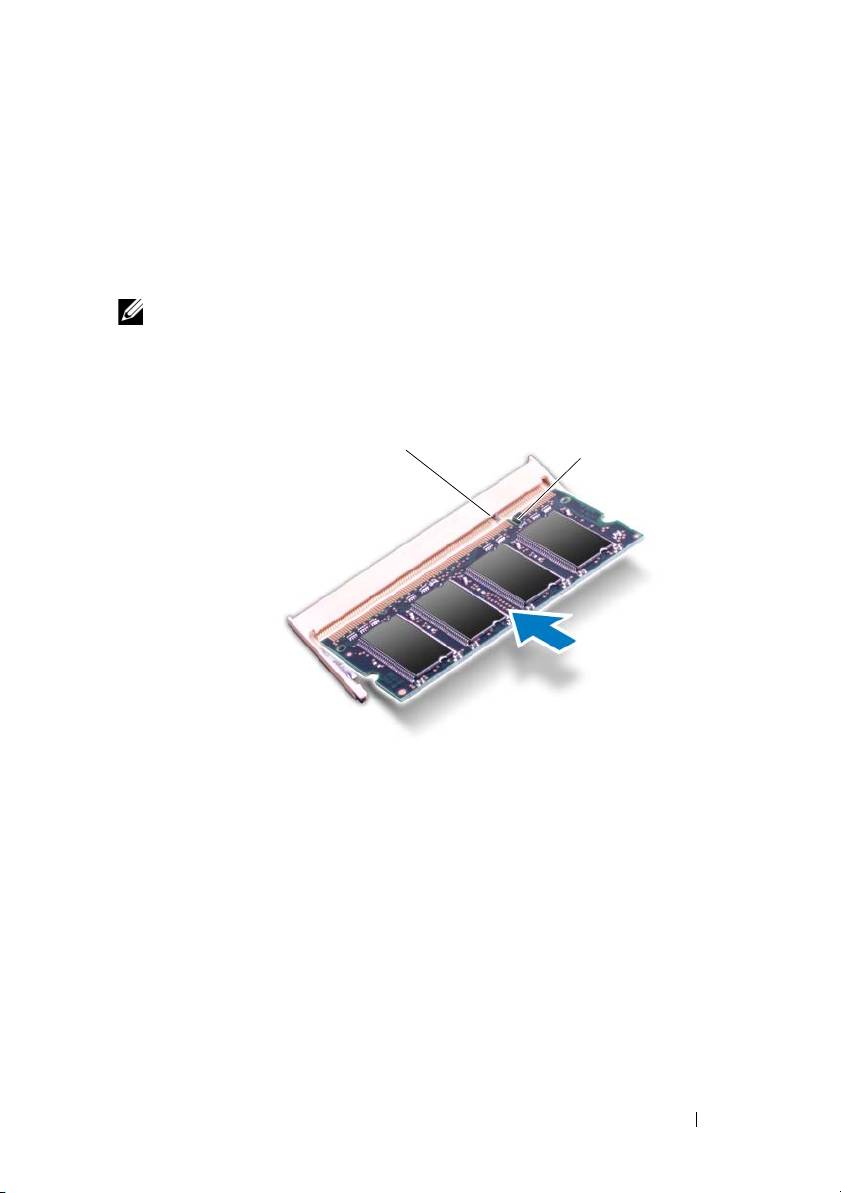
Align the notch on the memory module with the tab in the
memory-module connector.
3
Slide the memory module firmly into the memory-module connector at a
45-degree angle, and then press down the memory module on both sides
until it clicks into place. If you do not hear the click, remove the memory
module and reinstall it.
NOTE: If the memory module is not installed properly, the computer may not boot.
1 tab 2 notch
4
If you replaced the memory module in the DIMM B connector, go to
step 6.
5
If you replaced the memory module in the DIMM A connector:
a
Replace the keyboard. See "Replacing the Keyboard" on page 33.
b
Turn the computer over.
6
Replace the module cover. See "Replacing the Module Cover" on page 16.
7
Replace the battery. See "Replacing the Battery" on page 14.
Memory 29
1
2

Connect your computer and all attached devices to electrical outlets, and turn
them on.
As the computer boots, it detects the memory module(s) and
automatically updates the system configuration information.
To confirm the amount of memory installed in the computer:
Click Start → Control Panel→ System and Security→ System.
30 Memory
Оглавление
- Contents
- Before You Begin
- Battery
- Module Cover
- Coin-Cell Battery
- Hard-Drive Assembly
- Optical Drive
- Memory Module(s)
- Keyboard
- Palm-Rest Assembly
- Wireless Mini-Card
- Display
- DC-in Connector Assembly
- USB Board
- Camera Module
- Thermal Fan
- System Board
- Heat-Sink Assembly
- Media-Card Reader Board
- Speakers
- System Setup
- Flashing the BIOS
