Sharp PN-70TW3: Turning Power On/Off
Turning Power On/Off: Sharp PN-70TW3
Turning Power On/Off
Caution
n
Operation mode
ENGLISH
• Turn on the monitor rst before turning on the computer or
When the monitor is turned on for the rst time after being
playback device.
shipped from the factory, the operation mode setting screen
• To keep the performance of the wireless controller stable, put
will be displayed. Set it to MODE1 or MODE2.
the monitor in the Power off (Standby mode) state once a day.
MODE1 ....OFF IF NO OPERATION is set to ON, and POWER
SAVE MODE is set to ON. (These settings can not
• When switching the main power switch or the POWER
be changed.)
button off and back on, always wait for at least 5 seconds.
Determines whether or not to set the monitor to go
A short interval may result in a malfunction.
into standby mode when there is no operation from
the remote control unit, or LAN for over 4 hours.
Power consumption in standby mode is also
Turning on the main power
minimized.
MODE2 ....Will perform standard operation.
OFF IF NO OPERATION is set to OFF, and
POWER SAVE MODE is set to OFF. These settings
can be changed.
Even after being set, changes can be made using
OPERATION MODE, located in the menu of the monitor. (See
Operation manual.)
n
Date/time setting
• If the time has yet to be set when the monitor is rst turned
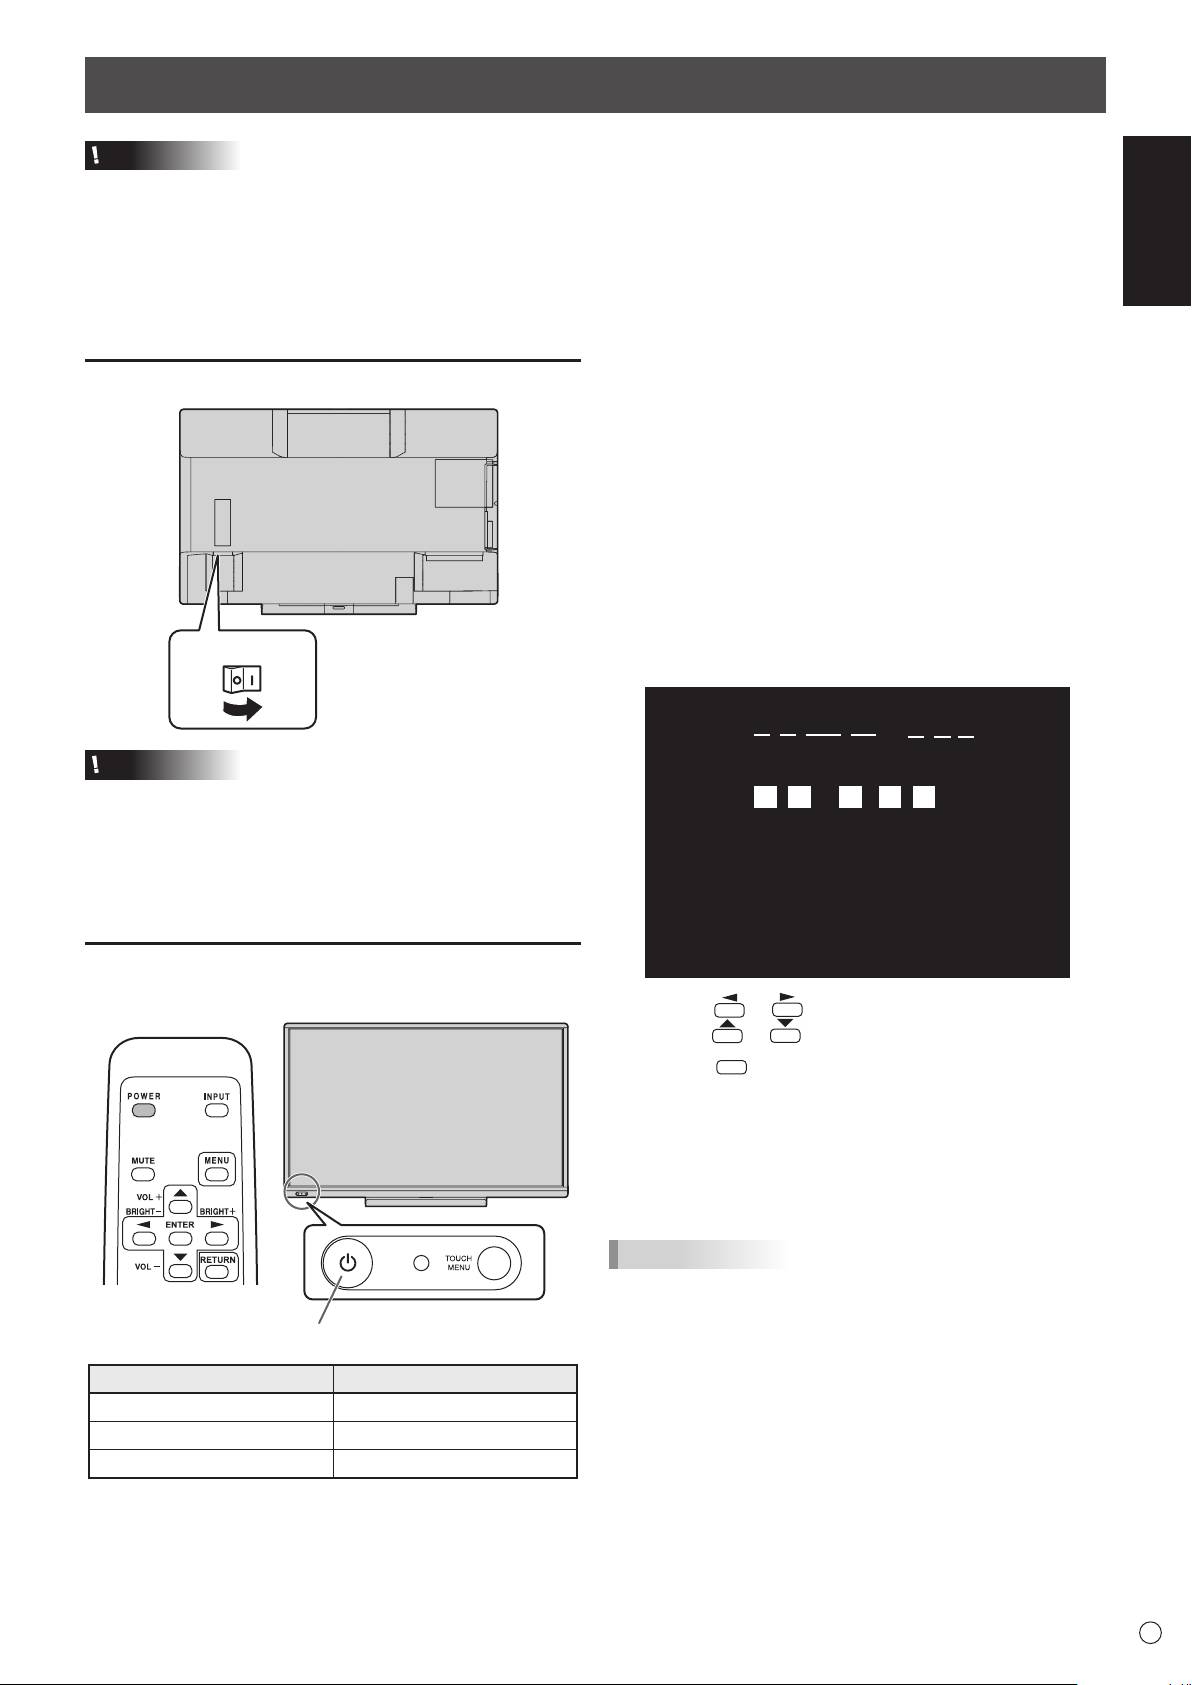
Main power switch
on, the date/time setting screen appears. Set the date and
time.
DATE/TIME SETTING
//
: :
Caution
• The main power must be turned on/off with the main power
01 01 16
/
00 00
:/ 20
switch. Do not connect/disconnect the power cord or turn
the breaker on/off while the main power switch is on.
• For a complete electrical disconnection, pull out the main
plug.
OK···[ENTER] CANCEL···[RETURN]
Turning power on
1. Press the POWER button.
1. Press or to select the date and time, and
press
or to change the numerical values.
ENTER
2. Press
.
• Be sure to set the date and time.
• The date/time setting screen will close automatically if
no operation is performed for about 15 seconds. The
date and time can be set using DATE/TIME SETTING
from the SETUP menu when the date/time setting screen
disappears.
TIPS
•
Set the date in “Day/Month/Year” order.
•
Set the time on a 24-hour basis.
POWER button / Power LED
•
The clock is maintained by the internal battery.
•
If you already set the time but the date/time setting
Status Status of the monitor
screen appears when the power is turned on, the
Green lit Power on
internal battery may be exhausted. Please contact
Orange lit Power off (Standby mode)
your local SHARP servicing dealer or service center for
Green ashing Input signal waiting mode
assistance with battery replacement.
•
Estimated service life of the internal battery: About 5
years (depending on monitor operation)
•
The initial battery was inserted at the factory when the
monitor was shipped, so it may run out of power before
its expected operation life.
9
E
Оглавление
- Contents
- SAFETY PRECAUTIONS
- SAFETY INSTRUCTION
- MOUNTING PRECAUTIONS
- Supplied Components Preparing the Remote Control Unit and the Touch Pen
- Connecting the wireless adapter
- Connections
- Turning Power On/Off
- Mounting Precautions (For SHARP dealers and service engineers)
- Table des matières
- PRÉCAUTIONS DE SÉCURITÉ
- MESURES DE SÉCURITÉ
- PRÉCAUTIONS POUR LE MONTAGE
- Composants fournis
- Connexion de l’adaptateur sans l
- Connexions
- Mise sous tension et hors tension
- Précautions pour le montage (À l’attention des revendeurs et techniciens SHARP)
- Índice
- PRECAUCIONES DE SEGURIDAD
- INSTRUCCIONES DE SEGURIDAD
- PRECAUCIONES DE MONTAJE
- Componentes suministrados
- Conexión del adaptador inalámbrico
- Conexiones
- Encendido/apagado
- Precauciones de montaje (para distribuidores y técnicos de servicio de SHARP)
- Inhalt
- SICHERHEITSVORKEHRUNGEN
- SICHERHEITSANLEITUNG
- WICHTIGE HINWEISE ZUR BEFESTIGUNG
- Mitgelieferte Komponenten
- Anschließen des Drahtlos-Adapters
- Anschlüsse
- Ein- und ausschalten
- Содержание
- ПРАВИЛА ТЕХНИКИ БЕЗОПАСНОСТИ
- ИНСТРУКЦИИ ПО БЕЗОПАСНОСТИ
- МЕРЫ ПРЕДОСТОРОЖНОСТИ ПРИ КРЕПЛЕНИИ
- Комплектные принадлежности
- Подключение беспроводного адаптера
- Соединения
- Включение/выключение питания
- Меры предосторожности при креплении (Для дилеров и инженеров по обслуживанию SHARP)
