Hoover XARION-XARION PRO TXP 1522 019: инструкция
Раздел: Бытовая, кухонная техника, электроника и оборудование
Тип: Пылесос
Инструкция к Пылесосу Hoover XARION-XARION PRO TXP 1522 019
Оглавление
- ПРЕДУПРЕЖДЕНИЕ: ВНИМАНИЕ! Извлеките все составные части из упаковки.
- Все насадки можно присоединять к концу pукоятка или концу телескопической трубы. Опорожнение контейнера для сбора пыли Очистка моющихся фильтров Чтобы вынуть фильтры:
- Для извлечения выходного фильтра выполните следующие действия: Очистка сепаратора Airvolution Ликвидация засорений Запасные части и расходные материалы компании Hoover • Воздушный Hepa фильтр электродвигателя: S104 - 35600990
- Окружающая среда:
®
®
PRINTED IN P.R.C.
48003366
INSTRUCTION MANUAL
1
U*
V*
W*
X*
E
J
L
F
C
T*
A
I
N*
N*
P*
O*
T*
M*
S
Q
D
B
H
G
P*
R
O*
M*
K
ENGLISH
GB
FRANÇAIS
FR
DEUTSCH
DE
ITALIANO
IT
NEDERLANDS
NL
PORTUGUÉS
PT
ESPAÑOL
ES
DANSK
DK
NORSK
NO
SVENSKA
SE
SUOMI
FI
E
ΛΛ
HNIKA
GR
PY
ССКИЙ
RU
POLSKI
PL
ČESKY
CZ
SLOVENČINA
SI
(
*Certain models only)
2
3
4
5
6
7
8
10
*
*
12
*
14
13
15
16
17
18
19
20
21
22
23
24
25
11
MID
9*
(* Depending on model)
1
IMPORTANT SAFETY REMINDERS
This cleaner should only be used for domestic cleaning, as described in this user guide.
Please ensure that this guide is fully understood before operating the appliance. Use only
attachments recommended or supplied by Hoover.
WARNING:
Electricity can be extremely dangerous. This appliance is double insulated
and must not be earthed. This plug is fitted with a 13 amp fuse (UK only).
IMPORTANT:
The wires in the mains power lead are coloured in accordance with the
following code:
Blue – Neutral Brown – Live
STATIC ELECTRICITY:
Some carpets can cause a small build up of static electricity.
Any static discharge is not hazardous to health.
AFTER USE:
Switch the cleaner off and remove the plug from the electricity supply.
Always switch off and remove the plug before cleaning the appliance or attempting any
maintenance task.
SAFETY WITH CHILDREN, ELDERLY OR THE INFIRM:
Do not let children play with
the appliance or its controls. Please supervise the use of the appliance by older children,
the elderly or the infirm.”
HOOVER SERVICE:
To ensure the continued safe and efficient operation of this appli
-
ance we recommend that any servicing or repairs are only carried out by an authorised
Hoover service engineer.
IT IS IMPORTANT THAT YOU DO NOT:
• Position the cleaner above you when cleaning the stairs.
• Use your cleaner out of doors or on any wet surface or for wet pick up.
•
Pick up hard or sharp objects, matches, hot ashes, cigarette ends or other
similar items.
• Spray with or pick up flammable liquids, cleaning fluids, aerosols or their vapours
as this may cause risk of fire / explosion.
• Run over the supply cord when using your cleaner or remove the plug by pulling
on the supply cord.
• Stand on or wrap the power cord around arms or legs when using the cleaner.
•
Use the appliance to clean people or animals.
•
Continue to use your cleaner if it appears to be faulty. If the supply cord is damaged
stop using the cleaner IMMEDIATELY. To avoid a safety hazard, an authorised
Hoover service engineer must replace the supply cord.
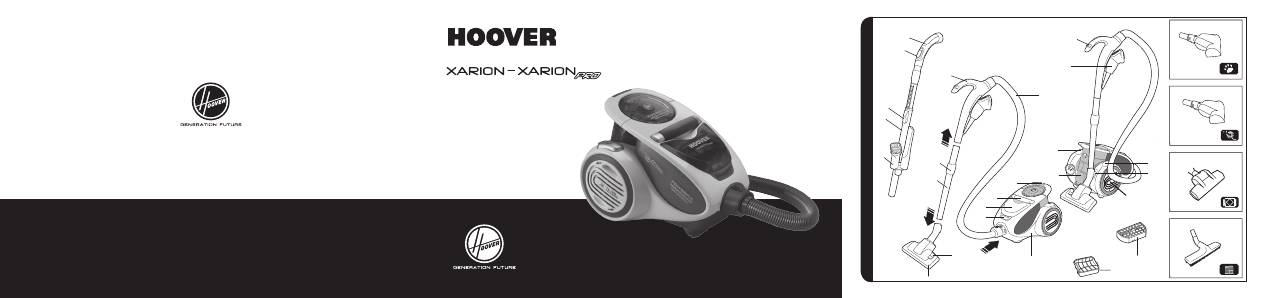
GETTING TO KNOW YOUR CLEANER
A. Cleaner main body
B. Carry handle
C. Dust Container
D. Dust Container handle and latch
E. On/Off Button
F.
Cord Rewind Button
G. Filter Door
H. Filter Door latch
I.
Pre-Motor Filter Pack
J.
Exhaust Filter Door
K.
Exhaust Filter
L.
Parking Slot
M. Handle*
N. Suction Control*
O. Telescopic Tube*
P. Telescopic Tube Adjuster*
Q. Carpet & Floor Nozzle
R. Surface Selector
S. Hose
T.
Accessories*
U. Pet Hair Remover Mini Turbo Nozzle*
V. Allergen Remover Mini Turbo Nozzle*
W.
Turbo Nozzle*
X.
Parquet Nozzle*
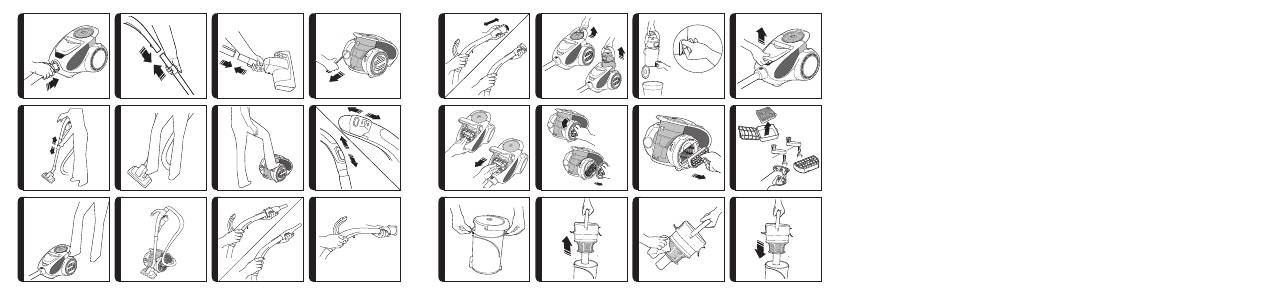
ASSEMBLING YOUR CLEANER
Remove all components from the packaging.
1.
Connect the hose to the cleaner main body, ensuring it clips and locks into position.
To release: simply press the two buttons on the hose end and pull.
[2]
2. Connect the tube upper end to the hose handle and store the accessories on the
handle.
[3]
3. Connect the tube lower end to the carpet and floor nozzle.
[4]
GB
(*Certain Models Only)
4800xxxx Xarion Pro Standard handle ML ef.indd 1
25/01/2011 10:36:27
2
USING YOUR CLEANER
1. Extract power cord and plug it into the power supply. Do not pull the cord beyond
the red marker.
[5]
2. Adjust the telescopic tube to the desired height by holding the handle and moving
the telescopic tube adjuster up or down.
[6]
3.
Select carpet care control height by pressing the pedal in the nozzle.
[7]
Hard Floor – Brushes are lowered to protect the floor.
Carpet – Brushes are raised for the deepest clean.
4.
Switch the cleaner on by pressing the On/Off Button on the cleaner main body.
[8]
5. Adjust the suction by sliding the suction control to the desired level.
[9]
6. Switch off at the end of use by pressing the On/Off Button. Unplug and press the
cord rewind button to wind the power cord back into the cleaner.
[10]
7. To store your cleaner adjust telescopic tube to the lowest height setting and park the
nozzle in the park position on the cleaner main body.
[11]
ACCESSORIES
All accessories can be fitted to the end of the handle or the end of the telescopic tube.
3 in 1 tool*
– Combines several functions in one, with maximum flexibility by the rotating
body. Reach into awkward areas by rotating the body. The 3 in 1 tool can be stored neatly
underneath the hose handle.
[1] (Depending on model)
Crevice Tool*
– For corners and hard to reach areas.
[12]
Furniture Nozzle*
– For soft furniture and fabrics
.[13]
Dusting Brush* –
For bookshelves, frames, keyboards and other delicate areas. To
extend the brushes push the button on the body of the tool.
[14]
Parquet Nozzle* –
For parquet floors and other delicate floors.
[1X]
Turbo Nozzle* –
Use the turbo nozzle for deep cleaning on carpets.
[1W]
Pet Hair Remover Mini Turbo Nozzle* -
Use the mini turbo nozzle on stairs or for deep
cleaning on textile surfaces and other hard to clean areas. Particularly suitable for pet
hairs removal. [1U]
Allergen Remover Mini Turbo Nozzle* –
Use the mini turbo nozzle on stairs or for deep
cleaning on textile surfaces and other hard to clean areas, particularly suitable for aller-
gen removal.
[1V]
IMPORTANT:
Do not
use the turbo and mini turbo nozzles on rugs with long fringes,
animal hides and carpet pile deeper than 15mm. Do not keep the nozzle stationary while
brush is rotating.
CLEANER MAINTENANCE
Emptying the Dust Container
When the dust reaches the max level indicator in the container empty the dust container.
IMPORTANT:
To maintain optimum performance do not allow the dust to sit higher than
the max level.
1.
Release the container carry handle by lifting the centre latch to detach the dust
container from the main cleaner and pull upward to remove.
[15]
2.
Hold the dust container over a bin with one hand and with the other pull the dust
container catch to open the door and empty.
[16]
3. Close the dust container door and refit to the cleaner main body. To lock in place
push the container carry handle down until the latch connects with the main body
of the cleaner. Once correctly retained the carry handle will sits flush with the top
of the cleaner.
Cleaning the washable filters
The cleaner is fitted with a filter pack. To maintain optimum cleaning performance regu
-
larly remove the the filters and tap against the side of the bin to release dust.The filters
should be washed every 3 months or when the filter has excessive dust level.
IMPORTANT: All bagless cleaners require regular filter cleaning. Failure to clean
your filters may result in air blockage, overheating and product failure. This may
invalidate your guarantee.
IMPORTANT:
Regularly check and maintain the filters.
IMPORTANT:
Always ensure the filter pack is fully dry before use.
To access the Pre- Motor filter:
NOTE:
Ensure the carry handle is at its down position before opening the filter door.
1. Unlock the filter door by pulling the filter latch upwards. Open the filter door. [17]
2.
Remove the blue filter pack by pressing down on the retainer catch to release. The
filter pack will pop up. Slide the filter pack out. [18]
3. Unlatch the filter pack frame.
4.
Remove the micro filter from the pack frame and wash the micro filter by handusing
warm water. Do not use hot water or detergents. Remove excess water from the
filter and leave to dry fully before reusing. [21]
5.
Reassemble to filter pack once fully dry and refit to the cleaner. Press on the top of
the filter to ensure it clips back into place.
GB
(*Certain Models Only)
4800xxxx Xarion Pro Standard handle ML ef.indd 2
25/01/2011 10:36:28
3
To access the exhaust filter:
1. Unlock the exhaust filter door by rotating the door along arrow indicated.
[19]
2. Remove the filter pack from recess.
[20]
3. Gently tap and wash the filter unit. Do not use hot water or detergents. Remove
excess water from the filter and leave to dry fully before reusing.
[21]
4. Reassemble filter pack once fully dry and refit to the cleaner.
IMPORTANT:
Do not use the product without the filter pack fitted.
Cleaning the Airvolution separation unit
This cleaner uses the Airvolution separation system, unique to Hoover. If necessary the
Airvolution separation unit can be removed from the dust container and cleaned.
1.
Remove dust container from the cleaner by releasing the container carry handle to
detach the dust container from the main cleaner and pull upward to remove.
[15]
2.
Place the dust container on a flat surface and unclip the clips from either side of the
dust container.
[22]
3.
Using the dust container handle lift the dust container upper section containing the-
separation unit from the lower section.
[23]
4. Use a cloth to remove excessive dust from the separation unit’s surface.
[24]
5. Reassemble the dust container upper section. Push clips back to fully close the dust
container.
[25]
6. Refit the dust container to the cleaner. To lock in place push the container carry
handle down until the latch connects with the main body of the cleaner. Once cor
-
rectly retained the carry handle will sit flush with the top of the cleaner.
Removing a blockage
1.
Check if the dust container is full. If so refer to ‘Emptying the dust container.
2.
If the dust container is empty but suction is still low:
A.
Do the filters need cleaning? If so refer to ‘Cleaning the washable filters’.
B.
Check if there is any other blockage in the system - Use a rod or pole to remove
any blockage from the extension tube or flexible hose.
C.
Check if pre-motor filter is fitted and filter door is closed
D.
Check if the cyclonic unit needs to be cleaned. Refer to ‘Cleaning the cyclone
unit’
USER CHECKLIST
Should you have a problem with the product, complete this simple user checklist
before calling your local Hoover service.
• Is there a working electricity supply to the cleaner? Please check with another
electrical appliance.
• Is the cyclonic dust container over-filled? Please refer to ‘Cleaner Maintenance’.
• Is the filter blocked? Please refer to ‘Cleaner Maintenance’.
• Is the hose or nozzle blocked? Please refer to ‘Removing a blockage from the
system’.
• Has the cleaner overheated? If so, it will take approximately 30 minutes to auto
-
matically reset.
IMPORTANT INFORMATION
Hoover spares and Consumables
Always replace parts with genuine Hoover spares. These are available from your lo
-
cal Hoover dealer or direct from Hoover. When ordering parts always quote your model
number.
Consumables:
• Hepa Pre-Motor Filter: S104 - 35600990
• Hepa Exhaust Filter Door: T101 - 35600991
Hoover Service
Should you require service, spares and consumables at any time, please contact your
local Hoover Service Office.
Quality
BSI ISO 9001
Hoover’s factories have been independently assessed for quality. Our products are
made using a quality system which meets the requirements of ISO 9001
GB
(*Certain Models Only)
4800xxxx Xarion Pro Standard handle ML ef.indd 3
25/01/2011 10:36:28
4
The Environment:
This appliance is marked according to the European Directive 2002/96/EC on Waste
Electrical and Electronic Equipment (WEEE).
By ensuring this product is disposed of correctly you will help prevent potential negative
consequences for the environment and human health, which could otherwise be caused
by inappropriate waste handling of this product.
The symbol on the product indicates that this product may not be treated
as houshold waste. Instead it shall be handed over to the appliance col
-
lection point for recycling of electrical and electronic equipment.
Disposal must be carried out in accordance with the local environmental
regulations for waste disposal.
For more detailed information about treatment, recovery and recycling of this product,
please contact your local city office, your household waste disposal service or the shop
where you purchased the product.
Your Guarantee
The guarantee conditions for this appliance are as defined by our representative in the
country in which it is sold. Details regarding these conditions can be obtained from the
dealer from whom the appliance was purchased. The bill of sale or receipt must be pro
-
duced when making any claim under the terms of this guarantee.
Subject to change without notice.
GB
4800xxxx Xarion Pro Standard handle ML ef.indd 4
25/01/2011 10:36:29
5
REMARQUES IMPORTANTES CONCERNANT LA SÉCURITÉ
Cet aspirateur doit uniquement être utilisé pour le nettoyage domestique, conformément
aux instructions de ce manuel. Veuillez vous assurer que ces instructions sont entièrement
comprises avant d'utiliser l'appareil. N'utilisez que les accessoires recommandés ou
fournis par Hoover.
ATTENTION :
L'électricité peut être extrêmement dangereuse. Cet appareil est
doublement isolé et ne doit pas être mis à la terre. Cette fiche est équipée d'un fusible 13
ampères (uniquement au R.U.).
IMPORTANT :
Les fils du cordon d’alimentation sont colorés selon le code suivant :
Bleu – Neutre Marron – Phase
ELECTRICITE STATIQUE :
Certains tapis/moquettes peuvent entraîner une petite
accumulation d'électricité statique. Les décharges d’électricité statique ne sont pas
dangereuses pour la santé.
APRES UTILISATION :
Eteindre l'aspirateur et débrancher la prise de l'alimentation
secteur. Toujours éteindre l’aspirateur et retirer la prise avant de nettoyer l’aspirateur ou
d'entreprendre toute intervention de maintenance.
SÉCURITÉ DES ENFANTS, DES PERSONNES ÂGÉES ET INFIRMES :
Ne pas laisser
les enfants jouer avec l'appareil ou ses commandes. Veuillez superviser les enfants, les
personnes âgées ou infirmes lorsqu’ils utilisent l’aspirateur .
SERVICE HOOVER :
Pour assurer l’utilisation sûre et efficace de cet appareil, nous
recommandons de ne faire effectuer l’entretien et les réparations que par un réparateur
Hoover agréé.
IL EST IMPORTANT DE NE PAS :
• Placer l’aspirateur en hauteur que vous lorsque vous nettoyez des escaliers.
• Utiliser votre aspirateur à l’extérieur, sur des surfaces humides ou pour aspirer
des liquides.
• Aspirer des objets durs ou tranchants, allumettes, cendres chaudes, mégots de
cigarettes ou autres objets similaires.
• Pulvériser ou aspirer un liquide inflammable, des produits d’entretien liquides, des
aérosols ou leurs vapeurs car cela comporte des risques d’incendie ou d’explosion.
• Faire passer l'aspirateur sur le cordon d'alimentation ou débrancher la prise en
tirant sur le cordon.
•
Marcher sur le cordon d'alimentation ou l'enrouler autour de vos bras ou vos
jambes quand vous utilisez l'aspirateur.
•
Utiliser l'appareil sur des personnes ou des animaux.
• Continuer à utiliser votre aspirateur s'il semble défectueux. Si le cordon d'alimentation
est endommagé, arrêter IMMEDIATEMENT l'aspirateur. Pour éviter les risques
d'accident, un réparateur Hoover agréé doit remplacer le cordon.
PREMIÈRE UTILISATION
A. Corps de l’aspirateur
B.
Poignée transport
C.
Bac à poussière
D.
Poignée et loquet de verrouillage de bac à poussière
E.
Commutateur Marche/Arrêt
F.
Bouton d’enroulement du cordon
G.
Trappe de filtre
H.
Loquet de verrouillage de trappe de filtre
I.
Jeu de filtres de protection du moteur
J.
Trappe du filtre d’évacuation
K. Filtre d’évacuation
L.
Fente de rangement
M.
Poignée*
N.
Régulation de l’aspiration*
O.
Tube télescopique*
P.
Bouton de réglage du tube télescopique*
Q.
Brosse moquette et sol dur
R.
Sélecteur surface
S. Flexible
T.
Accessoires*
U.
Mini turbobrosse pour élimination des poils d’animaux domestiques*
V.
Mini turbobrosse pour élimination des allergènes*
W.
Super turbobrosse*
X.
Brosse Parquet Caresse*
MONTAGE DE L'ASPIRATEUR
Sortez tous les composants de l’emballage.
1. Raccordez le flexible à l’aspirateur en veillant à ce qu’il se fixe bien et se verrouille
correctement. Pour le détacher : il suffit d’appuyer sur les deux boutons situés sur
l’embout de fixation du flexible et de tirer.
[2]
2.
Raccordez l’extrémité supérieure du tube à la poignée de guidage
[3]
, et rangez
l’accessoires sous la poignée/du tube.
3. Raccordez l’extrémité inférieure du tube à la brosse moquette et sol dur.
[4]
FR
(*Sur certains modèles uniquement)
4800xxxx Xarion Pro Standard handle ML ef.indd 5
25/01/2011 10:36:29
6
UTILISATION DE L'ASPIRATEUR
1.
Sortez le cordon d’alimentation et branchez-le sur la prise d’alimentation. Ne sortez
pas le cordon au-delà du repère rouge
. [5]
2.
Pour régler la longueur du tube télescopique à la hauteur désirée en tenant la
poignée et en déplaçant le tube télescopique de réglage vers le haut ou vers le
bas.
[6]
3. Sélectionnez le type de surface à nettoyer en appuyant sur la pédale de la brosse.
[7]
Sol dur – Les brosses sont baissées pour protéger le sol.
Moquette – Les brosses sont relevées pour un nettoyage en grande profondeur.
4.
Allumez l’aspirateur en appuyant sur le bouton de Marche/Arrêt.
[8]
5.
Ajustez l’aspiration en glissant le curseur d’aspirateur jusqu’au niveau voulu.
[9]
6. Eteignez l’aspirateur après utilisation en appuyant sur le bouton de Marche/Arrêt.
Débranchez l’aspirateur et enroulez le cordon d’alimentation dans l’aspirateur
enappuyant sur le bouton d’enroulement du cordon.
[10]
7. Pour ranger l’aspirateur, réglez le tube télescopique à la hauteur la plus basse et
rangez la brosse sur la position parking de l’aspirateur.
[11]
ACCESSOIRES
Tous les accessoires s’adaptent à l’extrémité du poignée ou à l’extrémité du tube
télescopique.
Accessoire 3-en-1*
– Combine plusieurs fonctions en un seul avec une souplesse
maximum par rotation du corps. Il permet d’accéder aux endroits difficiles. L’accessoire
3-en-1 se range de manière compacte sous la poignée du tuyau.
[1]
Suceur plat*
– Pour coins et endroits difficiles d’accès.
[12]
Petit suceur*
– Pour tissus d’ameublement.
[13]
Brosse meuble*
– Pour étagères, cadres, claviers et autres surfaces délicates. Pour
sortir les brosses, appuyez sur le bouton situé sur le corps de l’accessoire.
[14]
Brosse Parquet Caresse*
– Pour parquet et autres sols délicats.
[1X]
Super turbobrosse*
– Pour le nettoyage en profondeur des moquettes.
[1W]
Mini turbobrosse pour élimination des poils d’animaux domestiques*
- Mini turbo
brosse pour escaliers ou nettoyage en profondeur des surfaces textiles et autres surfaces
difficiles à aspirer. Particulièrement efficace pour éliminer les poils d’animaux.
[1U]
Mini turbobrosse pour élimination des allergènes*
– Utilisez la mini turbo brosse pour
les escaliers ou le nettoyage en profondeur des surfaces textiles et autres surfaces
difficiles à nettoyer, particulièrement efficace pour éliminer les allergènes.
[1V]
IMPORTANT :
Ne pas utiliser les suceurs turbo et mini turbo sur les tapis à franges
longues, les peaux d’animaux ou les moquettes à poils de plus de 15 mm de longueur.
Ne pas laisser la brosse tourner sur place.
ENTRETIEN DE L'ASPIRATEUR
Pour vider le bac à poussière
Lorsque la poussière atteint le repère de niveau maximum sur le bac, videz le bac à
poussière.
IMPORTANT :
Afin de maintenir la performance optimale de l'appareil, ne pas
laisser la poussière s'accumuler au-delà du niveau maximum.
1. Libérez la poignée de transport du bac en soulevant le loquet de verrouillage central
pour détacher le bac à poussière de l’aspirateur et tirez vers le haut pour le retirer.
[15]
2.
Tenez le bac à poussière d’une main au-dessus d’une poubelle et tirez sur le verrou
du bac à poussière de l’autre pour ouvrir la trappe et videz le bac.
[16]
3. Fermez la trappe du bac à poussière et replacez le sur l’aspirateur. Pour le ver
-
rouiller, poussez la poignée de transport du bac vers le bas jusqu’à ce que le loquet
s’enclanche sur l’aspirateur. Une fois en place, la poignée de transport repose sur
la partie supérieure de l’aspirateur.
Pour nettoyer les filtres lavables
L'aspirateur est pourvu d'un jeu de filtres bleus. Pour une performance optimale de nettoyage,
retirez régulièrement les filtres et les tapoter contre la paroi de la cuve pour décoller la
poussière. Les filtres doivent être lavés tous les 3 mois ou lorsqu'ils sont colmatés.
IMPORTANT : Tous les aspirateurs sans sac nécessitent un nettoyage régulier des
filtres. Un manque de nettoyage des filtres peut entraîner un blocage d’air, une
surchauffe et un défaut du produit. Ceci peut annuler votre garantie.
IMPORTANT :
Contrôlez et entretenez régulièrement les filtres.
IMPORTANT :
Veillez toujours à ce que le jeu de filtre soit bien sec avant utilisation.
Pour accéder au filtre :
REMARQUE :
Veillez à ce que la poignée de transport soit bien en position basse avant
d’ouvrir la trappe de filtre.
1. Déverrouillez la trappe de filtre en tirant le verrou de filtre vers le haut. Ouvrez la
trappede filtre.
[17]
2.
Retirez le jeu de filtres en appuyant vers le bas sur le verrou de maintien pour le
libérer. Lejeu de filtres sera expulsé. Sortez le jeu de filtres en le faisant glisser.
[18]
3. Déverrouillez le support du jeu de filtres.
4.
Retirez le micro filtre du jeu de filtres et nettoyez-le à la main avec de l’eau tiède.
N’utilisez pas d’eau chaude ou de détergents. Eliminez l’excédent d’eau du filtre et
laissezlesécher complètement avant de le réutiliser.
[21]
5.
Remontez le jeu de filtres une fois complètement sec et remettez le bac à poussière
surl’aspirateur. Appuyez sur le sommet du filtre en veillant à ce qu’il se fixe bien en
place.
IMPORTANT :
N’utilisez pas l’aspirateur sans filtres.
FR
(*Sur certains modèles uniquement)
4800xxxx Xarion Pro Standard handle ML ef.indd 6
25/01/2011 10:36:29
7
Pour accéder au filtre sortie moteur :
1. Déverrouillez la trappe du filtre d’évacuation en la tournant dans le sens indiqué par
la flèche.
[19]
2.
R etirez le jeu de filtres de son logement.
[20]
3. Tapotez doucement et laver le filtre (pièce de couleur bleu). N’utilisez pas d’eau
chaude ou de détergents. Eliminez l’excédent d’eau du filtre et laissez-le sécher
complètement avant de le réutiliser.
[21]
4.
R emontez le jeu de filtres une fois complètement sec et remettez-le en place sur
l’aspirateur.
IMPORTANT :
N’utilisez pas l’aspirateur sans les filtres.
Nettoyage du système de séparation Airvolution
Cet aspirateur dispose du système de séparation Airvolution unique à Hoover. Si néces
-
saire, il est possible de démonter l’unité de séparation Airvolution du bac à poussière
pour la nettoyer.
1. Retirez le bac à poussière de l’aspirateur en déverrouillant la poignée 1. de trans
-
port du bac pour le détacher de l’aspirateur et tirez vers le haut pour le retirer.
[15]
2.
Placez le bac à poussière sur une surface plate et défaites les clips de part et
d’autre du bac.
[22]
3. Soulevez la section supérieure du bac à poussière contenant l’unité de séparation
de la section inférieure à l’aide de sa poignée.
[23]
4.
Eliminez la poussière de la surface de l’unité de séparation à l’aide d’un chiffon.
[24]
5.
Remontez la section supérieure du bac à poussière. Refermez la cuve complète
-
ment à l’aide des clips.
[25]
6. Remettez le bac à poussière dans l’aspirateur. Pour le verrouiller, poussez la
poignée de transport du bac vers le bas jusqu’à ce que le loquet s’enclanche
sur l’aspirateur. Une fois en place, la poignée de transport repose sur la partie
supérieure de l’aspirateur.
Pour éliminer une obstruction
1. Vérifiez si le bac à poussière est plein. Si c’est le cas, voir « Pour vider le bac à
poussière ».
2.
Si le bac à poussière est vide mais que l'aspirateur aspire mal :
A.
Les filtres ont-ils besoin d’être nettoyés ? Si c’est le cas, voir « Pour nettoyer les
filtres lavables ».
B.
Vérifiez s'il y a une obstruction à un autre endroit - Eliminez les éventuelles
obstructions dans le tube de rallonge ou dans le tuyau flexible à l'aide d'une tige
ou d'un manche.
C.
Vérifiez que le filtre de protection du moteur est en place et que la trappe de filtre
est fermée.
D.
Vérifiez si la cassette cyclonique a besoin d'être nettoyée. Reportez-vous à
« Pour nettoyer la cassette cyclonique ».
TE DES VÉRIFICATIONS À EFFECTUER
En cas de problèmes avec l'appareil, effectuez les vérifications de la liste de vérifications
avant d'appeler le service après-vente Hoover.
• L'aspirateur est-il alimenté en électricité ? Veuillez vérifier la prise utilisée avec un
autre appareil électrique.
• Le bac à poussière cyclonique est-il saturé ? Veuillez vous reporter à « Entretien
de l'aspirateur ».
• Le filtre est-il colmaté ? Veuillez vous reporter à « Entretien de l'aspirateur ».
• Le tuyau ou le suceur est-il bouché ? Veuillez vous reporter à « Pour éliminer une
obstruction ».
• L'aspirateur a-t-il surchauffé ? Si c'est le cas, il lui faudra environ 30 minutes pour
se réinitialiser automatiquement.
INFORMATIONS IMPORTANTES
Pièces détachées et consommables Hoover
Toujours remplacer les pièces par des pièces détachées de la marque Hoover. Celles-ci
sont disponibles auprès de votre revendeur Hoover ou directement chez Hoover. Quand
vous commandez des pièces, veuillez toujours préciser le numéro de votre modèle.
Consommables:
• Filtre Hepa de protection du moteur : S104 - 35600990
• Trappe du filtre d’évacuation Hepa : T101 - 35600991
Service Hoover
Pour toute intervention à tout moment, veuillez contacter le service après-vente Hoover
le plus proche.
FR
4800xxxx Xarion Pro Standard handle ML ef.indd 7
25/01/2011 10:36:29
8
Sécurité
Bien qu’un certificat de sécurité des appareils électroménagers ne soit pas exigé par la loi
au Royaume-Uni, Hoover est d’avis qu’un agrément indépendant est la meilleure manière
d’attester la sécurité de conception et de fabrication. Le British Electrotechnical Approvals
Board (BEAB), autorité britannique nationale indépendante chargée de la sécurité des
appareils électroménagers, garantit le respect et la maintenance des normes de sécurité
européennes durant tout le cycle de production de l’appareil. Tous les appareils qui
satisfont à ces exigences peuvent porter la marque de sécurité BEAB.
Qualité
BSI ISO 9001
La qualité des usines Hoover a fait l’objet d’une évaluation indépendante. Nos produits
sont fabriqués selon un système de qualité conforme à la norme ISO 9001.
Environnement :
Cet appareil porte des marques conformément à la directive européenne
2002/96/CE relative aux déchets d'équipements électriques et
électroniques (WEEE).
Si vous jetez ce produit convenablement, vous contribuerez à éviter des
conséquences potentiellement nuisibles pour l'environnement et pour la
santé.
Le symbole figurant sur le produit indique qu'il ne peut pas être mis à la
poubelle avec les ordures ménagères. Vous devez le déposer dans un
centre de recyclage des déchets électriques et électroniques.
La mise au rebut doit être effectuée conformément à la réglementation locale en matière
de déchets.
Pour obtenir des compléments d'information sur le traitement, la récupération et le
recyclage de ce produit, merci de contacter votre municipalité, le service local des ordures
ménagères ou le lieu d'achat du produit.
Votre garantie
Les conditions de garantie de cet appareil sont définies par notre représentant dans le
pays où il est vendu et peuvent être obtenues auprès de votre revendeur. La facture
d’achat ou le reçu doivent être présentés pour toutes réclamations relevant des conditions
de cette garantie.
Ces conditions peuvent être modifiées sans préavis.
FR
4800xxxx Xarion Pro Standard handle ML ef.indd 8
25/01/2011 10:36:30
9
WICHTIGE SICHERHEITSHINWEISE
Dieser Staubsauger darf nur zur Reinigung im Haushalt gemäß dieser
Bedienungsanleitung verwendet werden. Vor dem Gebrauch des Geräts muss die
vorliegende Bedienungsanleitung gelesen und vollständig verstanden worden sein.
Verwenden Sie nur von Hoover empfohlene oder gelieferte Zubehörteile.
ACHTUNG:
Elektrizität kann gefährlich sein! Dieses Gerät ist doppelt isoliert und darf
nicht geerdet werden. Der Netzstecker enthält eine Sicherung von 13 A (nur GB).
WICHTIG:
Die einzelnen Drähte des Netzkabels sind wie folgt farbig gekennzeichnet:
Blau – Nullleiter Braun – Stromführend
STATISCHE ELEKTRIZITÄT:
Manche Teppiche können die Bildung statischer Elektrizität
verursachen, die jedoch sehr gering und bei Entladung nicht gesundheitsschädlich ist.
NACH JEDEM GEBRAUCH:
Gerät ausschalten und Stecker aus der Steckdose ziehen.
Auch vor der Reinigung oder Wartung des Geräts den Staubsauger stets ausschalten
und den Netzstecker aus der Dose ziehen.
SICHERHEIT IN BEZUG AUF KINDER SOWIE ÄLTERE ODER KRANKE MENSCHEN:
Lassen Sie Kinder nicht mit dem Gerät oder den Bedienelementen spielen. Die Benutzung
des Geräts durch größere Kinder, ältere oder kranke Menschen sollte nur unter Aufsicht
eines Erwachsenen erfolgen.
HOOVER-KUNDENDIENST:
Um auf Dauer den sicheren und effizienten Betrieb dieses
Geräts zu gewährleisten, empfehlen wir, Wartungs- und Reparaturarbeiten ausschließlich
von einem zugelassenen Hoover-Kundendiensttechniker durchführen zu lassen.
VERBOTE:
•
Positionieren Sie den Staubsauger bei der Reinigung von Treppen nicht oberhalb
Ihres Standorts!
• Benutzen Sie den Staubsauger nicht im Freien, auf nassen Oberflächen oder für
die Aufnahme von nassen Materialien.
• Vermeiden Sie es, harte oder scharfe Gegenstände, Streichhölzer, heiße Asche,
Zigarettenkippen oder Ähnliches aufzusaugen.
• Brennbare Flüssigkeiten, Flüssigreiniger, Aerosol oder Aerosoldämpfe weder [in
Staubsaugernähe] versprühen noch aufsaugen, da diese brennbar sind bzw. zu
einer Explosion führen könnten.
• Während des Saugens nicht über das Netzkabel fahren. Nicht am Kabel ziehen,
um den Gerätestecker aus der Netzdose zu ziehen.
•
Stellen Sie sich beim Gebrauch des Staubsaugers nicht auf das Netzkabel und
wickeln Sie es sich nicht um Arme oder Beine.
•
Benutzen Sie das Gerät nicht zur Reinigung von Menschen oder Tieren.
• Den Staubsauger bitte nicht mehr benutzen, wenn ein Defekt des Gerätes vorliegt oder vermutet
wird. Ist das Netzkabel beschädigt, darf der Staubsauger NICHT LÄNGER benutzt werden.
Ein beschädigtes Netzkabel muss von einem zugelassenen Hoover-Kundendiensttechniker
ausgetauscht werden, damit die Sicherheit des Gerätes gewährleistet ist.
BEZEICHNUNG DER TEILE
A. Gerätekorpus
B. Tragegriff
C. Staubbehälter
D. Staubbehältertragegriff und -verriegelung
E. Ein-/Aus-Taste
F.
Kabelaufwicklung
G.
Vormotorfilterfachklappe
H.
Entriegelung für Vormotorfilterfach
I.
Vormotorfilterkassette
J.
Klappe Abluftfilter
K. Abluftfilter
L.
Verstau-Schlitz
M. Handgriff*
N. Nebenluftregelung*
O. Teleskoprohr*
P. Teleskoprohrlängenverstellung*
Q.
Umschaltbare Bodendüse
R.
Pedal zur Wahl des Bodenbelags
S. Schlauch
T.
3in1-Zubehör*
U.
Miniturbodüse*
V.
AllergyRemover-Miniturbodüse*
W. Turbobodendüse*
X.
Caresse-Hartbodendüse*
ZUSAMMENBAU IHRES STAUBSAUGERS
Nehmen Sie alle Komponenten des Geräts aus dem Karton.
1.
Befestigen Sie das Ende des Saugschlauches am Gerätekorpus, so dass das
Schlauchende einrastet und arretiert ist. Zum entfernen drücken Sie die beiden
Knöpfe am Ende des Saugschlauchs und ziehen Sie den Schlauch heraus.
[2]
2. Schließen Sie das obere Rohrende am Steuergriff
[3]
an und verstauen Sie das
Zubehör unter dem Griff.
3. Befestigen Sie am unteren Rohrende die gewünschte Bodendüse.
[4]
DE
(*Geräteausstattung ist modellabhängig)
4800xxxx Xarion Pro Standard handle ML ef.indd 9
25/01/2011 10:36:30
10
GEBRAUCH DES STAUBSAUGERS
1. Ziehen Sie das Stromkabel heraus und schließen es an einer Steckdose an. Ziehen
Sie das Kabel nicht weiter heraus, als bis zur roten Markierung.
[5]
2.
Stellen Sie das Teleskoprohr auf die gewünschte Höhe ein, indem Sie den Griff am
Teleskoprohr nach unten oder oben schieben und den Handgriff in die gewünschte
Position einstellen.
[6]
3. Das Pedal an der Düse drücken, um die gewünschte Bodenart auszuwählen.
[7]
Hartböden – Der Borstenkranz wird zum Schutz des Bodens abgesenkt.
Teppichböden – Besonders gründliche Reinigung durch Anheben des Bürstenkranz.
4.
Schalten Sie das Gerät ein, indem Sie den Ein/Aus-Schalter am Gerätekörper
betätigen.
[8]
5.
Stellen Sie die Saugstärke durch Verschieben des Saugkraftreglers auf die gewün
-
schte Stufe ein.
[9]
6. Nach Gebrauch durch Betätigen des Ein/Aus-Schalters ausschalten. Ziehen Sie
den Stecker heraus und drücken Sie die Taste für die Kabelaufwickelung, wodurch
das Netzkabel in den Staubsauger eingezogen wird.
[10]
7. Zur Aufbewahrung Ihres Staubsaugers das Teleskoprohr auf die niedrigste Höhe
einstellen und die Düse in der Parkposition am Gerätekörper platzieren.
[11]
ZUBEHÖR
Alle Zubehörteile können am Ende des Schlauches oder des Telekoprohres befestigt werden.
3in1-Zubehör* –
Kombiniert mehrere Funktionen in einem Zubehörteil. Die einzelnen
Funktionen können durch Drehen ausgewählt werden. Das 3-in-1-Zubehör kann stets
einsatzbereit unter dem Handgriff aufbewahrt werden
. [1]
Fugendüse* –
Für Ecken und schwer erreichbare Bereiche.
[12]
Polsterdüse* –
Ideal zur Reingung von Polstermöbeln.
[13]
Möbelpinsel* –
Für Bücherregale, Rahmen, Tastaturen und andere empfindliche Bereiche.
Zum Verlängern der Bürsten die Taste am Gehäuse des Zubehörteils drücken.
[14]
Caresse-Hartbodendüse* –
Für Parkettböden und sonstige empfindliche Böden.
[1X]
Turbobodendüse* –
Benutzen Sie die Turbobodendüse zur besonders gründlichen
Reinigung von Teppichböden.
[1W]
Miniturbodüse* -
Die Miniturbodüse eignet sich speziell zur Reinigung von Matratzen
und Polstermöbeln. Besonders geeignet zur Entfernung von Tierhaaren.
[1U]
AllergyRemover-Miniturbodüse* –
Die Miniturbodüse eignet sich speziell zur Reinigung
von Treppen oder zur Tiefenreinigung von textilen Oberflächen und anderen, schwer zu
reinigenden Flächen und ist besonders wirksam gegen allergieauslösende Faktoren.
[1V]
WICHTIG:
Benutzen Sie die Turbo- und Mini-Turbodüse nicht auf Teppichen und
Vorlegern mit langen Fransen, auf Tierfellen und auf über 15 mm tiefem Teppichflor.
Halten Sie die Düse bei sich drehender Bürste nicht still.
WARTUNG DES STAUBSAUGERS
Leeren des Staubbehälters
Der Staubbehälter muss geleert werden, wenn die MAX.-Marke am Behälter erreicht ist.
WICHTIG: Bitte beachten Sie, dass zur Aufrechterhaltung der optimalen Leistungsfähigkeit
Ihres Geräts der Staubbehälter nicht über die MAX.-Marke gefüllt sein sollte.
1.
Den Staubbehältergriff anheben und damit den Behälter aus dem Gerät heben.
[15]
2.
Halten Sie den Staubbehälter mit einer Hand über einen Abfalleimer und drück
-
en mit der anderen Hand den Entriegelungsknopf am unteren Ende, so dass die
Klappe sich öffnet.
[16]
3. Schließen Sie die Staubbehälterklappe, und setzen Sie den Staubbehälter wieder
in den Staubsauger ein. Zur Arretierung den Behältertragegriff nach unten drücken,
bis er spürbar einrastet. Bei richtiger Montage rastet der Tragegriff bündig mit dem
Oberteil des Staubsaugers zu ein.
Reinigen der waschbaren Filter
Der Staubsauger ist mit zwei blauen-Filterkassetten ausgestattet. Zur Aufrechterhaltung
der optimalen Leistungsfähigkeit Ihres Gerätes die Filter bitte regelmäßig entfernen
und gründlich ausklopfen. Den Filter alle 3 Monate, oder wenn der Filter sehr starke
Verschmutzung aufweist, mit lauwarmen Wasser auswaschen.
WICHTIG: Alle beutellosen Staubsauger müssen regelmäßig gereinigt werden.
Werden die Filter nicht gereinigt, kann dies zu Verstopfung, Überhitzung und
Produktausfall führen. Dadurch erlischt möglicherweise Ihre Garantie.
WICHTIG:
Die Filter regelmäßig überprüfen und warten.
WICHTIG:
Die Filterpackung immer erst dann benutzen, wenn sie ganz trocken ist.
So entfernen Sie die Vormotorfilterkassette:
HINWEIS:
Stellen Sie sicher, dass der Tragegriff in der unteren Position ist, bevor Sie
die Filtertür öffnen.
1. Entriegeln Sie den Filterdeckel. Öffnen Sie den Filterdeckel.
[17]
2.
Entnehmen Sie die Filterkassette, indem Sie auf den Feststellriegel drücken. Die
Filterkassette hebt sich an. Ziehen Sie die Filterkassette vorsichtig raus.
[18]
3. Den Rahmen der Kassette vorsichtig öffnen.
4.
Nehmen Sie den Mikrofilter aus der Umverpackung und waschen Sie den
Mikrofilter in lauwarmem Wasser. Verwenden Sie kein heißes Wasser und keine
Reinigungsmittel. Entfernen Sie überschüssiges Wasser aus dem Filter und lassen
Sie ihn vor erneuter Verwendung gründlich trocknen.
[21]
5.
Setzen Sie den Filterpack im Staubsauger wieder ein, wenn er völlig getrocknet ist.
Drücken Sie auf den Filter um sicherzustellen, dass er richtig einrastet.
WICHTIG:
Das Gerät darf nicht ohne die Filter benutzt werden.
DE
(*Geräteausstattung ist modellabhängig)
4800xxxx Xarion Pro Standard handle ML ef.indd 10
25/01/2011 10:36:30
11
So entfernen Sie den Abluftfilter:
1. Entriegeln Sie die Abluftfilterabdeckung, indem Sie sie in die mit dem Pfeil angege
-
bene Richtung drehen.
[19]
2. Nehmen Sie die Filterkassette heraus.
[20]
3. Klopfen Sie die Filterkassette unter Wasser vorsichtig aus. Verwenden Sie kein
heißes Wasser und keine Reinigungsmittel. Entfernen Sie überschüssiges Wasser
aus dem Filter und lassen Sie ihn vor erneuter Verwendung gründlich trocknen.
[21]
4.
Setzen Sie die Filterkassette im Staubsauger erst dann wieder ein, wenn sie völlig
getrocknet ist.
WICHTIG:
Das Gerät darf nicht ohne die Filter benutzt werden.
Reinigung der AirVolution-Funktionseinheit
Dieser Staubsauger nutzt die neue, von Hoover patentierte, AirVolution-
Schmutzabscheidetechnologie. Bei Bedarf kann die AirVolution-Schmutzabscheiderein-
heit aus dem Staubbehälter ausgebaut und gereinigt werden.
1. Durch anheben des Behältertragegriffs können Sie den Staubbehälter aus
dem Staubsauger ausbauen. Ziehen Sie dazu den Staubbehälter aus dem
Staubsaugerkörper nach oben.
[15]
2.
Platzieren Sie den Staubbehälter auf einer ebenen Fläche und lösen Sie die Clips
an den Seiten des Staubbehälters.
[22]
3.
Trennen Sie den oberen Teil des Staubbehälters mit der Schmutzabscheidereinheit
mit Hilfe der Behältergriffe vom unteren Teil.
[23]
4.
Wischen Sie den Staub mit einem Tuch von der Oberfläche der
Schmutzabscheidereinheit ab.
[24]
5.
Montieren Sie wieder den oberen Teil des Staubbehälters. Drücken Sie die Clips
wieder zurück, bis der Staubbehälter ganz geschlossen ist.
[25]
6. Setzen Sie den Staubbehälter wieder in den Staubsauger. Zur Arretierung den
Behältertragegriff nach unten drücken, bis er spürbar einrastet. Bei richtiger
Montage rastet der Tragegriff bündig mit dem Oberteil des Staubsaugers zu ein.
Entfernen einer Verstopfung
1.
Prüfen Sie, ob der Staubbehälter voll ist. Falls ja, siehe „Leeren des Staubbehälters“
.
2.
Falls die Kassette leer ist, und die Saugkraft dennoch schwach ist, Folgendes prüfen:
A.
Müssen die Filter gereinigt werden? Falls ja, siehe „Reinigung der waschbaren
Filter“.
B.
Prüfen Sie, ob der Saugtrakt an einer anderen Stelle verstopft ist. - Entfernen Sie
Verstopfungen im Teleskoprohr oder dem flexiblen Saugschlauch mit einem Stab.
C.
Prüfen Sie, ob die Filter korrekt eingebaut und die Filterdeckel richtig geschlos
-
sen sind.
D.
Prüfen Sie, ob die Schmutzabscheidereinheit gereinigt werden muss. Weitere
Informationen finden Sie unter “Reinigung der AirVolution-Funktionseinheit”.
PRÜFLISTE ZUR FEHLERSUCHEWICHTIGE INFORMATIONEN DE PRÜFLISTE ZUR FEHLERSUCHE
Bitte prüfen Sie die einzelnen Punkte dieser Prüfliste, bevor Sie sich im Falles eines
Problems an Ihre zuständige Hoover-Kundendienststelle werden.
• Ist die Stromversorgung in Ordnung? Bitte überprüfen Sie sie mit einem anderen
elektrischen Gerät.
• Ist der zyklonische Staubbehälter übervoll? Siehe „Wartung des Staubsaugers“
.
• Ist der Filter blockiert? Siehe „Wartung des Staubsaugers“
.
• Ist der Saugschlauch oder die Düse verstopft? Siehe „
Verstopfung des Saugtrakts
beheben
“
.
• Ist der Staubsauger überhitzt? Falls ja, dauert es ca. 30 Minuten, bis der
Überhitzungsschutz sich automatisch abschaltet.
WICHTIGE INFORMATIONEN
Hoover Original-Ersatzteile und Verbrauchsartikel
Verwenden Sie stets Original-Ersatzteile von Hoover. Diese sind von Ihrem Hoover-
Fachhändler oder direkt von Hoover erhältlich. Geben Sie bei der Bestellung von Ersatz-
teilen bitte stets die komplette Matrikelnummer (Plakette auf der Unterseite des Gerätes)
Ihres Staubsaugermodells an.
Verbrauchsartikel:
• HEPA-Vormotorfilter: S104 - 35600990
• Klappen für Hepa-Abluftfilter: T101 - 35600991
Hoover-Service
Zur Wartung oder Reparatur Ihres Produkts wenden Sie sich bitte an Ihre zuständige
Hoover-Kundendienststelle.
Qualität
BSI ISO 9001
Die Hoover-Werke wurden unabhängig voneinander jeweils einer Qualitätsprüfung un
-
terzogen. Unsere Produkte werden
4800xxxx Xarion Pro Standard handle ML ef.indd 11
25/01/2011 10:36:30

12
Umweltschutz:
Dieses Gerät ist entsprechend der europäischen Richtlinie 2002/96/EG
des europäischen Parlaments und Rates über Elektro- und Elektronik-
Altgeräte (WEEE-Richtlinie) gekennzeichnet.
Durch die sichere und umweltgerechte Entsorgung dieses Produkts tragen
Sie dazu bei, mögliche negative Auswirkungen auf die Umwelt und die
Gesundheit des Menschen zu verhindern.
Das am Produkt angebrachte Symbol gibt an, dass dieses Produkt nicht
als Hausmüll behandelt werden darf, sondern an einer entsprechenden
Sammelstelle für das Recycling von elektrischen und elektronischen Geräten zu entsorgen
ist.
Die Entsorgung ist in Übereinstimmung mit allen geltenden Vorschriften für die
umweltgerechte Abfallentsorgung vorzunehmen.
Für ausführlichere Informationen über die Müllbehandlung und das Recycling dieses
Produkts wenden Sie sich bitte an Ihre zuständige Umweltbehörde, die Müllentsorgung
oder an die Verkaufsstelle, von der Sie das Produkt erworben haben.
Garantieerklärung
Die Garantiebestimmungen für dieses Gerät entsprechen den Richtlinien des Landes,
in dem Sie das Gerät erworben haben. Weitere Einzelheiten dazu erhalten Sie von dem
Händler, bei dem Sie das Gerät erworben haben. Bitte bewahren Sie den Kaufbeleg
sorgfältig auf, denn er wird für eventuell auftretende Garantieansprüchen benötigt.
Änderungen vorbehalten.
DE
4800xxxx Xarion Pro Standard handle ML ef.indd 12
25/01/2011 10:36:31
13
AVVERTENZE IMPORTANTI PER LA SICUREZZA
Questo apparecchio deve essere utilizzato esclusivamente in ambito domestico per
interventi di pulizia, secondo le istruzioni riportate nel presente documento. Accertarsi
di aver compreso le istruzioni prima di mettere in funzione l'apparecchio. Utilizzare solo
accessori consigliati o forniti da Hoover.
AVVERTENZA:
l'elettricità può essere estremamente pericolosa. Questo apparecchio
è dotato di doppio isolamento e non richiede la messa a terra. La spina è munita di un
fusibile da 13 ampere (solo Regno Unito).
IMPORTANTE:
i fili contenuti nel cavo di alimentazione sono colorati secondo il seguente
codice:
Blu – Neutro
Marrone – Fase
ELETTRICITÀ STATICA:
alcuni tappeti possono produrre un accumulo di elettricità
statica. Le cariche di elettricità statica non sono pericolose per la salute.
DOPO L'UTILIZZO:
spegnere l'apparecchio e scollegare la spina dalla presa di corrente.
Prima di procedere alla pulizia dell'apparecchiatura o di effettuare qualsiasi operazione
di manutenzione, spegnere sempre l'apparecchio e scollegare la spina.
SICUREZZA CON I BAMBINI, GLI ANZIANI O I DISABILI:
non lasciare che i
bambini giochino con l'apparecchio o con i relativi comandi. Supervisionare l'utilizzo
dell'apparecchio da parte di ragazzi o persone anziane o disabili.
ASSISTENZA HOOVER:
per garantire un funzionamento sempre sicuro ed efficiente
dell'apparecchiatura, si consiglia di fare eseguire eventuali interventi di assistenza o di
riparazione dai tecnici del servizio assistenza autorizzato Hoover.
È IMPORTANTE EVITARE DI:
• Collocare l'apparecchio in una posizione più alta rispetto alla propria quando si
puliscono delle scale.
• Utilizzare l'apparecchio all'aperto, su superfici bagnate o per aspirare liquidi.
•
Aspirare oggetti duri o taglienti, fiammiferi, ceneri incandescenti, mozziconi di
sigaretta o oggetti simili.
• Vaporizzare o aspirare liquidi infiammabili, liquidi detergenti, aerosol o i loro vapori
poiché ne può derivare un rischio di incendio/esplosione.
•
Calpestare il cavo di alimentazione durante l'utilizzo dell'apparecchio o scollegare
la spina dalla presa tirando il cavo di alimentazione.
•
Calpestare il cavo di alimentazione dell'apparecchio o avvolgerlo intorno alle
braccia o alle gambe durante l'uso.
•
Utilizzare l'apparecchio per l'igiene della persona o degli animali.
•
Continuare a utilizzare l'apparecchio in caso di presunto guasto. Se il cavo di alimentazione
è danneggiato, interrompere IMMEDIATAMENTE l'utilizzo dell'apparecchio. Per evitare
pericoli, il cavo di alimentazione dovrà essere sostituito da un tecnico del servizio
assistenza autorizzato Hoover.
DESCRIZIONE DELL'ASPIRAPOLVERE
A. Corpo principale dell’apparecchio
B. Impugnatura da trasporto
C. Contenitore raccoglipolvere
D. Impugnatura e dispositivo di blocco del contenitore raccoglipolvere
E. Pulsante di accensione/spegnimento
F.
Pulsante di riavvolgimento del cavo
G.
Sportello del filtro
H.
Dispositivo di blocco dello sportello del filtro
I.
Unità Filtro Pre-Motore
J.
Sportello del filtro in uscita
K.
Filtro in uscita
L.
Stazionamento
M. Impugnatura*
N. Dispositivo regolazione forza aspirante*
O. Tubo telescopico*
P. Dispositivo di controllo del tubo telescopico*
Q. Spazzola per tappeti e pavimenti
R.
Selettore modalità tappeti /pavimenti della spazzola
S.
Tubo flessibile
T.
Accessori*
U. Mini turbospazzola per rimuovere i peli di animali domestici*
V. Mini turbospazzola per rimuovere gli allergeni*
W.
Spazzola Grand Turbo*
X.
Spazzola Parquet Caresse*
MONTAGGIO DELL'APPARECCHIO
Disimballare tutti i componenti.
1. Collegare il tubo flessibile al corpo principale dell’apparecchio, assicurandosi chesi
agganci e si blocchi in posizione. Per disinserire il tubo, è sufficiente premere i due
pulsanti all’estremità del tubo flessibile e tirare per estrarlo.
[2]
2.
Collegare l’estremità superiore del tubo telescopico all’impugnatura [3] e inserire la
bocchetta sotto l’impugnatura.
3. Collegare l’estremità inferiore del tubo telescopico alla spazzola per tappeti e
pavimenti.
[4]
IT
(*Solo su alcuni modelli)
4800xxxx Xarion Pro Standard handle ML ef.indd 13
25/01/2011 10:36:31

14
UTILIZZO DELL'APPARECCHIO
1.
Estrarre il cavo di alimentazione e inserirlo in una presa di corrente. Non tirare il
cavo oltre l’indicatore rosso. [5]
2. Regolare il tubo telescopico all’altezza desiderata sollevando o abbassando
dispositivo di controllo del tubo telescopico del tubo telescopico. [6]
3. Selezionare il tipo di superficie da pulire premendo il pedale sulla spazzola. [7]
Pavimento – Le setole si abbassano per proteggere il pavimento.
Tappeto/moquette – Le setole si sollevano per garantire una pulizia più in profondità.
4. Accendere l’apparecchio premendo il pulsante di accensione/spegnimento sul
corpo principale dell’aspirapolvere. [8]
5.
Regolare l’intensità di aspirazione facendo scorrere il dispositivo di regolazione al
livello desiderato. [9]
6.
Dopo l’uso, spegnere l’apparecchio premendo il pulsante di accensione/
spegnimento. Staccare la spina e premere il pulsante di riavvolgimento del cavo
per riavvolgere il cavo di alimentazione. [10]
7.
Per riporre l’apparecchio, regolare il tubo telescopico all’altezza inferiore e collocare
la spazzola in posizione di parcheggio sul corpo principale dell’apparecchio. [11]
ACCESSORI
Tutti gli accessori devono essere inseriti nell'estremità inferiore del
impugnatura o del
tubo telescopico.
Accessori 3 in 1* –
combina diverse funzioni in un unico dispositivo che garantendo la
massima flessibilità. Ruotando il dispositivo è possibile raggiungere aree difficili. La boc
-
chetta 3 in 1 può essere comodamente riposta sotto l’impugnatura del tubo flessibile.
[1]
Bocchetta per fessure* –
per angoli e punti difficili da raggiungere.
[12]
Bocchetta tutti gli usi* –
per tessuti, imbottiti e superfici delicate.
[13]
Spazzola a pennello* –
per librerie, cornici, tastiere e altre superfici delicate. Per esten
-
dere le setole, premere il pulsante posto sul corpo dell’accessorio.
[14]
Spazzola Parquet Caresse* –
per parquet e pavimenti delicati.
[1X]
Spazzola Grand Turbo* –
per una pulizia profonda di tappeti e moquette.
[1W]
Mini turbospazzola per rimuovere i peli di animali domestici* -
utilizzare la mini
turbospazzola per la pulizia profonda di superfici tessili e imbottiti e per altre aree difficili.
Particolarmente adatta per rimuovere i peli degli animali domestici.
[1U]
Mini turbospazzola per rimuovere gli allergeni* –
Utilizzare la mini turbospazzola per
la pulizia profonda di superfici tessili, imbottiti e altre aree difficili da pulire in cui si an
-
nidano acari e batteri.
[1V]
MANUTENZIONE DELL'APPARECCHIO
IMPORTANTE:
non utilizzare la turbospazzola e la mini turbospazzola su pellicce e su
tappeti a frange o con pelo di oltre 15 mm. Non tenere ferma la spazzola sul tappeto con
il rullo in rotazione.
MANUTENZIONE DELL’APPA RECCHIO
Svuotamento del contenitore raccoglipolvere
Quando la polvere raggiunge l'indicatore di livello massimo, svuotare il contenitore
raccoglipolvere.
IMPORTANTE:
per ottenere prestazioni ottimali, non consentire che la polvere si
accumuli oltre il livello massimo.
1.
Per rimuovere il contenitore raccoglipolvere dal corpo principale dell’apparecchio
sollevare il dispositivo di blocco centrale e tirare verso l’alto.
[15]
2. 2. Con una mano tenere il contenitore raccoglipolvere sopra un cestino e con l’altra
sbloccare il gancio del contenitore raccoglipolvere per aprire lo sportello e svuotarne
il contenuto.
[16]
3.
Chiudere lo sportello contenitore raccoglipolvere e riposizionarlo sul corpo principale
dell’apparecchio. Per bloccarlo in posizione, spingere la maniglia di trasporto del
contenitore verso il basso finché il dispositivo di blocco non si aggancia al corpo
principale dell’apparecchio. Una volta posizionata correttamente, la maniglia di
trasporto risulterà allineata alla parte superiore dell’apparecchio.
Pulizia dei filtri lavabili
L’apparecchio è dotato di un’unità composta da un microfiltro in spugna e da un filtro.
Per mantenere prestazioni ottimali, rimuovere i filtri e picchiettarli contro il lato del cestino per
eliminare la polvere. I filtri devono essere lavati ogni 3 mesi oppure ogni volta che la polvere in
essi contenuta risulti eccessiva.
IMPORTANTE: Tutti gli apparecchi senza sacchetto richiedono una regolare
pulizia del filtro. La mancata pulizia dei filtri può causare il blocco dell’aria, il
surriscaldamento e il danneggiamento dell’apparecchio.Tutto ciò può invalidare
la garanzia.
IMPORTANTE:
controllare i filtri sistematicamente e sottoporli a regolare manutenzione.
IMPORTANTE:
prima di utilizzare i filtri, accertarsi sempre che siano asciutti.
Per accedere al filtro Pre-motore:
NOTA:
accertarsi che la maniglia di trasporto si trovi in posizione abbassata prima di
aprire lo sportello del filtro.
1. SSbloccare lo sportello del filtro tirando verso l’alto il dispositivo di blocco. Aprire lo
sportello del filtro. [17]
2.
Rimuovere l’unità filtro premendo verso il basso il gancio di blocco per rilasciarla.
L’unità filtro fuoriesce. Far scorre verso l’esterno l’unità filtro. [18]
3. Aprire il contenitore dell’unità filtro.
4.
Rimuovere il micro filtro dall’apparecchio e lavarlo a mano con acqua calda. Non
utilizzare acqua bollente o detergenti. Eliminare l’acqua in eccesso dai filtri con un
panno asciutto e lasciarli asciugare completamente prima di riutilizzarli. [21]
5.
Riassemblare l’unità filtro una volta asciugata e rimontarla sull’apparecchio. Premere
la parte superiore del filtro per accertarsi che venga agganciato correttamente in
posizione.
IMPORTANTE:
non utilizzare il prodotto senza aver prima montato il filtro.
IT
(*Solo su alcuni modelli)
4800xxxx Xarion Pro Standard handle ML ef.indd 14
25/01/2011 10:36:31
15
Per accedere al filtro in uscita:
1. Svitare lo sportello del filtro in uscita posizionato sulla ruota del prodotto facendolo
ruotare nella direzione indicata dalla freccia.
[19]
2.
Rimuovere l’unità filtro dal suo alloggiamento.
[20]
3. Picchiettare e lavare l’unità filtro. Non utilizzare acqua bollente o detergenti. Elimin
-
are l’acqua in eccesso dai filtri con un panno asciutto e lasciarli asciugare completa
-
mente prima di riutilizzarli.
[21]
4.
Riassemblare l’unità filtro una volta asciugata e rimontarla sull’apparecchio.
IMPORTANTE:
non utilizzare il prodotto senza aver prima montato il filtro.
Pulizia dell’unità di separazione Airvolution
Questo apparecchio utilizza il sistema di separazione Airvolution, un sistema unico utiliz-
zato in esclusiva da Hoover. Se necessario per la pulizia è possibile rimuovere l’unità di
separazione Airvolution dal contenitore raccoglipolvere.
1.
Rilasciare la maniglia di trasporto 1. del contenitore raccoglipolvere per sganciarlo quindi
rimuovere il contenitore tirandolo verso l’alto.
[15]
2.
Aprire il contenitore raccoglipolvere sbloccando i ganci laterali.
[22]
3.
Utilizzando l’apposita maniglia, sollevare la sezione superiore contenente l’unità di
separazione dalla sezione inferiore.
[23]
4.
Utilizzare un panno per rimuovere la polvere in eccesso dalla superficie dell’unità.
[24]
5.
Riassemblare la sezione superiore del contenitore raccoglipolvere. Spingere i ganci
laterali verso il basso per chiudere il contenitore raccoglipolvere
. [25]
6.
Rimontare il contenitore raccoglipolvere sull’apparecchio. Per bloccarlo in posizione,
spingere la maniglia di trasporto del contenitore verso il basso finché il dispositivo di blocco
non si aggancia al corpo principale dell’apparecchio. Una volta posizionata correttamente,
la maniglia di trasporto risulterà allineata alla parte superiore dell’apparecchio.
Rimozione di un'ostruzione
1. Controllare che il contenitore raccoglipolvere non sia pieno. Se è pieno, vedere
"Svuotamento del contenitore raccoglipolvere".
2.
Se il contenitore raccoglipolvere non è pieno ma l'aspirazione è ancora scarsa:
A.
Potrebbe essere necessario pulire i filtri. In questo caso, vedere la sezione
“Pulizia dei filtri lavabili”.
B.
Controllare che non vi siano altre ostruzioni nel sistema. - Utilizzare un’asticella
o un bastoncino per rimuovere eventuali ostruzioni dal tubo telescopico o dal
tubo flessibile.
C.
Verificare che il filtro pre-motore sia installato e lo sportello del filtro sia chiuso.
D.
Verificare se l’unità di separazione debba essere pulita. Fare riferimento al para
-
grafo “Pulizia dell’unità di separazione”.
CHECKLIST UTENTE
In caso di problemi, completare questa semplice checklist utente
prima di chiamare il
centro assistenza Hoover.
• La presa elettrica a cui è collegato l'apparecchio è funzionante? Controllare
collegando un altro elettrodomestico.
• Il contenitore raccoglipolvere Cyclone è pieno? Vedere "Manutenzione dell'apparecchio".
• Il filtro è bloccato? Vedere "Manutenzione dell'apparecchio".
• Il tubo flessibile o la spazzola è bloccata? Vedere "Rimozione di un'ostruzione dal
sistema".
• L'aspirapolvere si è surriscaldato? In questo caso, il reset automatico richiede
circa 30 minuti
.
INFORMAZIONI IMPORTANTI
Parti di ricambio e di consumo Hoover
Utilizzare sempre parti di ricambio originali Hoover, che è possibile acquistare dal
distributore locale Hoover o direttamente dalla Hoover. Quando si ordinano delle parti di
ricambio, ricordarsi sempre di fornire il numero di modello dell'apparecchio utilizzato.
Materiali di consumo:
• Filtro pre-motore Hepa: S104 - 35600990
• Sportello del filtro Hepa in uscita : T101 - 35600991
Assistenza Hoover
Per richiedere assistenza in qualsiasi momento, contattare il centro assistenza Hoover
più vicino.
Qualità
BSI ISO 9001
La qualità degli stabilimenti Hoover è stata sottoposta a valutazione indipendente. I nostri
prodotti vengono realizzati mediante un sistema di qualità che soddisfa i requisiti ISO
9001.
IT
4800xxxx Xarion Pro Standard handle ML ef.indd 15
25/01/2011 10:36:31
16
Ambiente:
L'apparecchio è stato ritenuto conforme alla Direttiva europea WEEE
(RAEE) 2002/96/EC sulla gestione dei rifiuti da apparecchiature elettriche
ed elettroniche.
Garantendo il corretto smaltimento del prodotto, il cliente contribuisce alla
salvaguardia della salute delle persone e alla protezione dell'ambiente
che potrebbero altrimenti essere compromessi da uno smaltimento
eseguito in maniera non idonea.
Il simbolo apposto su di esso indica che questo prodotto non può essere smaltito come
i normali rifiuti domestici, bensì deve essere portato al punto di raccolta o al centro di
riciclaggio delle apparecchiature elettriche ed elettroniche più vicino.
Lo smaltimento deve essere eseguito in conformità alle normative locali vigenti per la
salvaguardia dell'ambiente e lo smaltimento dei rifiuti.
Per ulteriori informazioni sul trattamento, il recupero e il riciclaggio di questo prodotto,
contattare l'unità territoriale competente per il servizio di smaltimento o il negozio in cui il
prodotto è stato acquistato.
Regolamento per la garanzia
Le condizioni di garanzia relative a questo apparecchio sono definite dal rappresentate
Hoover nel Paese di vendita. Per conoscere in dettaglio le condizioni, rivolgersi al
distributore Hoover presso il quale l'apparecchio è stato acquistato. Per ogni contestazione
ai sensi dei termini della garanzia, è necessario mostrare la fattura o un documento di
acquisto equipollente.
Queste condizioni potrebbero venire modificate senza obbligo di preavviso.
IT
4800xxxx Xarion Pro Standard handle ML ef.indd 16
25/01/2011 10:36:32
17
BELANGRIJKE VEILIGHEIDSTIPS
Deze stofzuiger is uitsluitend bestemd voor huishoudelijk gebruik, zoals beschreven
in deze gebruiksaanwijzing. Zorg ervoor dat u de instructies volledig begrijpt voordat
u het apparaat in gebruik neemt. Gebruik alleen hulpmiddelen die door Hoover worden
geadviseerd of geleverd.
WAARSCHUWING:
Elektriciteit kan zeer gevaarlijk zijn. Dit apparaat is dubbel geïsoleerd
en hoeft niet te worden geaard. De stekker is voorzien van een zekering van 13 A (alleen
voor de Britse markt).
BELANGRIJK:
De draden in de stroomkabel zijn gekleurd volgens de volgende code:
Blauw – Neutraal
Bruin – Fase
STATISCHE ELEKTRICITEIT:
Sommige tapijten kunnen statische elektriciteit veroorzaken.
Ontladingen van statische elektriciteit zijn onschadelijk voor uw gezondheid.
NA GEBRUIK:
Schakel de stofzuiger uit en verwijder de stekker uit het stopcontact.
Schakel de stofzuiger altijd uit en verwijder de stekker uit het stopcontact voordat u het
toestel schoonmaakt of onderhoudt.
VEILIGHEID VOOR KINDEREN, OUDEREN OF MINDER BEGAAFDEN:
Laat kinderen
niet spelen met het apparaat of de bedieningsonderdelen. Zorg voor toezicht bij gebruik
van het apparaat door oudere kinderen, ouderen of minder begaafden.
HOOVER SERVICE:
Om de veilige en doeltreffende werking van het apparaat te
verzekeren, adviseren wij om onderhoud of reparaties alleen door een erkende
onderhoudsmonteur van Hoover uit te laten voeren.
HET VOLGENDE MAG U NOOIT DOEN:
•
Plaats de stofzuiger nooit boven u bij het stofzuigen van een trap.
• Gebruik uw stofzuiger niet buitenshuis, op natte oppervlakken of om water mee
op te zuigen.
• Zuig geen harde of scherpe objecten, lucifers, smeulende as, sigarettenpeuken of
andere vergelijkbare voorwerpen op.
•
Gebruik geen spuitbussen in de buurt van de stofzuiger en zuig geen ontvlambare vloeistoffen,
reinigingsmiddelen of dampen op, want dit kan brand/ontploffing veroorzaken.
•
Rijd niet met de stofzuiger over het netsnoer en trek niet aan het snoer om de
stekker uit het stopcontact te halen.
• Wikkel het netsnoer niet rond uw armen of benen en ga er niet op staan tijdens
het stofzuigen.
•
Maak met deze stofzuiger geen mensen of dieren schoon.
• Gebruik uw stofzuiger niet wanneer het toestel defect lijkt te zijn. Als het netsnoer is
beschadigd, zet de stofzuiger dan ONMIDDELLIJK uit. Om veiligheidsrisico’s te
voorkomen, moet het netsnoer worden vervangen door een erkend monteur van Hoover.
ALLES OVER UW STOFZUIGER
A. De stofzuiger zelf
B. Draaghendel
C. Stofreservoir
D. Handvat en vergrendeling stofreservoir
E. Aan/uit-schakelaar
F.
Knop oprolmechanisme
G.
Deur filter
H.
Vergrendeling deur filter
I.
Pre-motor filterpakket
J.
Klep van uitblaasfilter
K. Uitlaatfilter
L.
Parkeerstand
M. Handvat
N.
Zuigbediening
O. Telescopische buis
P. Regelaar voor telescopische buis
Q. Tapijt en vloermondstuk
R. Oppervlakteselectieknop
S. Slang
T.
Accessoire
U. Miniturbozuigmond voor dierenharen*
V. Miniturbozuigmond voor allergene stoffen*
W.
Grand Turbozuigmond*
X.
Zuigmond voor parket Caresse*
DE STOFZUIGER MONTEREN
Neem alle onderdelen uit de verpakking.
1. Steek de slang in de stofzuiger en klik deze erin vast. Verwijderen: druk de twee
knoppen op het slanguiteinde in en trek de slang eruit.
[2]
2. Sluit de bovenkant van de buis aan op het navigatorhandvat
[3]
en berg het
accessoire op onder het handvat.
3.
Sluit de onderkant van de buis aan op de zuigmond voor tapijten en vloeren.
[4]
NL
(*Alleen bepaalde modellen)
4800xxxx Xarion Pro Standard handle ML ef.indd 17
25/01/2011 10:36:32
18
DE STOFZUIGER GEBRUIKEN
1.
Trek het netsnoer uit de stofzuiger en steek de stekker in het stopcontact. Trek het
snoer niet verder uit dan de rode markering.
[5]
2.
Stel de telescopische buis in op de gewenste hoogte door het handvat vast te
houden en de regelaar voor telescopische buis omhoog of omlaag te brengen.
[6]
3.
Selecteer het type te reinigen oppervlak met het pedaal op het mondstuk.
[7]
Harde vloer – De borstels wijzen naar beneden en beschermen zo de vloer.
Tapijt – De borstels zijn ingetrokken om zo diep mogelijk te kunnen zuigen.
4.
Zet de stofzuiger aan door te drukken op de aan/uit-schakelaar op de stofzuiger
zelf.
[8]
5.
Zet de zuigkrachtregelaar op het gewenste niveau.
[9]
6.
Schakel de stofzuiger na gebruik uit door op de aan/uit-schakelaar te drukken. Trek
de stekker uit het stopcontact en druk op de knop van de oprolautomaat. Nu rolt het
netsnoer zichzelf weer op in de stofzuiger.
[10]
7. Berg uw stofzuiger als volgt op: zet de telescopische buis in de laagste stand en
bevestig de zuigmond aan de stofzuiger in de parkeerstand.
[11]
ACCESSOIRES
Alle accessoires kunnen op het uiteinde van de handvat of op het uiteinde van de
telescopische buis worden geplaatst.
3-in-1-accessoire* –
Combineert verschillende functies, met maximale flexibiliteit door
hetroterende gedeelte. U kunt moeilijke plaatsen bereiken door het hulpstuk te roteren.
Het 3-in-1 hulpstuk kan handig worden opgeborgen onder de handgreep van de slang.
[1]
Kierenmondstuk* –
Voor hoeken en moeilijk bereikbare plaatsen.
[12]
Meubelmondstuk* –
Voor zachte meubels en stoffen.
[13]
Stofborstel* –
Voor boekenrekken, kozijnen, toetsenborden en andere kwetsbare plek
-
ken. Druk op de knop op het hulpstuk om de borstels uit te schuiven.
[14]
Zuigmond voor parket Caresse* –
Voor parketvloeren en andere kwetsbare vloeren.
[1X]
Grand Turbozuigmond* –
Gebruik het turbomondstuk voor de grondige reiniging van
tapijten.
[1W]
Miniturbozuigmond voor dierenharen* -
Gebruik het miniturbomondstuk voor trappen
of voor het grondig reinigen van textielproducten en andere moeilijk schoon te maken
plekken. Vooral geschikt voor het verwijderen van haren van huisdieren
. [1U]
Miniturbozuigmond voor allergene stoffen* –
Gebruik het miniturbomondstuk voor
trappen of voor het grondig reinigen van textielproducten en andere moeilijk schoon te
maken plekken; bijzonder geschikt om huisstofmijt te verwijderen
. [1V]
BELANGRIJK:
Gebruik het turbomondstuk en het mini-turbomondstuk niet op tapijten
met lange franjes, op dierenhuiden of op tapijten dikker dan 15 mm. Houd het mondstuk
niet stil wanneer de borstel draait.
ONDERHOUD STOFZUIGER
Het stofreservoir legen
Leeg het stofreservoir zodra het stof de markering ‘max. niveau’ in het reservoir bereikt.
BELANGRIJK:
Zorg ervoor dat het stof niet boven het aangegeven maximale niveau
uitkomt als u wilt dat uw stofzuiger optimaal presteert.
1.
Breng de middelste vergrendeling van het stofreservoir omhoog om het reservoir
los te koppelen van de stofzuiger en trek het reservoir omhoog uit de stofzuiger.
[15]
2.
Houd het stofreservoir met uw ene hand boven een afvalbak en trek met de andere
hand aan de ontgrendeling om de deur te openen en het reservoir te legen.
[16]
3.
Sluit de klep van het stofreservoir en plaats hem terug op de stofzuiger. Om het te
vergrendelen duwt u de draaggreep van het reservoir omlaag totdat de vergren
-
deling wordt aangesloten op de stofzuiger. Wanneer het reservoir goed zit, is de
draaggreep op gelijke hoogte met de bovenkant van de stofzuiger.
De wasbare filters reinigen
De stofzuiger is voorzien van een blauw-filterelement. Voor optimale reinigingsprestaties
moet u de filters regelmatig verwijderen en uitkloppen tegen de zijkant van een vuilnisbak,
om zo het stof eruit te verwijderen. De filters moeten om de drie maanden worden
uitgespoeld, maar ook wanneer het filter te veel stof bevat.
BELANGRIJK:Bij alle zakloze stofzuigers moeten de filters regelmatig worden
gereinigd.Het niet reinigen van de filters kan leiden tot verstopping, oververhitting
en storing van het product.Hierdoor kan uw garantie komen te vervallen.
BELANGRIJK:
Controleer en reinig de filters regelmatig.
BELANGRIJK:
Zorg er voor gebruik altijd voor dat het filterelement helemaal droog is.
Voor toegang tot de filters:
OPMERKING:
Zorg ervoor dat het draaghandvat in de stand naar beneden staat voordat
u de filterklep opent.
1. Ontgrendel de filterdeur door de vergrendeling omhoog te trekken. Open de filter
-
deur.
[17]
2.
Verwijder het filterelement door de vergrendeling omlaag te duwen. Het filterele
-
ment komt omhoog. Schuif het filterelement uit de stofzuiger.
[18]
3. Ontgrendel het frame van het filterelement.
4.
Neem het microfilter uit het frame en was het microfilter op de hand in warm water.
Gebruik geen heet water of schoonmaakmiddelen. Verwijder het overtollige water
uit het filter en laat hem helemaal opdrogen alvorens hem opnieuw te gebruiken.
[21]
5.
Monteer het filterpakket weer als deze volledig droog is en plaats hem terug in de
stofzuiger. Druk op de bovenkant van het filter om het weer op zijn plaats te klikken.
NL
(*Alleen bepaalde modellen)
4800xxxx Xarion Pro Standard handle ML ef.indd 18
25/01/2011 10:36:32
