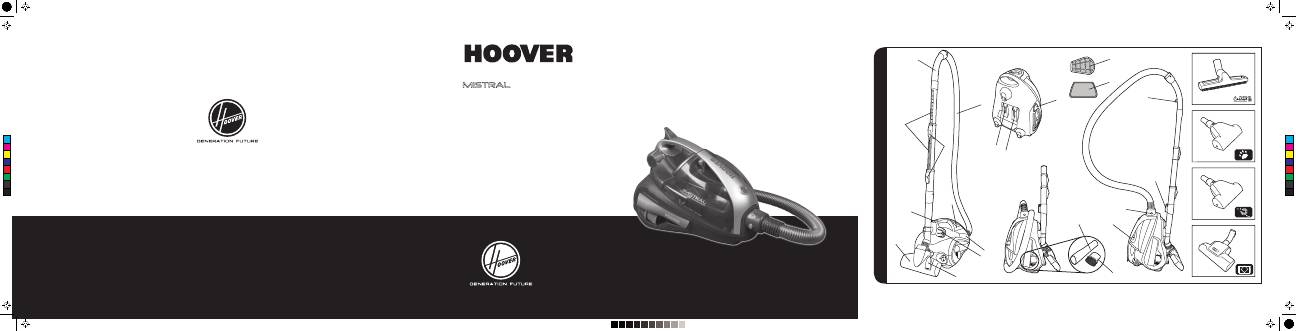
Hoover MISTRAL TMI1815 019: инструкция
Раздел: Бытовая, кухонная техника, электроника и оборудование
Тип: Пылесос
Инструкция к Пылесосу Hoover MISTRAL TMI1815 019
®
®
PRINTED IN P.R.C.
48003649
INSTRUCTION MANUAL
ENGLISH
GB
FRANÇAIS
FR
DEUTSCH
DE
ITALIANO
IT
NEDERLANDS
NL
PORTUGUÉS
PT
ESPAÑOL
ES
DANSK DK
NORSK NO
SVENSKA
SE
SUOMI FI
E
ΛΛ
HNIKA
GR
PY
ССКИЙ
RU
POLSKI PL
ČESKY
CZ
SLOVENČINA
SI
TÜRKÇE TR
1
V**
W*
X*
Y*
C
M
Y
CM
MY
CY
CMY
K
48001794 Freespace Evo IM Front Page 1.pdf 1 19/04/2010 08:27:31
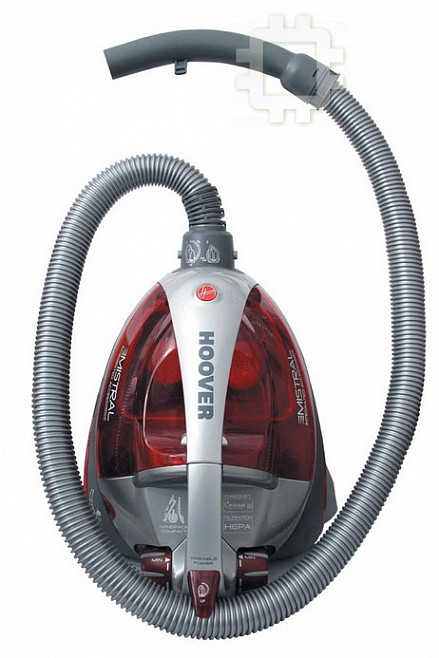
MISTRAL
A
B
C
F
G
H
I
D
L
J
K
E
P**
Q
R
S
T
U
O
M
N
* Certain models only
** Nozzle design may vary according to model
PARQUET
2
3
4
**
5
6
7
**
8
9
10
11
12
13
14
15
16
17
18
19
20
21
22
23
24
25
C
M
Y
CM
MY
CY
CMY
K
* Certain models only
** Nozzle design may vary according to model

This cleaner should only be used for domestic cleaning, as described in this user guide.
Please ensure that this guide is fully understood before operating the appliance. Use only
attachments recommended or supplied by Hoover.
Warning:
Electricity can be extremely dangerous. This appliance is double insulated and
must not be earthed. This plug is fitted with a 13 amp fuse (UK only).
important:
The wires in the mains power lead are coloured in accordance with the
following code:
Blue – neutral Brown – Live
StatiC ELECtriCitY:
Some carpets can cause a small build up of static electricity. Any
static discharge is not hazardous to health.
aFtEr USE:
Switch the cleaner off and remove the plug from the electricity supply.
Always switch off and remove the plug before cleaning the appliance or attempting any
maintenance task.
SaFEtY With ChiLdrEn, ELdErLY or thE inFirm:
Do not let children play with the
appliance or its controls. Please supervise the use of the appliance by older children, the
elderly or the infirm.
hooVEr SErViCE:
To ensure the continued safe and efficient operation of this appliance
we recommend that any servicing or repairs are only carried out by an authorised Hoover
service engineer.
*
Certain models only
**nozzle design may vary according to model
IMPORTANT SAfETy REMINDERS IT IS IMPORTANT THAT yOU DO NOT: GETTING TO KNOw yOUR clEANER ASSEMblING yOUR clEANER
Position the cleaner above you when cleaning the stairs.
•
Use your cleaner out of doors or on any wet surface or for wet pick up.
•
Pick up hard or sharp objects, matches, hot ashes, cigarette ends or other similar
•
items.
Spray with or pick up flammable liquids, cleaning fluids, aerosols or their vapours as this
•
may cause risk of fire / explosion.
Run over the supply cord when using your cleaner or remove the plug by pulling on the
•
supply cord.
Stand on or wrap the power cord around arms or legs when using the cleaner.
•
Use the appliance to clean people or animals.
•
continue to use your cleaner if it appears to be faulty. If the supply cord is damaged
•
stop using the cleaner IMMEDIATEly. To avoid a safety hazard, an authorised Hoover
service engineer must replace the supply cord.
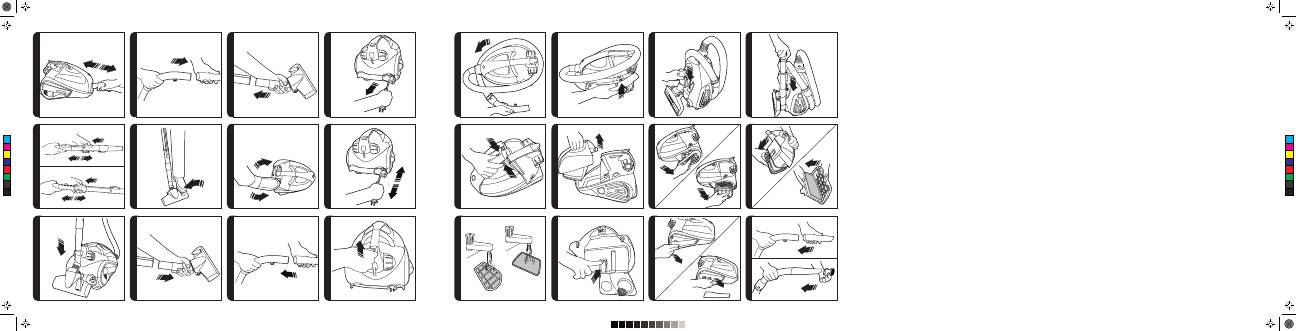
Remove all components from the packaging.
connect the hose to the cleaner main body, ensuring it clips and locks into position. To
1.
release the hose: simply press the two hose release buttons on the hose end and remove
hose.
[2]
connect the handle to the tube upper end.
2.
[3]
connect the tube lower end to the carpet and floor nozzle**.
3.
[4]
cleaner main body
A.
On-Off / Variable Power control Roller
b.
Dust container
c.
Dust container Release buttons
D.
Hose latch
E.
Handle
f.
Telescopic Tube
G.
Telescopic Tube Adjusters
H.
Hose
I.
Handle Hook
J.
Telescopic Tube Parking Hook
K.
Hose Release buttons
l.
Pre-motor filter
M.
Exhaust filter
N.
Exhaust filter cover Release button
O.
carpet & floor Nozzle**
P.
floor Type Selector Pedal
Q.
crevice Tool
R.
Dusting brush
S.
Nozzle Parking Slot
T.
Telescopic Tube Parking Slot
U.
Parquet Nozzle**
V.
Pet Hair Remover Mini Turbo Nozzle*
w.
Allergen Remover Mini Turbo Nozzle*
X.
Grand Turbo Nozzle*
y.
1
gB
MistralManual__1-4_union.indd 1
01/07/2011 17.54.44

clEANER MAINTENANcE
Emptying the dust Container
when the dust reaches the max level indicator on the container, empty the dust
container.
important:
To maintain optimum performance do not allow the dust to sit higher than
the max level.
Remove the hose from the cleaner.
1.
[2]
Press the dust container release buttons on the bin cover
2.
[18]
and lift the dust container
out of cleaner.
[19]
USING yOUR clEANER PARKING AND STORAGE
Hold the dust container upside down so that the pre-motor filter faces upwards.
3.
Unlatch then unhinge the pre-motor filter frame and remove the pre-motor filter from
the frame.
[21]
If the filters are dirty refer to section ‘cleaning the washable filters.
Hold the dust container over a bin, press dust container flap release button to empty
4.
the dust.
[23]
Use the dusting brush
5.
[1S]
when necessary to remove excessive dust from the internal
surface of the dust bin.
close the dust container flap and relocate the pre-motor filter frame on top of it,
6.
ensuring the latch is well closed. Then refit the dust container into the cleaner.
Cleaning the Washable Filters
The cleaner is fitted with a pre-motor filter. To maintain optimum cleaning performance,
regularly clean the filters. Remove excess dust from the filters by gently tapping them
against the side of a bin. The filters should be washed after every 5 container empties.
important: all bagless cleaners require regular filter cleaning. Failure to clean your
filters may result in air blockage, overheating and product failure. this may invalidate
your guarantee.
important: regularly check and maintain the filters by following the filter
maintenance instructions , it is also recommended that you purchase new filters after
every 3rd filter wash. this will maintain your cleaners performance.
to access the pre-motor filter:
Remove the Dust container from the cleaner mainbody.
1.
[19]
Hold the Dust container over a bin with one hand, Hold the dust container upside
2.
down so that the pre-motor filter faces upwards. Unlatch then unhinge the pre-motor
filter frame and remove the pre-motor filter from the frame.
[21]
Gently tap and wash the filter packs using hand warm water.
3.
[22]
Remove excess water
from the filters with a dry cloth and leave to dry fully before re-using.
Reassemble filter packs once fully dry and refit to the cleane.
4.
important:
Do not use the product without the pre-motor filter pack fitted.
important:
Always ensure the filter packs are fully dry before use.
to access the exhaust filter:
Unlock the exhaust filter cover by sliding the button towards the rear of the cleaner.
1.
Remove the filter pack from the recess.
2.
[20]
Gently tap and wash the filter pack using hand warm water.
3.
[22]
Remove excess water
from the filters with a dry cloth and leave to dry fully before re-using. Reassemble filter
packs once fully dry and refit to the cleaner.
remember:
Do not use hot water or detergents. In the unlikely event of the filters
becoming damaged, fit a Genuine Hoover consumable. Do not try and use the product
without a filter fitted.
2
*Certain models only
** nozzle design may vary according to model
gB
Extract power cord and plug it into the power supply.
1.
[5]
Do not pull the cord beyond
the red marker.
Adjust the telescopic tube to the desired height by moving the telescopic tube adjusters
2.
up and raise and lower the handle to the most comfortable cleaning position.
[6]
carpet & floor Nozzle** - Press the floor type selector pedal on the nozzle
3.
[7]
to select
the ideal cleaning mode for the floor type.
hard Floor:
brushes are lowered to protect the floor.
Carpet:
brushes are raised for the deepest clean.
Switch the cleaner on by turning the On - Off / Variable Power control Roller clockwise
4.
on the cleaner main body.
[8]
Adjust the power level by turning the On-Off / Variable Power control Roller to the
5.
desired level.
[8]
Switch off at the end of use turning the On-Off / Variable Power control Roller.
6.
[8]
Unplug and gently pull the cord, the cord will begin to automatically retract back into
the cleaner.
[9]
The flexible hose and tube can be parked for temporary storage while in use
[10]
or in the
Nanopack storage position when not in use
[17]
:
Retract the telescopic tube to its storage length.
1.
Remove the nozzle from the end of the telescopic tube.
2.
[11]
Remove the hose handle from the telescopic tube.
3.
[12]
lift the hose latch at the rear of the cleaner [13] and wrap the flexible hose around the
4.
product.
[14]
Park the hose handle on the product.
5.
[15]
Assemble the nozzle into the parking slot underneath the product.
6.
[16]
Assemble the telescopic tube into the remaining parking slot underneath the product.
7.
[17]
MistralManual__1-4_union.indd 2
01/07/2011 17.54.44
Оглавление
- IMPORTANT SAfETy REMINDERSIT IS IMPORTANT THAT yOU DO NOT: GETTING TO KNOw yOUR clEANERASSEMblING yOUR clEANER
- clEANER MAINTENANcE
- AccESSORIES AND NOZZlES
- gB
- REMARQUES IMPORTANTES cONcERNANT lA SécURITéIl EST IMPORTANT DE NE PAS : PREMIèRE UTIlISATIONMONTAGE DE l’ASPIRATEUR
- ENTRETIEN DE l’ASPIRATEUR
- AccESSOIRES ET bROSSES
- Fr
- wIcHTIGE SIcHERHEITSHINwEISEwIcHTIGE HINwEISE bEZEIcHNUNG DER TEIlEZUSAMMENbAU IHRES STAUbSAUGERS
- wARTUNG DES STAUbSAUGERS
- ZUbEHÖR UND DÜSEN
- dE
- AVVERTENZE IMPORTANTI PER lA SIcUREZZAè IMPORTANTE EVITARE DI: DEScRIZIONE DEll’ASPIRAPOlVEREMONTAGGIO DEll’APPAREccHIO
- MANUTENZIONE DEll’APPAREccHIO
- AccESSORI E SPAZZOlE
- it
- bElANGRIJKE VEIlIGHEIDSTIPSHET IS bElANGRIJK DAT MAG U NOOIT DOEN: AllES OVER Uw STOfZUIGERDE STOfZUIGER MONTEREN
- ONDERHOUD STOfZUIGER
- AccESSOIRES EN ZUIGMONDEN
- nL
- IMPORTANTE AVISOS DE SEGURANçAé IMPORTANTE QUE O/A UTIlIZADOR/A NãO: APRESENTAçãO DO ASPIRADORMONTAGEM DO ASPIRADOR
- MANUTENçãO DO ASPIRADOR
- AcESSÓRIOS E EScOVAS
- pt
- cONSEJOS IMPORTANTES DE SEGURIDADES IMPORTANTE REcORDAR QUE NO DEbE: INfORMAcIÓN SObRE SU ASPIRADORMONTAJE DEl ASPIRADOR
- MANTENIMIENTO DEl ASPIRADOR
- AccESORIOS y cEPIllOS
- ES
- VIGTIGE SIKKERHEDSOPlySNINGERDET ER VIGTIGT, AT DU IKKE: KEND DIN STøVSUGERMONTERING Af STøVSUGEREN
- VEDlIGEHOlDElSE Af STøVSUGEREN
- TIlbEHøR OG MUNDSTyKKER
- da
- VIKTIGE SIKKERHETSADVARSlERDET ER VIKTIG AT DU IKKE: blI KJENT MED STøVSUGEREN DINMONTERE STøVSUGEREN
- VEDlIKEHOlD AV STøVSUGEREN
- TIlbEHøR OG MUNNSTyKKER
- no
- VIKTIGA SÄKERHETSANVISNINGARDET ÄR VIKTIGT ATT DU AlDRIG GÖR NÅGOT AV fÖlJANDE: bEKANTA DIG MED DAMMSUGARENSÄTTA IHOP DAMMSUGAREN
- UNDERHÅll AV DAMMSUGAREN
- TIllbEHÖR OcH MUNSTycKEN
- SE
- TÄRKEITÄ HUOMAUTUKSIA TURVAllISUUDESTAÄlÄ TEE NÄIN: IMURIN OSATIMURIN KOKOAMINEN
- IMURIN KUNNOSSAPITO
- lISÄVARUSTEET JA SUUTTIMET
- FL
- ΣΗΜΑΝΤΙΚΕΣ υΠΕΝΘυΜΙΣΕΙΣ ΑΣφΑλΕΙΑΣΕΙΝΑΙ ΣΗΜΑΝΤΙΚΟ ΝΑ: ΕξΟΙΚΕΙωΣΗ ΜΕ ΤΗ ΣΚΟυΠΑΣυΝΑρΜΟλΟγΗΣΗ ΤΗΣ ΣΚΟυΠΑΣ ΣΑΣ
- ΣυΝΤΗρΗΣΗ ΤΗΣ ΣΚΟυΠΑΣ
- ΕξΑρΤΗΜΑΤΑ ΚΑΙ ΑΚρΟφυΣΙΑ
- gr
- ВАЖНЫЕ зАмЕчАНИя По ТЕхНИкЕ бЕзоПАСНоСТИ:зАПРЕщАЕТСя: ПозНАкомьТЕСь С коНСТРукцИЕй ВАшЕго ПЫлЕСоСАСбоРкА ПЫлЕСоСА
- ТЕхНИчЕСкоЕ обСлуЖИВАНИЕ ПЫлЕСоСА
- ПРИНАДлЕЖНоСТИ И НАСАДкИ
- rU
- wSKAZÓwKI DOTycZĄcE bEZPIEcZEŃSTwANIE wOlNO: ElEMENTy ODKURZAcZAMONTAŻ ODKURZAcZA
- KONSERwAcJA ODKURZAcZA
- AKcESORIA I SSAwKI
- pL
- DŮlEŽITÁ bEZPEčNOSTNí UPOZORNěNíJE ZAKÁZÁNO PROVÁDěT NÁSlEDUJící: SEZNÁMENí S VySAVAčEMSESTAVENí VySAVAčE
- ÚDRŽbA VySAVAčE
- TRySKy A PŘíSlUŠENSTVí
- Cz
- POMEMbNA VARNOSTNA OPOZORIlANE SMETE: SEZNANJANJE S SESAlNIKOMSESTAVlJANJE SESAlNIKA
- VZDRŽEVANJE SESAlNIKA
- DODATNI PRIKlJUčKI IN NASTAVKI
- Si
- ÖNEMlİ GÜVENlİK TEDbİRlERİŞUNlARI yAPMAMANIZ ÖNEMlIDIR: SÜPÜRGENIZI yAKINDAN TANIyINSÜPÜRGENIZI KURUlMASI
- SÜPÜRGENİZİN bAKIMI
- AKSESUARlAR VE bAŞlIKlAR
- tr
- TR


