Canon i-SENSYS MF8380Cdw: Checking SSID or Network Key for a Wireless LAN Router/Access Point Véri fi cation du SSID ou de la clé réseau d'un routeur/point d'accès de réseau sans fi l Controllo del SSID o della chiave di rete di un router LAN wireless o Access Point Überprüfen der SSID oder des Netzwerkschlüssels für einen Router/Access Point für Wireless LAN
Checking SSID or Network Key for a Wireless LAN Router/Access Point Véri fi cation du SSID ou de la clé réseau d'un routeur/point d'accès de réseau sans fi l Controllo del SSID o della chiave di rete di un router LAN wireless o Access Point Überprüfen der SSID oder des Netzwerkschlüssels für einen Router/Access Point für Wireless LAN: Canon i-SENSYS MF8380Cdw
English Français
Italiano Deutsch
17
English
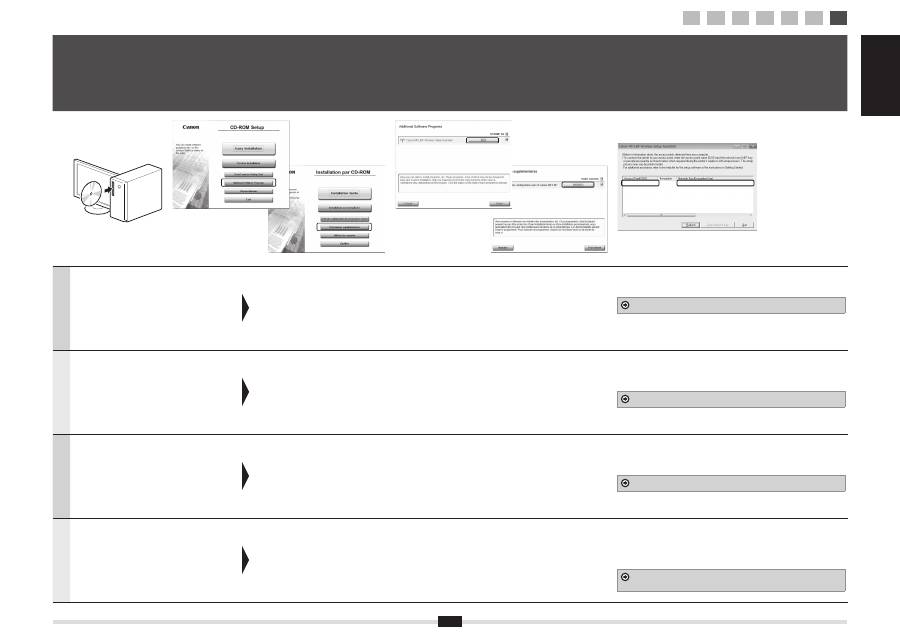
You can check the SSID or the network
key using "Canon MF/LBP Wireless Setup
Assistant."
* "Canon MF/LBP Wireless Setup Assistant" is included
in the supplied User Software CD-ROM in the machine.
Insert the User Software CD-
ROM into the slot on your
computer.
Click [Additional Software
Programs].
Click the [Start] button next to "Canon MF/
LBP Wireless Setup Assistant."
Read the License Agreement and click [Yes]
to agree.
The Wireless LAN or access point's information will be displayed.
Write down the information (indicated in frames) on P.12.
Afterwards, return to P.8 and continue the setup procedure.
Français
Vous pouvez véri
fi
er le SSID ou la clé réseau
avec l'outil "Assistant de con
fi
guration sans
fi
l
Canon MF/LBP".
* L'outil "Assistant de con
fi
guration sans
fi
l Canon MF/
LBP" est disponible sur le CD-ROM "User Software
CD-ROM" fourni avec la machine.
Insérez le CD-ROM "User
Software CD-ROM" dans le
lecteur de votre ordinateur.
Cliquez sur [Programmes
supplémentaires].
Cliquez sur le bouton [Démarrer] en regard
de l'option "Assistant de con
fi
guration sans
fi
l Canon MF/LBP".
Lisez attentivement le contrat de licence et
cliquez sur [Yes] pour l'accepter.
Les informations du routeur ou point d'accès de réseau sans
fi
l
s'af
fi
chent.
Prenez note des informations (indiquées par des encadrés) de la P.12.
Ensuite, revenez à la P.8 et continuez la procédure de con
fi
guration.
Italiano
È possibile controllare il SSID o la chiave
di rete utilizzando lo strumento "Assistente
con
fi
gurazione wireless Canon MF/LBP".
* "Assistente con
fi
gurazione wireless Canon MF/LBP" si
trova sullo User Software CD-ROM fornito a corredo
con la macchina.
Inserire lo User Software
CD-ROM nel lettore del
computer.
Fare clic su [Programmi
software aggiuntivi].
Fare clic sul pulsante [Avvia] accanto ad
"Assistente con
fi
gurazione wireless Canon
MF/LBP".
Leggere il Contratto di licenza e scegliere
[Yes] per accettare i termini.
Vengono visualizzare le informazioni relative alla LAN wireless o
all'Access Point.
Annotare le informazioni (indicate nei riquadri) in Pag.12.
Tornare quindi a Pag.8 e continuare la procedura di con
fi
gurazione.
Deutsch
Sie können die SSID oder den
Netzwerkschlüssel mit dem "Canon MF/
LBP-Assistenten für drahtlose Einstellungen"
überprüfen.
* Der "Canon MF/LBP-Assistent für drahtlose
Einstellungen" ist auf der mit dem Gerät gelieferten
User Software CD-ROM enthalten.
Legen Sie die User Software
CD-ROM in das Laufwerk
Ihres Computers ein.
Klicken Sie auf [Zusätzliche
Softwareprogramme].
Klicken Sie neben "Canon MF/LBP-
Assistent für drahtlose Einstellungen" auf
die Schalt
fl
äche [Starten].
Lesen Sie die Lizenzvereinbarung, und
klicken Sie auf [Yes], um zuzustimmen.
Die Informationen zum Wireless LAN oder zum Access Point für
Wireless LAN werden angezeigt.
Notieren Sie sich die (in Rahmen angegebenen) Informationen unter
S.12.
Kehren Sie anschließend zu S.8 zurück, und fahren Sie mit der
Einrichtung fort.
A-2
Checking SSID or Network Key for a Wireless LAN Router/Access Point Véri fi cation du SSID ou de la clé réseau d'un routeur/point d'accès de réseau sans fi l Controllo del SSID o della chiave di rete di un router LAN wireless o Access Point Überprüfen der SSID oder des Netzwerkschlüssels für einen Router/Access Point für Wireless LAN
SampleEFGHIJ
WPA-PSK
543210EDCBA
1
2
3
4-A 4-B A-1 A-2
18
English
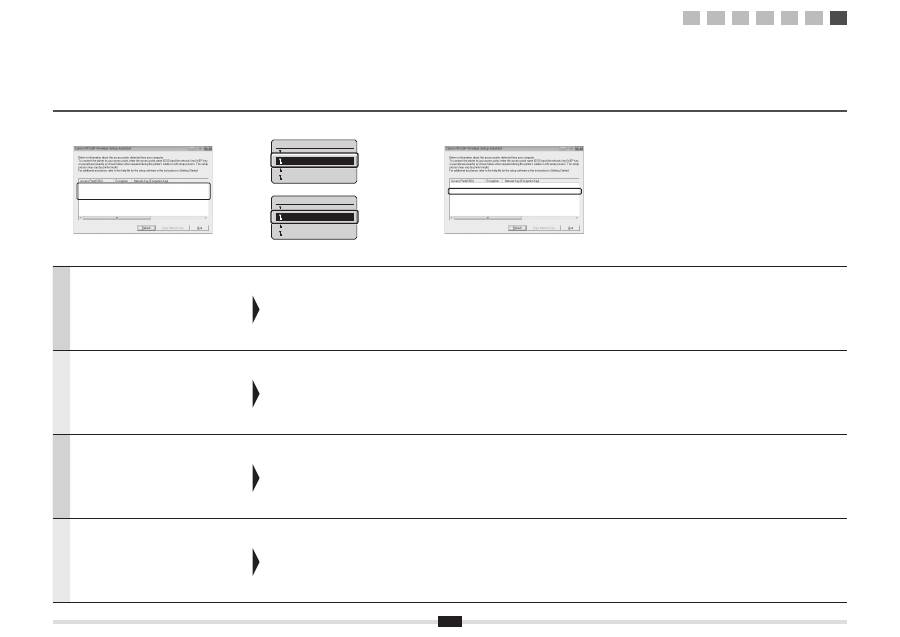
If multiple access points are displayed
1. Write down all SSID that are displayed.
2. Perform the procedure in "4-B Setting the
Access Point Manually and Connecting" (P.8).
3. Select the SSID that matches the one you write
down from the displayed SSID.
4. Write down the network key for SSID you
selected.
5. Perform the procedure in "4-B Setting the
Access Point Manually and Connecting" (P.8).
If the information for the wireless LAN router or access
point is not displayed
Click the [Refresh] button.
If the information is not displayed when you click the [Refresh]
button, check if the computer settings for a wireless LAN
router or access point are complete.
Français
Si plusieurs points d'accès s'af
fi
chent
1. Prenez note de tous les SSID af
fi
chés.
2. Appliquez la procédure "4-B Con
fi
guration
manuelle et connexion du point d'accès" (P.8).
3. Sélectionnez le SSID correspondant à celui que
vous avez noté plus haut (SSID af
fi
ché(s)).
4. Prenez note des clés réseau correspondant au
SSID sélectionné.
5. Appliquez la procédure "4-B Con
fi
guration
manuelle et connexion du point d'accès" (P.8).
Si les informations sur le routeur ou point d'accès de
réseau sans
fi
l ne s'af
fi
chent pas
Cliquez sur le bouton [Refresh].
Si les informations ne s'af
fi
chent pas lorsque vous cliquez sur
le bouton [Refresh], véri
fi
ez que les réglages de l'ordinateur
correspondant au routeur ou point d'accès de réseau sans
fi
l
ont été con
fi
gurés.
Italiano
Se vengono visualizzati più Access Point
1. Annotare tutti i SSID visualizzati.
2. Eseguire la procedura in "4-B Impostazione
manuale dell'Access Point e connessione"
(Pag.8).
3. Selezionare il SSID corrispondente a quello
annotato dal SSID visualizzato.
4. Annotare la chiave di rete relativa al SSID
selezionato.
5. Eseguire la procedura in "4-B Impostazione
manuale dell'Access Point e connessione"
(Pag.8).
Se non vengono visualizzate le informazioni relative al
router LAN wireless o all'Access Point.
Fare clic sul pulsante [Refresh].
Se le informazioni non vengono visualizzate dopo aver
premuto il pulsante [Refresh], veri
fi
care che le impostazioni
del computer e del router LAN wireless o dell'Access Point
siano complete.
Deutsch
Wenn mehrere Access Points angezeigt werden
1. Notieren Sie sich alle angezeigten SSIDs.
2. Führen Sie die Vorgehensweise in "4-B
Manuelles Einstellen des Access Points und
Herstellen einer Verbindung" (S.8) durch.
3. Wählen Sie die SSID aus, die der SSID
entspricht, die Sie sich als angezeigte SSID
notiert haben.
4. Notieren Sie sich den Netzwerkschlüssel für die
von Ihnen ausgewählte SSID.
5. Führen Sie die Vorgehensweise in "4-B
Manuelles Einstellen des Access Points und
Herstellen einer Verbindung" (S.8) durch.
Wenn die Informationen für den Router oder Access
Point für Wireless LAN nicht angezeigt werden
Klicken Sie auf die Schalt
fl
äche [Refresh].
Wenn die Informationen nach dem Klicken auf die Schalt
fl
äche
[Refresh] nicht angezeigt werden, überprüfen Sie, ob die
Computereinstellungen für einen Router oder Access Point für
Wireless LAN vollständig vorgenommen wurden.
SampleABCD
WEP
01234567890123456789ABCDEF
SampleEFGHIJ
WPA-PSK
543210EDCBA
SampleK
WPA2-PSK
1234ABCD
SampleABCD
WEP
01234567890123456789ABCDEF
SampleEFGHIJ
WPA-PSK
543210EDCBA
SampleK
WPA2-PSK
1234ABCD
Select Access Point
SampleABCD WEP 13
SampleEFGHIJ WPA-PS
SampleKL WPA2-PSK 9
SampleMNOP None 7
Choisir point d'accès
ExempleABCD WEP 13
ExempleEFGHIJ WPA-P
ExempleKL WPA2-PSK
...
ExempleMNOP Aucun 7
1
2
3
4-A 4-B A-1 A-2

Оглавление
- ContentsTable des matièresSommarioInhalt
- Checking Before the Setup Véri fi cation avant la con fi guration Controllo prima della con fi gurazione Überprüfen vor der Einrichtung
- Switching the Connection Method to Wireless LAN Changement de méthode de connexion pour choisir Réseau sans fi l Cambiare il metodo di connessione in LAN wireless Umschalten der Verbindungsmethode zu Wireless LAN
- Selecting a Method for Setting the Wireless LAN Sélectionnez une méthode de con fi guration du réseau sans fi l Selezione di un metodo di impostazione della LAN wireless Auswählen einer Methode zur Einstellung des Wireless LANs
- Setting the Machine Using the WPS (Push Button Mode) Con fi guration de la machine avec les fonctions WPS (système à bouton poussoir) Con fi gurazione della macchina utilizzando WPS (pressione del pulsante) Einrichten des Geräts mit WPS (Tastenwahlmodus)
- Setting the Access Point Manually and Connecting Con fi guration manuelle et connexion du point d'accès Impostazione manuale dell'Access Point e connessione Manuelles Einstellen des Access Points und Herstellen einer Verbindung
- Checking the Wireless LAN Setting is Completed La véri fi cation des réglages de réseau sans fi l est terminée Veri fi care la completezza della con fi gurazione della LAN wireless Überprüfen, ob die Einstellung des Wireless LANs abgeschlossen ist
- Checking SSID or Network Key for a Wireless LAN Router/Access Point Véri fi cation du SSID ou de la clé réseau d'un routeur/point d'accès de réseau sans fi l Controllo del SSID o della chiave di rete di un router LAN wireless o Access Point Überprüfen der SSID oder des Netzwerkschlüssels für einen Router/Access Point für Wireless LAN
- ObsahTartalomSpis tre ś ci Obsah
- Kontrola p ř ed nastavením Ellen ő rzés a beállítás el ő tt Sprawdzanie przed kon fi guracj ą Kontrola pred nastavením
- P ř epnutí metody p ř ipojení na bezdrátovou sí ť LAN A csatlakozási mód átváltása vezeték nélküli helyi hálózati kapcsolatra Zmiana metody po łą czenia na sie ć bezprzewodow ą LAN Prepnutie spôsobu pripojenia na bezdrôtovú sie ť LAN
- Výb ě r metody pro nastavení bezdrátové sít ě LAN A vezeték nélküli helyi hálózat beállítási módjának kiválasztása Wybieranie metody kon fi guracji sieci bezprzewodowej LAN Výber spôsobu nastavenia bezdrôtovej siete LAN
- Nastavení p ř ístroje pomocí funkce WPS (režim Push Button) A készülék beállítása WPS (gombnyomásos mód) segítségével Kon fi guracja urz ą dzenia przy u ż yciu funkcji WPS (Tryb klawiatury fi zycznej) Nastavenie zariadenia pomocou funkcie WPS (Režim stla č enia tla č idla)
- Ru č ní nastavení a p ř ipojení p ř ístupového bodu A hozzáférési pont manuális beállítása és csatlakoztatása R ę czna kon fi guracja i pod łą czenie punktu dost ę pu Ru č né nastavenie prístupového bodu a pripojenie
- Kontrola dokon č ení nastavení bezdrátové sít ě LAN A vezeték nélküli helyi hálózat megfelel ő beállításának ellen ő rzése Sprawdzanie, czy kon fi guracja sieci bezprzewodowej LAN jest zako ń czona Kontrola dokon č enia nastavenia bezdrôtovej siete LAN
- Kontrola identi fi kátoru SSID nebo sí ť ového klí č e pro sm ě rova č nebo p ř ístupový bod bezdrátové sít ě LAN A vezeték nélküli helyi hálózati útválasztó vagy hozzáférési pont SSID azonosítójának vagy hálózati kulcsának ellen ő rzése Sprawdzanie SSID lub klucza sieciowego routera sieci bezprzewodowej LAN / punktu dost ę pu Kontrola identi fi kátora SSID alebo sie ť ového k ľ ú č a smerova č a bezdrôtovej siete LAN/prístupového bodu
- SadržajCuprinsVsebinaСъдържание
- Provjera prije postavljanja Veri fi care înaintea instal ă rii Preverjanje pred nastavitvijo
- Prebacivanje na č ina povezivanja na beži č ni LAN Comutarea metodei de conexiune la LAN f ă r ă fi r Preklop na na č in povezave z brezži č nim lokalnim omrežjem
- Odabir na č ina postavljanja beži č nog LAN-a Selectarea unei metode pentru setarea LAN f ă r ă fi r Izbira na č ina nastavitve brezži č nega lokalnega omrežja
- Postavljanje ure đ aja putem WPS-a (povezivanje pritiskom na gumb) Instalarea aparatului utilizând modul buton WPS Nastavitev naprave s funkcijo WPS (na č in na pritisk gumba)
- Ru č no postavljanje pristupne to č ke i povezivanje Setarea manual ă a punctului de acces ş i conectarea Ro č na nastavitev dostopne to č ke in vzpostavitev povezave
- Provjera je li postavljanje postavki beži č nog LAN-a završeno Veri fi carea fi naliz ă rii instal ă rii re ţ elei LAN f ă r ă fi r Preverjanje zaklju č enosti nastavitev brezži č nega lokalnega omrežja
- Provjera SSID-a ili mrežnog klju č a za usmjeriva č /pristupnu to č ku za beži č ni LAN Veri fi carea SSID sau a cheii de re ţ ea pentru un router/punct de acces LAN f ă r ă fi r Iskanje vrednosti SSID ali omrežnega klju č a za usmerjevalnik/dostopno to č ko za brezži č no lokalno omrežje
- СодержаниеЗміст ﺕﺎﻳﻮﺘﶈﺍ ﺐﻟﺎﻄﻣ ﺖﺳﺮﻬﻓ
- Проверка перед настройкой Перевірка перед налаштуванням ﺩﺍﺪﻋﻹﺍ ﻞﺒﻗ ﺺﺤﻔﻟﺍ ﻢﯿﻈﻨﺗ ﺯﺍ ﻞﺒﻗ ﯽﺳﺭﺮﺑ
- Изменение способа подключения на беспроводную сеть
- Выбор метода настройки беспроводной сети
- Настройка аппарата с использованием функции WPS ( режим нажатия кнопки )
- Настройка точки доступа вручную и подключение
- Проверка параметров беспроводной локальной сети завершена
- Проверка SSID или ключа сети для маршрутизатора беспроводной сети или точки доступа
- İ çindekiler SatursTurinysSisukord
- Kurulumdan Önce Kontrol Etme P ā rbaude pirms iestat ī šanas Patikrinimas prieš s ą rank ą Seadistuseelne kontroll
- Ba ğ lant ı Yöntemini Kablosuz LAN’a De ğ i ş tirme Savienojuma metodes iestat ī šana uz bezvadu LAN Prijungimo b ū do perjungimas į belaid į LAN Ühendusviisi Traadita side kohtvõrk määramine
- Kablosuz LAN’ ı Ayarlamak için Yöntem Seçme Metodes izv ē le bezvadu LAN iestat ī šanai B ū do pasirinkimas nustatant belaid į LAN Traadita side kohtvõrgu seadmisviisi valimine
- Makineyi WPS (Tu ş Modu) Kullanarak Ayarlama Iek ā rtas iestat ī šana, izmantojot WPS (spiedpogas rež ī ms) WPS naudojan č io aparato nustatymas (mygtuko režimas) Seadme seadmine WPS-i abil (nupuvajutusrežiim)
- Eri ş im Noktas ı n ı Manuel Olarak Ayarlama ve Ba ğ lanma Manu ā la piek ļ uves punkta iestat ī šana un savienošana Prieigos taško nustatymas rankiniu b ū du ir prijungimas Pöörduspunkti käsitsi seadmine ja ühendamine
- Kablosuz LAN Ayar ı n ı n Tamamlan ı p Tamamlanmad ı ğ ı n ı Kontrol Etme P ā rbaude, vai bezvadu LAN iestat ī šana ir pabeigta Belaidžio LAN nustatymo patikra baigta Traadita side kohtvõrgu seadmise lõpuleviimise kontrollimine
- Kablosuz LAN Yönlendiricisi/Eri ş im Noktas ı için SSID veya A ğ Anahtar ı n ı Kontrol Etme Bezvadu LAN maršrut ē t ā ja/piek ļ uves punkta bezvadu SSID vai t ī kla atsl ē gas p ā rbaude Belaidžio LAN maršrutizatoriaus / prieigos taško SSID arba tinklo rakto tikrinimas Traadita side kohtvõrgu marsruuteri või pöörduspunkti SSID või võrguvõtme vaatamine
- IndholdInnholdSisällysInnehåll
- Kontrol før opsætning Kontrollere før oppsettet Tarkistukset ennen asetuksien määrittämistä Kontrollera innan inställningen
- Skift af tilslutningsmetoden til trådløst LAN Bytte tilkoblingsmetoden til trådløst LAN Kytkentätavan vaihtaminen langattomaksi lähiverkoksi Ändra anslutningsmetoden till trådlöst nätverk
- Valg af metode til indstilling af trådløst LAN Velge en metode for innstilling av trådløst LAN Langattoman lähiverkon asetustavan valitseminen Välja en metod för att ställa in det trådlösa nätverket
- Indstillingen af maskinen ved hjælp af WPS (trykknapstilstand) Stille inn maskinen med WPS (trykknappmodus) Laitteen asetukset WPS-toiminnolla (painiketila) Ställa in enheten med hjälp av WPS (tryckknappsläge)
- Manuel indstilling af adgangspunkt og tilslutning Stille inn tilgangspunktet manuelt og koble til Liityntäpisteen määrittäminen manuaalisesti ja yhteyden muodostaminen Ställa in åtkomstpunkten manuellt och ansluta
- Kontrol af, at den trådløse LAN-indstilling er fuldført Kontrollere at den trådløse LAN-innstillingen er fullført Langattoman lähiverkon asetuksien viimeistelemisen tarkistaminen Kontrollera att inställningen av det trådlösa nätverket är slutförd
- Kontrol af SSID eller netværksnøgle for en trådløs LAN-router/et trådløst adgangspunkt Kontrollere SSID eller nettverksnøkkel for en trådløs LAN-ruter/tilgangspunkt Langattoman lähiverkon reitittimen/liityntäpisteen SSID:n tai verkkoavaimen tarkistaminen Kontrollera SSID eller nätverksnyckel för en router för ett trådlöst nätverk/åtkomstpunkt
- ContenidoInhoudsopgaveÍndiceΠεριεχόμενα
- Comprobación antes de la con fi guración Controle uitvoeren vóór de instelprocedure Veri fi car antes da con fi guração
- Cambio del método de conexión a LAN inalámbrica De verbindingsmethode instellen op draadloos LAN Mudar o método de ligação para LAN sem fi os
- Selección de un método para con fi gurar la LAN inalámbrica Een methode voor het instellen van het draadloze LAN selecteren Seleccionar o método de con fi guração da LAN sem fi os
- Con fi guración de la máquina utilizando WPS (Modo de botón pulsador) De machine instellen met de WPS Drukknop-modus Con fi gurar a máquina utilizando WPS (Modo de botão)
- Con fi guración del punto de acceso manualmente y conexión Het toegangspunt handmatig instellen en verbinding maken Con fi gurar o ponto de acesso manualmente e estabelecer a ligação Χειροκίνητη ρύθμιση του σημείου πρόσβασης και σύνδεση
- Comprobación de la fi nalización de la con fi guración de LAN inalámbrica Controleren of het draadloze LAN correct is ingesteld Veri fi car se a con fi guração da LAN sem fi os está concluída
- Comprobación del SSID o la clave de red para un router/punto de acceso de LAN inalámbrica De SSID of netwerksleutel voor een draadloze LAN-router/toegangspunt controleren Veri fi car o SSID ou a chave de rede de um router/ponto de acesso de LAN sem fi os
