Canon PIXMA MP 190: инструкция
Раздел: Офисная Техника
Тип: Струйный Принтер
Характеристики, спецификации
Инструкция к Струйному Принтеру Canon PIXMA MP 190
Оглавление
- X Подготовка аппарата к использованию X Только для Европейского союза (и Европейской экономической зоны). X Только для покупаетелей в Европе, на Ближнем Востоке, в Африке и России
- X Установка программного обеспечения
- Отказ от прав Сведения о товарных знаках
- X Работа с прилагаемой документацией
- X Работа с руководством по экранным меню, записанным на установочном диске для настройки аппарата
- X Чтение настоящего документа
- X Меры предосторожности ВНИМАНИЕ
- z Техническое обслуживание z Эксплуатация аппарата z Прочее
- ПРЕДУПРЕЖДЕНИЕ
- z Эксплуатация аппарата z Картриджи FINE (чернильные) X Юридические ограничения на использование аппарата, а также на использование изображений
- 1 Введение X Функции аппарата
- X Элементы аппарата и их функции Аппарат z Внешний вид
- z Вид сзади и вид внутренних компонентов
- Панель управления (10) Кнопка [ВКЛ./ВЫКЛ.]
- (11) Индикатор черных и цветных чернил (12) Индикатор бумаги (13) Кнопка [Бумага] (14) Кнопка [+]
- 2 Копирование X Загрузка бумаги X Рекомендуемая бумага
- X Установка размера и типа бумаги X Загрузка документов X Создание копий X Дополнительная функция копирования
- 3 Печать с компьютера X Печать документов
- 4 Сканирование X Способы сканирования
- 5 Печать фотографий непосредственно с цифровой камеры X Подсоединение PictBridge-совместимого устройства
- 6 Обслуживание X Замена картриджа FINE 1 Обязательно включите питание. 2 Приподнимите блок сканирования и установите опору блока сканирования в нужное положение. 3 Если в картридже FINE закончились чернила, нажмите на его язычок для разблокировки фиксаторов, а затем извлеките картридж FINE.
- 4 Выньте новый картридж FINE из упаковки. Затем возьмите картридж FINE, как показано на рисунке, и удалите защитную ленту (A). 5 Вставьте картридж FINE в свободный отсек под небольшим углом. 6 Нажмите на картридж FINE так, чтобы он зафиксировался в нужном положении.
- 7 Если потребуется заменить еще один картридж FINE, повторите шаги с 3 по 6. 8 Приподнимите блок сканирования и, сложив опору блока сканирования, опустите блок сканирования в исходное положение. X Чистка картриджа FINE 1 Нажимая кнопку [Обслуживание], выберите или (в зависимости от того, что требуется). 2 Нажмите кнопку [Черный] или [Цветное].
- 7 Поиск и устранение неисправностей X Устранение замятий бумаги X Дополнительная информация

The following FINE Cartridges are compatible with this machine.
Les cartouches FINE suivantes sont compatibles avec cette machine.
Následující kazety FINE jsou kompatibilní s tímto přístrojem.
ENGLISH
Selle masinaga ühilduvad allpool märgitud FINE-kassetid.
Ar šo iekārtu ir savienojamas sekojošās FINE kasetnes.
Su šiuo aparatu suderintos spausdinimo kasetės „FINE“.
Az alábbi FINE patronok használhatók a készülékkel.
Urządzenie to obsługuje wymienione poniżej kasety FINE.
Данный аппарат совместим со следующими картриджами FINE.
Sledeče FINE kartuše so primerne za to napravo.
S týmto zariadením sú kompatibilné nasledovné kazety FINE (FINE Cartridge).
Aşağıdaki HASSAS Kartuşlar bu makine ile uyumludur.
Нижчезазначені картриджі FINE сумісні з цим апаратом.
The following FINE Cartridges (High Yield) are also compatible with this machine.
LATVIEŠUPOLSKI MAGYARTÜRKÇE РУССКИЙ ČESKYEESTI FRANÇAIS
Les cartouches FINE (haut rendement) suivantes sont compatibles avec cette machine.
Následující kazety FINE (vysoce výnosné) jsou také kompatibilní s tímto přístrojem.
Selle masinaga ühilduvad ka allpool märgitud FINE-kassetid (suure tootlikkusega).
Quick Start Guide
Ar šo iekārtu ir savienojamas sekojošās FINE kasetnes (ar augstu plūstamību).
IETUVIŠKAI
L
Toliau nurodytos „FINE“ (didelės išeigos) spausdinimo kasetės taip pat tinka šiam aparatui.
Guide de démarrage rapide
Az alábbi FINE patronok (High Yield) szintén használhatók a készülékkel.
Urządzenie to również obsługuje wymienione poniżej kasety FINE (wysokiej wydajności).
Quick Start Guide
Данный аппарат также совместим со следующими картриджами FINE (высокое качество).
Stručná příručka
Sledeče FINE kartuše (z veliko kapaciteto) so tudi primerne za to napravo.
S týmto zariadením sú kompatibilné nasledovné kazety FINE (FINE Cartridge) (vel’kokapacitné).
Kiirstardi juhend
Aşağıdaki HASSAS Kartuşlar da (Yüksek Verim) bu makine ile uyumludur.
Нижчезазначені картриджі FINE (високопродуктивні) також сумісні з цим апаратом.
Darba uzsākšanas rokasgrāmata
Greito parengimo instrukcija
Beüzemelési útmutató
For details on FINE Cartridge replacement, refer to “Replacing A FINE Cartridge” in this guide.
Szybkie wprowadzenie
Pour avoir des informations sur le remplacement de cartouches FINE, reportez-vous à « Remplacement d’une cartouche FINE » dans
ce manuel.
SLOVENŠČINA
Více informací o výměně kazet FINE viz část „Výměna kazet FINE“ v této příručce.
Краткое руководство по началу работы
FINE-kassettide asendamise kohta täpsema teabe saamiseks vt käesoleva juhendi osa „FINE-kasseti asendamine“.
Plašāku informāciju par FINE kasetņu nomaiņu meklējiet šīs pamācības nodaļā „FINE kasetnes nomaiņa“.
Kratka navodila za postavitev in uporabo
Išsamesnės informacijos apie spausdinimo kasečių „FINE“ keitimą ieškokite šios instrukcijos skyriuje „Spausdinimo kasetės „FINE“
keitimas“.
SLOVENSKY
A FINE patron cseréjével kapcsolatos részleteket lásd a „FINE patron cseréje” fejezetben.
Stručná příručka
Szczegółowe informacje na temat wymiany kaset FINE znajdują się w sekcji „Wymiana kasety FINE” w niniejszym podręczniku.
Для получения дополнительной информации о замене картриджа FINE см. раздел “Замена картриджа FINE” в настоящем
руководстве.
Hızlı Kurulum Kılavuzu
Za podrobnosti o zamenjavi FINIH KARTUŠ si preberite razdelek »Zamenjava FINE kartuše « v tem priročniku.
Podrobnejšie informácie o výmene kazety FINE (FINE Cartridge) nájdete v
č
asti Výmena kazety FINE (FINE Cartridge) v tejto príru
č
ke.
Коротка інструкція з користування
HASSAS Kartuşun değiştirilmesi hakkında ayrıntılar için, bu kılavuzdaki “Bir HASSAS Kartuşun Değiştirilmesi” kısmına bakın.
Для отримання інформації щодо заміни картриджів FINE перегляньте розділ „Заміна картриджа FINE“ цього довідника.
УКРАЇНСЬКА
QT5-0530-V01
E14
QT5-0530-V01 XXXXXXXX ©CANON INC.2006 PRINTED IN VIETNAM

Canon Europa N.V., Bovenkerkerweg 59-61, 1185 XB Amstelveen, The Netherlands

ENGLISH
Quick Start Guide
Table of Contents
Introduction 12
Copying 17
Printing From Your Computer 19
Scanning 20
Printing Photographs Directly From A Digital Camera 21
Maintenance 22
Troubleshooting 25
ENGLISH
X Preparing the machine
Unpack the machine
Please confirm bundled thing by the illustration printed on the flapped lid of the packing box.
IMPORTANT
• Do not connect the USB cable until after the software is installed.
• A printer cable is not included. You must purchase a USB cable (less than 10 ft. / 3 m) to connect your
machine to a computer.
1 Turn ON the machine.
2 Prepare the FINE Cartridges (ink cartridges).
• If the Scanning Unit (Printer Cover) is left open for more than 10 minutes, the FINE Cartridge Holder
moves to the right. Close and reopen the Scanning Unit (Printer Cover) to return the Holder to the center.
• Do not reattach the Protective Tape once you have removed it.
3 Install the FINE Cartridge.
• Ensure that all the FINE Cartridges are installed in the order directed by the label. The machine cannot
be used unless all the FINE Cartridges are installed.
• For safety reasons, store FINE Cartridges out of the reach of small children.
• Do not drop or shake FINE Cartridges as this may cause the ink to leak out and stain your clothes and
hands.
• The Alarm Lamp still lights orange if a FINE Cartridge is not installed properly. Open the Scanning Unit
(Printer Cover) and make sure that all the FINE Cartridges are installed in the correct order directed on
the label.
X European Union (and EEA) only.
This symbol indicates that this product is not to be disposed of with your
household waste, according to the WEEE Directive (2002/96/EC) and your
national law. This product should be handed over to a designated collection
point, e.g., on an authorized one-for-one basis when you buy a new similar
product or to an authorized collection site for recycling waste electrical and
electronic equipment (EEE). Improper handling of this type of waste could
have a possible negative impact on the environment and human health due
to potentially hazardous substances that are generally associated with EEE.
At the same time, your cooperation in the correct disposal of this product
will contribute to the effective usage of natural resources. For more
information about where you can drop off your waste equipment for
recycling, please contact your local city office, waste authority, approved
WEEE scheme or your household waste disposal service. For more
information regarding return and recycling of WEEE products, please visit
www.canon-europe.com/environment.
(EEA: Norway, Iceland and Liechtenstein)
X For Customers in Europe, Middle-East, Africa and Russia
only
For Canon Customer Support contacts, please see the back cover of the European
Warranty System (EWS) Booklet or visit www.canon-europe.com.
Printer Model: K10282 (MP160)
2

X Install the software
ENGLISH
Select Easy Install in order to install the application software, On-screen Manual and MP
drivers. Select Custom Install in order to choose the options you would like to install.
When the User Registration screen appears, if you click Register and computer is
connected to the internet, the on-screen instructions to register your product will appear.
Registration can also be performed from the icon on the desktop after installation is
completed.
IMPORTANT
• Temporarily disable any firewall software and close any open applications, including
anti-virus software. Computer security programs can be re-started after software
installation.
Installing the Printer Driver - Windows
• You must log on as an administrator or have administrative privileges in order to install
the software in Windows XP or Windows 2000.
• If the following screen appears, the USB cable is connected.
Perform the following steps.
1. Disconnect the USB cable.
2. Click [Cancel].
• Do not switch users during the installation process.
Installing the Printer Driver - Macintosh
• Do not connect the machine to Mac OS 9 or Mac OS X Classic environments since they
are not supported.
• Enter the name and password for an Administrator Account.
Perform the following to make sure the driver has been installed correctly:
1. Select [Utilities] from the [Go] menu.
2. Double-click the [Printer Setup Utility] ([Print Center] when using Mac OS X
v.10.2.8) icon.
If the printer is displayed in the [Printer List], the printer driver is installed.
If the printer is not displayed in the [Printer List], click [Add] in the [Printer List] and
select [USB] from the pop-up menu. Select MP160 from the [Product] list and click
[Add].
When connecting from Mac OS X v.10.3.3 or earlier:
Restarting the computer while connected to the machine may cause the machine not to be
detected. To resolve this, either unplug the USB cable then plug it back in again, or turn
the machine OFF then back ON again.
3
ENGLISH
Disclaimer
Canon Inc. has reviewed this manual thoroughly in order that it will be an easy-to-use
guide to your Canon MP160. All statements, technical information and recommendations
in this manual and in any guides or related documents are believed reliable, but the
accuracy and completeness thereof are not guaranteed or warranted, and they are not
intended to be, nor should they be understood to be, representation or warranties
concerning the products described. Specifications are subject to change without notice.
As an ENERGY STAR® partner, Canon Inc. has determined that
this product meets the ENERGY STAR® guidelines for energy
efficiency.
This machine supports Exif 2.21 (also called “Exif Print”).
Exif Print is a standard for enhancing the communication
between digital cameras and printers. By connecting to an
Exif Print-compliant digital camera, the camera’s image data
at the time of shooting is used and optimized, yielding
extremely high quality prints.
About Consumables
Consumables (ink tanks / FINE Cartridges) are available for 5 years after production has
stopped.
Trademark Notices
• Windows is a registered trademark of Microsoft Corporation in the United States and
other countries.
• Macintosh and Mac are trademarks of Apple Computer, Inc., registered in the United
States and other countries.
Copyright ©2006 CANON INC.
All rights reserved. No part of this publication may be transmitted or copied in any form
whatsoever without expressed written permission from Canon Inc.
4

X How To Use The Documentation Provided
ENGLISH
Easy Setup Instructions (Printed documentation):
Be sure to read this sheet first.
This sheet includes instructions for setting up your machine and getting it ready for use.
Follow all steps in this sheet before using your machine.
Quick Start Guide (This guide):
Read this guide when starting to use the machine.
After following the instructions in the Easy Setup Instructions, we recommend that you
read this guide to familiarize yourself with the basic operation of all functions that can be
performed by your machine.
User’s Guide (On-screen manual):
This guide is available on the Setup CD-ROM.
This guide includes instructions on printing from your computer, direct photo printing
from a digital camera, and copying. Refer to this guide for in-depth instructions not
included in the Quick Start Guide, or if you want to learn more about advanced features.
Printer Driver Guide/Scanning Guide (On-screen manual):
These guides are available on the Setup CD-ROM.
Refer to these guides for full instructions on printing and scanning from your computer.
These guides describe the details of each function, as well as how to use the MP Drivers
and MP Navigator.
Photo Application Guide (On-screen manual):
This guide is available on the Setup CD-ROM.
This guide describes the utility software on the Setup CD-ROM, such as Easy-PhotoPrint
and Easy-WebPrint, including instructions on how to scan data, various printing methods,
and details of functions.
Users in Asia only:
The on-screen manuals may not be installed depending on the country of purchase. If not,
the on-screen manuals may be copied from the "Manual" folder in the Setup CD-ROM to
your computer's hard disk.
5

ENGLISH
X Displaying On-screen Manual Stored On The Setup
CD-ROM
You can install the on-screen manuals using the Setup CD-ROM by either of the
following.
• Select "Easy Install" to install the on-screen manuals along with the printer driver and
applications.
• Select "On-screen Manual" from "Custom Install" to install the on-screen manuals. If
you have not installed or have deleted the on-screen manuals, use either method above
to install them.
• A start-up icon for the On-screen manual will be placed on the desktop after installing
the software with Easy Install.
• Double-click the icon, then from the pop-up menu, click the title of each manual you
want to open.
Various Web browsers are available for viewing HTML content, and therefore the same
text or image may appear different depending on which browser you use. The on-screen
manuals have been prepared on the assumption that they are displayed and read under the
following conditions:
For Windows:
• Browser: Windows HTML Help Viewer
• Note: Microsoft Internet Explorer 5.0 or later must be installed.
• The on-screen manuals may not be displayed properly depending on your operating
system or Internet Explorer version. We recommend that you keep your system up to
date with Windows Update.
For Macintosh:
• Browser: Help Viewer
• Note: The on-screen manuals may not be displayed properly depending on your
operating system. We recommend that you keep your system up to date.
6

X Reading The Document
ENGLISH
Symbols Used In This Guide
CAUTION Indicates a caution concerning operations that may lead to injury to persons or
damage to property if not performed correctly. In order to use the machine
safely, always pay attention to these cautions.
IMPORTANT Indicates operational warnings and restrictions. Be certain to read these items
to operate the machine correctly, and to avoid damage to the machine.
Indicates notes for operation or additional explanations. Reading these is
highly recommended.
Indicates the description of the machine when connected to a computer.
Read this when the machine is connected to a Windows system.
Read this when the machine is connected to a Macintosh system.
z(Operation branch title) Used for an operation that can be performed in branch procedures.
Buttons Used In This Guide
[button name] Text enclosed in these brackets indicates a button on the Operation Panel of the
machine or an item on the computer to be manipulated.
Example: [Color]
<letter> Text enclosed in these brackets indicates a letter in the alphabet or number which
appears on the LED (Light Emitting Diode).
Example: <P>, <3>
Terms Used In This Guide
machine General term used to represent the MP160.
default A setting that remains in effect unless you change it.
document The original sheets of paper, pages of a book, or photographs that you copy or
scan with the machine.
paper Paper on which you can print with the machine.
7

ENGLISH
X Safety Precautions
Please read the safety warnings and cautions provided in this guide to ensure that you use
your machine safely. Do not attempt to use the machine in any way not described in this
guide. For detailed safety information, refer to the User’s Guide.
WARNING
You may cause an electric shock/fire or damage the machine if you ignore any of
these safety precautions.
z Location
• Do not place the machine close to flammable solvents such as alcohol or thinners.
z Power supply
• Never attempt to plug or unplug the machine from the power supply when your hands
are wet.
• Always push the plug all the way into the power outlet.
• Never damage, modify, stretch or excessively bend or twist the power cord. Do not
place heavy objects on the power cord.
• Never plug the machine into a power socket that is shared with other equipment
(extension lead/cord, 2- or 3-way adapter, etc.).
• Never use the machine if the power cord is bundled or knotted.
• If you detect smoke, unusual smells or strange noises around the machine, immediately
unplug the machine at the power supply and contact your local authorized Canon dealer
or the Canon help line.
Using the machine in such conditions may result in fire or electrical shock.
• Periodically, unplug the machine and use a dry cloth to wipe off any dust or dirt
collected on the plug and the power outlet.
If the machine is placed at a location exposed to a lot of dust, smoke, or high humidity,
the dust collected on the plug absorbs moisture and may cause insulation failure and
fire.
8

z Maintenance
ENGLISH
• Use a damp cloth to clean the machine. Never use flammable solvents such as alcohol,
benzene or thinners. If flammable solvents come in contact with electrical components
inside the machine, it could cause a fire or electrical shock.
• Always turn OFF the power and unplug the machine from the power outlet before
cleaning the machine. If you leave ON or accidentally switch the machine ON while
cleaning it, it may result in injury or damage the machine.
z Handling
• Do not attempt to disassemble or modify the machine. There are no user serviceable
parts inside the machine.
The machine contains high-voltage components. Never attempt any maintenance
procedure not described in this guide. Incorrect maintenance procedures may damage
the machine, or cause a fire or electrical shock.
• Do not use flammable sprays near the machine.
This could cause a fire or electrical shock if the spray comes into contact with electrical
components inside the machine.
z Others
• When setting the machine near electric products with fluorescent lighting, separate the
machine at least 5.9 inches (15 cm) from electric products equipped with fluorescent
lighting. If you place it near to them, the machine may malfunction as a result of the
noise emitted by the fluorescent lighting.
• When turning OFF the power, be sure to press [ON/OFF] and confirm that the Alarm
Lamp has shut off. If you pull the power plug out of the wall outlet while the Alarm
Lamp is on, the FINE Cartridge is not protected, and you may not be able to print later.
9

ENGLISH
CAUTION
You may cause injury or damage the machine if you ignore any of these safety
precautions.
z Location
• Place the machine on a flat, stable, vibration-free surface that is strong enough to
support its weight.
• Do not install the machine in a location that is very humid or dusty, in direct sunlight,
outdoors, or close to a heating source. Installing in such a location may result in fire or
electrical shock. To avoid the risk of fire or electrical shocks, install the machine in a
location with an ambient temperature range of 41°F to 95°F (5°C to 35°C) and
humidity of 10% to 90% (condensation free).
• Do not place the machine on a thick rug or carpet. If fibers or dust come inside the
machine, it could cause a fire.
z Power supply
• Never remove the plug by pulling on the cord.
Pulling on the power cord may damage the cord and cause a fire or electrical shock.
• Do not use an extension cord as this may result in fire or electrical shock.
• Ensure that the area around the power outlet is kept clear at all times so you can easily
unplug the power cord if necessary. Otherwise you will be unable to disconnect the
power plug in case of an emergency.
• Never use a power supply source other than the one rated for the machine in the country
where you purchased the machine as it may result in fire or electrical shock.
The operating requirement of this machine is as follows:
100-240 V AC, 50/60 Hz (depending on local electrical requirements)
• The socket-outlet shall be installed near the equipment and shall be easily accessible.
10

z Handling
ENGLISH
• Close the Document Cover gently to avoid catching your hand. Failing to do so may
result in personal injury.
• Do not press down hard on the Document Cover when using the Platen Glass to scan
thick books. This may damage the Platen Glass and Document Cover, and/or result in
personal injury.
• When moving the machine, carry the machine at both ends.
• Do not insert your hands into the machine while it is printing. Parts inside the machine
are moving and this may result in injury.
• Do not turn the machine upside down. Ink may leak out and stain clothing or the
surrounding area.
z FINE Cartridges (Ink Cartridges)
• For safety reasons, store FINE Cartridges (Ink Cartridges) out of the reach of small
children. If a child ingests any ink, consult a doctor immediately.
• Do not shake FINE Cartridges (Ink Cartridges). Ink may leak out and stain clothing or
the surrounding area.
• Never touch the nozzle and the gold terminal.
X Legal Limitations On Use Of Your Product And Use Of
Images
It may be unlawful to make copies of, scan, print or use reproductions of the following
documents. The list provided is non-exhaustive. When in doubt, check with a legal
representative in your jurisdiction.
.
• Paper money
• Traveler’s checks
• Money orders
• Food stamps
• Certificates of deposit
• Passports
• Postage stamps (canceled or uncanceled)
• Immigration papers
• Identifying badges or insignias
• Internal revenue stamps (canceled or
• Selective service or draft papers
uncanceled)
• Checks or drafts issued by governmental
• Bonds or other certificates of indebtedness
agencies
• Stock certificates
• Motor vehicle licenses and certificates of title
• Copyrighted works/works of art without
permission of copyright owner
11

ENGLISH
1 Introduction
X Features Of Your Machine
Thank you for purchasing the Canon MP160. Your machine incorporates the following
functions in one simple-to-operate device:
Desktop photo printer Prints photo-quality images directly from a digital camera, without
using a computer.
Copier Makes color or black & white copies. Also, applies advanced copy
features to your copies.
Printer Prints photographs, vivid color and crisp black and white documents
from your computer.
Scanner Scans high-resolution images to your computer and processes them
easily using the utility software supplied.
You may select to use your machine as a stand-alone device for copying, and photo
printing. Alternatively, connect your machine to a computer and you will have a fully
integrated desktop printer/copier/scanner. The utility software supplied with your
machine enables you to perform a variety of tasks from your computer effortlessly and
efficiently.
12 Introduction Chapter 1
X Machine Parts And Their Functions
ENGLISH
Machine
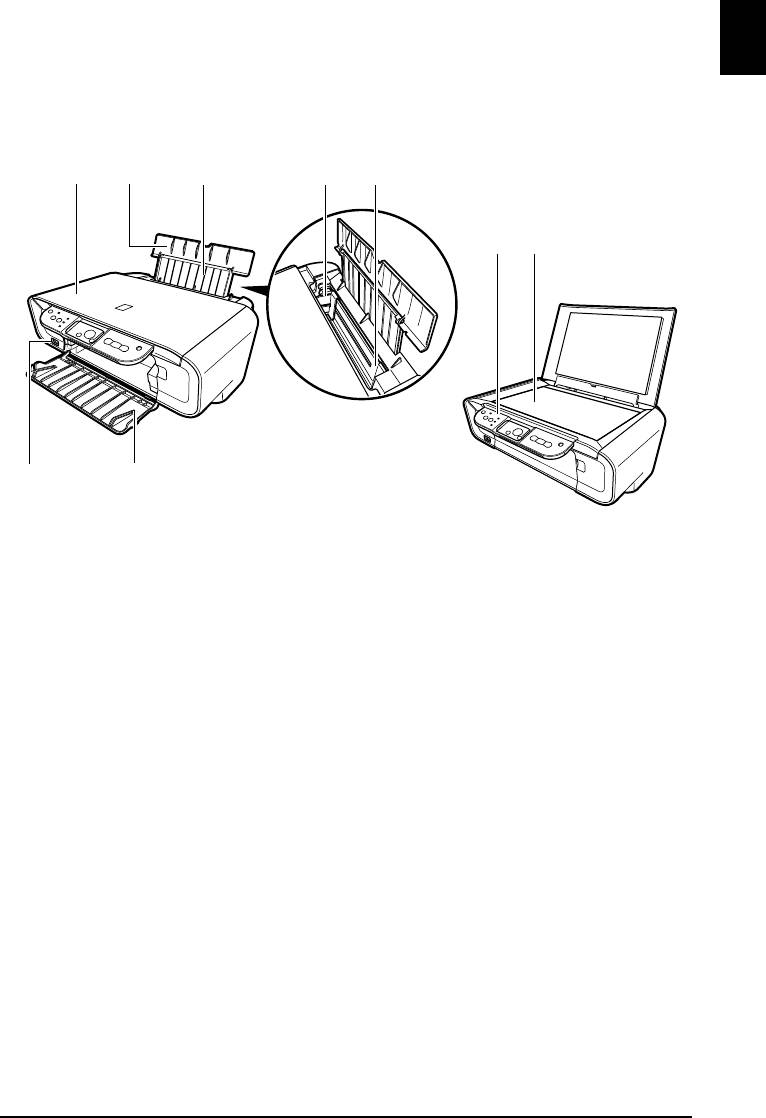
z Exterior
(1) (2) (3) (4)
(5)
(9) (8)
(6)(7)
(1) Document Cover
Covers the Platen Glass. Open this cover when loading a document on the Platen Glass.
(2) Paper Support
Supports paper loaded in the Auto Sheet Feeder. Open it before loading paper.
(3) Paper Support Extension
Supports paper loaded in the Auto Sheet Feeder. Pull it out before loading paper.
(4) Paper Guide
When loading paper, ensure the left edge of the paper just touches this guide.
(5) Auto Sheet Feeder
Load paper here. Paper feeds automatically, one sheet at a time.
(6) Paper Output Tray
Printouts are output to this tray. Open the tray before you start copying or printing. When not being
used, keep it closed in the machine.
(7) Direct Print Port
Used to connect a PictBridge-compliant device to the machine when printing images directly from
the camera.
(8) Platen Glass
Used to load a document to be processed.
(9) Operation Panel
Displays the operational status of the machine. It is also used to change or check the settings of each
function. For details, see page 15.
Chapter 1 Introduction 13
ENGLISH
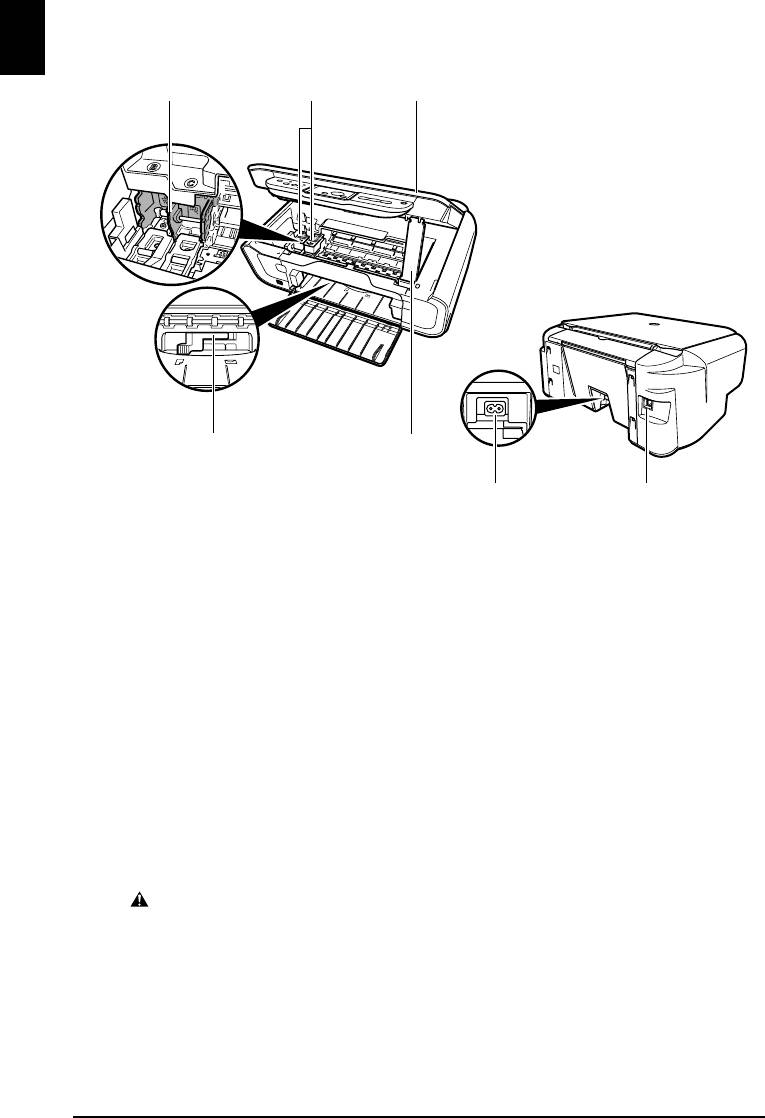
z Rear view and interior
(10)
(11) (12)
(14) (13)
(15) (16)
(10) FINE Cartridge Holder
Install the FINE Cartridges here.
(11) FINE Cartridges (Ink Cartridges)
Replaceable cartridges that comprise an integrated Print Head and ink tank.
(12) Scanning Unit
Used to scan a document.
(13) Scanning Unit Support
Used to hold the Scanning Unit being opened.
(14) Paper Thickness Lever
Used to adjust the gap between the FINE Cartridge and surface of the printing paper.
(15) Power Connector
Used to connect the power cord to the machine.
(16) USB Port
Used to connect a computer to the machine when printing from or scanning to the computer.
IMPORTANT
• While the machine is printing from or scanning images to the computer, or the computer is
in the sleep mode or standby mode, do not disconnect and connect the USB cable.
14 Introduction Chapter 1
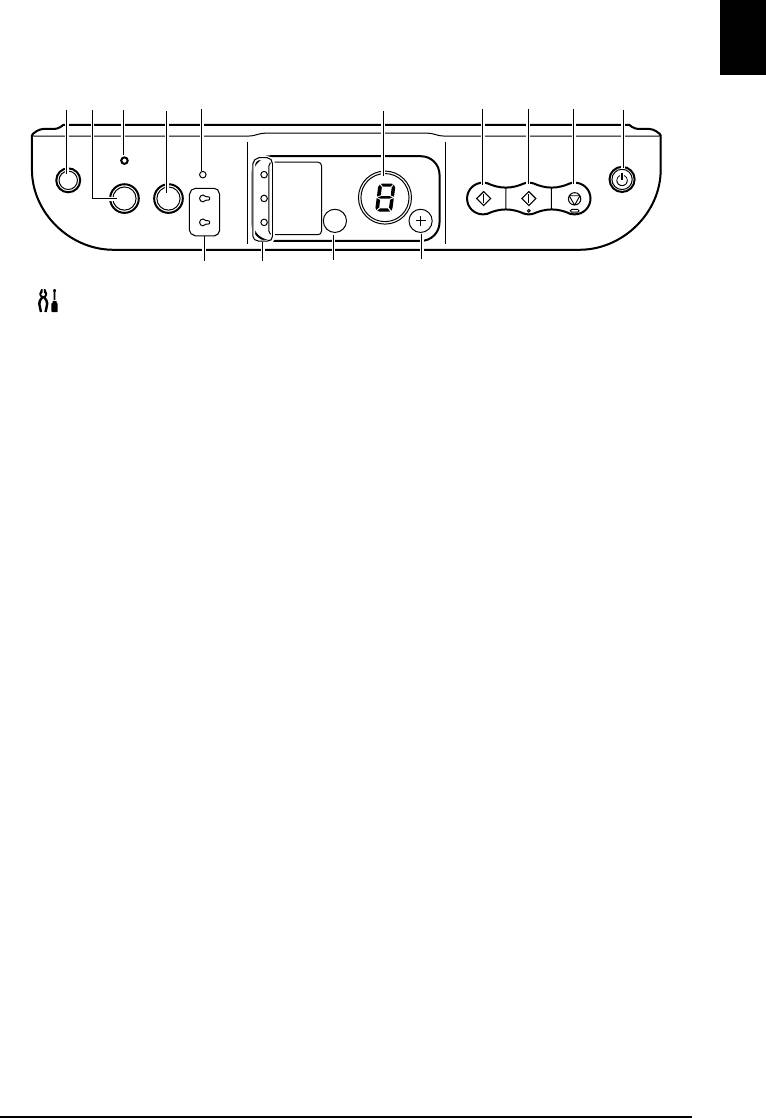
Operation Panel
ENGLISH
(1) (2) (3) (4) (5) (6) (10)(7) (8) (9)
(11) (12) (13) (14)
(1) [ (Maintenance)] Button
Accesses the Maintenance menu.
(2) [Fit to Page] Button
Enables/disables the Fit-to-Page copying.
(3) Fit-to-Page Lamp
Lights when Fit-to-Page copying is enabled.
(4) [SCAN] Button
Opens the MP Navigator to scan a document to your computer according to the settings selected. To
use this button, the machine must be connected to a computer.
(5) Alarm Lamp
Lights if an error occurs, or when the paper or ink runs out.
(6) LED (Light Emitting Diode)
Displays the number of copies, Maintenance menu selections or the operational status.
(7) [Black] Button*
Starts black & white copying. Also, press this button to confirm settings or operations.
(8) [Color] Button*
Starts color copying. Also, press this button to confirm settings or operations.
(9) [Stop/Reset] Button
Cancels operations and returns the machine to standby mode.
(10) [ON/OFF] Button
Turns the machine ON and OFF. Before turning ON the machine, make sure the Document Cover is
closed.
* In the software applications or manuals, [Start] or [OK] is occasionally substituted for [Black] and/or
[Color] buttons.
Chapter 1 Introduction 15

ENGLISH
(11) Black/Color Ink Lamp
Lights when a Black/Color FINE Cartridge is empty.
(12) Paper Lamp
Displays the selected paper size and type for copying.
(13) [Paper] Button
Switches the paper size and type for copying.
(14) [+] Button
Increases the number of copies.
16 Introduction Chapter 1
ENGLISH
2 Copying
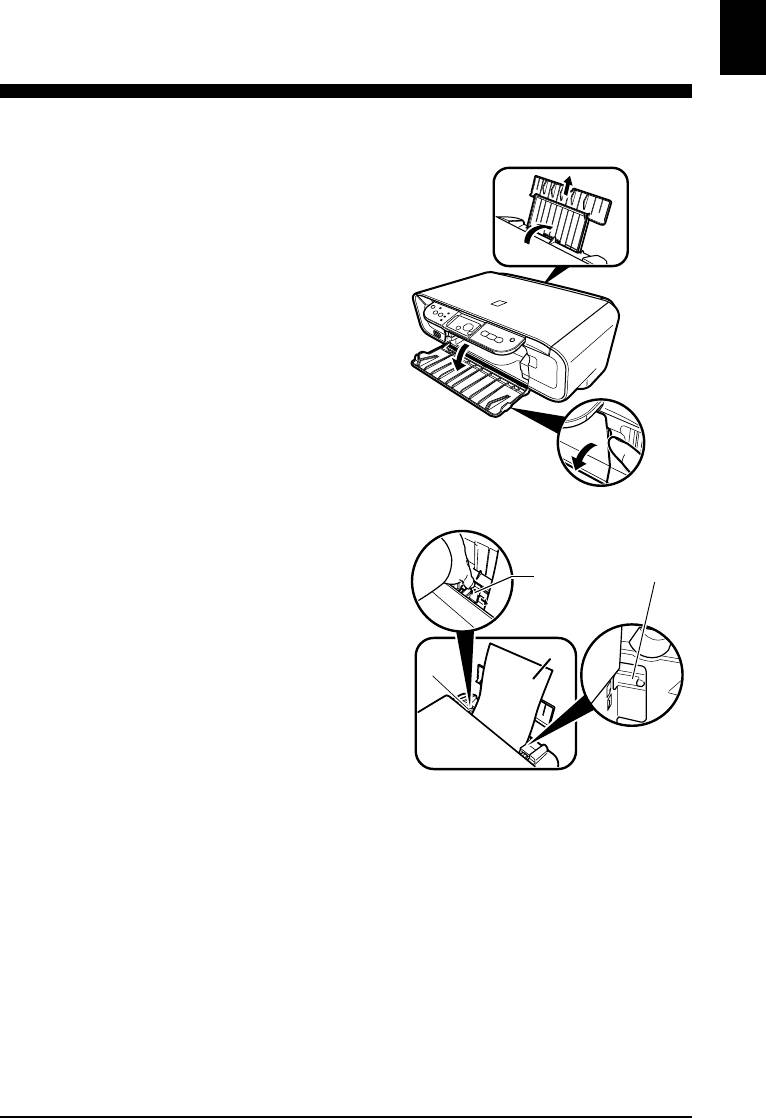
X Loading Paper
1 Open the Paper Support (1),
(1)
then pull out the Paper Support
Extension (2).
(2)
2 Place a stack of paper (print
side up) in the Auto Sheet
(B)
Feeder (1), pinch the Paper
(A)
Guide (A) and adjust it to the left
side of the stack (2).
• Make sure the stack does not exceed the
A4
(2)
Load Limit Mark (B).
• For details on loading paper, see the
(1)
User’s Guide.
X Recommended Paper
• Plain paper
• Super White Paper*
• Glossy Photo Paper*
• Matte Photo Paper*
• Photo Paper Pro*
• Photo Paper Plus Glossy*
• Photo Paper Plus Semi-Gloss*
*
Indicates Canon genuine media.
For details on the general paper guidelines, see the User’s Guide.
Chapter 2 Copying 17
ENGLISH
X Setting The Paper Size And Type
For copying or photo printing, on the Operation Panel, you need to set the size and type
of paper loaded in the Auto Sheet Feeder. (See page 17)
1 Press [Paper] repeatedly to select the paper size and type.
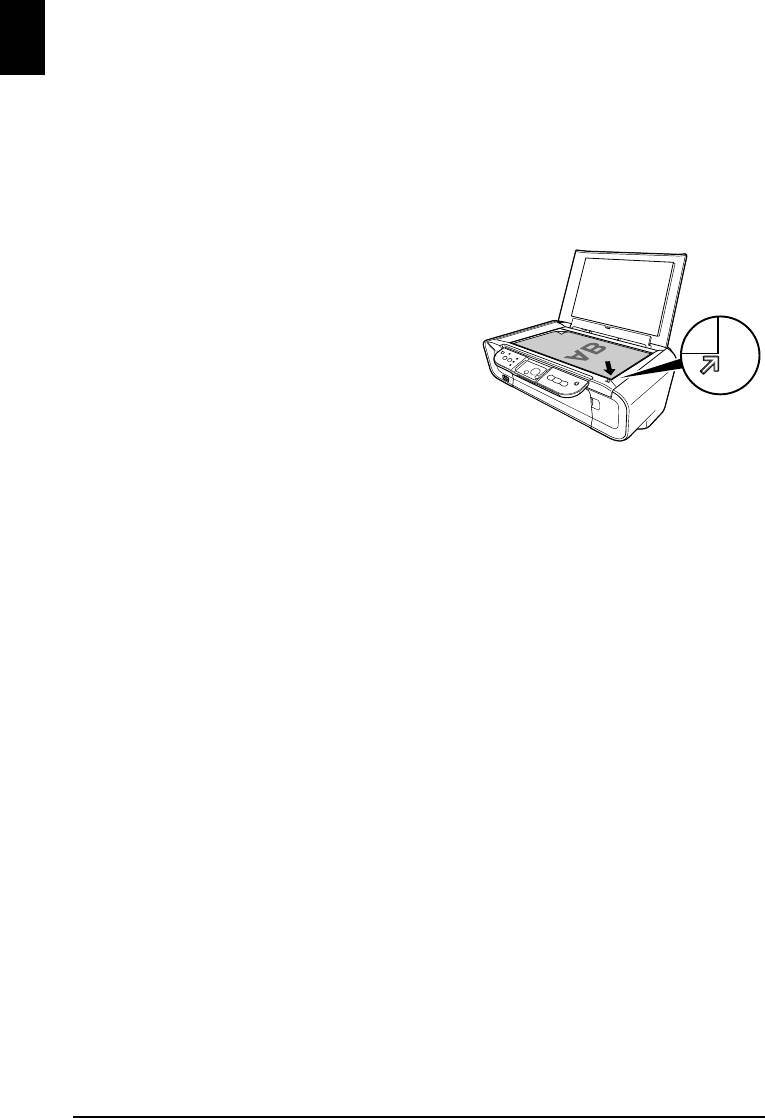
X Loading Documents
1 Lift the Document Cover.
2 Load your document.
• Place your document face down on the Platen
Glass.
• Align the upper left corner of your document
with the alignment mark on the lower right
corner of the Platen Glass.
3 Gently close the Document Cover.
X Making Copies
1 Press [+] repeatedly to select the number of copies (max. 20 copies).
2 Press [Color] for color copying, or [Black] for black & white copying.
• If you press and hold down the button for longer than 2 seconds, the LED flashes once. Then
release the button and the machine starts high speed (draft) copying (A4 or Letter plain paper
only).
X Advanced Copy Feature
Fit-to-Page copying Copies the images so that they fit the size of the paper.
For details on Fit-to-Page copying, see the User’s Guide.
18 Copying Chapter 2


