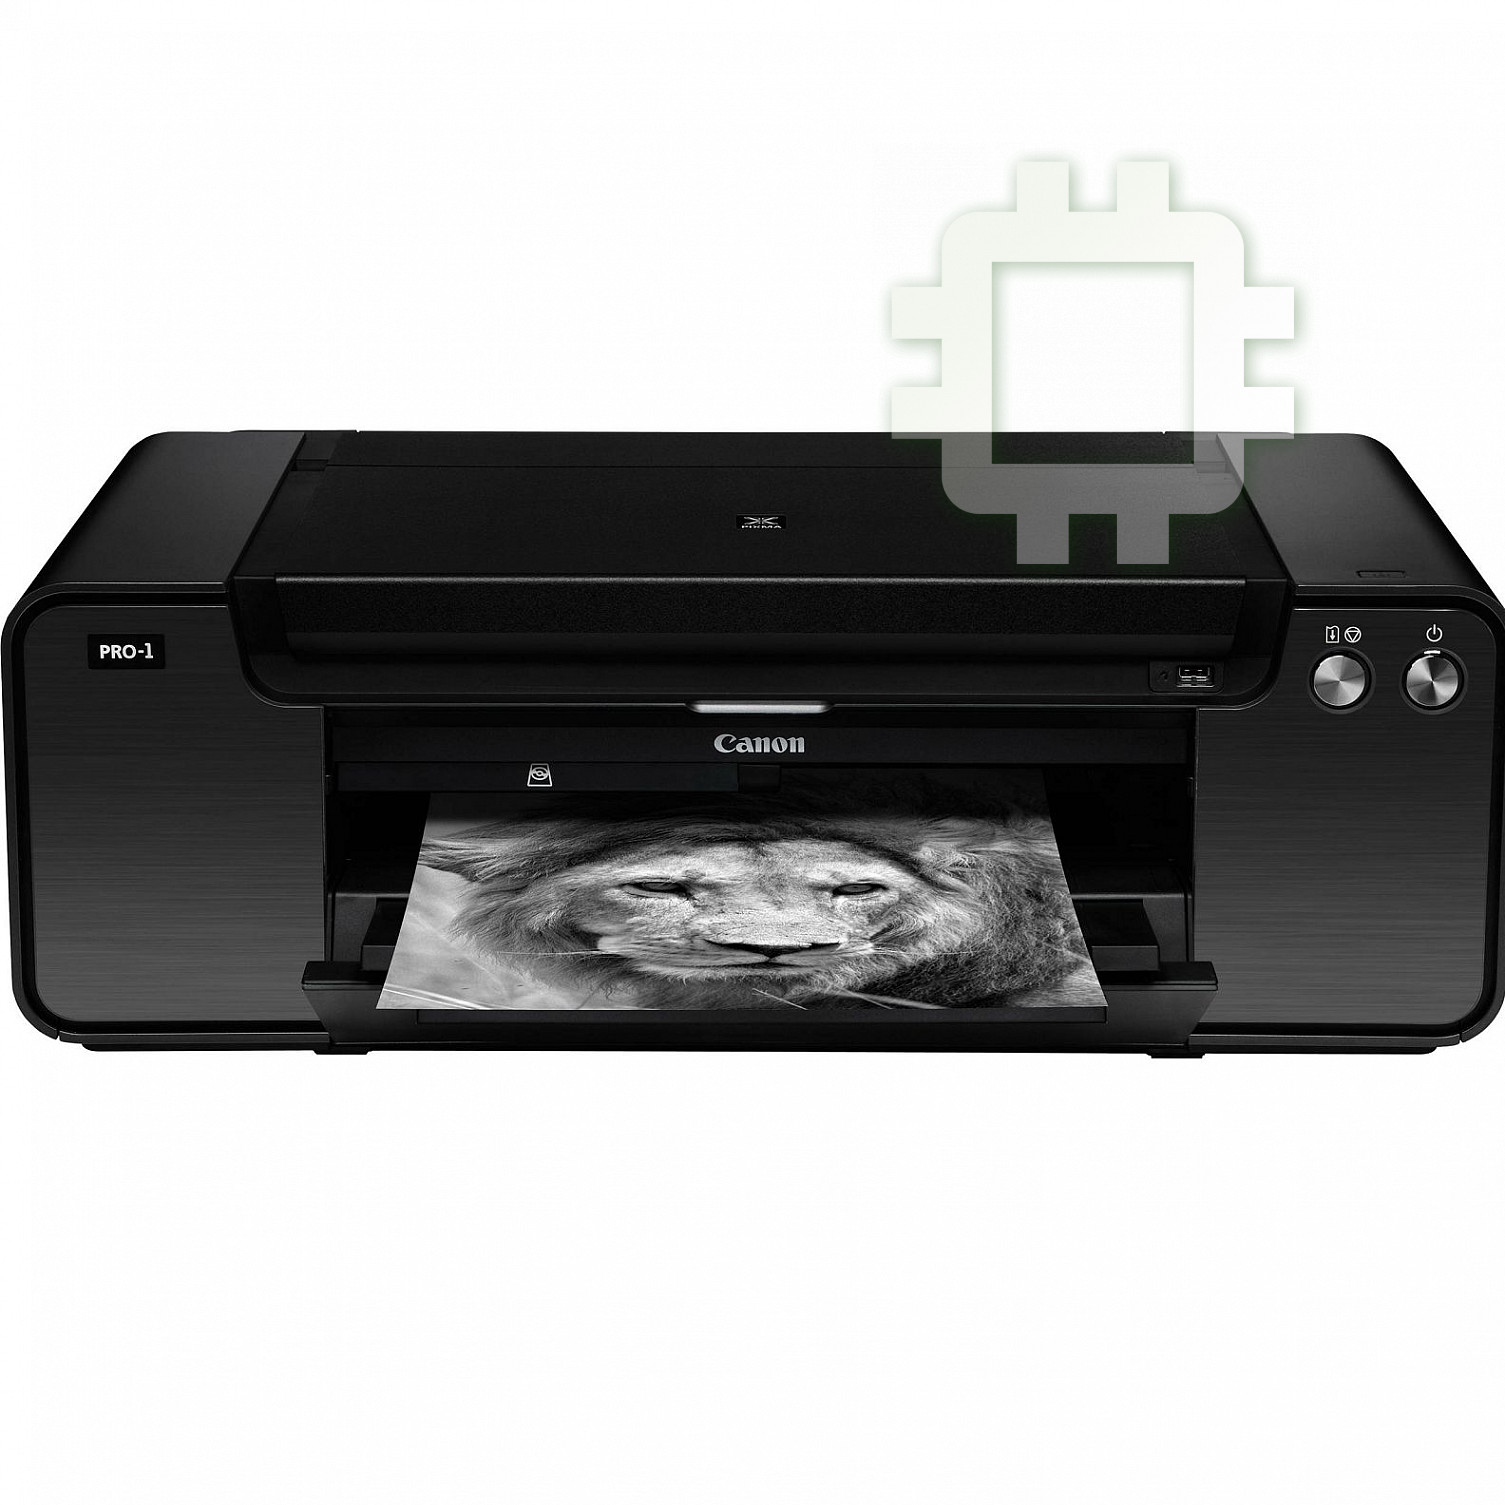
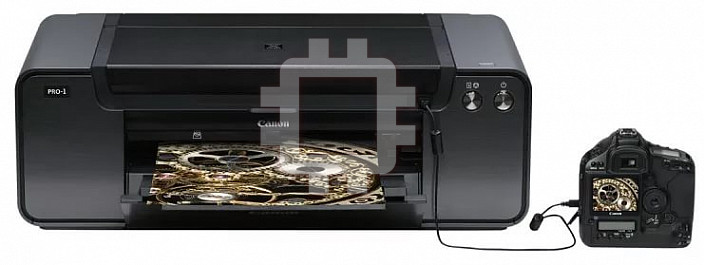
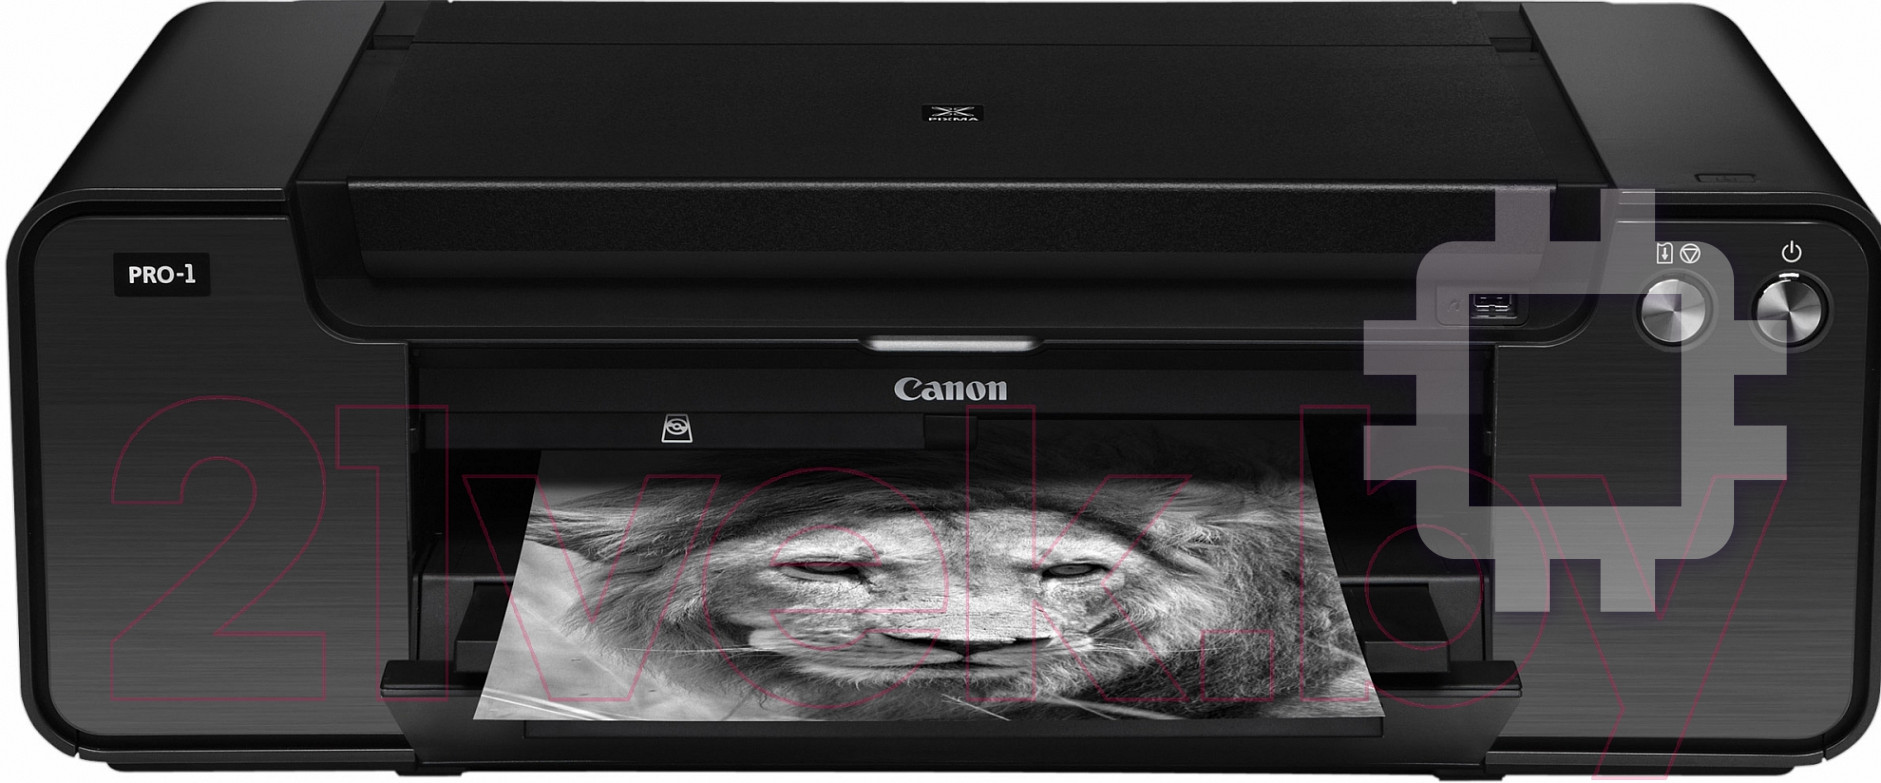
Canon pixma pro-1: инструкция
Раздел: Офисная Техника
Тип: Струйный Принтер

Характеристики, спецификации
Инструкция к Струйному Принтеру Canon pixma pro-1
Оглавление
CANON INC.
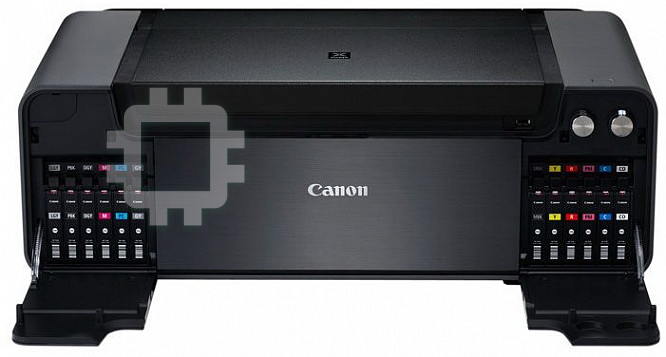
The following ink tanks are compatible with this printer.
30-2, Shimomaruko 3-chome, Ohta-ku, Tokyo 146-8501, Japan
Les réservoirs d’encre suivants sont compatibles avec cette imprimante.
Die folgenden Tintenpatronen sind mit diesem Drucker kompatibel.
CANON CANADA INC.
ENGLISH
6390 Dixie Road, Mississauga, Ontario, L5T 1P7 Canada
I serbatoi d'inchiostro riportati di seguito sono compatibili con questa stampante.
FRANÇAIS
DEUTSCH
De volgende inkttanks zijn compatibel met deze printer.
ITALIANO
Os seguintes cartuchos de tinta são compatíveis com esta impressora.
NEDERLANDS
CANON EUROPA N.V.
Los depósitos de tinta siguientes son compatibles con esta impresora.
PORT DO BRASIL
Bovenkerkerweg 59 1185 XB Amstelveen The Netherlands
ESPAÑOL
ΕΛΛΗΝΙΚΑ
www.canon-europe.com
Följande bläckbehållare kan användas med denna skrivare.
Blekktankene nedenfor er kompatible med denne skriveren.
CANON AUSTRALIA PTY LTD
SVENSKA
NORSK
1 Thomas Holt Drive, North Ryde, Sydney N.S.W. 2113, Australia
Følgende blækbeholdere er kompatible med printeren.
DANSK
canon.com.au
SUOMI
Seuraavat mustesäiliöt ovat yhteensopivia tämän tulostimen kanssa.
CANON NEW ZEALAND LIMITED
ČESKY
Akoranga Business Park, Akoranga Drive, Northcote, Auckland,
SLOVENSKY
New Zealand
POLSKI
MAGYAR
canon.co.nz
A nyomtatóval az alábbi típusú tintatartályok használhatók.
CANON SINGAPORE PTE. LTD.
РУССКИЙ
УКРАЇНСЬКА
1 HarbourFront Avenue #04-01 Keppel Bay Tower Singapore
SLOVENŠČINA
098632
يبرع
www.canon-asia.com
TÜRKÇE
Getting Started
CANON HONGKONG CO.LTD.
LATVIEŠU
LIETUVIŠKAI
EESTI
Kowloon, Hong Kong
Su šiuo spausdintuvu suderinamos toliau nurodytos rašalo talpyklos.
www.canon-asia.com
ROMÂNĂ
Järgmised tindimahutid ühilduvad selle printeriga.
CANON KOREA BUSINESS SOLUTIONS INC.
БЪЛГАРСКИ
168-12 Samseong-Dong, Gangnam-gu, Seoul, Korea
www.canon-bs.co.kr
QT5-6303-V01 XXXXXXXX © CANON INC. 2013 PRINTED IN XXXXXXXX
IMPRIME XX XXXXXXXX

ENGLISH
FRANÇAIS
DEUTSCH
ITALIANO
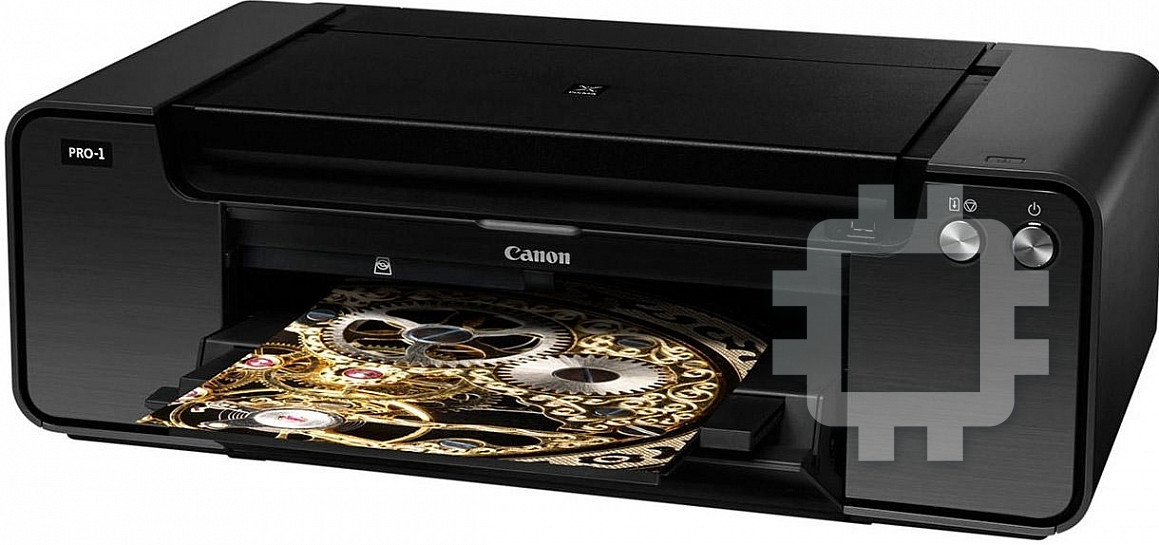
Getting Started
Démarrage
Inbetriebnahme
Guida Rapida
Make sure to read this manual before using the printer. Please keep it in hand for future reference.
Veuillez lire ce manuel avant d’utiliser l’imprimante. Conservez-le à portée de main pour toute référence ultérieure.
Lesen Sie dieses Handbuch vor Verwendung des Druckers. Sie sollten es immer greifbar haben, falls Sie es zu einem späteren Zeitpunkt benötigen.
Leggere il presente manuale prima di utilizzare la stampante. Tenerlo a disposizione per riferimenti futuri.

Contents■
Sommaire■
Inhalt■
Sommario■
1 Preparation P.5
1 Préparation P.5
1 Vorbereitung S.5
1 Preparazione P.5
2 Install the Ink Tanks P.9
2 Installation des cartouches d’encre P.9
2 Einsetzen der Tintenpatronen S.9
2 Installazione dei serbatoi d’inchiostro P.9
3 Install the Print Head P.12
3 Installation de la tête d’impression P.12
3 Einbauen des Druckkopfs S.12
3 Installazione della testina di stampa P.12
4 Software Installation P.18
4 Installation du logiciel P.18
4 Softwareinstallation S.18
4 Installazione del software P.18
5 Load Paper P.30
5 Chargement du papier P.30
5 Einlegen von Papier S.30
5 Caricamento della carta P.30
6 Application Software P.31
6 Logiciels d’application P.31
6 Anwendungssoftware S.31
6 Applicazioni software P.31
Printer Installation Flow■
Procédure d’installation de l’imprimante■
Abfolge der Druckerinstallation■
Procedimento di installazione della stampante■
40
Printer Preparation
Minutes (approx.)
Préparation de l’imprimante
minutes (environ)
Druckervorbereitung
Minuten (Durchschnittl.)
Preparazione della stampante
Minuti (appross.)
20
Software Installation
Minutes (approx.)
Installation du logiciel
minutes (environ)
Softwareinstallation
Minuten (Durchschnittl.)
Installazione del software
Minuti (appross.)
Installation Complete
Fin de l’installation
Installation abgeschlossen
Installazione completata
1
■
Symbols Used in This
■
Symboles utilisés dans
■
In diesem Dokument
■
Simboli utilizzati in questo
Document
ce document
verwendete Symbole
documento
Prohibited actions.
Actions interdites.
Unzulässige Aktionen.
Azioni proibite.
Instructions including
Instructions comportant des
Anweisungen, die wichtige
Istruzioni che includono
important information.
informations importantes.
Informationen beinhalten.
informazioni importanti.
•
In this guide, Windows 8 operating
•
Dans ce guide, le système
•
In diesem Handbuch wird das
•
In questo manuale, il sistema
system is referred to as Windows 8
d’exploitation Windows 8 est
Betriebssystem Windows 8 als
operativo Windows 8 viene
and Windows 7 SP1 as Windows 7.
appelé Windows 8 et le système
Windows 8 bezeichnet, das
denominato Windows 8 e il sistema
•
In this guide, the screens are based
d’exploitation Windows 7 SP1 est
Betriebssystem Windows 7 SP1 als
operativo Windows 7 SP1 viene
on Windows 7 and Mac OS X v.10.8.
appelé Windows 7.
Windows 7.
denominato Windows 7.
Unless noted otherwise, the screens
•
Dans ce guide, les captures d’écran
•
Die Bildschirme in diesem
•
In questo manuale, le schermate si
are those of Windows 7.
ont été prises sous Windows
7 et
Handbuch beziehen sich auf das
basano su Windows 7 e Mac OS X
Mac OS X v.10.8.
Betriebssystem Windows 7 und Mac
v.10.8.
Sauf mention contraire, les écrans
OS X v.10.8.
Se non specicato altrimenti, le
sont ceux de
Windows 7.
Sofern nicht anders angegeben
schermate si riferiscono a Windows
beziehen sich die Bildschirme auf
7.
Windows 7.
•
Microsoft is a registered trademark of Microsoft
•
Microsoft est une marque déposée de Microsoft
•
Microsoft ist eine eingetragene Marke der
•
Microsoft è un marchio registrato di Microsoft
Corporation.
Corporation.
Microsoft Corporation.
Corporation.
•
Windows is a trademark or registered trademark
•
Windows est une marque ou une marque
•
Windows ist eine Marke oder eingetragene
•
Windows è un marchio o un marchio registrato
of Microsoft Corporation in the U.S. and/or other
déposée de Microsoft Corporation aux États-
Marke der Microsoft Corporation in den USA
di Microsoft Corporation, negli Stati Uniti e/o in
countries.
Unis et/ou dans d’autres pays.
und/oder anderen Ländern.
altri paesi.
•
Windows Vista is a trademark or registered
•
Windows Vista est une marque ou une marque
•
Windows Vista ist eine Marke oder eingetragene
•
Windows Vista è un marchio o un marchio
trademark of Microsoft Corporation in the U.S.
déposée de Microsoft Corporation aux États-
Marke der Microsoft Corporation in den USA
registrato di Microsoft Corporation, negli Stati
and/or other countries.
Unis et/ou dans d’autres pays.
und/oder anderen Ländern.
Uniti e/o in altri paesi.
•
Internet Explorer is a trademark or registered
•
Internet Explorer est une marque ou une
•
Internet Explorer ist eine Marke oder
•
Internet Explorer è un marchio o un marchio
trademark of Microsoft Corporation in the U.S.
marque déposée de Microsoft Corporation aux
eingetragene Marke der Microsoft Corporation
registrato di Microsoft Corporation, negli Stati
and/or other countries.
États-Unis et/ou dans d’autres pays.
in den USA und/oder anderen Ländern.
Uniti e/o in altri paesi.
•
Mac, Mac OS, AirPort, Safari, Bonjour, iPad,
•
Mac, Mac OS, AirPort, Safari, Bonjour, iPad,
•
Mac, Mac OS, AirPort, Safari, Bonjour, iPad,
•
Mac, Mac OS, AirPort, Safari, Bonjour, iPad,
iPhone and iPod touch are trademarks of Apple
iPhone et iPod touch sont des marques d’Apple
iPhone und iPod touch sind in den USA und
iPhone e iPod touch sono marchi di Apple Inc.,
Inc., registered in the U.S. and other countries.
Inc., déposées aux États-Unis et dans d’autres
anderen Ländern eingetragene Marken von
registrati negli Stati Uniti e in altri paesi. AirPrint
AirPrint and the AirPrint logo are trademarks of
pays. AirPrint et le logo AirPrint sont des
Apple Inc. AirPrint und das AirPrint-Logo sind
e il logo AirPrint sono marchi di Apple Inc.
Apple Inc.
marques d’Apple Inc.
Marken von Apple Inc.
•
Adobe, Photoshop, Photoshop Elements,
•
Adobe, Photoshop, Photoshop Elements,
•
Adobe, Photoshop, Photoshop Elements,
•
Adobe, Photoshop, Photoshop Elements,
Lightroom, Adobe RGB e Adobe RGB (1998)
Lightroom, Adobe RGB and Adobe RGB (1998)
Lightroom, Adobe RGB et Adobe RGB (1998)
Lightroom, Adobe RGB und Adobe RGB (1998)
sono marchi registrati o marchi di Adobe
are either registered trademarks or trademarks
sont des marques déposées ou des marques
sind eingetragene Marken oder Marken von
Systems Incorporated negli Stati Uniti e/o in altri
of Adobe Systems Incorporated in the United
d’Adobe Systems Incorporated aux États-Unis
Adobe Systems Incorporated in den USA und/
paesi.
States and/or other countries.
et/ou dans d’autres pays.
oder anderen Ländern.
2
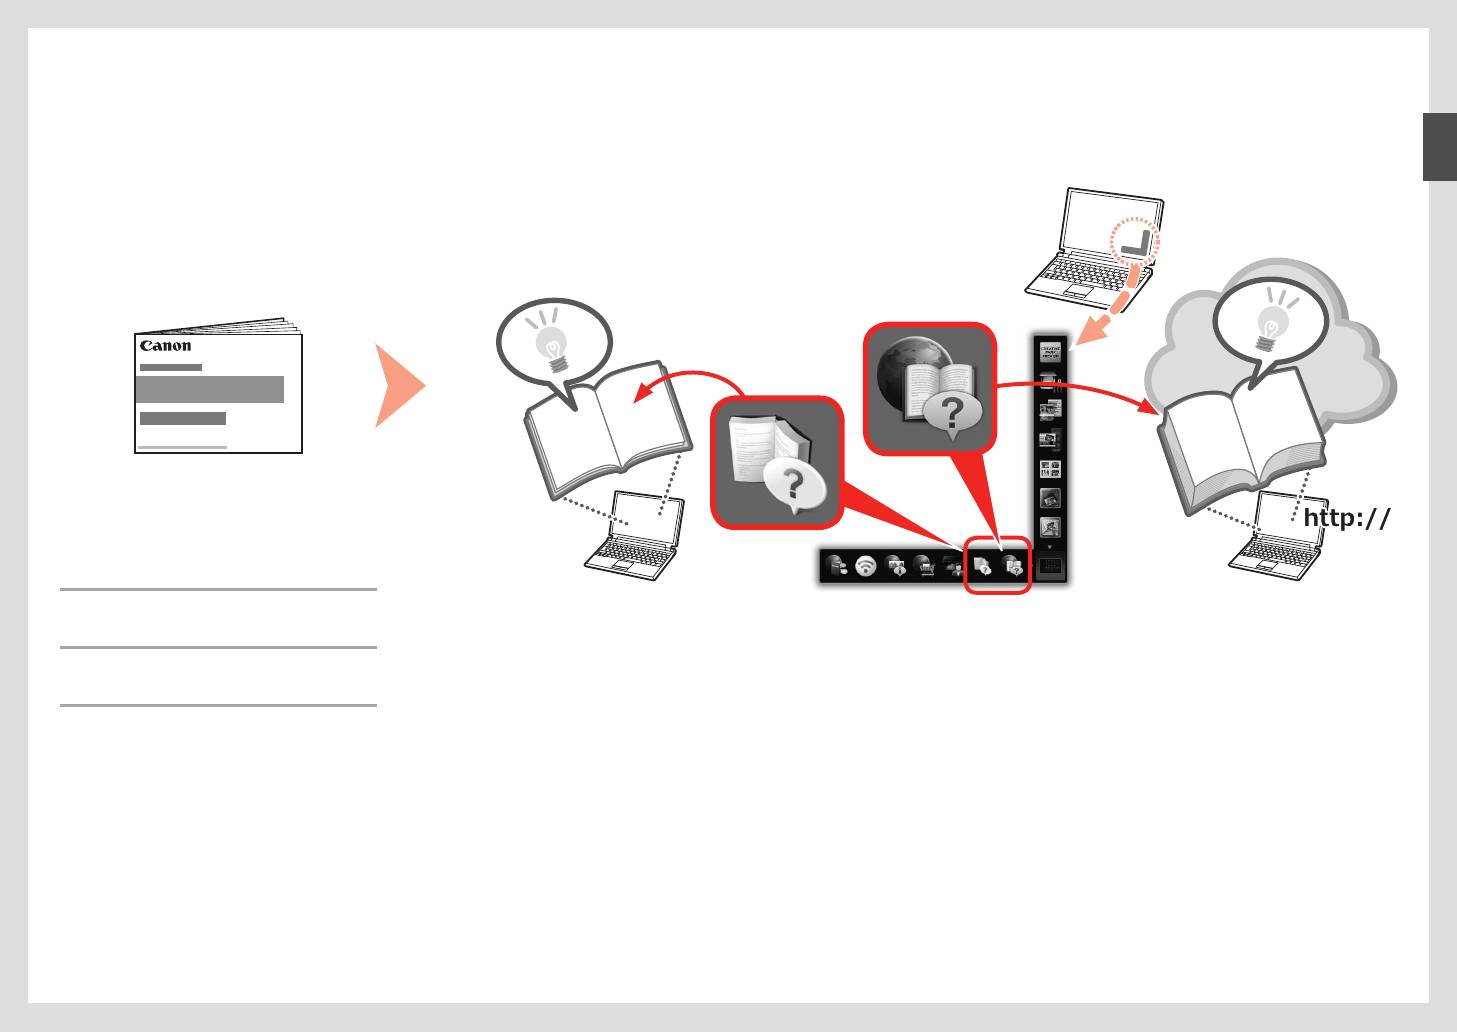
Printed Manual■ On-screen Manual and Online Manual■
Manuel imprimé■ Manuel à l’écran et Manuel en ligne■
Gedrucktes Handbuch■ On-Screen-Handbuch und Online-Handbuch■
Manuale cartaceo■ Manuale a video e Manuale online■
•
Getting Started
(this manual)
•
Démarrage
(ce manuel)
•
Inbetriebnahme
(dieses Handbuch)
•
Guida Rapida
(questo manuale)
3
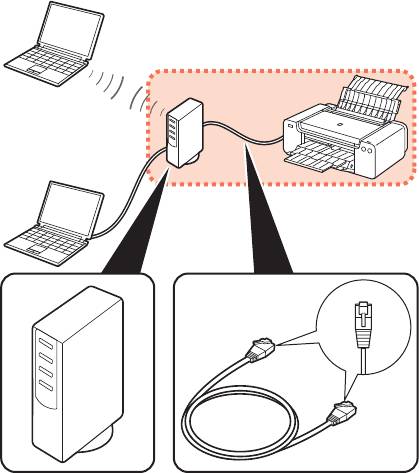
Devices Required for Wired Connection■
Périphériques requis pour une connexion laire■
Erforderliche Geräte für Kabelverbindung■
Dispositivi necessari per la connessione cablata■
When using the printer over a wired connection, a commercial network device (router, etc.) and Ethernet cable are required.
Lorsque vous utilisez l’imprimante via une connexion laire, un périphérique réseau (routeur, etc.) et un câble Ethernet sont requis.
Bei Verwendung des Druckers über eine Kabelverbindung sind ein handelsübliches Netzwerkgerät (Router usw.) und ein Ethernet-Kabel erforderlich.
Quando si utilizza la stampante su una connessione cablata, è necessario utilizzare un dispositivo di rete commerciale (router e così via) e un cavo Ethernet.
Router, etc. Ethernet cable
Routeur, etc. Câble Ethernet
Router usw. Ethernet-Kabel
Router e così via Cavo Ethernet
4
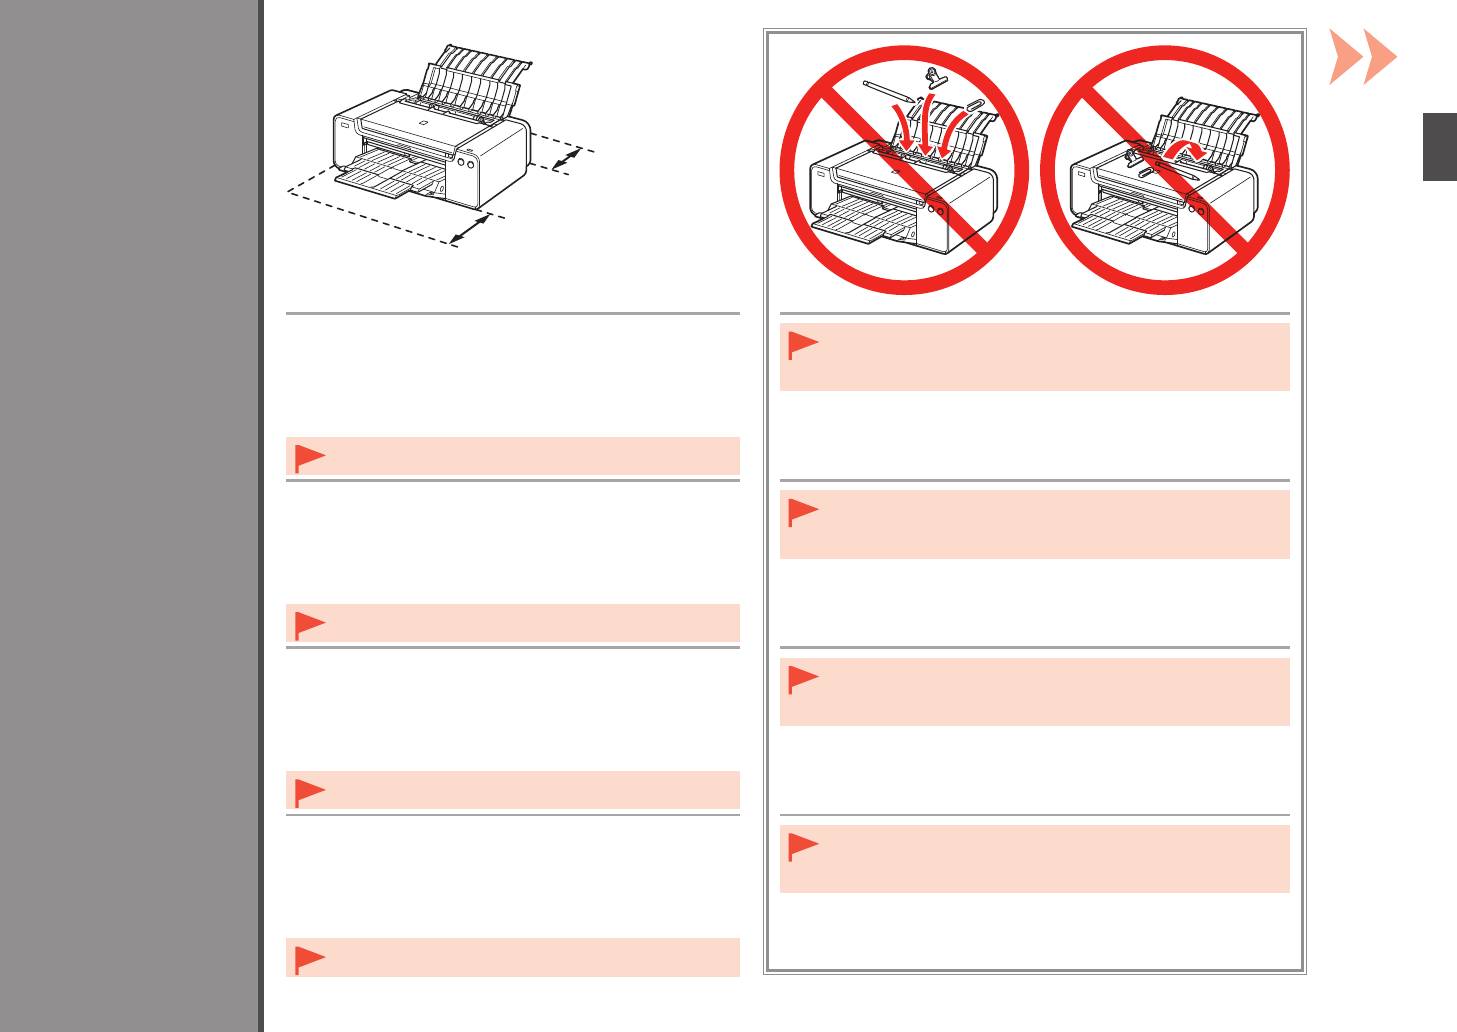
25 cm (10 inches)
25 cm (10 pouces)
25 cm (10 Zoll)
1
25 cm (10 pollici)
35 cm (14 inches)
35 cm (14 pouces)
35 cm (14 Zoll)
35 cm (14 pollici)
•
Place the printer on a flat surface.
•
Do not install the printer where an object may fall on it. In addition, do
Preparation
Préparation
•
Do not place any object in front of the printer.
not place any object on the top of the printer. It may fall into the printer
Vorbereitung
•
To open the Paper Support and Paper Output Tray, keep a space
when opening covers, resulting in malfunction.
Preparazione
of 35 cm (14 inches) in front of the printer and a space of 25 cm
(10 inches) behind it.
•
When installing the printer, lift and move it with the help of
another person.
•
Placez l’imprimante sur une surface plane.
•
N’installez pas l’imprimante dans une zone présentant un risque de
•
Ne placez aucun objet devant l’imprimante.
chute d’objets. En outre, ne placez aucun objet sur le dessus de
•
Pour ouvrir le support papier et le bac de sortie papier, conservez
l’imprimante. Il pourrait tomber dans l’imprimante à l’ouverture des
u
n espace de 35 cm (14 pouces) devant l’imprimante et un espace
capots et causer des dysfonctionnements.
de 25 cm (10 pouces) derrière.
•
Lors de l’installation de l’imprimante, soulevez-la et déplacez-
la avec l’aide d’une autre personne.
•
Stellen Sie den Drucker auf einer flachen Oberfläche auf.
•
Stellen Sie den Drucker nicht an Standorten auf, an denen
•
Legen Sie keine Gegenstände vor dem Drucker ab.
Gegenstände auf ihn fallen können. Legen Sie keine Gegenstände auf
•
L
assen Sie mindestens 35 cm (14 Zoll) vor und 25 cm (10 Zoll)
das Gerät. Sie könnten beim Öffnen von Abdeckungen ins Innere des
hinter dem Drucker frei, damit die Papierstütze und das
Druckers gelangen, was zu Fehlfunktionen führen kann.
Papierausgabefach geöffnet werden können.
•
Heben und bewegen Sie den Drucker zusammen mit einer
anderen Person, um ihn aufzustellen.
•
Collocare la stampante su un ripiano orizzontale.
•
Non installare la stampante dove rischia di essere colpita da oggetti
•
Non collocare oggetti davanti alla stampante.
che cadono. Inoltre, non collocare oggetti sopra la stampante.
•
Per aprire il supporto per la carta e il vassoio di uscita della carta,
Potrebbero cadere dentro la stampante all’apertura del coperchio
mantenere uno spazio di 35 cm (14 pollici) davanti alla stampante
e
provocare malfunzionamenti.
e uno spazio di 25 cm (10 pollici) dietro di essa.
•
Durante l’installazione, sollevare e spostare la stampante con
l’aiuto di un’altra persona.
5
1 2
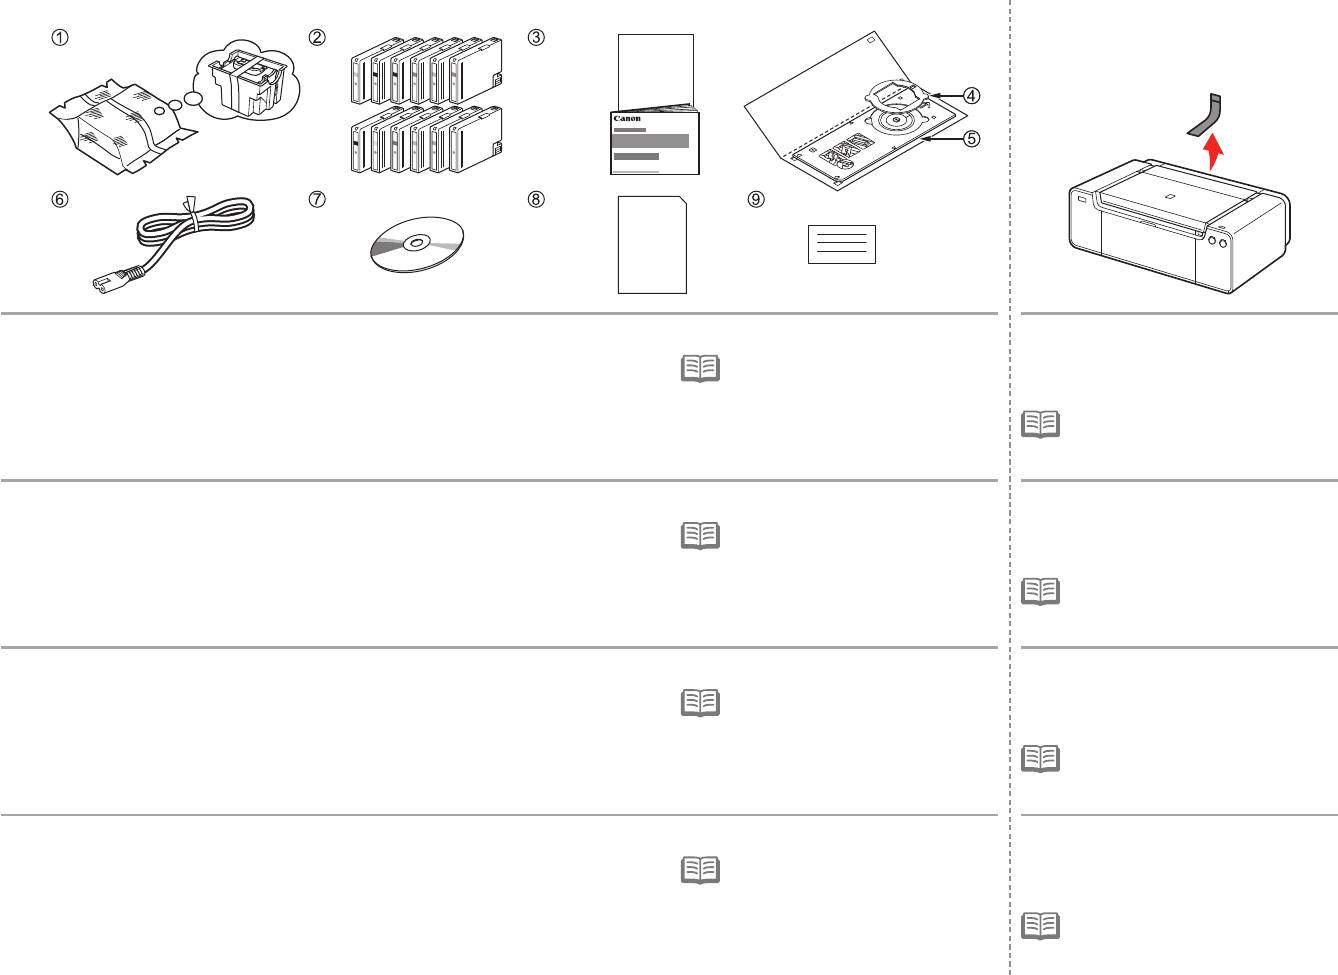
Make sure all the following items are supplied.
Remove all orange tape and protective
1. Print Head
7. Setup CD-ROM
materials from the inside and outside of
•
A USB cable is necessary to connect
2. Ink tanks (12: LGY, PBK, DGY, M, PC, GY,
8. Matte Photo Paper MP-101 (for Automatic
the printer with your computer (USB
the printer.
MBK, Y, R, PM, C, CO)
Print Head Alignment)
connection only).
3
. Manuals
9
. Other documents
•
The tape and protective materials may
4. 8 cm disc adapter
differ in shape and position from those
5. Disc tray
shown here.
6. Power cord
Vérifiez que vous avez bien reçu tous les éléments suivants.
Retirez l’intégralité du ruban orange
1. Tête d’impression
7. CD-ROM d’installation
et du plastique de protection présents
•
Un câble USB est nécessaire pour
2. Réservoirs d’encre (12 : LGY, PBK, DGY, M,
8. Papier Photo Mat MP-101 (pour l’alignement
brancher l’imprimante à votre ordinateur
à l’intérieur et sur l’extérieur de
PC, GY, MBK, Y, R, PM, C, CO)
automatique de la tête d’impression)
(connexion USB uniquement).
l’imprimante.
3
. Manuels
9
. Autres documents
•
La forme et la position réelles du ruban
4. Adaptateur disque 8 cm
et du plastique de protection peuvent
5. Bac disque
différer de celles montrées ici.
6. Cordon d’alimentation
Vergewissern Sie sich, dass alle unten gezeigten Gegenstände in der Verpackung enthalten sind.
Entfernen Sie alle orangefarbenen
1. Druckkopf
7. Installations-CD-ROM (Setup CD-ROM)
Klebebänder und das Schutzmaterial
•
Um den Drucker mit Ihrem Computer
2. Tintenpatronen (12: LGY, PBK, DGY, M, PC,
8. Fotopapier Matt (Matte Photo Paper) MP-101
zu verbinden, benötigen Sie ein USB-
innen und außen am Drucker.
GY, MBK, Y, R, PM, C, CO)
(für die automatische Druckkopfausrichtung)
Kabel (nur USB-Verbindung).
3
. Handbücher
9
. Weitere Dokumente
•
Klebebänder und Schutzmaterial
4. 8-cm-CD-Adapter
können in Form und Position von
5. CD-Fach
der hier dargestellten Anwendung
6. Netzkabel
abweichen.
Assicurarsi che siano presenti i seguenti elementi.
Rimuovere il nastro arancione e tutti
1. Testina di stampa
7. CD-ROM di installazione (Setup CD-ROM)
i materiali protettivi dall’interno e
•
Per collegare la stampante al computer,
2. Serbatoi d’inchiostro (12: LGY, PBK, DGY,
8. Carta Fotografica Opaca (Matte Phote
è necessario un cavo USB (solo
dall’esterno della stampante.
M, PC, GY, MBK, Y, R, PM, C, CO)
Paper) MP-101 (per l’allineamento
connessione USB).
3
. Manuali
automatico della testina di stampa)
4. Adattatore per dischi da 8 cm
9
. Altri documenti
•
La forma e la posizione del nastro e dei
materiali protettivi potrebbero essere
5. Vassoio disco
diverse da quelle illustrate qui.
6. Cavo di alimentazione
6
C
3 4
5 6
A
1
2
B
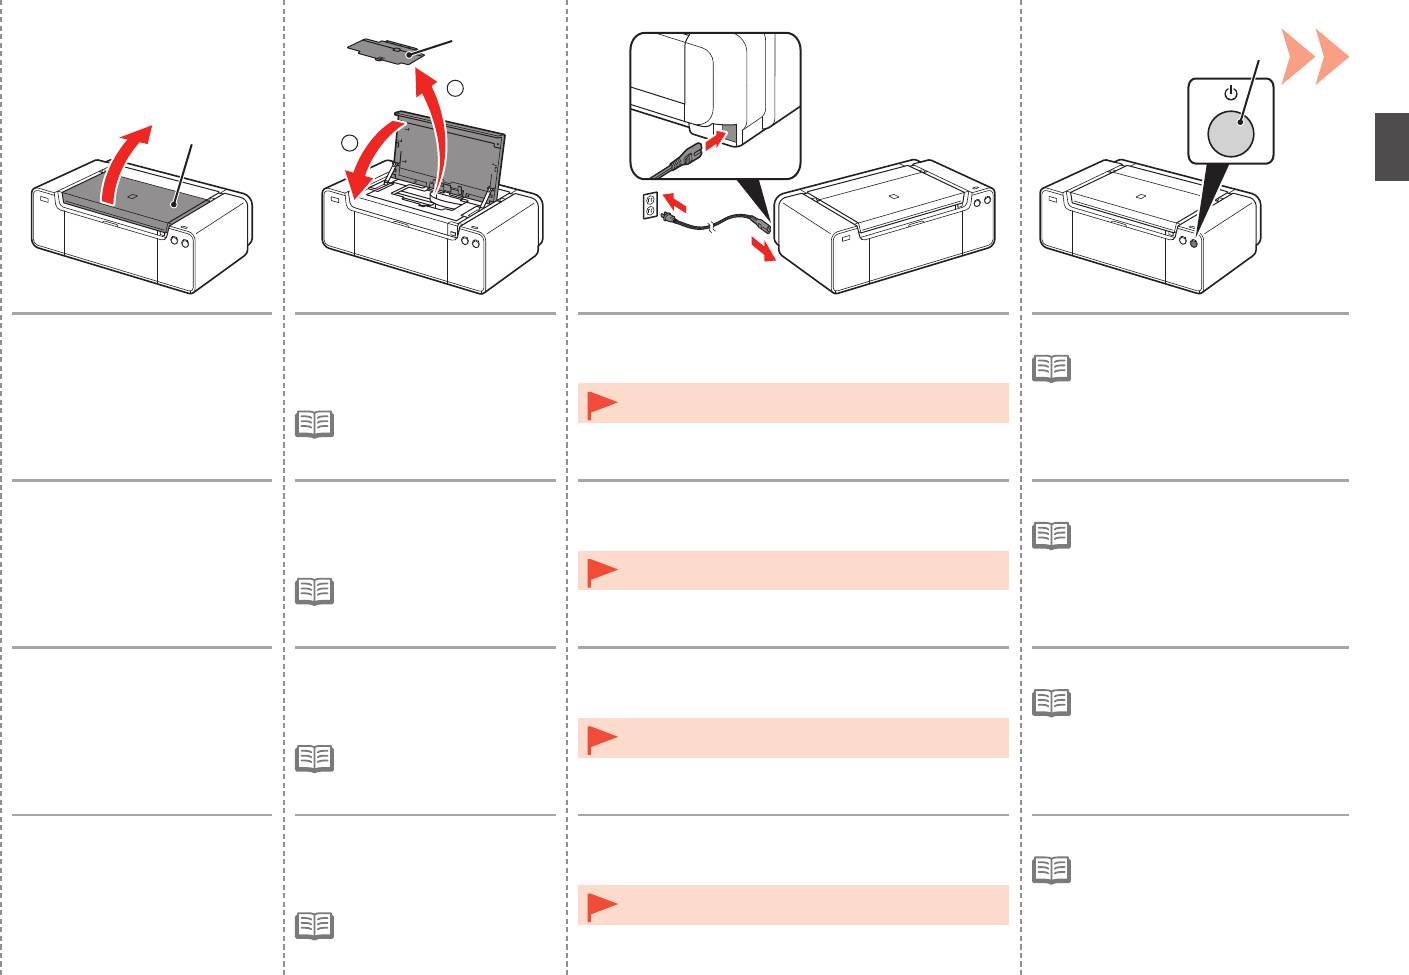
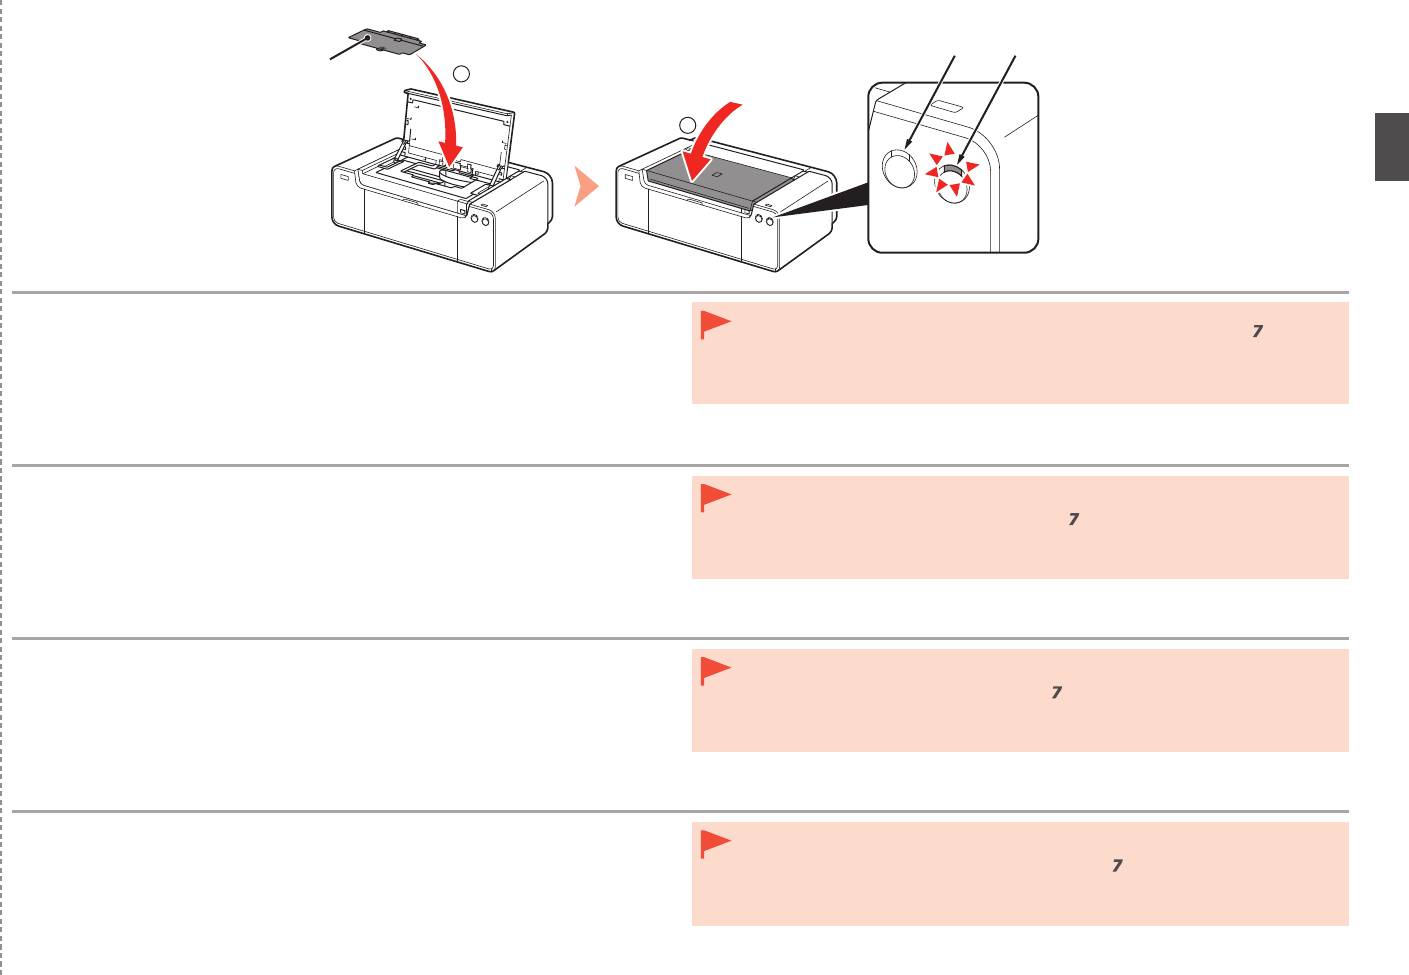
Open the Top Cover (A). 1. Remove the Head Cover (B).
Insert the power cord into the connector on the left
Press the ON button (C).
2. Close the Top Cover.
side at the back of the printer and into the wall outlet
•
It takes about 5 seconds for the ON
firmly.
button to work after the power cord is
plugged in.
•
Do NOT connect the USB cable or Ethernet cable at this
•
The Head Cover is to be
stage.
installed during the printer
installation.
Ouvrez le capot supérieur (A). 1. Retirez le capot des têtes (B).
Insérez fermement le cordon d’alimentation dans le
Appuyez sur le bouton MARCHE (ON) (C).
2. Fermez le capot supérieur.
connecteur à l’arrière de l’imprimante, sur le côté
•
Il faut environ 5 secondes pour que
gauche, et dans la prise secteur.
le bouton MARCHE (ON) réagisse
après le branchement du cordon
•
NE branchez PAS le câble USB ni le câble Ethernet
d’alimentation.
•
Le capot des têtes doit
maintenant.
être mis en place lors de
l’installation de l’imprimante.
Öffnen Sie die obere
1. Entfernen Sie die Abdeckung
Schließen Sie das Netzkabel am Netzkabelanschluss
Drücken Sie die Taste EIN (ON) (C).
Abdeckung (A).
für den Kopf (B).
links auf der Rückseite des Druckers an, und stecken
•
Es dauert ca. 5 Sekunden, bis die
2
. Schließen Sie die obere
Sie das andere Ende in die Steckdose.
Taste EIN (ON) nach Anschluss des
Abdeckung.
Netzkabels funktioniert.
•
Schließen Sie zu diesem Zeitpunkt das USB-Kabel oder
•
Die Abdeckung für den
Ethernet-Kabel noch NICHT an.
Kopf wird während der
Druckerinstallation angebracht.
Aprire il coperchio superiore (A). 1. Rimuovere il coperchio della
Inserire il cavo di alimentazione nel connettore sulla
Premere il pulsante ON (C).
testina (B).
parte posteriore sinistra della stampante e nella presa
•
Il pulsante ON funziona dopo circa
2
. Chiudere il coperchio
a muro.
5 secondi che il cavo di alimentazione
superiore.
è stato collegato alla presa elettrica.
•
NON collegare il cavo USB o quello Ethernet in questa
•
Il coperchio della testina deve
fase.
essere installato durante
l’installazione della stampante.
7
7
D
1 2
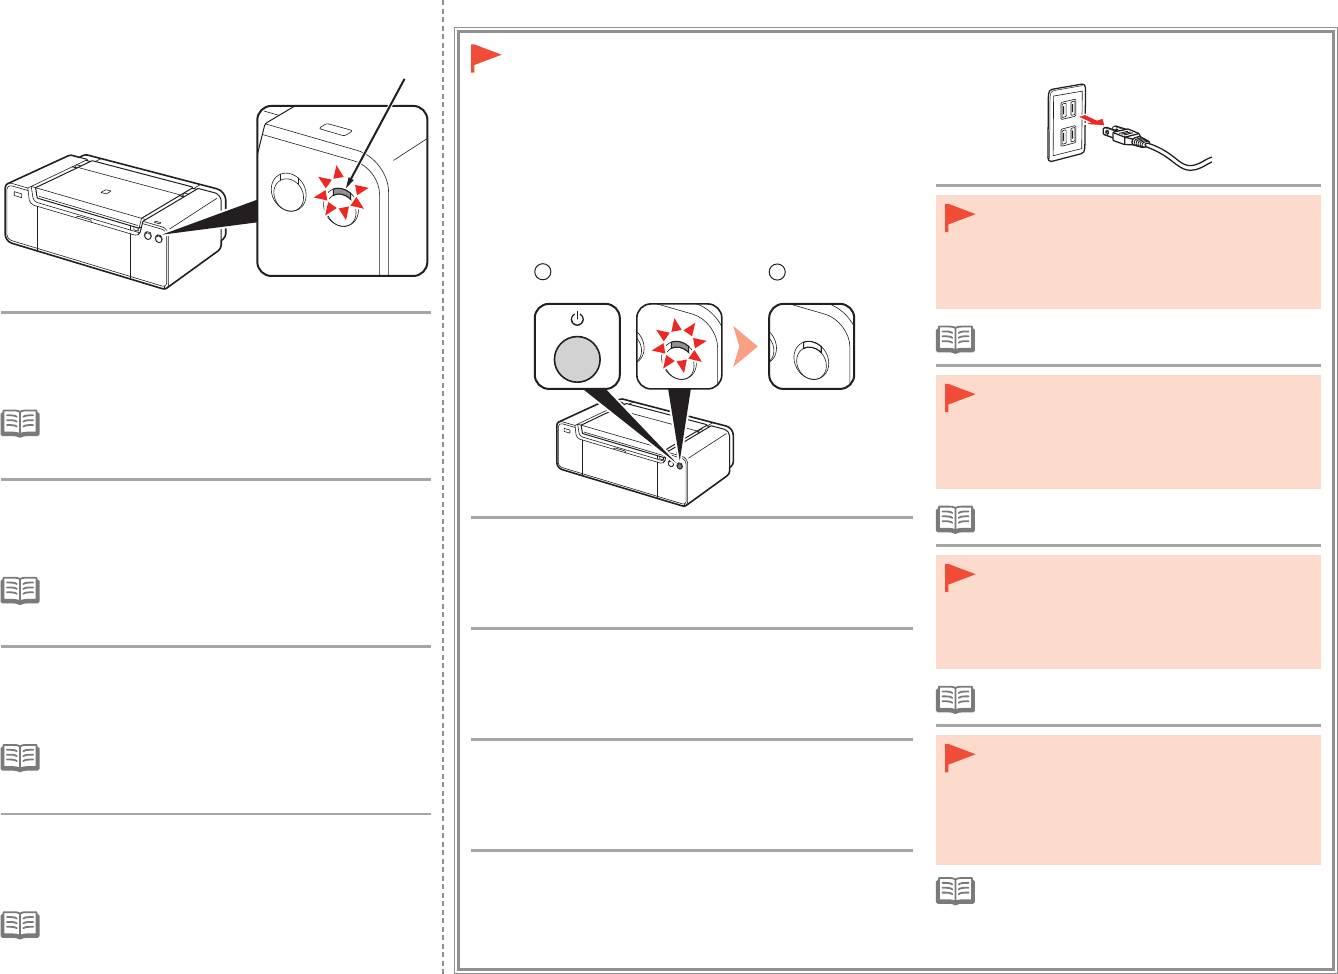
When it is necessary to turn off the printer
Lorsqu’il est nécessaire de mettre
l’imprimante hors tension
Wenn das Gerät ausgeschaltet werden muss
•
Before removing the power plug, make sure that
Se è necessario spegnere la stampante
the POWER lamp is not lit. Removing the power
plug while the POWER lamp is lit or ashing may
cause drying and clogging of the Print Head,
resulting in poor printing.
Wait for about 2 minutes until the POWER lamp
•
The specication of the power cord differs for each
(white) (D) stops flashing and stays lit, then proceed
country or region.
to the next step.
•
Avant de retirer la che d’alimentation, vériez que
le voyant du bouton ALIMENTATION (POWER)
•
The printer may make some operating noises. This is
est éteint. Si vous retirez la che d’alimentation
normal operation.
alors que le voyant du bouton ALIMENTATION
(POWER) est allumé ou clignote, la tête
d’impression risque de sécher et de se boucher,
ce
qui donnera une mauvaise qualité d’impression.
Patientez environ 2 minutes jusqu’à ce que le voyant
•
Les caractéristiques techniques du cordon
ALIMENTATION (POWER) (blanc) (D) cesse de
d’alimentation varient suivant le pays ou la région.
clignoter et reste allumé, puis passez à l’étape
Be sure to follow the procedure below.
suivante.
1. Press the ON button to turn off the printer.
•
Vergewissern Sie sich, dass die POWER-Anzeige
•
L’imprimante peut émettre des bruits de fonctionnement.
2. Make sure that the POWER lamp is not lit.
nicht leuchtet, bevor Sie den Netzstecker ziehen.
Ceci est normal.
Operating noise may continue for up to 60 seconds until the printer
Wenn der Netzstecker gezogen wird, während die
turns off.
POWER-Anzeige leuchtet oder blinkt, kann der
Druckkopf austrocknen und verstopfen, wodurch
Veillez à suivre la procédure ci-dessous.
sich die Druckqualität verschlechtert.
Warten Sie etwa 2 Minuten, bis die POWER-Anzeige
1. Appuyez sur le bouton MARCHE (ON) pour mettre l’imprimante hors tension.
(weiß) (D) nicht mehr blinkt, sondern dauerhaft
2. Vériez que le voyant ALIMENTATION (POWER) est éteint.
•
Die Spezikationen des Netzkabels fallen je nach
leuchtet, und fahren Sie dann mit dem nächsten
Le bruit de fonctionnement peut rester audible pendant 60
Land oder Region unterschiedlich aus.
Schritt fort.
secondes, jusqu’à ce que l’imprimante soit hors tension.
•
Der Drucker gibt unter Umständen Betriebsgeräusche
•
Prima di rimuovere la presa di alimentazione,
aus. Dies ist vollkommen normal.
Gehen Sie bitte wie nachfolgend beschrieben vor.
assicurarsi che la spia ALIMENTAZIONE
1. Drücken Sie die Taste EIN (ON), um das Gerät auszuschalten.
(POWER) sia spenta. La rimozione della presa di
alimentazione mentre la spia ALIMENTAZIONE
2. Stellen Sie sicher, dass die POWER-Anzeige nicht leuchtet.
(POWER) è accesa o lampeggia potrebbe causare
Die Betriebsgeräusche können bis zu 60 Sekunden andauern, bis
l’essiccazione e l’ostruzione della testina di
Attendere circa 2 minuti finché la spia
sich der Drucker ausschaltet.
stampa, con il conseguente peggioramento della
ALIMENTAZIONE (POWER) (bianca) (D) non
qualità di stampa.
lampeggia più e rimane fissa, quindi andare al
Attenersi alla procedura illustrata di seguito.
•
La specica del cavo di alimentazione varia in
passaggio successivo.
1. Premere il pulsante ON per spegnere la stampante.
base al paese o alla regione.
•
La stampante potrebbe emettere rumori durante il
2. Assicurarsi che la spia ALIMENTAZIONE (POWER) sia spenta.
funzionamento. Tali rumori fanno parte del normale
La stampante potrebbe continuare a emettere i rumori di
funzionamento della stampante.
funzionamento per un massimo di 60 secondi, fino allo spegnimento.
8
1
A
2
C
2
B
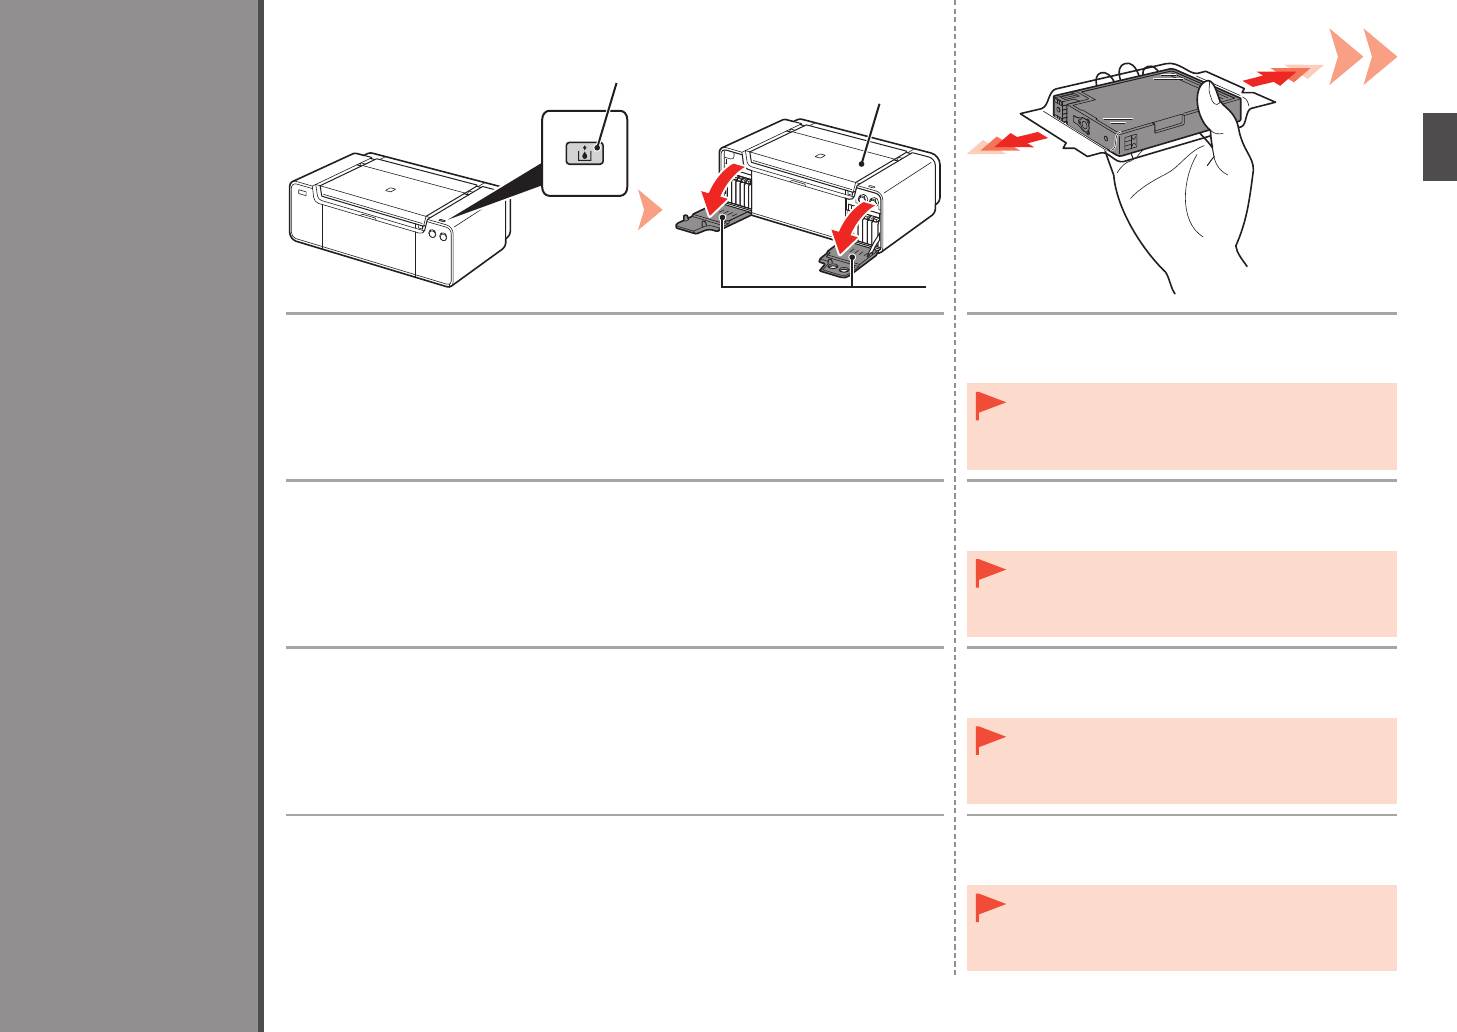
Press the Tank Cover Open button (A).
Before removing the ink tank from its package, shake
The left and right Tank Covers (B) open.
it 5 to 6 times horizontally.
Make sure the Top Cover (C) is closed.
•
Handle the ink tanks carefully. Do not drop or apply
excessive pressure to them.
•
Be sure to use the supplied ink tanks.
Install the Ink Tanks
Appuyez sur le bouton Ouverture du couvercle du réservoir (Tank Cover Open) (A).
Avant de retirer le réservoir d’encre de son emballage,
Les couvercles de réservoir droit et gauche (B) s’ouvrent.
secouez-le 5 à 6 fois de façon horizontale.
Assurez-vous que le capot supérieur (C) est fermé.
•
Manipulez les réservoirs d’encre avec précaution. Ne
les faites pas tomber et n’exercez pas une trop grande
pression dessus.
•
Prenez soin d’utiliser les cartouches d’encre fournies.
Einsetzen der Tintenpatronen
Drücken Sie die Taste zum Öffnen der Tintenpatronenabdeckung (Tank Cover Open) (A).
Schütteln Sie die Tintenpatrone 5 oder 6 Mal hin und
Die linke und rechte Abdeckung der Tintenpatronen (B) werden geöffnet.
her, bevor Sie sie aus der Verpackung nehmen.
Achten Sie darauf, dass die obere Abdeckung (C) geschlossen ist.
•
Behandeln Sie die Tintenpatrone vorsichtig. Lassen Sie
sie nicht fallen, und üben Sie keinen übermäßigen Druck
auf sie aus.
Installation des cartouches d’encre
•
Verwenden Sie nur die mitgelieferten Tintenbehälter.
Installazione dei serbatoi d’inchiostro
Premere il pulsante di apertura del coperchio del serbatoio (Tank Cover Open) (A).
Prima di rimuovere il serbatoio d’inchiostro dalla
I coperchi dei serbatoi (B) destro e sinistro si aprono.
confezione, agitarlo 5 o 6 volte in senso orizzontale.
Assicurarsi che il coperchio superiore (C) sia chiuso.
•
Maneggiare con cura i serbatoi d’inchiostro. Evitare di farli
cadere o di applicarvi una pressione eccessiva.
•
Utilizzare i serbatoi di inchiostro forniti con la stampante.
9
3
4
D
D
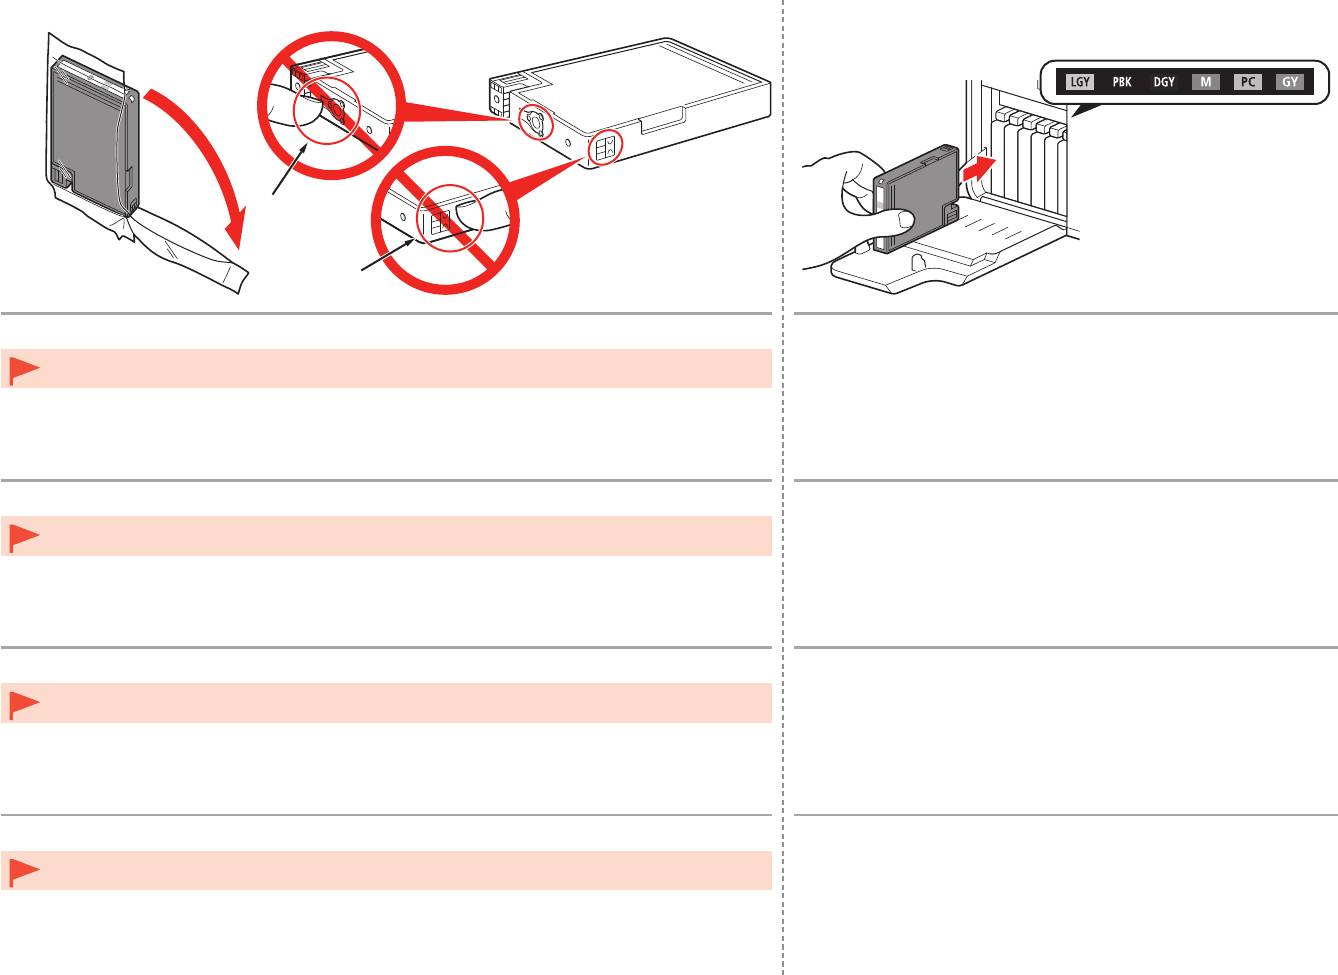
Remove the ink tank from the package.
Set the ink tank.
Press the mark (PUSH) to set the ink tank firmly into place.
Do not touch the contacts (D) of the ink tanks.•
When the installation is completed properly, the Ink lamp lights red.
Make sure that the color of the label matches the ink tank.
Sortez le réservoir d’encre de l’emballage.
Installez le réservoir d’encre.
Appuyez sur le repère (PUSH) du réservoir d’encre jusqu’à ce qu’il
Ne touchez pas les contacts (D) des réservoirs d’encre.•
se mette correctement en place.
Une fois l’installation terminée, le voyant Encre (Ink) s’allume en rouge.
Assurez-vous que la couleur de l’étiquette correspond à celle du réservoir d’encre.
Nehmen Sie die Tintenpatrone aus der Verpackung.
Setzen Sie die Tintenpatrone ein.
Drücken Sie auf die Markierung (PUSH), damit die Tintenpatrone
Berühren Sie nicht die Kontakte (D) der Tintenpatronen.•
fest einrastet.
Wenn die Tintenpatrone richtig eingesetzt wurde, leuchtet die Anzeige für die
Tintenpatrone (Ink) rot.
Die Farbe des Aufklebers muss mit der Farbe der Tintenpatrone übereinstimmen.
Estrarre il serbatoio d’inchiostro dalla confezione.
Inserire il serbatoio d’inchiostro.
Premere sul segno (PUSH) per posizionare in modo stabile il
Non toccare i contatti (D) dei serbatoi d’inchiostro.•
serbatoio d’inchiostro.
Se l’installazione è stata eseguita correttamente, l’indicatore luminoso
dell’inchiostro (Ink) emetterà una luce rossa.
Assicurarsi che il colore del serbatoio d’inchiostro corrisponda all’etichetta.
10
5 6
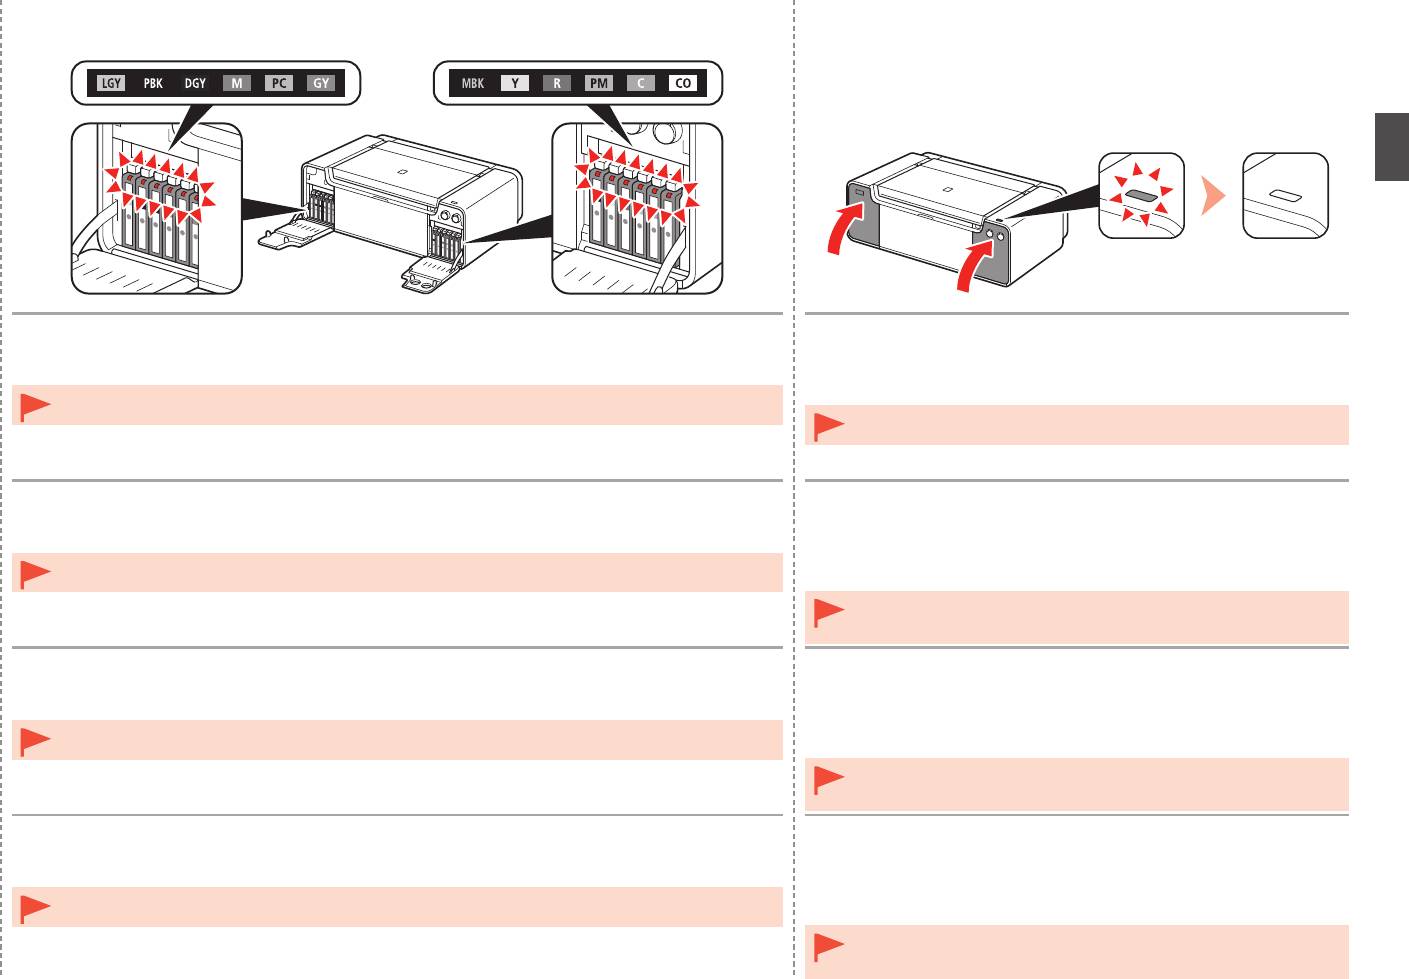
Install all the other ink tanks in the same way according to the color order indicated on the label.
1. Close the left and right Tank Covers until they click.
2. Make sure that the Tank Cover Open button (blue) is not lit, then
Make sure all the Ink lamps light red.
proceed to the next step.
Once you have installed the ink tanks, do not remove them unnecessarily.•
•
If the Tank Cover Open button (blue) remains lit, make sure that the ink
tanks are correctly installed.
Installez toutes les autres cartouches d’encre de la même manière, en respectant l’ordre des
1. Fermez les couvercles de réservoir droit et gauche jusqu’à ce
couleurs indiqué sur l’étiquette.
qu’ils s’enclenchent.
Vérifiez que tous les témoins d’encre (Ink) sont allumés en rouge.
2
. Vérifiez que le bouton Ouverture du couvercle du réservoir
(Tank Cover Open) (bleu) est éteint, puis passez à l’étape
Une fois les réservoirs d’encre installés, ne les retirez que lorsque c’est absolument nécessaire.•
suivante.
•
Si le bouton Ouverture du couvercle du réservoir (Tank Cover Open)
(bleu) reste allumé, vériez que les réservoirs d’encre sont correctement
installés.
Setzen Sie die übrigen Tintenbehälter auf dieselbe Weise ein. Beachten Sie dabei die
1. Schließen Sie die linke und rechte Abdeckung der
Farbreihenfolge auf den Aufklebern.
Tintenpatronen, bis sie hörbar einrasten.
Stellen Sie sicher, dass alle Anzeige für Tintenbehälter (Ink) rot leuchten.
2
. Stellen Sie sicher, dass die Taste zum Öffnen der
Tintenpatronenabdeckung (Tank Cover Open) (blau) nicht
Nach dem Einsetzen sollten die Tintenbehälter nicht unnötig wieder ausgebaut werden.•
leuchtet, und fahren Sie dann mit dem nächsten Schritt fort.
•
Wenn die Taste zum Öffnen der Tintenpatronenabdeckung (Tank Cover
Open) (blau) weiterhin leuchtet, überprüfen Sie, ob die Tintenpatronen
richtig eingesetzt wurden.
Installare tutti gli altri serbatoi d’inchiostro con la stessa procedura in base all’ordine di colore
1. Chiudere i coperchi dei serbatoi destro e sinistro finché non
indicato sull’etichetta.
scattano in posizione.
Assicurarsi che tutte le spie dell’inchiostro (Ink) si accendano e diventino rosse.
2
. Assicurarsi che il pulsante di apertura del coperchio del
serbatoio (Tank Cover Open) (blu) sia spento, quindi andare al
Una volta installati i serbatoi d’inchiostro, non rimuoverli se non in caso di effettiva necessità.•
passaggio successivo.
•
Se il pulsante di apertura del coperchio del serbatoio (Tank Cover Open)
(blu) rimane acceso, assicurarsi che i serbatoi d’inchiostro siano installati
correttamente.
11
1 2
3
B
A
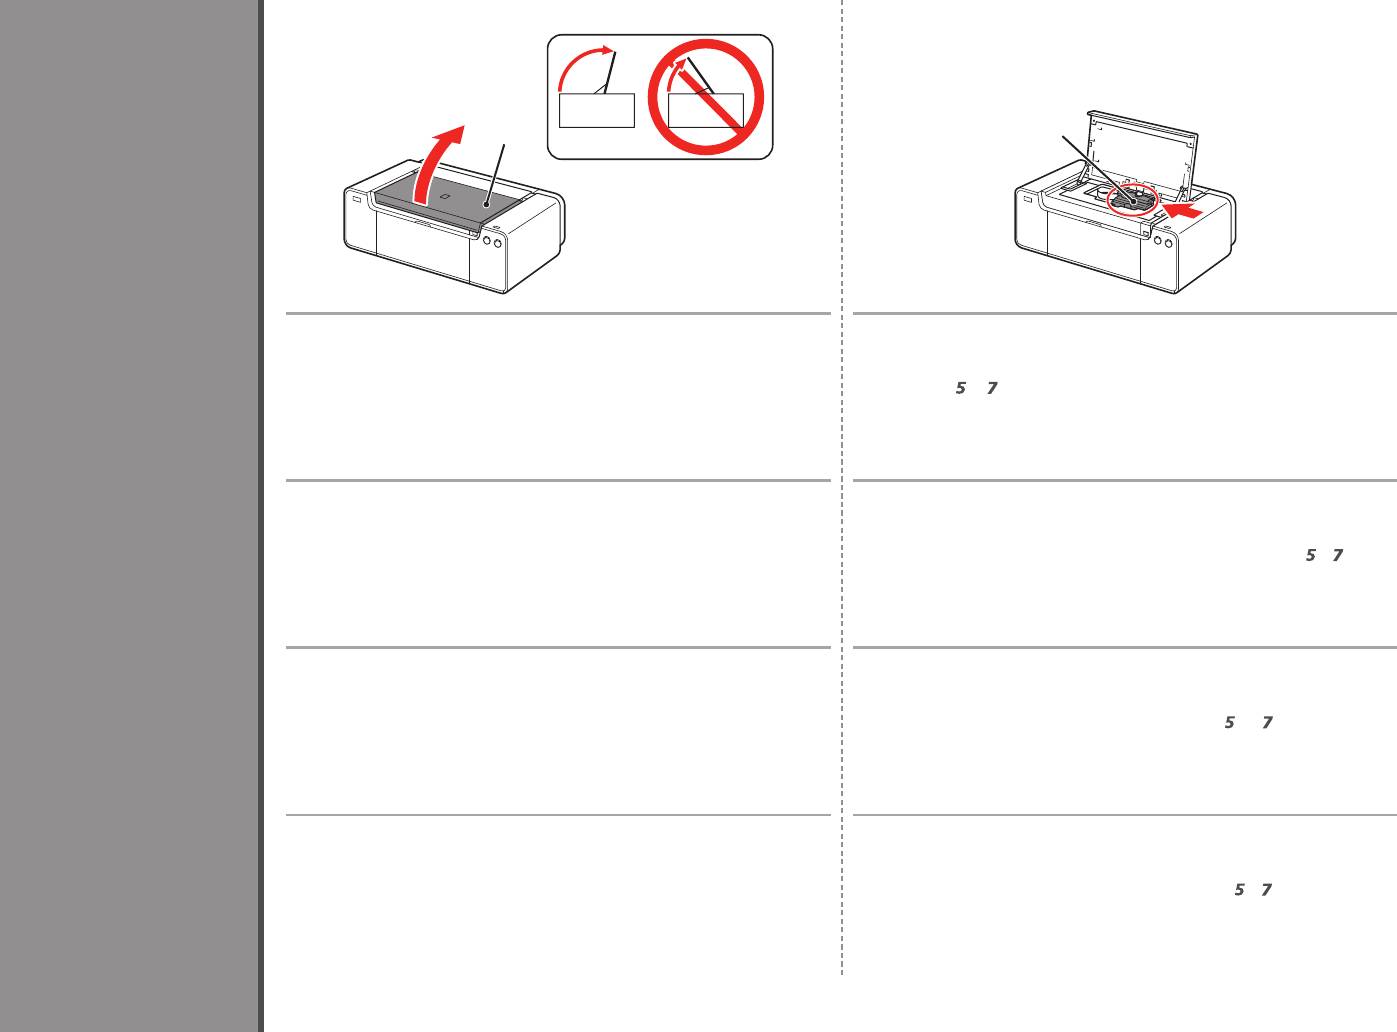
Open the Top Cover (A) completely. The Print Head Holder (B) moves to the installation position.
If the Print Head Holder does not move, make sure that the printer is turned on. For
details, refer to
to
on page 7 in "1 Preparation."
Ouvrez complètement le capot supérieur (A). Le support de tête d’impression (B) se place en position
Install the Print Head
d’installation.
Si le support de la tête d’impression ne se déplace pas, vérifiez que l’imprimante
est sous tension. Pour plus d’informations, reportez-vous aux étapes
à
de la
section « 1 Préparation », page 7.
Einbauen des Druckkopfs
Öffnen Sie die obere Abdeckung (A) vollständig. Der Druckkopfhalter (B) wird in die Installationsposition gefahren.
Wenn sich der Druckkopfhalter nicht bewegt, überprüfen Sie, ob der Drucker
eingeschaltet ist. Weitere Informationen finden Sie unter
bis
auf Seite 7 im
Abschnitt „1 Vorbereitung“.
Installation de la tête d’impression
Installazione della testina di stampa
Aprire completamente il coperchio superiore (A). Il supporto della testina di stampa (B) si sposta nella posizione di
installazione.
Se il supporto della testina di stampa non si sposta, assicurarsi di avere
acceso la stampante. Per ulteriori informazioni, vedere da
a
a pagina 7 in
“1 Preparazione”.
12
3 4
F
E
C
D
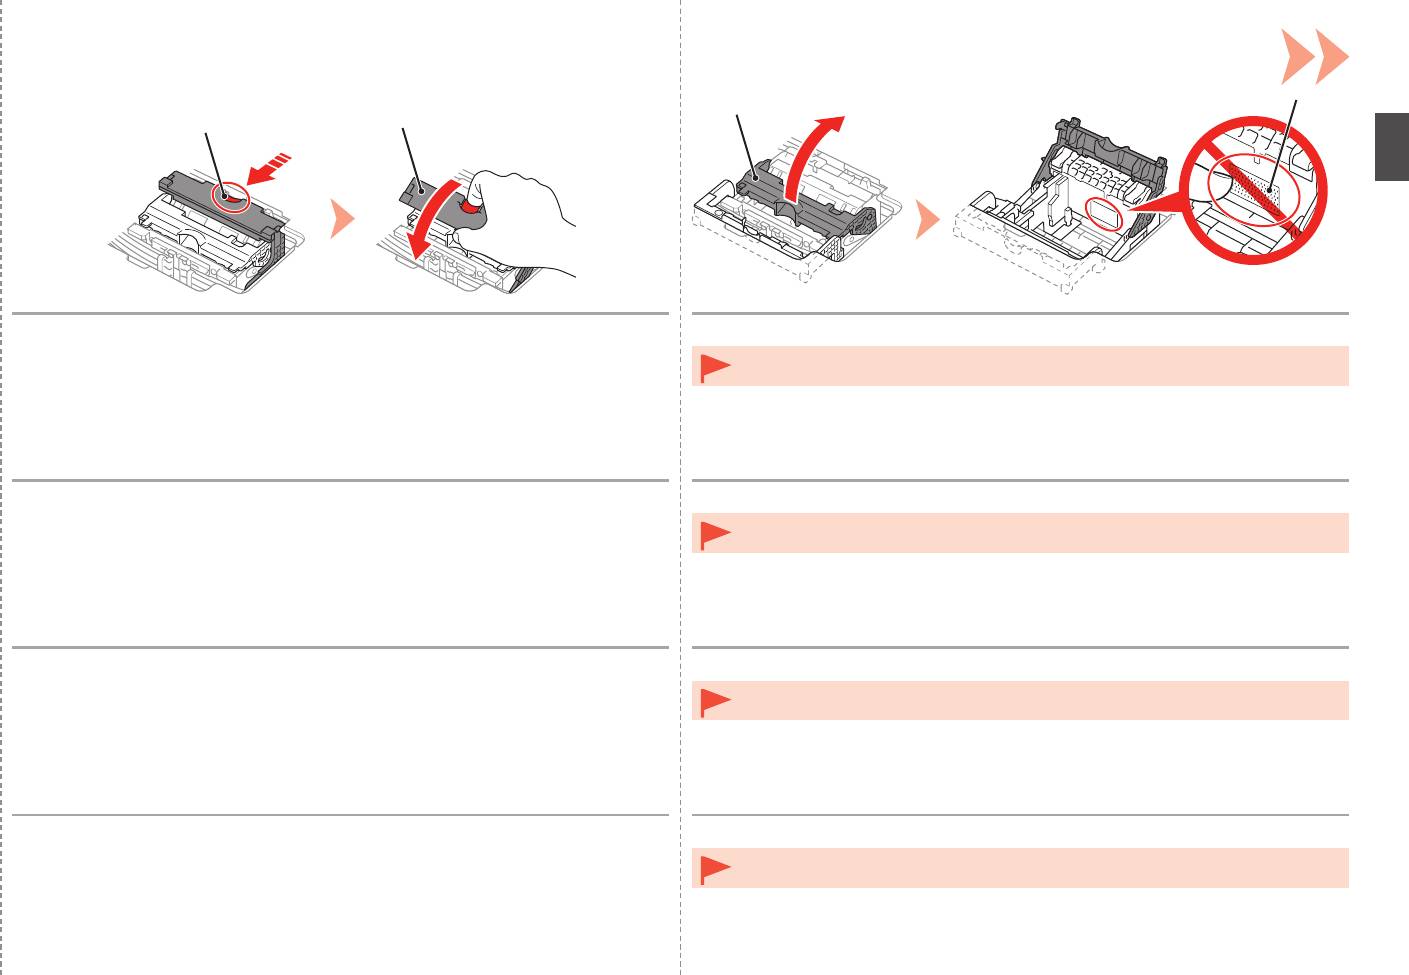
While pressing the Lock Button (C) in the direction of the arrow, open the Joint
Open the Print Head Lock Lever (2) (E) fully until it stops.
Lever (1) (D) forward.
•
Do not touch the inside of the Print Head Holder (F). The printer may not print properly if you
touch it.
Lorsque vous appuyez sur le bouton de verrouillage (C) dans le sens de la flèche,
Relevez le levier de verrouillage de la tête d’impression (2) (E) jusqu’à ce qu’il s’arrête.
relevez le levier mixte (1) (D) vers l’avant.
•
Ne touchez pas l’intérieur du support de tête d’impression (F). L’imprimante risque de ne pas
imprimer correctement si vous y touchez.
Drücken Sie die Taste für die Verriegelung (C) in Richtung des Pfeils, und öffnen
Öffnen Sie die Druckkopfverriegelung (2) (E) vollständig bis zum Anschlag.
Sie gleichzeitig den Winkelhebel (1) (D) nach vorn.
•
Vermeiden Sie jede Berührung der Komponenten im Inneren des Druckkopfhalters (F). Nach
einer Berührung druckt der Drucker unter Umständen nicht mehr einwandfrei.
Spingendo il pulsante di blocco (C) nella direzione della freccia, aprire la leva di
Aprire completamente la leva di bloccaggio della testina di stampa (2) (E) fino all’arresto.
collegamento (1) (D) spostandola in avanti.
•
Non toccare la parte interna del supporto della testina di stampa (F). In caso contrario, la
stampante potrebbe non stampare correttamente.
13
H
5
I
G
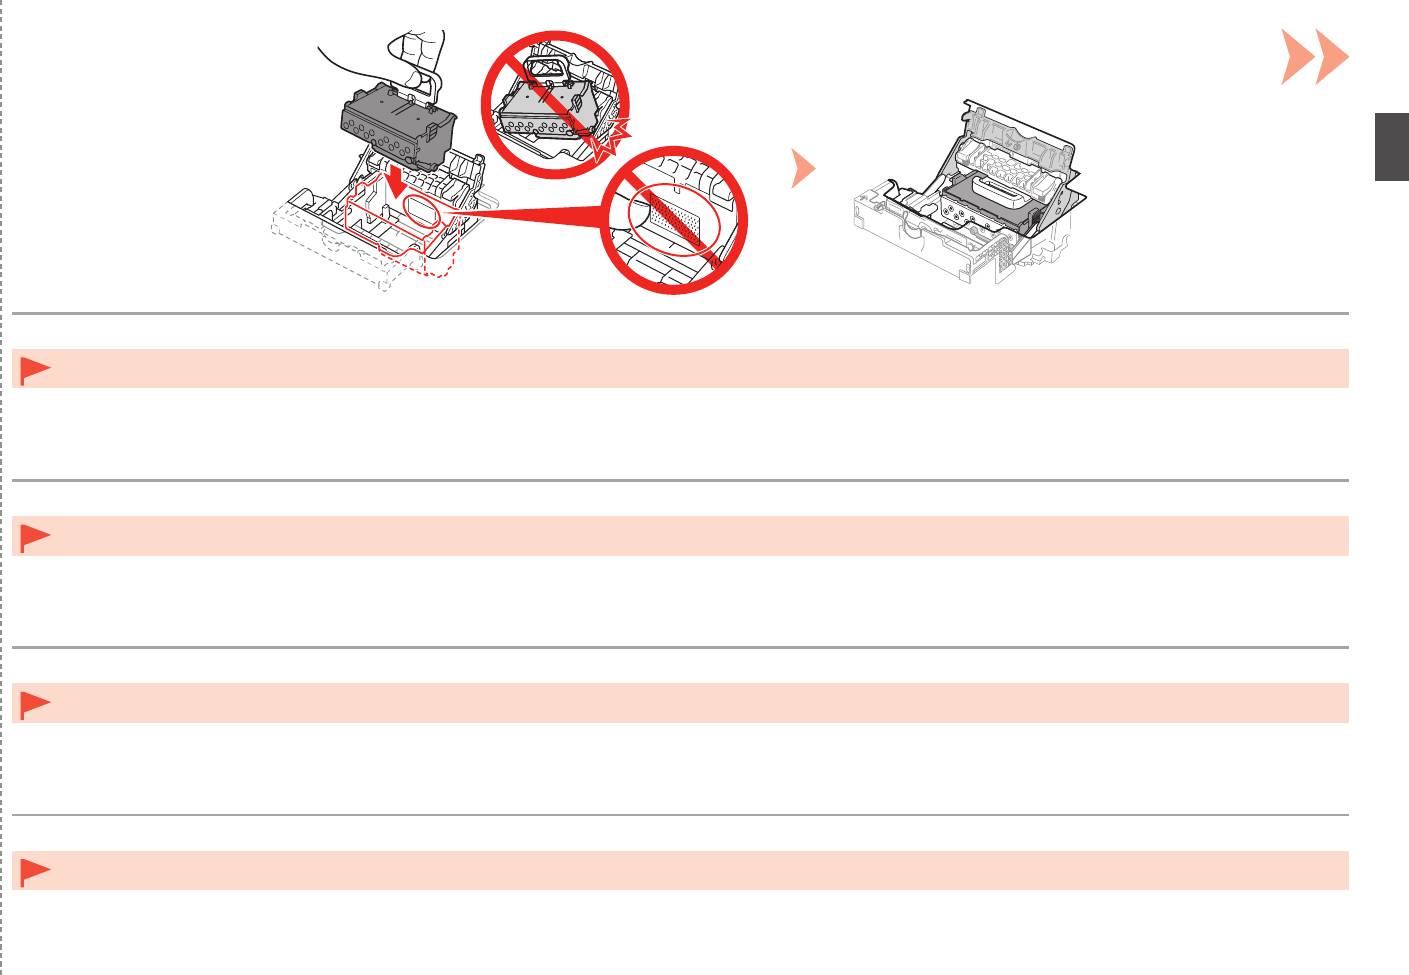
1. Remove the head case (G) from the silver package.
•
Handle the Print Head carefully. Do not drop or apply excessive pressure to it.
2. Remove the tape.
•
Do not touch the metal parts (I) of the Print Head. The printer may not print properly if you touch them.
3. Hold the blue handle and remove the Print Head (H).
•
There may be some transparent or light color ink on the inside of the bag the Print Head comes in - this has no
effect on print quality. Be careful not to get ink on yourself when handling these items.
1. Retirez le boîtier des têtes (G) de l’emballage argenté.
•
Manipulez la tête d’impression avec précaution. Ne la faites pas tomber et n’exercez pas une trop grande
2. Retirez le ruban.
pression dessus.
•
Ne touchez pas les parties métalliques (I) de la tête d’impression. L’imprimante risque de ne pas imprimer
3. Soulevez la poignée bleue et retirez la tête d’impression (H).
correctement.
•
Il peut y avoir de l’encre transparente ou claire à l’intérieur du sachet de la tête d’impression. Cela n’affecte pas
la
qualité d’impression. Veillez à ne pas mettre d’encre sur vous lors de la manipulation de ces éléments.
1. Entfernen Sie das Gehäuse für den Kopf (G) aus der silbernen
•
Behandeln Sie den Druckkopf vorsichtig. Lassen Sie ihn nicht fallen, und üben Sie keinen übermäßigen Druck
Verpackung.
auf ihn aus.
2
. Entfernen Sie das Klebeband.
•
Vermeiden Sie jede Berührung der Metallteile (I) des Druckkopfs. Nach einer Berührung druckt das Gerät unter
Umständen nicht mehr einwandfrei.
3. Halten Sie den blauen Henkel, und entfernen Sie den
•
Auf der Innenseite der Umverpackung, in der der Druckkopf geliefert wird, ist unter Umständen ein T
intenlm
Druckkopf (H).
in transparenter oder heller Farbe zu sehen. Dies hat keinen Einuss auf die Druckqualität. Achten Sie beim
Umgang mit Teilen der Tintenversorgung darauf, dass keine Tinte auf Ihre Kleidung gerät.
1. Rimuovere la custodia della testina (G) dalla confezione di colore
•
Maneggiare con cura la testina di stampa. Evitare di farla cadere o di applicarvi una pressione eccessiva.
argento.
•
Non toccare le parti in metallo (I) della testina di stampa. In caso contrario, la stampante potrebbe non stampare
2
. Rimuovere il nastro.
correttamente.
•
All’interno della confezione della testina di stampa è possibile che siano presenti tracce di inchiostro trasparente
3. Rimuovere la testina di stampa (H) afferrando la maniglia blu.
o di colore chiaro. Ciò non inuisce sulla qualità di stampa. Fare attenzione a non sporcarsi quando si
maneggiano tali elementi.
14
6
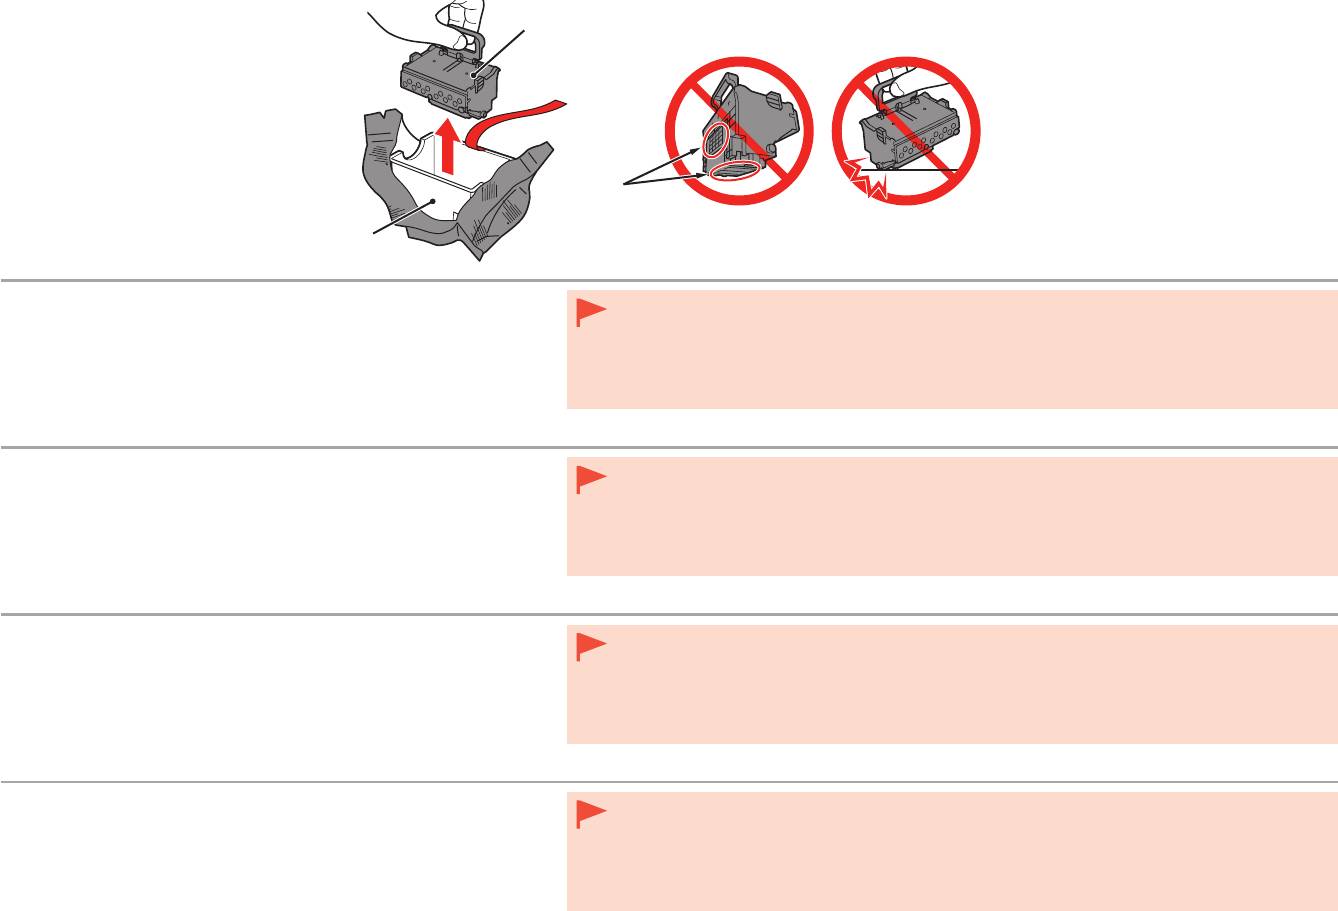
Insert the Print Head from straight above as shown to set it in place.
Do not knock the Print Head against the sides of the holder.•
Insérez la tête d’impression par le dessus pour la mettre en place comme illustré.
Ne heurtez pas la tête d’impression contre les côtés du support.•
Setzen Sie den Druckkopf von oben gerade wie dargestellt ein, um ihn anzubringen.
Achten Sie darauf, dass der Druckkopf nicht gegen die Seiten des Halters stößt.•
Per posizionare la testina di stampa, inserirla dall’alto come illustrato.
Non fare urtare la testina di stampa contro i lati del supporto.•
15
7
E
8
D
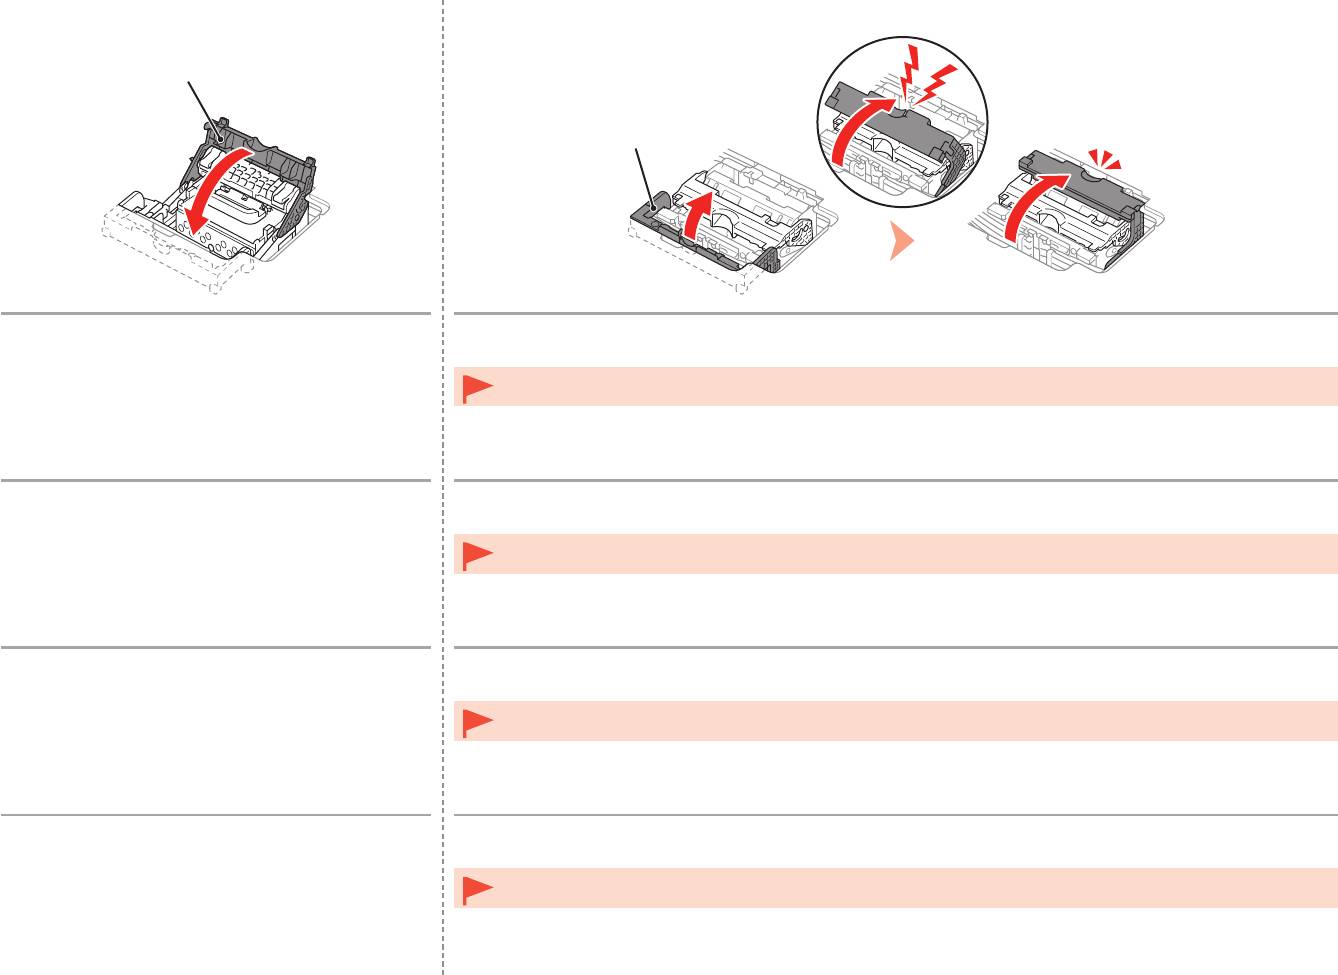
Lower the Print Head Lock Lever (3) (E).
Close the Joint Lever (4) (D) completely until it clicks.
The Joint Lever (4) may be tight and make a noise while being closed.
Once you have installed the Print Head, do not remove it unnecessarily.•
Abaissez complètement le levier de verrouillage
Abaissez le levier mixte (4) (D) complètement jusqu’à ce qu’il se mette en place.
de la tête d’impression (3) (E).
Le levier mixte (4) peut être très serré et faire du bruit lorsque vous l’abaissez.
Une fois la tête d’impression installée, ne la retirez que lorsque c’est absolument nécessaire.•
Senken Sie die Druckkopfverriegelung (3) (E).
Schließen Sie den Winkelhebel (4) (D) vollständig, bis er hörbar einrastet.
Möglicherweise ist der Winkelhebel (4) sehr straff und gibt Geräusche von sich, wenn er geschlossen ist.
Nach dem Einsetzen sollte der Druckkopf nicht unnötig wieder ausgebaut werden.•
Abbassare completamente la leva di bloccaggio della
Chiudere completamente la leva di collegamento (4) (D) finché non scatta in posizione.
testina di stampa (3) (E).
Quando viene chiusa, la leva di collegamento (4) potrebbe opporre resistenza ed emettere un rumore.
Una volta installata la testina di stampa, non rimuoverla se non in caso di effettiva necessità.•
16
9
1
2
L K
J
1. Install the Head Cover (J).
•
If the Alarm lamp (orange) (L) ashes, make sure that the Print Head Lock Lever is closed
2. Close the Top Cover.
correctly. Open the Joint Lever and Print Head Lock Lever, then start again from
.
•
When the printer is turned on for the rst time, ink is used to ready the printer for printing. The
3. W
ait for about 20 minutes until the POWER lamp (white) (K) stops flashing and
remaining ink level can be checked from the printer driver (Windows) or Canon IJ Printer Utility
stays lit, then proceed to the next step.
(Mac) after software installation.
T
his operation is required to make the printer ready for use. Do not turn off the
printer until the POWER lamp stays lit.
The printer may make some operating noises when preparing to print. This is normal operation.
1. Installez le capot des têtes (J).
•
Si le voyant Alarme (Alarm) (orange) (L) clignote, vériez que le levier de verrouillage de tête
2. Fermez le capot supérieur.
d’impression est correctement abaissé. Relevez le levier mixte et le levier de verrouillage de
tête d’impression, puis reprenez à partir de l’étape
.
3. A
ttendez environ 20 minutes que le voyant ALIMENTATION (POWER) (blanc)
•
Lorsque vous mettez l’imprimante sous tension pour la première fois, de l’encre est utilisée
(K) cesse de clignoter et reste allumé, puis passez à l’étape suivante.
pour la préparer à l’impression. Vous pouvez vérier le niveau d’encre restant à partir du pilote
C
ette opération est nécessaire pour préparer l’imprimante. Ne mettez pas
d’imprimante (Windows) ou Canon IJ Printer Utility (Mac) après avoir installé le logiciel.
l’imprimante hors tension tant que le voyant ALIMENTATION (POWER) ne
L’imprimante peut émettre des bruits de fonctionnement lorsqu’elle se prépare à imprimer. Ceci est
reste pas allumé.
normal.
1. Bringen Sie die Abdeckung für den Kopf (J) an.
•
Wenn die Alarm-Anzeige (orange) (L) blinkt, überprüfen Sie, ob der Sperrhebel für den
2. Schließen Sie die obere Abdeckung.
Druckkopf ordnungsgemäß geschlossen ist. Öffnen Sie den Winkelhebel und den Sperrhebel
für den Druckkopf, und
beginnen Sie erneut bei
.
3. W
arten Sie etwa 20 Minuten, bis die POWER-Lampe (weiß) (K) nicht mehr
•
Beim ersten Einschalten des Druckers wird Tinte verbraucht, um den Drucker auf das Drucken
blinkt, sondern kontinuierlich leuchtet, und fahren Sie dann mit dem nächsten
vorzubereiten.
Der verbleibende Tintenstand kann über den Druckertreiber (Windows) oder das
Schritt fort.
Canon IJ Printer Utility (Mac) nach der Softwareinstallation überprüft werden.
D
ieser Vorgang ist erforderlich, um den Drucker einsatzbereit zu machen.
Während der Vorbereitung auf das Drucken gibt der Drucker möglicherweise Betriebsgeräusche von
Schalten Sie den Drucker erst aus, wenn die POWER-Anzeige
sich. Dies ist vollkommen normal.
kontinuierlich leuchtet.
1. Installare il coperchio della testina (J).
•
Se la spia di Allarme (Alarm) (arancione) (L) lampeggia, assicurarsi che la leva di bloccaggio
2. Chiudere il coperchio superiore.
della testina di stampa sia chiusa correttamente. Aprire la leva di collegamento e la leva di
bloccaggio della testina di stampa, quindi ricominciare da
.
3. A
ttendere circa 20 minuti finché la spia ALIMENTAZIONE (POWER) (bianca)
•
Quando la stampante viene accesa per la prima volta, viene utilizzato inchiostro per prepararla
(K) non lampeggia più e rimane fissa, quindi andare al passaggio successivo.
alla stampa. È possibile controllare il livello dell’inchiostro rimasto dal driver della stampante
Q
uesta operazione è necessaria per rendere la stampante pronta per l’uso.
(Windows) o dalla Canon IJ Printer Utility (Mac) dopo l’installazione del software.
Non spegnere la stampante fino a quando la spia ALIMENTAZIONE
La stampante potrebbe emettere rumori durante la preparazione alla stampa. Tali rumori fanno parte
(POWER) rimane accesa.
del normale funzionamento della stampante.
17


