Canon pixma pro-1 – страница 2
Инструкция к Струйному Принтеру Canon pixma pro-1
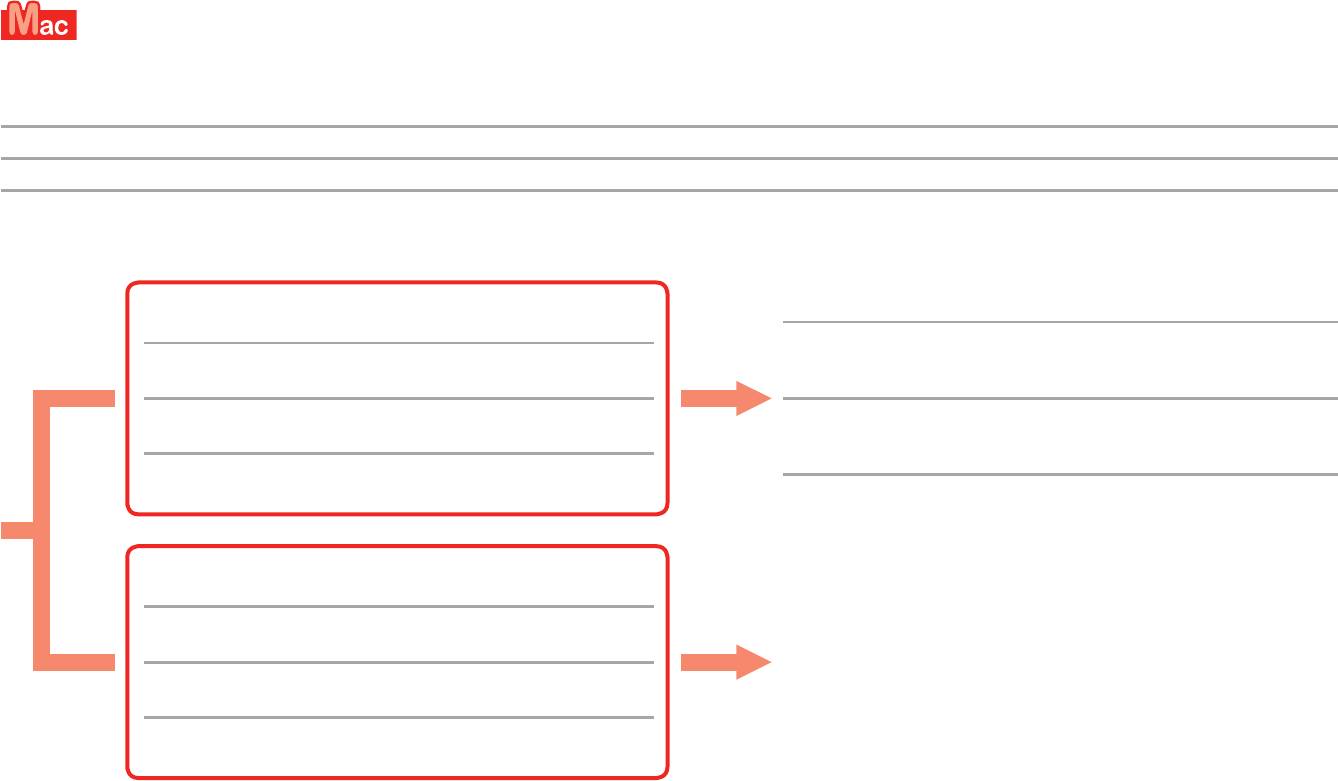
Оглавление
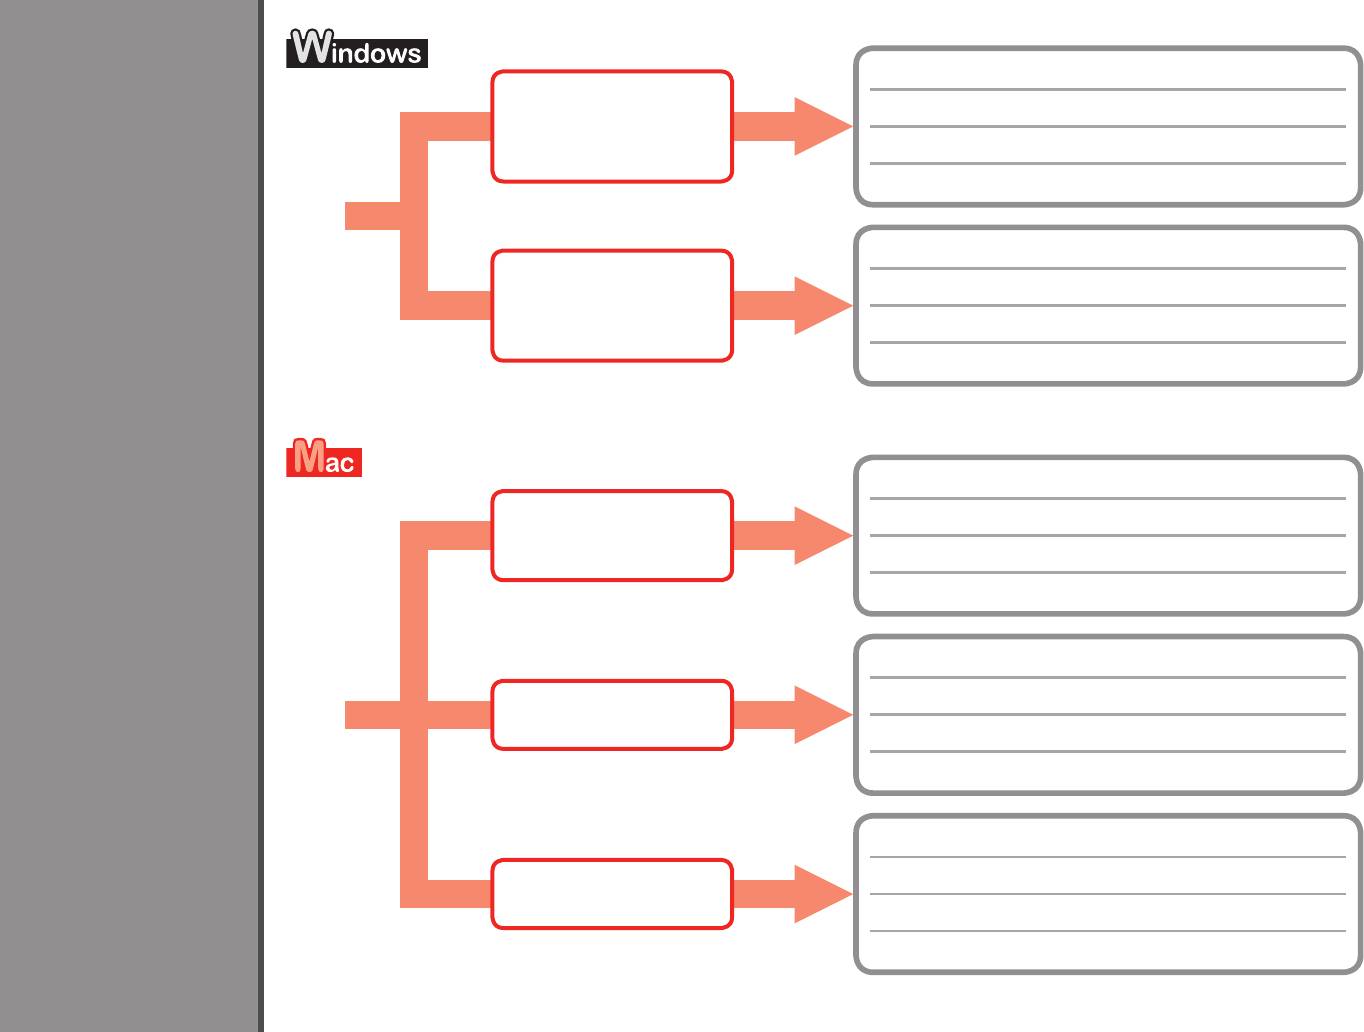
Go to Page 24 to install.
Windows XP SP3
4
Passez à la page 24 pour effectuer l’installation.
Windows Vista SP1
Windows 7
Fahren Sie für die Installation mit Seite 24 fort.
Windows 8
Vedere a pagina 24 per installare.
Go to Page 19 to install.
Windows XP
Passez à la page
19 pour effectuer l’installation.
Windows XP SP1
Windows XP SP2
Fahren Sie für die Installation mit Seite 19 fort.
Windows Vista
Vedere a pagina 19 per installare.
Go to Page 24 to install.
Softwareinstallation
Software Installation
Mac OS X v10.6.8
Passez à la page
24 pour effectuer l’installation.
Installation du logiciel
Mac OS X v10.7
Mac OS X v10.8
Fahren Sie für die Installation mit Seite 24 fort.
Installazione del software
Vedere a pagina 24 per installare.
Go to Page 21 to install.
Passez à la page
21 pour effectuer l’installation.
Mac OS X
v10.6 - v10.6.7
Fahren Sie für die Installation mit Seite 21 fort.
Vedere a pagina 21 per installare.
Go to Page 22 to install.
Passez à la page
22 pour effectuer l’installation.
Mac OS X
v10.4.11 - v10.5
Fahren Sie für die Installation mit Seite 22 fort.
Vedere a pagina 22 per installare.
18
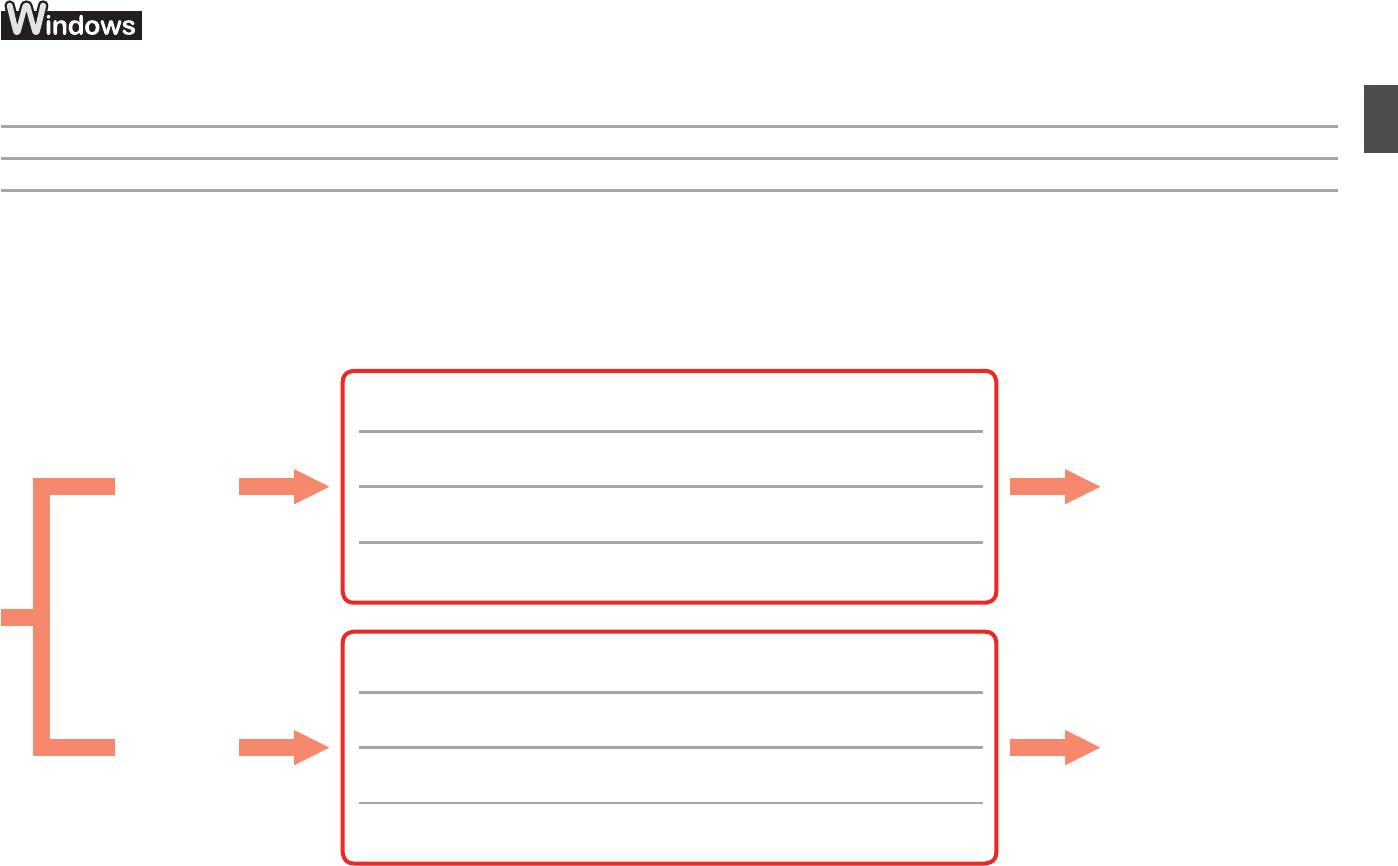
For Windows XP/Windows XP SP1/Windows XP SP2/Windows Vista
Sous Windows XP/Windows XP SP1/Windows XP SP2/Windows Vista
Für Windows XP/Windows XP SP1/Windows XP SP2/Windows Vista
Per Windows XP/Windows XP SP1/Windows XP SP2/Windows Vista
It is recommended that you upgrade to Windows XP SP3 or Windows Vista SP1 or later by applying a Windows service pack.
Nous vous recommandons d’effectuer une mise à niveau vers Windows XP SP3 ou Windows Vista SP1 ou une version ultérieure en appliquant un Service Pack Windows.
Es wird empfohlen, dass Sie auf Windows XP SP3 oder Windows Vista SP1 oder höher aktualisieren, indem Sie ein Windows-Servicepack verwenden.
Si consiglia di eseguire l’aggiornamento a Windows XP SP3 o Windows Vista SP1 o versione successiva applicando un service pack Windows.
Do you prefer to apply a Windows service pack?
Préférez-vous appliquer un Service Pack Windows ?
Möchten Sie ein Windows-Servicepack verwenden?
Applicare un service pack Windows?
After upgrading, perform the installation by following the procedure on and after
page 24.
Yes
Après la mise à niveau, effectuez l’installation en suivant la procédure indiquée
Go to page 24
Oui
page
24 et suivantes.
Passez à la page 24
Ja
Nach der Aktualisierung führen Sie die Installation gemäß den Anweisungen ab
Fahren Sie mit Seite 24 fort
Sì
Seite 24 durch.
Vai alla pagina 24
Al termine dell’aggiornamento, eseguire l’installazione seguendo la procedura a
pagina 24 e in quelle successive.
Install the software (the printer driver and IJ Network Tool) stored on the Setup
CD-ROM.
No
Installez les logiciels (le pilote d’imprimante et IJ Network Tool) enregistrés sur le
Go to page 20
Non
CD-ROM d’installation.
Passez à la page
20.
Nein
Installieren Sie die Software (den Druckertreiber und IJ Network Tool), die sich auf
Fahren Sie mit Seite 20 fort
No
der Installations-CD-ROM (Setup CD-ROM) bendet.
Vai alla pagina 20
Installare il software (il driver della stampante e IJ Network Tool) memorizzato sul
CD-ROM di installazione (Setup CD-ROM).
19
For Windows XP/Windows XP SP1/Windows XP SP2/Windows Vista
Sous Windows XP/Windows XP SP1/Windows XP SP2/Windows Vista
Für Windows XP/Windows XP SP1/Windows XP SP2/Windows Vista
Per Windows XP/Windows XP SP1/Windows XP SP2/Windows Vista
If you prefer not to apply a Windows service pack, install the printer driver and IJ Network Tool by
Si vous préférez ne pas appliquer un Service Pack Windows, installez le pilote d’imprimante et IJ
following the procedure below.
Network Tool en suivant la procédure ci-dessous.
1. Insert the Setup CD-ROM into the computer's CD-ROM drive.
1. Insérez le CD-ROM d’installation dans le lecteur de CD-ROM de l’ordinateur.
2. If an error message prompting you to update the Windows service pack and try
2. Si un message d’erreur vous invitant à mettre à jour le Service Pack Windows
again appears, close the message screen.
et à réessayer s’affiche, fermez l’écran du message.
3
. For Windows XP
3
. Sous Windows XP
Select My Computer from the Start menu.
Sélectionnez Poste de travail dans le menu Démarrer.
For Windows Vista
Sous Windows Vista
Select Computer from the Start menu.
Sélectionnez Ordinateur dans le menu Démarrer.
4
. Right-click the CD-ROM icon, then select Open.
4
. Cliquez avec le bouton droit sur l’icône de CD-ROM, puis sélectionnez Ouvrir.
5
. Open the win > Driver > DrvSetup folder, then double-click SETUP.EXE.
5
. Ouvrez le dossier win > Driver > DrvSetup, puis double-cliquez sur SETUP.EXE.
6
. After the installation, open the printer driver setup window, then click Print
6
. Après l’installation, ouvrez la fenêtre de configuration du pilote d’imprimante,
Head Alignment on the Maintenance tab.
puis cliquez sur Alignement tête d’impression dans l’onglet Entretien.
Use the supplied MP-101 for Print Head Alignment.
Utilisez le papier MP-101 fourni pour l’alignement de la tête d’impression.
Wenn Sie kein Windows-Servicepack verwenden möchten, installieren Sie den Druckertreiber und
Se si preferisce non applicare un service pack Windows, installare il driver della stampante e IJ
das IJ Network Tool anhand der folgenden Schritte:
Network Tool attenendosi alla procedura illustrata di seguito.
1. Legen Sie die Installations-CD-ROM (Setup CD-ROM) in das CD-ROM-
1. Inserire il CD-ROM di installazione (Setup CD-ROM) nell’unità CD-ROM del
Laufwerk des Computers ein.
computer.
2
. Wenn eine Fehlermeldung erscheint, die zur Aktualisierung des Windows-
2
. Se viene visualizzato un messaggio di errore con la richiesta di aggiornare il
Servicepacks und zu einem erneuten Versuch auffordert, schließen Sie den
service pack Windows e di riprovare, chiudere la finestra del messaggio.
Benachrichtigungsbildschirm.
3
. Per Windows XP
3
. Bei Windows XP
Selezionare Risorse del computer (My Computer) dal menu Start.
Wählen Sie Arbeitsplatz (My Computer) aus dem Start-Menü aus.
Per Windows Vista
Bei Windows Vista
Selezionare Computer dal menu Start.
Wählen Sie Computer aus dem Start-Menü aus.
4
. Fare clic con il pulsante destro del mouse sull’icona del CD-ROM, quindi
4
. Klicken Sie mit der rechten Maustaste auf das CD-ROM-Symbol und wählen Sie
selezionare Apri (Open).
Öffnen (Open).
5
. Aprire la cartella win > Driver > DrvSetup, quindi fare doppio clic su SETUP.
5
. Öffnen Sie unter win > Driver > DrvSetup-Ordner und doppelklicken Sie dann
EXE.
auf SETUP.EXE.
6
. Al termine dell’installazione, aprire la finestra di configurazione del driver della
6
. Öffnen Sie nach der Installation den Druckertreiber Druckkopfausrichtung
stampante, quindi fare clic su Allineamento testina di stampa (Print Head
(Print Head Alignment) auf der Registerkarte Wartung (Maintenance).
Alignment) nella scheda Manutenzione (Maintenance).
Verwenden Sie das mitgelieferte MP-101 für die Ausrichtung des Druckkopfs.
Utilizzare la carta MP-101 in dotazione per l’allineamento della testina di
stampa.
20
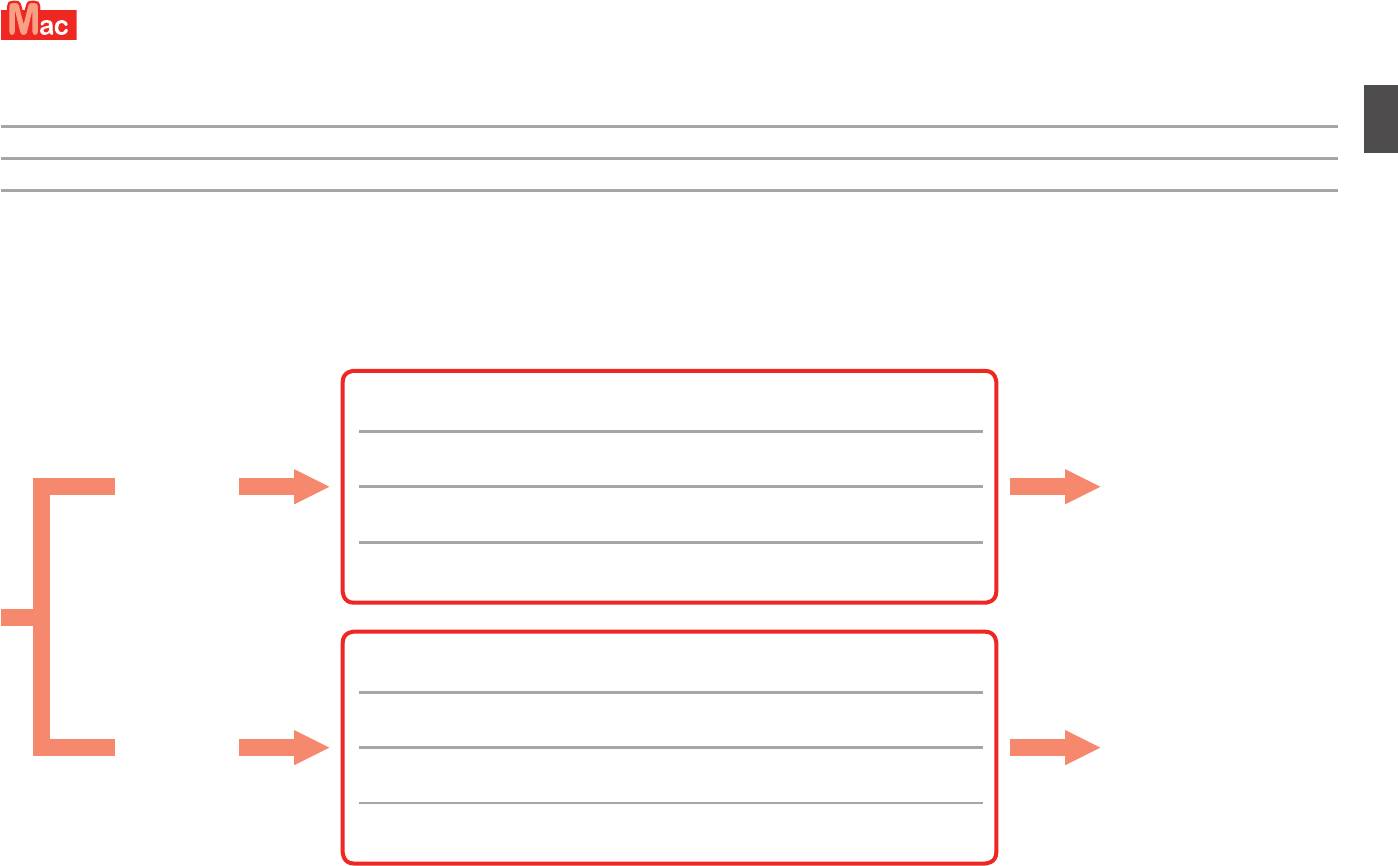
For Mac OS X v10.6 to v10.6.7
Sous Mac OS X v10.6 à v10.6.7
Für Mac OS X v10.6 bis v10.6.7
Per Mac OS X v10.6 a v10.6.7
It is recommended that you upgrade to Mac OS X v10.6.8 by applying a Mac OS software update.
Nous vous recommandons d’effectuer une mise à niveau vers Mac OS X v10.6.8 en appliquant une mise à jour du logiciel Mac OS.
Es wird empfohlen, dass Sie auf Mac OS X v10.6.8 aktualisieren, indem Sie eine Mac OS-Softwareaktualisierung verwenden.
Si consiglia di eseguire l’aggiornamento a Mac OS X v10.6.8 applicando un aggiornamento software Mac OS.
Do you prefer to apply a Mac OS software update?
Préférez-vous appliquer une mise à jour du logiciel Mac OS ?
Möchten Sie eine Mac OS-Softwareaktualisierung verwenden?
Applicare un aggiornamento software Mac OS?
After upgrading, perform the installation by following the procedure on and after
page 24.
Yes
Après la mise à niveau, effectuez l’installation en suivant la procédure indiquée
Go to page 24
Oui
page
24 et suivantes.
Passez à la page 24
Ja
Nach der Aktualisierung führen Sie die Installation gemäß den Anweisungen ab
Fahren Sie mit Seite 24 fort
Sì
Seite 24 durch.
Vai alla pagina 24
Al termine dell’aggiornamento, eseguire l’installazione seguendo la procedura a
pagina 24 e in quelle successive.
Perform the installation using the same method as Mac OS X v10.4.11 to v10.5.
No
Effectuez l’installation en utilisant la même méthode qu’avec Mac OS X v10.4.11 à
Go to page 22
Non
v10.5.
Passez à la page
22
Nein
Führen Sie die Installation gemäß den Anwendungen für Mac OS X v10.4.11 bis
Fahren Sie mit Seite 22 fort
No
v10.5 durch.
Vai alla pagina 22
Eseguire l’installazione utilizzando lo stesso metodo di Mac OS X v10.4.11 a
v10.5.
21
For Mac OS X v10.4.11 to v10.5
Sous Mac OS X v10.4.11 à v10.5
Für Mac OS X v10.4.11 bis v10.5
Per Mac OS X v10.4.11 a v10.5
Perform the installation by following one of the methods below.
Effectuez l’installation en suivant l’une des méthodes ci-dessous.
Führen Sie die Installation gemäß einer der folgenden Anweisungen durch.
Eseguire l’installazione utilizzando uno dei metodi sottostanti.
Perform the installation by referring to "PRO-1 series Support Guide" on
the Canon support page (canon.com/support).
Install the software downloaded from the Internet
Effectuez l’installation en vous reportant au « Guide d’assistance PRO-1
Installez le logiciel téléchargé sur Internet.
series » sur la page d’assistance Canon (canon.com/support).
Installieren Sie die im Internet heruntergeladene Software Führen Sie die Installation gemäß dem “PRO-1 series Support-
Handbuch” auf der Canon Supportseite durch (canon.com/support).
Installare il software scaricato da Internet
Per eseguire l’installazione, fare riferimento a “Manuale di assistenza
PRO-1 series” nella pagina di assistenza Canon (canon.com/support).
Install the software (the printer driver and IJ Network Tool) stored
on the CD-ROM.
Installez les logiciels (le pilote d’imprimante et IJ Network Tool)
Go to page 23
enregistrés sur le CD-ROM.
Passez à la page
23
Installieren Sie die Software (den Druckertreiber und IJ Network
Fahren Sie mit Seite 23 fort
Tool), die sich auf der CD-ROM bendet.
Vai alla pagina 23
Installare il software (il driver della stampante e IJ Network Tool)
memorizzato sul CD-ROM di installazione.
22

For Mac OS X v10.4.11 to v10.5
Sous Mac OS X v10.4.11 à v10.5
Für Mac OS X v10.4.11 bis v10.5
Per Mac OS X v10.4.11 a v10.5
Install the software (the printer driver and IJ Network Tool) stored on the Setup CD-ROM by
Installez les logiciels (le pilote d’imprimante et IJ Network Tool) enregistrés sur le CD-ROM
following 1 to 3 below.
d’installation en suivant les étapes 1 à 3 ci-dessous.
1. Insert the Setup CD-ROM into the computer's CD-ROM drive.
1. Insérez le CD-ROM d’installation dans le lecteur de CD-ROM de l’ordinateur.
2. Open the Mac OS X 10.4.11 - 10.6.7 folder.
2. Ouvrez le dossier Mac OS X 10.4.11 - 10.6.7.
Install the software suitable for your operating system.
Installez les logiciels adaptés à votre système d’exploitation.
3
. After the installation, perform Print Head Alignment.
3
. Après l’installation, effectuez l’alignement de la tête d’impression.
For details, refer to Manual.html in the Manual folder in the Mac OS X 10.4.11
Pour plus de détails, reportez-vous au fichier Manual.html dans le dossier
- 10.6.7 folder.
Manual du dossier Mac OS X 10.4.11 - 10.6.7.
Installieren Sie die Software (den Druckertreiber und IJ Network Tool), die sich auf der
Installare il software (il driver della stampante e IJ Network Tool) memorizzato sul CD-ROM di
Installations-CD-ROM (Setup CD-ROM) bendet, indem Sie die im folgenden aufgeführten Schritte
installazione (Setup CD-ROM) seguendo i passaggi da 1 a 3 sottostanti.
1 bis 3 befolgen.
1. Legen Sie die Installations-CD-ROM (Setup CD-ROM) in das CD-ROM-
1. Inserire il CD-ROM di installazione (Setup CD-ROM) nell’unità CD-ROM del
Laufwerk des Computers ein.
computer.
2
. Öffnen Sie den Ordner Mac OS X 10.4.11 – 10.6.7.
2
. Aprire la cartella Mac OS X 10.4.11 - 10.6.7.
Installieren Sie die für Ihr Betriebssystem geeignete Software.
Installare il software adatto per il sistema operativo in uso.
3
. Führen Sie die nach der Installation eine Ausrichtung des Druckkopfs durch.
3
. Al termine dell’installazione, eseguire l’allineamento della testina di stampa.
Weitere Informationen finden Sie unter Manual.html im Ordner Manual im
Per ulteriori informazioni, vedere Manual.html nella cartella Manual all’interno
Ordner Mac OS X 10.4.11 – 10.6.7.
della cartella Mac OS X 10.4.11 - 10.6.7.
23
To use the printer by connecting it to a computer, software
Do not connect the USB
Easy-WebPrint EX
including the drivers needs to be copied (installed) to the
Easy-WebPrint EX is Web print software that is installed
computer's hard disk. The installation process takes about
cable yet.
on the computer when installing the supplied software.
20 minutes. (The installation time varies depending on the
Internet Explorer 7, 8, or 9 (Windows) is required to use this
computer environment or the number of application software to
software.
Easy-WebPrint EX for Internet Explorer 9 needs to be
be installed.)
downloaded from the Internet.
An Internet connection is required for installation.
Pour utiliser l’imprimante en la connectant à un ordinateur, il
Ne branchez pas encore
Easy-WebPrint EX
convient de copier (installer) le logiciel, y compris les pilotes,
Easy-WebPrint EX est un logiciel d’impression Web qui
sur le disque dur de l’ordinateur. Le processus d’installation
le câble USB.
est installé sur l’ordinateur en même temps que le logiciel
prend environ 20 minutes. (La durée de l’installation varie selon
f
ourni. Internet Explorer 7, 8 ou 9 (Windows) est requis pour
l’environnement informatique et le nombre d’applications à
utiliser ce logiciel.
Vous devez télécharger Easy-WebPrint EX pour Internet
installer.)
E
xplorer 9 sur Internet.
Vous devrez vous connecter à Internet pour l’installation.
Um den Drucker über einen Computer zu verwenden, muss
Schließen Sie das USB-
Easy-WebPrint EX
die Software einschließlich der Treiber auf die Festplatte des
Bei Easy-WebPrint EX handelt es sich um die
Computers kopiert (installiert) werden. Der Installationsvorgang
Kabel noch nicht an.
Webdrucksoftware, die bei der Installation der mitgelieferten
nimmt ca. 20 Minuten in Anspruch. (Die Installationsdauer
Software auf Ihrem Computer installiert wird. Für die
hängt von der Computerumgebung sowie der Anzahl der zu
Verwendung dieser Software ist Internet Explorer 7, 8 oder 9
(Windows) erforderlich.
installierenden Anwendungen ab.)
Easy-WebPrint EX für Internet Explorer 9 muss im Internet
heruntergeladen werden.
Für die Installation ist eine Internetverbindung erforderlich.
Per utilizzare la stampante collegata a un computer, è
Non collegare ancora il
Easy-WebPrint EX
necessario installare il software, inclusi i driver, nel disco rigido
Easy-WebPrint EX è un software di stampa Web che viene
del computer. Il processo di installazione richiede circa 20
cavo USB.
installato nel computer insieme al software fornito. Per
minuti. (La durata dell’installazione varia a seconda
utilizzare questo software è necessario disporre di Internet
dell’ambiente del computer o del numero di applicazioni da
Explorer 7, 8 o 9 (Windows).
Scaricare da Internet Easy-WebPrint EX per Internet
installare.)
Explorer 9.
P
er eseguire l’installazione, è necessario disporre di una
connessione a Internet.
24
BA
1
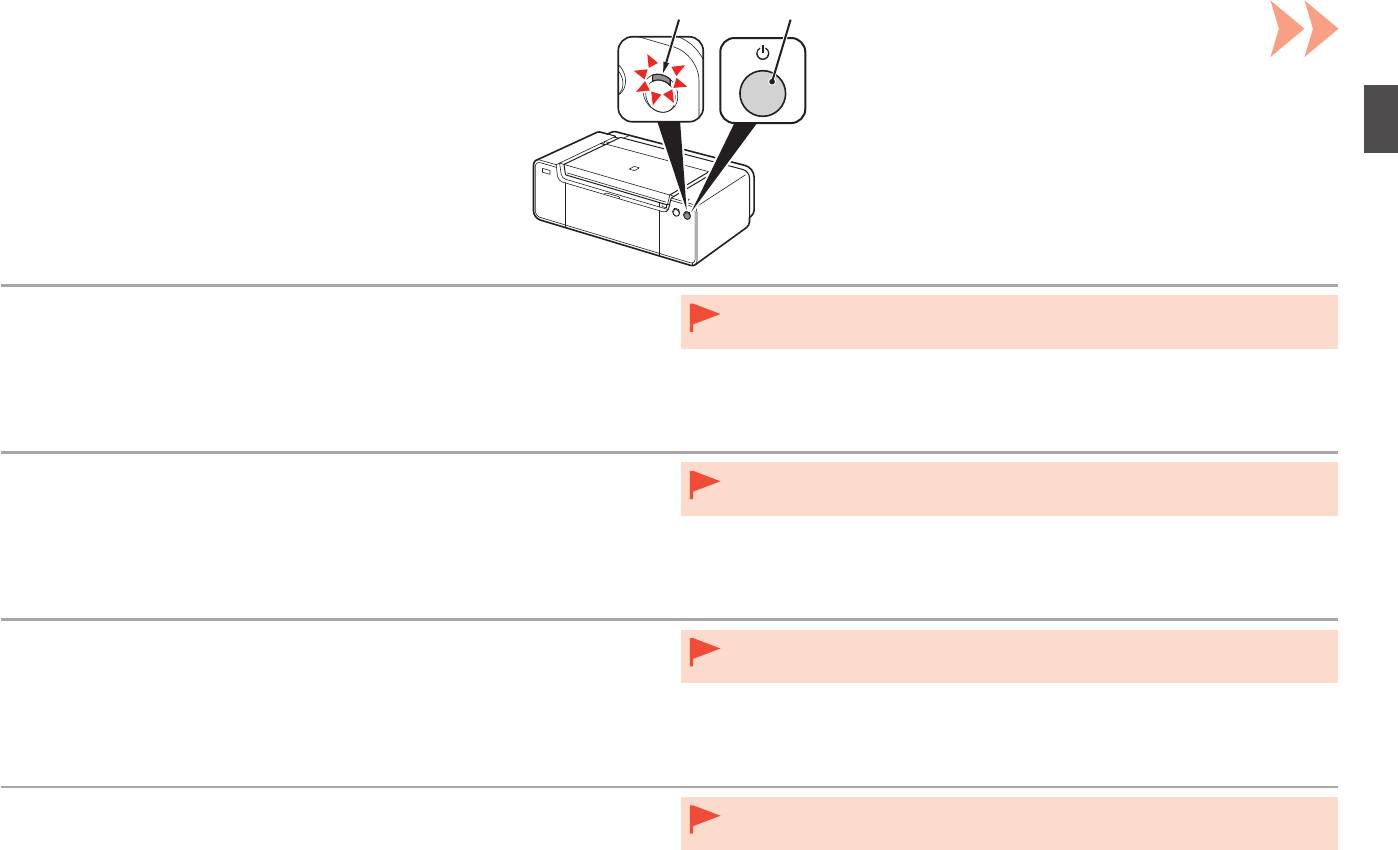
1. Make sure that the POWER lamp (white) (A) is lit.
•
Do not connect the printer to the computer with the USB cable yet. If it is already connected,
2. Press the ON button (B) to TURN OFF THE PRINTER.
disconnect the USB cable from the computer.
Operating noise may continue for up to 60 seconds until the printer turns off.
1. Vérifiez que le voyant ALIMENTATION (POWER) (blanc) (A) est allumé.
•
Ne branchez pas encore l’imprimante à l’ordinateur à l’aide du câble USB. S’il est déjà
2. Appuyez sur le bouton MARCHE (ON) (B) POUR METTRE L’IMPRIMANTE
branché, déconnectez le câble USB de l’ordinateur.
HORS TENSION.
Le bruit de fonctionnement peut rester audible pendant 60 secondes, jusqu’à ce que l’imprimante
soit hors tension.
1. Stellen Sie sicher, dass die POWER-Anzeige (weiß) (A) leuchtet.
•
Schließen Sie den Drucker noch nicht mit dem USB-Kabel an den Computer an. Wenn Sie das
2. Drücken Sie die Taste EIN (ON) (B), um DEN DRUCKER AUSZUSCHALTEN.
USB-Kabel bereits angeschlossen haben, ziehen Sie es vom Computer ab.
Die Betriebsgeräusche können bis zu 60 Sekunden andauern, bis sich der Drucker ausschaltet.
1. Assicurarsi che la spia ALIMENTAZIONE (POWER) (bianca) (A) sia accesa.
•
Non collegare ancora la stampante al computer con il cavo USB. Se è già collegato, scollegare
2. Premere il pulsante ON (B) per SPEGNERE LA STAMPANTE.
il cavo USB dal computer.
La stampante potrebbe continuare a emettere i rumori di funzionamento per un massimo di
60 secondi, fino allo spegnimento.
25
2
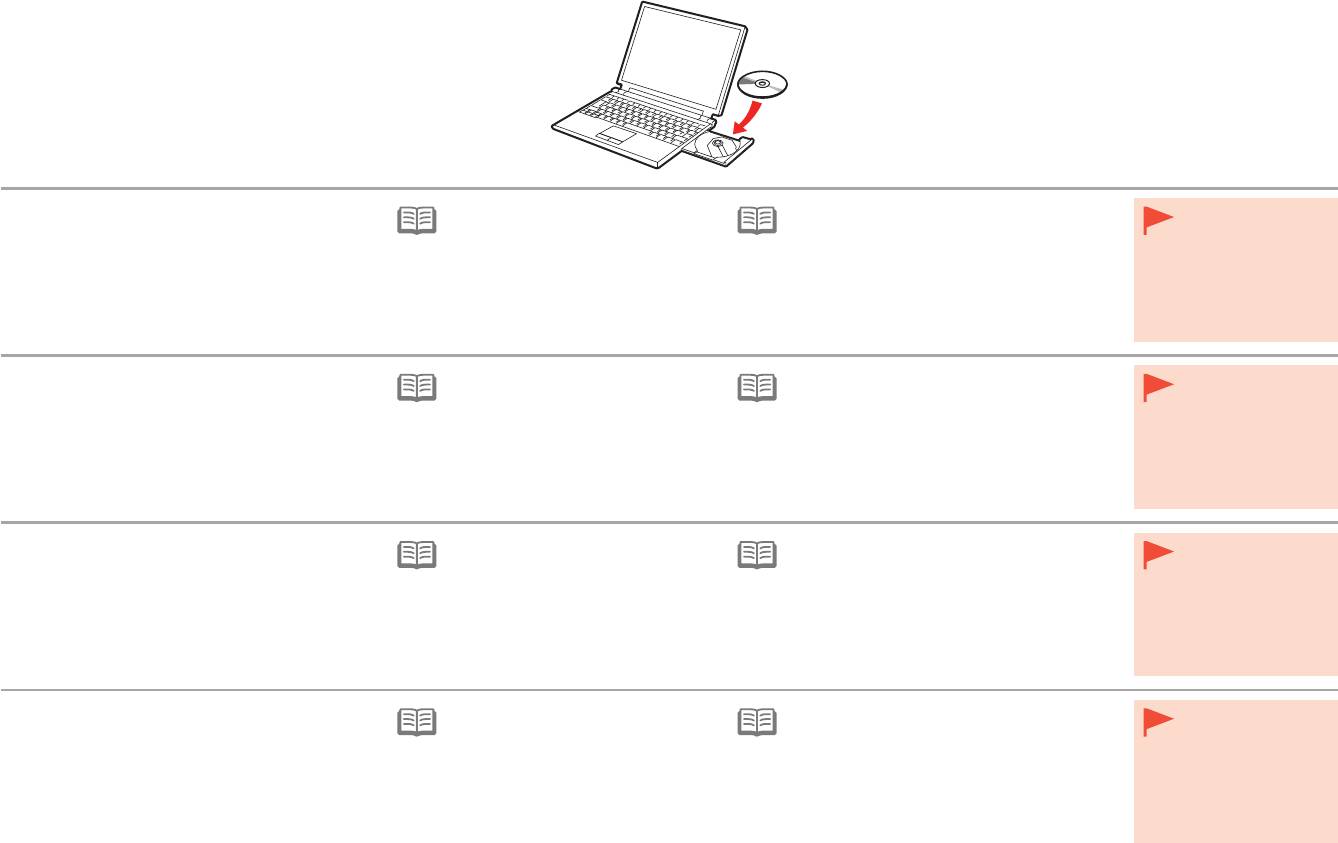
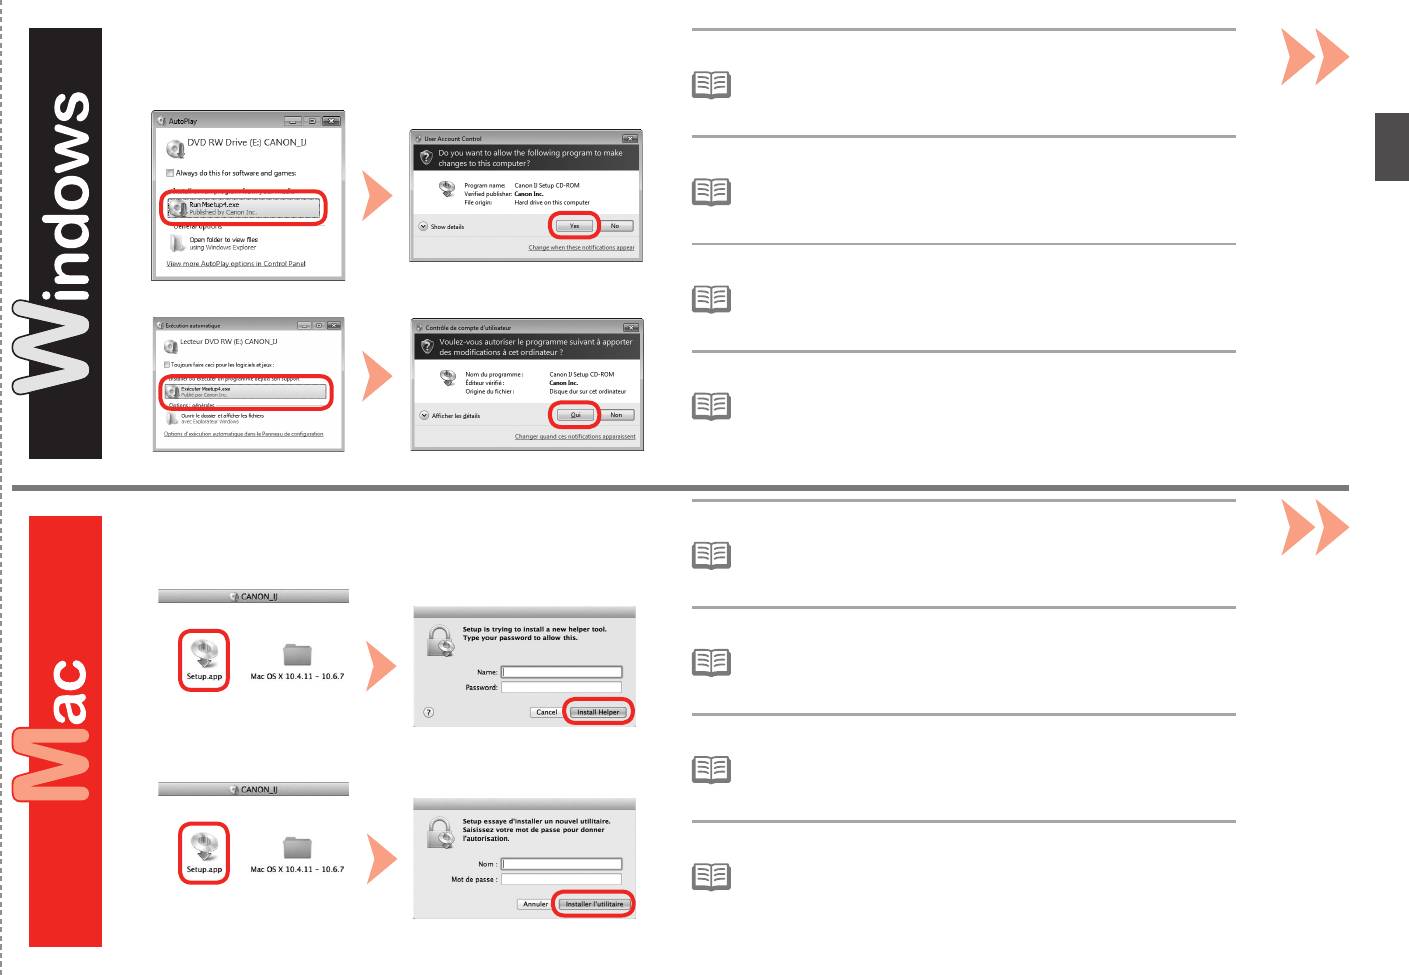
1. Make sure that the printer has turned off.
For Windows (other than Windows 8)
For Windows 8 If the USB cable is
•
2. Turn on the computer.
already connected,
•
If the "Setup CD-ROM" does not autorun, insert
unplug it. If a
3. Insert the Setup CD-ROM into the CD-ROM
•
If the program does not start
the CD-ROM into the computer again and
message appears on
drive.
automatically, double-click the CD-ROM
click the selection button which appears in the
the computer, click
icon in Computer or My Computer.
window. When selection window opens, double-
Cancel.
When the CD-ROM contents appear,
click the MSETUP4.EXE. Follow the on-screen
If you are using Windows, the setup program starts
double-click MSETUP4.EXE.
instructions to proceed.
automatically.
1. Vérifiez que l’imprimante est hors tension.
Sous Windows (autre que Windows 8)
Sous Windows 8 Si le câble USB
•
2. Allumez l’ordinateur.
est déjà branché,
•
Si le « CD-ROM d’installation
» ne s’exécute
débranchez-le. Si un
3. Insérez le CD-ROM d’installation dans le
•
Si le programme d’installation ne se
pas automatiquement, insérez-le à nouveau
message apparaît
lecteur de CD-ROM.
lance pas automatiquement, double-
dans l’ordinateur et cliquez sur le bouton de
sur l’écran de
cliquez sur l’icône de CD-ROM dans
sélection qui s’afche dans la fenêtre. Lorsque la
l’ordinateur, cliquez
Ordinateur (Computer) ou Poste de
fenêtre de sélection s’afche, double-cliquez sur
sur Annuler.
Si vous utilisez Windows, le programme d’installation
travail (My Computer). Une fois le
MSETUP4.EXE. Suivez les instructions à l’écran
démarre automatiquement.
contenu du CD-ROM afché, double-
pour continuer.
cliquez sur MSETUP4.EXE.
1. Stellen Sie sicher, dass der Drucker
Für Windows (andere als Windows 8)
Für Windows 8
•
Wenn das USB-Kabel
ausgeschaltet ist.
bereits angeschlossen
•
Wenn die “Installations-CD-ROM (Setup CD-
ist, ziehen Sie es
2
. Schalten Sie den Computer ein.
•
Wenn das Programm nicht automatisch
ROM)” nicht automatisch ausgeführt wird, legen
ab. Falls auf dem
3. Legen Sie die Installations-CD-ROM (Setup
startet, doppelklicken Sie auf das CD-
Sie die CD-ROM erneut in den Computer ein
Computerbildschirm
ROM-Symbol unter Computer oder
und klicken Sie auf die Auswahlschaltäche, die
CD-ROM) in das CD-ROM-Laufwerk ein.
eine Meldung
Arbeitsplatz (My Computer). Wenn
im Fenster erscheint. Wenn das Auswahlfenster
angezeigt wird,
der Inhalt der CD-ROM angezeigt wird,
erscheint, doppelklicken Sie auf MSETUP4.
Wenn Sie Windows verwenden, startet das Setup-
klicken Sie auf
doppelklicken Sie auf MSETUP4.EXE.
EXE. Befolgen Sie die Anweisungen auf dem
Programm automatisch.
Abbrechen (Cancel).
Bildschirm, um fortzufahren.
1. Assicurarsi che la stampante sia spenta.
Per Windows (diverso da Windows 8)
Per Windows 8 Se è già collegato,
•
2. Accendere il computer.
scollegare il cavo
•
Se il “CD-ROM di installazione (Setup CD-
USB. Se sul
3. Inserire il CD-ROM di installazione (Setup
•
Se il programma non viene avviato
ROM)” non viene avviato automaticamente,
computer viene
CD-ROM) nell’unità CD-ROM.
automaticamente, fare doppio clic
inserire nuovamente il CD-ROM nel computer
visualizzato un
sull’icona del CD-ROM in Computer
e fare clic sul pulsante di selezione visualizzato
messaggio, fare clic
o
Risorse del computer (My
nella nestra. Quando si apre la nestra di
su Annulla (Cancel).
Se si utilizza Windows, il programma di installazione
Computer). Quando viene visualizzato
selezione, fare doppio clic su MSETUP4.EXE.
verrà avviato automaticamente.
il contenuto del CD-ROM, fare doppio
Seguire le istruzioni a video per continuare.
clic sul le MSETUP4.EXE.
26
Follow the on-screen instructions to proceed.
3
If the CD-ROM does not autorun:
Double-click (My) Computer > CD-ROM icon > MSETUP4.EXE.•
Suivez les instructions à l’écran pour continuer.
Si le CD-ROM ne s’exécute pas automatiquement :
•
Double-cliquez sur Poste de travail/Ordinateur > icône du CD-ROM >
MSETUP4.EXE.
Befolgen Sie die Anweisungen auf dem Bildschirm, um fortzufahren.
Falls die CD-ROM nicht automatisch gestartet wird:
•
Doppelklicken Sie auf Computer bzw. Arbeitsplatz ((My) Computer) > CD-
ROM-Symbol > MSETUP4.EXE.
Seguire le istruzioni a video per continuare.
Se il CD-ROM non viene avviato automaticamente:
•
Fare doppio clic su (Risorse del computer) Computer ((My) Computer)>
icona CD-ROM > MSETUP4.EXE.
Follow the on-screen instructions to proceed.
If the CD-ROM does not autorun:
3
Double-click the CD-ROM icon on the desktop.•
Suivez les instructions à l’écran pour continuer.
Si le CD-ROM ne s’exécute pas automatiquement :
Double-cliquez sur l’icône CD-ROM située sur le bureau.•
Befolgen Sie die Anweisungen auf dem Bildschirm, um fortzufahren.
Falls die CD-ROM nicht automatisch gestartet wird:
Doppelklicken Sie auf das CD-ROM-Symbol auf dem Desktop.•
Seguire le istruzioni a video per continuare.
Se il CD-ROM non viene avviato automaticamente:
Fare doppio clic sull’icona del CD-ROM sul desktop.•
27
1
2
4
2
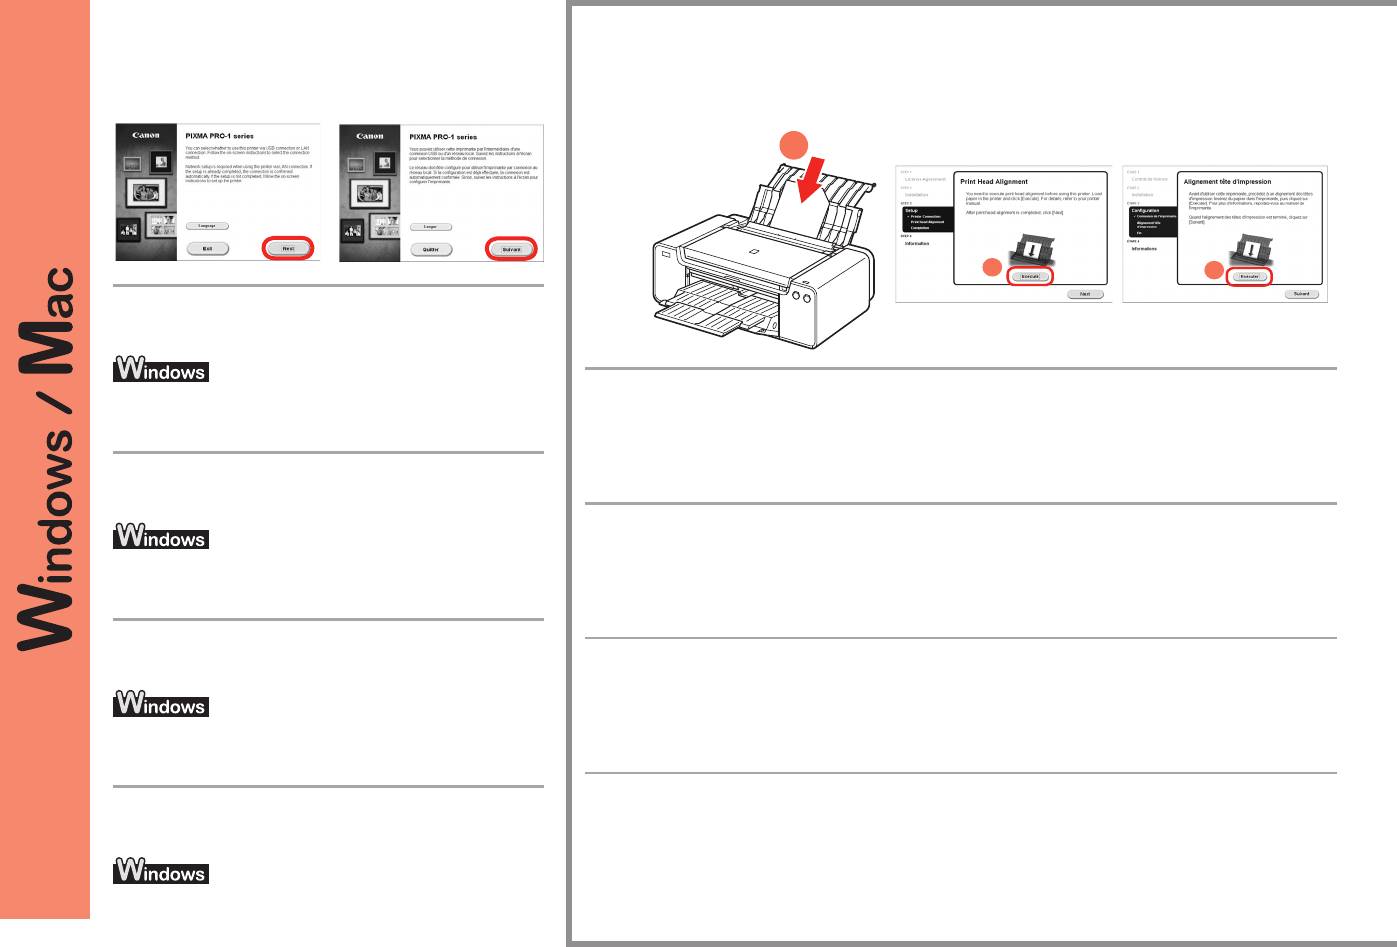
Important Information for the Installation: Print Head Alignment
Informations importantes concernant l’installation : Alignement tête d’impression
Wichtige Informationen für die Installation: Druckkopfausrichtung
Informazioni importanti per l’installazione: allineamento testina di stampa
Thereafter, follow the instructions on the computer
screen to proceed with operation.
When the Print Head Alignment screen appears, load 2 sheets of supplied specialty paper
To select a language, click Language.
(Matte Photo Paper MP-101) in the Rear Tray, then click Execute.
Load paper in portrait orientation so that the cut corner is at the top right.
Après cela, suivez les instructions à l’écran de
Follow the on-screen instructions to proceed with operation.
l’ordinateur pour poursuivre l’installation.
For details on how to load paper, refer to "5 Load Paper" on page 30.
Lorsque l’écran Alignement tête d’impression s’affiche, chargez 2 feuilles du papier spécial
fourni (Papier Photo Mat MP-101) dans le réceptacle arrière, puis cliquez sur Exécuter.
Pour sélectionner une langue, cliquez sur Langue.
Chargez le papier selon l’orientation Portrait afin que le coin coupé se trouve en haut à droite.
Suivez les instructions à l’écran pour poursuivre l’opération.
Pour plus d’informations sur le chargement du papier, reportez-vous à l’étape « 5 Chargement du papier », page 30.
Befolgen Sie danach sämtliche Anweisungen auf dem
Computerbildschirm, um mit der Softwareinstallation
Wenn der Bildschirm “Druckkopfausrichtung” angezeigt wird, legen Sie 2 Blätter des
fortzufahren.
mitgelieferten Spezialpapiers (Fotopapier Matt MP-101) in das hintere Fach ein, und klicken
Sie auf Ausführen (Execute).
Legen Sie das Papier im Hochformat so ein, dass sich die angeschnittene Ecke rechts oben befindet.
Um eine Sprache auszuwählen, klicken Sie auf Sprache (Language).
Befolgen Sie die Anweisungen auf dem Bildschirm, um die Installation fortzusetzen.
Informationen zum Einlegen von Papier finden Sie unter “5 Einlegen von Papier” auf Seite 30.
Quando viene visualizzata la schermata Allineamento testina di stampa, caricare 2 fogli della
Seguire, quindi, le istruzioni visualizzate sullo
carta speciale in dotazione (Carta Fotografica Opaca MP-101) nel vassoio posteriore, quindi
schermo del computer per continuare.
fare clic su Esegui (Execute).
Caricare la carta con orientamento verticale in modo che l’angolo smussato si trovi in alto a destra.
Seguire le istruzioni a video per continuare con l’operazione.
Per ulteriori informazioni su come caricare la carta, consultare “5 Caricamento della carta” a pagina 30.
Per selezionare una lingua, fare clic su Lingua (Language).
28
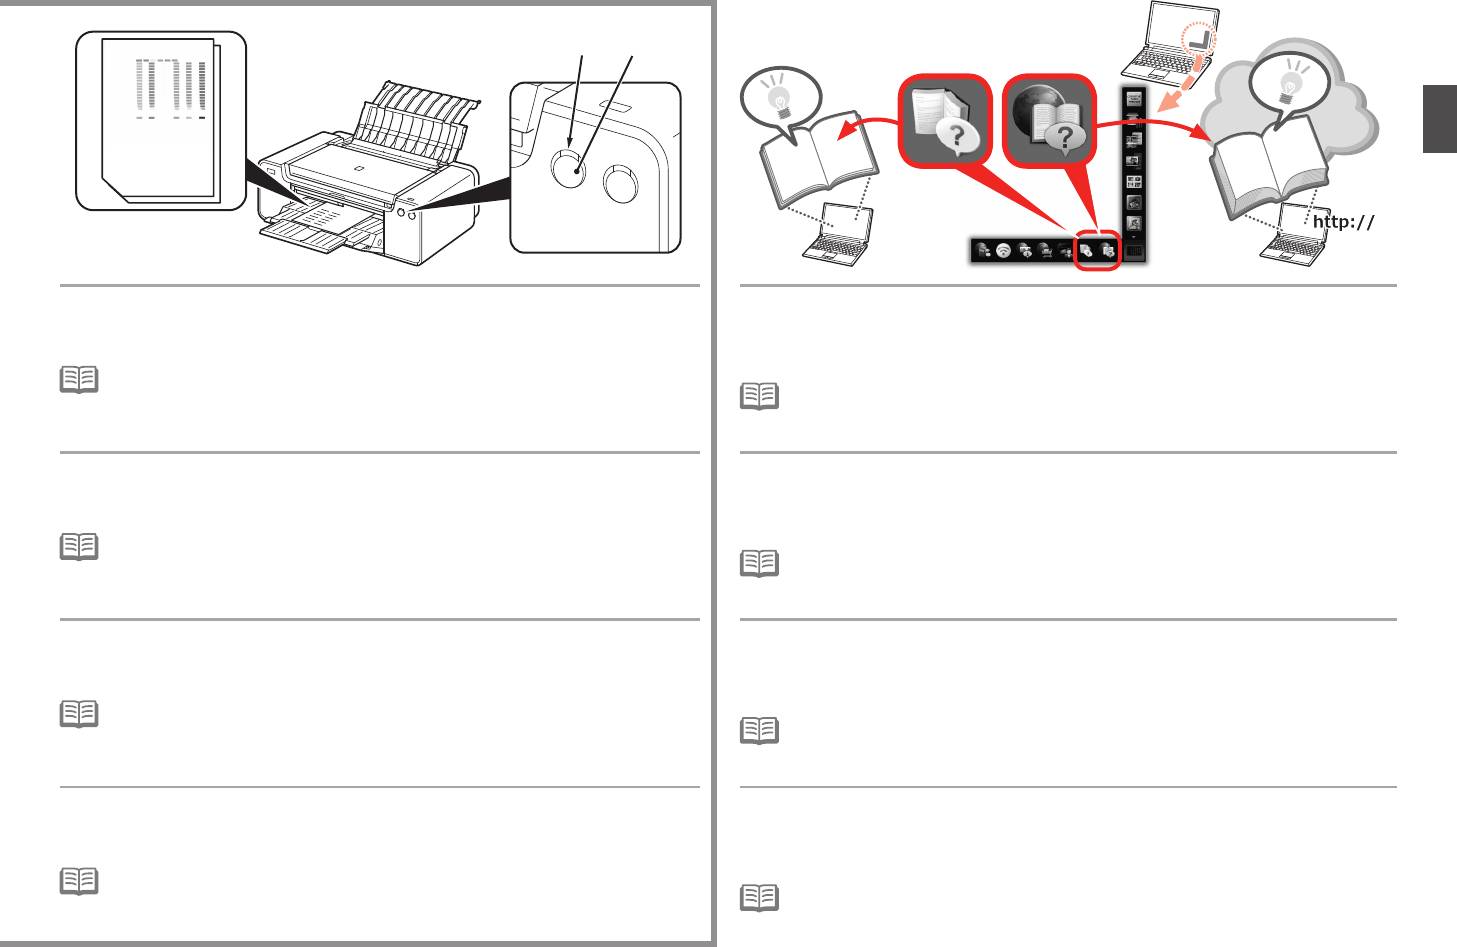
C
D
When the second page of the pattern is printed, Print Head Alignment is
At the end of the installation, Quick Menu starts up. You can open the Online
complete.
Manual and On-screen Manual from here when you want to know about the details
Some parts of patterns printed on the first page are faint.
of the functions and operations or when need arises.
•
If the Alarm lamp (orange) (C) ashes, press the RESUME/CANCEL button (D) on the
printer to clear the error, then click Next. After the installation is complete, perform Print
•
Installation of Quick Menu and On-screen Manual on the computer is required.
Head Alignment by referring to the Online Manual.
•
Internet connection is required for using the Online Manual.
Une fois que la seconde page du motif est imprimée, l’alignement de la tête
À la fin de l’installation, Quick Menu démarre. À partir de là, vous pouvez ouvrir
d’impression est terminé.
le Manuel en ligne et le Manuel à l’écran si vous voulez en savoir plus sur les
Certaines zones des motifs imprimés sur la première page sont pâles.
fonctions et opérations, ou en cas de besoin.
•
Si le voyant Alarme (Alarm) (orange) (C) clignote, appuyez sur le bouton REPRENDRE/
ANNULER (RESUME/CANCEL) (D) de l’imprimante pour éliminer l’erreur, puis cliquez sur
•
L’installation sur l’ordinateur de Quick Menu et du Manuel à l’écran est requise.
Suivant. Une fois l’installation terminée, effectuez l’alignement de la tête d’impression en
•
Une connexion Internet est nécessaire pour utiliser le Manuel en ligne.
vous reportant au Manuel en ligne.
Nachdem die zweite Seite des Musters gedruckt wurde, ist die Ausrichtung des
Am Ende der Installation öffnet sich das Quick Menu. Sie können das Online-
Druckkopfs abgeschlossen.
Handbuch und On-Screen-Handbuch von hier aus öffnen, wenn Sie weitere
Einige Teile der gedruckten Muster auf der ersten Seite sind blass.
Informationen zu den Funktionen und dem Betrieb usw. wünschen.
•
Wenn die Alarm-Anzeige (orange) (C) blinkt, drücken Sie die Taste FORTSETZEN/
ABBRECHEN (RESUME/CANCEL) (D) am Drucker, um den Fehler zu beheben, und
•
Die Installation von Quick Menu und On-Screen-Handbuch auf dem Computer ist erforderlich.
klicken Sie dann auf Weiter (Next). Führen Sie nach dem Abschluss der Installation die
•
Für die Verwendung vom Online-Handbuch ist eine Internetverbindung erforderlich.
Ausrichtung des Druckkopfs gemäß den Anweisungen im Online-Handbuch durch.
Al termine della stampa della seconda pagina del motivo, l’allineamento della
Al termine dell’installazione, viene avviato Quick Menu. Da qui è possibile aprire il
testina di stampa è completato.
Manuale online e il Manuale a video quando si desidera conoscere i dettagli delle
Una parte dei motivi stampati sulla prima pagina è sbiadita.
funzioni e delle operazioni o in caso di necessità.
•
Se la spia di Allarme (Alarm) (arancione) (C) lampeggia, premere il pulsante RIPRENDI/
ANNULLA (RESUME/CANCEL) (D) posto sulla stampante per correggere l’errore, quindi
•
Quick Menu e il Manuale a video devono essere installati nel computer.
fare clic su Avanti (Next). Al termine dell’installazione, eseguire l’Allineamento testina di
•
Per utilizzare il Manuale online è necessario disporre di una connessione a Internet.
stampa facendo riferimento al Manuale online.
29
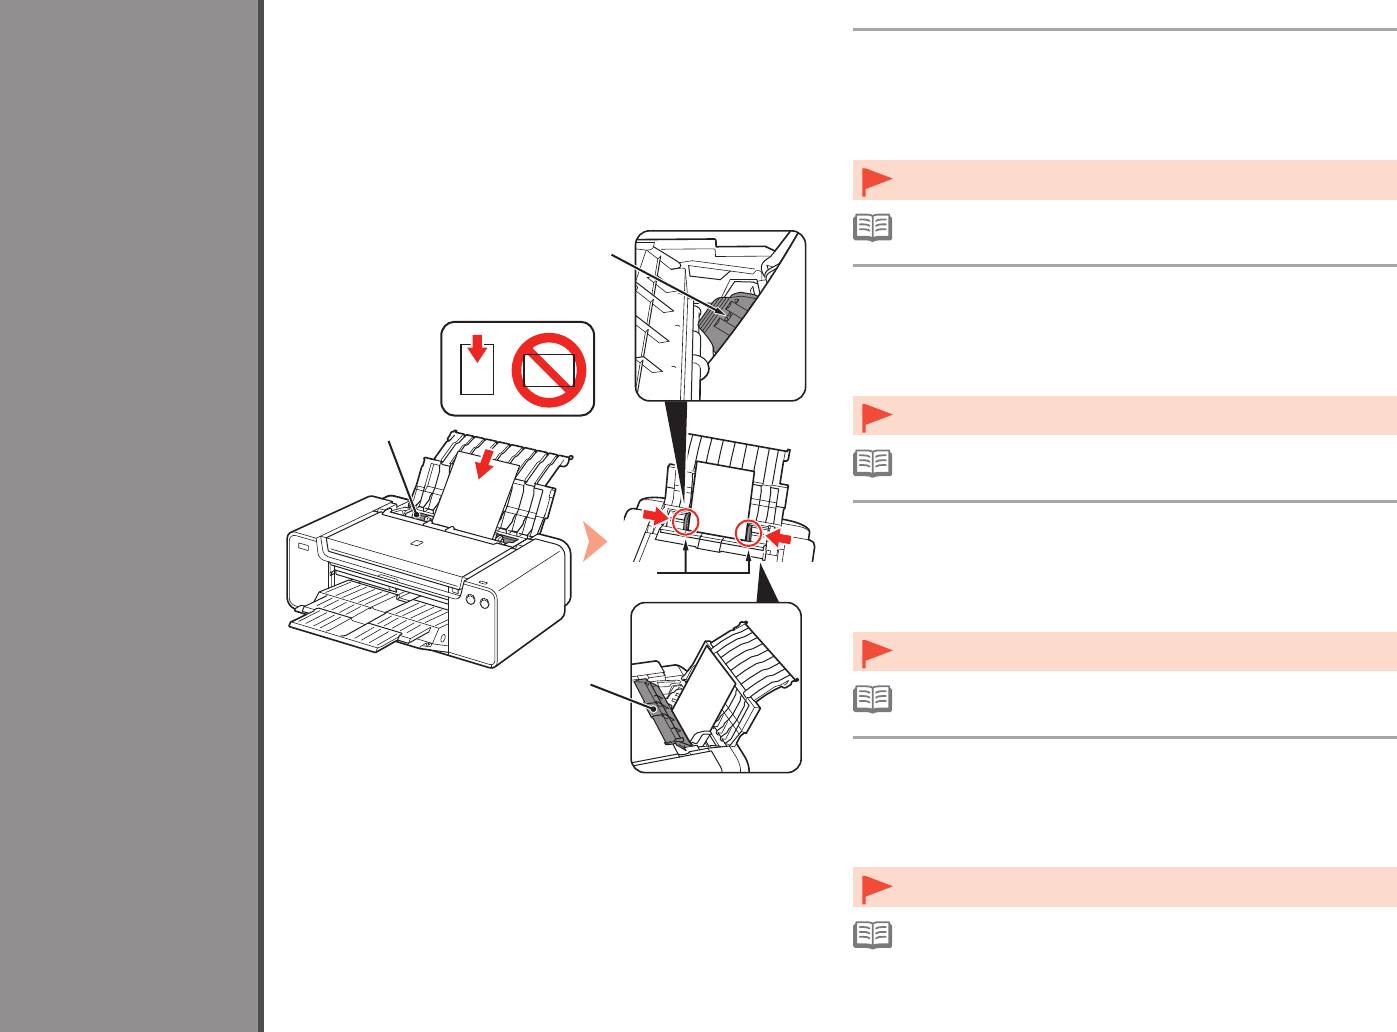
Load paper in the Rear Tray (A) and slide the left and right Paper
Guides (B) against both edges of the paper, then close the Feed
Slot Cover (D).
Load paper in portrait orientation with the printing side facing up.
5
Make sure that the height of the paper stack does not exceed the line (C).
Close the Feed Slot Cover (D) gently. Otherwise it may damage the paper.•
•
For details on other paper loading methods and supported paper types, refer
to "Loading Paper" in the On-screen Manual or Online Manual.
C
Chargez du papier dans le réceptacle arrière (A), faites glisser les
guides papier (B) gauche et droit contre les deux bords du papier,
puis fermez le couvercle de la fente d’alimentation (D).
Load Paper
Chargez du papier dans le sens de la hauteur (orientation Portrait), face à imprimer
vers le haut.
Vérifiez que la hauteur du papier chargé ne dépasse pas la ligne (C).
•
Fermez délicatement le couvercle de la fente d’alimentation (D). Sinon, vous
A
risquez d’abîmer le papier.
•
Pour plus d’informations sur les autres méthodes de chargement du
papier et sur les types de papier pris en charge, reportez-vous à la section
«
Chargement du papier » dans le Manuel à l’écran ou le Manuel en ligne.
Einlegen von Papier
Legen Sie Papier in das hintere Fach (A) ein, und verschieben Sie
Chargement du papier
die linke und rechte Papierführung (B) an beide Kanten des Papiers.
Schließen Sie dann die Abdeckung für Einzugsschacht (D).
Caricamento della carta
B
Legen Sie das Papier im Hochformat mit der zu bedruckenden Seite nach oben
ein.
Vergewissern Sie sich, dass die Höhe des Papierstapels nicht die Linie (C)
übersteigt.
•
Schließen Sie vorsichtig die Abdeckung für den Einzugsschacht (D).
Andernfalls wird möglicherweise das Papier beschädigt.
D
•
Informationen zu weiteren Möglichkeiten für das Einlegen von Papier und
zu den unterstützten Papiertypen nden Sie unter “Einlegen von Papier” im
On-Screen-Handbuch bzw. Online-Handbuch.
Caricare la carta nel vassoio posteriore (A) e fare scorrere le guide della
carta (B) destra e sinistra no a quando non toccano entrambi i bordi del
foglio, quindi chiudere il coperchio dell’alimentatore manuale (D).
Caricare la carta con orientamento verticale con il lato di stampa rivolto verso l’alto.
Verificare che l’altezza della pila di carta non superi la linea (C).
•
Chiudere con delicatezza il coperchio dello slot di alimentazione (D). In caso
contrario potrebbe danneggiare la carta.
•
Per informazioni dettagliate su altri metodi di caricamento della carta e sui
tipi di carta supportati, consultare “Caricamento della carta” nel Manuale a
video o Manuale online.
30
Various application software are installed
My Image Garden
on the computer along with the drivers.
You can print creative items by correcting/
6
enhancing photos using the application
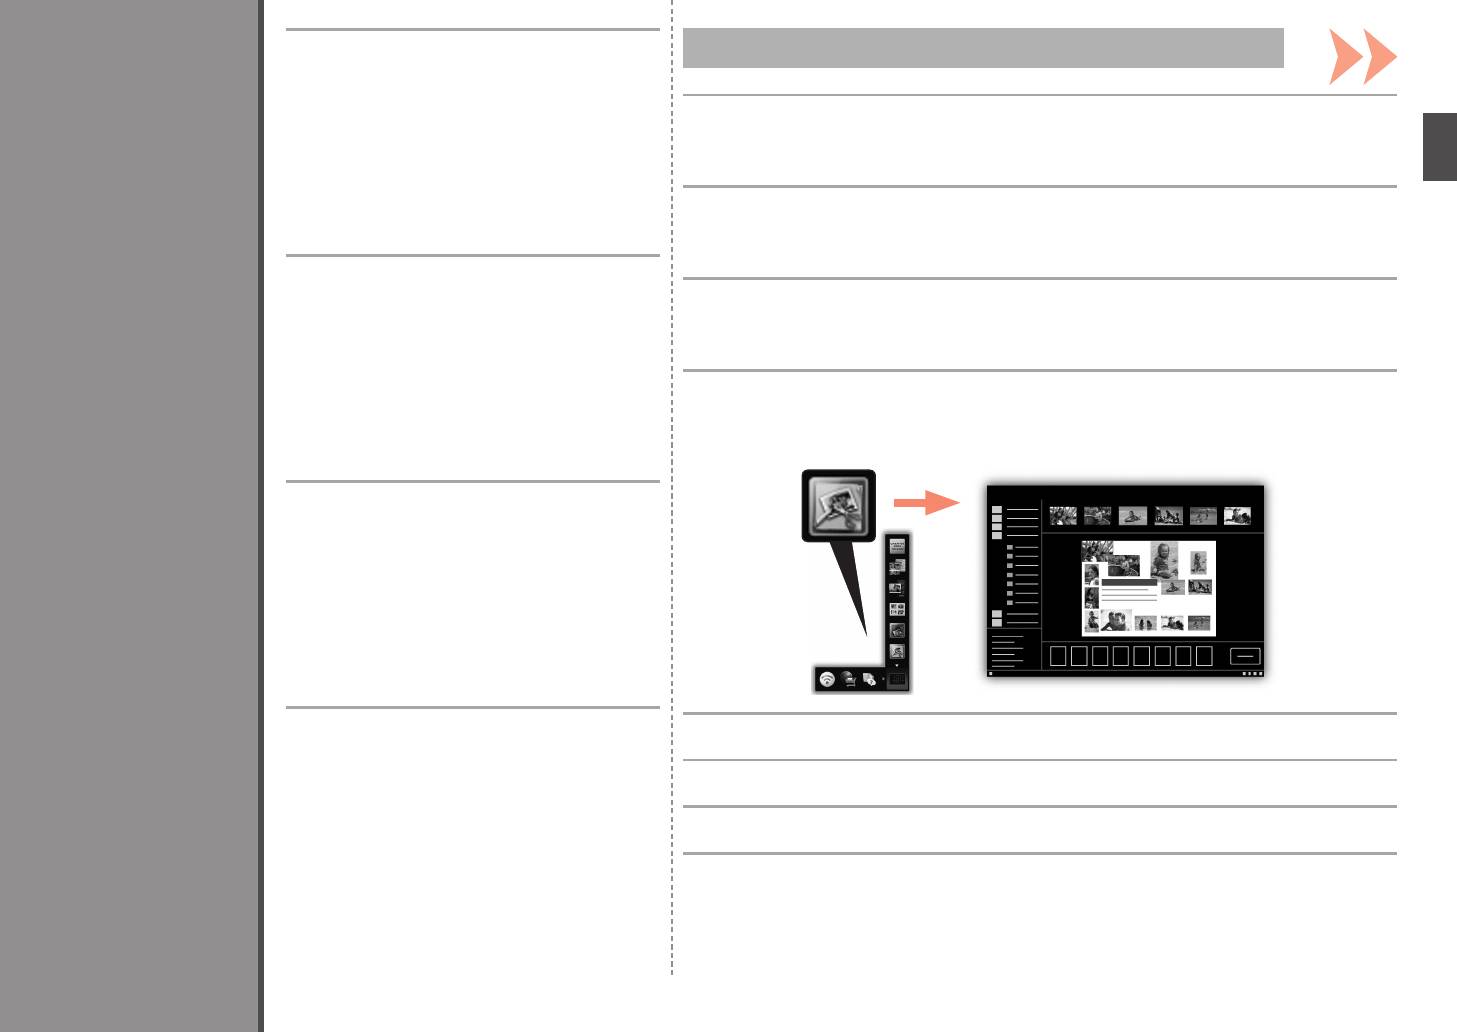
My Image Garden is an application that allows you to utilize photos taken with digital cameras and other images
saved on your computer, in many ways for various purposes. You can organize a vast number of images easily, or
software.
create collages, cards, and other items from your favorite photos and print them.
For details on how to use the application
software and the printer, refer to the
Online Manual.
My Image Garden est une application qui vous permet d’utiliser des photos prises avec des appareils photo
numériques et d’autres images enregistrées sur votre ordinateur, et ce de plusieurs façons et à diverses ns. Vous
pouvez organiser facilement de nombreuses images ou créer des collages, des cartes et autres éléments à partir
de vos photos préférées et les imprimer.
Différentes applications sont installées sur
l’ordinateur en même temps que les
My Image Garden ist eine Anwendung, mit der Sie mit Digitalkameras aufgenommene Fotos und andere auf dem
Computer gespeicherte Bilder auf verschiedene Art und für verschiedene Zwecke nutzen können. Sie können eine
pilotes. Vous pouvez réaliser des
große Anzahl von Bildern organisieren oder Collagen, Karten und andere Dinge aus Ihren Lieblingsfotos erstellen
impressions créatives en corrigeant/
und drucken.
améliorant vos photos à l’aide de ces
logiciels d’application.
My Image Garden è un’applicazione che consente di utilizzare le foto scattate con fotocamere digitali e altre
Pour plus d’informations sur l’utilisation
immagini salvate sul computer, in molti modi per vari scopi. È possibile organizzare in modo semplice un elevato
numero di immagini o creare composizioni, schede e altri elementi dalle foto preferite e stamparli.
des logiciels et de l’imprimante, reportez-
vous au Manuel en ligne.
Auf dem Computer werden zusammen mit
Application Software
Anwendungssoftware
Applicazioni software
den Treibern verschiedene Anwendungen
Logiciels d’application
installiert. Sie können kreative Objekte
drucken, indem Sie Fotos mithilfe der
Anwendungssoftware korrigieren/
optimieren.
Informationen zur Verwendung der
Anwendungssoftware und des Druckers
nden Sie im Online-Handbuch.
Insieme ai driver vengono installate nel
To start My Image Garden, click the icon in Quick Menu on the desktop.
computer diverse applicazioni software.
Tali applicazioni consentono di stampare
Pour démarrer My Image Garden, cliquez sur l’icône dans Quick Menu sur le bureau.
materiali creativi con correzione/
ottimizzazione delle foto.
Um My Image Garden zu starten, Klicken Sie auf das Symbol im Quick Menu auf dem Desktop.
Per informazioni sull’utilizzo delle
applicazioni software e della stampante,
consultare il Manuale online.
Per avviare My Image Garden, fare clic sull’icona in Quick Menu sul desktop.
31
CREATIVE PARK PREMIUM
Print Studio Pro
A service where customers using models that support
PREMIUM Contents can download exclusive printing
materials.
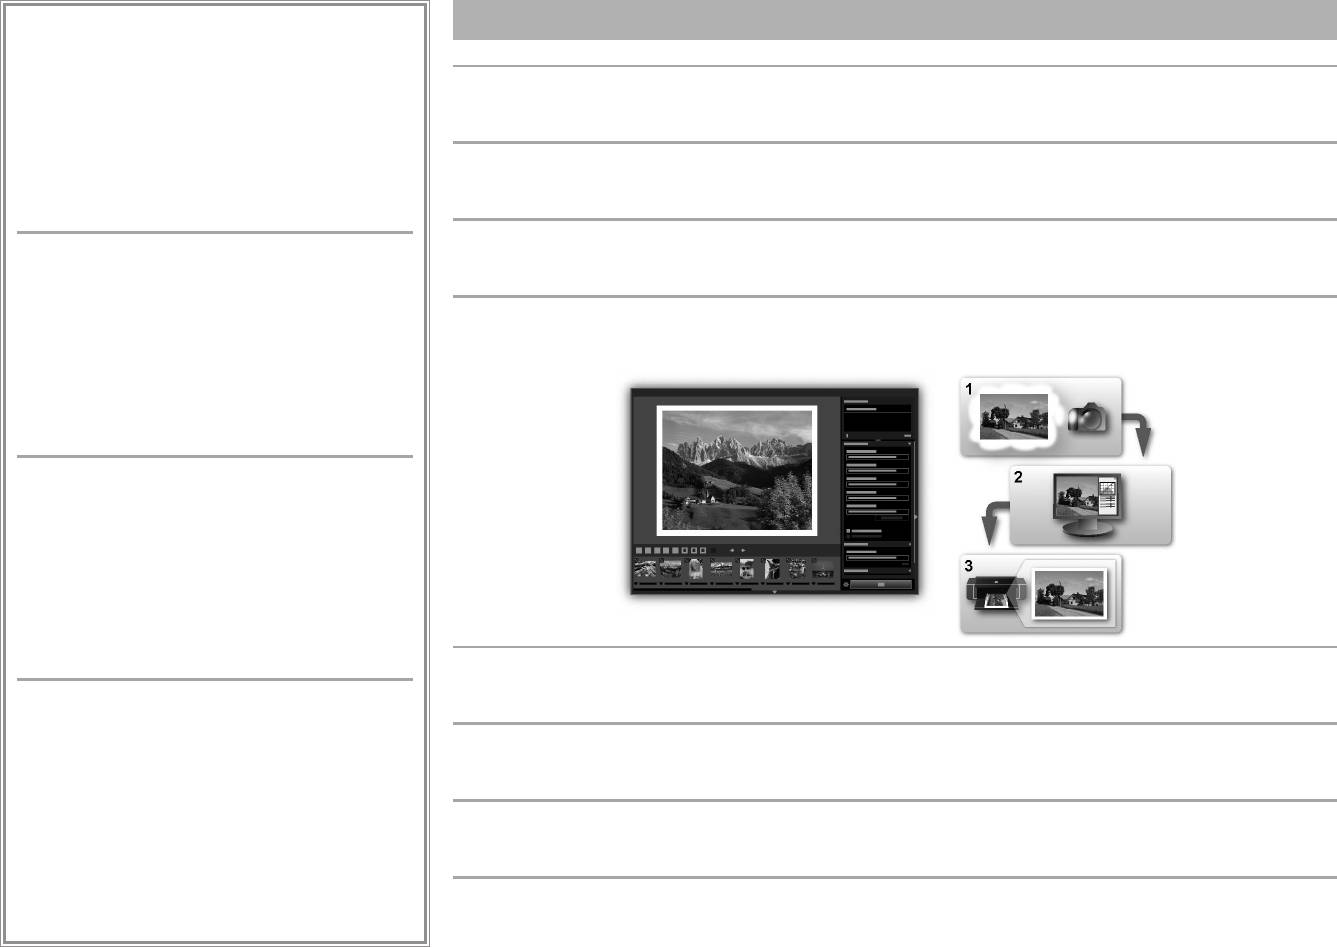
Print Studio Pro is a plug-in that makes professional photo printing easier and more convenient. In addition to printing bordered photos and
PREMIUM Contents can be downloaded easily via My
borderless photos, you can perform various printing tasks such as index printing, grayscale printing, and printing using ICC proles. Y
ou can
Image Garden. Downloaded PREMIUM Contents can be
also adjust the margins or add text.
printed directly with My Image Garden. To print downloaded
PREMIUM Contents, genuine Canon ink tanks/ink cartridges
must be installed for all colors on a supported printer.
Print Studio Pro est un plug-in qui facilite l’impression de photos professionnelles. Outre l’impression de photos avec ou sans bordure, vous
pouvez effectuer différentes tâches comme l’impression d’index, de niveaux de gris et au moyen de prols ICC. Vous pouvez également
ajuster les marges ou ajouter du texte.
Print Studio Pro ist ein Plug-in, mit dem professioneller Fotodruck erleichtert und verbessert wird. Zusätzlich zum Drucken von Fotos mit und
CREATIVE PARK PREMIUM
ohne Rand können Sie verschiedene Druckaufgaben durchführen, wie Indexdruck, Graustufendruck und Druck mithilfe von ICC-Prolen. Sie
können ebenfalls Ränder anpassen oder Text hinzufügen.
Ce service permet aux clients qui utilisent des modèles
prenant en charge le contenu PREMIUM de télécharger des
contenus d’impression exclusifs.
Print Studio Pro è un plugin che consente di rendere la stampa fotograca professionale più semplice e conveniente. Oltre alla stampa di foto
Vous pouvez télécharger facilement des contenus PREMIUM
con bordi e senza bordi, è anche possibile eseguire diverse attività di stampa, ad esempio stampa indice, stampa in scala di grigi e stampa
via My Image Garden. Les contenus PREMIUM téléchargés
utilizzando proli ICC. È anche possibile regolare i margini o aggiungere testo.
peuvent être imprimés directement via My Image Garden.
Pour imprimer les contenus PREMIUM téléchargés, vous
devez installer des réservoirs d’encre/cartouches d’encre de
marque Canon pour toutes les couleurs sur une imprimante
prise en charge.
CREATIVE PARK PREMIUM
Ein Dienst, bei dem Kunden, die Modelle verwenden, die
PREMIUM-Inhalte unterstützen, exklusive Druckmaterialien
herunterladen können.
PREMIUM-Inhalte können einfach über My Image Garden
heruntergeladen werden. Heruntergeladene PREMIUM-
Inhalte können direkt mit My Image Garden gedruckt
werden. Für das Drucken heruntergeladener PREMIUM-
Inhalte müssen Original-Tintenpatronen von Canon für alle
vom Computer unterstützten Farben installiert sein.
By using Print Studio Pro, you can print images developed/corrected in "Digital Photo Professional" (RAW image editing software provided
by Canon), Adobe Photoshop, Adobe Photoshop Elements, or Adobe Photoshop Lightroom easily and in high quality. For details, refer to the
CREATIVE PARK PREMIUM
Online Manual: Digital Photo Printing Guide.
Un servizio che consente ai clienti che utilizzano modelli che
supportano contenuto PREMIUM di scaricare materiali di
Print Studio Pro vous permet d’imprimer facilement des images de haute qualité développées/corrigées dans «
Digital Photo Professional »
stampa esclusivi.
(logiciel de retouche d’images RAW fourni par Canon), Adobe Photoshop, Adobe Photoshop Elements ou Adobe Photoshop Lightroom. Pour
Il contenuto PREMIUM può essere scaricato in maniera
plus d’informations, reportez-vous au Manuel en ligne
: Guide d’impression de photographies numériques.
semplice tramite My Image Garden. Il contenuto PREMIUM
scaricato può essere stampato direttamente con My Image
Garden. Per stampare contenuto PREMIUM scaricato, è
Mit Print Studio Pro können Sie Bilder, die in “Digital Photo Professional” (von Canon bereitgestellte RAW-Bildbearbeitungssoftware), Adobe
necessario installare serbatoi d’inchiostro / cartucce
Photoshop, Adobe Photoshop Elements oder Adobe Photoshop Lightroom erstellt oder korrigiert wurden, einfach und in hoher Qualität
d’inchiostro Canon originali per tutti i colori in una stampante
drucken. Details nden Sie im Online-Handbuch: Handbuch zum digitalen Fotodruck.
supportata.
Se si utilizza Print Studio Pro, è possibile stampare immagini sviluppate/corrette in “Digital Photo Professional” (software di modica di
immagini RAW fornito da Canon), Adobe Photoshop, Adobe Photoshop Elements o Adobe Photoshop Lightroom in modo semplice e in alta
qualità. Per ulteriori informazioni, consultare il Manuale online: Guida alla stampa fotograca digitale.
32

NEDERLANDS
PORT DO BRASIL
ESPAÑOL
ΕΛΛΗΝΙΚΑ
Aan de Slag-gids
Para Começar
Guía de inicio
Ξεκινώντας
Lees eerst deze handleiding voordat u de printer gaat gebruiken. Houd deze onder handbereik voor toekomstig gebruik.
Certique-se de ler este manual antes de usar a impressora. Mantenha-o à mão para referência futura.
Asegúrese de leer este manual antes de utilizar la impresora. Téngalo a mano para poder consultarlo en cualquier momento.
Πριν χρησιμοποιήσετε τον εκτυπωτή, πρέπει να διαβάσετε αυτό το εγχειρίδιο. Κρατήστε το εγχειρίδιο για να μπορείτε να ανατρέξετε σε αυτό στο μέλλον.

Inhoud■
Sumário■
Contenido■
Περιεχόμενα■
1 Voorbereiding P.5
1 Preparação P.5
1 Preparación P.5
1 Προετοιμασία Σ.5
2 De inkttanks installeren P.9
2 Instale os cartuchos de tinta P.9
2 Instalación de los depósitos de tinta P.9
2 Τοποθέτηση των δοχείων μελάνης Σ.9
3 De printkop installeren P.12
3 Instale a cabeça de impressão P.12
3 Instalación del cabezal de impresión P.12
3 Τοποθέτηση της κεφαλής εκτύπωσης Σ.12
4 Software installeren P.18
4 Instalação do software P.18
4 Instalación del software P.18
4 Εγκατάσταση λογισμικού Σ.18
5 Papier plaatsen P.30
5 Colocar papel P.30
5 Carga del papel P.30
5 Τοποθέτηση χαρτιού Σ.30
6 Toepassingssoftware P.31
6 Software aplicativo P.31
6 Software de aplicación P.31
6 Λογισμικό εφαρμογής Σ.31
Overzicht van de printerinstallatie■
Fluxo de instalação da impressora■
Flujo de instalación de la impresora■
Ροή εγκατάστασης του εκτυπωτή■
40
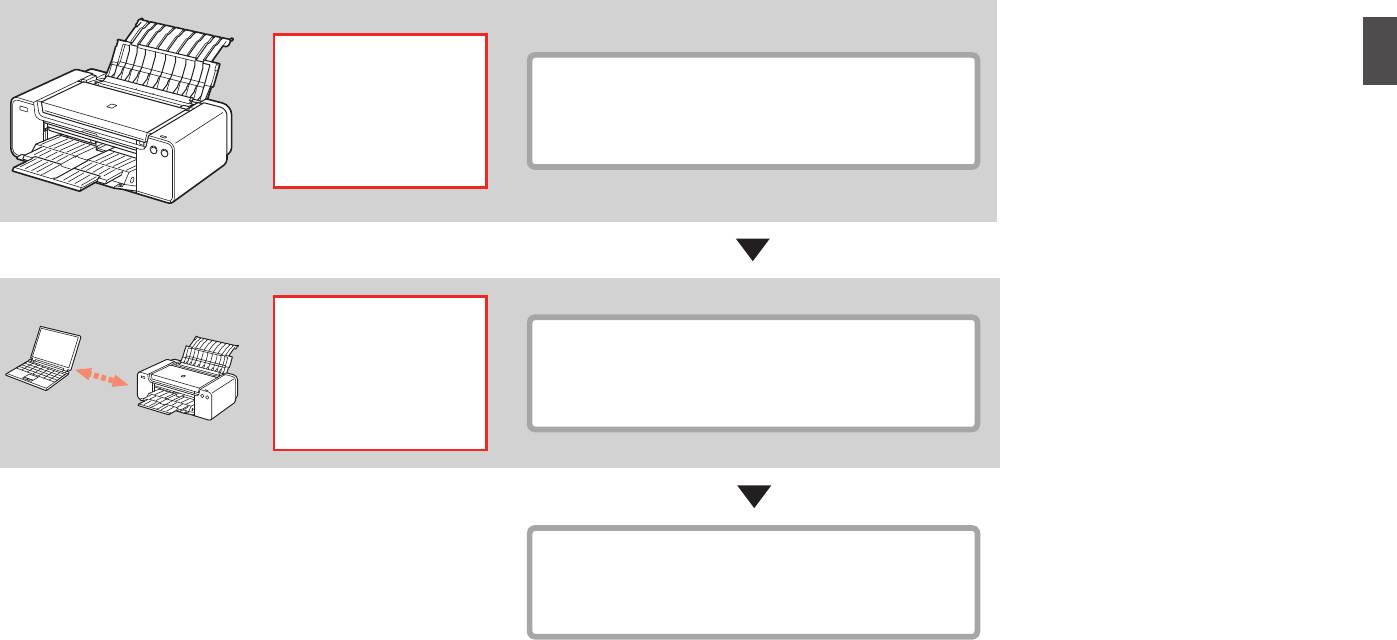
Printer voorbereiden
Minuten (ongeveer)
Preparação da impressora
Minutos (aprox.)
Preparación de la impresora
Minutos (aprox.)
Προετοιμασία του εκτυπωτή
Λεπτά (περίπου)
20
Software installeren
Minuten (ongeveer)
Instalação do software
Minutos (aprox.)
Instalación del software
Minutos (aprox.)
Εγκατάσταση λογισμικού
Λεπτά (περίπου)
Installatie voltooid
Instalação concluída
Instalación finalizada
Η εγκατάσταση ολοκληρώθηκε
1
■
Gebruikte symbolen
■
Símbolos Utilizados Neste
■
Símbolos utilizados
■
Σύμβολα που χρησιμοποιούνται
in dit document
Documento
en este documento
στο παρόν έγγραφο
Verboden handelingen.
Ações proibidas.
Acciones prohibidas.
Απαγορευμένες ενέργειες.
Instructies met belangrijke
Instruções que incluem
Instrucciones que incluyen
Οδηγίες που περιλαμβάνουν
informatie.
informações importantes.
información importante.
σημαντικές πληροφορίες.
•
In deze handleiding wordt het
•
Neste guia, o sistema operacional
•
En esta guía, para referirse al
•
Σε αυτόν τον οδηγό, το λειτουργικό
besturingssysteem Windows 8
Windows 8 é chamado de Windows
sistema operativo Windows 8 se
σύστημα Windows 8 αναφέρεται ως
aangeduid met Windows 8 en
8 e o sistema operacional Windows 7
utiliza el término Windows 8 y para
Windows 8 και το Windows 7 SP1 ως
Windows 7 SP1 met Windows 7.
SP1 de Windows 7.
Windows 7 SP1 se utiliza el término
Windows 7.
•
De schermafbeeldingen in deze
•
Neste guia, as telas se baseiam no
Windows 7.
•
Επίσης, οι οθόνες που απεικονίζονται
handleiding zijn gebaseerd op
Windows 7 e no Mac OS X v.10.8.
•
Las pantallas de esta guía se basan
βασίζονται στα λειτουργικά
Windows 7 en Mac OS X v.10.8.
A menos que observado o contrário,
en Windows 7 y Mac OS X v.10.8.
συστήματα Windows 7 και Mac OS X
Tenzij anders vermeld, zijn de
as telas serão as do Windows 7.
A menos que se indique lo contrario,
v.10.8.
schermafbeeldingen afkomstig uit
las pantallas serán de Windows 7.
Οι οθόνες που απεικονίζονται
Windows 7.
βασίζονται στο λειτουργικό σύστημα
Windows 7, εκτός των περιπτώσεων
όπου αναφέρεται διαφορετικά.
•
Microsoft is een gedeponeerd handelsmerk
•
Microsoft é uma marca registrada da Microsoft
•
Microsoft es una marca comercial registrada de
•
Η επωνυμία Microsoft είναι σήμα κατατεθέν της
van Microsoft Corporation.
Corporation.
Microsoft Corporation.
Microsoft Corporation.
•
Windows is een handelsmerk of gedeponeerd
•
Windows é uma marca comercial ou registrada
•
Windows es una marca comercial o una marca
•
Η επωνυμία Windows είναι εμπορικό σήμα ή
handelsmerk van Microsoft Corporation in de
da Microsoft Corporation nos EUA e/ou em
comercial registrada de Microsoft Corporation
σήμα κατατεθέν της Microsoft Corporation στις
V.S. en/of andere landen.
outros países.
en EE.UU. y en otros países.
Η.Π.Α. ή/και σε άλλες χώρες.
•
Windows Vista is een handelsmerk of
•
Windows Vista é uma marca comercial ou
•
Windows Vista es una marca comercial o
•
Η επωνυμία Windows Vista είναι εμπορικό σήμα
gedeponeerd handelsmerk van Microsoft
registrada da Microsoft Corporation nos EUA
una marca comercial registrada de Microsoft
ή σήμα κατατεθέν της Microsoft Corporation στις
Corporation in de V.S. en/of andere landen.
e/ou em outros países.
Corporation en EE.UU. y en otros países.
Η.Π.Α. ή/και σε άλλες χώρες.
•
Internet Explorer is een handelsmerk of
•
Internet Explorer é uma marca comercial ou
•
Internet Explorer es una marca comercial o
•
Η επωνυμία Internet Explorer είναι εμπορικό
gedeponeerd handelsmerk van Microsoft
registrada da Microsoft Corporation nos EUA
una marca comercial registrada de Microsoft
σήμα ή σήμα κατατεθέν της Microsoft
Corporation in de V.S. en/of andere landen.
e/ou em outros países.
Corporation en EE.UU. y en otros países.
Corporation στις Η.Π.Α. ή/και σε άλλες χώρες.
•
Mac, Mac OS, AirPort, Safari, Bonjour, iPad,
•
Mac, Mac OS, AirPort, Safari, Bonjour, iPad,
•
Mac, Mac OS, AirPort, Safari, Bonjour, iPad,
•
Οι επωνυμίες Mac, Mac OS, AirPort, Safari,
iPhone en iPod touch zijn handelsmerken
iPhone e iPod touch são marcas comerciais da
iPhone e iPod touch son marcas comerciales
Bonjour, iPad, iPhone και iPod touch είναι
van Apple Inc., gedeponeerd in de V.S. en
Apple Inc., registradas nos EUA e em outros
de Apple Inc., registradas en EE. UU. y otros
εμπορικά σήματα της Apple Inc., κατατεθέντα
andere landen. AirPrint en het AirPrint-logo zijn
países. AirPrint e o logotipo AirPrint são marcas
países. AirPrint y el logotipo de AirPrint son
στις Η.Π.Α. και σε άλλες χώρες. Η επωνυμία
handelsmerken van Apple Inc.
comerciais da Apple Inc.
marcas comerciales de Apple Inc.
AirPrint και το λογότυπο AirPrint είναι εμπορικά
•
Adobe, Photoshop, Photoshop Elements,
•
Adobe, Photoshop, Photoshop Elements,
•
Adobe, Photoshop, Photoshop Elements,
σήματα της Apple Inc.
Lightroom, Adobe RGB en Adobe RGB
Lightroom, Adobe RGB e Adobe RGB (1998)
Lightroom, Adobe RGB y Adobe RGB (1998)
•
Οι επωνυμίες Adobe, Photoshop, Photoshop
(1998) zijn gedeponeerde handelsmerken
são marcas registradas ou marcas comerciais
son marcas comerciales registradas o marcas
Elements, Lightroom, Adobe RGB και Adobe
of handelsmerken van Adobe Systems
da Adobe Systems Incorporated nos Estados
comerciales de Adobe Systems Incorporated en
RGB (1998) είναι εμπορικά σήματα ή σήματα
Incorporated in de Verenigde Staten en/of
Unidos e/ou em outros países.
Estados Unidos y en otros países.
κατατεθέντα της Adobe Systems Incorporated
andere landen.
στις Ηνωμένες Πολιτείες και σε άλλες χώρες.
2
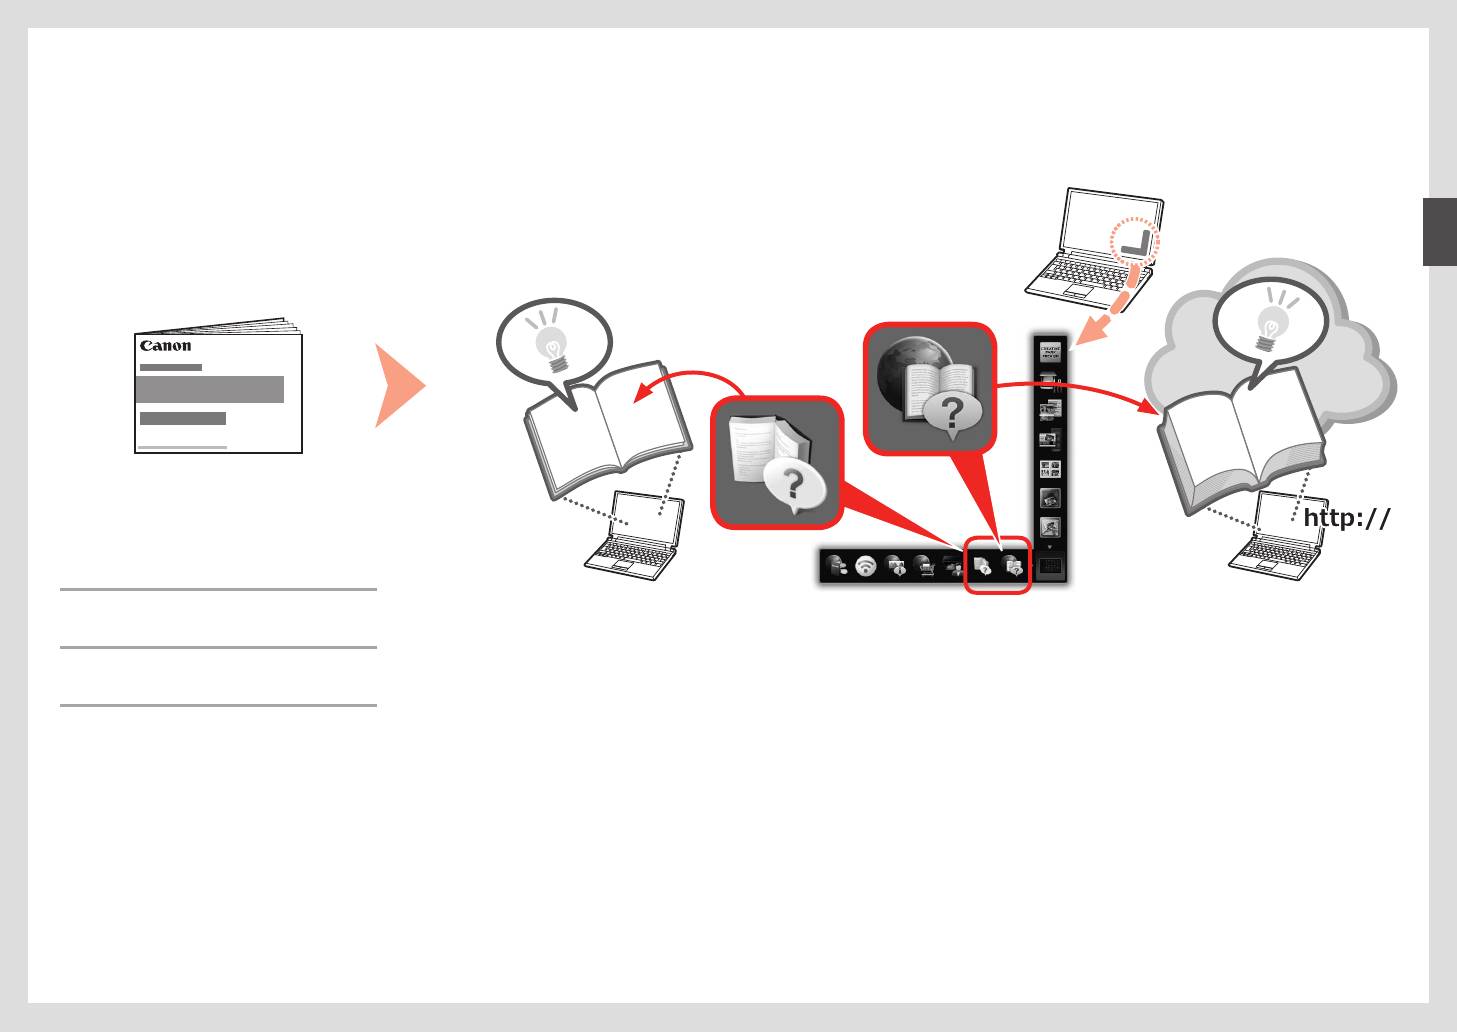
Gedrukte handleiding■ Schermhandleiding en Online handleiding■
Manual impresso■ Manual Interativo e Manual On-line■
Manual impreso■ Manual en pantalla y Manual en línea■
Έντυπο εγχειρίδιο■ Ηλεκτρονικό εγχειρίδιο και Εγχειρίδιο Online■
•
Aan de Slag-gids
(deze handleiding)
•
Para Começar
(este manual)
•
Guía de inicio
(este manual)
•
Ξεκινώντας
(το παρόν εγχειρίδιο)
3


