Sony KF-50SX100K – page 2
Manual for Sony KF-50SX100K
Table of contents
22
Menu System
Menu System
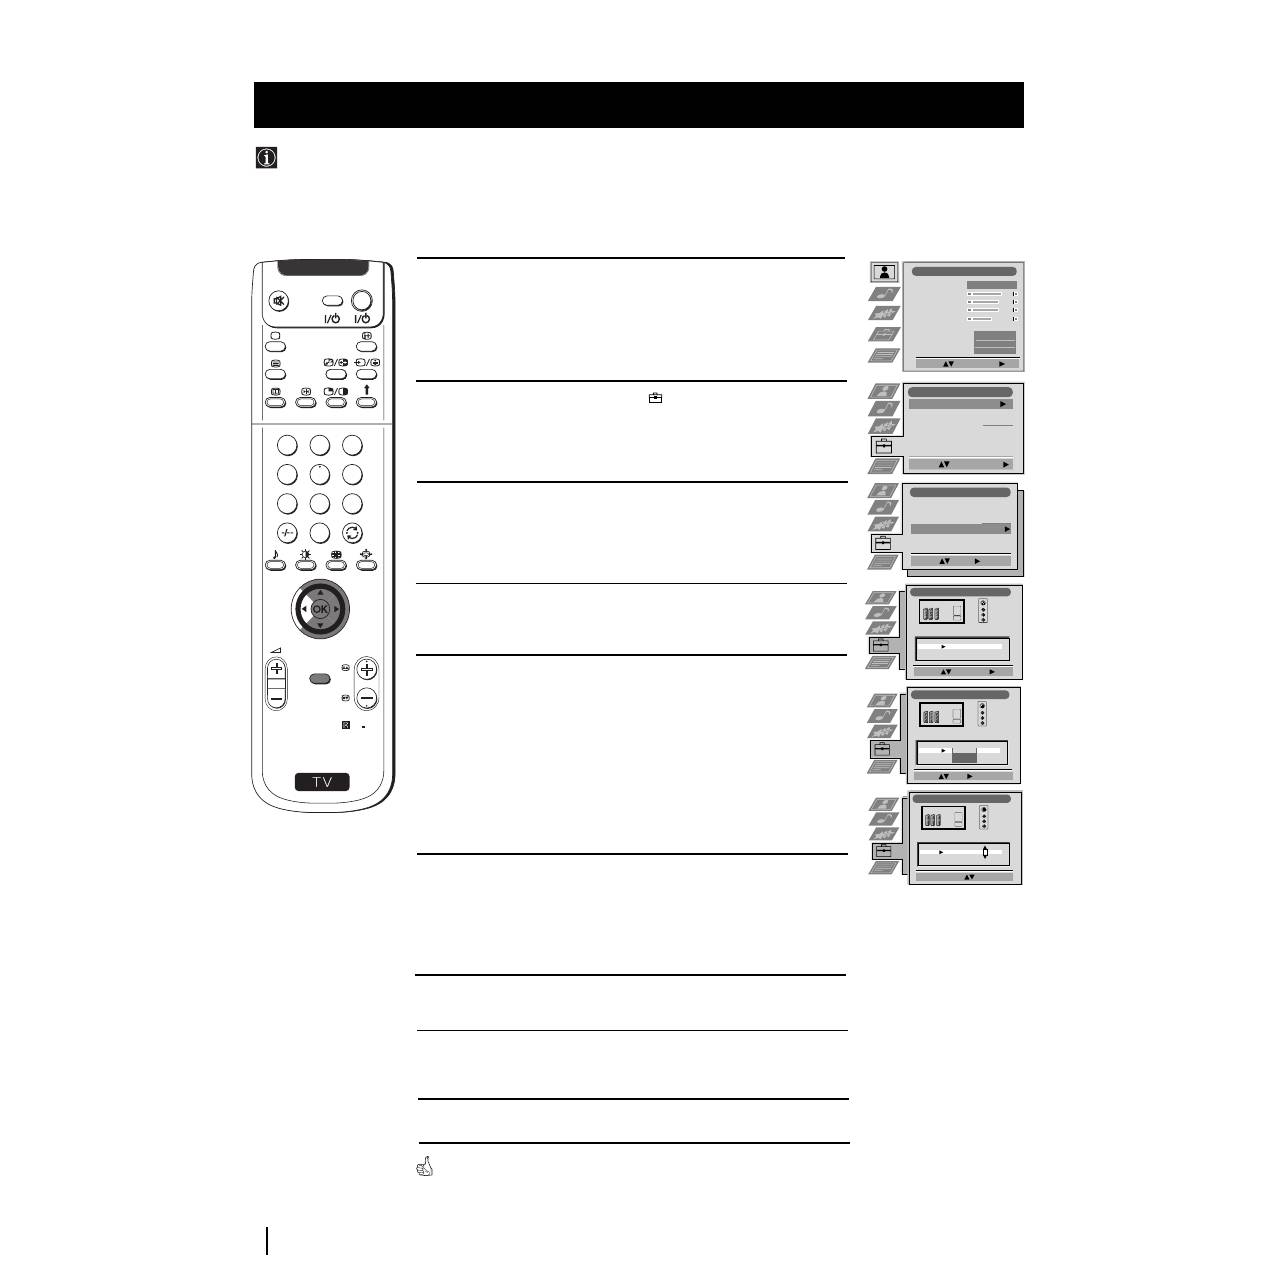
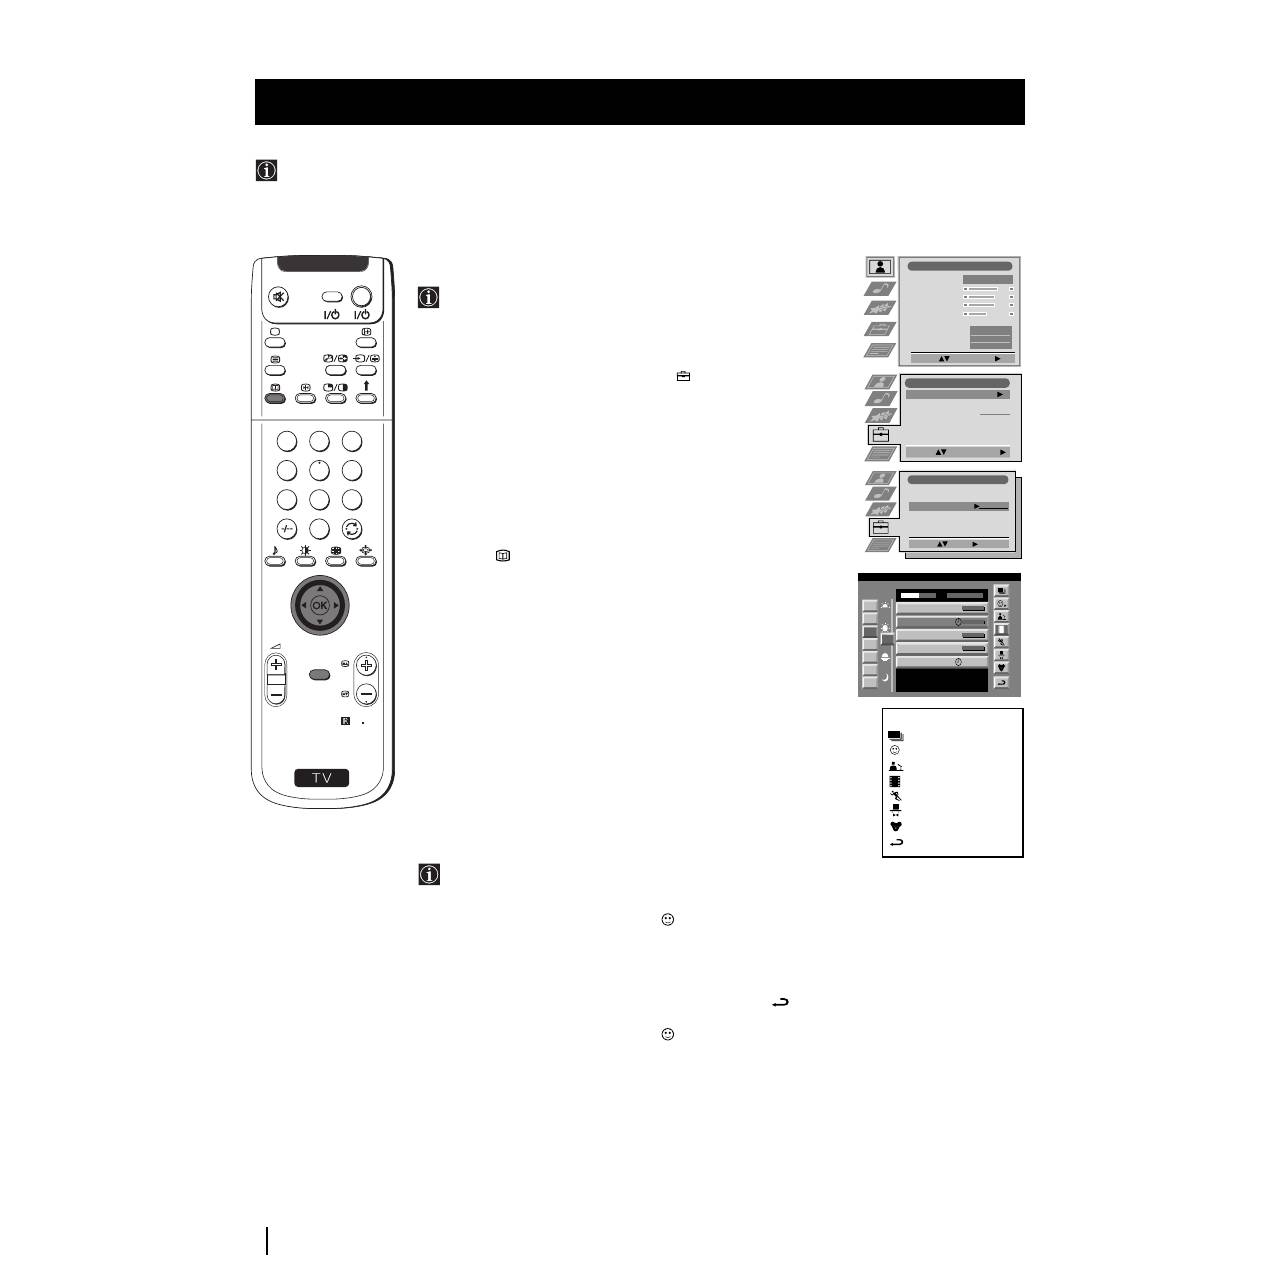
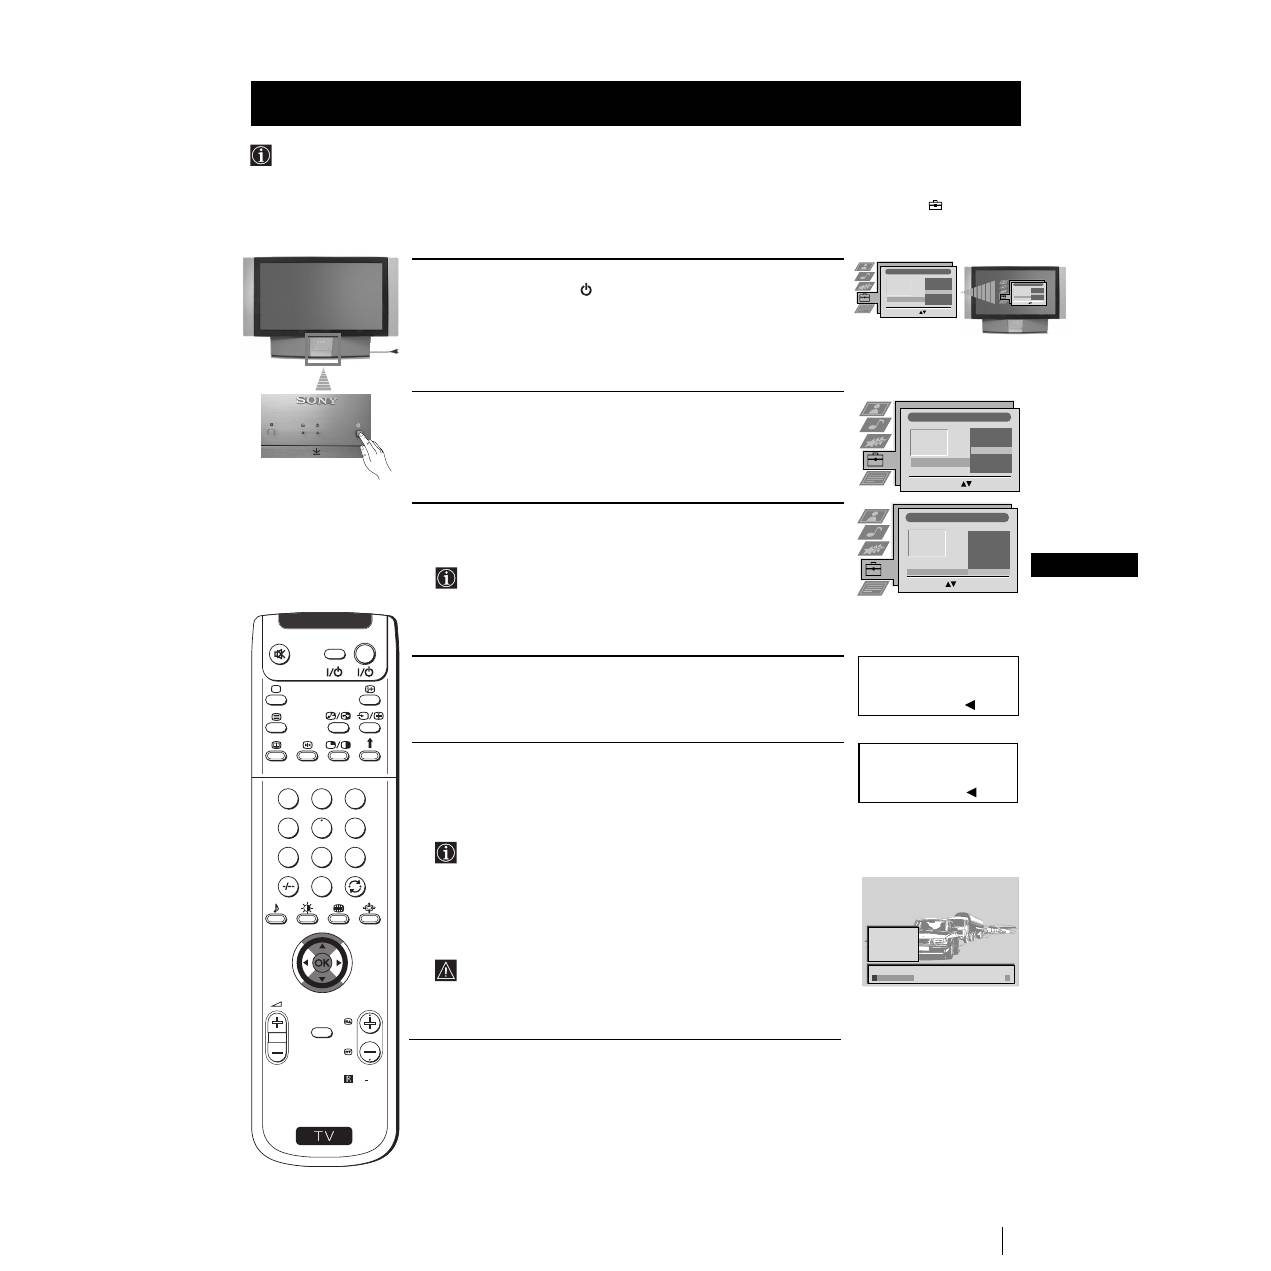
This function enables you to select the size of the picture coming from the input source as well as designate a name to the optional
equipment you have connected to the sockets of this set. This name can contain up to 5 characters (letters or numbers).
Labelling and Selecting the screen format of Input Sources
1
Press the MENU button on the remote control to display the menu
on the screen.
2
Push the joystick to
$
to select the
symbol, then push to
z
to
enter the Set Up menu.
3
Push the joystick to
$
or
4
to select AV Preset, then push to
z
.
4
Push the joystick to
$
or
4
to select the input source. Then push to
z
.
5
Push the joystick to
$
or
4
to select:
$
Off
(size of picture is not automatically adjusted).
Normal
(size of picture is automatically adjusted according to the
broadcaster information).
4
Full
(The set automatically adjusts the picture size to eliminate
any dark areas on the TV picture (as shown on the section
“Changing the Screen Format”).
Next push to
z
.
6
With the first element of the LABEL column highlighted, push the
joystick
to
$
or
4
to select a letter, number, "+" or blank;
then push to
z
to confirm this character. Select the other four
characters in the same way.
7
After selecting all the characters, press the OK button.
8
Repeat steps 4 to 7 if you wish to select the picture size or label other
input
sources.
9
Press the MENU button to exit and return to the normal TV screen.
Whenever the equipment with the labeled input is selected for use, the name
appears for a few seconds on the screen
S
RM 903
PROGR
MENU
1
4
7
2
5
8
0
3
6
9
TV
VIDEO
Picture Adjustment
Select:
Enter Menu:
Picture Mode
Contrast
Brightness
Colour
Sharpness
Reset
AI
Noise Reduction
Colour Tone
Personal
On
Off
Normal
Set Up
Auto Tuning
Programme Sorting
Select NexTView
AV Preset
Manual Set Up
Select:
Start Auto Tuning
Start
- - - - - - -
Enter:
Set Up
Auto Tuning
Programme Sorting
Select NexTView
AV Preset
Manual Set Up
Select:
- - - - - - -
AV Preset
Select:
Enter:
INPUT
LABEL
VIDEO
VIDEO
VIDEO
AV1
AV2
AV3
AV4
AUTO FORMAT
Off
Off
Normal
Full
AV Preset
Select A-Z, 0-9:
Confirm: OK
INPUT
LABEL
IDEO
V
VIDEO
VIDEO
AV1
AV2
AV3
AV4
AUTO FORMAT
Off
Off
Normal
Normal
AV Preset
Select:
Next: Confirm: OK
INPUT
LABEL
VIDEO
VIDEO
VIDEO
AV1
AV2
AV3
AV4
AUTO FORMAT
Off
Off
Normal
Full
23
GB
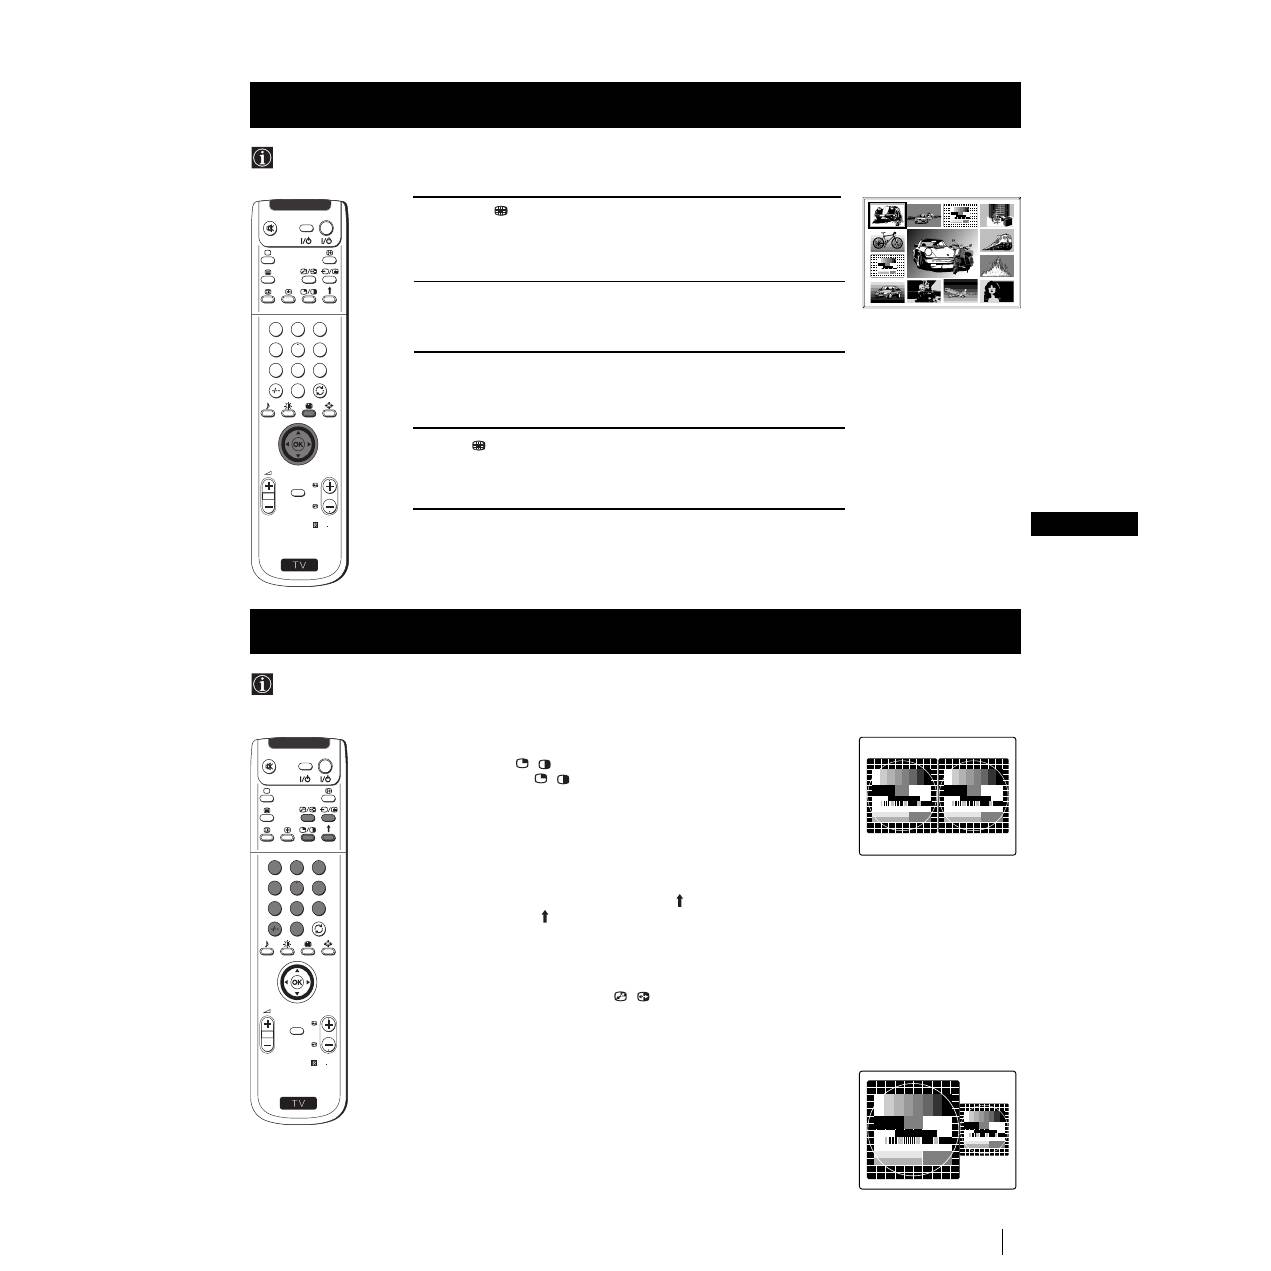
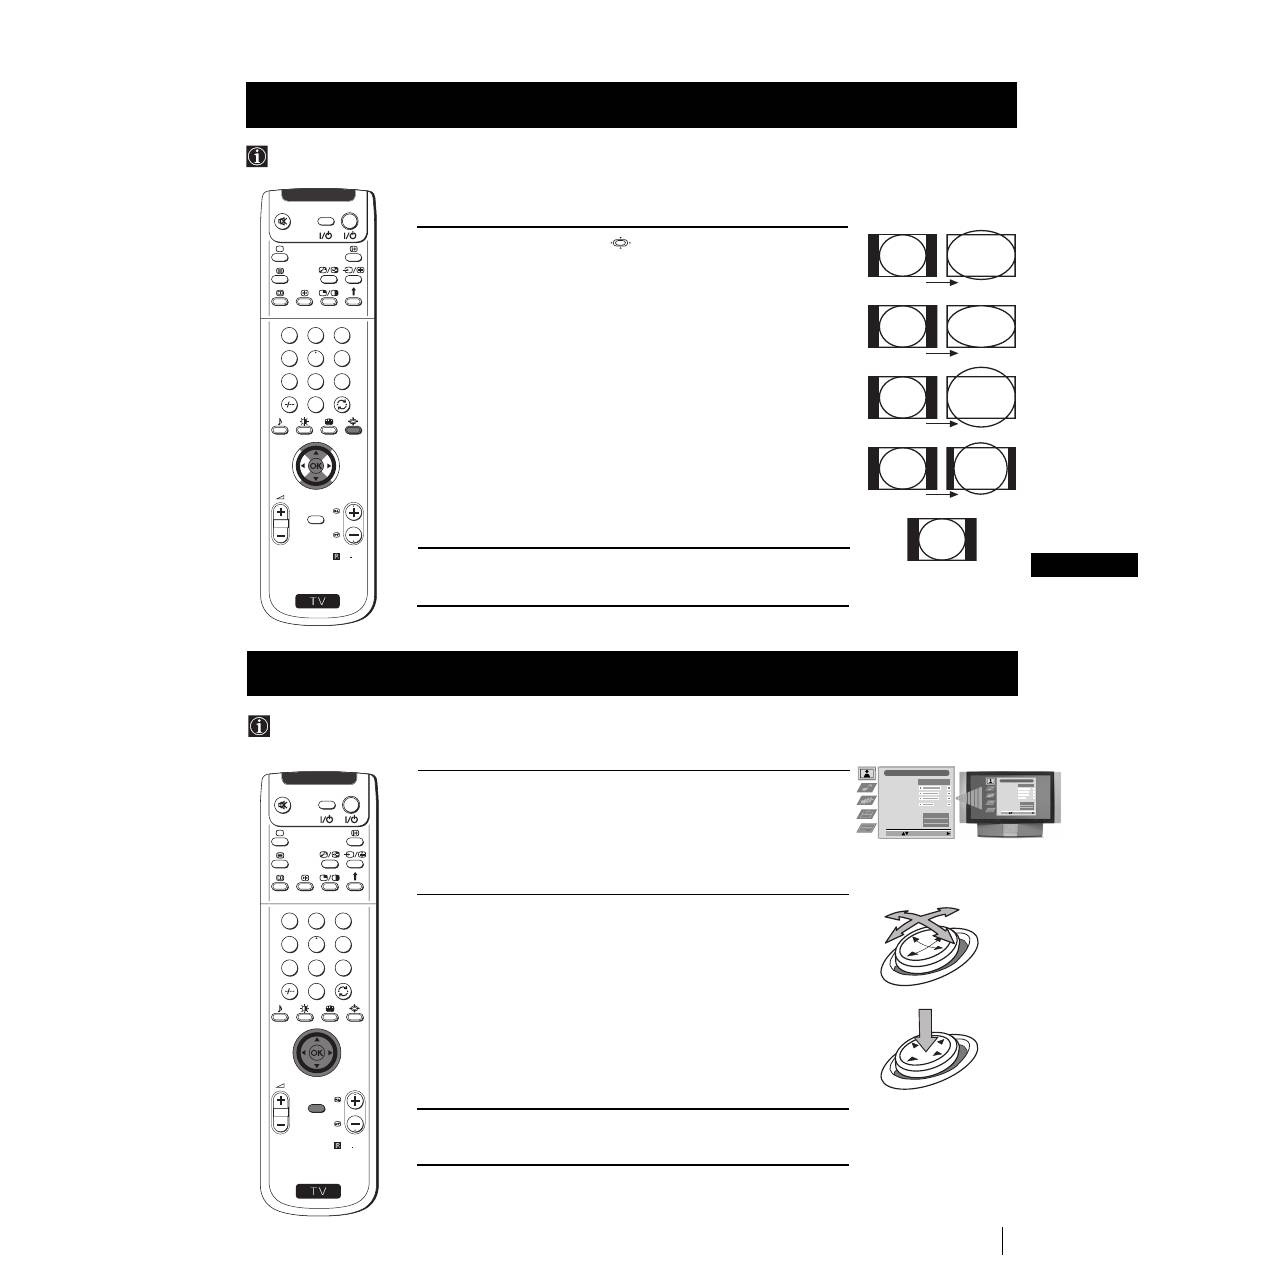
1
Press the
button on the remote control to select the PIP mode.
Now 13 programme positions appear on the screen, with the current
channel in the centre.
2
Push the joystick to
$
,
4
,
Z
or
z
to move within the 13 displayed
channels.
3
Press the OK button to select the framed channel. The selected
channel moves to the centre.
4
Press
to return to the normal TV mode.
Menu System
Menu System
Multi PIP (Picture in Picture) mode displays a succession of 12 still pictures and a 13th that is live. You can manually select which
channel you wish to watch, either full-screen or in the PIP.
Using Multi PIP (Picture In Picture)
S
RM 903
PROGR
MENU
1
4
7
2
5
8
0
3
6
9
TV
VIDEO
03
05
01
06
11
09
08
02
10
07
13
12
04
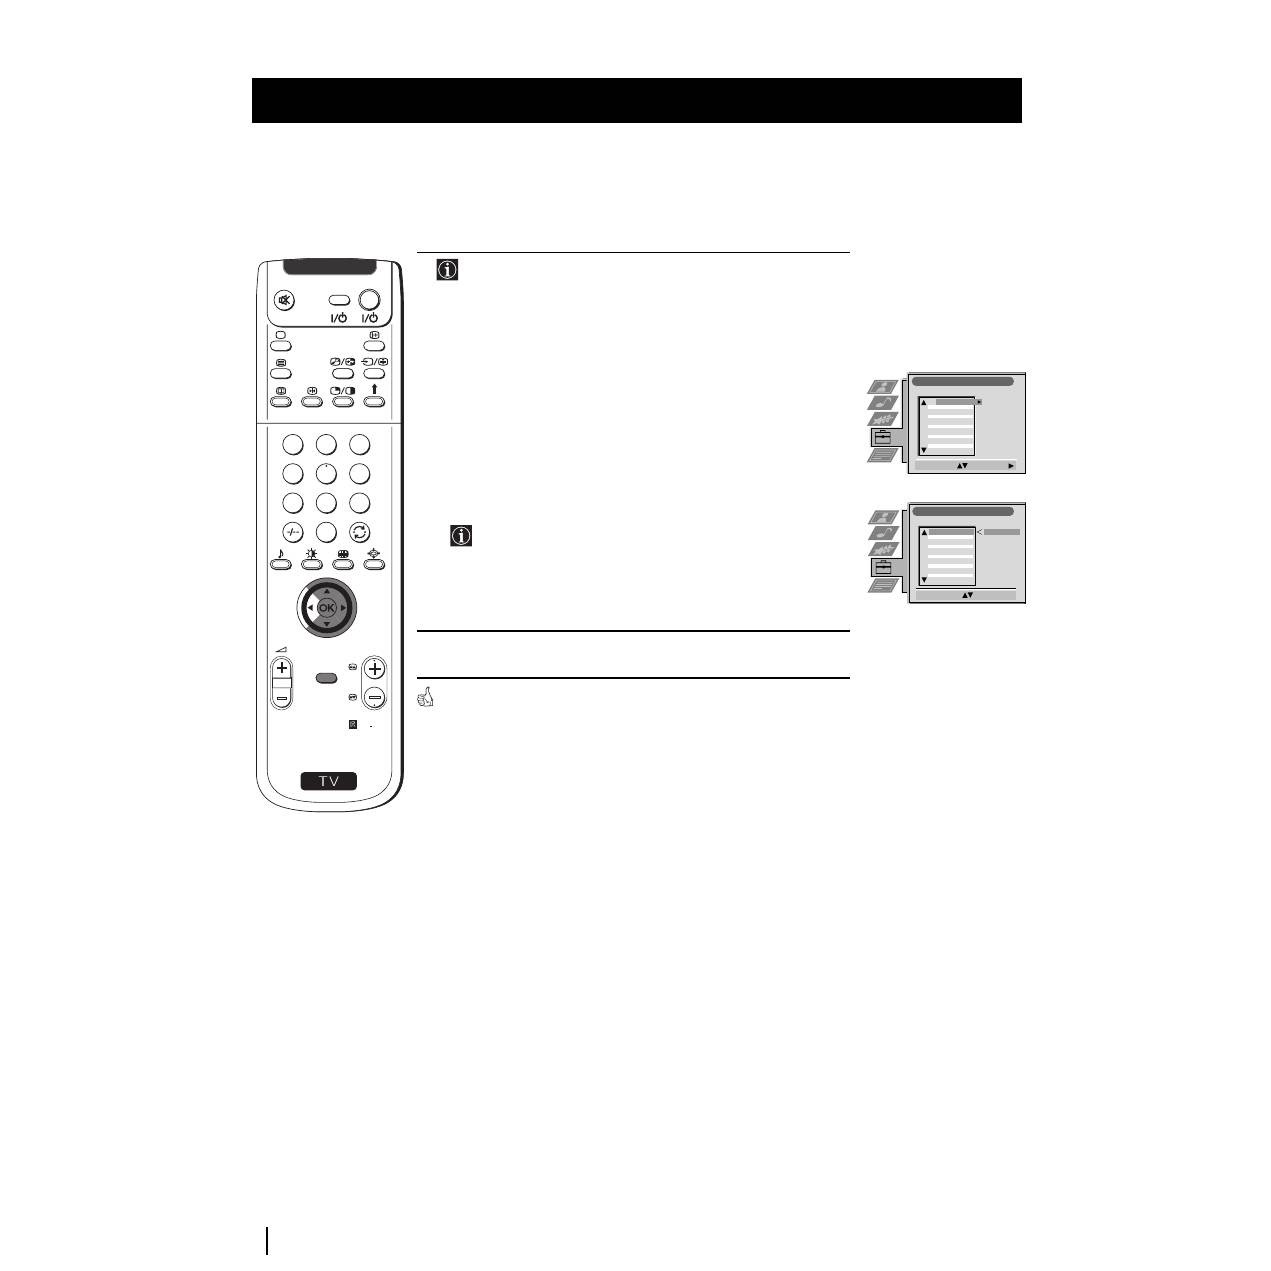
Switching PAP on and off
Press the button
/
on the remote control to display the two screens
in format 4:3. Press
/
again to switch PAP off.
Selecting PAP source
1
To change the source of the left screen:
With PAP switched on, press the number buttons (to select a TV
channel) or press
…
(to select a video source).
2
To change the source of the right screen:
With PAP switched on, press the button on the remote control.
When the symbol appears at the bottom of the right screen,
press the number buttons (to select a TV channel) or press
…
(to
select a video source).
Swapping screens
With PAP switched on, press the
/
button on the remote control to
swap the two screens.
Zooming the screens
With PAP switched on, push the joystick repeatedly to
Z
or
z
to
change the size of the two screens.
Selecting the sound of the right screen
You can select the sound of the right screen via headphones. With
PAP switched on, refer to the "Adjusting the Sound" section of this
instruction manual and set the option "
l
Dual Sound" to "PAP".
PAP divides the screen into two for watching two channels simultaneously. One of the pictures can be selected to come from a
video source.
The sound of the left screen comes through the set loudspeakers, the sound of the right screen is selectable via
headphones.
Using PAP (Picture And Picture)
S
RM 903
PROGR
MENU
1
4
7
2
5
8
0
3
6
9
TV
VIDEO
24
Teletext
Teletext
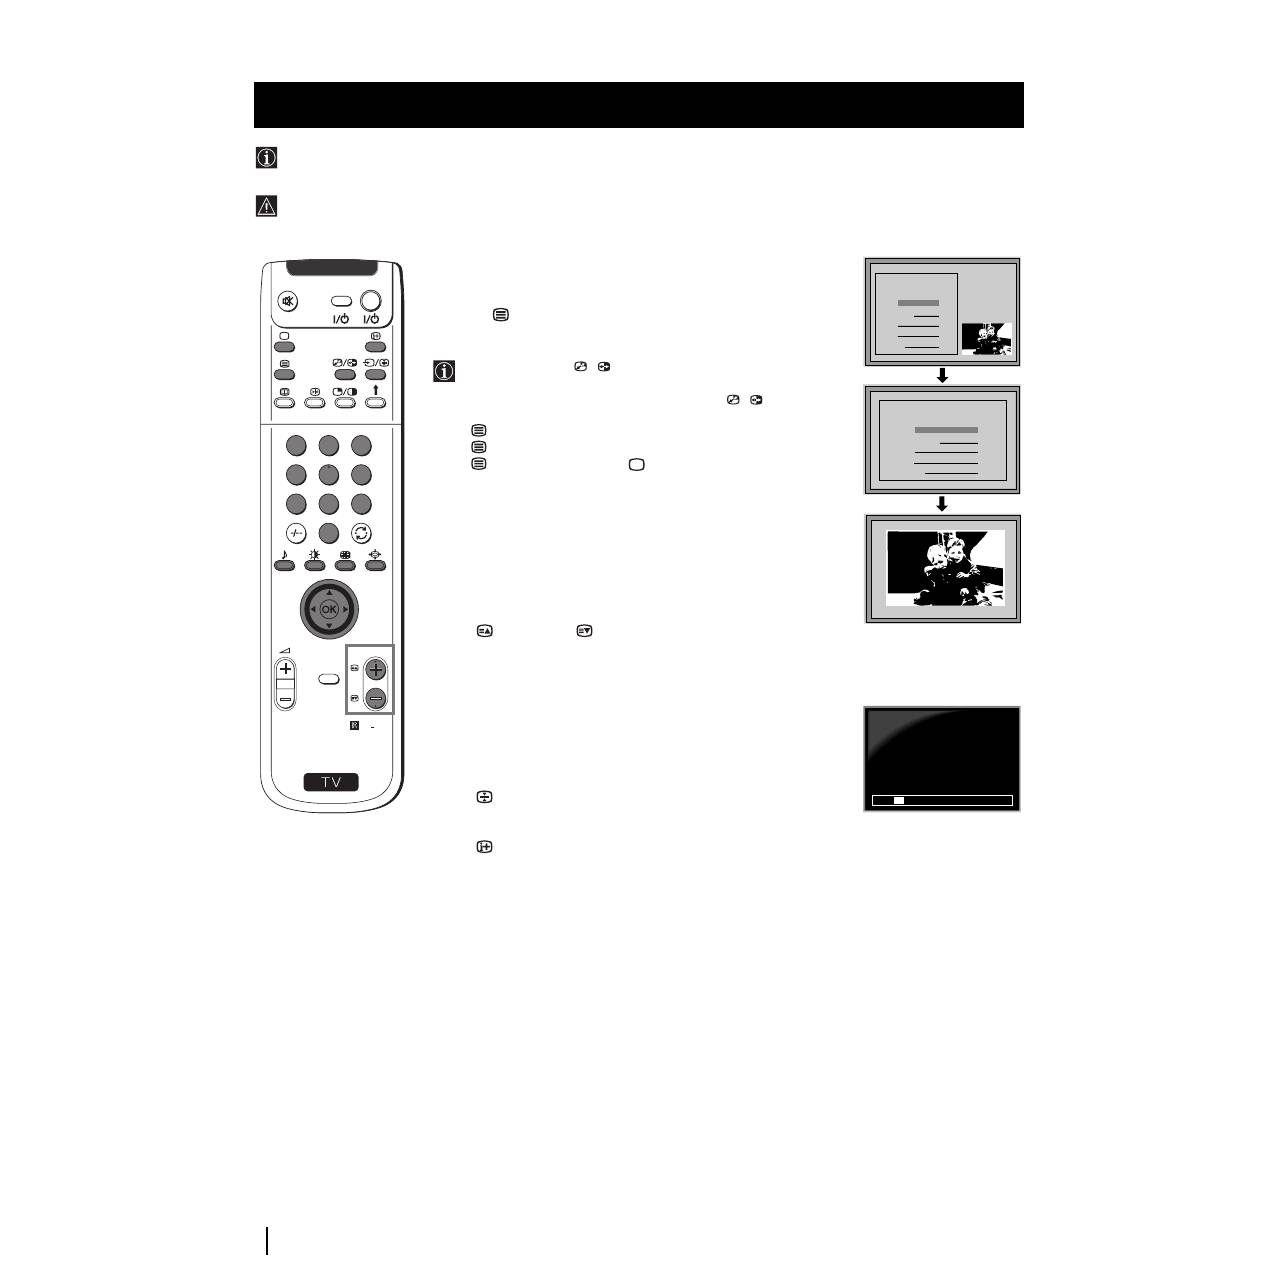
Most TV channels broadcast information via Teletext. The index page of the teletext service (usually page 100) gives you
information on how to use the service.
! Please use a TV channel with a strong signal, otherwise there may be Teletext errors.
Teletext
Switching Teletext on and off
1
Select the TV channel which carries the teletext service you want
to view.
2
Press the
button once for Picture and Teletext (P&T). The screen
is divided in two, with the TV channel in the right corner and the
Teletext display on the left.
P&T mode: Press
/
then press PROGR +/- to change
the channel of the TV screen. Push the joystick to
Z
or
z
to
change the size of the TV screen then press
/
again to
resume normal teletext reception.
3
Press
twice to get Teletext only.
4
Press
three times for Mix mode.
5
Press
a fourth time or press
to switch off Teletext.
Selecting a Teletext page
Input three digits for the page number using the numbered buttons on
the control. If you make a mistake, type in any three digits then re-enter
the correct page number.
Using Other Teletext Functions
Selecting the next or preceding page
Press the
(PROG+) or
(PROGR-) buttons on the remote
control to select the previous or next page.
Selecting a sub page
A teletext page may consist of several sub pages. In this case, after a
few seconds, an information line is displayed showing the number of
subpages.
Select the sub page by pressing
4
or
$
.
To freeze a Teletext page
Press the
button to freeze the page. Press again to cancel the freeze.
Revealing the index page
Press the
button to reveal the index page (normally page 100).
Fastext
(only available if the TV station broadcasts Fastext signals)
When the colour coded menu appears at the bottom of a teletext page,
press a coloured button on the remote control (red, green, yellow or blue)
to access the corresponding page.
Using the feature "Page Catching"
1
Press the numbered buttons on the remote control to select a teletext
page which has several page numbers on it (eg the index page).
2
Press the OK button.
3
Push the joystick to
4
or
$
to select the desired page number
then press the OK buttons. The requested page is displayed after
some seconds.
continued...
S
RM 903
PROGR
MENU
1
4
7
2
5
8
0
3
6
9
TV
VIDEO
TELETEXT
Index
Programme
News
Sport
Weather
25
153
101
98
01
TELETEXT
Index
Programme
News
Sport
Weather
25
153
101
98
TELETEXT
Index
Programme
News
Sport
Weather
25
153
101
98
TELETEXT
Index
Programme
News
Sport
Weather
25
153
101
98
TELETEXT
Index
Programme
News
Sport
Weather
25
153
101
98
TELETEXT
Index
Programme
News
Sport
Weather
25
153
101
98
TELETEXT
Index
Programme
News
Sport
Weather
25
153
101
98
TELETEXT
Index
Programme
News
Sport
Weather
25
153
101
98
TELETEXT
Index
Programme
News
Sport
Weather
25
153
101
98
01
TELETEXT
Index
Programme
News
Sport
Weather
25
153
101
98
216-02
01
03
04
05
06
07
08
02
25
GB
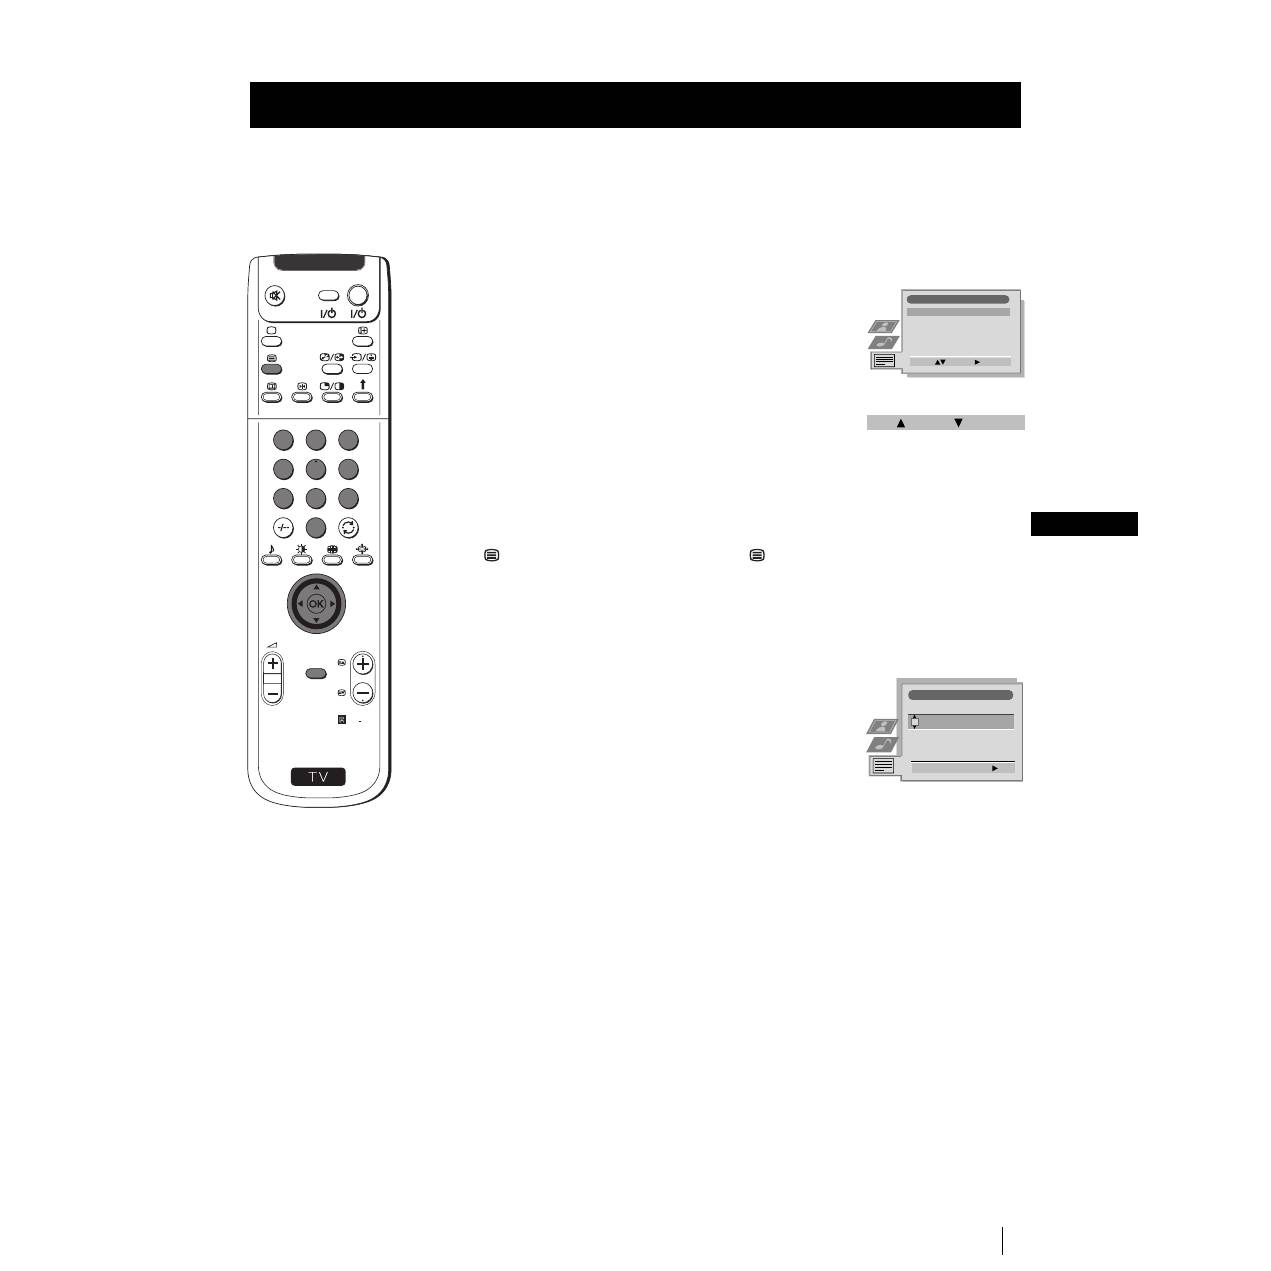
Using the Teletext menu
1
With Teletext switched on, press the MENU button on the remote
control to display the teletext menu on the TV screen.
2
Push the joystick to
4
or
$
to select your chosen item, then push to
z
to display the relevant sub menu.
3
To remove the teletext menu from the screen, press the MENU
button.
Top / Bottom / Full
The Top/Bottom/Full sub menu allows you to enlarge different
sections of the Teletext page. Push the joystick
4
to enlarge the
upper half of the screen, push to
$
to enlarge the lower half. Press
the OK button to restore the page to normal size.
Text Clear
After having selected this function, you can watch a TV channel while
waiting for a requested Teletext page. As soon as the page is available,
the symbol
changes colour. To view the page, press
.
Reveal
Some teletext pages contain hidden information (eg for a quiz),
which you can reveal. The hidden information appears on screen.
Time Page
(depending on availability of teletext service)
You can call up a time-coded page such as an alarm page at a time
specified by you. After you have displayed the Time Page sub menu:
1
Press the numbered buttons on the remote control to enter the
three digits of the desired page.
2
Press the numbered buttons again to enter the four digits of the
desired time.
3
Press the OK button to store the desired time. The time is displayed
in the top left corner of the screen. At the requested time the page is
displayed.
Page Overview
(depending on availability of teletext service)
In the Page Overview menu the block and group pages of TOP- Text
are sorted into two columns, so that the customer can easily select this
page. For each block page in the first column, the corresponding
group pages are shown in the second column. Push the joystick
4
or
$
to select the desired block page, then push to
z
to enter to the group
pages column. Push to
4
or
$
to select the desired group page .
Finally, press the OK button to display the page.
Teletext
Teletext
S
RM 903
PROGR
MENU
1
4
7
2
5
8
0
3
6
9
TV
VIDEO
Teletext
Top / Bottom / Full
Text Clear
Reveal
Time Page
Page Overview
Select:
Enter:
Top:
Bottom:
Full: OK
Time Page
PAGE
TIME
Select Page: 0-9
Next:
- - : - -
– – –
26
NexTView
NexTView
* (depending on availability of service)
NexTView is an on-screen electronic programme guide (EPG), providing you with programme information for different
broadcasters.
NexTView *
Selecting your NexTView provider
The set automatically selects the best NexTView provider for you.
This provider is available about 30 minutes after the channel tuning.
You can however change this selection of provider if you wish.
1
Press the MENU button on the remote control to display the menu
on the screen.
2
Push the joystick to
4
or
$
to select the
symbol, then push to
z
to enter the Set Up menu.
3
Push to
4
or
$
to highlight Select NexTView then push to
z
. A list
is displayed containing all available NexTView providers.
4
Push to
4
or
$
to select the desired provider then press the OK
button to store.
5
Press the MENU button to remove the menu from the screen.
Displaying NexTView
1
Press the
button repeatedly on the remote control to switch
NexTView on and off.
* In some cases, you may also need to push the joystick to
Z
to
display the Sony electronic programme guide.
2
Push the joystick to
4
,
$
,
Z
or
z
buttons to move the cursor
around the screen.
3
Press the OK button to confirm a selection.
a) If you press the OK button in the date, time or icon (themes)
columns, you change the programme list according to the
selection.
b) If you press the OK button in the programme list, you directly
display the channel if the broadcast is currently running, or,
you display the "Long Info" menu if the broadcast is running at
some future time.
Using the "Individual Setting" menu
You can make a personal list of the types of programmes you
wish to view on the programme guide.
1
Push the joystick
4
or
$
to select the
icon then push to
z
to
display the "Individual Setting" menu.
2
Push the joystick
4
or
$
to select your chosen item on the screen
then press the OK button to confirm your choice.
3
Repeat step 2 for all the items you wish to have in your list.
4
When you have finished the list, push to
z
to select the
icon.
5
Press the OK button to return to the previous menu.
6
Push the joystick
4
or
$
to select the
icon then press the OK
button again to activate your "Individual Setting" filter.
S
RM 903
PROGR
MENU
1
4
7
2
5
8
0
3
6
9
TV
VIDEO
Picture Adjustment
Select:
Enter Menu:
Picture Mode
Contrast
Brightness
Colour
Sharpness
Reset
AI
Noise Reduction
Colour Tone
Personal
On
Off
Normal
Set Up
Auto Tuning
Programme Sorting
Select NexTView
AV Preset
Manual Set Up
Select:
Start Auto Tuning
Start
- - - - - - -
7
Tue
07 Tue
12:38
8
Wed
10
Fri
11
Sat
12
Sun
13
Mon
9
Thu
12
SWISS
Star Wars
Super RTL
Hat der alte Hexenmeister sich doch
einmal fortbegeben, und nun sollen
seine Geister auch nach meinem Willen
leben.
Werner - Beinhart
Pro 7
Flui grüsst den Rest der Welt
Kabel 1
Once upon a time in the West
Euronews
International News
RTL Plus
10:35 - 12:45
10:20 - 12:00
10:45 - 10:50
11:00 - 11:20
11:45 - 12:50
TXT
TPS / RINGIER
Tue 07. 04 .98
Index
full selection list
personal selection
news broadcasts
movies
sports
entertainment
children
return to last menu
Enter:
Set Up
Auto Tuning
Programme Sorting
Select NexTView
AV Preset
Manual Set Up
Select:
- - - - - - -
continued...

27
GB
Using the Long Info menu
With this menu screen, you can set timers or record selected
programmes.
1
Push
4
or
$
to select a future programme in the programme list
column.
2
Press the OK button to display the Long Info menu on the TV
screen.
To set the timer
Push the joystick
4
or
$
to highlight the
icon then press the OK
button repeatedly to "set the timer" or "cancel the timer". If you choose
to set the timer, the programme is marked with a clock symbol and a
message appears on the screen shortly before the programme is due
to start asking whether you wish to still view this programme.
To view the timer table
Push the joystick
Z
or
z
to highlight the
icon then press the OK
button repeatedly to switch on/off the timer table. This table shows the
programmes on which you have already set a timer. (You can set a timer
on up to 5 programmes).
To record programmes
(only with Smartlink VCRs)
1
Connect your Smartlink VCR.
2
Push the joystick to
Z
or
z
to select
then press the OK button
to download the information to your VCR.
3
To set up the VCR:
VPS/PDC
Push the joystick
Z
or
z
to select VPS/PDC then press the OK
button repeatedly to select On or Off. With this setting on you have
the guaranteed recording of the whole broadcast should there be a
change in the TV programme. This only works if the selected
channel broadcasts a VPS/PDC signal.
Speed
Push the joystick to
$
to select Speed then press the OK button
repeatedly to select between SP for standardplay or LP for longplay.
With longplay you can record twice as much on a videotape.
The picture quality however may suffer.
VCR Setup
Push the joystick to
$
to select VCR Setup then press the OK
button repeatedly to select which VCR you wish to programme,
namely VCR1 or VCR2.
4
Finally, push the joystick to
z
to select the
icon then press the
OK
button to remove the menu from the TV screen.
NexTView
NexTView
07 Tue
12:38
Address Mapping
The position of the addresses in the
OSDA is shown in the following diagram.
The position values of the DPW are set
to '0'.
If other values are set, the complete
combination will be scrolled.
Example:
if the DPWC is set to '63', the char-
Speed
Timer Prog
VPS/PDC
SP
VCR1
On
This channel has been set for a timer
First nextTView/EPG-Providers in Europe
SWISS
TXT
TPS / RINGIER
nexTView
Tue 07. 04 .98
Speed
VCR Setup
VPS/PDC
SP
VCR1
On
S
RM 903
PROGR
MENU
1
4
7
2
5
8
0
3
6
9
TV
VIDEO
28
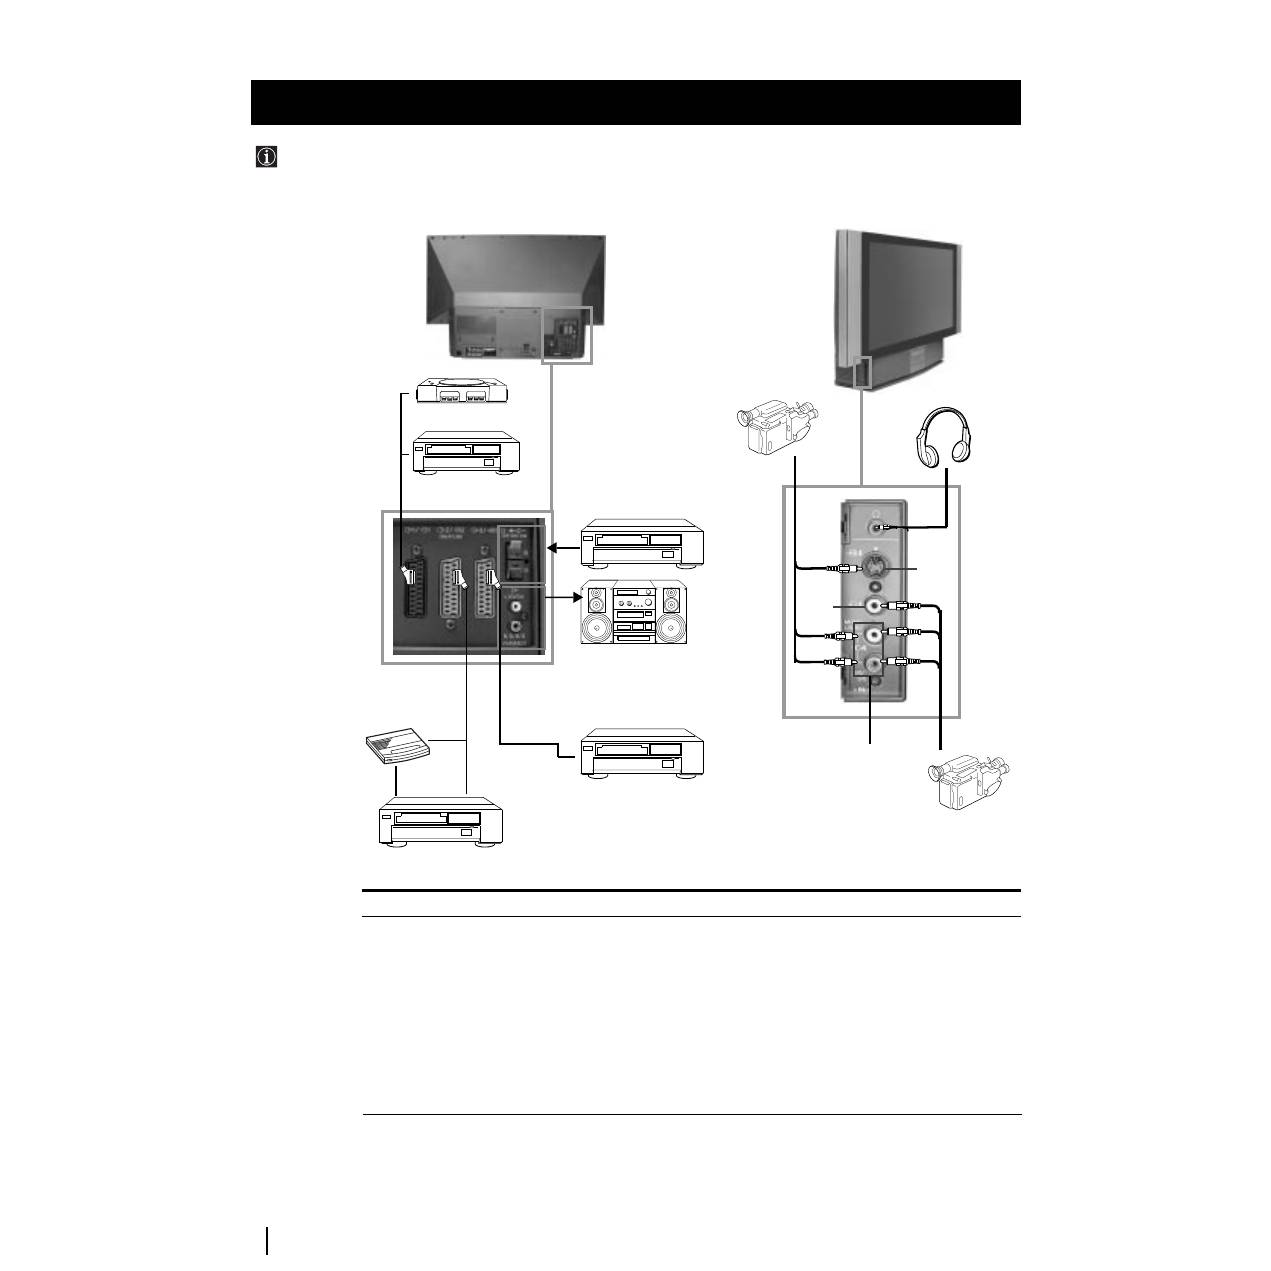
Optional Connections
Acceptable input signal
A
Audio/video and RGB signal
B
Audio/video and S video signal
C
Audio/video and S video signal
D
Centre speaker input Set “Speaker”
on the Features menu to “Centre in”.
E
No inputs
F
S Video signal
G
Video signal
H
Audio signal
I
No input
1
2
B
A
C
H
I
DVD
VCR
S.VHS/Hi8/DVC
camcorder
Dolby
Surround
Amplifier
Hi-Fi
F
G
8mm/Hi8/DVC
camcorder
“PlayStation”*
Decoder
D
E
Available output signal
Video/audio from TV tuner.
Video/audio from selected source.
Video/audio displayed on TV screen (monitor out).
No outputs.
Audio signal.
No output.
No output.
No output.
Audio signal to headphones.
To avoid picture
distortion:
• Do not connect
equipment to
F
and
G
connectors at
the same time.
VCR
Optional Connections
Using the following instructions, you can connect a wide range of optional equipment to this set.
Connecting Optional Equipment
* “PlayStation”
is a product of
Sony
Computer
Entertainment,
Inc.
* “PlayStation”
is a trademark
of Sony
Computer
Entertainment,
Inc.

29
GB
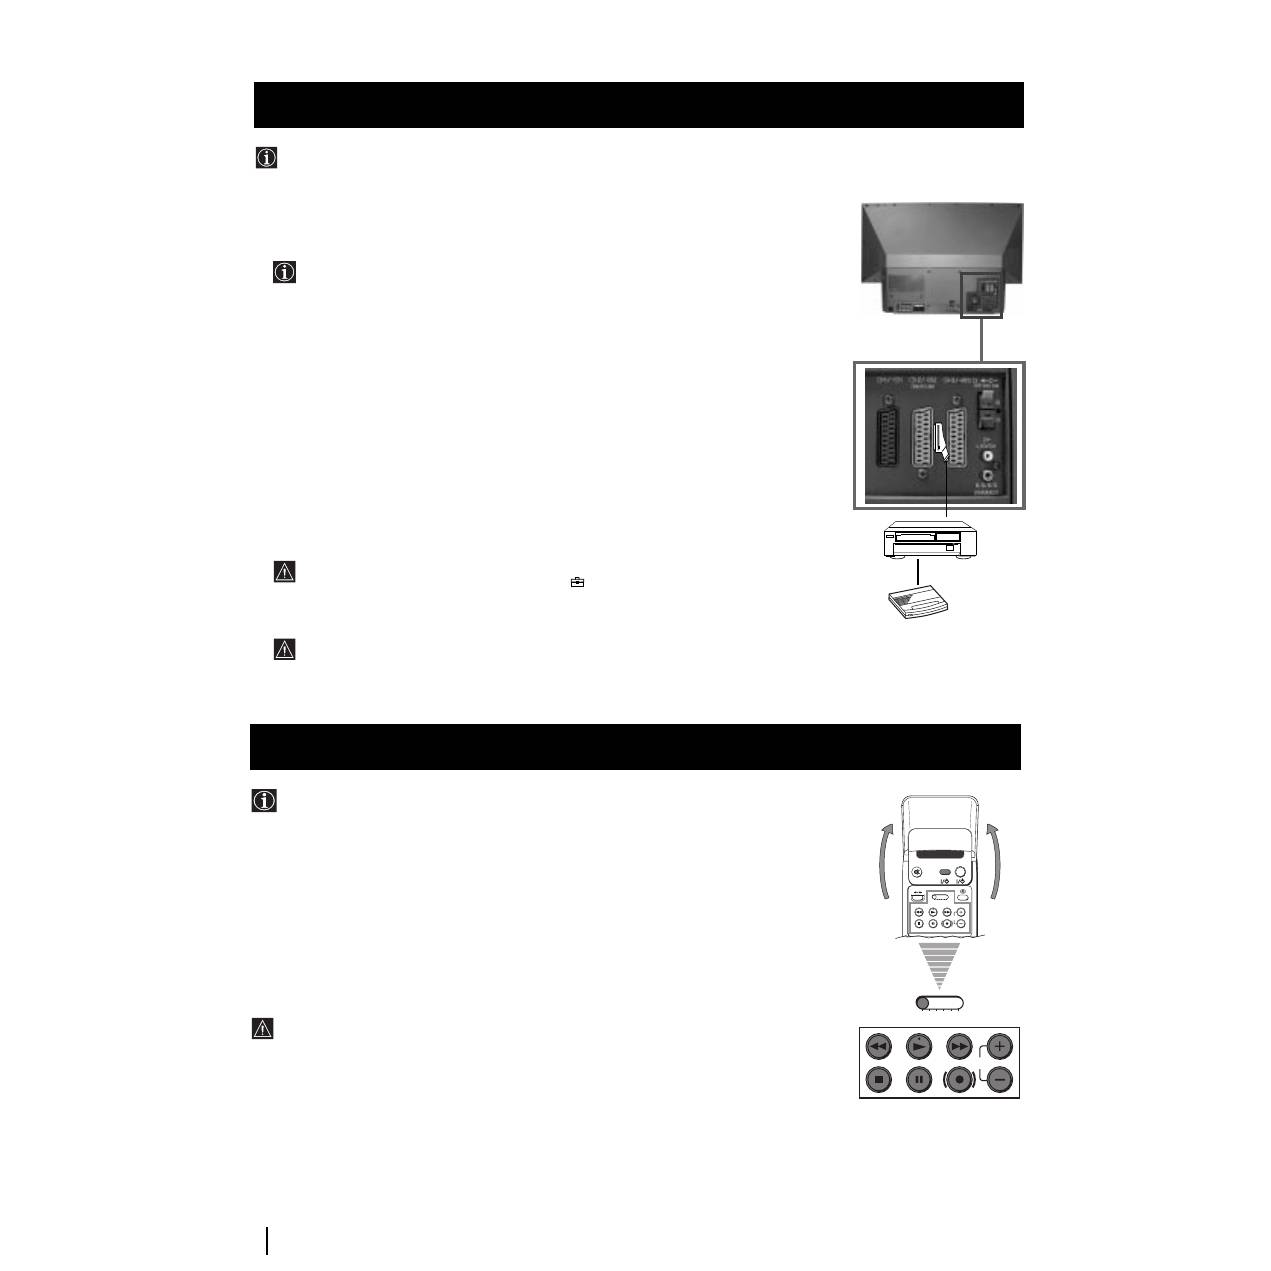
Additional Information when connecting equipment
Connecting a VCR
We recommend you connect your VCR to the
B
or
C
socket using a scart lead. If you do not have a scart lead, use the “Manually
Tuning the TV” section of this instruction manual to tune in the channel of the VCR test signal to TV programme number “0”.
Also refer to your VCR instruction manual to get the VCR test signal.
If your video supports Smartlink please refer to the "Smartlink" section of this instruction manual.
Connecting to External Audio Equipment
1 To listen to the audio of the set on the Hi-Fi equipment:
Plug in your Hi-Fi equipment to the
E
sockets on the rear of the set if you wish to amplify the audio output
from the TV.
The output level from
E
sockets can be varied by adjusting the volume of the headphones. Refer to the “Adjusting the sound”
section of this instruction manual to adjust the volume of the headphones.
2 To listen to the Dolby Prologic system sound on the set speakers:
Plug in your Dolby Prologic system decoder amplifier to the
D
socket on the rear of the set if you wish to listen to the audio
output from your equipment on the TV speaker. If you have a Dolby amplifier, connect the centre output from your amplifier
to the
D
socket to use the set as a centre speaker. Refer to the “Using the Features menu” section of this instruction manual
and set the option “Speaker” to “Centre in”.
Remember that the maximum input level of this input is 30 W. Be careful never to over this limit.
For mono equipment
Connect the phono plug to the L/G/S/I socket on the front of the TV and select the
4 input signal using the instructions on
this page below.
Select and View the Input Signal
In order to get the input signal of a connected equipment onto the TV screen, you need to select the symbol of the
connector to which you have connected the device.
e. g. : Your VCR is connected to the connector with the symbol
Y
1/
1. Press the button
on the remote control
repeatedly until you see the symbol
1 on the screen.
Optional Connections
S
RM 903
PROGR
MENU
1
4
7
2
5
8
0
3
6
9
TV
VIDEO
Optional Connections
Using Optional Equipment
1
Connect your equipment to the designated socket, as it is indicated on the previous page.
2
Press the
button repeatedly on your remote control until the correct input symbol
appears on the screen.
Symbol
Input signals
1
1
1
1
• Audio/video input signal through the Scart connector
A
or * RGB
through Scart connector
A
.
2
2
2
2
• Audio/Video input signal through the Scart connector
B
or * S Video
through Scart connector
B
.
3
3
3
3
• Audio/Video input signal through the Scart connector
C
or * S Video
through Scart connector
C
.
4
4
4
4
• S Video input signal through the 4-pin DIN connector
F
or * video input
signal through phono jack
G
and audio input signal through phono jacks
H
.
* (automatic detection of the signal according to the connected equipment)
3
Switch on the connected equipment.
4
To return to the normal TV picture, press the
button on the remote control.
30
Optional Connections
Optional Connections
Smartlink is a direct link between the set and a VCR.
For Smartlink you need:
• A VCR which supports Smartlink, NextView Link, Easy Link or Megalogic.
Megalogic is a trademark of Grundig Corporation.
EasyLink is a trademark of Philips Corporation.
• A fully-wired 21 pin SCART cable to connect your VCR to the Scart connector
:
2/
q
2
(SMARTLINK) on the rear of the set.
The features of Smartlink are:
• Tuning information such as the channel overview are downloaded from the set to the VCR.
• Direct recording: While watching TV you need to press just one button on the VCR to record
this
programme.
• Automatically switching on: With the set in standby mode, pressing the “Play
z
” button on
your VCR automatically switches the TV on.
If you have connected a decoder to a VCR which supports Smartlink feature, select
the menu Further Programme Preset in the
(Manual Set Up) menu and select
DECODER AV2
to each coded channel. For more details, please refer to the section
"Using the Further Programme Preset function" of this instruction manual.
For more information on Smartlink, please refer to the Instruction Manual of your
VCR.
Smartlink
VCR
Decoder
Using the buttons underneath the cover of the remote control you can
control other Sony equipment.
1
Open the cover of the Remote Control.
2
Set the selector VTR 1234 DVD according to the equipment you want to control:
VTR 1
Beta VCR
VTR 2
8 mm VCR
VTR 3
VHS VCR
VTR 4
Digital Video (DCR-VX 1000/9000 E, VHR-1000)
DVD
Digital Video Disk
3
Use the buttons underneath the cover on the remote control to operate the equipment.
• If your equipment has a COMMAND MODE selector, set this
selector to the same position as the VTR 1234 DVD selector on this set Remote Control.
• If the equipment does not have a certain function, the corresponding
button on the remote control will not work.
Remote Control of other Sony Equipment
VIDEO
TV
VTR 1 2 3 4 DVD
C H
C H
VTR 1 2 3 4 DVD
Rear
31
GB
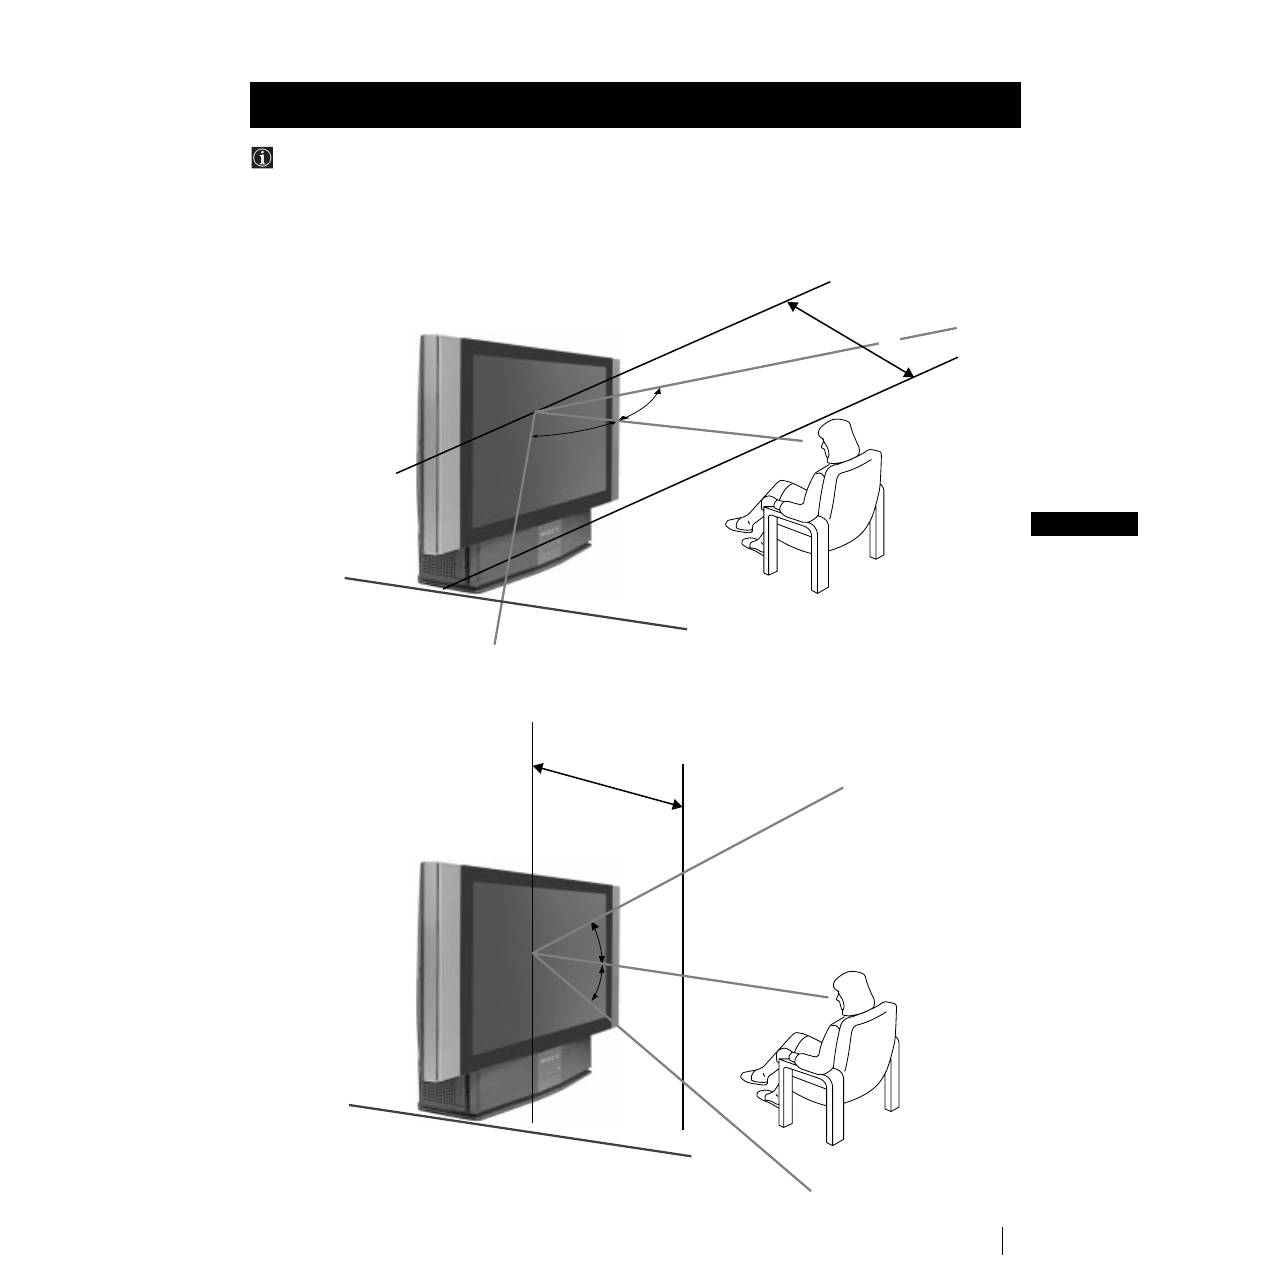
Additional Information
Additional Information
For the best picture quality, try to position the set so that you can view the screen from within the areas shown below.
Optimum Viewing Area
Horizontal viewing area
(Optimum viewing position)
Vertical viewing area
(Optimum viewing position)
65º
2 m and more
2 m and more
30º
30º
65º
32
Additional Information
Additional Information
Replacing the Lamp
When the lamp becomes dark or the picture colour is
not normal or the lamp indicator on the set flashes,
replace with a new lamp.
• Use the lamp XL-2000E for replacement. If you use
another lamp, it may cause damage to the set.
• Do not remove the lamp except when replacing it.
• Before replacing the lamp, turn off the power and
disconnect the power cord.
• Replace the lamp after it becomes cool. The front
glass of the lamp remains 100 °C (212 °F) and more
even 30 minutes after the power is turned off.
• Do not place the removed lamp in proximity to
children or flammable material.
• Do not get the removed lamp wet, or insert objects
inside the lamp. It may cause the lamp to explode.
• Do not place near metal or easily flammable objects,
as this may cause fire. Also, do not put your hand
inside the lamp compartment, as you may be burned.
• Attach the new lamp firmly. If it is not firmly
attached, the picture may become dark.
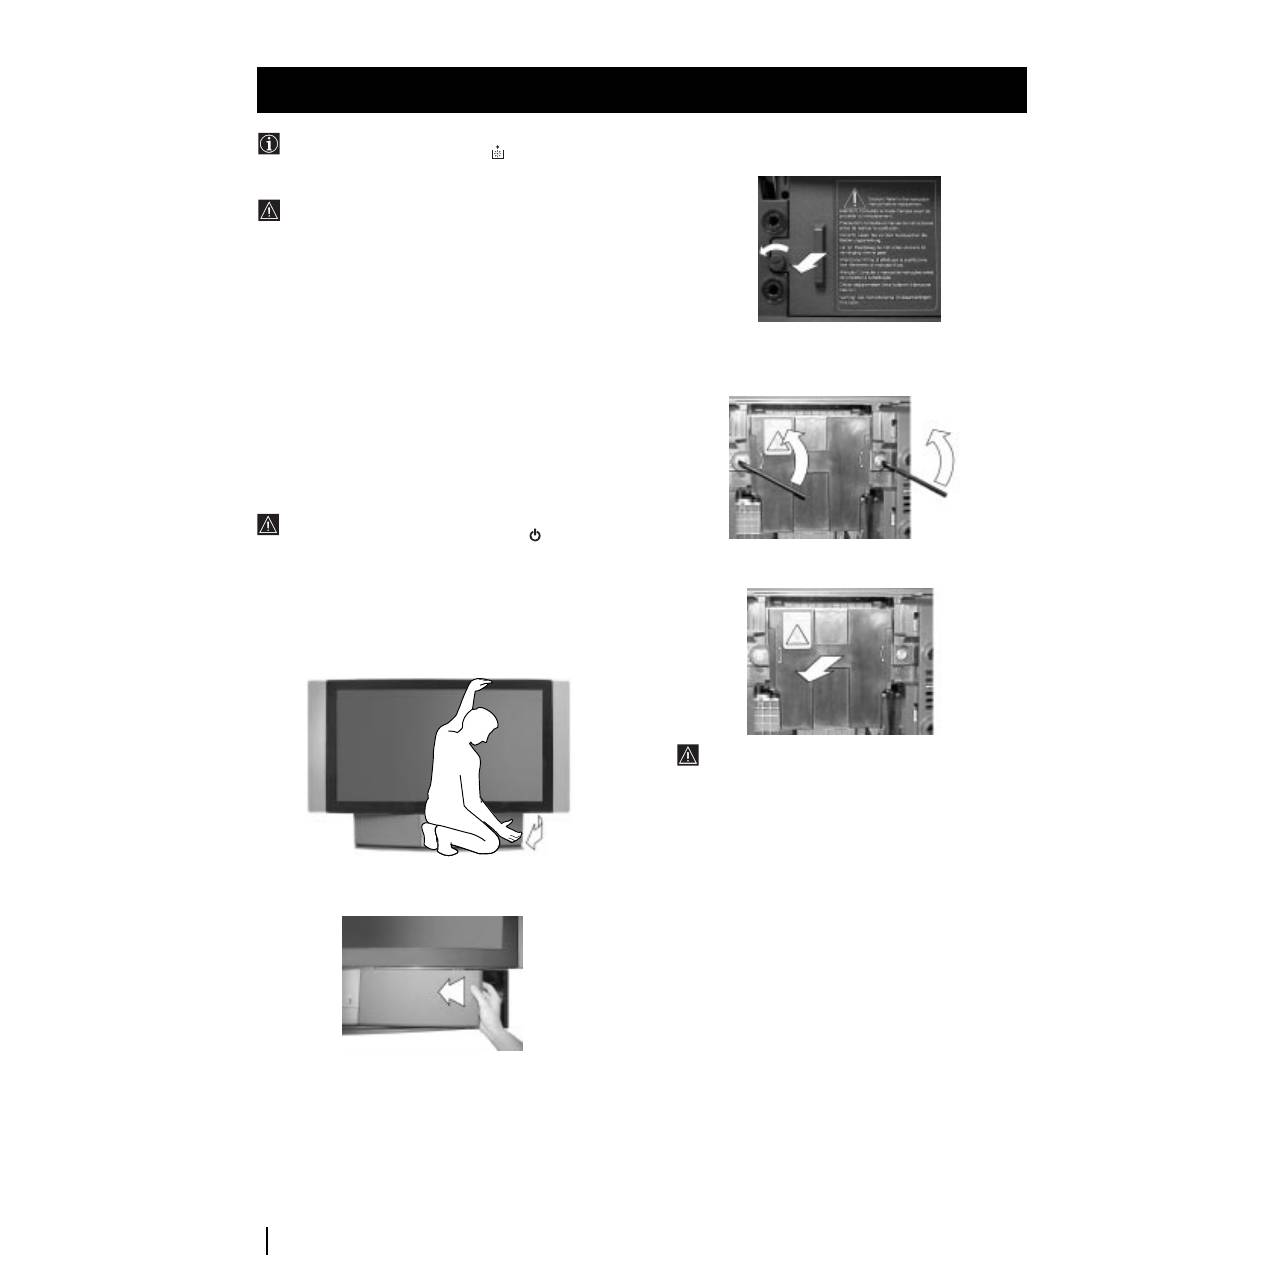
1
Turn off the power and disconnect the power cord.
• If you start changing the lamp without disconnecting
the power cord, the standby indicator
on the set
flashes. To continue changing the lamp, disconnect the
power cord.
• Replace the lamp 30 minutes or more after the power
is turned off.
Prepare the new lamp.
2
Remove the front panel
.
Remove the front panel without moving the set.
Grasping the right side of the front panel with your
fingers, pull it forward. Be careful not to catch your
fingernails.
3
Loosen the screw with the object such as a coin and
remove the lamp cover.
4
Loosen two screws and pull out the lamp.
Loosen two screws with the supplied wrench.
Pull out the lamp by the handle.
The lamp is still too hot just after the power is turned
off. Be careful that you don’t touch the front glass or
surrounding area of the lamp or the glass of the lamp
compartment.
5
Attach the new lamp.
Replace the new lamp securely in the lamp receptacle and
fasten the screws tightly.
6
Attach the lamp cover.
Fasten the screw tightly with the object such as a coin.
7
Attach the front panel.
Attach the front panel as it was.
Notes
•
Do not touch or stain the front glass of the new lamp or the glass
of the lamp compartment. If the glass become dirty, the picture
quality may deteriorate or the lamp life may shorten.
•
Attach the lamp cover firmly. If it is not firmly attached, the
power will not turn on.
•
When the lamp burns out, a noise is audible. This does not
represent a damage.
•
Consult your nearest Sony service center to obtain a new lamp.
•
Always remember to dispose of used lamps in an evironmental
friendly way.

33
Additional Information
Additional Information
Specifications
TV system
B/G/H, D/K, I, L
Colour system
PAL, SECAM
NTSC 3.58, 4.43 (only Video In)
Channel coverage
VHF:
E2-E12
UHF:
E21-E69
CATV: S1-S20
HYPER: S21-S41
D/K:
R1-R12, R21-R69
I:
UHF B21-B69
L:
F2-F10, B-Q, F21-F69
Rear Terminals
•
Centre speaker input terminals (2
terminals)
•
(L, R) audio outputs (phono jacks)
•
:
1/
21-pin Euro connector (CENELEC
standard)
including audio/video input, RGB
input,
TV audio/video output.
•
:
2/
q
2
21-pin Euro connector (CENELEC
(SMARTLINK)
standard) including audio/video
input, S video input,
selectable audio/video output.
•
:
3/
q
3
21-pin Euro connector (CENELEC
standard)
including audio/video input, S video
input,
audio/video output (monitor out).
Front Terminals
q
4 S video input - 4 pin DIN
…
4 video input - phono jack
4 audio inputs - phono jacks
Headphones jack - minijack stereo
C
Sound output
2 x 20 W (music power)
2 x 15 W (RMS)
Centre SP input
30 W (RMS) (using as the centre speaker)
Power consumption
210 W
Standby Power consumption
≤
1 W
Dimensions (w x h x d)
Approx. 1376 x 898 x 384 mm
Weight
Approx. 43 kg
Accessories supplied
1 Remote Control (RM-903)
2 Batteries (IEC designated)
1 Wrench
2 Brackets
2 Screws
1 Cleaning Cloth
Other features
Digital Comb filter (High resolution)
TELETEXT, Fastext, TOPtext (2000 page TEXT memory)
NexTView
NICAM
Sleep Timer
Smartlink
Noise Reduction
Graphic Equaliser
Personal ID
Design and specifications are subject to change without notice.
Ecological Paper - Totally Chlorine Free
33
GB
34
GB
Problem
No picture (screen is dark), no sound.
Poor or no picture (screen is dark),
but good sound.
Poor picture quality when watching a
RGB video source.
Good picture, no sound
No colour on colour programmes
Distorted picture when changing
programmes or selecting teletext
Striped picture
Noisy picture when viewing TV channel
Remote control does not function
The lamp indicator on the set
flashes.
The standby indicator
on the set
flashes.
Additional Information
Additional Information
Here are some simple solutions to the problems which may affect the picture and sound.
Troubleshooting
Solution
• Plug the set in.
• Press the
button on the front of the set.
• If the
indicator is on in red colour, press TV
button on the remote
control.
• Check the aerial connection.
• Check that the selected video source is on.
• Turn the set off for 3 or 4 seconds and then turn it on again using the
button on the front of the set.
• Using the MENU system, select the Picture Adjustment menu. Adjust the
brightness, contrast and colour balance levels.
• Press the
button repeatedly on the remote control until the RGB
symbol
1 is displayed on the screen.
• Press the
+/- button on the remote control.
• Check that "Main" speaker is selected in the "Features" menu.
• Using the MENU system, select the Picture Adjustment menu. Adjust the
colour
balance.
• Turn off any equipment connected to the Scart connectors on the rear of
the set.
• Adjust the RF Atenuator (ATT). For details, please refer to the section
"Using the Further Programme Preset function".
• Adjust Fine Tuning (AFT) to obtain better picture reception. For details,
please refer to the section "Using the Further Programme Preset function"
• Replace the batteries.
• Replace the lamp. For details please refer to the section “Replace the
Lamp”
• If you are changing the lamp without disconnecting the power cord, the
standby indicator flashes. To continue changing the lamp, disconnect the
power cord and wait for about 30 minutes.
• Check that the lamp cover is tightly attached.
• If you are not changing the lamp but the standby indicator flashes, contact
your nearest Sony service centre.
• If you continue to have these problems, have your TV serviced by qualified personnel.
• NEVER open the casing yourself.
34

3
CZ
Úvod
Děkujeme Vám za výběr tohoto modelu Sony “Grand Wega”.
Před použitím tohoto aparátu si pozorně přečtěte tuto příručku a zachovejte ji pro budoucí informaci.
•
Kódy pro užívání tohoto Návodu k obsluze:
•
Potencionální rizika.
•
Důležité informace.
•
Informace o funkci.
•
1,2..
Sekvence k následovným pokynům.
•
Stínová tlačítka dálkového ovladače označují tlačítka,
která máte stisknout pro provedení různých pokynů.
•
Informace o výsledcích pokynů.
Bezpečnostní opatření
Každý televizor pracuje s velmi vysokým napětím. Abyste zabránili vzniku požáru nebo elektrického výboje, řid’te se prosím
následujícími bezpečnostními instrukcemi.
Obsah
Úvod ............................................................................................................................................................................................................ 3
Bezpečnostní opatření
................................................................................................................................................................................ 3
Všeobecný popis
Kontrola přídavných doplňků .......................................................................................................................................................... 4
Přehled tlačítek aparátu................................................................................................................................................................... 4
Přehled tlačítek dálkového ovladače ............................................................................................................................................... 5
Instalace
Vložení baterií do dálkového ovladače ............................................................................................................................................ 6
Připojení antény a videa .................................................................................................................................................................. 6
Umístění aparátu ............................................................................................................................................................................. 6
První uvedení do chodu
Zapnutí aparátu a automatické naladění ......................................................................................................................................... 7
Režim Menu
Změna formátu zobrazení................................................................................................................................................................ 9
Úvod do režimu Menu na obrazovce .............................................................................................................................................. 9
Stručný návod k volbě Menu ......................................................................................................................................................... 10
Použití režimu menu:
Seřízení obrazu............................................................................................................................................................................ 11
Seřízení zvuku ............................................................................................................................................................................. 12
Použití Menu “Spec. funkce” ...................................................................................................................................................... 14
Ruční ladění televizoru ................................................................................................................................................................ 15
Identifikace jednotlivých vysílacích stanic................................................................................................................................... 16
Vynechávání programových pozic .............................................................................................................................................. 17
Použití funkce “Rozšířené předvolby” ......................................................................................................................................... 18
Zavedení Vašeho osobního ID čísla ............................................................................................................................................ 19
Ukázka různých funkcí ................................................................................................................................................................ 20
Seřízení vodorovného centrování obrazu pro videozdroj RGB ................................................................................................... 21
Identifikace a volba formátu zobrazení vstupních signálů .......................................................................................................... 22
Multi obrazy (Multi PIP) ............................................................................................................................................................... 23
Dva obrazy na obrazovce (PAP).................................................................................................................................................. 23
Teletext
................................................................................................................................................................................................ 24
NexTView
............................................................................................................................................................................................ 26
Přídavná zařízení
Připojení přídavných zařízení ......................................................................................................................................................... 28
Použití přídavných zařízení ............................................................................................................................................................ 29
“Smartlink”..................................................................................................................................................................................... 30
Dálková ovládání jiných zařízení Sony ........................................................................................................................................... 30
Doplňkové informace
Optimální úhel vidění .................................................................................................................................................................... 31
Výměna žárovky ............................................................................................................................................................................ 32
Specifikace .................................................................................................................................................................................... 33
Řešení problémů ........................................................................................................................................................................... 34
MENU
K
•
Doporučujeme Vám přepravovat aparát za pomoci druhé
osoby tak, že jednou rukou uchopíte spodní část obrazovky
a druhou rukou horní část obrazovky. Vždy dbejte na to,
abyste při přenášení aparátu nemačkali reproduktory
umístěné po stranách obrazovky, ani přední panely, aby
nedošlo k jejich deformaci nebo rozbití.
•
Ničím nepřikrývejte nebo neblokujte ventilační drážku, která
se nachází vzadu aparátu, na jeho levé spodní části. Pro
zajištění účinné ventilace, je třeba umístit aparát ve
vzdálenosti nejméně 10 cm od zdi.
•
Jestliže se aparát přemístí ze studeného prostředí přímo do
teplého nebo se opakovaně mění teplota místnosti, je
možné, že to způsobí nejasný obraz nebo špatnou kvalitu
barev v některých částech obrazovky. Toto je způsobeno
vlhkostí, která se nashromáždila na zrcátkách nebo na
čočkách uvnitř přístroje. Před užitím aparátu je třeba vlhkost
nechat odpařit.
•
Aby byl obraz zřetelný, nevystavujte obrazovku přímému
osvětlení. Pokud možno, použijte bodové stropní osvětlení.
•
Tento televizor byl vyroben za použití vysoce přesné technologie.
Přesto však vzhledem ke struktuře zobrazovacího panelu se
mohou objevit černé či světlejší tečky. Nepovažujte toto za
poruchu televizoru je to dáno použitím vysoce přesné a jemné
technologie.
•
K obrazovce tohoto aparátu je dodán antireflexní kryt. Aby
nedošlo k poškození obrazovky, řiďte se podle následujících
pokynů:
•
Pro setření prachu z obrazovky používejte hadr na čištění, který
je součástí aparátu nebo jiný jemný hadr.
•
Obrazovku udržujte jemným, lehce navlhčeným hadrem.
Nepoužívejte brusné pasty. Jako bezpečnostní zaopatření
před každým čištěním odpojte aparát od elektrické sítě.
•
Vyvarujte se dotýkání obrazovky, abyste nepoškrábali její
povrch.

4
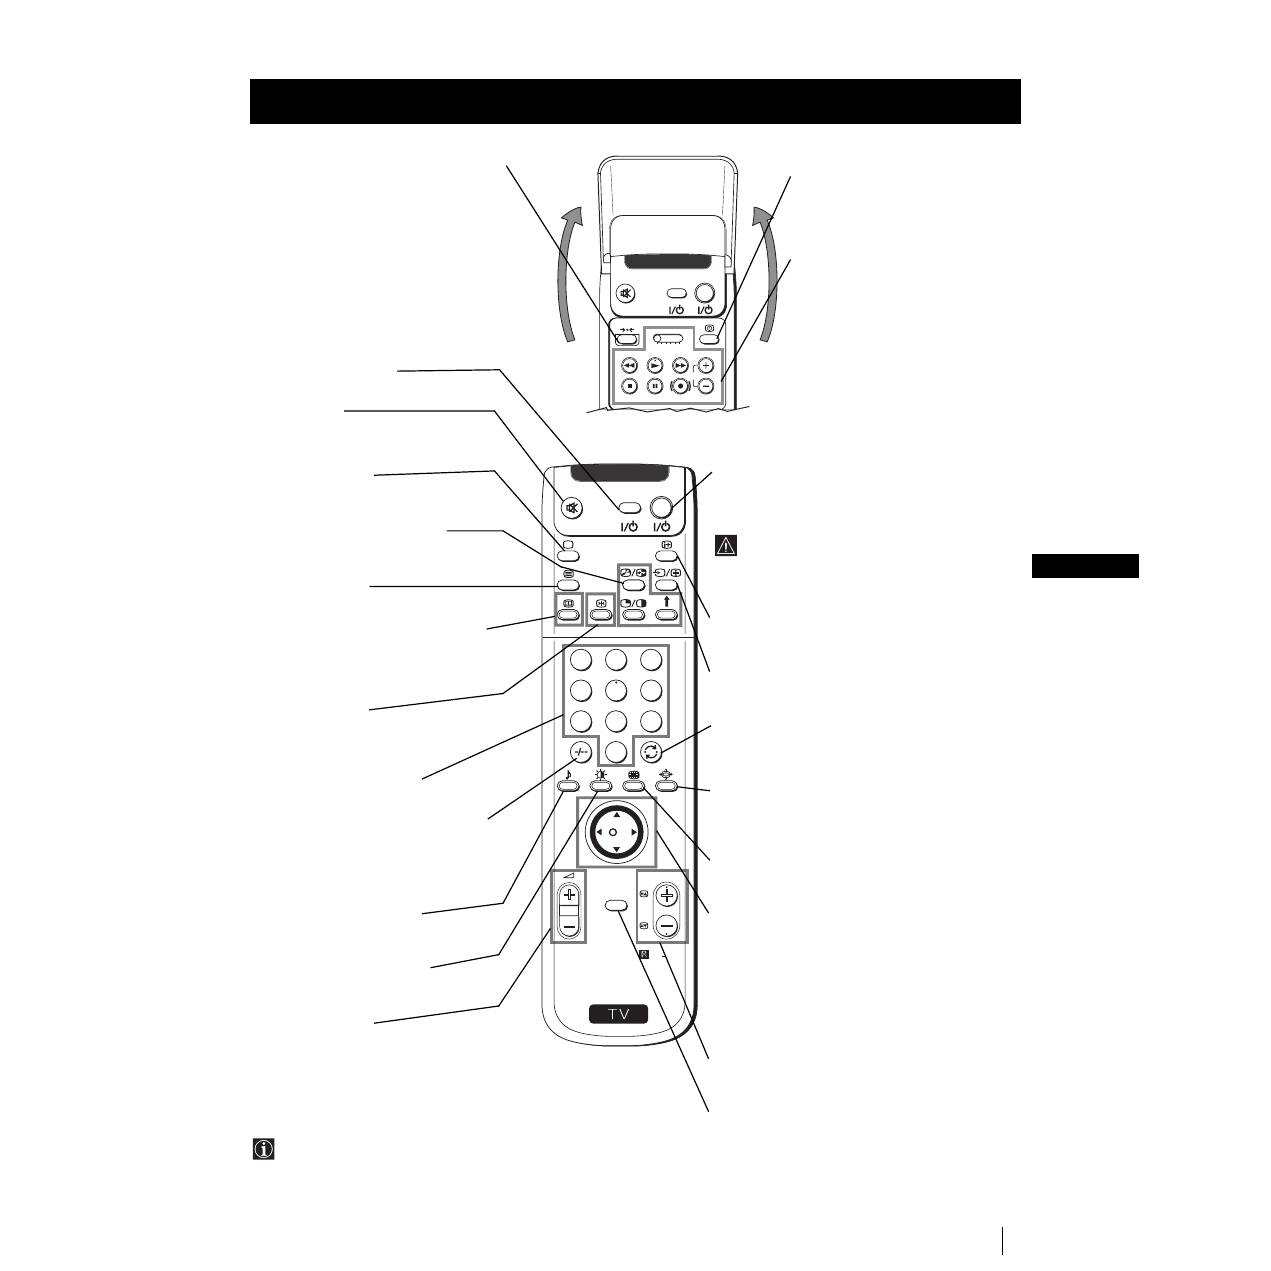
Dálkový ovladač
(RM-903)
Kontrola přídavných doplňků Přehled tlačítek aparátu
Všeobecný popis
Všeobecný popis
2 baterie (typ R6)
1 Klič
2 Držaky
2 Dva šrouby
1 Jeden hadr na čištění
Indikátor
žárovky
Vstup pro
příjem videa
Tlačítka pro výběr
následujících nebo
předchozích kanálů
(pro volbu televizní stanice)
Tlačítko pro
výběr vstupního
signálu
Tlačítka pro
ovládání hlasitosti
zvuku
Tlačítko
zapnuto
/
vypnuto
Ukazatel režimu
dočasného vypnutí
(standby):
• Pokud vypnete aparát
stisknutím tlačítka
dočasného vypnutí na
dálkovém ovladači,
indikátor se rozsvítí
červeně.
• Pokud vypnete aparát
stisknutím hlavního
vypínače, indikátor se
rozsvítí žlutě.
Vstup pro
sluchátka
Vstup pro
příjem audia
Vstup pro příjem
S videa
Stlačením znaménka
na
čelní části aparátu získáte
přístup k ovládacímu
čelnímu panelu.
5
CZ
S
RM 903
PROGR
MENU
1
4
7
2
5
8
0
3
6
9
K
VIDEO
TV
VIDEO
TV
VTR 1 2 3 4 DVD
C H
Dočasné vypnutí televizoru
Stiskem se televizor dočasně vypne (časový
ukazatel
se rozsvítí červeně). Stiskněte opět
tlačítko a zapojte televizor časovým spínačem
(standby).
Televizor se automaticky přepne do
pohotovostního režimu po 15-30 min bez
televizního signálu (standby), pokud se
během této doby nestiskne žádné jiné
tlačítko.
Zobrazení informace na obrazovce
Stisknutím se na obrazovce objeví všechny údaje.
Zmizí opětovným stisknutím.
Výběr vstupního signálu
Tiskněte jej opakovaně, až se na obrazovce objeví
zvolený vstupní signál.
Návrat k poslednímu vybranému kanálu
Stiskněte jej, aby se znovu objevil poslední
zvolený kanál (předchozí kanál by měl být
viditelný po dobu alespoň 5 vteřin).
Výběr formátu zobrazení
Tiskněte jej opakovaně, aby se změnil formát
zobrazení. Obsáhlejší informaci najdete v kapitole
“Změna rozměrů obrazovky”.
Multi obraz (Multi PIP)
Stisknutím se zobrazí druh Multi PIP. Opětovným
stisknutím se vypne.
Páčka pro výběr menu
•
Když je MENU zapnuto:
4
Zvýšit jeden stupeň
$
Snížit jeden stupeň
Z
Zvolit menu nebo se vrátit na předchozí volbu
z
Zvolit menu nebo zvolit následující volbu
OK
Potvrdit volbu
•
Když je MENU vypnuto:
Z
Vstupte přímo do posledního vybraného menu
OK
Objeví se všeobecný seznam programů
Volba kanálů
Stiskněte jej pro volbu předchozího nebo
následujícího kanálu.
Zapojení režimu menu
Stiskněte jej a menu se objeví na obrazovce.
Znovu stiskněte a tímto se vypojí a objeví se
normální obrazovka.
Všeobecný popis
Přehled tlačítek dálkového ovladače
Opětné seřízení aparátu předstanovené
ve výrobně
Tlačítka dálkového ovladače je třeba
stisknout nejen k opětnému seřízení
obrazu a zvuku, které jsou již
předstanovené ve výrobně, ale také k
zapojení aparátu.
Poté, co se na obrazovce objeví menu
automatického naladění, postupujte tak,
jak je uvedeno v kapitole “Zapnutí aparátu
a automatické naladění” (v bodě 4) v této
příručce Návodu k obsluze.
Zapnutí/Vypnutí videa
Stisknutím se video zapne nebo vypne.
Vypnutí zvuku
Pokud chcete zvuk vypnout, stiskněte
tlačítko.
Zvuk se zapne opětovným stisknutím.
Výběr z režimu TV
Stisknutím se vypne Teletext nebo vstup
do videa.
PAP (2 obrazy na obrazovce)
Podrobnější informace najdete v kapitole
“Dva obrazy na obrazovce (PAP)”.
Výběr z teletextu
Stisknutím se zobrazí teletext.
Zobrazení elektronického průvodce
programů
Stisknutím se zobrazí el. průvodce
programů (EPG). Opětovným stisknutím
se vypne.
Zmrazení obrazu
Stiskem se obraz televizoru zmrazí.
Opětným stisknutím se vrátí normální
obraz televizoru.
Tlačítko pro výběr kanálů
Stisknutím lze zvolit žádaný kanál.
Při volbě programu složeného ze dvou
čísel např. 23, nejdříve stiskněte -/-- a
následovně tlačítka 2 a 3.
Jestliže první číslo, které stisknete není
správné, stiskněte znovu tlačítko (od 0 do
9) a poté znovu opakujte celou operaci.
Výběr specifického zvuku
Opakovaným tisknutím se nastaví
specifický zvuk.
Výběr specifického obrazu
Opakovaným tisknutím se nastaví
spacifický obraz.
Seřízení hlasitosti
Stisknutím se nastaví hlasitost televizoru.
Zobrazení času
Stisknutím zapnete nebo vypnete
hodiny (funguje pouze při vysílání z
teletextu).
Ovládádní videa
Podrobnější informaci najdete v
kapitole “Dálková ovládání jiných
zařízení Sony”.
Kromě funkcí, které má televize, veškerá barevná
tlačítka se také používají pro operace teletextu.
Podrobnější informace najdete v kapitole “Teletext” v
tomto Návodu k obsluze.
Všeobecný popis
6
Instalace
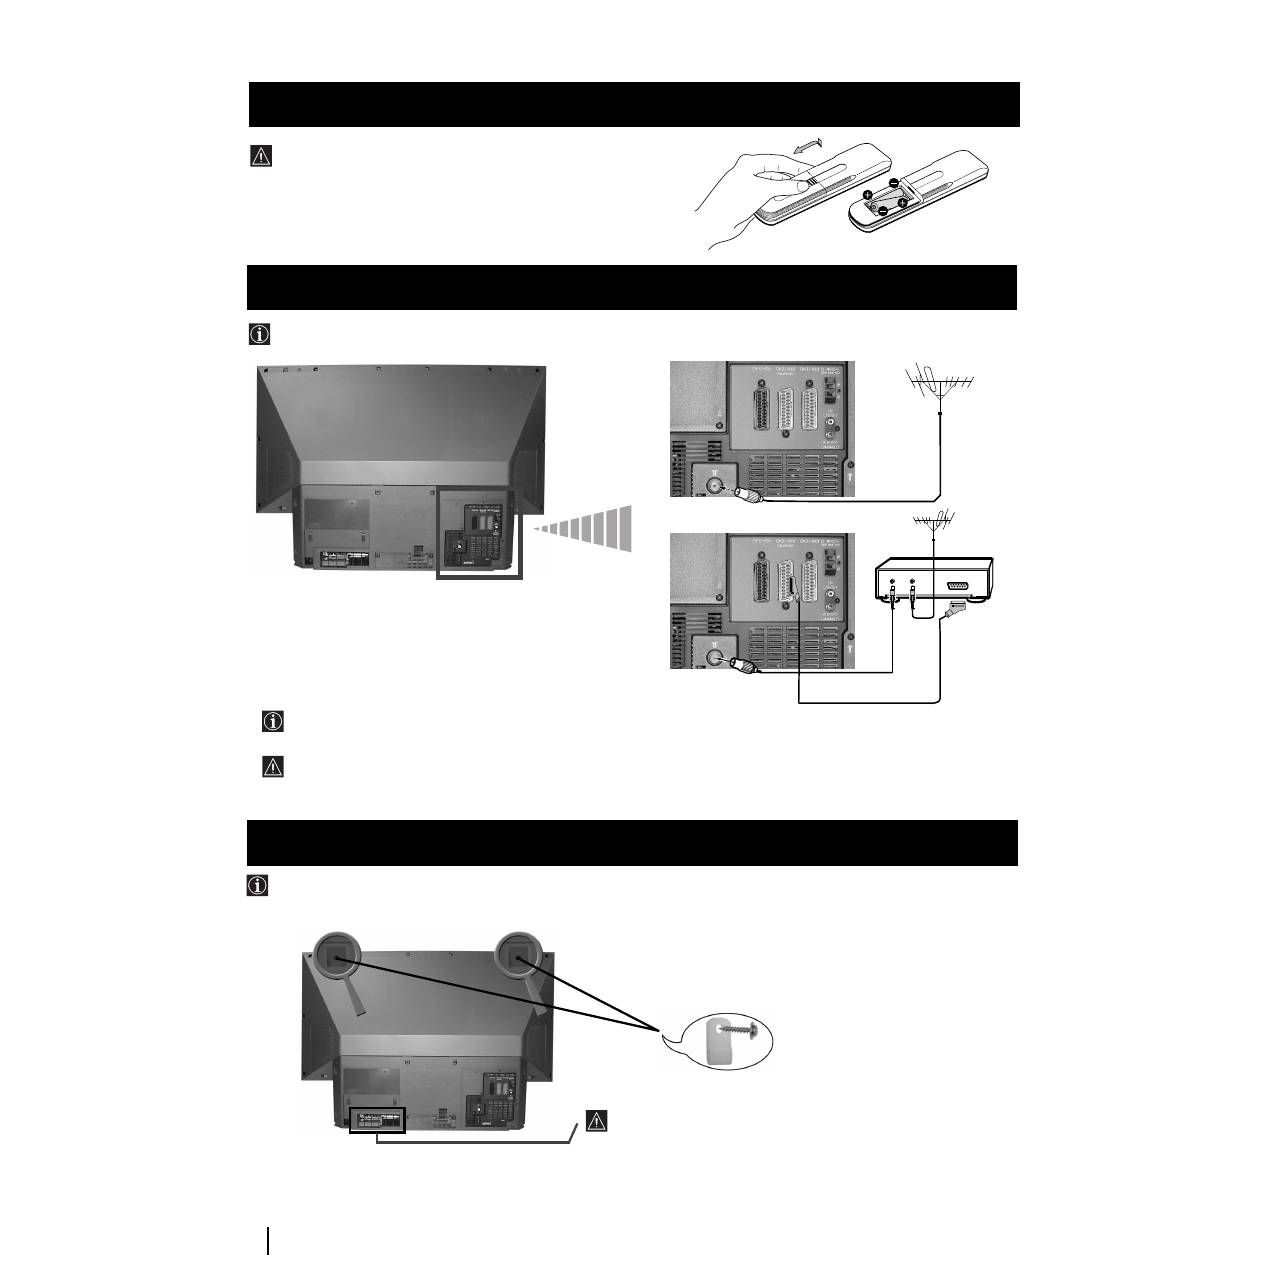
Zkontrolujte, jestli jsou baterie vloženy ve správné pozici.
Berte ohled na životní prostředí. Použitých baterií se zbavujte
způsobem, který životní prostředí nepoškozuje.
Vložení baterií do dálkového ovladače
Instalace
Přípojné kabely se nedodávají.
Připojení anteny a videa
OUT
IN
nebo
Konektor typu EURO je přídavné zařízení.
Jeho použitím můžete zlepšit kvalitu obrazu a zvuku při použití videa.
Jestliže nepoužijete konektor typu EURO, po automatickém naladění aparátu bude ještě třeba ručně doladit signální
kanál videa. Podrobnější informace najdete v kapitole “Ruční ladění televizoru”. Také můžete zkonzultovat Návod k
obsluze Vašeho videa, kde se dozvíte, jak získat kanál signálu videa.
Po u končení nastavení upevněte aparát z bezpečnostních důvodů ke stěně, např. za pomoci držáků, keteré jsou součástí přslušenství.
1
Držáky které jsou součástí příslušenství, příšroubujte na horní zadní stěnu aparátu.
2
Skrz držáky (bod 1) protáhněte sílnou šňůru nebo lanko a připevněte ji na stěnu nebo k opěrné polici apod.
Ničím nepřikrývejte nebo neblokujte ventilační drážku, která se
nachází vzadu aparátu, na jeho levé spodní části. Pro zajištění
účinné ventilace, je třeba umístit aparát ve vzdálenosti
nejméně 10 cm od zdi.
Umístění aparátu the set
7
CZ
První uvedení do chodu
Při prvním zapnutí aparátu se na obrazovce objeví sekvence menu, prostřednictvím kterých budete moci 1) vybrat jazyk
menu, 2) vybrat zemi, ve které si přejete používat aparát, 3) hledat a automaticky ukládat všechny použitelné kanály (televizní
stanice) a 4) měnit pořadí, ve kterém se objeví kanály (televizní stanice) na obrazovce.
Nicméně, jestliže budete chtít po nějaké době změnit jazyk menu, zemi, opakovat automatické ladění (např. v případě
přestěhování) nebo znovu změnit pořadí kanálů, můžete to provést výběrem vhodného příslušného menu v
(Nastavení).
Zapnutí aparátu a automatické naladění
1
Zapojte aparát do elektrické sítě (220-240 V AC, 50 Hz). Stiskněte
tlačítko zapnutí/vypnutí
na čelní straně aparátu, aby se zapnul.
Po prvním stisknutí tohoto tlačítka se na obrazovce automaticky
objeví menu
Language/Country
(Jazyk/Země).
2
Stiskněte páčku dálkového ovladače směrem
$
nebo
4
pro volbu
jazyka a následovně stiskněte tlačítko
OK
, abyste potvrdili volbu. Od
tohoto okamžiku se veškerá Menu automatického naladění objeví ve
zvoleném jazyce.
3
Stiskněte páčku směrem
$
nebo
4
pro volbu země, kde si přejete
používat aparát a dále stiskněte tlačítko
OK
, abyste potvrdili volbu.
Namísto země volte ”Vyp”, jestliže si nepřejete, aby se kanály
(televizní stanice) ukládaly v předem určeném pořadí, které
začíná pozicí programu č. 1.
4
Menu automatického naladění se na obrazovce objeví ve vybraném
jazyce. Stiskněte tlačítko
OK
a zvolte
Ano
.
5
Na obrazovce se automaticky objeví nové menu, které Vám potvrdí,
je-li zapojená anténa. Zkontrolujte, jestli je anténa zapojena a poté
stiskněte tlačítko
OK
pro započetí automatického naladění.
•
Aparát začíná automaticky ladit a ukládat do paměti všechny
příslušné kanály (televizní stanice).
•
Pokud v režimu menu “Země” zvolíte “Vyp” a po prvním
uvedení do chodu znovu provedete automatické vyladění,
televizní stanice zůstanou uloženy v paměti od toho čísla
programu, který jste sledovali v daný okamžik.
Tento proces může trvat několik minut. Mějte trpělivost a
nestiskávejte žádné tlačítko během trvání procesu ladění.
Proces by se neuskutečnil.
pokračuje ...
První uvedení do chodu
Language/Country
Language
Country
Select Language:
Confirm: OK
4
Italiano
Français
Español
English
Deutsch
Dansk
Č
e
š
tina
Language/Country
Language
Country
Select Language:
Confirm: OK
4
Italiano
Français
Español
English
Deutsch
Dansk
Č
e
š
tina
Language/Country
Language
Country
Select Language:
Confirm: OK
4
Italiano
Français
Español
English
Deutsch
Dansk
Č
e
š
tina
Jazyk/Země
Jazyk
Země
Vyb
ě
r
zemi
:
Potvrzení: OK
4
Finsko
Dánsko
Česká rep.
Bulharsko
Belgie
Rakousko
Vyp
Přejete si spustit
automatické laděni?
Ano: OK Ne:
Potvrd'te, prosím,
že anténaje připojena
Ano: OK Ne:
1
2
3
4
5
CO2
CO3
CO4
CO7
CO8
vyhledávání...
S
RM 903
PROGR
MENU
1
4
7
2
5
8
0
3
6
9
TV
VIDEO
8
První uvedení do chodu
6
Jakmile aparát naladil a uložil do paměti všechny kanály
(televizní stanice), na obrazovce se automaticky objeví Menu
Třídění programů, kterým můžete změnit pořadí, ve kterém se
kanály objeví na obrazovce.
a)
Jestliže si nepřejete změnit pořadí kanálů, přejděte na bod č. 7.
b)
Jestliže si přejete změnit pořadí kanálů:
1
Stiskněte páčku dálkového ovladače směrem
$
nebo
4
pro volbu
čísla programu s kanálem (televizní stanicí), jehož pozici chcete
změnit a poté ji stiskněte směrem
z
.
2
Stiskněte páčku dálkového ovladače směrem
$
nebo
4
pro volbu
nového čísla programu, ve kterém chcete uložit do paměti zvolený
kanál (televizní stanici) a poté stiskněte
OK
.
Zvolený kanál mění svou novou pozici programu a ostatní
kanály se mění podle něj.
3
Opakujte body č. 1) a 2), jestliže si přejete změnit pozici jiných
televizních kanálů
.
7
Stiskněte tlačítko
MENU
a menu zmizí.
Aparát je připraven k funkci.
První uvedení do chodu
S
RM 903
PROGR
MENU
1
4
7
2
5
8
0
3
6
9
VIDE
TV
O
Třídění programů
C03
TV 5
PROG
K.
NÁZEV
C03
C05
C07
C08
C09
C11
C12
C13
C14
C15
C16
TV 5
PRO 7
EU-SP
SWF
RTL
SAT
MDR
DDI
DSF
RTL 2
KAB 1
1
2
3
4
5
6
7
8
9
10
11
Výběr polohy:
Posun: OK
Třídění programů
Výběr prog:
Potvrzení:
PROG
K.
NÁZEV
1
2
3
4
5
6
7
8
9
10
11
C03
C05
C07
C08
C09
C11
C12
C13
C14
C15
C16
TV 5
PRO 7
EU-SP
SWF
RTL
SAT
MDR
DDI
DSF
RTL 2
KAB 1
9
CZ
Režim Menu
Tato funkce Vám umožní změnit formát televizního zobrazení.
Změna formátu zobrazení
1
Stiskněte tlačítko
MENU
, aby se Vám ukázal první stupeň menu na
obrazovce.
2
•
Pro vyvolání žádaného menu nebo výběru stiskněte páčku
směrem
4
nebo
$
.
•
Pro vstup do zvoleného menu nebo výběru ji stiskněte směrem
z
.
•
Pro návrat do předešlého menu nebo výběru ji stiskněte
směrem
Z
.
•
Pro změnu nastavení zvoleného výběru ji stiskněte směrem
$
/
4
/
Z
nebo
z
.
•
Pro potvrzení a uložení do paměti Vaší volby stiskněte
OK
.
3
Stiskněte tlačítko
MENU
a menu zmizí.
Tento aparát užívá na obrazovce takový režim Menu, který Vás vede různými operacemi. Použijte následující tlačítka
dálkového ovladače, pomocí kterých můžete volit Menu:
Úvod do režimu Menu na obrazovce
OK
stiskněte směrem
$
/
4
/
Z
o
stiskněte směrem
$
/
4
/
Z
nebo
z
stiskněte
OK
Nastavení Obrazu
Výběr:
Zadat Menú:
Reźim obrazu
Kontrast
Jas
Barevná sytost
Ostrost
Reset
Umělá inteligence
Redukce šumu
Barevný Tón
Osobní
Zap
Vyp
Normal
Nastavení Obrazu
Výběr:
Zadat Menú:
Reźim obrazu
Kontrast
Jas
Barevná sytost
Ostrost
Reset
Umělá inteligence
Redukce šumu
Barevný Tón
Osobní
Zap
Vyp
Normal
Režim Menu
Páčka:
1
Tiskněte opakovaně tlačítko
na dálkovém ovladači pro volbu
jednoho z těchto formátů.
Smart:
imitace efektu široké obrazovky pro vysílání s poměrem
stran 4:3.
4:3:
konvenční velikost obrazu 4:3, úplné informace o obrazu.
14:9:
kompromis mezi velikostí obrazu 4:3 a 16:9.
Zoom:
formát široké obrazovky pro filmy ve formátu poštovní
prihrádky.
Wide:
pro vysílání s poměrem stran 16:9.
V režimech
Smart
,
Zoom
a
14:9
je odříznuta horní a spodní část
obrazovky. Stisknutín
4
nebo
$
můžete nastavit umístění obrazu na
obrazovce (např. proto, abyste mohli číst titulky).
2
Stiskněte tlačítko
OK
pro potvrzení Vaší volby.
4:3
14:9
Zoom
Wide
Smart
S
RM 903
PROGR
MENU
1
4
7
2
5
8
0
3
6
9
TV
VIDEO
S
RM 903
PROGR
MENU
1
4
7
2
5
8
0
3
6
9
TV
VIDEO
