Sony CPD-E100P: Customizing Your Monitor Navigating the menu
Customizing Your Monitor Navigating the menu: Sony CPD-E100P
Table of contents
- Owner’s Record
- Table of Contents
- Precautions
- Identifying parts and controls
- Setup Step 1: Connect your monitor to your computer Step 2: Connect the power cord
- Step 3: Turn on the monitor and computer Selecting the on-screen menu language (LANGUAGE/ INFORMATION)
- Customizing Your Monitor Navigating the menu
- Adjusting the brightness and contrast
- Adjusting the horizontal size or centering of the picture (H-SIZE/ CENTER) Adjusting the vertical size or centering of the picture (V-SIZE/ CENTER) Adjusting the curvature of the picture’s sides (PIN/PIN BALANCE) Adjusting the angle of the picture’s sides (KEY/KEY BALANCE)
- Adjusting the picture’s rotation (ROTATION) Enlarging or reducing the picture (ZOOM) Adjusting the color of the picture (COLOR)
- Additional settings (DEGAUSS/ CANCEL MOIRE) Resetting the adjustments
- Technical Features Troubleshooting
- Trouble symptoms and remedies Symptom Check these items
- Symptom Check these items
- Self-diagnosis function Specifications
8
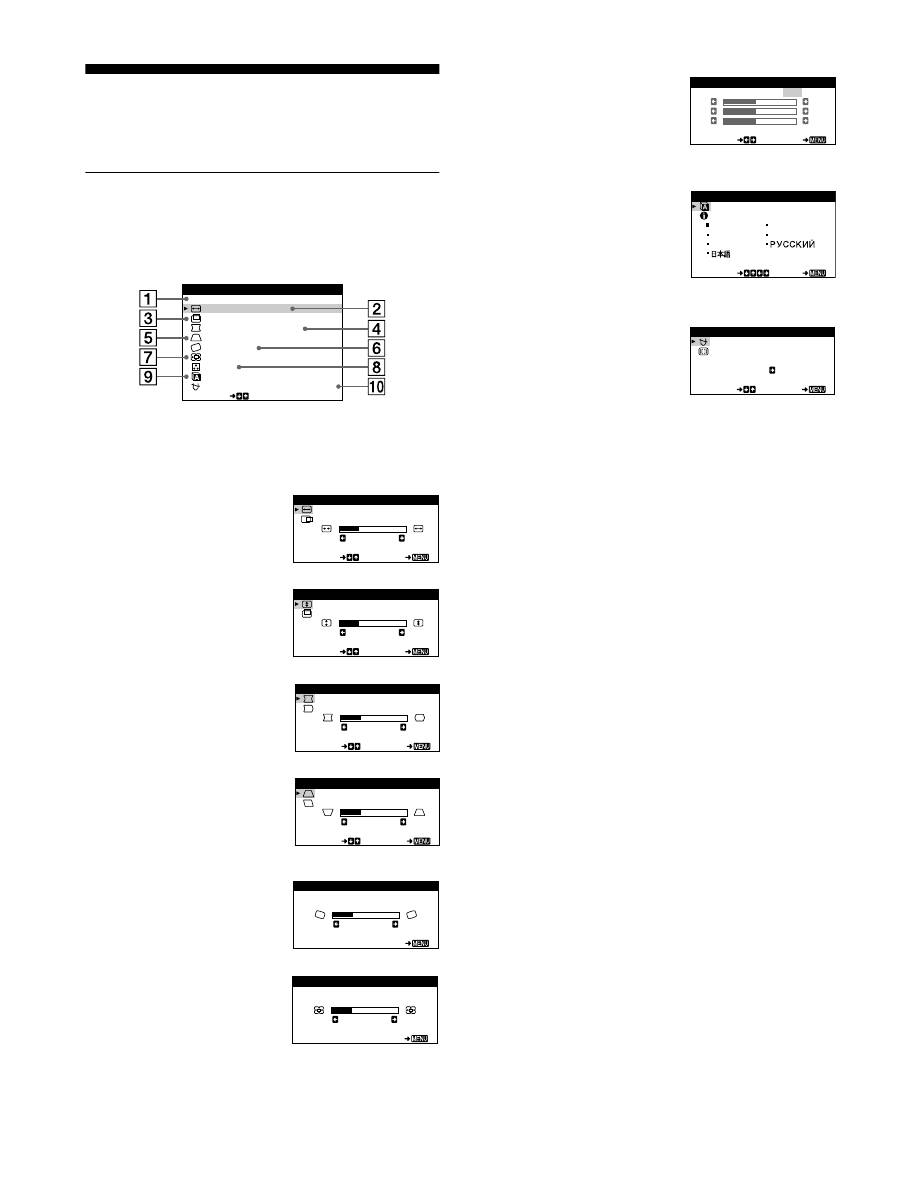
Customizing Your Monitor
You can make numerous adjustments to your monitor using the
on-screen menu.
Navigating the menu
Press the center of the control button to display the main MENU
on your screen. See page 9 for more information on using the
control button.
Use the control button to select one of the following menus.
1
EXIT
Select EXIT to close the menu.
2
H-SIZE/CENTER (page 10)
Select the H-SIZE/CENTER
menu to adjust the picture’s
horizontal size and centering.
3
V-SIZE/CENTER (page 10)
Select the V-SIZE/CENTER
menu to adjust the picture’s
vertical size and centering.
4
PIN/PIN BALANCE (page 10)
Select the PIN/PIN BALANCE
menu to adjust the curvature
picture’s sides.
5
KEY/KEY BALANCE
(page 10)
Select the KEY/KEY BALANCE
menu to adjust the angle of the
picture’s sides.
6
ROTATION (page 11)
Select the ROTATION menu to
adjust the picture’s rotation.
7
ZOOM (page 11)
Select the ZOOM menu to enlarge
or reduce the picture.
E
I T
H - S I Z E / CENT ER
V - S I Z E / CENT ER
P I N / P I N BA L ANCE
KEY / KEY BA L ANCE
ROT A T I ON
ZOOM
COLOR
SE L ECT
L ANGUAGE / I NFORMA T
N
O
I
DEGAUSS / CANCE L MO
E
R
I
MENU
H - S I Z E
2 6
SE L ECT
E
I T
H - S I ZE / CENTER
V - S I Z E
2 6
SE L ECT
E
I T
V - S I ZE / CENTER
P I N
2 6
SE L ECT
E
I T
P I N / P I N BALANCE
K E Y
2 6
SE L ECT
E
I T
KEY / KEY BALANCE
RO T A T I ON
2 6
E
I T
ROTAT I ON
Z OOM
2 6
E
I T
ZOOM
8
COLOR (page 11)
Select the COLOR menu to adjust
the picture’s color temperature.
You can use this to match the
monitor’s colors to a printed
picture’s colors.
9
LANGUAGE/INFORMATION
(page 7, 15)
Select the LANGUAGE/
INFORMATION menu to choose
the on-screen menu’s language
and display this monitor’s
information box.
q;
DEGAUSS/CANCEL MOIRE
(page 12)
Select the DEGAUSS/CANCEL
MOIRE menu to degauss the
screen and adjust the moire
cancellation level.
K
K
K
R
5 0
G
5 0
B
5 0
SE L ECT
E
I T
COLOR
5000
6500
9300
USER
ENGL I SH
FRAN A I S
DEUT SCH
I T A L I ANO
ESPA OL
SE L ECT
E
I T
LANGUAGE / I NFORMAT I ON
D EGA U S S
ON
SE L ECT
E
I T
DEGAUSS / CANCEL MO I RE
