Whirlpool AWG 231: INSTALLATION
INSTALLATION: Whirlpool AWG 231
•
As a result of quality control procedures, a certain amount of water
may remain in your machine. This is not harmful for your machine.
INSTALLATION
You must pay close attention to the following issues before using your
washing machine.
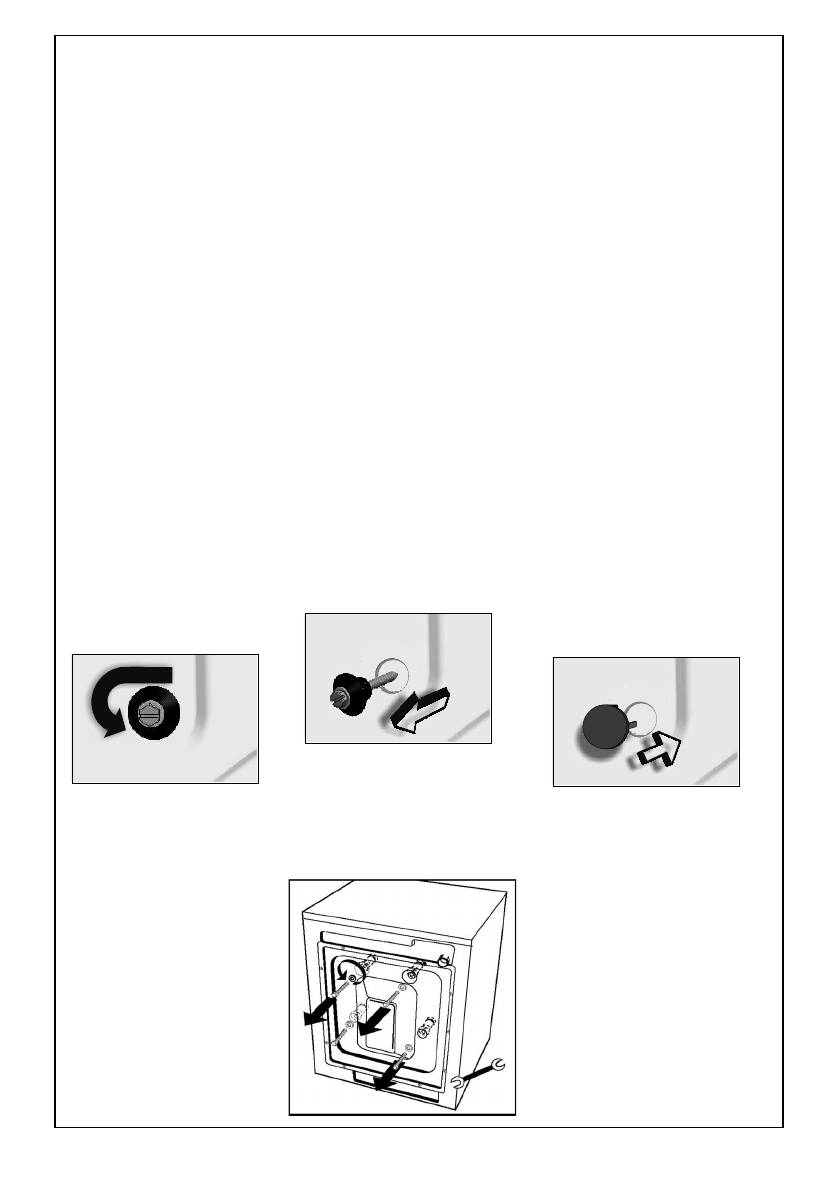
REMOVAL OF TRANSPORTATION SCREWS
•
Transportation screws, which are located at the rear side of the
machine, must be removed before running the machine.
•
Loosen the screws by rotating counter clockwise using a suitable
wrench. (DIAGRAM-1)
•
Remove the screws by pulling them.(DIAGRAM-2)
•
This will cause the plastic parts located in the interior part of your
machine to drop down under the appliance.
•
Lift the machine up slightly to pick up the plastic parts.
•
If all of the plastic parts from the screw groups have not dropped
down, open the door of your machine, move the drum until all plastic
parts drop down. Collect the parts that have fallen to the floor.
•
In the holes where the transport screws have been removed, insert
the plastic transport screw taps found in the accessories bag.
(DIAGRAM-3)
•
The transportation screws that have been removed from the machine
should be kept safe in the event of future transportation.
DIAGRAM-2
DIAGRAM-1 DIAGRAM-3
22
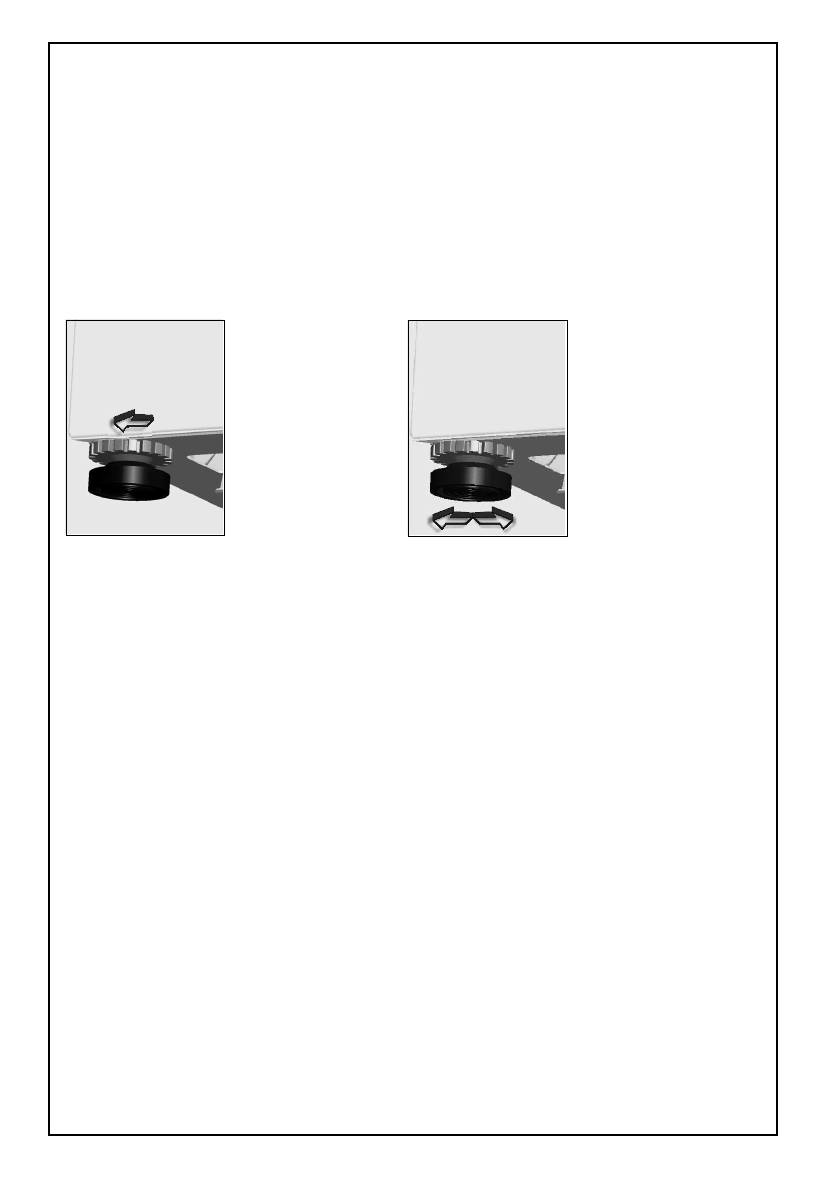
ADJUSTMENT OF FEET
•
Do not install your machine on rugs or similar surfaces.
•
For your machine to work silently and without vibrations, it should be
settled on a flat, non-slippery and tough surface.
•
You can adjust the balance of your machine from its feet.
•
First, loosen the plastic adjustment nut.
•
Adjust by rotating the feet upwards or downwards.
•
After balance has been achieved, tighten the plastic adjustment nut
again by rotating it upwards.
•
Never put cartons, wooden blocks or similar materials under the
machine to adjust the levelness of the machine with the ground.
ELECTRICAL CONNECTION
•
Your washing machine works with 220-240V and 50Hz.
•
A special grounded plug has been attached to the network cable of
your washing machine. This plug must be inserted to a grounded 10
amp socket. The currency rating of the attached electricity supply
should also be 10 amps. If you have no such sockets and fuses in
your house, the plug should be fitted by a qualified electrician.
•
Our company will not be held liable for any damage that may
occur as a result of usage without grounding.
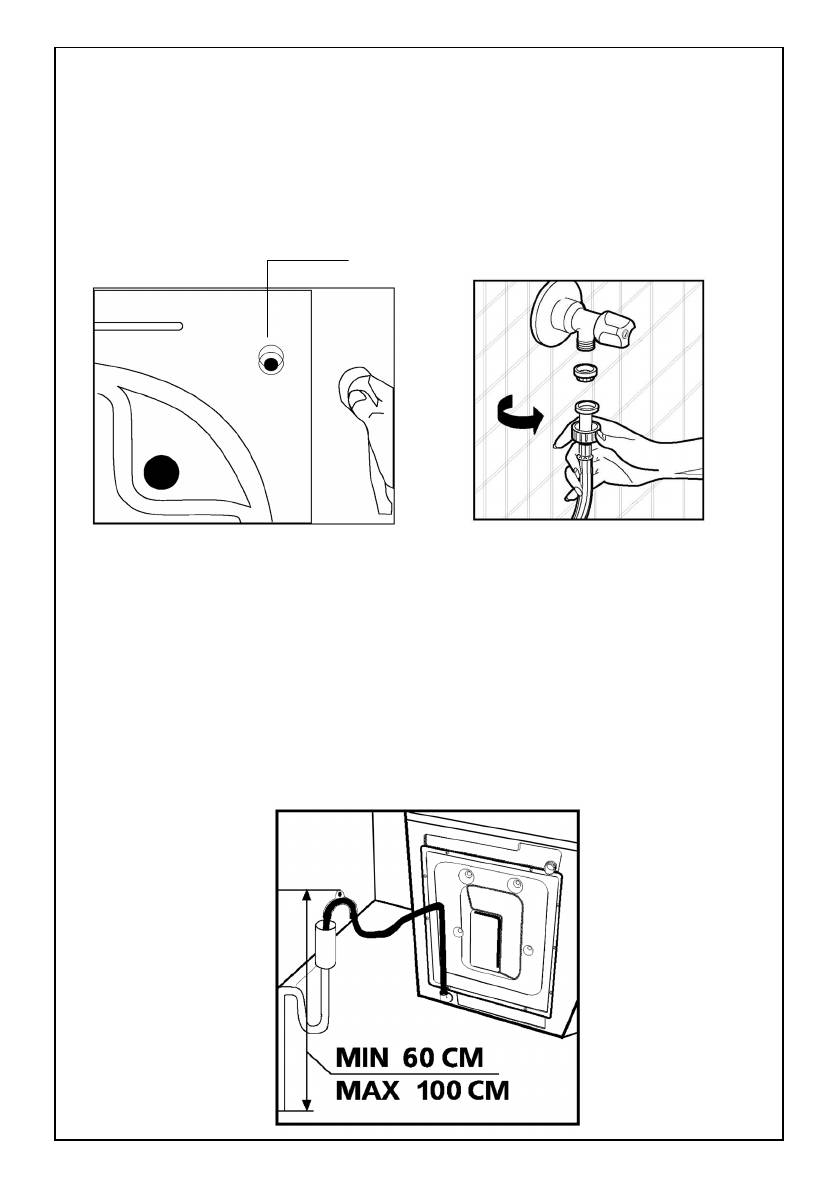
WATER SUPPLY CONNECTION
•
Depending on the specifications of your machine, it may be provided
with a single water inlet (cold) or double water inlet (cold/hot). The
white headed hose is for the cold water inlet and red headed hose is
for the hot water inlet (for machines with hot & cold water inlet).
•
To prevent leakage from the connection joints, 1 (valid for cold water
inlet) or 2 (valid for machines with hot & cold water inlet) seals are
included in the hose packaging. Fit these seals at the end of water
inlet hoses on the tap side.
•
Connect the white headed hose to the water inlet valve with white
filter and connect the red headed hose to the water inlet valve with
red filter (latter in the case of machines with hot & cold water inlet).
Manually tighten the connection parts. Please call a qualified plumber
for safer connections.
23
•
Water pressure of 1-10 bars from your tap will enable your machine
to work more efficiently (1 bar pressure means water flow of more
than 8 litres per minute from a fully opened tap).
•
After connections are secure, check for non-leakage of the
connection joints by turning on your tap fully.
•
Be sure that water inlet hoses are not folded, broken or crushed.
•
Mount the water inlet hoses to a 3”/4, geared water tap.
Cold water inlet (White filter valve)
WATER DRAIN CONNECTION
•
Be sure that water inlet hoses are not folded, twisted, crushed or
elongated by stretching.
•
Water drain hose should be mounted at a height of minimum 60 cm,
maximum 100 cm from the ground.
•
The end of the water drain hose may be directly fitted to the dirty
water outlet hole or a special apparatus mounted on the outlet
bracket of the wash-stand.
•
Never attempt to extend the water drain hose by adding extra parts.
24
Оглавление
- СОДЕРЖАНИЕ
- ПРЕЖДЕ ЧЕМ ПОЛЬЗОВАТЬСЯ СТИРАЛЬНОЙ МАШИНОЙ
- УСТАНОВКА
- ОПИСАНИЕ СТИРАЛЬНОЙ МАШИНЫ
- ПОДГОТОВКА К СТИРКЕ
- ОБСЛУЖИВАНИЕ И ЧИСТКА
- СЕРВИСНЫЙ ЦЕНТР
- CONTENTS
- BEFORE USING THE WASHING MACHINE
- INSTALLATION
- DESCRIPTION OF THE WASHING MACHINE
- PREPARATION OF THE WASHING
- MAINTENANCE AND CLEANING
- TROUBLESHOOTING GUIDE
- AFTER-SALES SERVICE
- NOTES


