Ariston CG64SG3: Start-up and use
Start-up and use: Ariston CG64SG3
22
GB
Using the hob
Lighting the burners
For each BURNER knob there is a complete ring
showing the strength of the flame for the relevant
burner.
To light one of the burners on the hob:
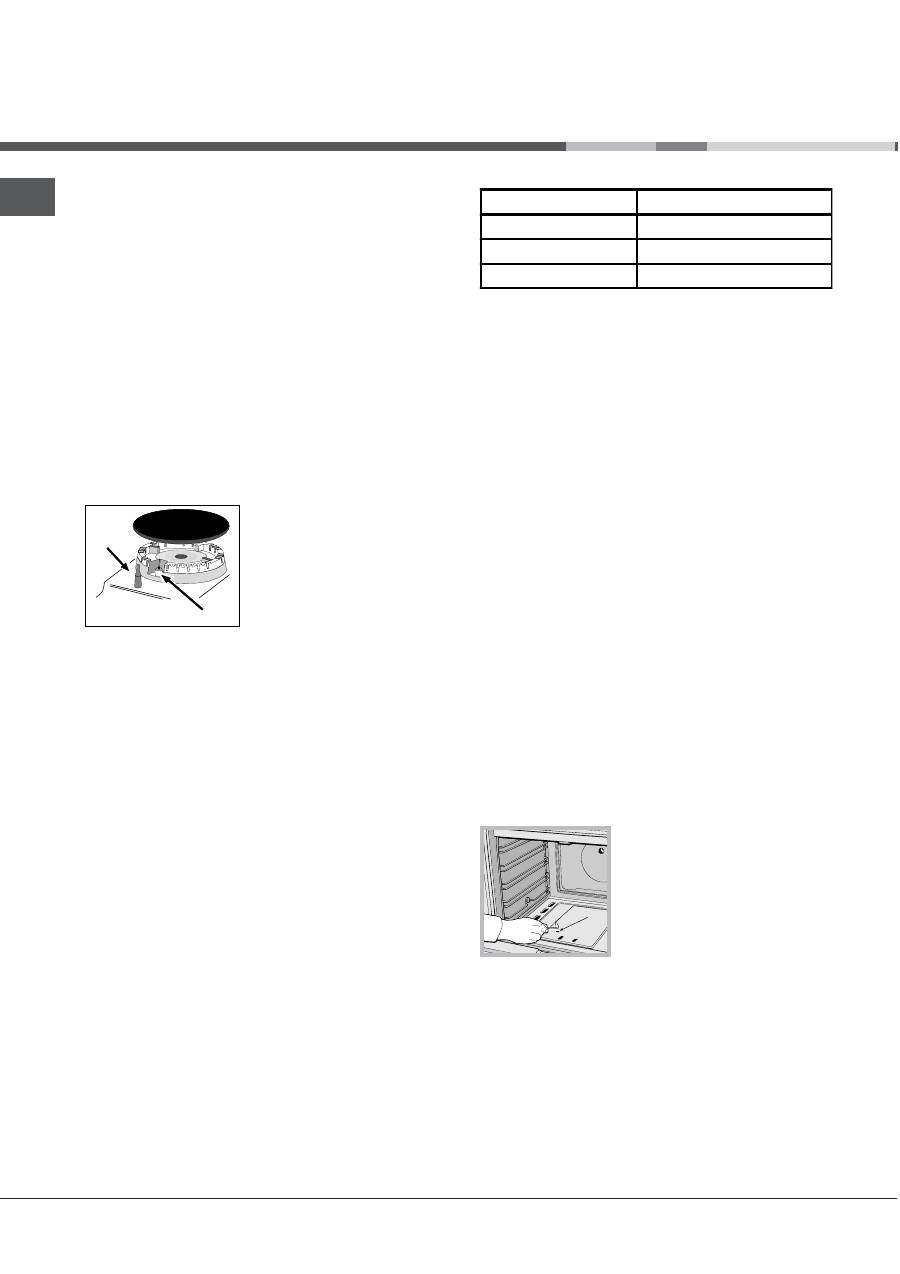
1. Bring a flame or gas lighter close to the burner.
2. Press the BURNER knob and turn it in an
anticlockwise direction so that it is pointing to the
maximum flame setting
E
.
3. Adjust the intensity of the flame to the desired
level by turning the BURNER knob in an
anticlockwise direction. This may be the minimum
setting
C
, the maximum setting
E
or any position in
between the two.
If the appliance is fitted with
an electronic lighting
device* (
C
), press the
ignition button, marked with
the symbol
1
, then hold
the BURNER knob down
and turn it in an
anticlockwise direction, towards the maximum flame
setting, until the burner is lit.The burner may be
extinguished when the knob is released. If this
occurs, repeat the operation, holding the knob down
for a longer period of time.
!
If the flame is accidentally extinguished, switch off
the burner and wait for at least 1 minute before
attempting to relight it.
If the appliance is equipped with a flame failure
safety device (X)*, press and hold the BURNER
knob for approximately 2-3 seconds to keep the
flame alight and to activate the device.
To switch the burner off, turn the knob until it reaches
the stop position
•.
Practical advice on using the burners
For the burners to work in the most efficient way
possible and to save on the amount of gas consumed,
it is recommended that only pans that have a lid and a
flat base are used. They should also be suited to the
size of the burner.
Start-up and use
Burner
ø Cookware diameter (cm)
Fast (R)
24 - 26
Semi Fast (S)
16 - 20
Auxiliary (A)
10 - 14
To identify the type of burner, please refer to the
diagrams contained in the “Burner and nozzle
specifications”.
!
On the models supplied with a reducer shelf,
remember that this should be used only for the
auxiliary burner when you use casserole dishes with a
diameter under 12 cm.
Using the oven
!
The first time you use your appliance, heat the
empty oven with its door closed at its maximum
temperature for at least half an hour. Ensure that the
room is well ventilated before switching the oven off
and opening the oven door. The appliance may emit a
slightly unpleasant odour caused by protective
substances used during the manufacturing process
burning away.
!
Before operating the product, remove all plastic film
from the sides of the appliance.
!
Never put objects directly on the bottom of the
oven; this will avoid the enamel coating being
damaged. Only use position 1 in the oven when
cooking with the rotisserie spit.
Lighting the oven
To light the oven burner, bring
a flame or gas lighter close to
opening F (
see figure
) and
press the OVEN control knob
while turning it in an
anticlockwise direction until it
reaches the MAX position.
If the appliance is fitted with an electronic lighting
device*, press the ignition button, marked with the
symbol
1
, then hold the OVEN control knob and
turn it in an anticlockwise direction, towards the MAX
position, until the burner is lit. If, after 15 seconds,
the burner is still not alight, release the knob, open
the oven door and wait for at least 1 minute before
trying to light it again. If there is no electricity the
burner may be lit using a flame or a lighter, as
described above.
*
Only available in certain models.
F
X
C
GB
23
*
Only available in certain models.
!
The oven is fitted with a safety device and it is
therefore necessary to hold the OVEN control knob
down for approximately 6 seconds.
!
If the flame is accidentally extinguished, switch off
the burner and wait for at least 1 minute before
attempting to relight the oven.
Adjusting the temperature
To set the desired cooking temperature, turn the
OVEN control knob in an anticlockwise direction.
Temperatures are displayed on the control panel and
may vary between MIN (150°C) and MAX (250°C).
Once the set temperature has been reached, the oven
will keep it constant by using its thermostat.
Grill
To light the grill, bring a flame or gas lighter close to
the burner and press the OVEN control knob while
turning it in a clockwise direction until it reaches the
d
position. The grill enables the surface of food to be
browned evenly and is particularly suitable for roast
dishes, schnitzel and sausages. Place the rack in
position 4 or 5 and the dripping pan in position 1 to
collect fat and prevent the formation of smoke.
If the appliance is fitted with an electronic lighting
device*, press the ignition button, marked with the
symbol
1
, then hold the OVEN control knob and turn
it in an clockwise direction, towards the
d
position. If,
after 15 seconds, the burner is still not alight, release
the knob, open the oven door and wait for at least 1
minute before trying to light it again. If there is no
electricity the burner may be lit using a flame or a
lighter, as described above.
!
The grill is fitted with a safety device and it is
therefore necessary to hold the OVEN control knob
down for approximately 6 seconds.
!
If the flame is accidentally
extinguished, switch off the
burner and wait for at least 1
minute before attempting to
relight the grill.
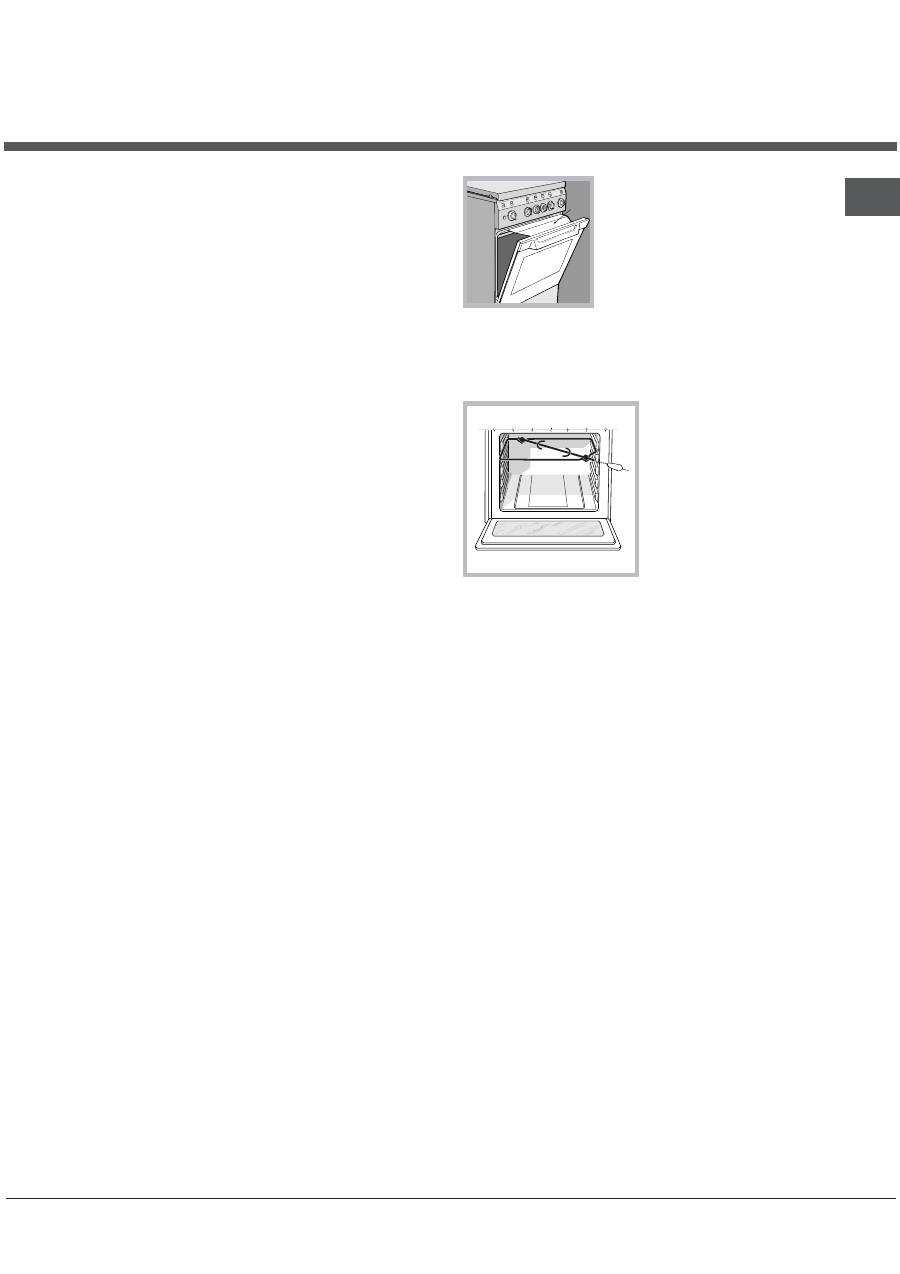
!
When using the grill, leave
the oven door ajar, positioning the deflector D
between the door and the control panel (
see figure
)
in order to prevent the knobs from overheating.
Turnspit
To operate the rotisserie
(
see diagram
) proceed
as follows:
1. Place the dripping
pan in position 1.
2. Place the rotisserie
support in position 4 and
insert the spit in the hole
provided on the back panel of the oven.
3. Acitvate the function by pressing the TURNSPIT
button.
Oven light
The light may be switched on at any moment by
pressing the OVEN LIGHT button.
D
24
GB
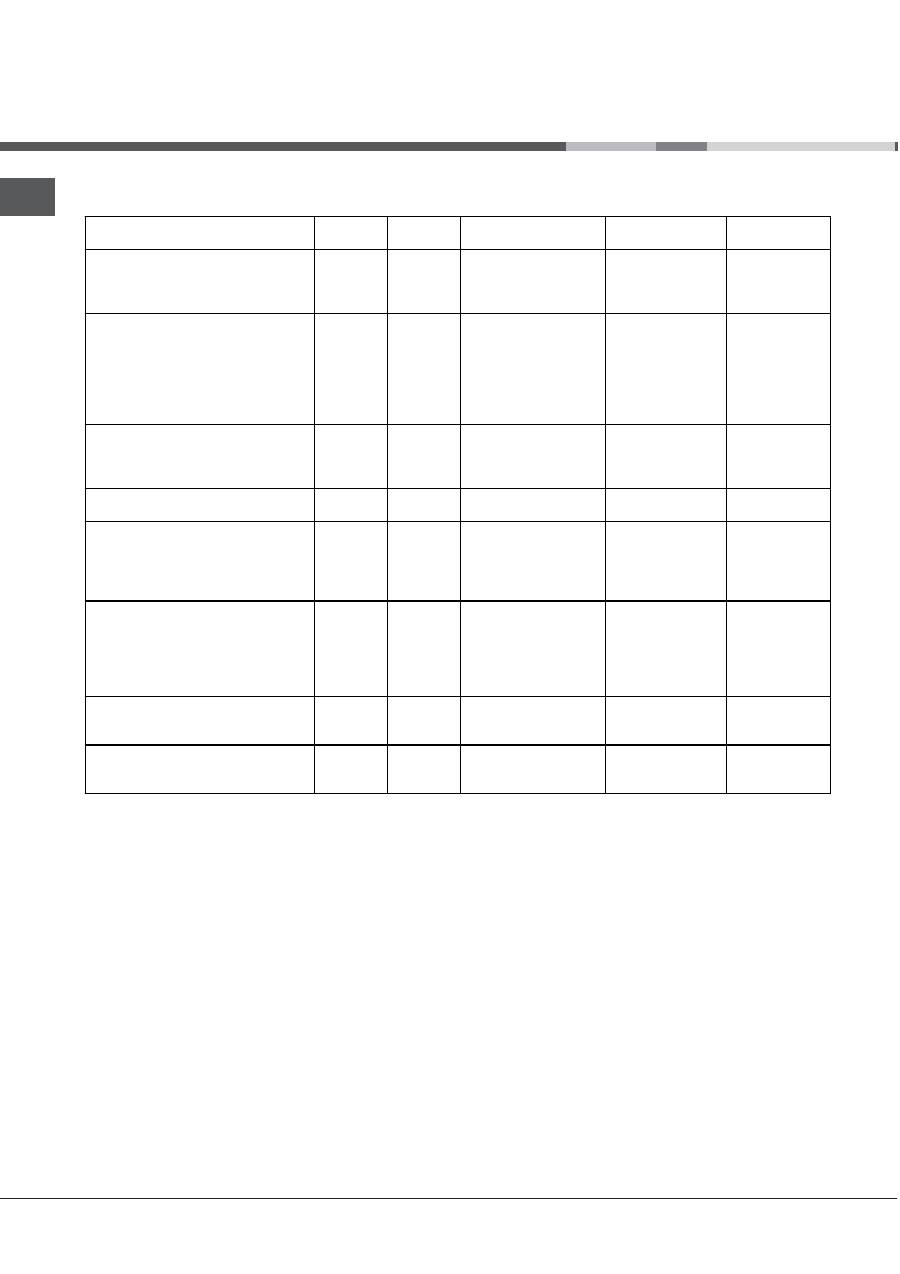
Oven cooking advice table
Foods
Weight (in
kg)
Rack
position
Preheating time (min)
Recommended
Temperature (°C)
Cooking time
(minutes)
Pasta
Lasagne
Cannelloni
Gratin dishes
2.5
2.5
2.5
3
3
3
10
10
10
210
200
200
60-75
40-50
40-50
Meat
Veal
Chicken
Duck
Rabbit
Pork
Lamb
1.7
1.5
1.8
2
2.1
1.8
3
3
3
3
3
3
10
10
10
10
10
10
200
220
200
200
200
200
85-90
90-100
100-110
70-80
70-80
90-95
Fish
Mackerel
Dentex
Trout baked in foil
1.1
1.5
1
3
3
3
10
10
10
180-200
180-200
180-200
35-40
40-50
40-45
Pizza
Neapolitan-style
1
3
15
220
15-20
Pies
Biscuits
Tart
Savoury pies
Leavened cakes
0.5
1.1
1
1
3
3
3
3
15
15
15
15
180
180
180
180
30-35
30-35
45-50
35-40
Grilled foods
Veal steak
Cutlets
Hamburgers
Mackerel
Toast
1
1.5
1
1
4 pcs
4
4
3
4
4
5
5
5
5
5
15-20
20
20-30
15-20
2-4
Grilling using the rotisserie
Spit-roast veal
Spit-roast chicken
1
2
-
-
5
5
70-80
70-80
Grilling using the multi-spit rotisserie*
Meat kebabs
Vegetable kebabs
1
0.8
-
-
5
5
40-45
25-30
Оглавление
- Installazione
- Descrizionedell’apparecchio
- Avvio e utilizzo
- Contaminuti analogico
- Precauzioni e consigli
- Manutenzione e cura
- Assistenza
- Operating Instructions
- Installation
- Description of theappliance
- Start-up and use
- Analogue timer
- Precautions and tips
- Care and maintenance
- Руководство по эксплуатации
- Монтаж
- Описание изделия
- Включение и эксплуатация
- Аналоговый таймер
- Предосторожности и рекомендации
- Техническоеобслуживание и уход
- Instructiuni de folosire
- Instalare
- Descrierea aparatului
- Pornire si utilizare
- Minutar analogic
- Precautii si sfaturi
- Întretinere si curatire
- Használati útmutató
- Üzembe helyezés
- A készülék leírása
- Bekapcsolás és használat
- Analóg percszámláló
- Óvintézkedések és tanácsok
- Karbantartás és ápolás
