Sony KV-32HQ150K – page 4
Manual for Sony KV-32HQ150K
Table of contents
11
Favourite menu
The Favourite menu gives you the option to:
a) Compile a list of all the programmes you wish to store as favourites.
b) Quickly display a favourite programme on screen.
c) Add or delete programmes to the favourite list.
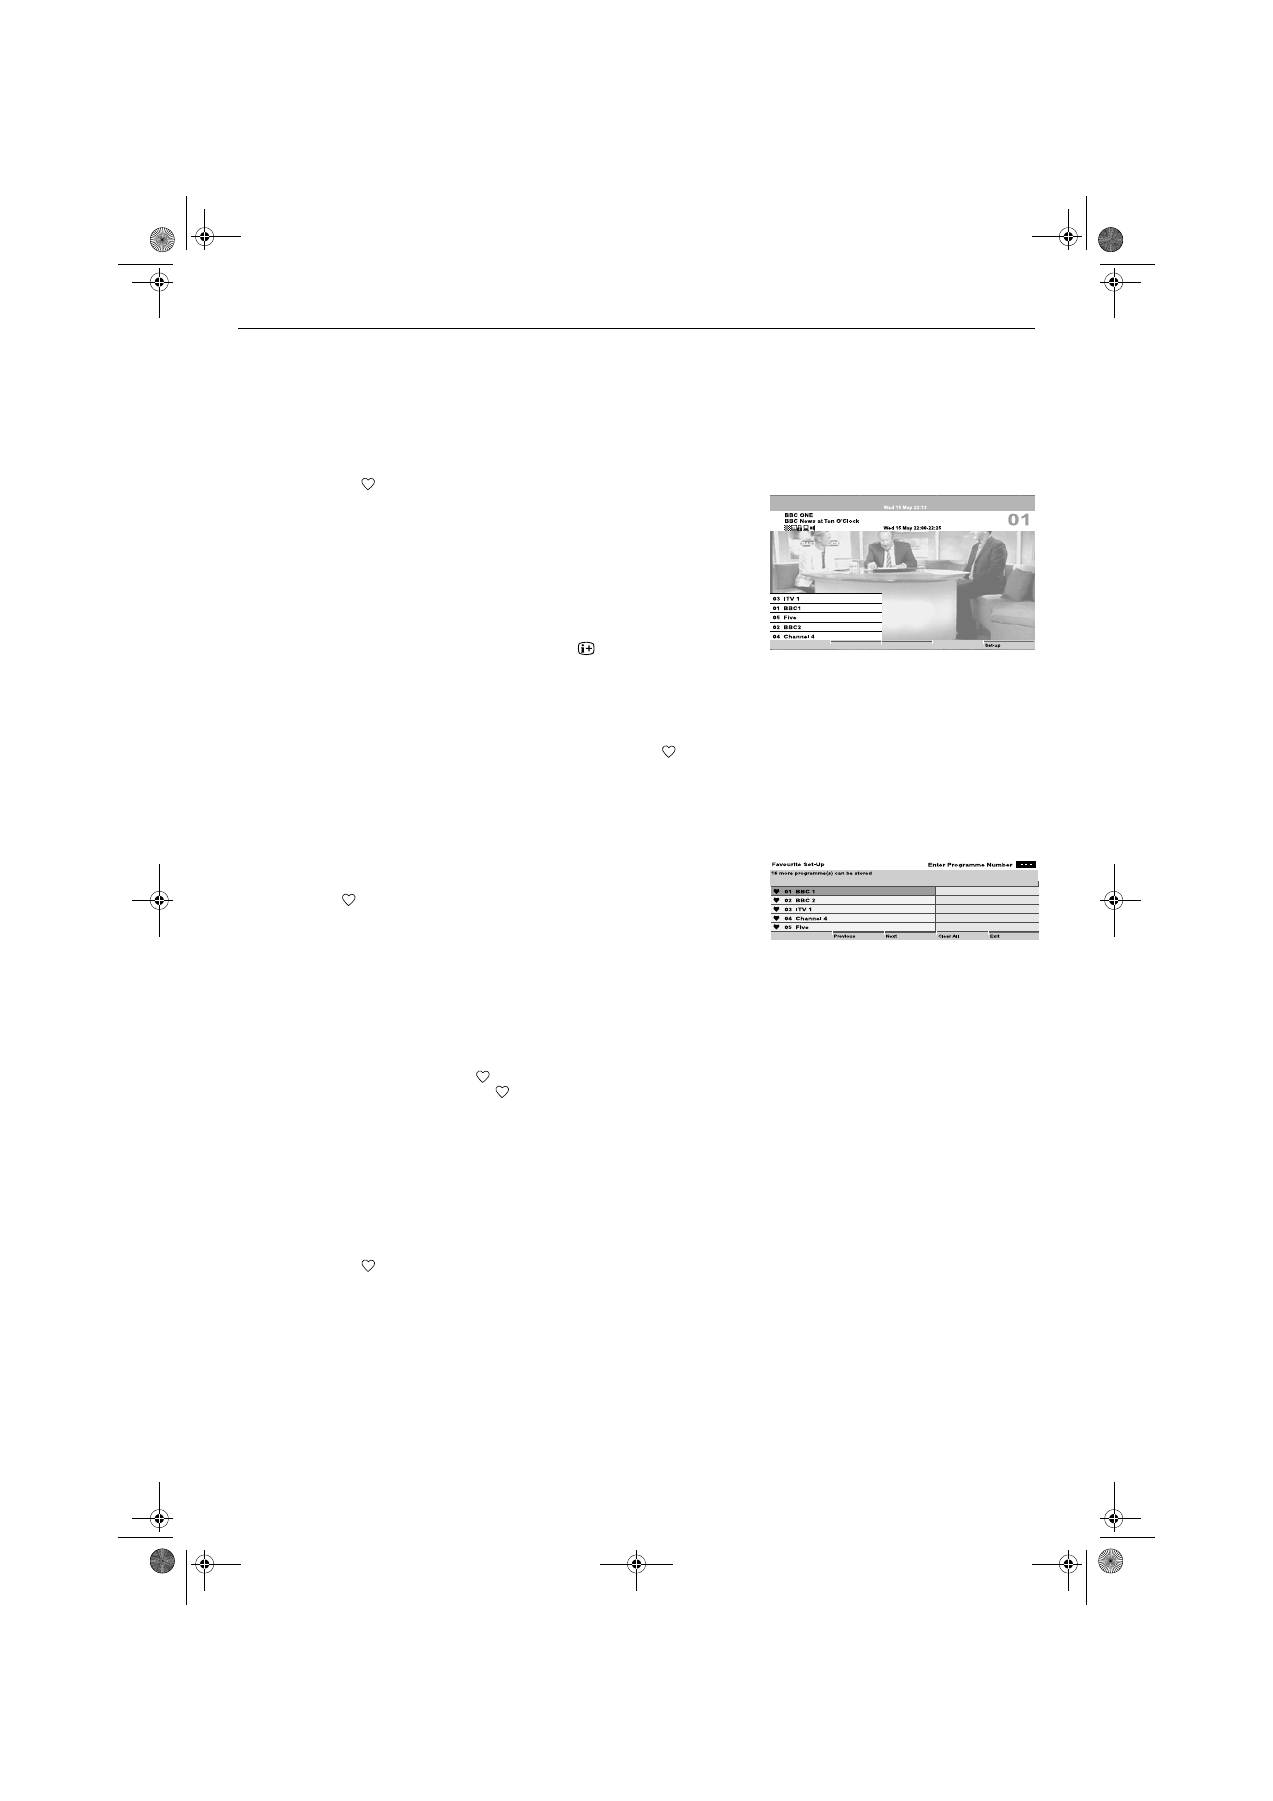
Viewing Favourite programmes
1.
Press the
button on the remote control to display the Favourite menu.
This menu consists of a programme information area, and a favourite
channel list. A maximum of 20 channels can be stored as favourites.
Note:
If no favourite programmes have been previously stored, a screen appears asking
if you wish to set Favourite programmes. Press the
B
button to select ‘Yes’ then
press
OK
. The Favourite Set-up menu appears. Follow the instructions for ‘Adding
or deleting a Favourite channel’
2.
Press the
V
or
v
buttons to move the cursor bar up or down the favourite
channel list. As each channel is highlighted, you can obtain a brief
description of its programme by pressing the
button (the availability
of this description depends on the broadcaster).
If there are more than 5 channels in the list, press the
GREEN
button to
display the next group of channels or
RED
button to display the previous
group.
3.
When the programme you want to view is highlighted, press the
OK
button to view the programme in the background. Press the
button to
return to normal operation.
To enter Favourite Set-up
1.
With the Favourite menu on screen, press the
BLUE
button to display the
Favourite set-up menu. This menu shows all the channels available to
you. A
will be shown alongside channels already stored as favourites.
Adding or deleting a Favourite channel
1.
Press the
V
or
v
button to highlight the channel you wish to add or delete.
If there are more than 5 channels in the selected list, press the
GREEN
button to display the next group of channels or the
RED
button to display
the previous group.
Alternatively, if you know the channel number, you can use the
0 - 9
buttons on the remote control to enter the channel number directly.
2.
When the channel you wish to add or delete is highlighted, press the
OK
button. This will either add a
to show the channel is now stored as a
favourite, or remove the existing
.
To clear all Favourite channels
1.
With the Favourite set-up menu on screen, press the
YELLOW
button.
2.
A display appears asking you to confirm you wish to delete all favourites.
3.
Press the
B
or
b
button to highlight ‘Yes’, then press the
OK
button.
Press the
BLUE
button to return to the Favourite menu.
4.
Press the
button to return to normal TV operation.
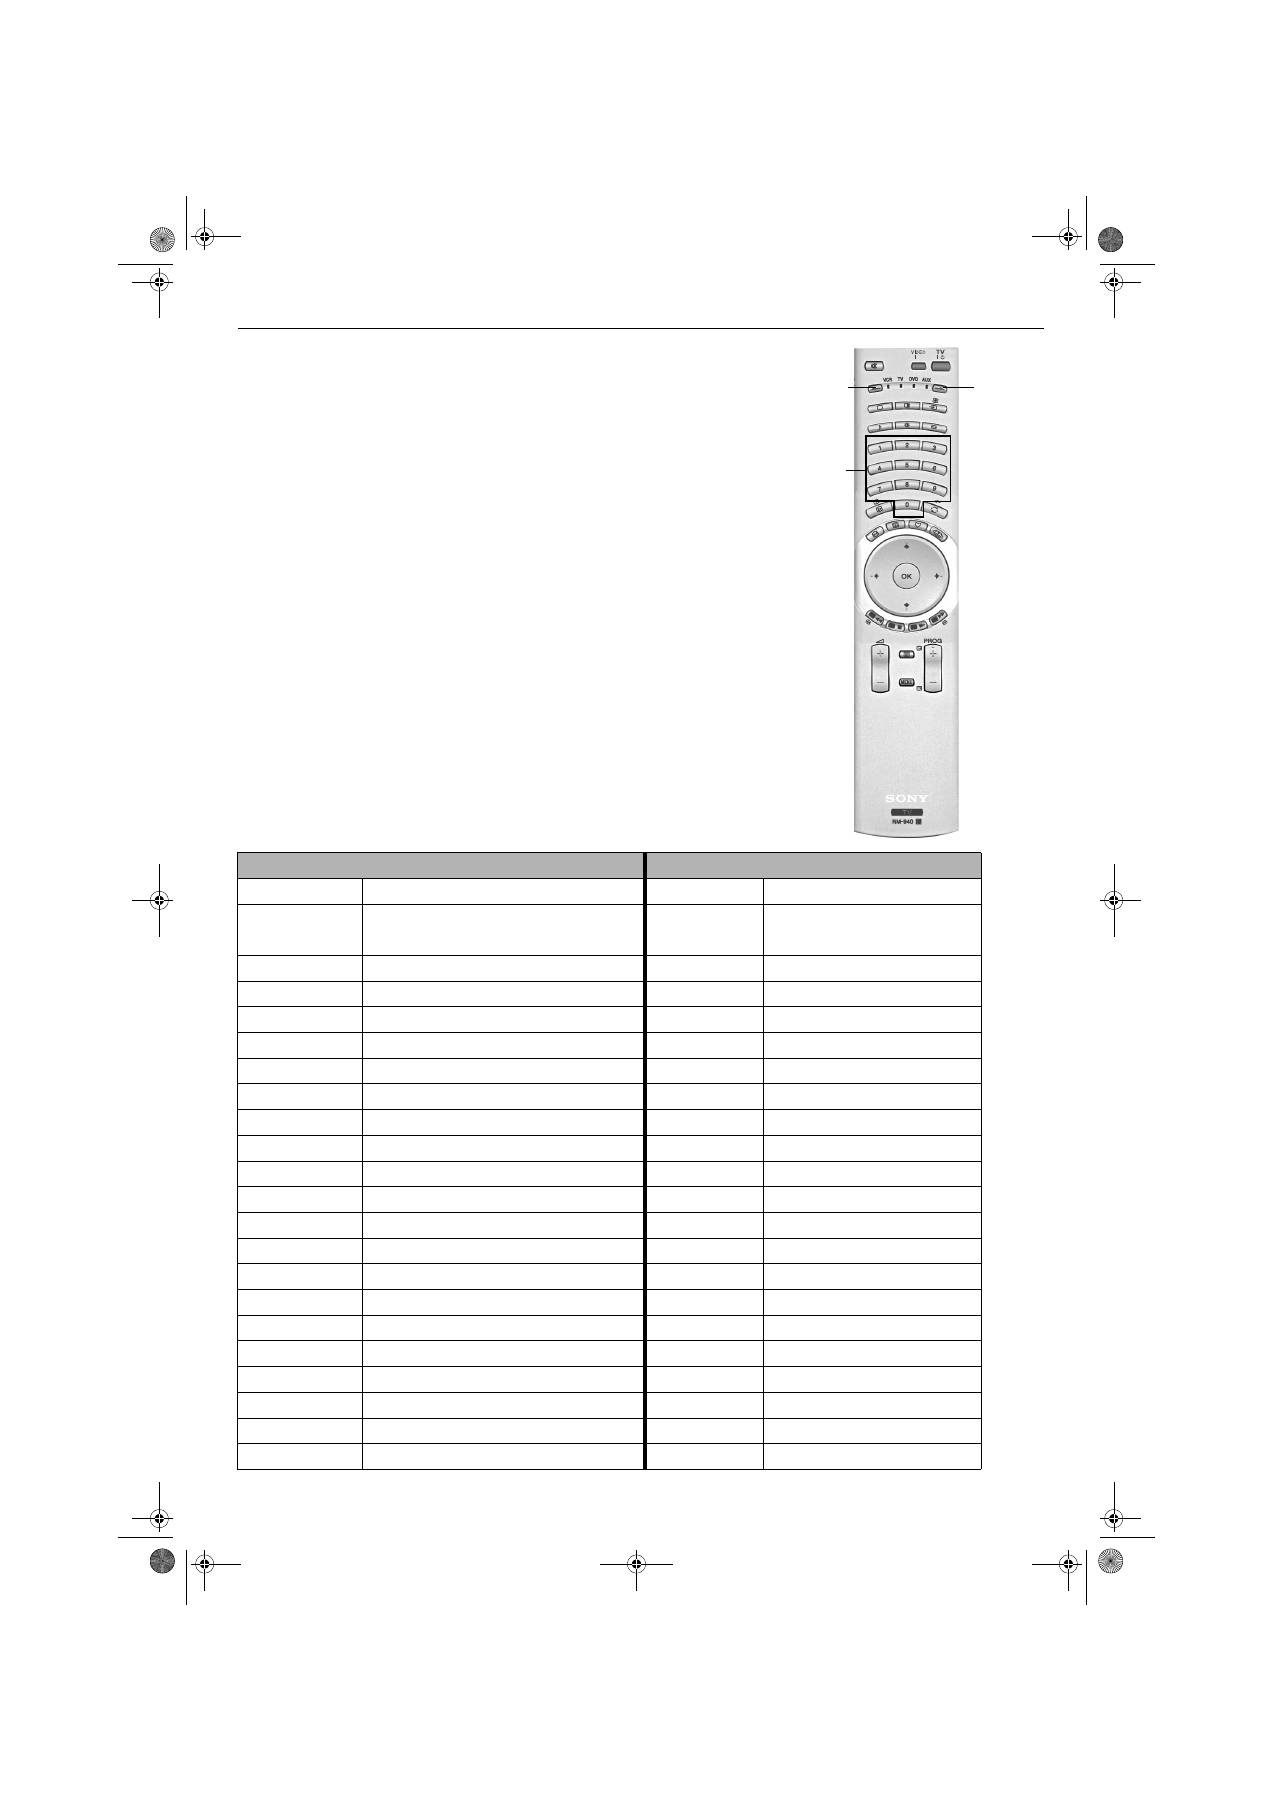
Favourite menu
Favourite Set-up menu
GBpages9-12.fm Page 11 Monday, January 10, 2005 5:44 PM
12
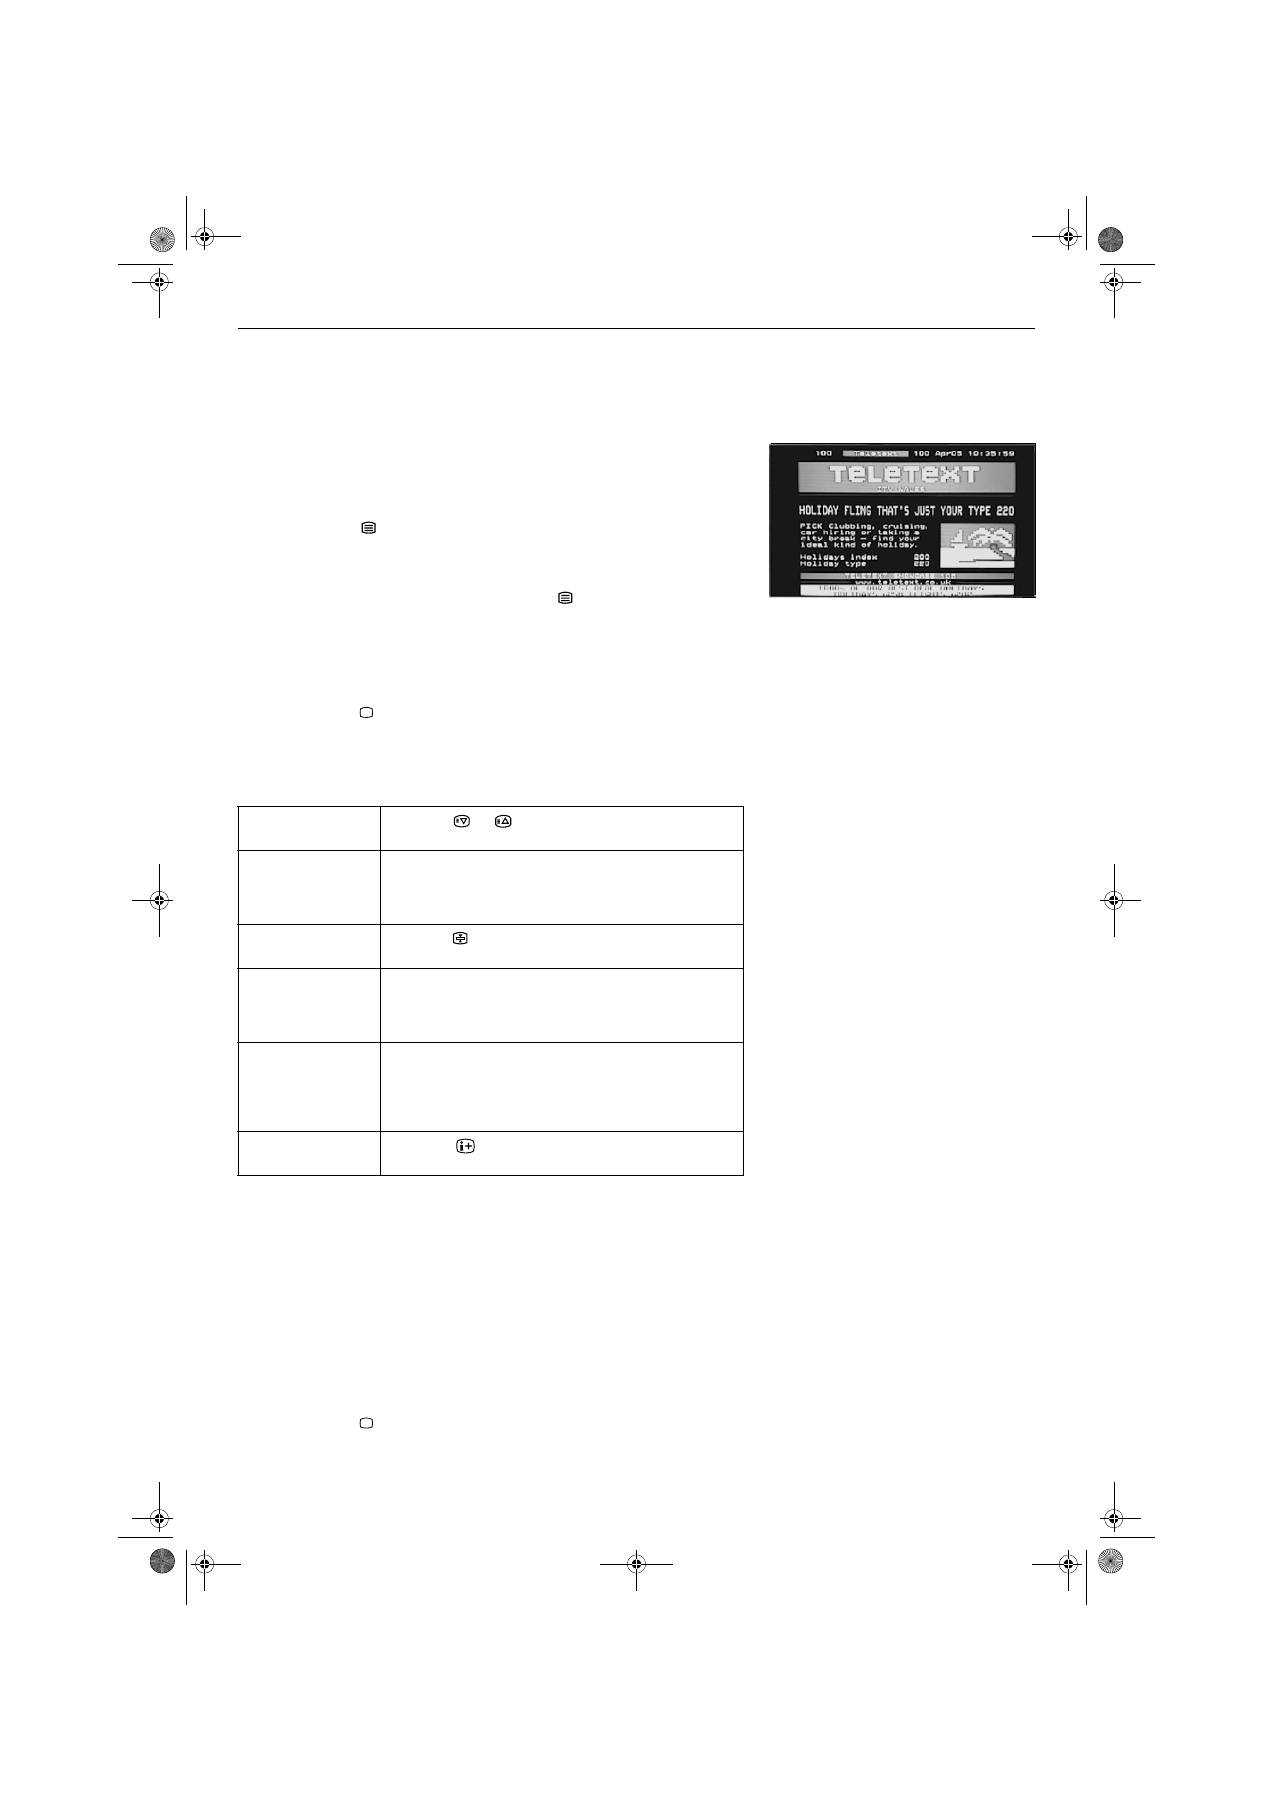
Text
Most TV channels provide a text service. The index page (usually page 100)
provides information on how to use the service. Please ensure you are receiving a
strong signal or some text errors may occur.
Viewing Text
How to use Text features
Viewing Top-Text
If transmitted by the broadcasting authorities, Top-Text can be viewed on this TV.
1.
Select the TV channel that carries the text service you wish to view.
2.
Press the
button to enter Picture and Text (P&T) mode. The screen is
divided into two with the Text display on the left and the TV channel in the
right corner.
Notes:
If you wish to view the Text in full screen mode, press the
button a second time.
3.
Press the numbered buttons to enter a three digit number for the text
page you wish to view. Your selected page appears on screen.
4.
Enter more 3 digit page numbers as required.
5.
Press the
button on the remote control at any time to exit Text mode.
To select the next
or preceding page
Press the
or
button.
To select a sub
page
A text page can consist of several sub pages. In this case
an information box is displayed at the bottom of the
screen showing the number of sub pages available.
Select the sub pages by pressing the
B
or
b
button.
To keep a page on
display
Press the
button. Press again to cancel.
To use Fastext
Fastext allows you to access pages with one button push.
When Fastext is available, four coloured items appear at
the bottom of the screen. Press the corresponding
coloured button on the remote control to display the page.
To use the Page
Catching feature
Select a page that contains several page numbers (e.g.
the index page), then press the
OK
button. Press the
V
or
v
button to highlight the page number required, then
press the
OK
button again. Your selected page appears
on screen.
To use the Reveal
function
Press the
button to reveal hidden information on the
page (such as answers to a quiz).
1.
Select a channel you know is broadcasting TOP-Text, then press the
YELLOW
button to show a pop-up list of ‘group’ topics.
2.
Press the
V
or
v
button to highlight the desired ‘group’, then press the
YELLOW
button or
OK
button to select.
3.
Press the
BLUE
button to show a pop-up list of ‘block’ topics.
4.
Press the
V
or
v
button to highlight the desired ‘block’, then press the
BLUE
button or
OK
button to select.
5.
Press the
button when you wish to exit Top-Text.
Text display
GBpages9-12.fm Page 12 Monday, January 10, 2005 5:44 PM
TV menu system
13
Using the TV menu system
This TV contains a menu system which is based on a series of on screen displays.
These displays help you get the most from your TV, from customising the picture and
sound to accessing advanced features. Use the following buttons on the remote
control to operate the TV menu system:
1.
Press the
MENU
button to display the main menu.
2.
Use the following buttons to operate the menu:
- Press the
v
or
V
buttons to highlight the required menu or option.
- Press the
b
button to enter the required menu or option.
- Press the
B
button to return to the last menu or option.
- Press the
v
,
V
,
B
or
b
buttons to alter the settings of the selected option.
- Press the
OK
button to confirm and store your selection.
3.
Press the
MENU
button to remove the menu from the TV screen.
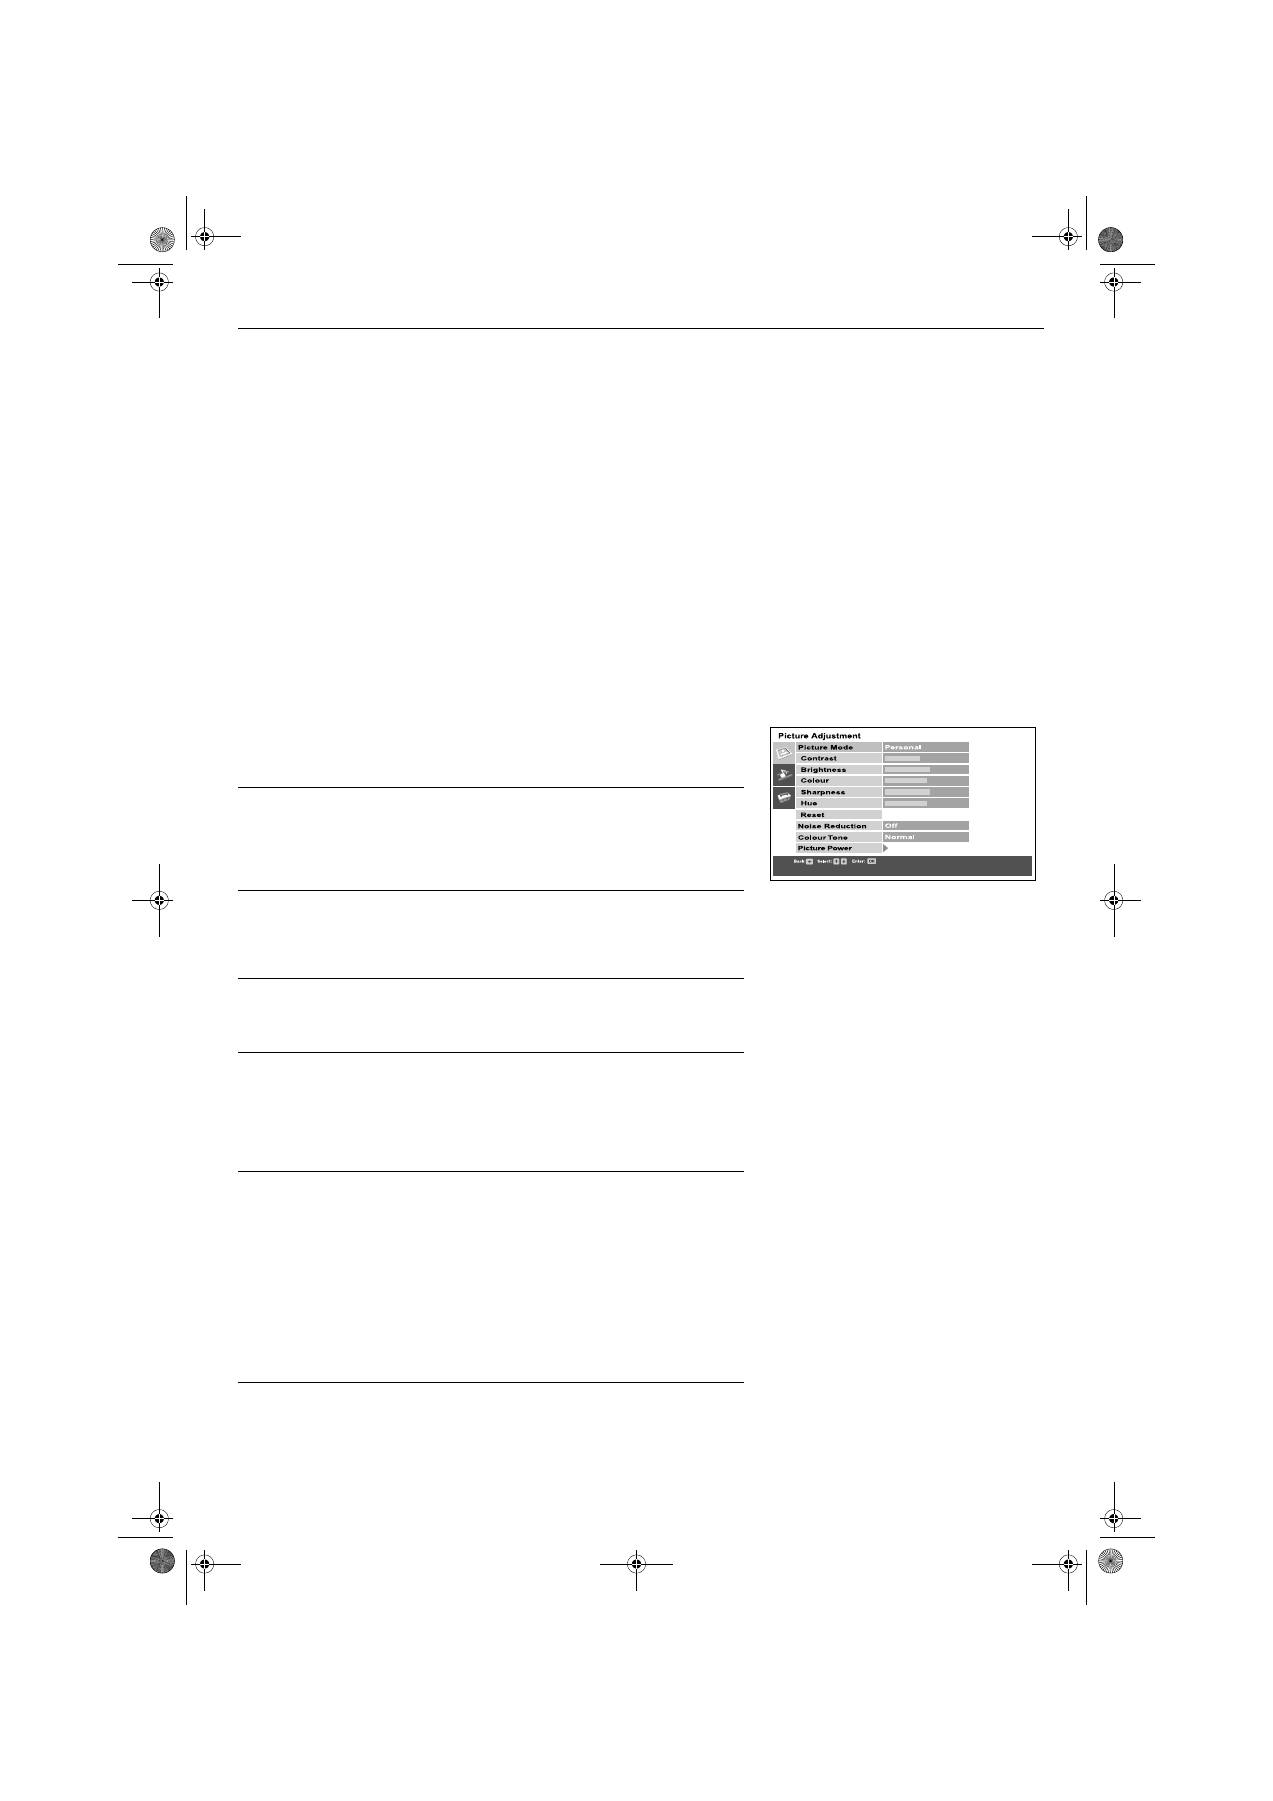
Picture Adjustment menu
This menu allows you to customise the TV picture settings. Highlight the required
option and press
b
to select. The table below explains each option and how to use it.
Picture Mode
This option allows you to select one of four picture modes. Press
V
or
v
to select
Live, Personal, Movie or Game. Press
OK
to confirm your choice.
Contrast, Brightness, Colour, Sharpness, Hue
These options allow you to adjust the contrast, brightness, colour and sharpness.
Press
B
or
b
to set the levels. Press
OK
to confirm.
Note:
Hue will only be available if an NTSC broadcast is received.
When adjusting these settings, the ‘Picture Mode’ automatically changes to ‘Personal’.
Reset
This option resets all picture settings to the factory preset levels. Press
b
to
restore default picture settings.
Note:
This feature is only available when ‘Picture Mode’ is set to ‘Personal’.
Noise Reduction
Sometimes a weak signal can produce a snowy picture (called Picture Noise).
This option can help to reduce this effect. Press
V
or
v
to select Off, Low, Auto or
High. Press
OK
to confirm.
Colour Tone
This option allows you to alter the tint of the picture. The settings available are:
Warm
:
Gives the white colours a red tint.
Normal
:
Gives the white colours a neutral tint.
Cool
:
Gives the white colours a blue tint.
Press
V
or
v
to select Warm, Normal or Cool. Press
OK
to confirm.
Picture Power
This option allows you to view a picture enhancement technology demonstration,
and set the contrast level to its optimum.
Sharpness
:
Optimizes the sharpness levels of the TV picture. Press
V
or
v
to
select ‘Low’ (Demo) or ‘High’, then press
OK
to confirm your
choice.
Note:
As this is a demonstration only, any changes made are not stored.
Contrast
:
Optimizes the contrast levels of the TV picture. Press
V
or
v
to
select ‘On’ or ‘Off’ then press
OK
to confirm your choice.
100Hz Mode
: This option allows you to choose the best setting to view moving
images. Press
V
or
v
to
select ‘100Hz Digital Plus’ or ‘Adv.
100Hz Digital Motion’ then press
OK
to confirm your choice.
Picture adjustment menu
GBpages13-17.fm Page 13 Monday, January 10, 2005 5:44 PM
TV menu system
14
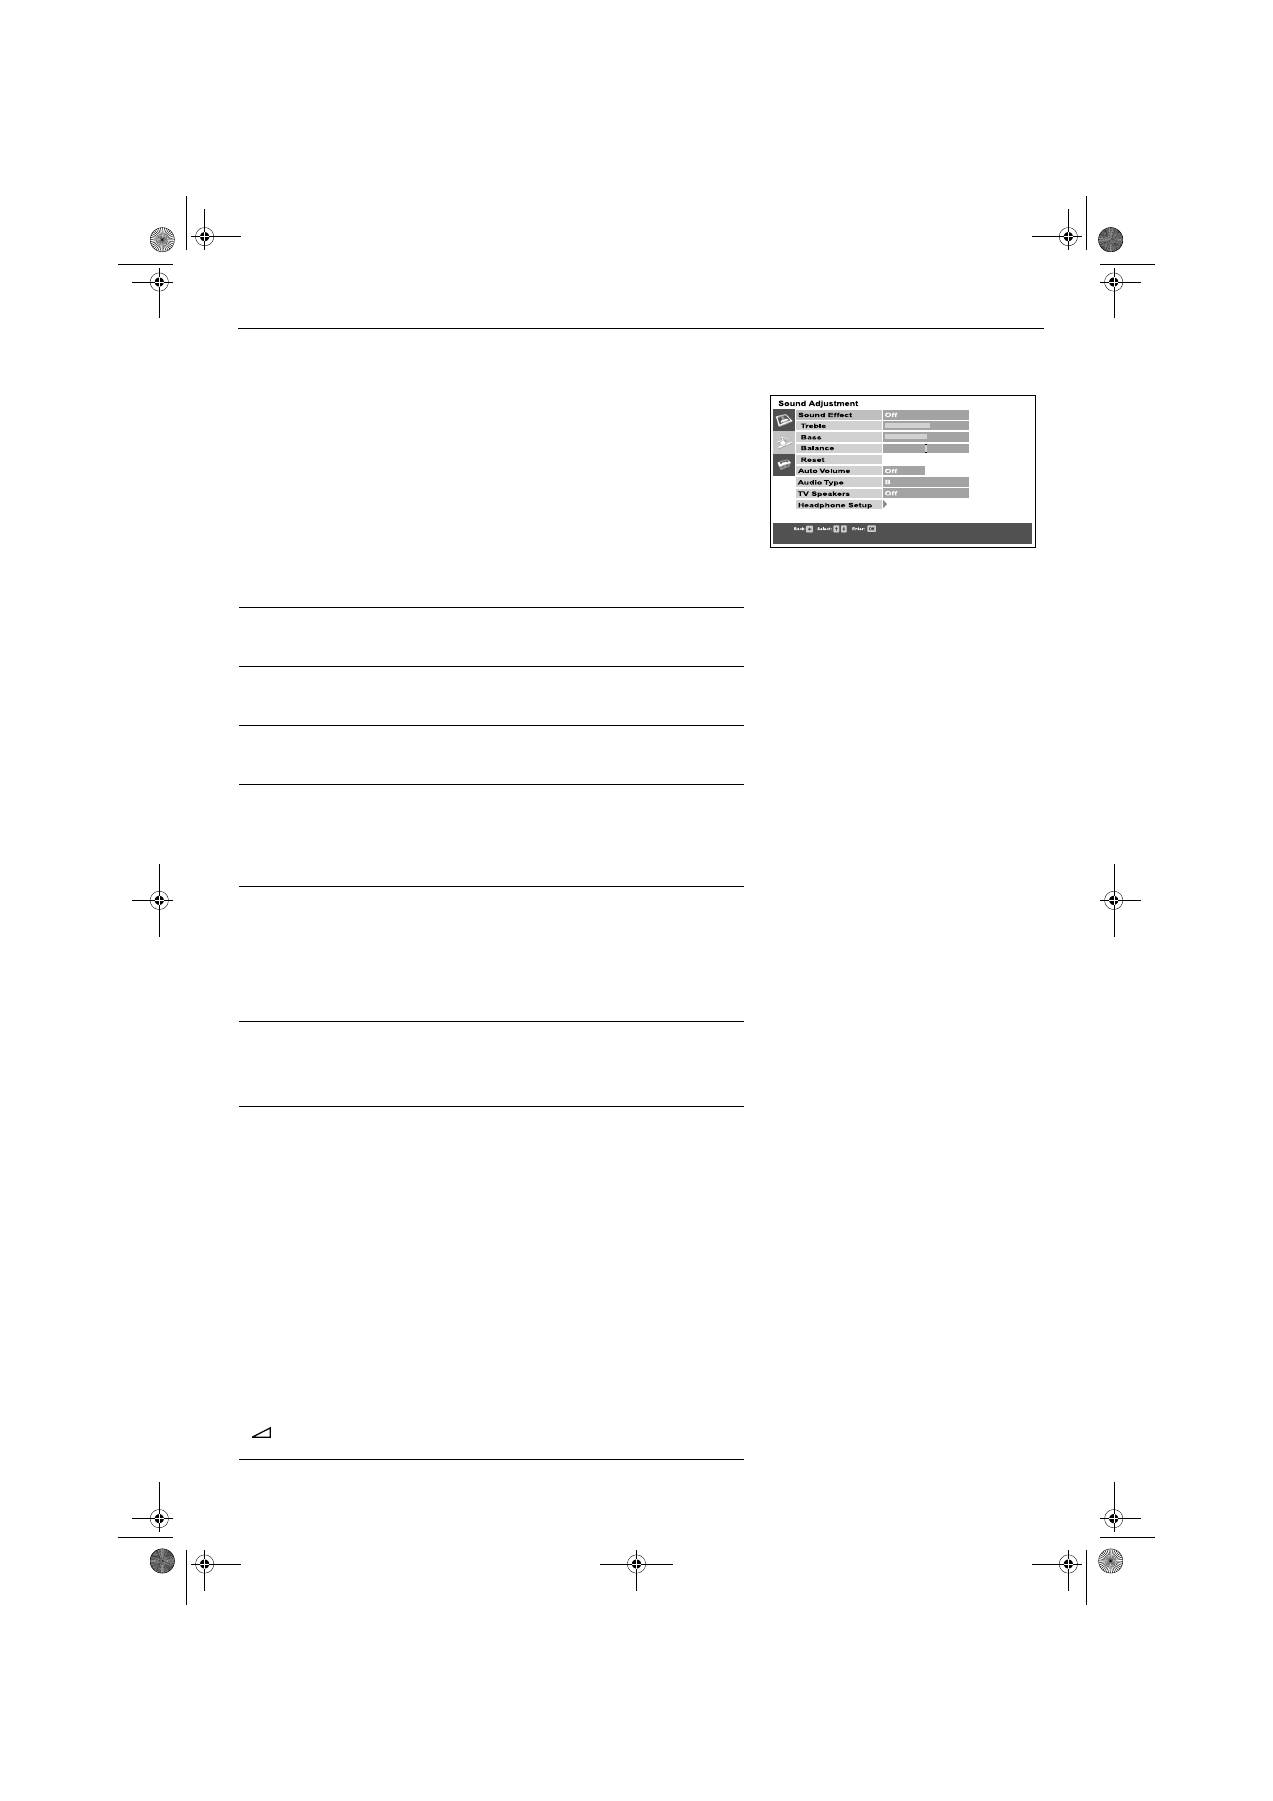
Sound Adjustment menu
This menu allows you to customise the sound. Highlight the required option and
press
b
to select. The table below explains each option and how to use it.
Sound Effect
This option allows you to select one of four sound modes. Press
V
or
v
to select
Off, Natural*, Dynamic or Dolby V**. Press
OK
to confirm.
Notes:
*
‘Natural’ and ‘Dynamic’ are functions of the ‘BBE High Definition Sound System’. This
system enhances clarity, detail, presence of sound and increases musical realism.
**
This TV has been designed to create surround sound effect by simulating the sound of
four speakers with two speakers when the broadcast signal is Dolby Surround encoded.
The sound effect can also be improved by connecting a suitable external amplifier (for
details refer to page 18). Manufactured under licence from Dolby Laboratories. ‘Dolby’ and
the double-D symbol are trademarks of Dolby Laboratories.
Treble, Bass
These options allow you to customise the sound by adjusting the treble and bass
levels. Press
B
or
b
to set the levels. Press
OK
to confirm.
Balance
This option allows you to set the balance of sound between the left and right
speakers. Press
B
or
b
to set the balance. Press
OK
to confirm.
Reset
This option resets all sound controls (treble, bass and balance) to the factory
preset levels. Press
b
to restore default sound settings.
Auto Volume
Sometimes the broadcast volume level changes (e.g. adverts tend to be louder
than programmes). This option allows you to cancel this effect, giving a constant
volume level. Press
V
or
v
to select ‘Off’ or ‘On’. Press
OK
to confirm.
Note:
This option is not available when ‘Sound Effect’ is set to ‘Dolby V’.
Audio Type
When receiving a bilingual broadcast:
This option allows you to choose which
language to listen to. Press
V
or
v
to select A to listen to the first language or B to
listen to the second language. Press
OK
to confirm.
When receiving a stereo broadcast:
This option allows you to choose between
mono or stereo sound. Press
V
or
v
to select Mono or Stereo. Press
OK
to
confirm.
TV Speakers
This option allows you to switch the TV speakers on or off. Press
V
or
v
to set the
speakers to ‘On’, ‘Off One Time’ or ‘Off Permanent’. Press
OK
to confirm.
Note:
This feature is useful when connecting external audio equipment (Hi-Fi etc.- see page 18).
Headphones Set-up
With this option you can configure settings for the headphones. Your options are
as follows:
Volume:
Allows you to set the volume level for the headphones. Press
B
or
b
to adjust the volume. Press
OK
to confirm.
Audio Type:
When receiving a bilingual broadcast:
This option allows you
to choose which language to listen to. Press
V
or
v
to select A to
listen to the first language or B to listen to the second language.
Press
OK
to confirm.
When receiving a stereo broadcast:
This option allows you to
choose between mono or stereo sound. Press
V
or
v
to select
Mono or Stereo. Press
OK
to confirm.
PAP Selection:
This option allows you to set which PAP picture sends its sound
to the headphones (refer to ‘Picture and Picture’ on page 9).
Press
V
or
v
to select ‘Frame’ if you wish to hear the sound from
the active picture (which will be highlighted) or ‘Right Picture’ to
permanently hear the sound from the right picture. Press
OK
to
confirm.
Note
:
The headphone volume is independent of the main volume set by the volume +/- button
of the remote control. However, the output level from the Audio output socket on the
rear of the TV is determined by the main volume setting.
Sound adjustment menu
GBpages13-17.fm Page 14 Monday, January 10, 2005 5:44 PM

TV menu system
15
Set up menu
This menu gives you access to more advanced features. The options are:
Language/Country
When you first installed the TV you were asked to select your language and
country. The ‘Language’ and ‘Country’ options in this ‘Set-up’ menu allow you to
change these settings. With the ‘Language’ or ‘Country’ option highlighted, press
b
to enter. Press
v
or
V
to select the desired Language or Country then press
OK
to confirm.
Auto Tuning
All the available channels were tuned in when the TV was first installed. This
‘Auto Tuning’ option allows you to repeat that process (e.g. to re-install the TV at
an alternative location or search for new channels that have been launched by
broadcasters). With the ‘Auto Tuning’ option highlighted, press
b
to select. The
autotune prompt appears on screen. Press
OK
to start the auto tuning process.
When all available channels have been tuned the TV returns to normal operation.
Programme sorting
This option allows you to change the order in which the channels are stored on
the TV and delete unwanted channels. With the ‘Programme sorting’ option
highlighted, press
b
to enter the ‘Programme sorting’ menu. Press
v
or
V
to
highlight the channel you wish to move to a new position, then press
b
to select
(press the
OK
button if you wish to delete the channel). Press
v
or
V
to highlight
the new position for your channel, then press the
OK
button. Your chosen
channel has now moved to the new position. Repeat to move other channels if
required.
Manual Tuning
This option allows you to manually tune in channels. With the ‘Manual Tuning’
option highlighted, press
b
to enter the Manual Tuning menu. Press
v
or
V
to
highlight the programme number you wish to tune. Press
OK
to confirm, and
display the setting screen. Press
v
or
V
to highlight System, then press the
b
button. Press
v
or
V
to set the system required. Choose from system B/G or D/K.
Press the
B
button. Press
v
button to highlight Channel and press the
b
button.
Press
v
or
V
to choose ‘C’ for terrestrial or ‘S’ for cable channels. Press the
b
button. The channel number is highlighted.
(a) If you know the channel number you want:
Press the
numbered
buttons
on the remote control to enter the channel number. Press
OK
to store.
(b)
I
f you do not know the channel number:
Press
V
to SEARCH.
The TV set automatically searches for the next available TV broadcast
channel or the VCR test signal. When a channel has been found press either
OK
to store or
V
to continue searching.
Naming a channel
The ‘Label’ option allows you to give the channel a personalised name.
a)
Press
v
or
V
to highlight ‘Label’ then press the
b
button to enter.
b)
Press the
v
or
V
button to select the first letter or number of your choice.
Press
b
button to confirm. Select remaining characters in this way, then press
the
OK
button to store.
AFT (Automatic Fine Tune)
This option allows you to fine tune the channel for optimum result.
a)
Press the
v
or
V
button to highlight ‘AFT’ then press the
b
button to enter.
b)
Press the
v
or
V
button to adjust the tuning frequency over a range of -15 to
+15. Press the
OK
button to store.
Note:
In most cases it is best to leave the AFT option set to ‘On’.
Decoder
This option allows you to set a channel for viewing an encoded signal (e.g. from a
pay TV decoder.
a)
Press
v
or
V
to highlight ‘Decoder’ then press the
b
button to enter.
b)
Press
v
or
V
to select AV1 or AV3 depending on which socket your decoder
is connected to. Press the
OK
button to store.
Set-up menu
Manual tuning setting screen
GBpages13-17.fm Page 15 Tuesday, January 11, 2005 11:09 AM
TV menu system
16
Notes on AV inputs:
AV1/AV2 inputs:
These sockets accept Video inputs or RGB inputs. The TV detects
which input is being applied to the socket, and automatically
displays the data on screen.
AV3/AV4 inputs:
These sockets accept Video inputs or S-VHS inputs. The TV
detects which input is being applied to the socket, and
automatically displays the data on screen.
AV3 Output
This option allows you to set which signal source is output from the AV3 scart
socket (labelled
) on the rear of the TV. If you connect a VCR to this
socket you can record from equipment connected to the other sockets of the TV.
Press
V
or
v
to select one of the following settings then press the
OK
button to
confirm:
TV
Always outputs the tuned analogue TV signal.
AV1
Outputs the signal from equipment connected to the
socket on the rear of the TV.
AV2
Outputs the signal from equipment connected to the
socket on the rear of the TV.
AV4
Outputs the signal from equipment connected to the
socket on the rear of the TV.
AV5
Outputs the signal from equipment connected to the
socket on the side of the TV.
AV Labels
This ‘AV Labels’ option allows you to assign a name to any equipment connected
to the AV sockets of the TV. The name is then displayed briefly on screen when
the equipment is selected. With the ‘AV Labels’ option highlighted, press
b
to
enter the ‘AV Labels’ menu. Press
v
or
V
to highlight the socket you wish to
name. Press
b
to select the LABEL column. Press
v
or
V
to select one of the
preset names ‘Cable’, ‘CAM’, DVD’, ‘Sat’, or Video’. Select ‘Edit’ if you wish to
assign your own name. Press
OK
to store.
Note:
If ‘Edit’ is selected, press
b
to select the LABEL column. Press
v
or
V
to select the first
character. Press
b
to confirm this character. Select the other characters in the same way
(up to a maximum of five characters). After selecting all required characters, press
OK
to
store.
VCR Compensation
This option corrects jitter that can sometimes appear when playing back
programmes recorded on a bad or faulty tape.
With the ‘VCR Compensation’ option highlighted, press
b
button to enter. Press
the
v
or
V
button to select the AV socket your VCR is connected to, then press
b
button to confirm. Press the
v
or
V
button to select ‘On’, then press
OK
button to
store.
3/
s
3
1
2
4/
s
4
5
/
s
5
GBpages13-17.fm Page 16 Tuesday, January 11, 2005 11:09 AM
TV menu system
17
Screen Adjustment
With this option you can configure settings for the TV screen. Your options are as
follows:
Auto Format:
With this option switched on, the TV can automatically
adjust the picture size to suit the broadcast. Press
V
or
v
to select ‘On’ or ‘Off’. Press
OK
to confirm.
4:3 Format Correction:
When viewing 4:3 or 14:9 broadcasts there will be dark
areas visible at the edge of the screen. The settings
available are:
4:3
Dark areas remain on the TV screen.
Smart:
The TV automatically switches to Smart mode,
eliminating any dark areas on the TV screen.
Press the
V
or
v
button to select ‘4:3’ or ‘Smart’. Press
OK
to confirm.
Note:
This feature is only available when ‘Auto Format’ is set to ‘On’.
Picture Rotation:
Due to the Earth’s natural magnetism the picture might
slant slightly. This option allows you to cancel out this
effect. With the ‘Picture Rotation’ option highlighted,
press
b
to select. Press
v
or
V
to rotate the picture over
a range of -5 to +5. Press
OK
to store.
RGB Setup:
When viewing signals from RGB equipment connected
to the AV1 or AV2 sockets (e.g. DVD player,
PlayStation) the picture may need adjusting. This
option allows you to adjust the size and horizontal
picture position of the signals from the RGB equipment.
With the ‘RGB Setup’ option highlighted, press
b
to
enter the ‘RGB Setup’ menu. Press
b
to select H
Centre. Press
v
or
V
to centralise the picture over a
range of -5 to +5. Press
OK
to store. Press
v
to select
H Size. Press
v
or
V
to adjust the picture size over a
range of -5 to +5. Press
OK
to store.
Note
:
If there is no RGB equipment connected to either the AV1 or
AV2 scart sockets the ‘RGB Set-up’ option will not be available.
GBpages13-17.fm Page 17 Tuesday, January 11, 2005 11:09 AM
Connecting other equipment to the TV
18
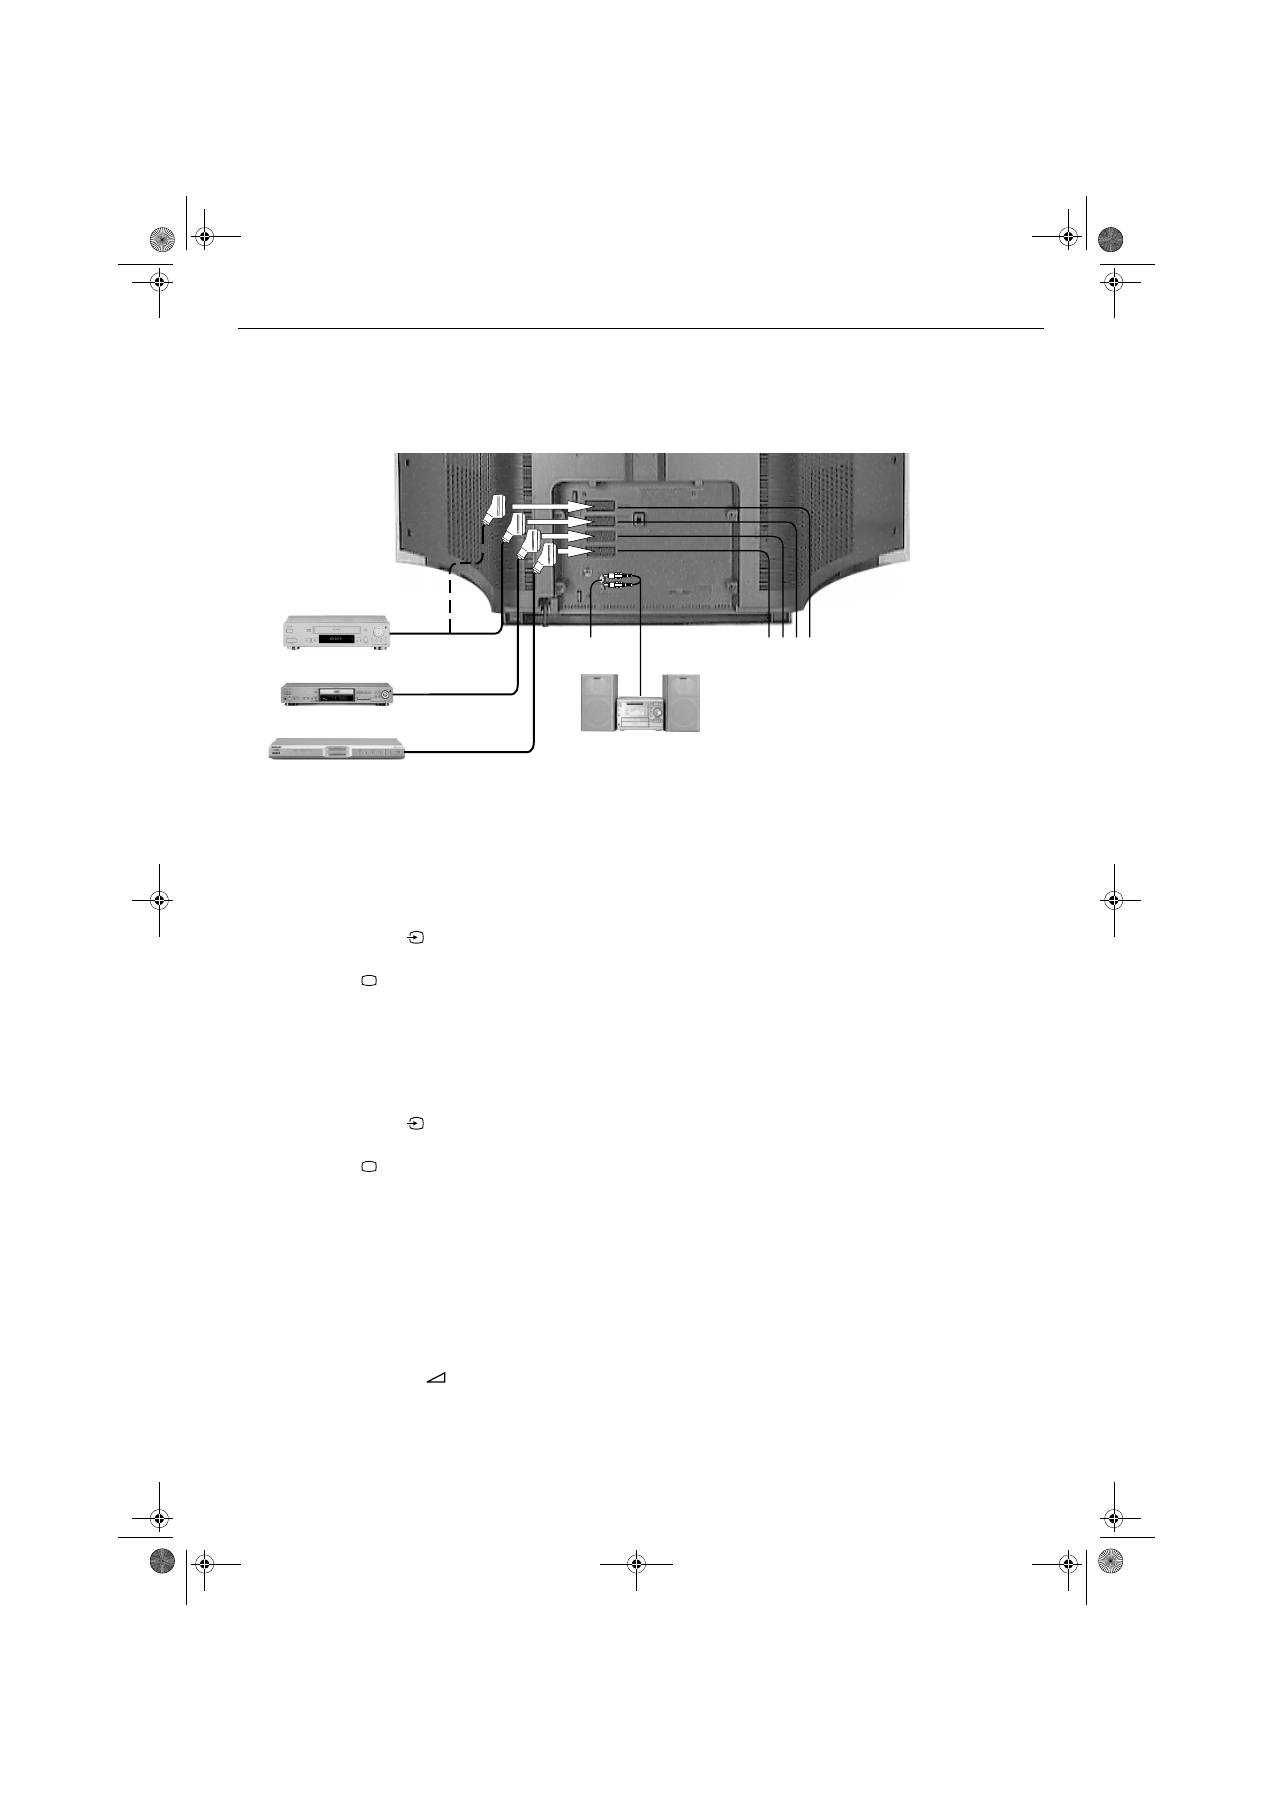
A wide range of equipment can be connected to the TV through the front and rear
sockets.
Connecting equipment to the rear sockets
Connecting a DVD player
Connecting a Decoder/Set top box
Connecting a SMARTLINK VCR
SMARTLINK is a direct link between the TV and a SMARTLINK VCR. Ensure your
SMARTLINK VCR is connected to the
C
socket labelled
(
SMARTLINK
)
i
3/
r
3
VCR
, using a fully wired 21 pin scart lead. For more information on SMARTLINK, refer
to your SMARTLINK VCR instruction manual.
Connecting a Hi-Fi
1.
Connect a scart lead from the
B
socket of the TV to a scart socket on
your DVD player (refer to your DVD instruction manual)
2.
Insert a DVD into the DVD player, then press the ‘PLAY’ button. The
picture appears automatically on the TV.
If not, press the
button on the remote control repeatedly until the
picture appears on screen.
3.
Press the
button when you wish to return to normal TV operation.
1.
Connect a scart lead from the
A
socket of the TV to a scart socket on
your set top box (refer to your set top box instruction manual).
2.
Switch on your set top box. The picture appears automatically on the TV.
If not, press the
button on the remote control repeatedly until the
picture appears on screen.
3.
Press the
button when you wish to return to normal TV operation.
1.
Connect a phono jack lead from the
E
sockets of the TV to your Hi-Fi
(refer to your Hi-Fi instruction manual).
2.
Use the Volume +/-
button to set the required volume level. If you
want to turn your TV speakers off, please refer to ‘TV Speakers’ in the
‘Sound Adjustment’ menu on page 14.
Note:
Connecting cables are not supplied.
Hi-Fi
ABCD
E
DVD
Decoder/Set top box
VCR
GBpages18-24.fm Page 18 Monday, January 10, 2005 5:45 PM
Connecting other equipment to the TV
19
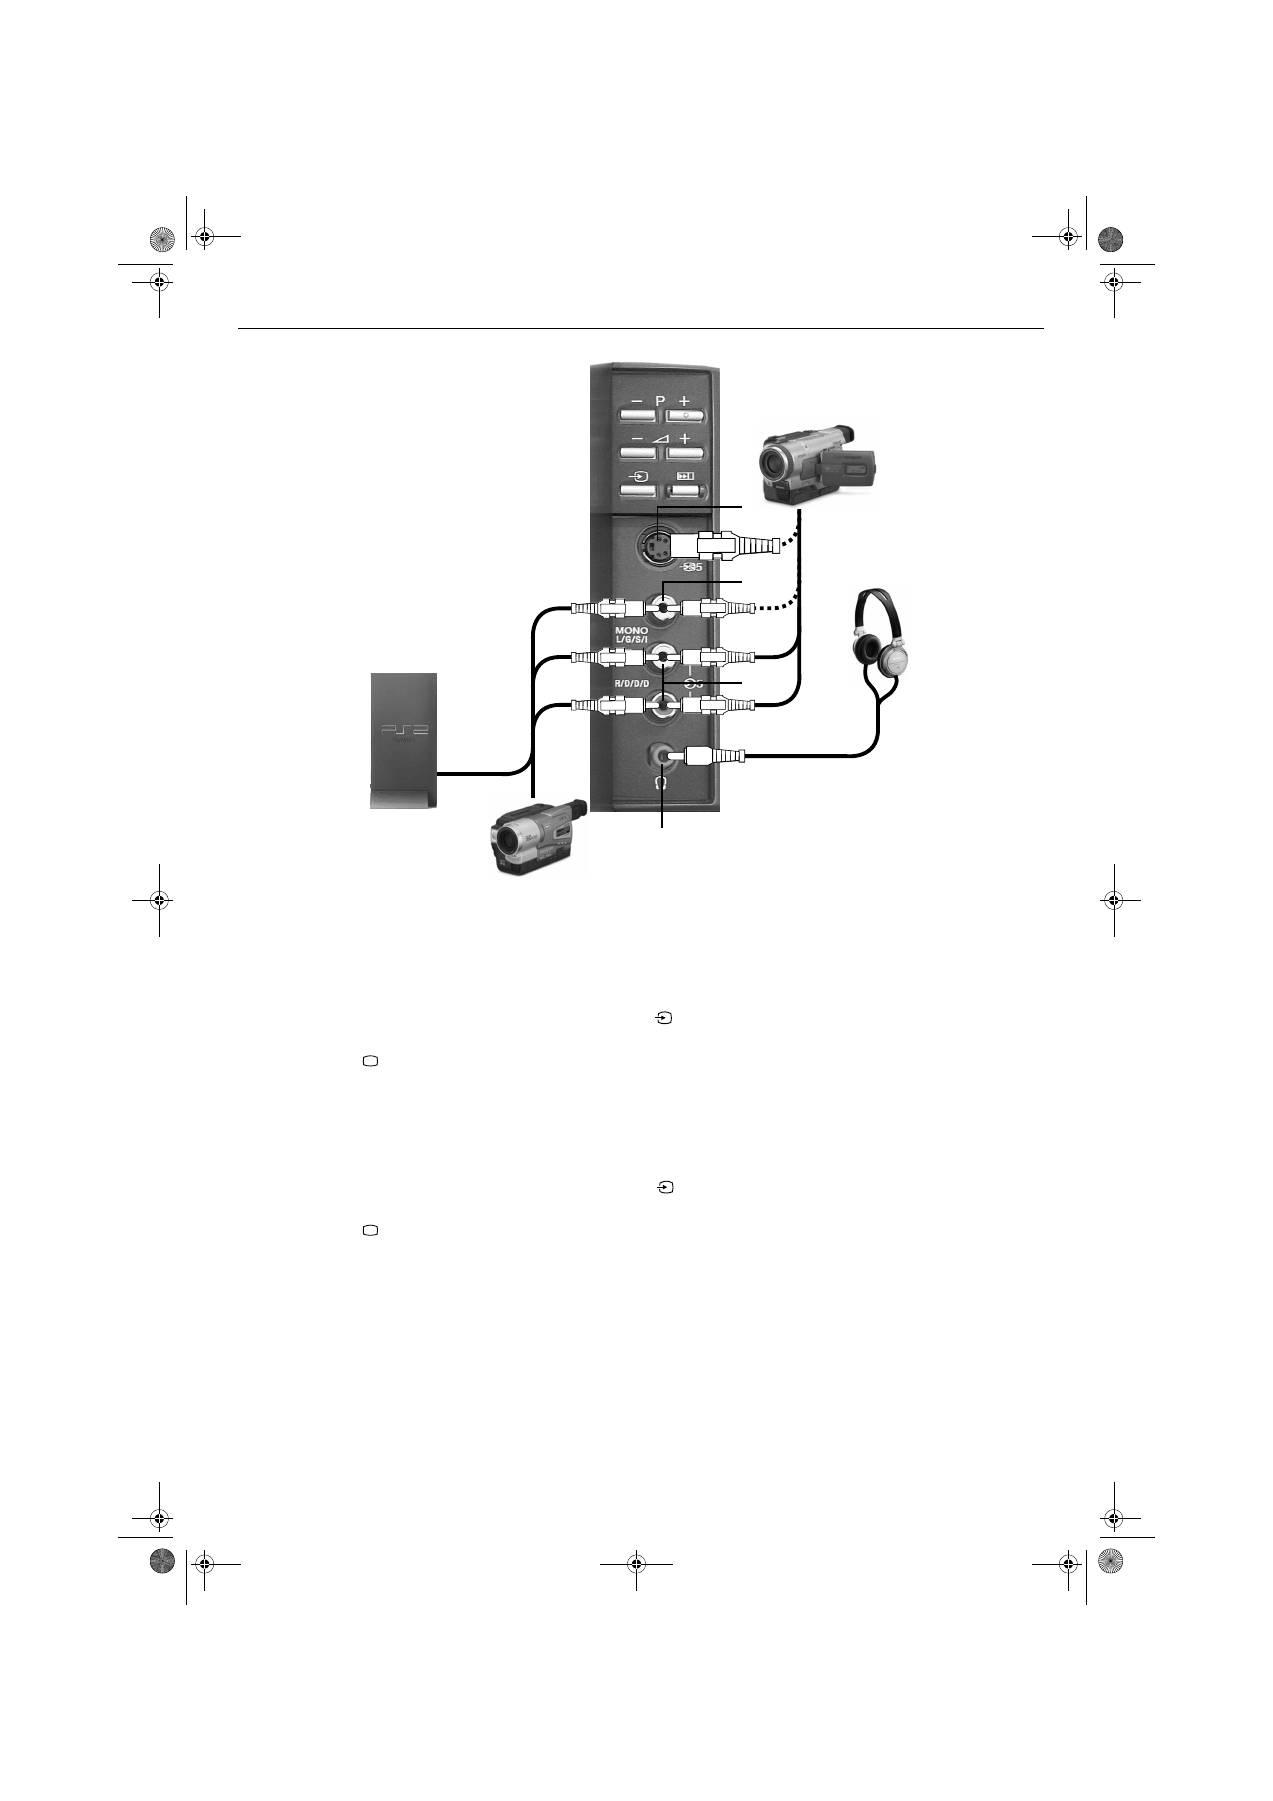
Connecting equipment to the front sockets
Connecting a PlayStation
Connecting an S-VHS/8mm/Hi8 Camcorder
Connecting headphones
1.
Connect the lead supplied with your playstation to the sockets
I
(video
input), and
J
(left and right audio input).
2.
Switch on the PlayStation, insert a game, then press the
button on
the remote control repeatedly until the picture appears on screen.
3.
Press the
button when you wish to return to normal TV operation
1.
Connect your camcorder to the sockets
H
and
J
or
I
and
J
as
shown.
2.
Press the ‘PLAY’ button on your camcorder, then press the
button on
the remote control repeatedly until the picture appears on screen.
3.
Press the
button when you wish to return to normal TV operation
1.
Connect your headphones to the
G
socket on the TV.
2.
Refer to the ‘Headphones Set-up’ option (see Sound adjustment menu
on page 14) to set the volume level.
G
Camcorder
J
I
H
S-VHS
Camcorder
PlayStation
Headphones
Note:
Connecting cables are not supplied.
GBpages18-24.fm Page 19 Monday, January 10, 2005 5:45 PM
Additional information
20
/
1
/
Using the remote control with DVD and VCR equipment
This remote control has been configured to operate not only Sony DVDs and VCRs, but
also those made by other manufacturers. To operate other makes of DVD and VCR using
this remote control, complete the following procedure.
1.
Find the 3 digit code for your brand from the list below. If your brand has more
than one code allocated to it, make a note of the first code only at this stage.
2.
Press the
>
or
.
button on the remote control until either the VCR green
light or the DVD green light illuminates.
3.
With the required green light illuminated, press and hold down the
>
button
for approximately 6 seconds, until the lights start to flash.
4.
Using the
numbered
buttons, enter the 3 digit code for your DVD or VCR.
Once a correct number has been entered, all three green lights will illuminate
momentarily.
5.
Turn on your DVD or VCR and check that the remote control operates the
main functions. If not, repeat steps 2 - 4 and enter the next 3 digit code
allocated to your brand of VCR or DVD.
6.
When you wish to use the remote control to operate the TV again, press the
>
or
.
button until the TV green light illuminates. Don’t forget to select
VCR or DVD using the
>
or
.
buttons every time you wish to operate
that equipment with this remote control.
Note:
The brand codes you set may be lost if weak batteries are not replaced immediately. Should this
happen, use the above procedure to reset the code. A small label has been attached to the
inside of the battery cover for you to make a note of your brand codes. Not all brands and models
of DVDs or VCRs are covered in this list.
VCR Brand List
DVD Brand List
Brand Code
Brand
Code
SONY (VHS)
301, 302, 303, 308, 309, 362
SONY
001, 029, 030, 036, 037 , 038, 039,
040, 041, 042, 043, 044, 053, 054,
055
SONY (BETA)
303, 307, 310
AKAI
032
SONY (DV)
304, 305, 306
AIWA
021
AIWA
325, 331, 351
DENON
018, 027, 020, 002
AKAI
326, 329, 330
GRUNDIG
009, 028, 023, 024, 016, 003
DAEWOO
342, 343
HITACHI
025, 026, 015, 004, 035
GRUNDIG
358, 355, 360, 361, 320, 351, 366
JVC
006, 017
HITACHI
327, 333, 334
KENWOOD
008
JVC
314, 315, 322, 344, 352, 353, 354, 348, 349
LG
015, 014, 034
LG
332, 338
LOEWE
009, 028, 023, 024, 016, 003
LOEWE
358, 355, 360, 361, 320, 351
MATSUI
013, 016
MATSUI
356, 357
ONKYO
022, 033
ORION
328
PANASONIC
018, 027, 020, 002, 045, 046, 047
PANASONIC
321, 323
PHILIPS
009, 028, 023, 024, 016, 003, 031
PHILIPS
311, 312, 313, 316, 317, 318, 358, 359, 363, 364 PIONEER
004
SAMSUNG
339, 340, 341, 345
SAMSUNG
011, 014
SANYO
335, 336
SANYO
007
SHARP
324
SHARP
019, 027
THOMSON
319, 350, 365
THOMSON
012
TOSHIBA
337
TOSHIBA
003
YAMAHA
018, 027, 020, 002
>
button
.
button
Numbered
buttons
GBpages18-24.fm Page 20 Monday, January 10, 2005 5:45 PM
Additional information
21
Teaching the remote control*
To reduce the number of remote controls you need, this remote control has a
learning feature. Once set up as explained below, it can be used in place of your
other remote controls.
Erasing the last learned function
Erasing all the learned functions
1.
Press and hold the
.
button for approximately six seconds, until the
‘AUX’ light flashes.
2.
Press the button on which you wish to store a learned function. The VCR,
TV, DVD and AUX lights flash in order.
The following buttons can be used to store learned
functions:
VIDEO I/
1
button
Numbered
buttons
V
,
v
,
B
,
b
buttons
OK
button
Coloured
buttons
Menu
button
Prog+/-
buttons
3.
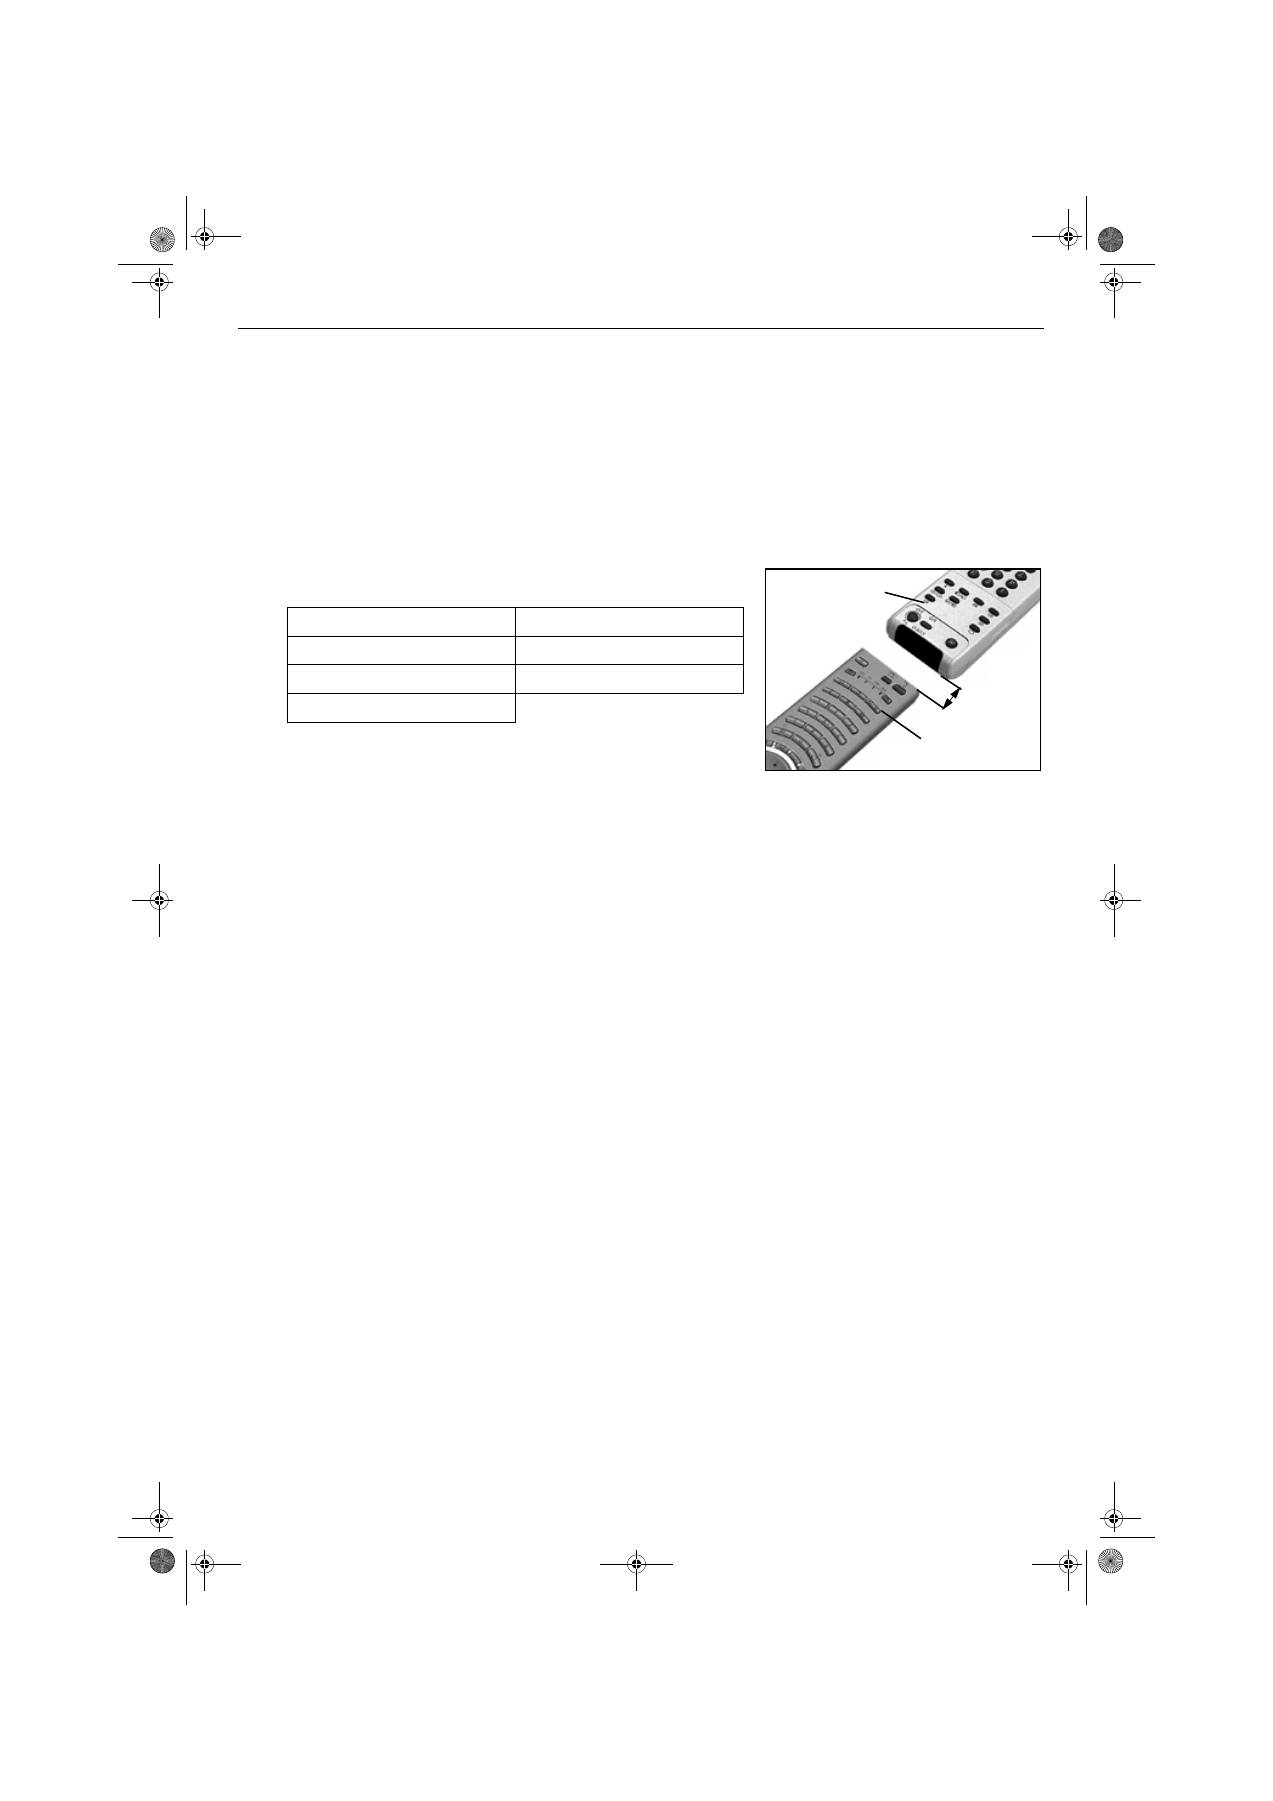
Position the other remote control as shown. Press the button that you
wish to teach your TV remote control. The VCR, TV, DVD and AUX lights
illuminate at the same time when a function has been learned and stored.
4.
Repeat steps 2 and 3 to learn other functions.
5.
Press the
.
button to finish.
1.
Press and hold the
.
button for approximately six seconds, until the
‘AUX’ light flashes.
2.
Press the
%
button to erase the last learned function.
3.
Press the
.
button to return to normal operation.
1.
Press and hold the
.
button for approximately six seconds, until the
‘AUX’ light flashes.
2.
Press the
%
and
.
buttons to erase all learned functions.
3.
Press the
.
button to return to normal operation.
*The functions learned may be lost if weak
batteries are not replaced immediately.
TV remote control
Other remote control
2-4cm
GBpages18-24.fm Page 21 Monday, January 10, 2005 5:45 PM
Additional information
22
Specifications
TV System
B/G/H, DK
Colour System
PAL,SECAM
NTSC 3.58, 4.43 (only Video In)
Channel Coverage
VHF: E2-E12
UHF:
E21-E69
CATV:
S1-S20
HYPER:
S21-S41
D/K:
R1-R12, R21-R69
Picture Tube
Super Fine Pitch FD Trinitron Approx. 82cm
Sound Output
Left/Right: 2x20W (music power), 2x10W (RMS)
Subwoofer: 1x30W (music power), 1x15W (RMS)
Power
Consumption
Approx. 160W
Dimensions
(w x h x d)
Approx. 1015 x 575 x 590mm
Weight
Approx. 68kg
Rear Terminals
21-pin Euro connector (CENELEC standard) including audio/video input,
RGB input, TV audio/video output.
21-pin Euro connector (CENELEC standard) including audio/video input,
RGB input, TV audio/video output
21-pin Euro connector (CENELEC standard) including audio/videoinput,
S-video input, selectable audio/video output.
21-pin Euro connector (CENELEC standard) including audio/videoinput,
S-video input.
RF In
Audio output - RCA phono jacks
Side Terminals
Video input - phono jack
S video input - 4 pin
DIN
Audio inputs - phono jacks
Headphones jack - minijack stereo
Accessories
Supplied
RM-940 remote control (1)
IEC designated size AA battery (2)
Design and specification are subject to change without notice
1
2
3/
s
3
4
/
s
4
5
s
5
5
GBpages18-24.fm Page 22 Tuesday, January 11, 2005 9:59 AM
Additional information
23
Troubleshooting
•
If you continue to have these problems, have your TV serviced by qualified
personnel .
•
NEVER open the casing yourself.
Problem
Possible causes
Solutions
No picture, no sound.
•
Power off.
•
TV in standby.
•
Aerial disconnected.
•
Plug in the TV.
•
Press the
button on the front of the TV.
If the
indicator is on press the
button on the remote control.
•
Check aerial connection.
Poor or no picture (screen is
dark), but good sound.
•
Picture preset level adjustment.
•
Select ‘Picture Adjustment’ menu then adjust the
brightness, picture and colour levels.
Some channels are blank.
•
Scrambled or subscription-only
channel.
•
Programme used only for data (no
picture or sound).
•
Programme not being transmitted.
•
Subscribe to pay-per-view broadcaster.
•
See ‘Programme sorting’ section (refer to page 15).
Standby indicator flashing.
•
Fault (irregular flash).
•
Do not open the cabinet, refer to qualified personnel.
•
Contact your nearest SONY Service Centre.
Good picture, no sound.
•
Volume control.
•
TV speakers turned ‘Off’.
•
Press the
+ button on the remote control.
•
If
is displayed on the screen, press the
button on
the remote control.
•
Set TV speakers to ‘On’ in Sound Adjustment menu.
No colour on colour
programmes.
•
Colour level setting.
•
Select ‘Picture Adjustment’ menu then adjust the colour
setting.
Remote control does not
function.
•
Batteries low.
•
Wrong mode.
•
Replace batteries.
•
Press the
>
or
.
button to check if your remote
control is in the correct Mode for the equipment you are
trying to control.
Distorted picture when
changing programmes or
selecting teletext.
•
Inputs from external equipment not
switched off.
•
Switch off all additionally connected equipment.
/
GBpages18-24.fm Page 23 Monday, January 10, 2005 5:45 PM
24
GBpages18-24.fm Page 24 Monday, January 10, 2005 5:45 PM
1
HU
HUpages1-8.FM Page 1 Monday, January 10, 2005 5:45 PM
Biztonsági tudnivalók
2
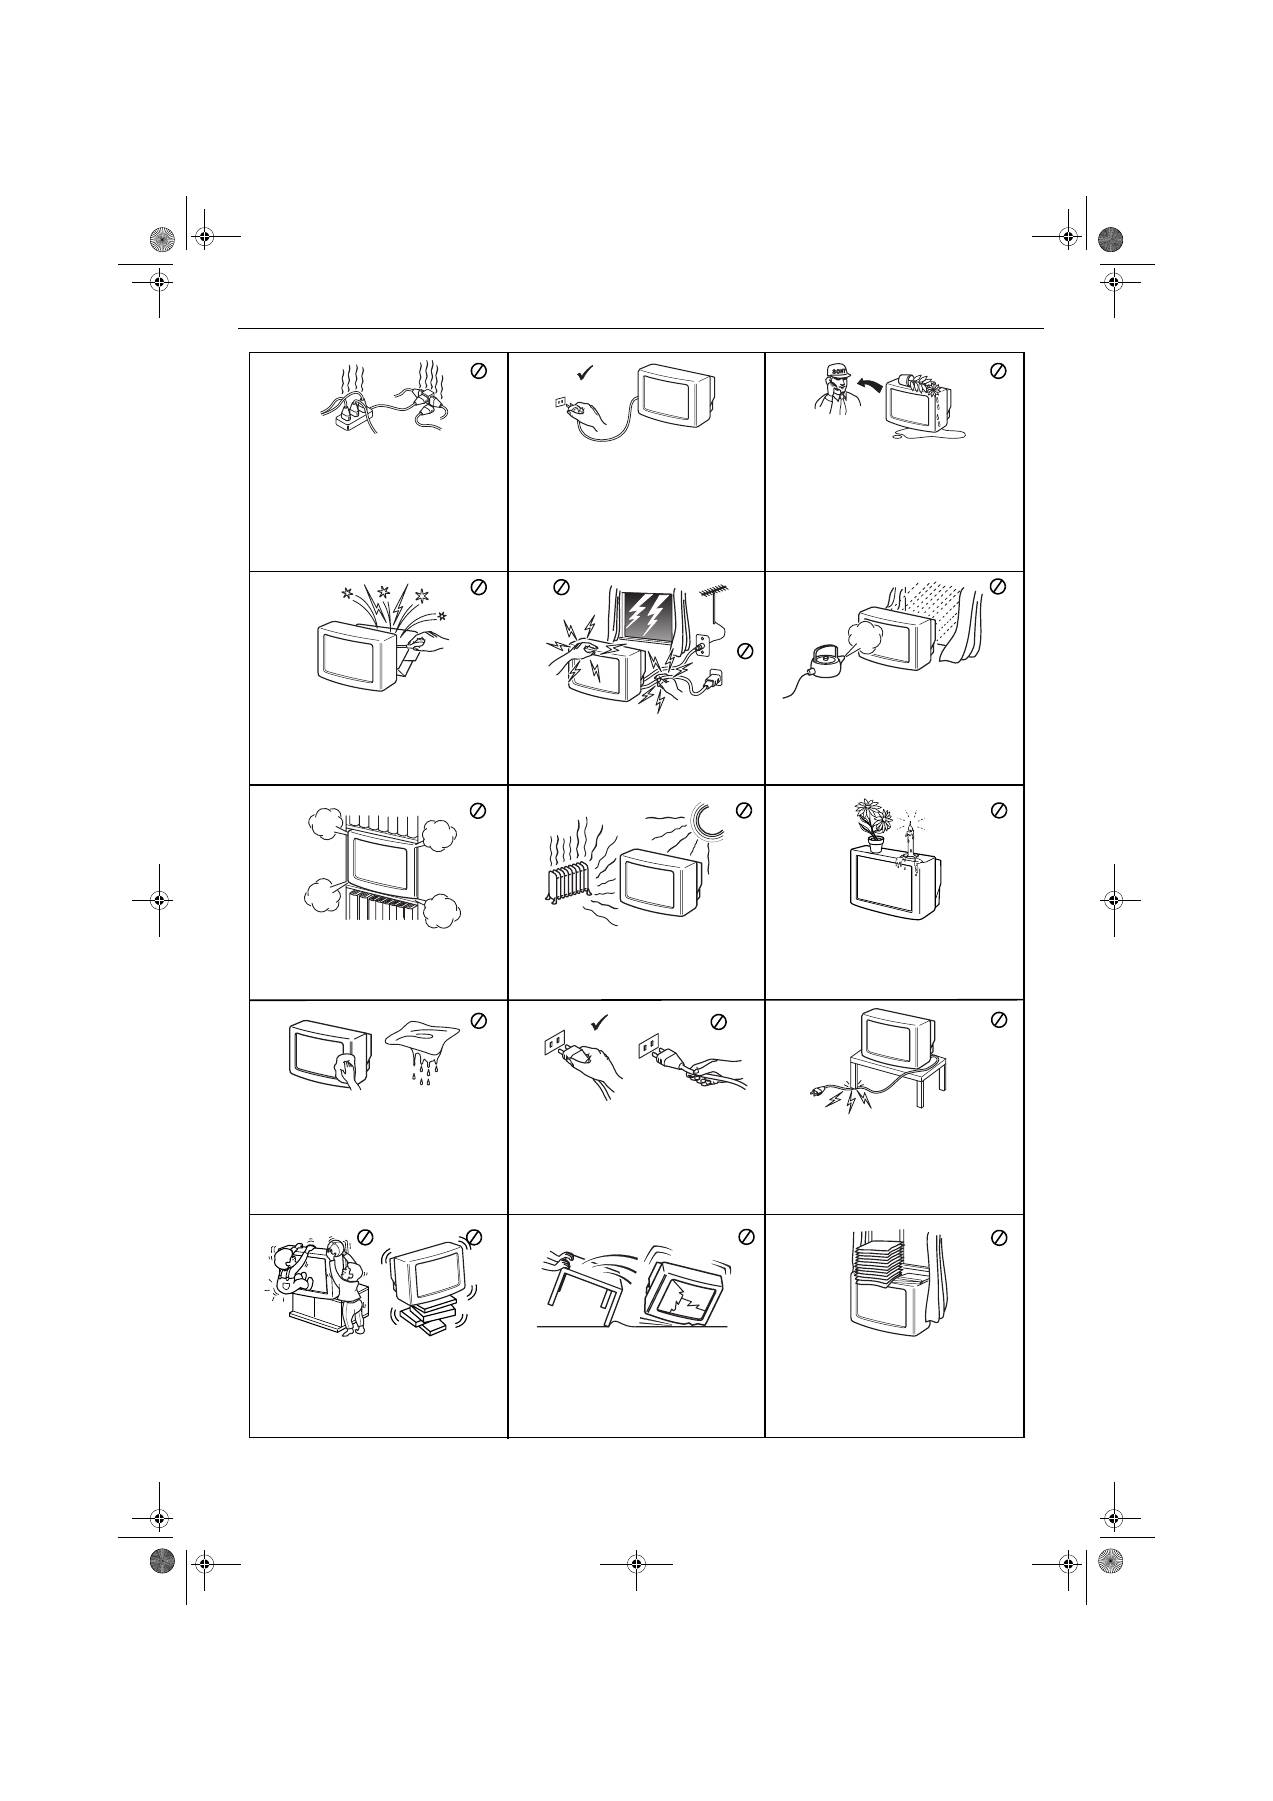
Kizárólag 220-240 V-os hálózati váltakozó
feszültséggel üzemeltesse a készüléket. Ne
csatlakoztasson túl sok készüléket
ugyanahhoz az aljzathoz, mert a túlterhelés
tüzet okozhat.
Ne dugjon semmilyen tárgyat a készülékbe,
mert ezzel tüzet és áramütést okozhat. Ha a
szellőző nyílásokon keresztül bármilyen
szilárd test, vagy folyadék kerül a készülék
belsejébe, húzza ki a hálózati csatlakozó
vezetéket. Azonnal ellenőriztesse
szakemberrel!
Soha ne nyissa ki a készülék hátsó burkolatát.
A javítást bízza szakemberre.
Az áramütés és a tűz veszélyének elkerülése
érdekében óvja a TV készüléket esőtől és
nedvességtől.
Viharos időjárás, villámlás idején saját
biztonsága érdekében ne érintse meg a
készüléket, a hálózati csatlakozó vezetéket
és az antennakábelt.
A készülék szellőzőnyílásait hagyja
szabadon. A megfelelő szellőzés érdekében a
készülék minden oldalánál hagyjon legalább
10 cm-es szabad területet.
Ne állítsa a készüléket szélsőségesen meleg,
párás vagy poros helyre, vagy olyan helyre,
ahol mechanikai vibrációnak lehet kitéve.
A tv készüléket puha, enyhén megnedvesített
ruhával tisztítsa. Ne használjon karcoló eszközt,
alkáli anyagot tartalmazó tisztítószert,
súrolóport vagy oldószereket (hígitót vagy
benzint). Óvja a képernyot a karcolásoktól.
Biztonsági okokból húzza ki a készülék hálózati
vezetékét, mielőtt a tisztítást elkezdi.
A hálózati csatlakozó kihúzásánál a
csatlakozó dugót fogja meg, és ne a
vezetéket.
Ne tegyen nehéz tárgyat a hálózati vezetékre,
mert megsérülhet.
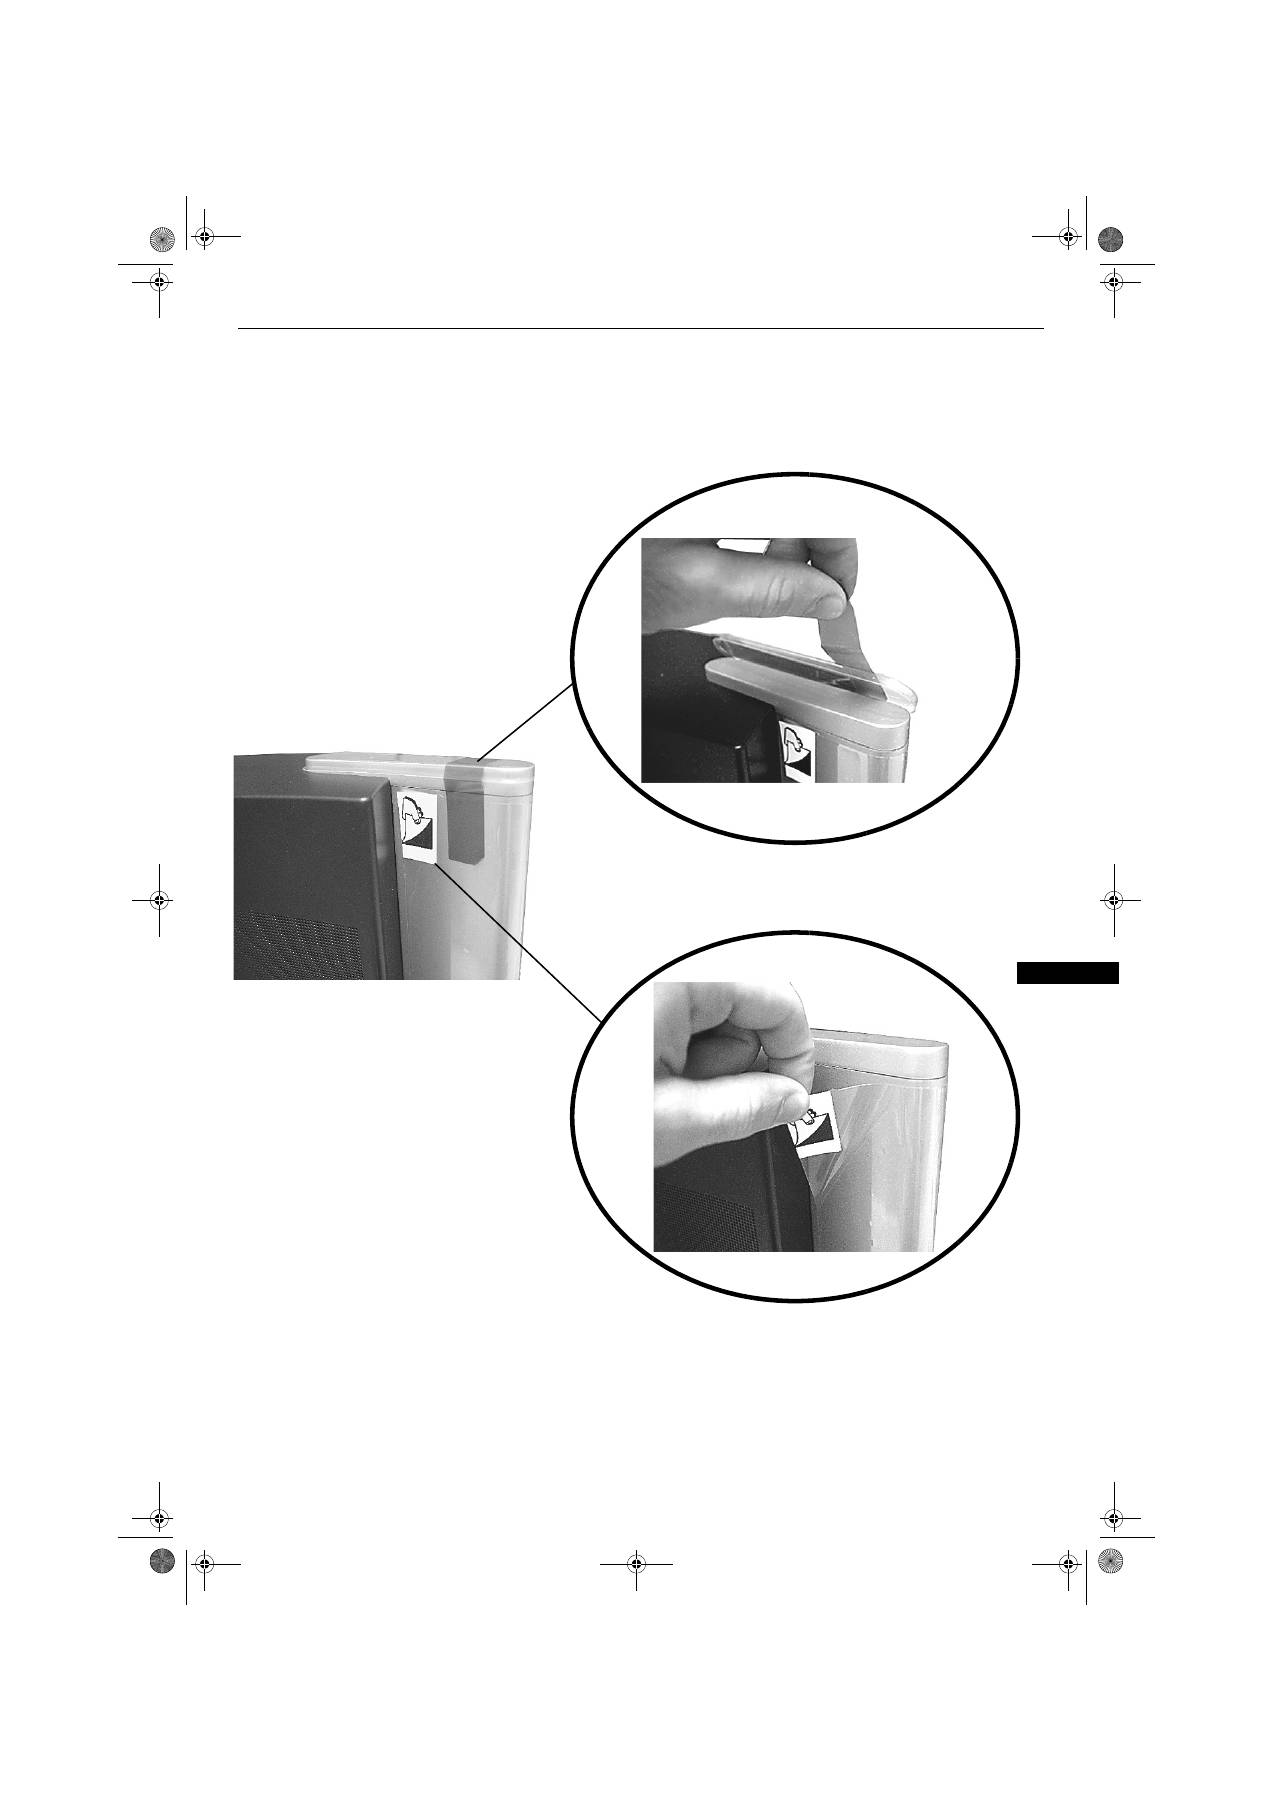
Javasoljuk, hogy a felesleges vezetéket
csévélje fel a tv készülék hátulján lévo
tartóra.
Mozgatás előtt húzza ki a hálózati
csatlakozót a konnektorból. A készüléket
óvatosan szállítsa, kerülje a zötykölődős
utcákat, óvja a készüléket ütéstől,
rázkódástól.
Ne takarja le a készülék szellőzőnyílásait pl.
függönnyel, újsággal, stb.
A TV készüléket stabil állványra helyezze.
Soha se próbálja a készüléket az állvánnyal
együtt mozgatni mindig külön mozgassa a
tévét és az állványt. Ne engedje, hogy a gyerek
felmásszon a TV-re. Ne fordítsa a TV
készüléket az oldalára, vagy a képernyővel
felfelé.
A tűz veszélyének elkerülése érdekében ne
tegyen a készülék közelébe gyúlékony
tárgyakat, ne gyújtson nyílt lángot (ne
égessen pl. gyertyát).
Energiatakarékossági és biztonsági okok
miatt ne hagyja a készüléket készenléti
üzemmódban, amikor nem használja.
Hosszabb távollét esetén húzza ki a hálózati
csatlakozó vezetéket a fali konnektorból.
Ügyelni kell viszont arra, hogy egyes
készülékek bizonyos funkciói csak a
készenléti állapotban működnek. A
használati útmutató erről egyértelműen
tájékoztatást nyújt a későbbi fejezetekben.
HUpages1-8.FM Page 2 Monday, January 10, 2005 5:45 PM

Tartalomjegyzék
3
Első lépések
A mellékelt tartozékok ellenőrzése ...............................................................4
Az elemek behelyezése a távvezérlőbe........................................................4
Antenna és videomagnó csatlakoztatása a TV-hez .....................................5
A TV bekapcsolása.......................................................................................5
A TV automatikus hangolása........................................................................6
A videocsatorna megkeresése ....................................................................6
Áttekintés
A TV kezelőgombjainak áttekintése .............................................................7
A távirányító gombjainak áttekintése ...........................................................8
Alapműveletek
Dinamikus kép és kép (PAP) ........................................................................9
Képernyő üzemmód ....................................................................................10
Kedvencek menü
Kedvenc programok megtekintése ............................................................. 11
Belépés a Kedvencek beállítása menübe .................................................. 11
Kedvenc csatorna hozzáadása vagy törlése............................................... 11
Az összes kedvenc csatorna törlése........................................................... 11
Teletext
A Teletext megtekintése ...............................................................................12
A TopText megtekintése ..............................................................................12
A TV menürendszere
A TV menürendszerének használata ............................................................13
Képbeállítás menü........................................................................................13
Hangszabályozás menü ...............................................................................14
Beállítás menü ..............................................................................................15
Nyelv/Ország ..........................................................................................15
Automatikus hangolás .............................................................................15
Programhelyek rend.................................................................................15
Kézi hangolás ..........................................................................................15
AV3 Kimenet ............................................................................................16
AV nevek ..................................................................................................16
Videomagnó stabilizátor ..........................................................................16
Képernyőszabályozás .............................................................................17
Egyéb készülékek csatlakoztatása a TV-hez
Berendezések csatlakoztatása a hátsó aljzatokhoz.....................................18
Berendezések csatlakoztatása az elülső aljzatokhoz...................................19
A távvezérlő használata DVD-készülékekhez/videomagnókhoz ..................20
A távvezérlő tanítása ....................................................................................21
További információk
Műszaki adatok ............................................................................................22
Hibakeresés..................................................................................................23
HUpages1-8.FM Page 3 Monday, January 10, 2005 5:45 PM
Első lépések
4
Kövesse az
1 - 6
. lépéseket a készülék üzembe
helyezéséhez és a programok megtekintéséhez.
1
A mellékelt tartozékok ellenőrzése
2
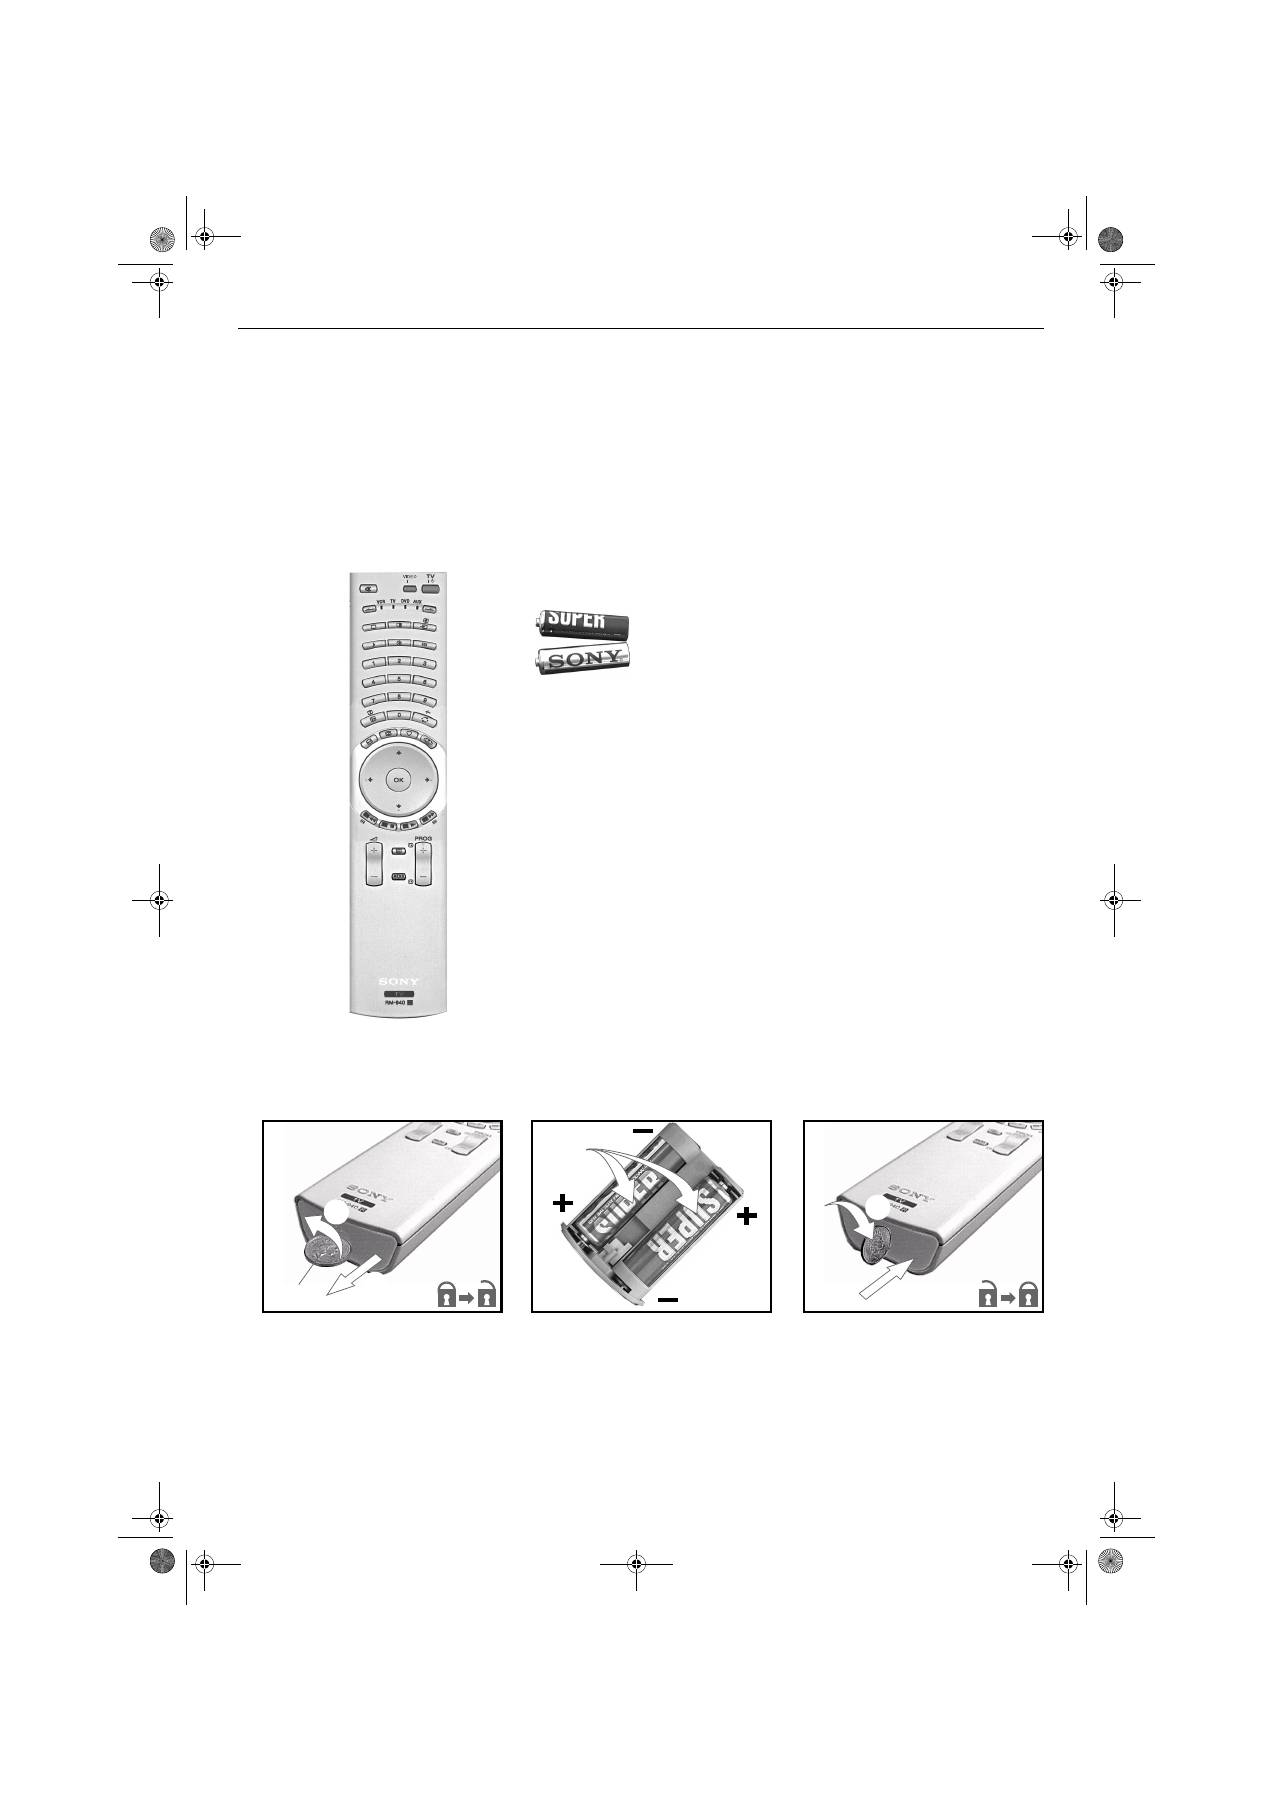
Az elemek behelyezése a távvezérlőbe
Soha ne felejtse el:
•
ügyeljen a helyes polaritásra, amikor behelyezi az elemeket.
(Lásd az elemtartón lévő jelöléseket)
•
az elemek hulladékba helyezéséről környezetbarát módon gondoskodjon
Elemek
Távvezérlő
2 1
Pénzérme
3 5 4
/
1
/
HUpages1-8.FM Page 4 Monday, January 10, 2005 5:45 PM
Első lépések
5
3
Antenna és videomagnó csatlakoztatása a TV-
készülékhez
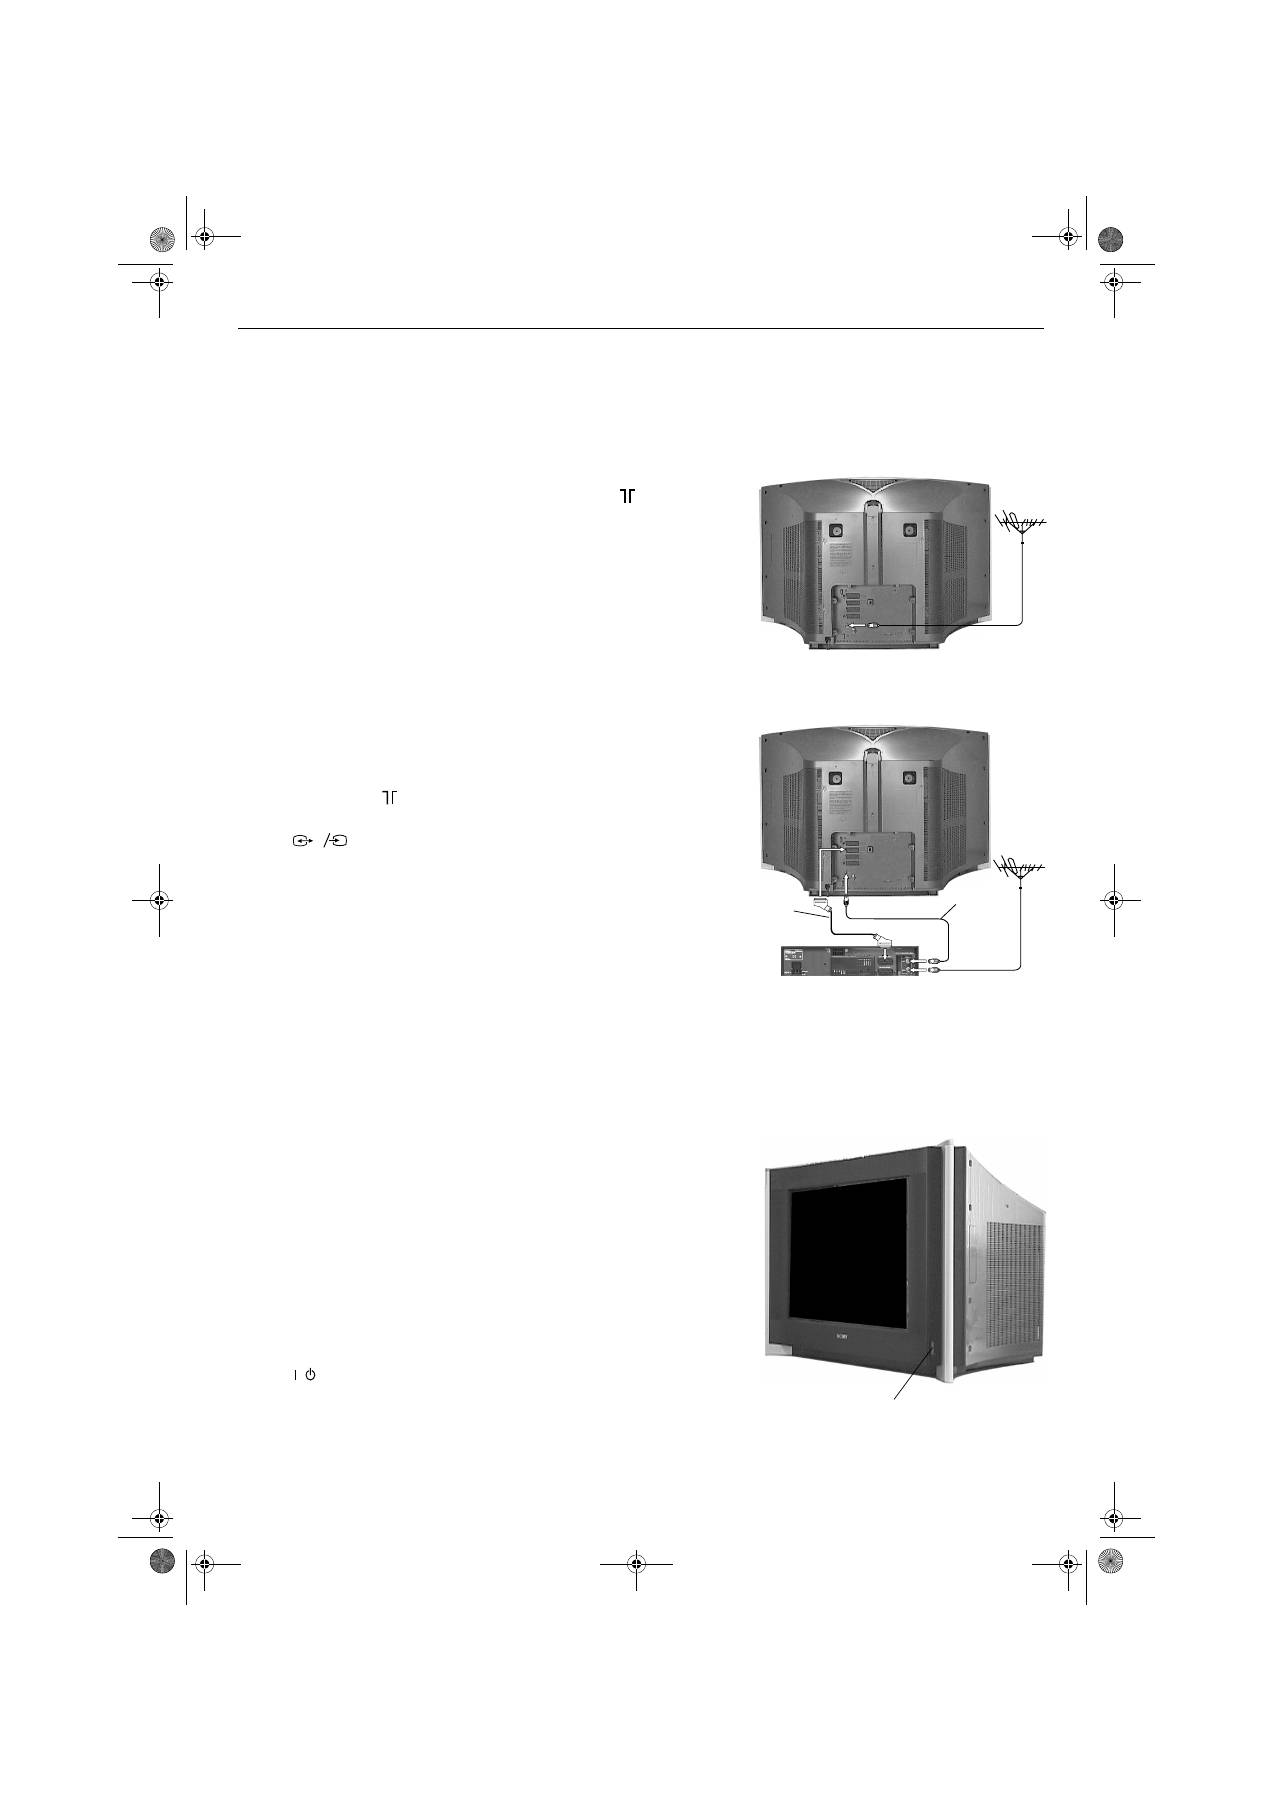
Csak antenna csatlakoztatása
1.
Csatlakoztassa az antennakábelt a TV hátlapján lévő
jelzésű
antennaaljzathoz.
Antenna és videomagnó csatlakoztatása
1.
Csatlakoztassa az antennakábelt a videomagnón lévő IN aljzathoz.
2.
Csatlakoztassa egy kábelt a videomagnón lévő OUT aljzathoz és a TV
hátlapján lévő
jelzésű antennaaljzathoz.
3.
Csatlakoztasson egy teljes huzalozású Scart kábelt a TV hátlapján lévő
aljzathoz és a videomagnó Scart aljzatához.
4.
Csatlakoztassa a videomagnót a hálózati aljzathoz, és kapcsolja be.
5.
Helyezzen egy felvételt tartalmazó kazettát a videomagnóba, és nyomja
meg a "PLAY" gombot. Ez lehetővé teszi, hogy a TV megkeresse és tárolja
a videocsatornát "A TV automatikus hangolása" művelet során.
Megjegyzések:
Az aljzatok elnevezései a videomagnó gyártmányától és típusától függően különbözők
lehetnek. A részletekért lapozza fel a videomagnó kezelési útmutatóját.
Ha a videomagnónak nincs Scart aljzata, a Scart csatlakoztatást figyelmen kívül hagyva
kövesse a csatlakoztatási utasításokat. Manuálisan be is kell hangolnia a videomagnót az
egyik TV-csatornára.
s
3
3
4
A TV bekapcsolása
1.
Csatlakoztassa a TV hálózati csatlakozóját a hálózati aljzathoz (220-240
V AC, 50 Hz).
2.
Nyomja be a hálózati kapcsolót a TV-készülék oldalán.
Megjegyzés:
Ha a TV előlapján a piros jelzőfény világít, a TV készenléti üzemmódban van. A távvezérlőn
lévő TV
gombot megnyomva kapcsolja be a TV-t. Legyen türelemmel, mivel néhány
pillanatig eltarthat, amíg a kép megjelenik a képernyőn.
/
Hálózati kapcsoló
Scart
kábel
(nem tartozék)
RF kábel
(nem
tartozék)
Videomagnó
HUpages1-8.FM Page 5 Monday, January 10, 2005 5:45 PM
Első lépések
6
5
A TV automatikus hangolása
Megjegyzés:
Ha bármikor újra végre akarja hajtani az automatikus hangolást, az Auto Start up gomb
megnyomásával teheti ezt meg. (A 7. oldalon leírtak szerint.)
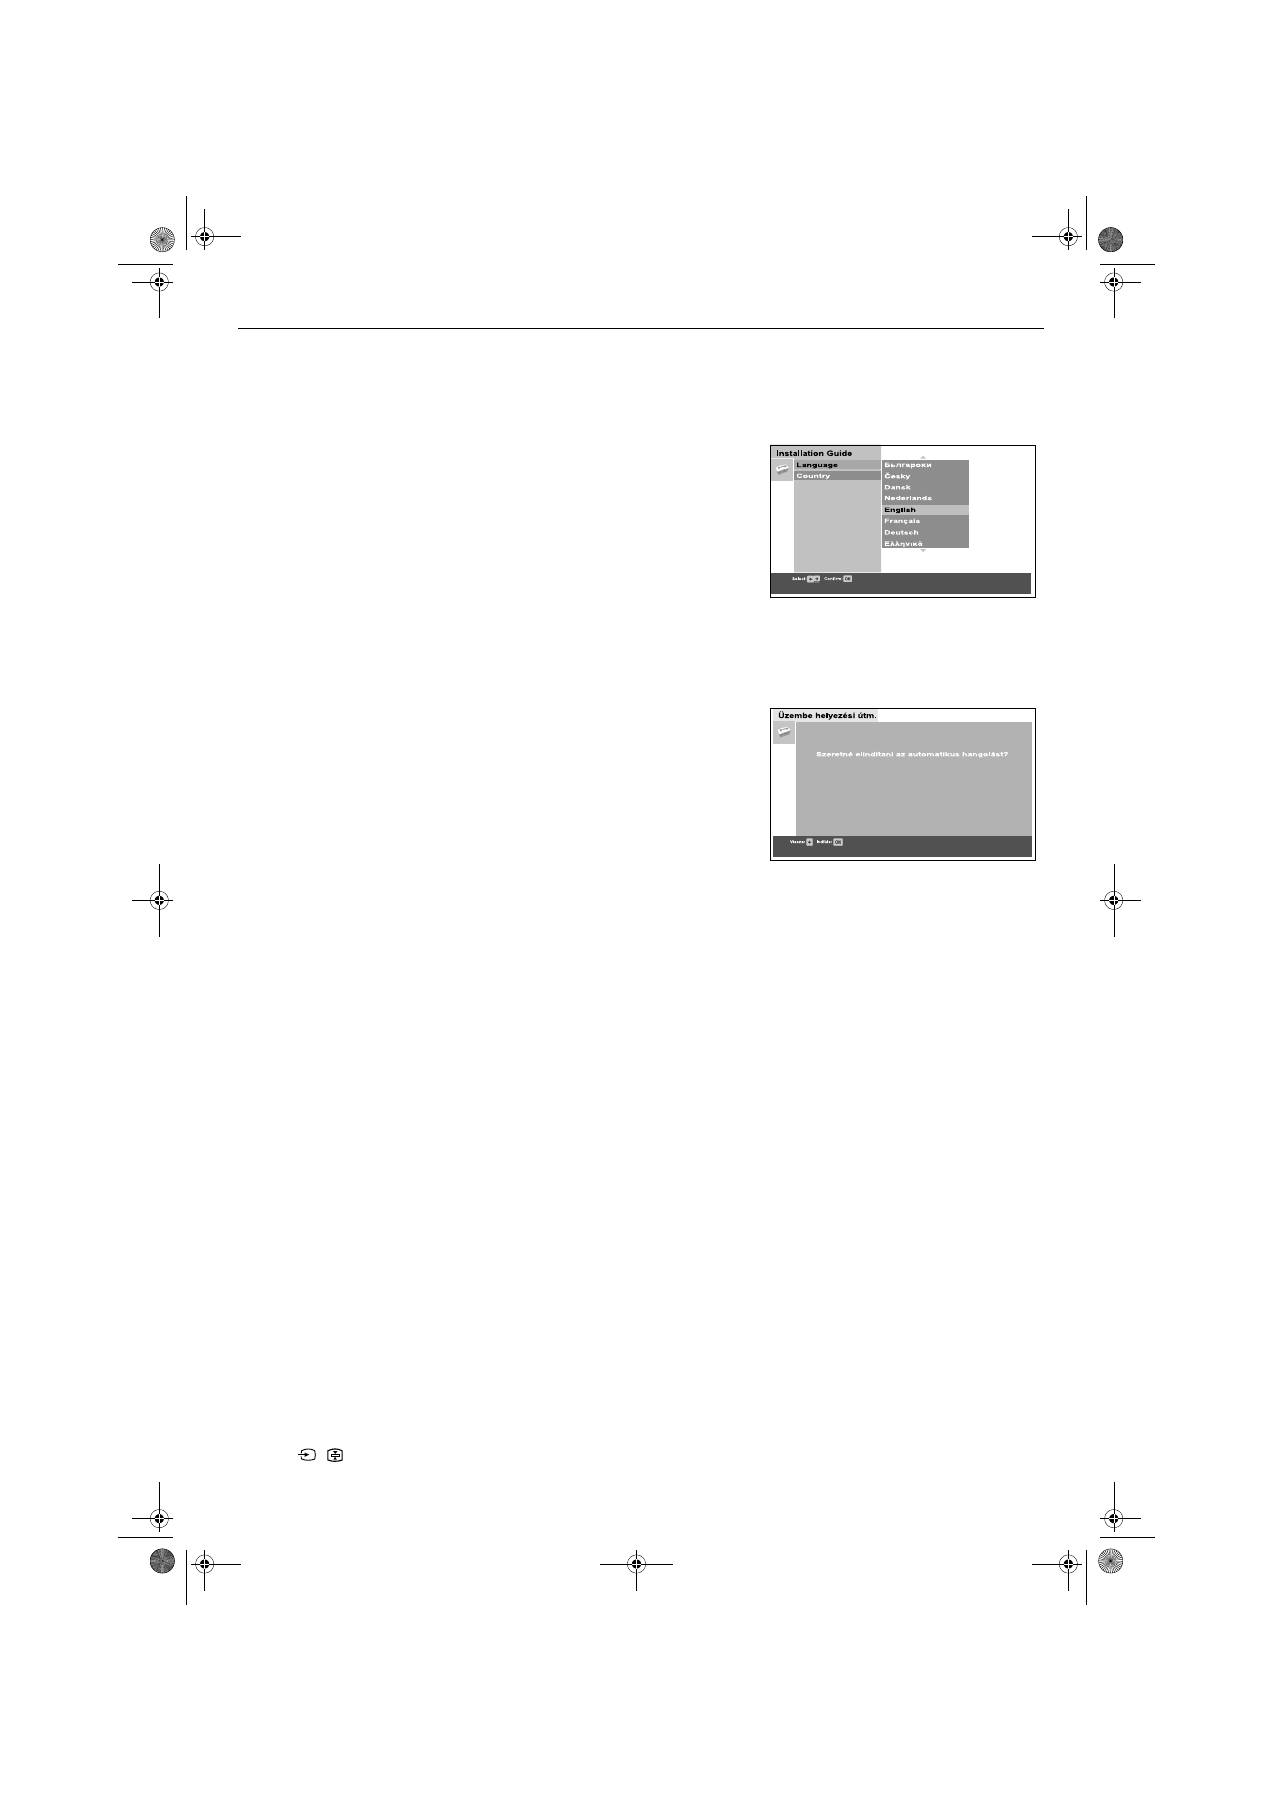
1.
Amikor első alkalommal bekapcsolja a TV-készüléket, a Sony logója
jelenik meg a TV képernyőjén, azt követően pedig a Nyelv/Ország menü
az English szó kiemelésével. A távvezérlőn lévő
V
vagy
v
gombot
megnyomva jelölje ki a kívánt nyelvet. Az
OK
gomb megnyomásával
erősítse meg a választását. Mostantól az összes menü a kiválasztott
nyelven jelenik meg.
2.
Most az Ország szó van kiemelve. A
V
vagy
v
gombbal válassza ki az
országot, amelyben a TV-t használja. Fontos, hogy megfelelő országot
válassza ki, hogy a Teletext megfelelően jelenjen meg. Az
OK
gomb
megnyomásával erősítse meg a választását.
A kép elforgatására vonatkozó felszólítás jelenik meg. A Föld
mágnesessége miatt egyes esetekben lehetséges, hogy a képernyő
ferdének látszik.
a)
Ha nincs szükség korrekcióra, nyomja meg a
OK
gombot.
b)
Ha bizonyos korrekció szükséges, a
V
vagy
v
gombot megnyomva
állítsa be az új pozíciót. Az OK gombot megnyomva tárolja a
beállítást.
A kép középre igazítására vonatkozó felszólítás jelenik meg. Ez lehetővé
teszi a kijelzés függőleges helyzetének szabályozását, ha az nincs
középre igazítva.
a)
Ha nincs szükség korrekcióra, nyomja meg a OK gombot.
b)
Ha bizonyos korrekció szükséges, a
V
vagy
v
gombot megnyomva
állítsa be az új pozíciót. Az
OK
gombot megnyomva tárolja a
beállítást.
Az automatikus hangolás képernyője jelenik meg. Az
OK
gombot
megnyomva válassza az Igen választ. Megkezdődik az automatikus
hangolás folyamata, amely az összes elérhető csatorna behangolását
elvégzi. A TV képernyőjén megjelenik egy kijelzés, amely a hangolás
folyamatáról ad tájékoztatást.
Ha a készülék egyetlen csatornát sem talál, a képernyőn megjelenő
üzenet arra kéri, hogy ellenőrizze az antenna csatlakoztatását. Ellenőrizze,
hogy az antenna megfelelően csatlakoztatva van-e, majd az
OK
gombot
megnyomva ismételje meg a hangolás műveletét.
Miután az összes elérhető csatornát sikerült megkeresni és tárolni,
automatikusan megjelenik a képernyőn a Programhely-átrendezés menü.
Ha változtatni kíván a csatornák sorrendjén, nyomja meg az
OK
gombot
és hajtsa végre a 15. oldalon található instrukciókat. Ha a csatornák
sorrendjén most nem akar változtatni, nyomja meg a
MENU
gombot,
hogy a visszatérjen a normál működéshez.
3.
A programok megtekintéséhez nyomja meg a távvezérlőn lévő
PROG+/-
gombot vagy a számgombokat.
6
A videocsatorna megkeresése
Ha a TV-készüléket videomagnóhoz csatlakoztatta, követve az "Antenna és
videomagnó csatlakoztatása a TV-hez" c. rész útmutatásait, most meg kell keresnie
a videocsatornát.
1.
Nyomja meg a távvezérlőn lévő
PROG+/-
gombot mindaddig, amíg a
felvételt tartalmazó videokazetta képe meg nem jelenik a képernyőn.
Megjegyzések:
Ha a videocsatornát egy másik programhelyre szeretné áthelyezni, lapozza fel a
"Programhelyek rend" c. szakaszt a 15. oldalon.
Ha a videomagnót Scart kábellel csatlakoztatta, nyomja meg a távvezérlőn a
/
gombot ismételten mindaddig, amíg a felvételt tartalmazó videokazetta
képe meg nem jelenik a TV képernyőjén.
Nyelv/Ország menü
Automatikus hangolási felszólítás
HUpages1-8.FM Page 6 Monday, January 10, 2005 5:45 PM

