Sony KDL-40W4710 – page 3
Manual for Sony KDL-40W4710
Table of contents

Speaker Turns on/off the TV’s internal speakers.
TV Speaker The TV speakers are turned on in order to
listen to the TV’s sound through the TV
speakers.
Audio System The TV speakers are turned off in order
to listen to the TV’s sound only through
your external audio equipment connected
to the audio output sockets. When
connected with “Control for HDMI”
compatible equipment, you can turn the
connected equipment on interlocked with
the TV. This setting must be made after
connecting the equipment.
Audio Out Variable The audio output from your audio system
can be controlled by the TV’s remote.
Fixed The audio output of the TV is fixed. Use
your audio receiver’s volume control to
adjust the volume (and other audio
settings) through your audio system.
z
• “Audio Out” is not available for audio system connected to the TV using the
HDMI sockets.
HDMI Set-up This is used to set the “Control for HDMI” compatible equipment connected to the
HDMI sockets. Note that the interlock setting must also be made on the connected
“Control for HDMI” compatible equipment side.
Control for HDMI This sets whether to interlock the “Control for HDMI”
compatible equipment and the TV. When set to “On”, the
following menu items can be performed. However, power
consumption in standby mode is higher than usual. If the
Using MENU Functions
specific Sony equipment that is compatible with “Control for
HDMI” is connected, this setting is applied to the connected
equipment automatically when the “Control for HDMI” is set
to “On” using the TV.
Auto Devices Off When this is set to “On”, the “Control for HDMI” compatible
equipment turns off when you switch the TV to standby mode
using the remote.
Auto TV On When this is set to “On” and if the connected “Control for
HDMI” compatible equipment is turned on, the TV
automatically turns on, and the displays the HDMI input from
the connected equipment.
Tuner Box
If set to “Advanced”, you can select a channel tuned by
Control
connected equipment using the TV’s remote.
Device List
Creates or updates the “HDMI Device List.” Up to 14
Update
“Control for HDMI” compatible equipment can be
connected, and up to 4 equipment can be connected to a
single socket. Be sure to update the “HDMI Device List”
when you change the “Control for HDMI” compatible
equipment connections or settings. Select them manually one
by one until getting a correct picture for several seconds.
HDMI Device List Displays the connected “Control for HDMI” compatible
equipment.
~
• You cannot use “Control for HDMI” if the TV operations
are linked to the operations of an audio system that is
compatible with control for HDMI.
Product Information Displays your TV’s product information.
(Continu ed)
41
GB
All Reset Resets all settings to the factory settings and then displays the “Auto Start-up”
screen.
z
• Be sure not to turn the TV off during this period (it takes about 30 seconds) or
press any buttons.
• All settings, including digital favourite list, country, language, auto tuned
channels, etc. will be reset.
Analogue Set-up
Programme List
Select “Off” to hide the list of analogue channels from the XMB™
Display
(XrossMediaBar).
Auto Tuning Tunes in all the available analogue channels.
This option allows you to retune the TV after moving house, or to search for new
channels that have been launched by broadcasters.
Programme Sorting Changes the order in which the analogue channels are stored on the TV.
1 Press F/f to select the channel you want to move to a new position, then press
.
2 Press F/f to select the new position for your channel, then press .
Manual Programme
Before selecting “Label”/“AFT”/“Audio Filter”/“LNA”/“Skip”/“Decoder”, press
Preset
PROG +/– to select the programme number with the channel. You cannot select a
programme number that is set to “Skip” (page 40).
System/Channel Presets programme channels manually.
1 Press F/f to select the programme number you want to
manually tune (if tuning a VCR/ DVD recorder, select
channel 00), then press .
2 Press F/f to select “System”, then press .
3 Press F/f to select one of the following TV broadcast
systems, then press .
B/G: For western European countries/regions
I: For the United Kingdom
D/K: For eastern European countries/regions
L: For France
4 Press F/f to select “Channel”, then press .
5 Press F/f to select “S” (for cable channels) or “C” (for
terrestrial channels), then press g.
~
• “S” is not available when “United Kingdom” is
selected for “Country” (page 6).
6 Tune the channels as follows:
If you do not know the channel number
(frequency)
Press F/f to search for the next available channel. When
a channel has been found, the search will stop. To
continue searching, press F/f.
If you know the channel number (frequency)
Press the number buttons to enter the channel number of
the broadcast you want or your VCR/DVD recorder
channel number.
7 Press to jump to “Confirm”, then press .
Your changes have been saved. Repeat the above
procedure to preset other channels manually.
42
GB
Label Assigns a name of your choice, up to five letters or numbers,
to the selected channel. This name will be displayed briefly
on the screen when the channel is selected.
To input characters, follow steps 1 to 3 of “Edit” (page 40).
AFT Allows you to fine-tune the selected programme number
manually if you feel that a slight tuning adjustment will
improve the picture quality.
You can adjust the fine tuning over a range of –15 to +15.
When “On” is selected, the fine tuning is performed
automatically.
Audio Filter Improves the sound for individual channels in the case of
distortion in mono broadcasts. Sometimes a non-standard
broadcast signal can cause sound distortion or intermittent
sound muting when watching mono programmes.
If you do not experience any sound distortion, we
recommend that you leave this option set to the factory
setting “Off.”
~
• You cannot receive stereo or dual sound when “Low” or
“High” is selected.
LNA Improves the picture quality for individual channels in the
case of very weak broadcast signals (noisy picture).
If you cannot see any improvement in the picture quality even
if you set to “On”, set this option to “Off” (factory setting).
Skip Skips unused analogue channels when you press PROG +/–
to select channels. (You can still select a skipped channel
using the number buttons.)
Decoder Shows and records the scrambled channel selected when
using a decoder connected directly to scart connector /
Using MENU Functions
AV1, or to scart connector / / AV2 via a
VCR/DVD recorder.
~
• Depending on the country selected for “Country” (page 6),
this option may not be available.
Confirm Saves changes made to the “Manual Programme Preset”
settings.
Digital Set-up
Digital Tuning Digital Auto
Tunes in the available digital channels.
Tuning
This option allows you to retune the TV after moving house,
or to search for new channels that have been launched by
broadcasters. For details, see step 6 of “5: Performing the
initial set-up” (page 6).
(Continu ed)
43
GB
Programme
Removes any unwanted digital channels stored on the TV,
Sorting
and changes the order of the digital channels stored on the
TV.
1 Press F/f to select the channel you want to remove or
move to a new position.
You can also select a channel by pressing the number
buttons to enter its three-digit channel number.
2 Remove or change the order of the digital channels as
follows:
To remove the digital channel
Press . After a confirmation message appears, press G
to select “Yes”, then press .
To change the order of the digital channels
Press g, then press F/f to select the new position for the
channel and press G.
3 Press RETURN.
Digital Manual
Tunes the digital channels manually. This feature is available
Tuning
when “Digital Auto Tuning” is set to “Antenna.”
1 Press the number button to select the channel number
you want to manually tune, then press F/f to tune the
channel.
2 When the available channels are found, press F/f to
select the channel you want to store, then press .
3 Press F/f to select the programme number where you
want to store the new channel, then press .
Repeat the above procedure to manually tune other channels.
Subtitle Set-up Subtitle Setting When “For Hard Of Hearing” is selected, some visual aids
may also be displayed with the subtitles (if TV channels
broadcast such information).
Subtitle
Allows you to select the language of the subtitles.
Language
Audio Set-up Audio Type Switches to broadcast for the hearing impaired when “For
Hard Of Hearing” is selected.
Audio Language Selects the language used for a programme. Some digital
channels may broadcast several audio languages for a
programme.
Audio
Provides audio description (narration) of visual information if
Description
TV channels broadcast such information.
Mixing Level* Adjusts the TV main audio and Audio Description output
levels.
Dynamic Range Compensates for differences in the audio level between
different channels. Note that this function may have no effect
for some channels.
Optical Out Selects the audio signal that is output from the DIGITAL
AUDIO OUT (OPTICAL) terminal on the rear of the TV. Set
to “Auto” when equipment compatible with Dolby Digital is
connected, and set to “PCM” when non-compatible
equipment is connected.
z
* This option is only available when “Audio Description” is set to “On.”
Radio Display Displays the screen wallpaper when you listen to a radio broadcast.
You can select the screen wallpaper colour, display a random colour or view a
slide show (page 26, 30).
To cancel the screen wallpaper display temporarily, press any button.
44
GB
Parental Lock Sets an age restriction for programmes. Any programme that exceeds the age
restriction can only be watched after a PIN code is entered correctly.
1 Press the number buttons to enter your existing PIN code.
If you have not previously set a PIN, a PIN code entry screen appears. Follow
the instructions of “PIN Code” below.
2 Press F/f to select the age restriction or “None” (for unrestricted watching),
then press .
3 Press RETURN.
PIN Code To set your PIN for the first time
1 Press the number buttons to enter the new PIN code.
2 Press the number buttons to enter the PIN code entered in step 1.
3 Press RETURN.
To change your PIN
1 Press the number buttons to enter your existing PIN code.
2 Press the number buttons to enter the new PIN code.
3 Press the number buttons to enter the new PIN code entered in step 2.
4 Press RETURN.
z
• PIN code 9999 is always accepted.
Technical Set-up Auto Service
Enables the TV to detect and store new digital services as
Update
they become available.
~
• For the service update to be able to take place the TV set
should be left in standby mode from time to time.
System Update Enables the TV to automatically receive software updates
free through your existing aerial/cable (when issued). We
Using MENU Functions
recommend that you leave the setting to “On” at all times.
~
• For the software upgrade to be able to take place the TV set
should be left in standby mode from time to time.
System
Displays the current software version and the signal level.
Information
~
• If signal bar is red (no signal) or amber (low signal), check
the aerial/cable connection.
Time Zone Allows you to manually select the time zone you are in, if it is
not the same as the default time zone setting for your country/
region.
Auto DST Sets whether or not to automatically switch between summer
time and winter time.
On Automatically switches between summer
time and winter time according to the
calendar.
Off The time is displayed according to the
time difference set by “Time Zone.”
Programme
You can switch GUIDE (Sony Guide or GUIDE Plus+). If
Guide
you change Sony Guide to GUIDE Plus+ programme, see
(only when GUIDE
page 17.
Plus+ is available)
Condition that this feature is displayed is following:
– in UK, Italy, France, Germany or Spain.
– you can receive digital broadcasting.
– when “Antenna” is selected in step 7 of “ 5: Performing
the initial set-up” (page 6).
(Continu ed)
45
GB
CA Module Set-up Allows you to access a pay TV service once you obtain a Conditional Access
Module (CAM) and a view card. See page 22 for the location of the
(PCMCIA) socket.
Network Settings
Network IP Address
DHCP (DNS
Automatically acquires the network
Settings
automatic)
settings through the Dynamic Host
Configuration Protocol server function of
the router or Internet service provider.
DHCP (DNS
Automatically acquires the network
manual)
settings except for DNS server settings.
You can manually set the DNS settings.
Manual Allows you to set the network settings
according to your network environment.
Test Diagnoses whether the network is correctly connected.
IP Address/
You need to configure each item when “Manual” is selected
Subnet Mask/
in “IP Address Settings.”
Default Gateway/
When “DHCP (DNS manual)” is selected, be sure to enter
Primary DNS/
“Primary DNS” and “Secondary DNS” server addresses
Secondary DNS
manually.
MAC Address Displays the MAC address, which is a fixed, globally unique
identifier of the network device.
Server Display
Displays the connected server list and allows you to select the server you want to
Settings
display on the Home menu.
Server Diagnostics Diagnoses whether the TV can connect to each server on the home network.
Renderer Function Enables playback of photos or music on the TV through other control devices on
the network, such as a digital still camera or mobile phone.
Renderer Access
Allows you to specify the accessible controller to the TV. When this setting is set
Control
to “On”, you can playback photos or music on the TV using the controller.
Renderer Set-up Automatic
Allows you to select whether to permit access to the TV
Access
automatically when the network device accesses the TV for
Permission
the first time.
Renderer Name Allows you to set the name of the TV to be shown on the
controller.
46
GB
Additional Information
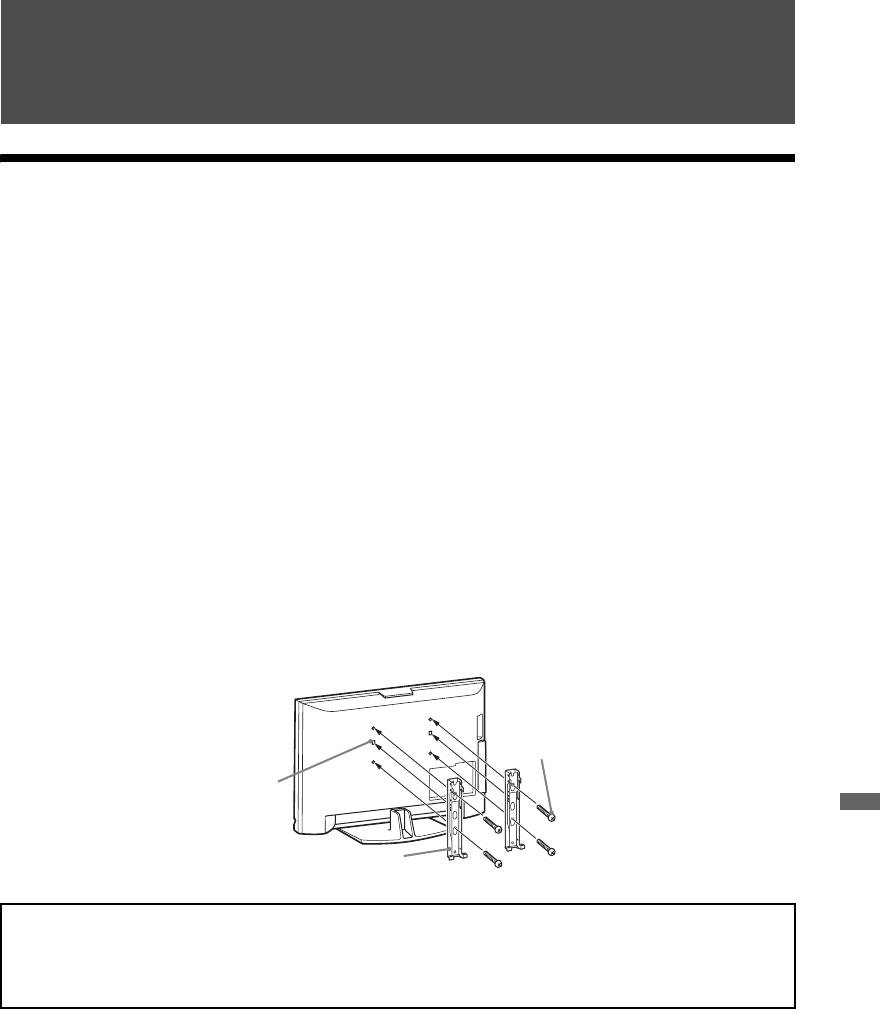
Installing the Accessories (Wall-Mount Bracket)
To Customers:
For product protection and safety reasons, Sony strongly recommends that installing of your TV be
performed by Sony dealers or licensed contractors. Do not attempt to install it yourself.
To Sony Dealers and Contractors:
Provide full attention to safety during the installation, periodic maintenance and examination of this
product.
Your TV can be installed using the Wall-Mount Bracket SU-WL500 (sold separately).
• Refer to the Instructions supplied with the Wall-Mount Bracket to properly carry out the
installation.
• Refer to “Detaching the Table-Top Stand from the TV” (page 8).
• Refer to “TV installation dimensions table” (page 48).
• Refer to “Screw and Hook locations diagram/table” (page 48).
~
• Place the TV on the Table-Top Stand, when securing the Mounting Hook.
Screw (+PSW6 × 16)
Square
hole
Additional Information
Mounting Hook
Sufficient expertise is required for installing this product, especially to determine the strength of the wall for
withstanding the TV’s weight. Be sure to entrust the attachment of this product to the wall to Sony dealers
or licensed contractors and pay adequate attention to safety during the installation. Sony is not liable for any
damage or injury caused by mishandling or improper installation.
(Continu ed)
47
GB
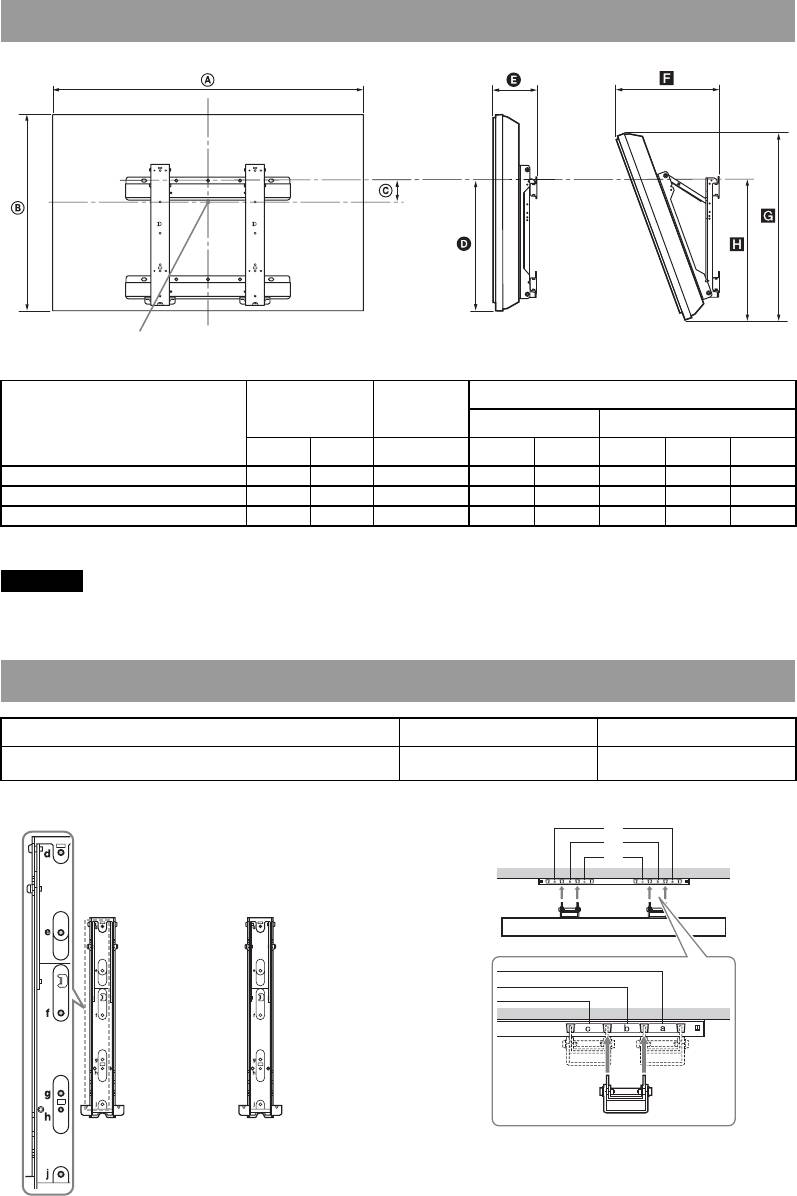
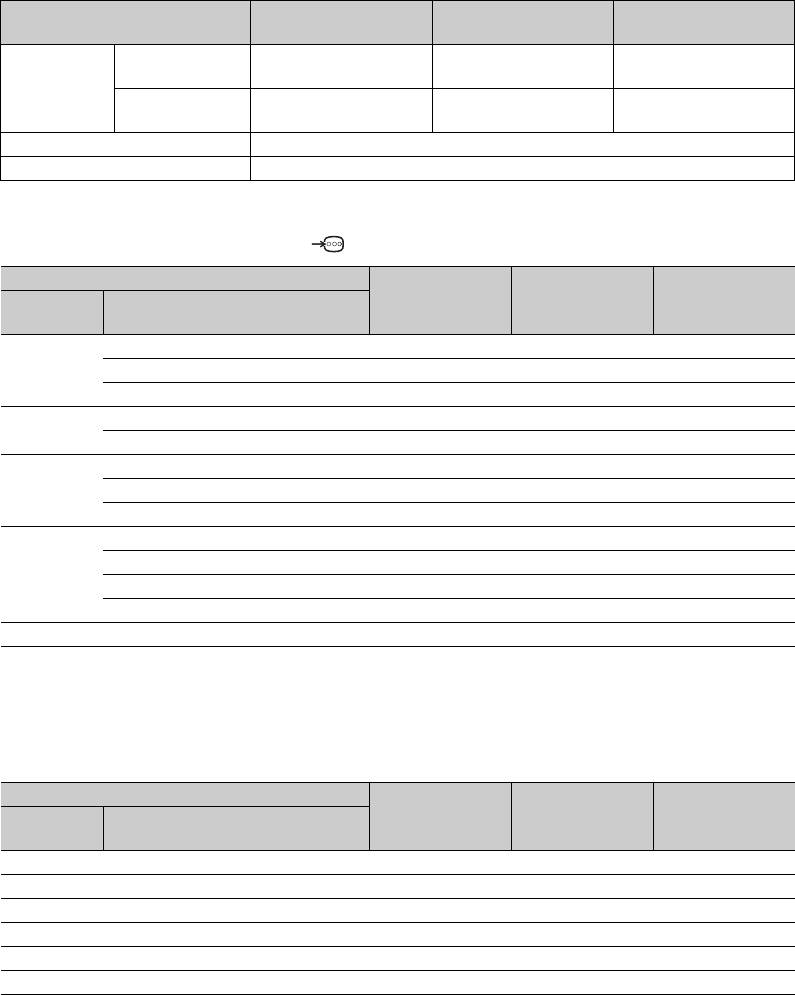
TV installation dimensions table
Screen centre point
Unit: mm
Length for each mounting angle
Display dimensions
Screen centre
Model Name
dimension
Angle (0°) Angle (20°)
AB C DEFGH
KDL-52W47xx/KDL-52W4500 1,262 829 39 487 179 413 786 522
KDL-46W47xx/KDL-46W4500 1,120 742 84 487 175 380 704 521
KDL-40W47xx/KDL-40W4500 986 646 122 474 170 348 614 507
Figures in the above table may differ slightly depending on the installation.
WARNING
The wall that the TV will be installed on should be capable of supporting a weight of at least four times that of
the TV. Refer to “Specifications” (page 49) for its weight.
Screw and Hook locations diagram/table
Model Name Screw location Hook location
KDL-52W47xx/KDL-46W47xx/KDL-40W47xx/
d, g b
KDL-52W4500/KDL-46W4500/KDL-40W4500
* Hook position “a, c” cannot be used for the models in the table above.
Screw location Hook location
a*
b
c*
48
GB
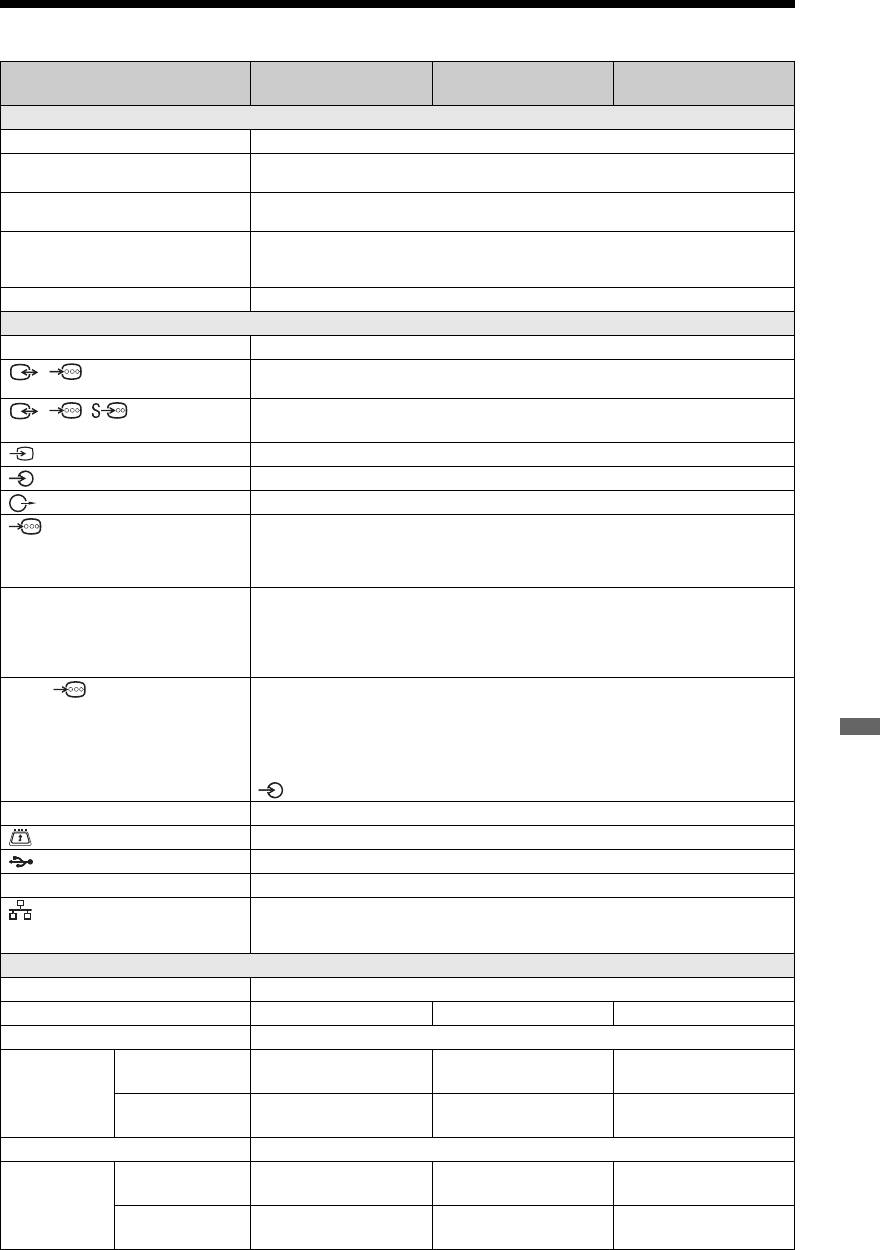
Specifications
Model name KDL-52W47xx/
KDL-46W47xx/
KDL-40W47xx/
KDL-52W4500
KDL-46W4500
KDL-40W4500
System
Panel system
LCD (Liquid Crystal Display) Panel
TV system
Analogue: Depending on your country selection: B/G/H, D/K, L, I
Digital: DVB-T/DVB-C
Colour/video system
Analogue: PAL, SECAM NTSC 3.58/4.43 (only Video In)
Digital: MPEG-2 MP@ML/HL, H.264/MPEG-4 AVC HP@L4.0, MP@L3.0
Channel coverage
Analogue: VHF: E2–E12/UHF: E21–E69/CATV: S1–S20/HYPER: S21–S41
D/K: R1–R12, R21–R69/L: F2–F10, B–Q, F21–F69/I: UHF B21–B69
Digital: VHF/UHF
Sound output
10 W + 10 W
Input/Output jacks
Aerial
75 ohm external terminal for VHF/UHF
/ AV1
21-pin Scart connector (CENELEC standard) including audio/video input, RGB input and TV
audio/video output.
/ / AV2
21-pin Scart connector (CENELEC standard) including audio/video input, RGB input, S Video
(SMARTLINK)
input, selectable audio/video output, and SMARTLINK interface.
AV3
Video input (phono jack)
AV3
Audio input (phono jacks)
DIGITAL AUDIO OUT (OPTICAL)(digital optical jack)/Audio output (phono jack)
COMPONENT IN
Supported formats: 1080p, 1080i, 720p, 576p, 576i, 480p, 480i
Y: 1 Vp-p, 75 ohms, 0.3V negative sync
PB/CB: 0.7 Vp-p, 75 ohms
PR/CR: 0.7 Vp-p, 75 ohms
HDMI IN 1, 2, 3
Video: 1080/24p, 1080p, 1080i, 720p, 576p, 576i, 480p, 480i
Audio: Two channel linear PCM
32, 44.1 and 48 kHz, 16, 20 and 24 bits
PC Input (see page 50)
Analogue audio (minijack): 500 mVrms (HDMI IN 2 only)
PC IN
PC Input (Dsub 15-pin)
G: 0.7 Vp-p, 75 ohms, non Sync on Green
B: 0.7 Vp-p, 75 ohms, non Sync on Green
R: 0.7 Vp-p, 75 ohms, non Sync on Green
HD: 1-5 Vp-p
Additional Information
VD: 1-5 Vp-p
PC audio input (minijack)
i
Headphones jack
CAM (Conditional Access Module) slot
USB port
DMPORT
DIGITAL MEDIA PORT
LAN
10BASE-T/100BASE-TX connector (Depending on the operating environment of the network,
connection speed may differ. 10BASE-T/100BASE-TX communication rate and
communication quality is not guaranteed for this TV.)
Power and others
Power requirements
220–240 V AC, 50 Hz
Screen size (measured diagonally)
52 inches 46 inches 40 inches
Display resolution
1,920 dots (horizontal) × 1,080 lines (vertical)
Power
in “Home”/
257 W 256 W 205 W
consumption
“Standard” mode
in “Shop”/“Vivid”
293 W 282 W 234 W
mode
Standby power consumption*
0.2 W or less (20W when Quick Start is “On”)
Dimensions
with Table-Top
126.2 × 87.1 × 34.7 cm 112.0 × 78.2 × 30.7 cm 98.6 × 68.4 × 27.9 cm
(Approx.)
Stand
(w × h × d)
without Table-Top
126.2 × 82.9 × 11.9 cm 112.0 × 74.2 × 11.5 cm 98.6 × 64.6 × 11.0 cm
Stand
(Continu ed)
49
GB
Model name KDL-52W47xx/
KDL-46W47xx/
KDL-40W47xx/
KDL-52W4500
KDL-46W4500
KDL-40W4500
Mass (Approx.) with Table-Top
39.5 kg 31.0 kg 23.0 kg
Stand
without Table-Top
33.0 kg 26.5 kg 19.5 kg
Stand
Supplied accessories
See “Before Use” on page 4.
Optional accessories
See “Installing the Accessories (Wall-Mount Bracket)” on page 47.
* Specified standby power is reached after the TV finishes necessary internal processes.
PC Input Signal Reference Chart for PC
Resolution
Signals Horizontal
× Vertical (Line) Horizontal
Vertical
Standard
(Pixel)
frequency (kHz)
frequency (Hz)
VGA 640 × 480 31.5 60 VGA
640 × 480 37.5 75 VESA
720 × 400 31.5 70 VGA-T
SVGA 800 × 600 37.9 60 VESA Guidelines
800 × 600 46.9 75 VESA
XGA 1024 × 768 48.4 60 VESA Guidelines
1024 × 768 56.5 70 VESA
1024 × 768 60.0 75 VESA
WXGA 1280 × 768 47.4 60 VESA
1280 × 768 47.8 60 VESA
1280 × 768 60.3 75
1360 × 768 47.7 60 VESA
SXGA 1280 × 1024 64.0 60 VESA
• This TV’s PC input does not support Sync on Green or Composite Sync.
• This TV’s PC input does not support interlaced signals.
• This TV’s PC input supports signals in the above chart with a 60 Hz vertical frequency.
PC Input Signal Reference Chart for HDMI IN 1, 2, 3
Resolution
Signals Horizontal
× Vertical (Line) Horizontal
Vertical
Standard
(Pixel)
frequency (kHz)
frequency (Hz)
VGA 640 × 480 31.5 60 VGA
SVGA 800 × 600 37.9 60 VESA Guidelines
XGA 1024 × 768 48.4 60 VESA Guidelines
WXGA 1280 × 768 47.4 60 VESA
WXGA 1280 × 768 47.8 60 VESA
SXGA 1280 × 1024 64.0 60 VESA
50
GB
Troubleshooting
Check whether the 1 (standby) indicator is flashing in red.
When it is flashing
The self-diagnosis function is activated.
1 Count how many 1 (standby) indicator flashes between each two second break.
For example, the indicator flashes three times, then there is a two second break, followed by
another three flashes, etc.
2 Press 1 on the top edge of the TV to turn it off, disconnect the mains lead, and inform your
dealer or Sony service centre of how the indicator flashes (number of flashes).
When it is not flashing
1 Check the items in the tables below.
2 If the problem still persists, have your TV serviced by qualified service personnel.
Condition Explanation/Solution
Picture
No picture (screen is dark) and
• Check the aerial/cable connection.
no sound
• Connect the TV to the mains, and press 1 on the top edge of the TV.
• If the 1 (standby) indicator lights up in red, press "/1.
No picture or no menu
• Press / to display the connected equipment list, then select the
information from equipment
desired input.
connected to the scart
• Check the connection between the optional equipment and the TV.
connector
Double images or ghosting
• Check the aerial/cable connection.
(only in analogue mode)
• Check the aerial location and direction.
Only snow and noise appear
• Check if the aerial is broken or bent.
on the screen (only in
• Check if the aerial has reached the end of its serviceable life (three to
analogue mode)
five years in normal use, one to two years at the seaside).
Additional Information
Picture or sound noise when
• Adjust “AFT” (Automatic Fine Tuning) to obtain better picture
viewing a TV channel (only in
reception (page 43).
analogue mode)
Some tiny black points and/or
• The picture of a display unit is composed of pixels. Tiny black points
bright points appear on the
and/or bright points (pixels) on the screen do not indicate a malfunction.
screen
No colour on programmes • Select “Reset” (page 35).
No colour or irregular colour
• Check the connection of the / COMPONENT IN sockets and
when viewing a signal from
check if each sockets are firmly seated in their respective sockets.
the / COMPONENT
IN sockets
Picture freezes or contains
• Check signal level (page 45). If signal bar is red (no signal) or amber
blocks on the screen
(low signal), check the aerial/cable connection.
• Remove the connected USB device. It can be damaged or not supported
by the TV.
Check the website below for updated information about compatible USB
devices:
http://support.sony-europe.com/TV/compatibility/
Sound
No sound, but good picture • Press 2 +/– or % (Mute).
• Check if the “Speaker” is set to “TV Speaker” (page 41).
• When using HDMI input with Super Audio CD or DVD-Audio,
DIGITAL AUDIO OUT (OPTICAL) may not output audio signals.
(Continu ed)
51
GB
Condition Explanation/Solution
There is a significant
• Adjust “Volume Offset” setting in the “Sound” menu (page 36).
difference in the output
volume level between
DIGITAL MEDIA PORT
input and TV or other
equipment input
Connection Diagnostic Results
“Connection successful.”does
Check Connections
not appear
• Use a straight cable for the LAN cable.
• Check if the cable is connected firmly.
• Check the connection between the TV and the broadband router.
Check Settings
• Change the IP address for the DNS server (see “Checking the Network
Connection” on page 32) while referring to the following.
– Contact your Internet service provider.
– Specify the IP address of the router if you do not know the DNS of
your Internet service provider.
Home Network
The server cannot be found, a
• Once server settings are changed, turn the TV off and on by pressing 1
list cannot be retrieved, and
on the TV.
playback fails
• Execute “Server Diagnostics” (page 33).
When using a PC as the server
• Check if the PC is turned on. Do not turn off the PC while accessing.
• If security software is installed on the server, be sure to allow
connections from external devices. For details, see the manual supplied
with your security software.
• The load on the PC may be too high or the server application may
become unstable. Try the following:
– Stop the server application and restart it.
– Restart the PC.
– Reduce the number of applications running on the PC.
– Reduce the amount of content.
Changes on the server are not
• Sometimes changes are not applied to displays on the TV even though
being applied or displayed
content has been added and/or deleted on the server. If this happens, go
content differs from content
back up one level and try opening the folder or server again.
on the server
Photo and/or music files do
Preliminary Check
not appear or icons are not
• Check that the connected device supports DLNA.
displayed
• Operations are not guaranteed for all servers. Also, operations differ
depending on the features of the server and the content in question.
• Turn the connected device on.
Check Connections
• Check that the LAN cable and/or mains lead of the server has not
become disconnected.
Check Settings
• Check that the connected device is registered under “Server Display
Settings” (page 33).
• Check that the server is correctly configured.
• Check that the selected equipment is connected to the network and can
be accessed.
• If the “IP Address Settings” in “Network” under “Network Settings” is
set to “DHCP (DNS automatic)” or “DHCP (DNS manual)”, it may take
some time to recognise a device if there is no DHCP server. Execute
“Server Diagnostics” (page 33).
52
GB
Condition Explanation/Solution
The TV cannot be found from
Check Connections
renderer-compatible
• Check that the LAN cable and/or mains lead of the server has not
equipment (the controller)
become disconnected.
Check Settings
• Check if the “Renderer Function” is activated (page 46).
• Check that the connected device is registered under “Renderer Access
Control” (page 46).
Channels
The desired channel cannot be
• Switch between digital and analogue mode and select the desired digital/
selected
analogue channel.
Some channels are blank • Scrambled/Subscription only channel. Subscribe to the pay TV service.
• Channel is used only for data (no picture or sound).
• Contact the broadcaster for transmission details.
Digital channels are not
• Contact a local installer to find out if digital transmissions are provided
displayed
in your area.
• Upgrade to a higher gain aerial.
General
Distorted picture and/or sound • Keep the TV away from electrical noise sources such as cars,
motorcycles, hair-dryers or optical equipment.
• When installing optional equipment, leave some space between the
optional equipment and the TV.
• Check the aerial/cable connection.
• Keep the aerial/cable TV cable away from other connecting cables.
The TV turns off
• Check if the “Sleep Timer” is activated, or confirm the “Duration”
automatically (the TV enters
setting of “On Timer Settings” (page 38).
standby mode)
• If no signal is received and no operation is performed in the TV mode
for 10 minutes, the TV automatically switches to standby mode.
The TV turns on automatically • Check if the “On Timer” is activated (page 38).
Some input sources cannot be
• Select “AV Preset” and cancel “Skip” of the input source (page 40).
selected
The remote does not function • Replace the batteries.
A channel cannot be added to
• Up to 999 channels can be stored in the favourite list.
the Favourite list
Additional Information
You have a blank TV listings
• Check the aerial/cable connection.
in the GUIDE Plus+ system
• Your cabling and set-up is OK, but your GUIDE Plus+ system was not
connected for enough time to receive TV listings data. Leave the TV
“STANDBY” overnight (24 hours) or use “Manual Data Download”
(page 19).
• You live in a country/region where the GUIDE Plus+ system is not yet
available. Check the list of countries to see if you are in a region that is
supported.
(http://www.europe.guideplus.com/)
HDMI equipment does not
• Check that your equipment is “Control for HDMI” compatible
appear on “HDMI Device
equipment.
List”
Not all channels are tuned • Check support web site for cable provide information.
http://support.sony-europe.com/TV/DVBC/
You cannot select “Off” in
• If any “Control for HDMI” compatible audio equipment is connected to
“Control for HDMI”
the TV, you cannot select “Off” in this menu. If you want to change the
audio output to the TV speaker, select “TV Speaker” in the “Speaker”
menu (page 41).
53
GB
Wprowadzenie
Informacje dot. znaków towarowych
Dziękujemy, że wybrali Państwo produkt firmy Sony.
s jest zastrzeżonym znakiem towarowym projektu
DVB
Przed przystąpieniem do eksploatacji telewizora należy
dokładnie zapoznać się z treścią niniejszej instrukcji oraz
s DLNA i DLNA CERTIFIED są znakami towarowymi
zachować ją do wykorzystania w przyszłości.
i/lub znakami usługowymi firmy Digital Living Network
Alliance.
s GUIDE Plus+ jest (1) zastrzeżonym znakiem handlowym
Producentem tego produktu jest Sony Corporation, 1-7-
lub znakiem handlowym, (2) jest produkowany na licencji
1 Konan Minato-ku Tokyo, 108-0075 Japonia.
i (3) jest chroniony różnorodnymi patentami
Upoważnionym przedstawicielem producenta w Unii
międzynarodowymi i wnioskami patentowymi, których
Europejskiej, uprawnionym do dokonywania i
właścicielem jest lub na które licencję posiada firma
potwierdzania oceny zgodności z wymaganiami
Gemstar-TV Guide International, Inc. lub powiązane z nią
zasadniczymi, jest Sony Deutschland GmbH,
firmy.
Hedelfinger Strasse 61, 70327 Stuttgart, Niemcy. Nadzór
nad dystrybucją na terytorium Rzeczypospolitej Polskiej
s FIRMA GEMSTAR-TV GUIDE INTERNATIONAL,
sprawuje Sony Poland, 00-876 Warszawa, ul. Ogrodowa
INC. I POWIĄZANE Z NIĄ FIRMY NIE PONOSZĄ
58. W sprawach serwisowych i gwarancyjnych należy
ŻADNEJ ODPOWIEDZIALNOŚCI ZA
kontaktować się z podmiotami, których adresy podano
DOKŁADNOŚĆ INFORMACJI O
w osobnych dokumentach gwarancyjnych lub
HARMONOGRAMIE PROGRAMÓW
serwisowych, lub z najbliższym sprzedawcą produktów
DOSTARCZANYCH PRZEZ SYSTEM GUIDE
Sony.
PLUS+. FIRMA GEMSTAR-TV GUIDE
INTERNATIONAL, INC. I POWIĄZANE Z NIĄ
FIRMY NIE PONOSZĄ W ŻADNYM WYPADKU
Informacja dotycząca funkcji Telewizji
ODPOWIEDZIALNOŚCI W JAKIEJKOLWIEK
KWOCIE ZA UTRATĘ ZYSKÓW, UTRATĘ
Cyfrowej
MOŻLIWOŚCI HANDLOWYCH ANI ZA
s Wszystkie funkcje dotyczące Telewizji Cyfrowej ( )
POŚREDNIE, SPECYFICZNE BĄDŹ WYNIKOWE
dostępne są tylko w krajach lub na obszarach, gdzie
STARTY ZWIĄZANE Z DOSTARCZANIEM LUB
nadawane są sygnały cyfrowej telewizji naziemnej DVB-T
WYKORZYSTANIEM JAKICHKOLWIEK
(MPEG2 i MPEG4 AVC) lub w miejscach, w których
INFORMACJI, USŁUG BĄDŹ SPRZĘTU
istnieje dostęp do kompatybilnych z urządzeniem
ZWIĄZANEGO Z SYSTEMEM GUIDE PLUS+.
sygnałów kablowych DVB-C (MPEG2 i MPEG4 AVC).
s Wyprodukowano na licencji Dolby Laboratories. Nazwa
Prosimy skontaktować się z lokalnym sprzedawcą, aby
Dolby i symbol podwójnej litery D są znakami
ustalić, czy w miejscu Państwa zamieszkania można
towarowymi firmy Dolby Laboratories.
odbierać sygnały DVB-T lub zwrócić się do dostawcy usług
s Nazwa HDMI, logo HDMI oraz High-Definition
kablowych o informacje, czy oferowane przez niego usługi
Multimedia Interface są znakami towarowymi lub
DVB-C będą dostępne w zakupionym odbiorniku TV.
zastrzeżonymi znakami towarowymi firmy HDMI
s Dostawca usług kablowych może doliczyć dodatkową
Licensing LLC.
opłatę za takie usługi oraz poprosić użytkownika o
s „BRAVIA” i są znakami towarowymi Sony
podpisanie stosownej umowy.
Corporation.
s Choć zakupiony model telewizora jest dostosowany do
s „XMB” i „xross media bar” są znakami towarowymi firm
odbioru sygnałów telewizji naziemnej DVB-T oraz
Sony Corporation i Sony Computer Entertainment Inc.
kablowej DVB-C, nie można zagwarantować jego
s Symbol „xx”, który pojawia się w nazwie modelu,
kompatybilności z tworzonymi w przyszłości programami
odpowiada dwóm znakom numerycznym opisującym
w formacie DVB-T lub DVB-C.
kolor.
s W niektórych krajach lub regionach pewne funkcje
Telewizji Cyfrowej lub kablowej DVB-C mogą być
niedostępne.
s Szczegółowe informacje na temat funkcji DVB-C znajdują
się na naszej stronie dotyczącej sygnałów przesyłanych
drogą kablową:
http://support.sony-europe.com/TV/DVBC/
2
PL
Spis treści
Instrukcja podłączenia i programowania 4
Informacje dotyczące bezpieczeństwa.......................................................................................... 9
Środki ostrożności ......................................................................................................................... 11
Pilot oraz elementy sterujące i wskaźniki telewizora ................................................................. 12
Odbiór audycji telewizyjnych
Odbiór audycji telewizyjnych ........................................................................................................ 16
Korzystanie z systemu GUIDE Plus+™ oraz cyfrowego przewodnika po programach EPG
(Digital Electronic Programme Guide) .......................................................................... 19
Korzystanie z listy Ulubionych kanałów cyfrowych .......................................................... 23
Korzystanie z dodatkowego sprzętu
Schemat połączeń.......................................................................................................................... 24
Oglądanie obrazów z podłączonych urządzeń............................................................................ 27
Odtwarzanie zdjęć/muzyki poprzez USB..................................................................................... 29
Korzystanie z BRAVIA Sync ze Sterowaniem przez HDMI......................................................... 32
Korzystanie z funkcji sieciowych
Podłączanie odbiornika TV do sieci ............................................................................................. 34
Korzystanie z plików graficznych/muzycznych poprzez sieć.................................................... 34
Sprawdzanie połączenia sieciowego ........................................................................................... 36
Konfigurowanie ustawień wyświetlania serwerów..................................................................... 37
Korzystanie z funkcji Menu
Nawigowanie w menu Dom odbiornika TV (XMB™)................................................................... 38
Ustawienia....................................................................................................................................... 39
Informacje dodatkowe
Instalowanie elementów dodatkowych (uchwyt ścienny).......................................................... 53
PL
Dane techniczne............................................................................................................................. 55
Rozwiązywanie problemów........................................................................................................... 57
: tylko w przypadku kanałów cyfrowych
Przed rozpoczęciem eksploatacji telewizora należy zapoznać się z treścią rozdziału „Informacje dotyczące
bezpieczeństwa” niniejszej instrukcji.
Zachować instrukcję do wykorzystania w przyszłości.
3
PL
Instrukcja podłączenia i programowania
•Należy ostrożnie obchodzić się z pilotem. Nie
Przed rozpoczęciem
należy nim rzucać, chodzić po nim, ani
wylewać na niego żadnych płynów.
użytkowania
•Nie należy kłaść pilota w pobliżu źródeł ciepła
Sprawdzić akcesoria
lub w miejscach narażonych na bezpośrednie
działanie promieni słonecznych. Chronić je
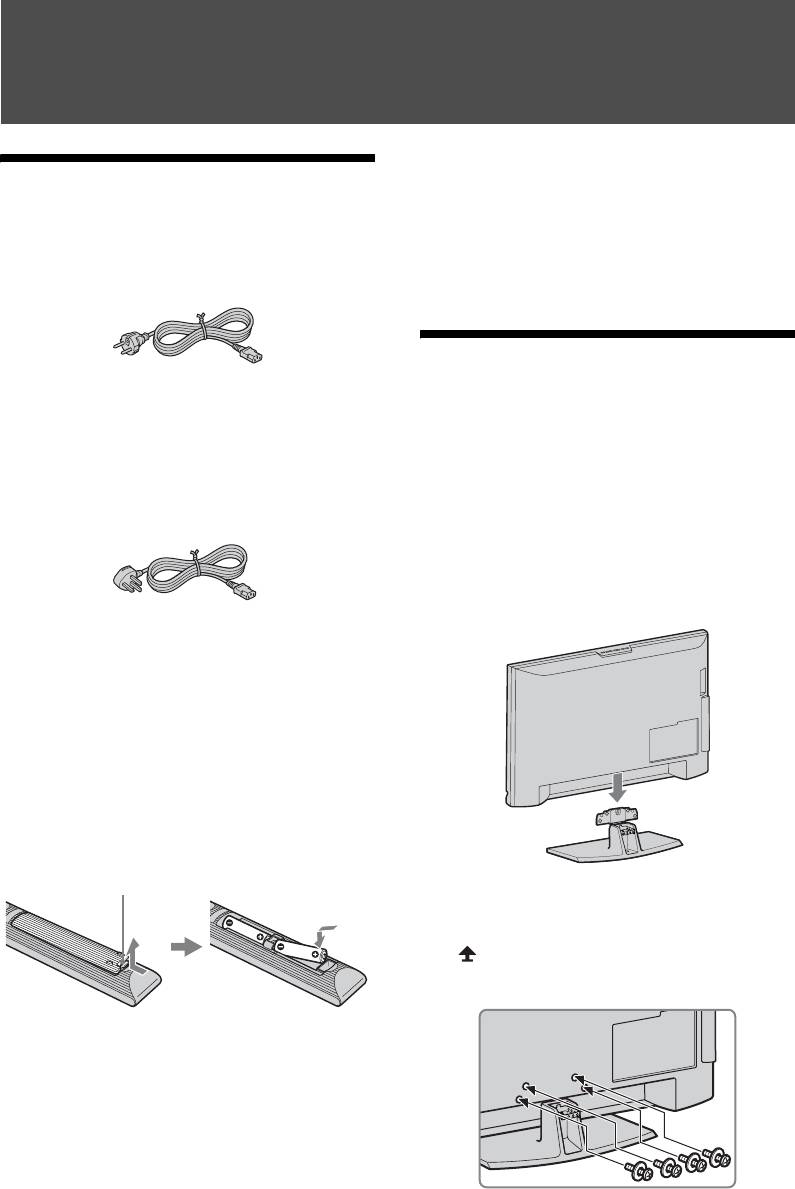
Przewód zasilający (typ C) (1)
przed wilgocią.
1: Mocowanie stojaka
~
(dla KDL-46W47xx/KDL-
• Tego przewodu zasilającego należy używać w
wypadku korzystania z odbiornika TV poza
40W47xx/KDL-46W4500/
Wielką Brytanią.
KDL-40W4500)
Przewód zasilający (typ BF) (1)
1 Otworzyć pudło kartonowe i wyjąć
(tylko KDL-52W47xx/KDL-46W47xx/
KDL-40W47xx)
stojak oraz śruby.
2 Umieścić odbiornik TV na stojaku.
Należy uważać, aby nie uszkodzić
kabli.
~
• Tego przewodu zasilającego należy używać w
wypadku korzystania z odbiornika TV w
Wielkiej Brytanii.
Pilot zdalnego sterowania RM-ED011 (1)
Baterie AA (typu R6) (2)
Stojak (1) oraz śruby mocujące stojaka (4)
(tylko KDL-46W47xx/KDL-40W47xx/
KDL-46W4500/KDL-40W4500)
Włożyć baterie do pilota
Aby otworzyć, nacisnąć i podnieść pokrywę.
3 Zamocować odbiornik TV do stojaka
zgodnie z oznaczeniem strzałkami
przeprowadzając dostarczane śruby
przez otwory montażowe.
~
• Przy wkładaniu baterii do pilota zachować
właściwą biegunowość.
•Nie należy używać różnych typów baterii
jednocześnie ani łączyć starych baterii z
nowymi.
•Zużyte baterie należy utylizować w sposób
nieszkodliwy dla środowiska naturalnego. W
niektórych regionach sposób utylizacji
~
zużytych baterii mogą regulować stosowne
•Jeśli pracuje się ze śrubokrętem elektrycznym,
przepisy. Należy skontaktować się w tej
należy ustawić moment obrotowy na ok.
sprawie z lokalnymi władzami.
1,5 N·m {15 kgf·cm}.
4
PL
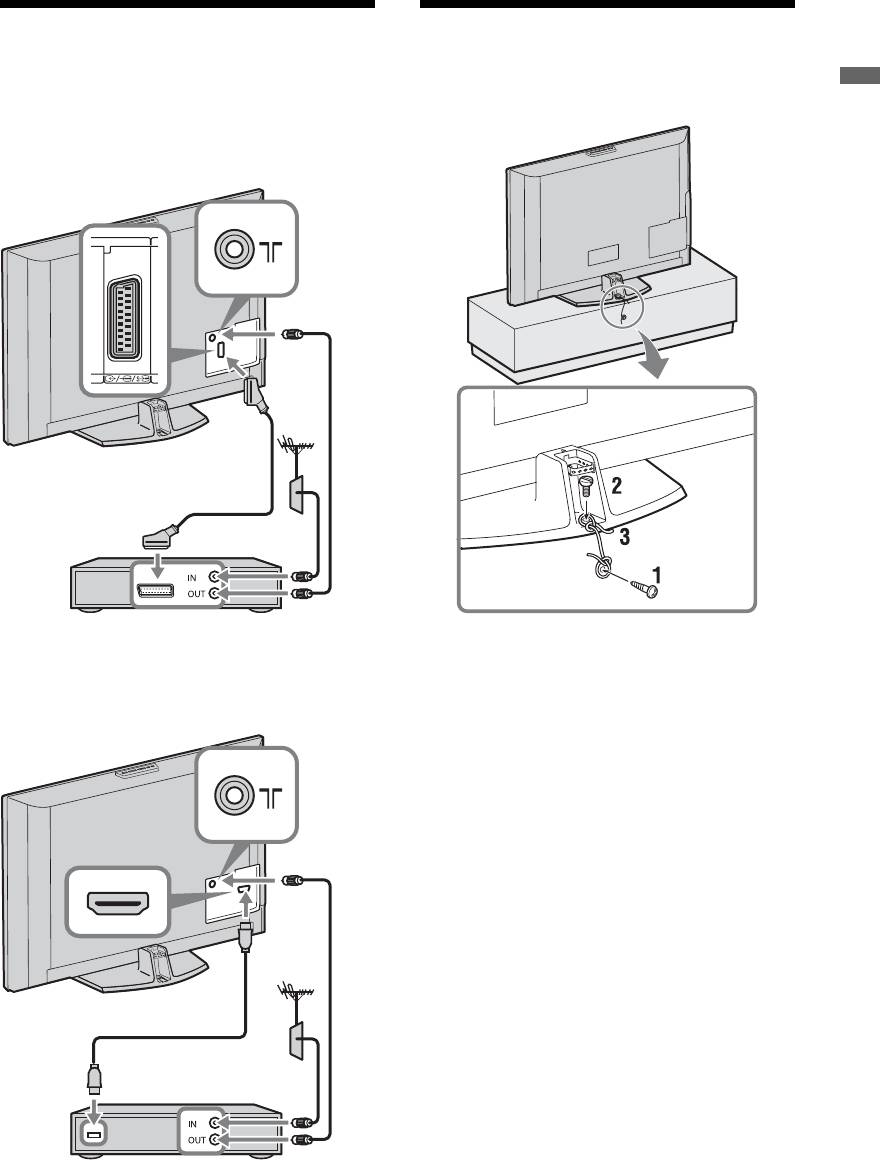
2: Podłączanie anteny/
3: Zabezpieczenie
urządzenia STB /nagrywarki
telewizora przed
(np. nagrywarki DVD)
przewróceniem
Instrukcja podłączenia i programowania
Podłączanie urządzenia STB/nagrywarki
(np. nagrywarki DVD) ze złączem SCART
A V
2
( SMARTLINK )
Przewód Scart
Urządzenie STB dla TV kablowej/nagrywarki
(np. nagrywarki DVD)
1 Wkręć wkręt do drewna (średnica
Podłączanie urządzenia STB/nagrywarki
4 mm, nie należy do wyposażenia) w
(np. nagrywarki DVD) ze złączem HDMI
podstawkę pod telewizor.
2 Wkręć śrubę (M6 × 12, nie należy do
wyposażenia) w otwór montażowy w
telewizorze.
3 Połącz wkręt do drewna i śrubę przy
pomocy mocnej linki.
Urządzenie STB dla TV kablowej/nagrywarki
(np. nagrywarki DVD)
5
PL
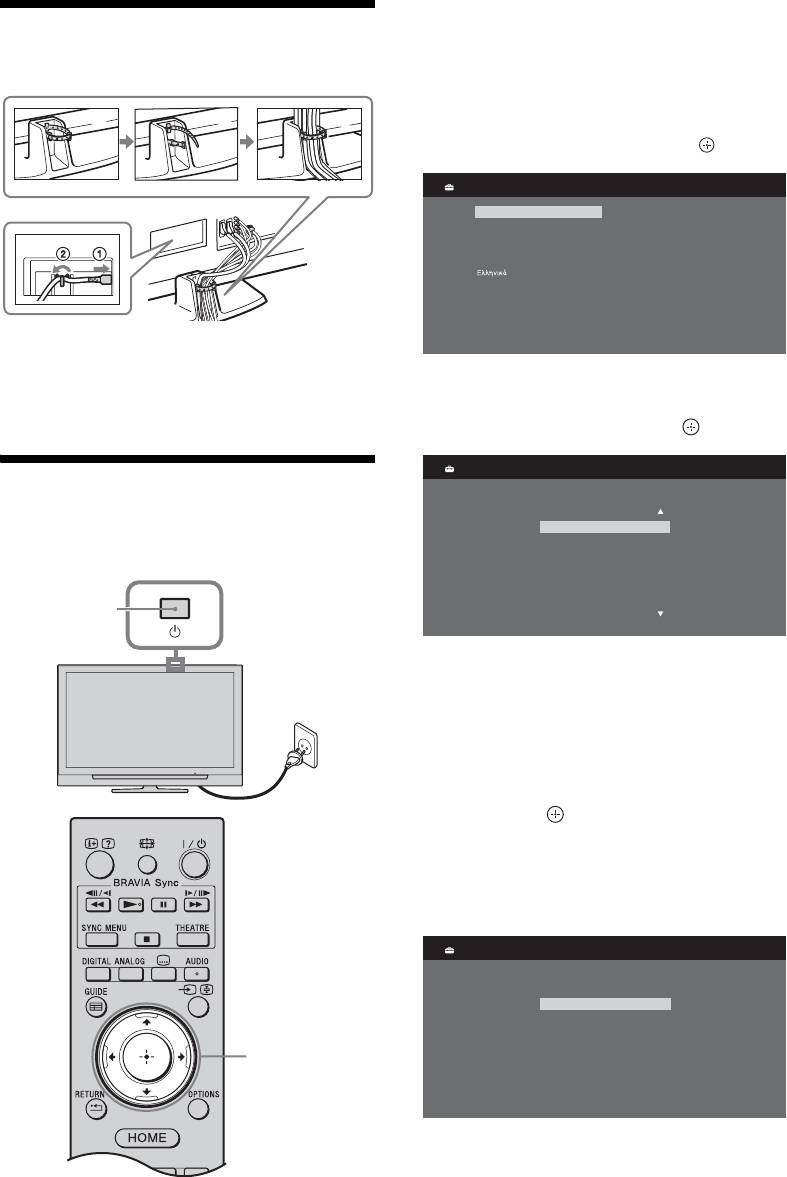
2 Nacisnąć 1 na odbiorniku TV.
4: Formowanie wiązki
Przy pierwszym włączeniu telewizora
przewodów
na ekranie pojawia się menu język.
3 Za pomocą przycisków F/f/G/g
432
wybrać język wyświetlany na ekranach
menu, a następnie nacisnąć .
Language
English
Česky
Nederlands
Magyar
Français
Русский
1
Italiano
ББлгар
ски
Deutsch
Suomi
Dansk
Türkçe
Svenska
Español
Norsk
Català
Slovenčina
Português
Română
Polski
~
4 W celu dokonania wyboru kraju w
•Nie należy prowadzić przewodu zasilającego w
którym używany będzie odbiornik TV,
jednej wiązce z innymi przewodami.
nacisnąć F/f, a następnie .
Kraj
5: Wykonywanie
Wybierz kraj.
początkowej konfiguracji
-
United Kingdom
Ireland
ustawień
Nederland
België/Belgique
Luxembourg
France
Italia
2
Jeśli kraju, w którym odbiornik będzie
używany, nie ma na liście, zamiast
1
nazwy kraju należy wybrać „-”.
5 W celu dokonania wyboru rodzaju
lokalizacji, w którym używany będzie
odbiornik TV, nacisnąć F/f, a
następnie .
~
• Wybrać „Dom”, aby uzyskać najlepsze
ustawienia do użytkowania odbiornika
TV w domu.
Lokalizacja
Wybierz lokalizację.
Dom
Sklep
3-11
1 Podłączyć odbiornik TV do gniazdka
sieciowego (220-240V AC, 50Hz).
6
PL
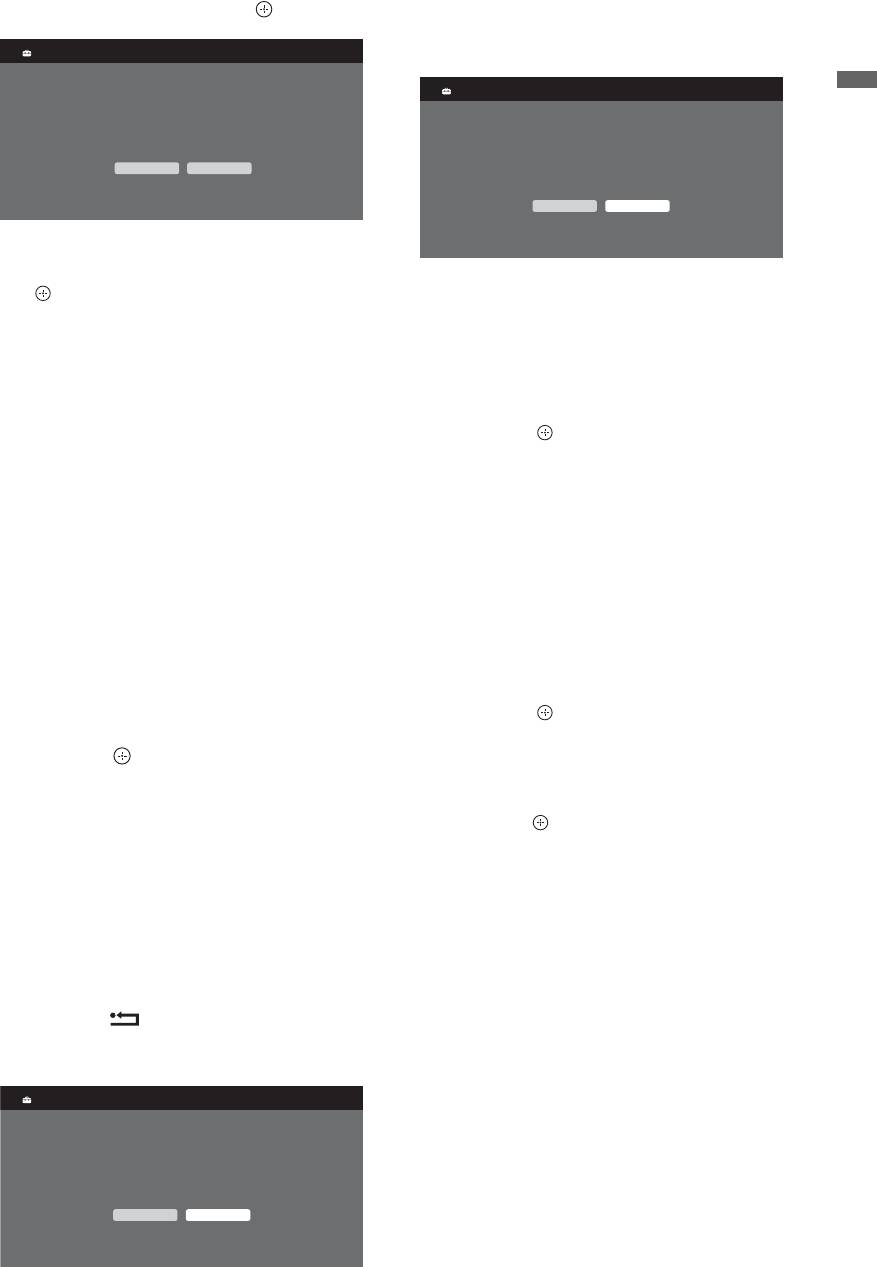
6 Wybrać „Tak” i nacisnąć .
Szczegółowe informacje, patrz strona
41.
Autoprogramowanie
10
Sterowanie przez HDMI
Instrukcja podłączenia i programowania
Czy chcesz rozpocząć Autoprogramowanie?
Czy chcesz włączyć sterowanie urządzeń
zgodnych z systeme m sterowania przez HDM I?
Tak Nie
Wybór "Tak" spowoduje zwiekszone
zużycie ener gii w trybie gotowosci.
Ta k Nie
7 Nacisnąć F/f, aby wybrać „Naziemna”
lub „Kablowa”, a następnie nacisnąć
Szczegółowe informacje, patrz strona
.
32.
Po wybraniu „Kablowa”, pojawi się
Po wykonaniu tego kroku, ekran
ekran wyboru rodzaju przeszukiwania.
ustawień GUIDE Plus+ jest
Patrz „Aby dostroić odbiornik TV do
wyświetlany tylko wtedy, gdy GUIDE
odbioru telewizji kablowej” (strona 7).
Plus+ jest dostępny.
Odbiornik TV rozpoczyna
11 Nacisnąć .
wyszukiwanie wszystkich dostępnych
kanałów cyfrowych, a następnie
Odbiornik TV jest teraz dostrojony do
analogowych. Procedura ta zajmuje
wszystkich dostępnych kanałów.
nieco czasu, należy więc cierpliwie
~
czekać i nie naciskać jakichkolwiek
•Gdy nie można odbierać sygnału kanałów
przycisków odbiornika TV lub pilota.
cyfrowych lub gdy w kroku 4 wybrano kraj, w
Jeśli zostanie wyświetlony komunikat
którym brak kanałów cyfrowych, to po
żądający potwierdzenia podłączenia
wykonaniu kroku 8 należy ustawić czas.
anteny
Nie znaleziono żadnych kanałów
Aby dostroić odbiornik TV do odbioru
cyfrowych lub analogowych. Sprawdzić
telewizji kablowej
wszystkie połączenia antenowe/
1 Nacisnąć .
telewizji kablowej, a następnie
2 Nacisnąć F/f, aby wybrać
nacisnąć , aby ponownie rozpocząć
„Przeszukiwanie szybkie” lub
autoprogramowanie.
„Przeszukiwanie pełne”, a następnie
8 Gdy na ekranie zostanie wyświetlone
nacisnąć .
menu „Sortowanie programów”,
należy postępować zgodnie z
„Przeszukiwanie szybkie”: kanały są
programowane zgodnie z informacją
czynnościami opisanymi w rozdziale
operatora telewizji kablowej zawartą w
„Sortowanie programów” (strona 47).
nadawanym sygnale.
Jeśli kolejność zachowanych w
Zalecanym ustawieniem
telewizorze kanałów analogowych ma
„Częstotliwość”, „Identyfikator sieci”
pozostać niezmieniona, nacisnąć
oraz „Szybkość transmisji symb.” jest
przycisk RETURN, aby przejść do
„Automat.”.
punktu 9.
Opcja ta jest polecana przy usłudze
9
szybkiego strojenia, jeśli jest ona
Szybki start
oferowana przez operatora telewizji
kablowej.
Jeżeli „Przeszukiwanie szybkie” nie
Czy chcesz włączyć opcję Szybki start?
Zapewnia ona szybsze włączanie TV, ale powoduje większe zużycie prądu w trybie gotowości.
zdoła zaprogramować kanałów, należy
skorzystać z metody „Przeszukiwanie
Ta k Nie
pełne” opisanej poniżej.
(Cd)
7
PL
„Przeszukiwanie pełne”: Wszystkie
3 Pobieranie danych GUIDE Plus+.
dostępne kanały zostaną
Początkowe pobieranie zajmuje nieco
zaprogramowane i zapamiętane.
czasu, należy więc cierpliwie czekać i
Procedura ta zajmuje nieco czasu.
nie naciskać jakichkolwiek przycisków
Opcja ta jest polecana wtedy, gdy
odbiornika TV lub pilota. Po pobraniu
operator telewizji kablowej nie oferuje
pierwszej partii danych listy
usługi „Przeszukiwanie szybkie”.
programów TV, kolejne pobieranie
Aby uzyskać dalsze informacje o
będą dokonywane automatycznie.
polecanych operatorach telewizji
kablowej, patrz strona internetowa:
http://support.sony-europe.com/TV/
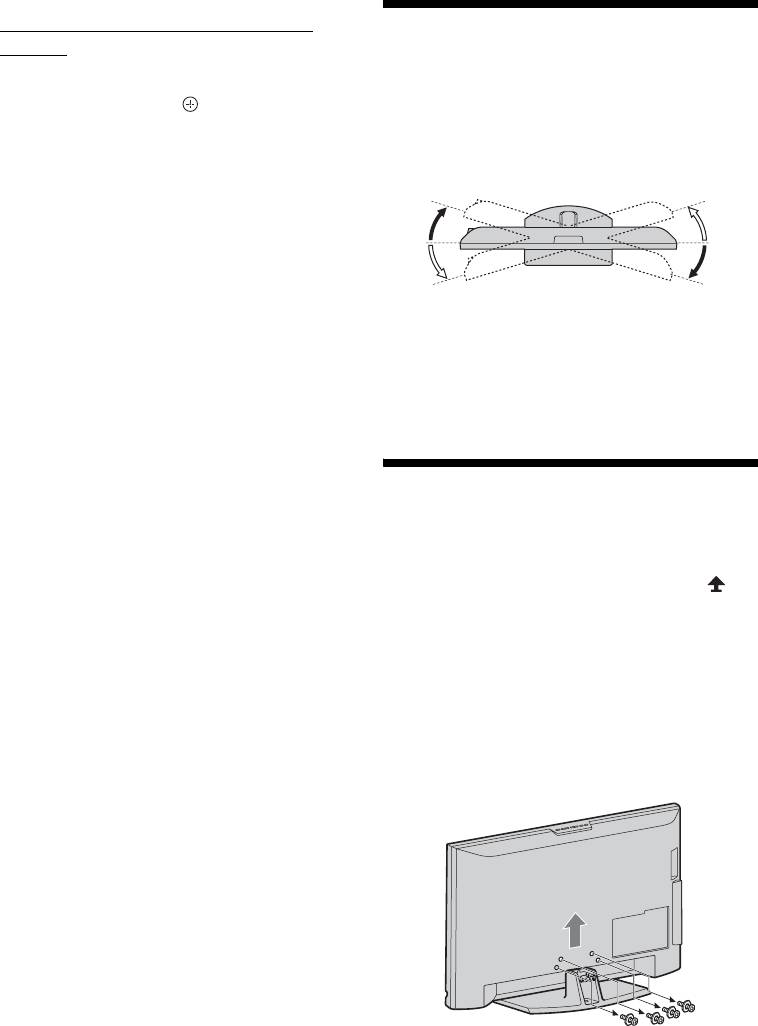
Regulowanie kąta
DVBC/
oglądania TV
3 Nacisnąć f, aby wybrać „Rozpocznij”,
a następnie nacisnąć .
Ten odbiornik TV można regulować w
zakresie kątów przedstawionym poniżej.
Odbiornik TV rozpoczyna
wyszukiwanie kanałów. Nie naciskać
Regulowanie kąta lewego i prawego
(obracanie)
żadnych przycisków na odbiorniku TV
Widok górny
ani na pilocie.
20°
20°
~
•Niektórzy operatorzy telewizji kablowej nie
20°
20°
świadczą usługi „Przeszukiwanie szybkie”.
Przód
Jeśli „Przeszukiwanie szybkie” nie wykryje
żadnych kanałów, przeprowadzić
~
„Przeszukiwanie pełne”.
• Podczas regulowania kąta, przytrzymywać
stojak odbiornika jedną ręką, aby uniknąć
Aby ustawić system GUIDE Plus+ (tylko
ześlizgiwania się lub przechylania odbiornika
wtedy, gdy system GUIDE Plus+ jest
TV.
dostępny)*
* Warunkiem ustawienia tej funkcji jest:
– przebywanie w Wielkiej Brytanii, Włoszech,
Odkręcanie stojaka od
Niemczech lub Hiszpanii.
odbiornika TV
– możliwość odbierania sygnału kanałów
cyfrowych.
~
– jeśli w kroku 7 punkcie „5: Wykonywanie
•Odkręcić śruby wskazywane strzałkami od
początkowej konfiguracji ustawień”
odbiornika TV.
wybrano opcję „Naziemna”.
•Stojak można odkręcić od odbiornika TV
1 Wprowadź kod pocztowy regionu w
jedynie w poniższych wypadkach.
– Jeśli odbiornik TV ma być zamontowany na
którym mieszkasz używając w tym celu
ścianie.
klawiszy F/f/G/g/+.
– Jeśli po zakupie odbiornik TV ma być
włożony do kartonu (tylko KDL-46W47xx/
~
•Wprowadź od lewej, jeśli liczba cyfr w
KDL-40W47xx/KDL-46W4500/
kodzie pocztowym jest mniejsza niż
KDL-40W4500).
siedem.
2 Wybierz język stosowany z GUIDE
Plus+.
Ten punkt zostanie pominięty, jeśli w
kroku 3 w punkcie „5: Wykonywanie
początkowej konfiguracji ustawień”:
„English”, „Deutsch”, „Español”,
„Italiano”, „Français” lub
„Nederlands”.
8
PL
