Sony KDL-40W4710 – page 2
Manual for Sony KDL-40W4710
Table of contents
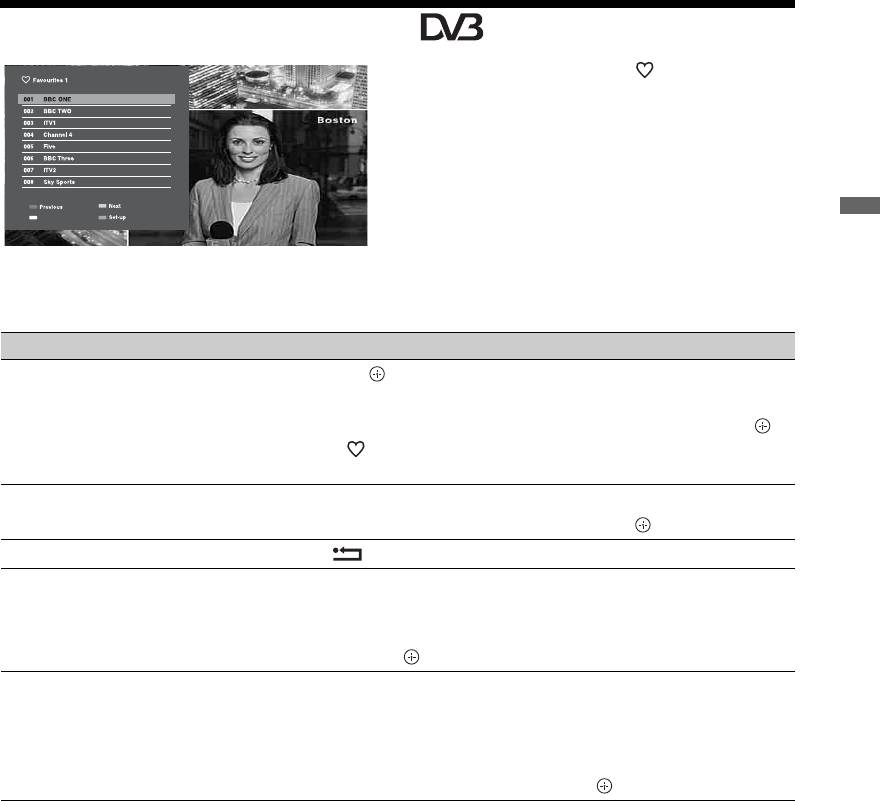
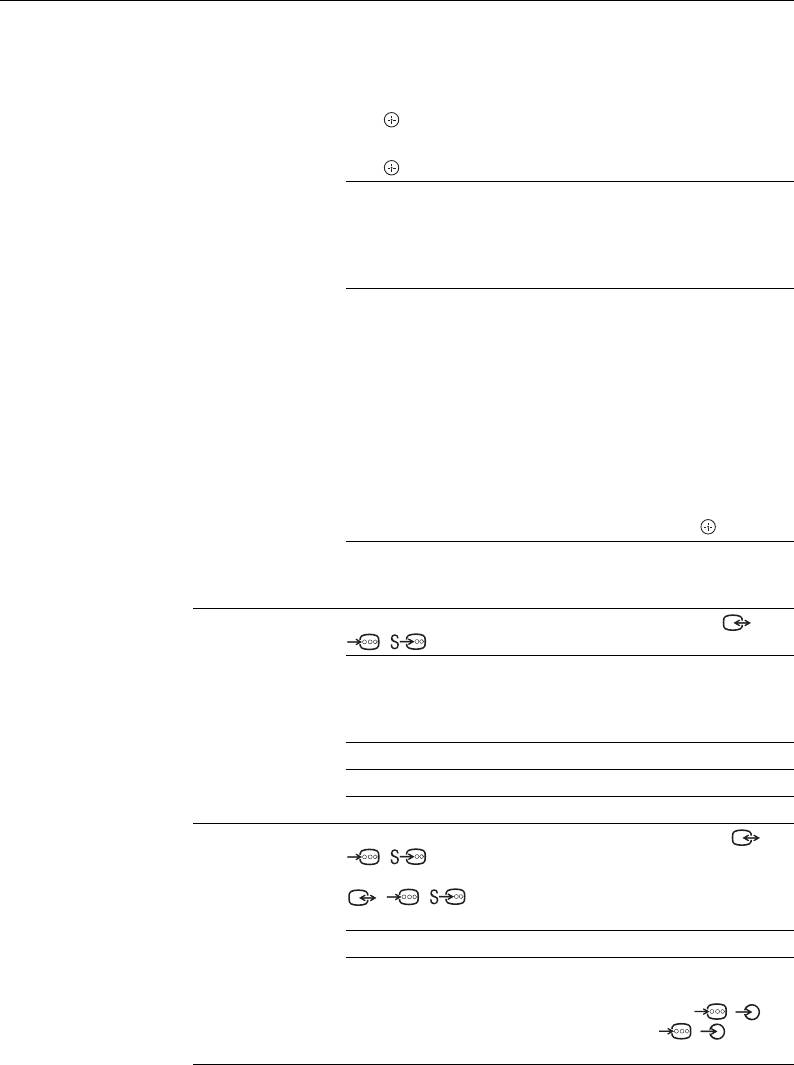
Using the Digital Favourite List *
1 In digital mode, press .
2 Perform the desired operation as shown in
the following table or displayed on the
screen.
Homes Under the Hammer 10:30 - 11:00
Watching TV
Digital Favourite List
* This function may not be available in some countries/regions.
To Do this
Create your Favourite list for the first
1 Press to select “Yes.”
time
2 Press the yellow button to select the favourite list.
3 Press F/f to select the channel you want to add, then press .
A symbol appears next to channels that you have stored in
the favourite list.
Watch a channel
1 Press yellow key to navigate through favourite lists.
2 Press F/f to select the channel, then press .
Turn off the Favourite list Press RETURN.
Add or remove channels in the
1 Press the blue button.
currently edited Favourite list
2 Press the yellow button to choose the list you want to edit.
3 Press F/f/G/g to select the channel you want to add or remove,
then press .
Remove all channels from the current
1 Press the blue button.
Favourite list
2 Press the yellow button to select the favourite list you want to
edit.
3 Press the blue button.
4 Press G/g to select “Yes”, then press to confirm.
21
GB
Using Optional Equipment
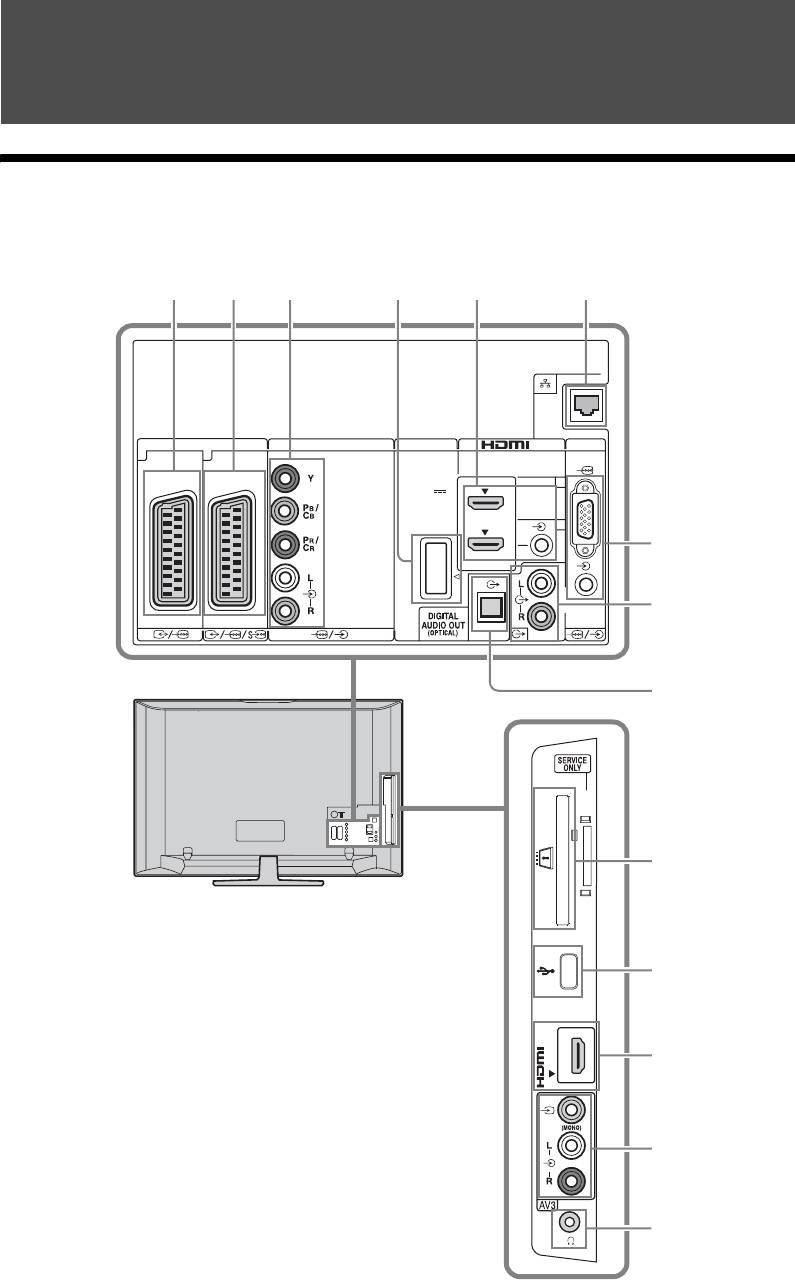
Connecting Chart
You can connect a wide range of optional equipment to your TV. Connecting cables are not
supplied.
123 4 5 6
A V
COMPONENT IN
DMPORT
IN
PC IN
12
( SMARTLINK )
1
DC 5V
0.7A MAX
2
7
8
9
0
qa
IN3
qs
qd
qf
22
GB
Connect to Input symbol on
Description
screen
1 /AV1 AV1 When you connect a decoder, the TV tuner outputs scrambled
signals to the decoder, and the decoder unscrambles the
signals before outputting them.
2 //
AV2 SmartLink is a direct link between the TV and a VCR/DVD
AV2
recorder.
(SMARTLINK)
3 /
Component The component video sockets support the following video
COMPONENT IN
inputs only: 480i, 480p, 576i, 576p, 720p, 1080i and 1080p.
4 DMPORT DMPORT You can play audio or video (optional cable required) of a
portable audio player that is connected to the TV using a
DIGITAL MEDIA PORT (DMPORT) adaptor.
Depending on the connected DIGITAL MEDIA PORT
adaptor, you can operate the connected equipment using the
TV as follows;
Using Optional Equipment
– Using the remote of the TV: N/x/X/m/M/F/f/G/
g// RETURN.
– Using the Options menu function: Press OPTIONS, and
select “Control Panel” or “Device Control (Menu).”
~
• Do not connect or disconnect a DIGITAL MEDIA PORT
adapter while the TV is turned on.
• The connected equipment is not charged when the TV is turned
off or in standby mode.
5 HDMI IN 1 or 2 HDMI 1 or
Digital video and audio signals are input from the connected
HDMI 2
equipment.
In addition, when you connect the equipment that is
qs HDMI 3 HDMI 3
compatible with control for HDMI, communication with the
connected equipment is supported. Refer to page 41 to set up
this communication.
If the equipment has a DVI socket, connect the DVI socket to
the HDMI IN socket through a DVI-HDMI adaptor interface
(not supplied), and connect the equipment’s audio out socket
to the audio in HDMI IN socket.
~
• The HDMI sockets support the following video inputs only:
480i, 480p, 576i, 576p, 720p, 1080i, 1080p and 1080/24p.
For PC video inputs, see page 50.
• Be sure to use only an authorised HDMI cable bearing the
HDMI logo. We recommend that you use a Sony HDMI
cable (high speed type).
• When connecting an audio system that is compatible with
control for HDMI, be sure to also connect it to the
DIGITAL AUDIO OUT (OPTICAL) socket.
6 LAN You can enjoy contents stored on DLNA-compatible devices
via a network (page 30).
7 /PC IN PC It is recommended to use a PC cable with ferrites, such as the
“Connector, D-sub 15” (ref. 1-793-504-11, available in Sony
Service Centre) or equivalent.
8
Connect to the audio output sockets to listen to the sound
L- -R
from the TV on Hi-Fi audio equipment.
9
Use an optical audio cable.
DIGITAL AUDIO
OUT (OPTICAL)
(Continu ed)
23
GB
Connect to Input symbol on
Description
screen
0 CAM
To use Pay Per View services.
(Conditional
For details, refer to the instruction manual supplied with your
Access Module)
CAM. To use the CAM, remove the “dummy” card from the
CAM slot, then turn off the TV and insert your CAM card
into the slot. When you are not using the CAM, we
recommend that you keep the “dummy” card in the CAM
slot.
~
• CAM is not supported in all countries. Please check with
your authorised dealer.
qa USB You can enjoy photo/music files stored in a Sony digital still
camera or camcorder through a USB cable or USB storage
device on your TV (page 26).
qd /L- -R
AV3 When connecting mono equipment, connect to the AV3
AV3
L socket.
qf i Headphones You can listen to TV sound through headphones.
24
GB
Option Description
Viewing Pictures from
PIP (in PC input
See page 26.
Connected Equipment
mode only)
PAP (except PC input
See page 25.
Switch on the connected equipment, then
mode and DIGITAL
perform one of the following operation.
MEDIA PORT
mode)
For equipment connected to the scart
Auto Adjustment (in
See page 39.
sockets using a fully-wired 21-pin scart lead
PC input mode only)
Start playback on the connected equipment.
Horizontal Shift (in
See page 39.
The picture from the connected equipment
PC input mode only)
appears on the screen.
Sleep Timer (except
See page 38.
PC input mode)
For an auto-tuned VCR/ DVD recorder
Power Saving See page 37.
In analogue mode, press PROG +/–, or the
Device Control
See page 23.
Using Optional Equipment
number buttons, to select the video channel.
(Menu) (in DIGITAL
MEDIA PORT mode
For a USB device
only)
See page 26.
Control Panel (in
See page 23.
DIGITAL MEDIA
For a Network device
PORT mode only)
See page 30.
Device Control (in
See page 29.
HDMI mode only)
For other connected equipment
Press / to display a list of connected
To view two pictures simultaneously
equipment. Press F/f to select the desired
– PAP (Picture and Picture)
input source, then press .
You can view two pictures (external input and
The highlighted item is automatically selected
TV programme) on the screen simultaneously.
if you do not perform any operation for two
Connect an optional equipment (page 22), and
seconds after pressing F/f.
make sure that images from the equipment
If you have set an input source to “Skip” in the
appear on the screen (page 25).
“AV Preset” menu (page 40), that input source
~
does not appear in the list.
• This function is not available for a PC input and
z
DIGITAL MEDIA PORT input.
• To return to normal TV mode, press DIGITAL or
• You cannot change the size of the pictures.
ANALOG.
• You cannot display analogue TV video in the TV
programme picture while displaying AV1, AV2 or
Using the Options menu
AV3 video in the external inputs picture.
Press OPTIONS to display the following
1 Press OPTIONS.
options when viewing pictures from connected
2 Press F/f to select “PAP”, then press .
equipment.
The picture from the connected equipment
Option Description
is displayed on the left, and the TV
Picture Mode (except
See page 35.
programme is displayed on the right.
PC input mode)
3 Press the number buttons or PROG +/– to
Display Mode (in PC
See page 35.
select the TV channel.
input mode only)
To return to single picture mode
Sound Mode See page 36.
Press RETURN.
Surround See page 36.
z
Speaker See page 41.
• The highlighted picture is audible. You can switch
Motionflow See page 37.
the audible picture by pressing G/g.
(Continu ed)
25
GB
To view two pictures simultaneously
– PIP (Picture in Picture)
Playing Back Photo/Music
You can view two pictures (PC input and TV
via USB
programme) on the screen simultaneously.
You can enjoy photo/music files stored in a
Connect a PC (page 22), and make sure that
Sony digital still camera or camcorder through
image from a PC appears on the screen.
a USB cable or USB storage media on your
1 Press OPTIONS to display the Options
TV.
menu.
1 Connect a supported USB device to the
2 Press F/f to select “PIP”, then press .
TV.
The picture from the connected PC is
2 Press HOME.
displayed in full size, and the TV
3 Press G/g to select “Photo” or “Music.”
programme is displayed in the small
screen.
4 Press F/f to select a USB device, then
You can use F/f/G/g to move the TV
press .
programme screen position.
In “Music”, “List View” appears. In
3 Press number buttons or PROG +/– to
“Photo”, “Thumbnail View” appears.
select the TV channel.
Press the yellow button to switch between
To return to single picture mode
“List View” and “Thumbnail View.”
Press RETURN.
5 Press F/f/G/g to select a file or folder,
z
then press .
• You can switch the audible picture by selecting
When you select a folder, select a file,
“Audio Swap” from the Options menu.
then press .
Playback starts.
Photo Playback Auto Start
The TV automatically starts photo playback
when the TV is turned on and a digital still
camera or other device storing photo files is
connected to the USB port and then turned on
(page 37).
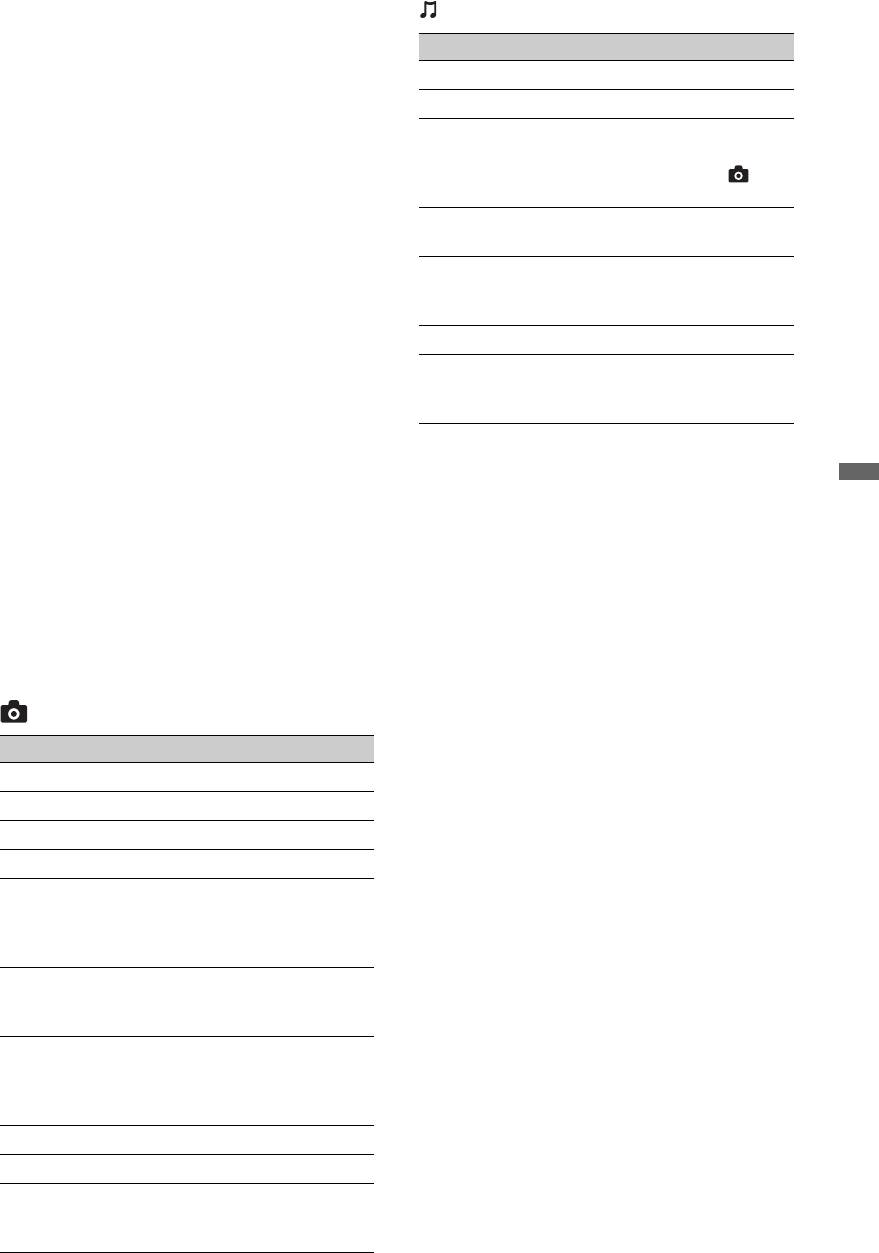
(Photo) Available Options
Option Description
Picture Mode See page 35.
Sound Mode See page 36.
Surround See page 36.
Cropping Crops a photograph.
Display map Displays a map of the
location where a photo
was shot along with the
photo itself.
Show Options Allows you to set repeat/
shuffle for photo
playback.
Photo Set-up Sets how playback should
be performed and what
effects to use during
slideshows.
Rotate and Save Rotates and saves
unprotected files.
26
GB
Option Description
– RAW (ARW/ARW 2.0 format files with this
extension “.arw.”) For preview only.
Speaker See page 41.
• When you connect a Sony digital still camera, set
Picture Frame Image Allows you to select a
the camera’s USB connection mode to Auto or
photograph to be
Mass Storage. For more information about USB
displayed as picture
connection mode, refer to the instructions supplied
frame.
with your digital camera.
Information Displays information
• USB playback is supported for the following
about the device, folders,
music file formats:
and files.
– MP3 (files with the extension “.mp3” that have
not been copyrighted)
(Music) Available Options
• USB Photo Viewer supports FAT12, FAT16 and
FAT32 file systems.
Option Description
• Depending on the exact file specifications, some
Sound Mode See page 36.
files, including those modified on a PC, cannot be
Surround See page 36.
played even if the file format is supported.
• Check the website below for updated information
Using Optional Equipment
Add to Slideshow Registers the background
music to be played during
about compatible USB devices.
a slideshow using
http://support.sony-europe.com/TV/compatibility/
(Photo).
Omit from Slideshow Cancels the registered
To display a photograph
background music.
— Picture Frame
Playback Options Allows music options to
You can display a photograph on the screen
be set for repeat, shuffle,
for a selected period of time. After that period,
or regular playback.
the TV automatically switches itself into
Speaker See page 41.
standby mode.
Information Displays information
1 Select a photograph.
about the device, folders,
and files.
You can select a photograph from the
connected USB device or preset picture
~
folder. For details on selecting a
• Picture quality may appear coarse when using
photograph, see page 26.
(Photo) because images may be enlarged
depending on the file. Also, images may not fill
2 Press OPTIONS while the selected
the entire screen depending on the image size and
photograph is displayed, then press F/f to
aspect ratio.
select “Picture Frame Image” and press
• Some photo files may take some time to be
.
displayed when using (Photo).
• The file name and folder name support only
3 Press RETURN repeatedly to return
English.
to the Home menu.
• While the TV is accessing the data on the USB
4 Press G/g to select “Photo”, then select
device, observe the following:
– Do not turn off the TV or connected USB
“Picture Frame” and press .
device.
The TV is switched to Picture Frame
– Do not disconnect the USB cable.
mode, and the selected photograph is
– Do not remove the USB device.
displayed on the screen.
The data on the USB device may be damaged.
To set the duration of displaying a
• Sony will not be held liable for any damage to, or
photograph
loss of, data on the recording media due to a
malfunction of any connected devices or the TV.
Press OPTIONS, then select “Duration”
• Playback does not start automatically if the TV is
and press . Then, select the duration,
turned on after connecting the digital still camera
and press .
or other device to the USB port.
The counter appears on the screen.
• USB playback is supported for the following
To return to the XMB™
photo file formats:
Press RETURN.
– JPEG (JPEG format files with the extension
“.jpg” and conforming to DCF or Exif)
(Continu ed)
27
GB

~
5 Select “Load GPS log files”, then press
• If the photograph is selected from a USB device, it
.
must remain connected to the TV.
6 Select the following items using F/f and
• If “Sleep Timer” is activated, the TV
automatically will switch into standby mode.
press , then press F/f to set.
–Time Zone
To display a photograph with the
–DST
location on the map
7 Select “OK”, then press .
When using an image capture device with GPS
The GPS log files are loaded.
function (digital still camera, etc.), it is
8 Disconnect the GPS unit and connect the
possible to display a photograph with a map of
the location where the photograph was taken
device on which the photograph is stored.
using a function of GPS for recording
9 Select a photograph (page 26).
longitude and latitude. Because map
10 Press the green/red buttons to zoom in/out
information is downloaded from the Internet
on the map.
online map service, the network connection
must be required and the TV has to be
connected to the network (page 30).
1 Select a photograph (page 26).
2 Press the green/red buttons to zoom in/out
on the map.
To change the display position of the map
on the TV screen, press the blue button
repeatedly.
~
• Because the Internet online map service is
provided by a third party, service may be changed
or terminated without prior notification to the
user.
• The position indicated on the map may differ
depending on the image capture device.
• Only a large-scale map that cannot be zoomed in
or out is displayed if the TV is not connected to
the Internet or the Internet online map service is
terminated.
• You can also display a slideshow with the location
on the map. Set “Photo Set-up” to “Simple with
map” (page 26).
z
• A map can be displayed in the case of
photograph’s EXIF data includes a date
information, and the associated longitude and
latitude information (“Log files”) has been
recorded using a Sony GPS unit. Follow the
procedure described below.
1 Connect the GPS unit to the USB port.
2 Press HOME.
3 Press G/g to select “Photo.”
4 Press F/f to select the GPS unit, then
press .
28
GB
To make the control for HDMI settings
Using BRAVIA Sync with
The control for HDMI settings must be set on
Control for HDMI
both the TV side and connected equipment
side. See “HDMI Set-up” on page 41 for the
The control for HDMI function enables the TV
TV side settings. For settings on the connected
to communicate with the connected equipment
equipment, refer to the operating instructions
that is compatible with the function, using
for that equipment.
HDMI CEC (Consumer Electronics Control).
For example, by connecting Sony equipment
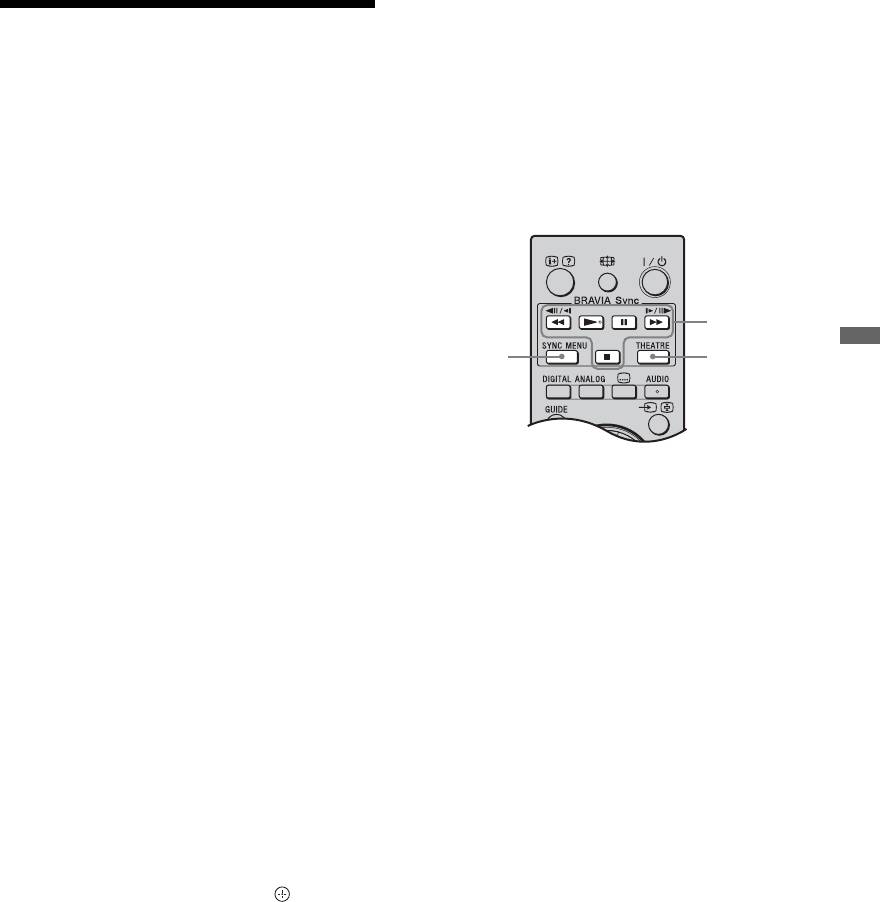
Buttons for using optional equipment
that is compatible with control for HDMI
(with HDMI cables), you can control them
together.
Be sure to connect the equipment correctly,
and make the necessary settings.
1
Control for HDMI
3
2
Using Optional Equipment
• Automatically turns the connected
equipment off when you switch the TV to
standby mode using the remote.
• Automatically turns the TV on and
1 m/N/X/M/x: You can operate the
switches the input to the connected
BRAVIA Sync-compatible equipment
equipment when the equipment starts to
that is connected to the TV.
play.
2 THEATRE
• If you turn on a connected audio system
You can set Theatre Mode on or off.
while the TV is on, the sound output
When Theatre Mode is set to on, the
switches from the TV speaker to the audio
optimum audio output (if the TV is
system.
connected with an audio system using an
• Adjusts the volume (2 +/–) and mutes the
HDMI cable) and picture quality for film-
sound (%) of a connected audio system.
based contents are automatically set.
• You can operate the connected Sony
z
equipment that has the BRAVIA Sync logo
• If you turn the TV off, Theatre Mode is also
by the TV remote by pressing:
turned off.
– N/x/X/m/M to operate the connected
3 SYNC MENU: Displays the menu of
equipment directly.
– SYNC MENU to display the menu of the connected
connected HDMI equipment. While
HDMI equipment on the screen.
viewing other input screens or TV
After displaying the menu, you can operate the
menu screen by using F/f/G/g and .
programmes, “HDMI Device Selection”
– OPTIONS to display “Device Control”, then select
is displayed when the button is pressed.
options from “Menu”, “Options”, and “Content
List” to operate the equipment.
– Refer to the instruction manual of the equipment for
~
available control.
• Control for HDMI (BRAVIA Sync) is only
available with the connected Sony equipment that
To connect the equipment that is
has the BRAVIA Sync logo or is compatible with
compatible with control for HDMI
control for HDMI.
Connect the compatible equipment and the TV
with an HDMI cable. When connecting an
audio system, be sure to also connect the
DIGITAL AUDIO OUT (OPTICAL) socket
of the TV and the audio system using an
optical audio cable. For details, see page 23.
29
GB
Using Network Features
With this TV, you can enjoy contents stored on
DLNA-compatible devices on the home
Enjoying Photo/Music Files
network.
via the Network
Devices that store and provide contents, such
as photo/music files, is called “server.” The
You can enjoy photo/music files on the server
TV receives the photo/music files from the
easily by selecting an icon on the Home menu
server via the network, and you can enjoy
of the TV.
them on the TV even in other rooms.
1 Press HOME.
To enjoy the home network, a DLNA-
2 Press G/g to select “Photo” or “Music.”
compatible device (VAIO, Cyber-shot, etc.) is
necessary as a server.
3 Press F/f to select a server, then press .
In “Music”, “List View” appears. In
“Photo”, “Thumbnail View” appears.
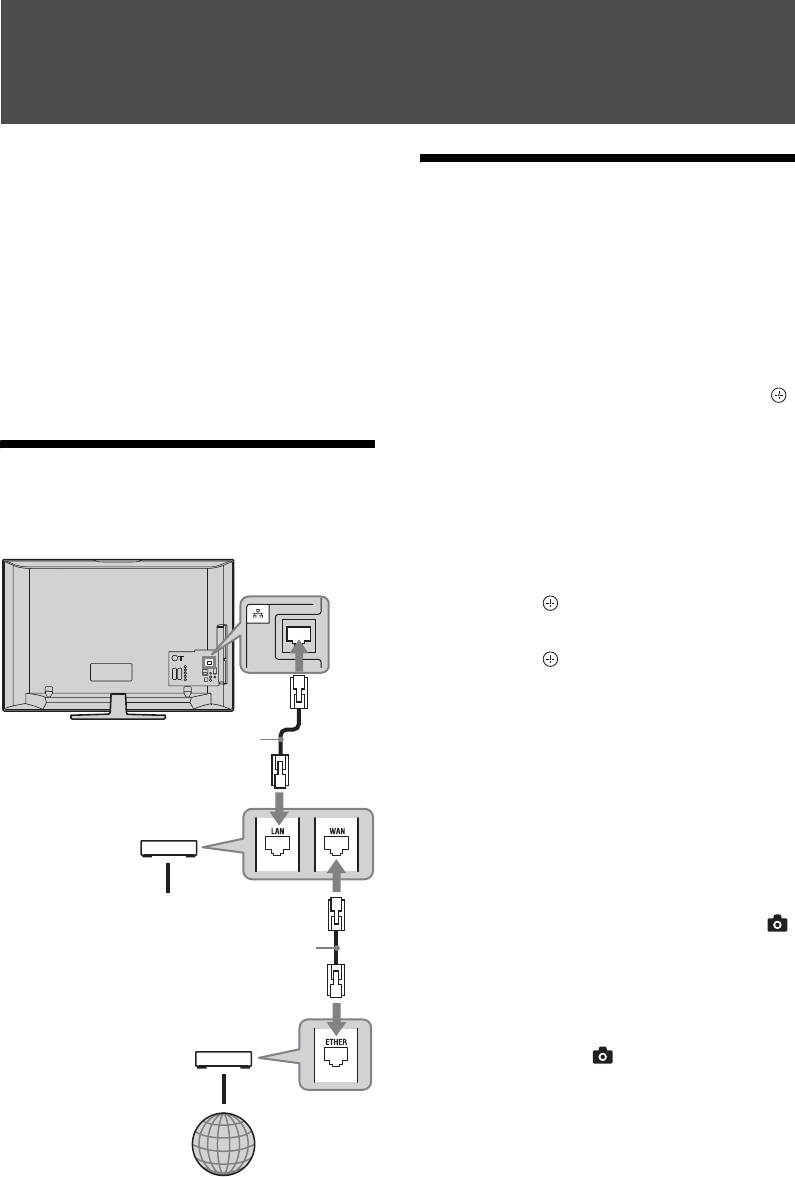
Connecting the TV to the
Press the yellow button to switch between
Network
“List View” and “Thumbnail View.”
If network devices do not appear,
TV
follow the steps on page 32.
4 Press F/f/G/g to select a file or folder,
then press .
When you select a folder, select a file,
then press .
Playback starts.
z
Network cable (not supplied)
• A map can be displayed with a photograph in the
case of longitude and latitude information has
been recorded to photograph’s EXIF data
(page 28).
Broadband router
~
• Depending on the network device, it may be
necessary to register the TV with the network
To network device
device.
• Picture quality may appear coarse when using
Network cable (not supplied)
(Photo) because images may be enlarged
depending on the file. Also, images may not fill
the entire screen depending on the image size and
aspect ratio.
DSL modem/
Cable modem
• Some photo files may take some time to be
displayed when using (Photo).
• The file name and folder name support only
English.
• To play the files which are received from a
network device, they need to have one of the
following file formats.
Internet
– Still images: JPEG format
– Music: MP3 format or linear PCM format
Depending on the network device, the file format
may be converted before transfer. In such cases,
the file format resulting after conversion is used
for playback. For details, see the instruction
30
GB
manual for the network device being used. Even
(Music) Available Options
files conforming to one of the file formats given
above cannot be played in some cases.
Option Description
Sound Mode See page 36.
To enjoy photographs and music on
Surround See page 36.
the TV screen by operating other
Add to Slideshow Registers the background
device
music to be played during
– Renderer
a slideshow using
(Photo).
“Renderer” is a feature for playing photo files
and music files stored in other network devices
Omit from Slideshow Cancels the registered
background music.
(digital still camera, mobile phone, etc.) on the
TV by operating the controller device in
Playback Options Allows music options to
question. To use this feature, a renderer-
be set for repeat, shuffle,
or regular playback.
compatible device such as a digital still camera
or mobile phone is required as the controller.
Speaker See page 41.
Refer as well to the instruction manual
Information Displays information
supplied with the controller.
about the device, folders,
and files.
1 Set “Renderer Function”, “Renderer
Access Control” and “Renderer Set-up” in
“Network Settings” if necessary
Using Network Features
(page 46).
2 Play the file selected using the controller
on the TV.
The file is played on the TV over the
connected network.
Use the controller or the TV’s remote to
perform operations during playback.
(Photo) Available Options
Option Description
Picture Mode See page 35.
Sound Mode See page 36.
Surround See page 36.
Cropping Crops a photograph.
Display map Displays a map of the
location where a photo
was shot along with the
photo itself.
Show Options Allows you to set repeat/
shuffle for photo
playback.
Photo Set-up Sets how playback should
be performed and what
effects to use during
slideshows.
Rotate Rotates files.
Speaker See page 41.
Information Displays information
about the device, folders,
and files.
31
GB

z
Checking the Network
• If “Connection successful.” does not appear, see
“Troubleshooting” on page 51 and check the
Connection
connections and settings.
If your home network has a DHCP server, this
step can be skipped.
Enter the respective (alphanumeric) values for
your router. The items that need to be set may
differ, depending on the Internet service
provider or the router. For details, refer to the
instruction manuals that have been provided
by your Internet service provider or supplied
with the router.
1 Press HOME.
2 Press G/g to select “Settings.”
3 Press F/f to select “Network Settings”,
then press .
4 Select “Network”, then press .
5 Select “IP Address Settings”, then press
.
6 Select an item, and press .
When you select “DHCP (DNS
automatic)”
Go to step 7.
When you select “DHCP (DNS manual)”
Set “Primary DNS”/“Secondary DNS”
using F/f/g and the number buttons.
When you select “Manual”
Set the following items using F/f/g and
the number buttons.
•IP Address
• Subnet Mask
• Default Gateway
• Primary DNS/Secondary DNS
If your ISP has a specific proxy server
setting
Press OPTIONS, then press F/f to select
“Proxy Set-up” and press . Then enter
the settings.
7 Press .
8 Select “Test”, then press .
9 Select “Yes”, then press .
The network diagnostic starts.
When the message “Connection
successful.” appears, press RETURN
repeatedly to exit.
32
GB
If you cannot connect to your home
Adjusting the Server
network
Display Settings
The TV can check if the server is being
correctly recognised.
You can select home network servers to be
displayed on the Home menu. Up to 10 servers
1 Press HOME.
can be displayed on the Home menu
2 Press G/g to select “Settings.”
automatically.
3 Press F/f to select “Network Settings”,
1 Set the server to allow connections from
then press .
the TV.
4 Select “Server Diagnostics”, then press
For details on settings on the server, refer
.
to the Operating Instructions supplied
5 Select “Yes”, then press .
with the server.
The server diagnostic starts.
2 Press HOME.
When the server diagnostic is complete,
3 Press G/g to select “Settings.”
the diagnostic result list appears.
4 Press F/f to select “Network Settings”,
6 Select the server you want to confirm,
then press .
then press .
5 Select “Server Display Settings”, then
The diagnostic results of the selected
press .
server appear.
Using Network Features
6 Select the server you want to display on
If the diagnostic results indicate a failure,
the Home menu, then press .
look up the possible causes and what to
do, and check connections and settings.
7 Select “Yes”, then press .
For details, see “Troubleshooting” on
page 51.
To set the server not to be displayed on
the Home menu
In step 7, press F/f to select “No”, then press
.
Available Options (on the connected
server settings display)
Option Description
Delete All Deletes all connected
servers.
Update List Updates the server list to
the latest information.
Information Displays information
about the connected server
currently selected.
Delete Deletes the connected
server currently selected.
33
GB
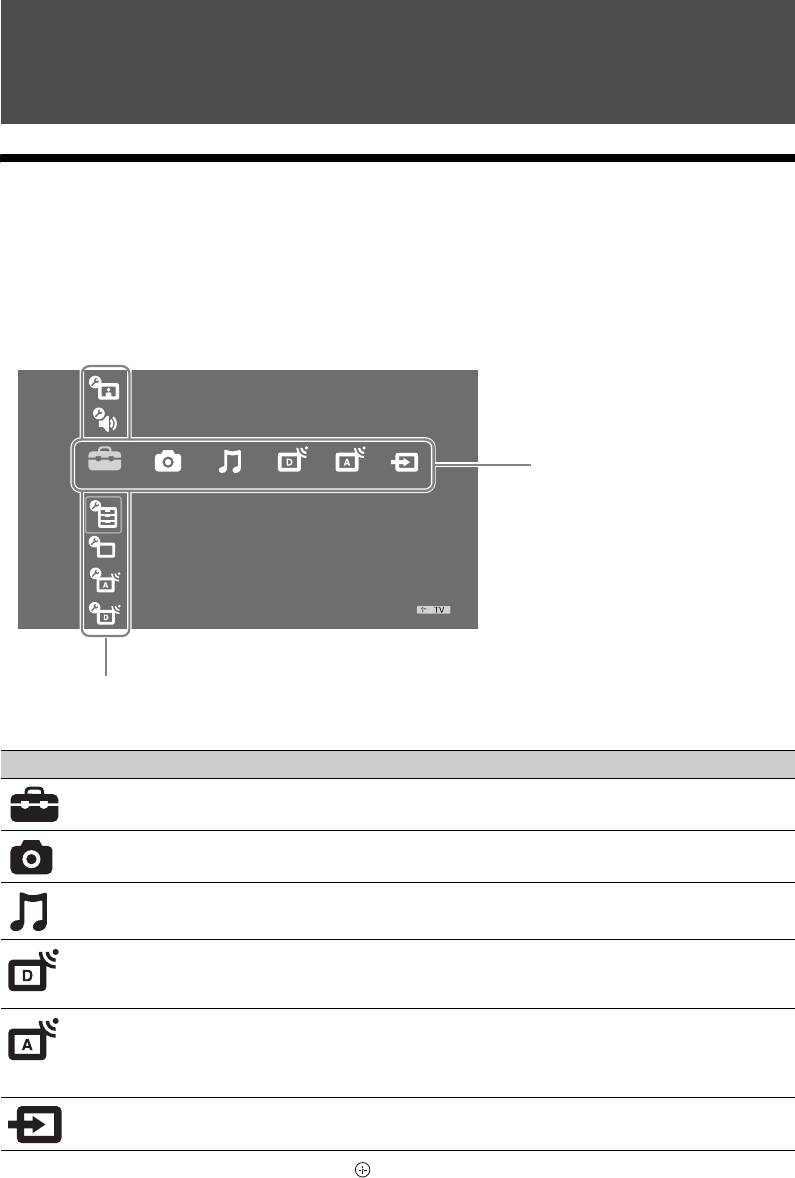
Using MENU Functions
Navigating through TV Home Menu (XMB™)
The XMB™ (XrossMediaBar) is a menu of BRAVIA features and input sources displayed on the
TV screen. The XMB™ is an easy way to select programming and adjust settings on your BRAVIA
TV.
1 Press HOME.
The TV Home menu appears on the screen.
Picture
Sound
Media Category Bar
Settings
Features
Set-up
Analogue Set-up
Digital Set-up
Category Object Bar
2 Press G/g to select the category.
Media category icon Description
Settings You can make advanced settings and adjustments. For details about
settings, see page 35.
Photo You can enjoy photo files via USB devices or the network (page 26, 30).
Music You can enjoy music files via USB devices or the network (page 26, 30).
Digital You can select a digital channel, favourite list (page 21), or Guide
(page 17, 20).
You can also select a channel using the number buttons or PROG +/–.
Analogue You can select an analogue channel.
You can also select a channel using the number buttons or PROG +/–.
To hide the list of analogue channels, set “Programme List Display” to
“Off” (page 42).
External Inputs You can select equipment connected to the TV.
To assign a label to an external input, see “AV Preset” (page 40).
3 Press F/f to select the item, then press .
4 Follow the instructions on the screen.
5 Press HOME to exit.
~
• The options you can adjust vary depending on the situation.
• Unavailable options are greyed out or not displayed.
34
GB
Settings
Picture
Picture Mode Selects the picture mode except for PC input source. “Picture Mode” includes
options best suited for video and photographs, respectively. The options that can be
selected differ depending on the input source.
Vivid For enhanced picture contrast and sharpness.
Standard For standard picture. Recommended for home entertainment.
Cinema For viewing film-based content. Most suitable for viewing in
a theatre-like environment.
Photo-Vivid For viewing photographs. Enhances picture contrast and
sharpness.
Photo-Standard For viewing photographs. Provides the optimum picture
quality for viewing in the home.
Photo-Original For viewing photographs. Represents the picture quality used
when imaging developed photographs.
Display Mode (only in
Selects the display mode for PC input source.
PC Input/ HDMI PC
Video For video images.
Input)
Text For text, charts or tables.
Reset Resets all picture settings except “Picture Mode” and “Display Mode” (only in PC
mode) to the factory settings.
Backlight Adjusts the brightness of the backlight.
Using MENU Functions
Contrast Increases or decreases picture contrast.
Brightness Brightens or darkens the picture.
Colour Increases or decreases colour intensity.
Hue Increases or decreases the green and red tones.
z
• “Hue” can only be adjusted for an NTSC colour signal (e.g., U.S.A. video tapes).
Colour Temperature Adjusts the whiteness of the picture.
Cool Gives the white colours a blue tint.
Neutral Gives the white colours a neutral tint.
Warm 1/Warm 2 Gives white colours a red tint. “Warm 2” gives a redder tint
than “Warm 1.”
z
• “Warm 1” and “Warm 2” are not available when “Picture Mode” is set to “Vivid”
(or “Photo-Vivid”).
Sharpness Sharpens or softens the picture.
Noise Reduction Reduces the picture noise (snowy picture) in a weak broadcast signal.
Auto Automatically reduces the picture noise (in analogue mode
only).
High/Medium/
Modifies the effect of the noise reduction.
Low
Off Turns off the “Noise Reduction” feature.
MPEG Noise
Reduces picture noise in MPEG-compressed videos. This is effective when
Reduction
viewing a DVD or digital broadcast.
(Continu ed)
35
GB
Advanced Settings Allows you to set “Picture” settings in more detail. These settings are not available
when “Picture Mode” is set to “Vivid”(or “Photo-Vivid”).
Adv. Contrast
Automatically adjusts “Backlight” and “Contrast” to the most
Enhancer
suitable settings judging from the brightness of the screen.
This setting is especially effective for dark images scenes. It
will increase the contrast distinction of the darker picture
scenes.
Live Colour Makes colours more vivid.
Colour Space Changes the colour reproduction gamut. “Wide” reproduces
the vivid colour and “Standard” reproduces the standard
colour.
~
• “Live Colour” is not available when “Colour Space” is set to “Standard.”
“Noise Reduction”, “MPEG Noise Reduction” and “Advanced Settings” are not available for PC.
Sound
Sound Mode Selects the sound mode.
Dynamic Enhances the treble and bass sounds.
Standard For standard sounds.
Clear Voice Makes voice sound clearer.
Reset Resets all the sound settings to the factory settings excluding “Dual Sound.”
Treble Adjusts higher-pitched sounds.
Bass Adjusts lower-pitched sounds.
Balance Emphasises left or right speaker balance.
Auto Volume Keeps a constant volume level even when volume level gaps occur (e.g., adverts
tend to be louder than programmes).
Volume Offset Adjusts the volume level of the current input relative to other inputs.
Surround S-FORCE Front
Provides a virtual surround sound experience made possible
Surround
using just two front speakers.
Off Selects for normal stereo or mono reception.
Voice Zoom Adjusts the sound level of human voices. For example, if the voice of a news
announcer is indistinct, you can turn up this setting to make the voice louder.
Conversely, if you are watching a sports programme, you can turn down this
setting to soften the voice of the commentator.
Sound Booster Produces a fuller sound for more impact, by emphasizing the treble and bass
sounds.
Dual Sound Selects the sound from the speaker for a stereo or bilingual broadcast.
Stereo/Mono For a stereo broadcast.
A/B/Mono For a bilingual broadcast, select “A” for sound channel 1, “B”
for sound channel 2, or “Mono” for a mono channel, if
available.
z
• If you select other equipment connected to the TV, set “Dual Sound” to “Stereo”,
“A” or “B.”
~
• “Treble”, “Bass”, “Balance” and “Auto Volume” are not available when “Speaker” is set to “Audio System”
and headphones are connected.
36
GB
Features
USB Auto Start Automatically starts photo playback when the TV is turned on and a digital still
camera or other device storing photo files is connected to the USB port and then
turned on.
~
• Playback does not start automatically if the TV is turned on after connecting the
digital still camera or other device to the USB port.
Slideshow Select to view JPEG files as a slideshow.
Thumbnail View Select to view JPEG files as a thumbnail.
Off Select to disable this function.
Quick Start The TV turns on faster than usual within two hours after switching to standby
mode. However, power consumption in standby mode is 20 Watt higher than
usual.
Power Saving Selects the power saving mode to reduce the power consumption of the TV. When
“Picture Off” is selected, the picture is switched off and the (Picture Off)
indicator on the TV front panel lights up in green. The sound remains unchanged.
Standard Power Default settings.
Reduced Power Reduces the power consumption of the TV.
Picture Off Switches off the picture. You can listen to the sound with the
picture off.
Light Sensor On Automatically optimises the picture settings according to the
ambient light in the room.
Off Turns off the “Light Sensor” feature.
~
Using MENU Functions
• Be sure not to put anything over the sensor, as its function may be affected. See
page 14 for the location of the light sensor.
Logo Illumination Lights up and turns off the Sony logo on the front of the TV.
Motionflow Provides smoother picture movement and reduces picture blur.
High Provides smoother picture movement such as for film-based
contents.
Standard Provides smooth picture movement. Use this setting for
standard use.
Off Use this setting when the “High” and “Standard” settings
result in noise.
~
• Depending on the video, you may not see the effect visually, even if you have
changed the setting.
Film Mode Provides an improved picture quality which is optimised for film when playing
DVD images taken on film.
Auto 1/Auto 2 “Auto 1” provides smoother picture movement than the
original film-based content. “Auto 2” provides the original
film-based content as is.
Off Turns off the “Film Mode” feature.
~
• If the image contains irregular signals or too much noise, “Film Mode” will be
automatically turned off even if “Auto 1”/“Auto 2” is selected.
• “Film Mode” is not available when “Video/Photo” is set to “Photo” or when
photograph is detected if “Video-A” is set.
(Continu ed)
37
GB

Game/Text Mode Provides the optimum screen for viewing images with fine lines and characters that
are input from video game equipment and PCs. Set to “On” for the sharp display of
fine lines or characters.
Video/Photo Provides suitable image quality by selecting the option depending on the input
source (video or photograph data).
Video-A Sets suitable image quality, depending on the input source,
video data or photograph data when directly connecting Sony
HDMI output-capable equipment that supports “Video-A”
mode.
Video Produces suitable image quality for moving pictures.
Photo Produces suitable image quality for still images.
~
• The setting is fixed to “Video” when “Video-A” mode is not supported on the
connected equipment, even if “Video-A” is selected.
• Only available for HDMI 1, HDMI 2, HDMI 3 and Component in format 1080i
or 1080p.
x.v.Colour Displays moving pictures that is more faithful to the original source by matching
the colour space of source.
~
• The setting is fixed to “Normal” when the input signal is HDMI (RGB), even if
“x.v.Colour” is selected.
• Only available for HDMI 1, HDMI 2, HDMI 3 and Component in format 720p,
1080i or 1080p.
Photo Colour Space Selects the option (sRGB, sYCC, Adobe RGB) to match the output colour space
within the output signal from the equipment connected to the HDMI, component
input jacks or USB.
~
• Select “sYCC” when using the equipment that supports “x.v.Colour.”
• Only available for HDMI 1, HDMI 2, HDMI 3 and Component in format 1080i
or 1080p.
• Not available when “Colour Space” is set to “Wide” (page 36).
Timer Settings Sets the timer to turn on/off the TV.
Sleep Timer Sets a period of time after which the TV automatically
switches itself into standby mode.
When the “Sleep Timer” is activated, the (Timer) indicator
on the TV front panel lights up in orange.
z
• If you switch off the TV and switch it on again, “Sleep
Timer” is reset to “Off.”
• A notification message appears on the screen one minute
before the TV switches to standby mode.
On Timer
On Timer Sets the timer to turn on the TV from
Settings
standby mode.
Timer Mode Sets the desired day(s) of the week you
want the timer to turn on the TV.
Time Sets the time to turn on the TV.
Duration Sets how long you want the TV to stay on
before switching to standby mode again.
Clock Set Allows you to adjust the clock manually. When the TV is
receiving digital channels, the clock cannot be adjusted
manually since it is set to the time code of the broadcasted
signal.
38
GB
Set-up
Auto Start-up Starts the initial set-up to select the language, country and location, and tune in all
available digital and analogue channels. Usually, you do not need to do this
operation because the language and country will have been selected and channels
already tuned when the TV was first installed (page 6). However, this option
allows you to repeat the process (e.g., to retune the TV after moving house, or to
search for new channels that have been launched by broadcasters).
Language Selects the language in which the menus are displayed.
Screen Settings Screen Format See “To change the screen format manually” on page 16.
Auto Format Automatically changes the screen format according to the
input signal. To keep your setting, select “Off.”
Display Area Adjusts the picture display area in 1080i/p and 720p sources
when “Screen Format” is set to “Wide.”
Auto During digital broadcasts, displays
pictures in accordance with the settings
recommended by the broadcast station.
Full Pixel Displays pictures in their original size.
Normal Displays pictures in their recommended
size.
Horizontal Shift Adjusts the horizontal position of the picture.
Vertical Shift Adjusts the vertical position of the picture when “Screen
Format” is set to “Smart”, “Zoom” or “14:9.”
Vertical Size Adjusts the vertical size of the picture when “Screen Format”
is set to “Smart”, “Zoom” or “14:9.”
PC Settings Screen Format Selects a screen format for displaying input from your PC.
Using MENU Functions
Full 1 Enlarges the picture to fill the vertical
display area, keeping its original
horizontal-to-vertical aspect ratio.
Full 2 Enlarges the picture to fill the display
area.
Reset Resets the PC screen settings to the factory settings.
Auto Adjustment Automatically adjusts the display position, phase and pitch of
the picture when the TV receives an input signal from the
connected PC.
z
• “Auto Adjustment” may not work well with certain input
signals. In such cases, manually adjust “Phase”, “Pitch” and
“Horizontal Shift.”
Phase Adjusts the phase when the screen flickers.
Pitch Adjusts the pitch when the picture has unwanted vertical
stripes.
Horizontal Shift Adjusts the horizontal position of the picture.
Power
Switches the TV to standby mode if no signal is received for
Management
30 seconds in the PC input.
(Continu ed)
39
GB
AV Set-up AV Preset Assigns a name to any equipment connected to the side and
rear sockets. The name will be displayed briefly on the screen
when the equipment is selected. You can skip an input source
that is not connected to any equipment.
1 Press F/f to select the desired input source, then press
.
2 Press F/f to select the desired option below, then press
.
-, CABLE, SAT,
Uses one of the preset labels to assign a
VCR, DVD/BD,
name to connected equipment.
GAME, AUDIO
SYSTEM, CAM,
PC
Edit Creates your own label.
1 Press F/f to select the desired letter
or number (“_” for a blank space),
then press g.
If you input a wrong character
Press G/g to select the wrong
character. Then, press F/f to select
the correct character.
2 Repeat the procedure in step 1 until
the name is completed.
3 Select “OK”, then press .
Skip Skips an input source that is not
connected to any equipment when you
press F/f to select the input source.
AV2 Input Sets a signal to be input through the socket labelled /
/ AV2 on the rear of the TV.
Auto Switches automatically among the signals
of RGB input, S Video input, Composite
video input depending on the input
signal.
RGB Inputs the RGB signal.
S Video Inputs the S Video signal.
Composite Inputs the Composite video signal.
AV2 Output Sets a signal to be output through the socket labelled /
/ AV2 on the rear of the TV. If you connect a
VCR/ DVD recorder or other recording equipment to the
/ / AV2 socket, you can then record from the
equipment connected to other sockets of the TV.
TV Outputs a broadcast.
Auto Outputs whatever is being viewed on the
screen (except signals from the HDMI IN
1, HDMI IN 2, HDMI IN 3, /
COMPONENT IN and / PC IN
sockets).
40
GB
