Sony KDL-19L4000 – page 8
Manual for Sony KDL-19L4000
Table of contents
33
SE
Öv
ri
g i
n
fo
rm
at
ion
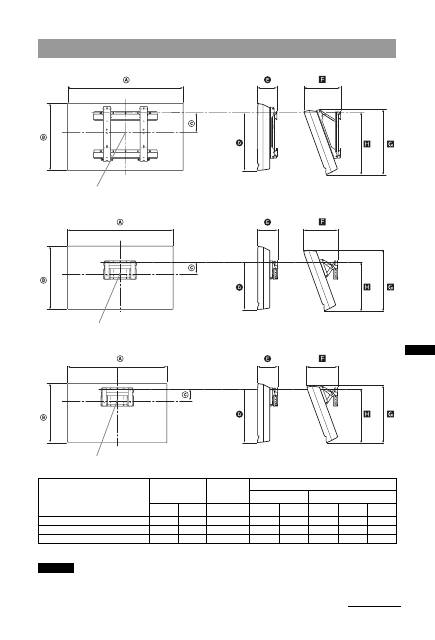
KDL-32L40xx
KDL-26L40xx
KDL-19L40xx
Enhet: mm
Värdena i ovanstående tabell kan variera något beroende på installationen.
Väggen där TV:n ska hängas upp måste vara tillräckligt stark för att kunna bära upp en vikt på åtminstone fyra
gånger TV-apparatens vikt. Se ”Specifikationer” (sidan 35) avseende dess vikt.
Tabell över TV:ns installationsmått
Modellnamn
Bildskärmsmått
Djup vid
skärmens
mittpunkt
Höjd vid olika monteringsvinklar
Vinkel (0
°
)
Vinkel (20
°
)
A
B
C
D
E
F
G
H
KDL-32L40xx
807
548
172
485
167
304
532
513
KDL-26L40xx
674
470
92
352
153
258
456
357
KDL-19L40xx
479
376
125
339
136
215
362
340
Skärmens mittpunkt
Skärmens mittpunkt
Skärmens mittpunkt
VARNING
Fortsättning
34
SE
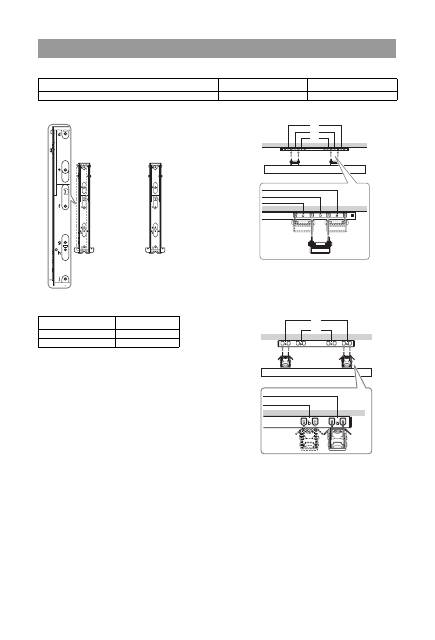
KDL-32L40xx
* Hakposition ”a” och ”b” kan inte användas för modellen i tabellen ovan.
KDL-26L40xx/KDL-19L40xx
Figurer och tabeller över skruvarnas och hakens placering
Modellnamn
Skruvarnas placering
Hakens placering
KDL-32L40xx
e, g
c
Modellnamn
Hakens placering
KDL-26L40xx
a
KDL-19L40xx
b
Skruvarnas placering
Hakens placering
b*
a*
c
b
a
35
SE
Öv
ri
g i
n
fo
rm
at
ion
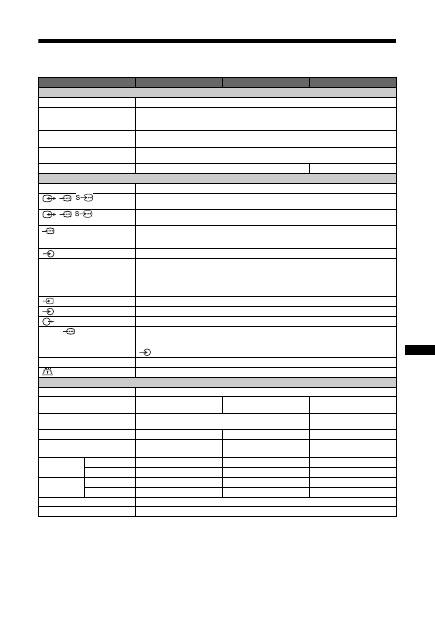
Specifikationer
*
1
AV1-utgångar endast tillgängliga för analog TV.
*
2
AV2-utgångar till den aktuella bildskärmen (förutom PC, HDMI1, 2, Component 1080i).
*
3
Specificerad standby-effekt uppnås när TV:n har avslutat nödvändiga interna processer.
Vi förbehåller oss rätten att ändra design och specifikationer utan föregående meddelande.
Modellbeteckning
KDL-32L40xx
KDL-26L40xx
KDL-19L40xx
System
Skärmsystem
LCD-skärm (bildskärm med flytande kristaller)
TV-system
Beroende på ditt val av land/region
Analogt: B/G/H, D/K, L, I
Digitalt: DVB-T
Färg/videosystem
Analogt: PAL, SECAM NTSC 3.58, 4.43 (endast videoingång)
Digitalt: MPEG-2 MP@ML
Kanaltäckning
Analogt: 48.25 - 855.25 MHz
Digitalt: VHF Band III (177.5 - 226.5 MHz)/UHF E21 - E69 (474 - 858 MHz)
Ljudutgång
10 W + 10 W (RMS)
5 W + 5 W (RMS)
In-/utgångar
Antenn
75 ohms extern anslutning för VHF/UHF
/
/
AV1
*
1
21-stifts scart-anslutning inklusive ljud/videoingång, RGB-ingång, S-Videoingång och ljud/
videoutgång för analog TV.
/
/
AV2
*
2
21-stifts scart-anslutning inklusive ljud/videoingång, RGB-ingång, S-Videoingång och ljud/
videoutgång.
COMPONENT IN
Understödda format: 1080i, 720p, 576p, 576i, 480p, 480i
Y: 1 Vp-p, 75 ohm, 0,3 V negativ synk/P
B
/C
B
: 0,7 Vp-p, 75 ohm/
P
R
/C
R
: 0,7 Vp-p, 75 ohm
COMPONENT IN
Ljudingång (phonokontakt)
HDMI IN 1, 2
Video: 1080i, 720p, 576p, 576i, 480p, 480i
Ljud: Tvåkanalig linjär PCM
32, 44,1 och 48 kHz, 16, 20 och 24 bitar
PC (se tabell)
Analogt ljud (minikontakt) (endast HDMI IN 2)
AV3
Videoingång (phonokontakt)
AV3
Ljudingång (phonokontakt)
Ljudutgång (vänster/höger) (phonokontakt)
PC IN
PC-ingång (15 Dsub) (se sida 36)
G: 0,7 Vp-p, 75 ohm, icke synk på Grön/B: 0,7 Vp-p, 75 ohm, icke synk på Grön/
R: 0,7 Vp-p, 75 ohm, icke synk på Grön
PC-ljudingång (minikontakt)
i
Utgång för hörlurar
CAM-plats (villkorlig åtkomstmodul)
Strömförsörjning och övrigt
Nätspänning
220–240 volt AC, 50 Hz
Skärmstorlek
32 tum (ungefär 81,3 cm mätt
diagonalt)
26 tum (ungefär 66,1 cm mätt
diagonalt)
19 tum (ungefär 48,1 cm mätt
diagonalt)
Bildupplösning
1 366 punkter (horisontellt) × 768 linjer (vertikalt)
1 680 punkter (horisontellt) ×
1 050 linjer (vertikalt)
Effektförbrukning
155 W
98 W
48 W
Effektförbrukning i viloläge*
3
(standby)
0,5 W eller mindre
0,5 W eller mindre
1 W eller mindre
Mått
(b × h × d)
med ställ
Cirka 80,7 × 58,5 × 24,2 cm
Cirka 67,4 × 51,0 × 24,2 cm
Cirka 47,9 × 41,3 × 19,1 cm
utan ställ
Cirka 80,7 × 54,8 × 10,1 cm
Cirka 67,4 × 47,0 × 9,5 cm
Cirka 47,9 × 37,6 × 7,6 cms
Vikt
med ställ
Cirka 15,0 kg
Cirka 11,7 kg
Cirka 5,8 kg
utan ställ
Cirka 13,0 kg
Cirka 9,5 kg
Cirka 5,3 kg
Medföljande tillbehör
Se ”1: Kontrollera tillbehör” på sidan 4.
Extra tillbehör
Läs ”Installera tillbehören (Väggfäste)” på sidan 32.
36
SE
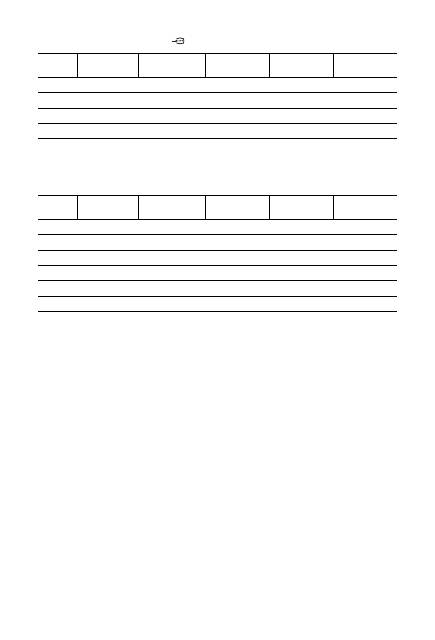
Referenstabell för PC-insignal för PC IN
• PC-ingången på denna TV stöder ej ”Synk på Grön” eller ”KompositSynk”.
• PC-ingången på denna TV stöder ej sammanflätade signaler.
• PC-ingången på denna TV stöder signaler i ovanstående tabell med en vertikal frekvens på 60 Hz.
Referenstabell över PC-insignaler för HDMI IN 1, 2
Signaler
Horisontellt
(bildpunkter)
Vertikalt (linjer)
Horisontell
frekvens (kHz)
Vertikal
frekvens (Hz)
Standard
VGA
640
480
31,5
60
VGA
SVGA
800
600
37,9
60
VESA riktlinjer
XGA
1024
768
48,4
60
VESA riktlinjer
WXGA
1280
768
47,8
60
VESA
Signaler
Horisontellt
(bildpunkter)
Vertikalt (linjer)
Horisontell
frekvens (kHz)
Vertikal
frekvens (Hz)
Standard
VGA
640
480
31,5
60
VGA
SVGA
800
600
37,9
60
VESA riktlinjer
XGA
1024
768
48,4
60
VESA riktlinjer
WXGA
1280
768
47,4
60
VESA
WXGA
1280
768
47,8
60
VESA
WXGA
1360
768
47,7
60
VESA

37
SE
Öv
ri
g i
n
fo
rm
at
ion
Felsökning
Kontrollera om standby-indikatorn
1
blinkar med rött sken.
Om den blinkar
Den självdiagnostiska funktionen är aktiverad.
Tryck på
1
på TV:ns översta kant för att stänga av den.
Dra ur nätkabeln och informera din återförsäljare eller ditt
Sony-servicecenter.
Om den inte blinkar
1
Kontrollera punkterna i nedanstående
tabell.
2
Om problemet kvarstår, kontakta en
auktoriserad servicetekniker.
Bild
Ingen bild (skärmen är mörk) och inget ljud
• Kontrollera antennanslutningen.
• Anslut TV:n till eluttaget och tryck på
1
upptill på
TV:n.
• Om standby-indikatorn
1
lyser med rött sken, tryck på
"/1
.
Ingen bild eller ingen menyinformation från
utrustning ansluten till Scart-kontakten
• Tryck på
för att visa listan över ansluten utrustning
och välj sedan önskad ingång.
• Kontrollera anslutningen mellan den externa
utrustningen och TV:n.
Dubbla bilder eller spökbilder
• Kontrollera antennanslutningen.
• Kontrollera antennens placering och inriktning.
På skärmen syns bara snö och brus
• Kontrollera om antennen är av eller böjd.
• Kontrollera om antennens livslängd har löpt ut (3-5 år
vid normal användning, 1-2 år vid havet).
Förvrängd bild (prickade linjer eller band)
• Håll TV:n borta från elektriska störningskällor såsom
bilar, motorcyklar, hårtorkar eller optisk utrustning.
• När extra utrustning installeras, se till att det finns lite
fritt utrymme mellan utrustningen och TV:n.
• Kontrollera antennanslutningen.
• Håll antennkabeln på avstånd från andra
anslutningskablar.
Bild- eller ljudstörningar när du tittar på en TV-
kanal
• Justera Fininställningsfunktionen ”AFT” för att erhålla
en bättre bildmottagning (sidan 28).
En del små svarta punkter och/eller ljuspunkter
syns på skärmen
• Bilden på skärmenheten är uppbyggd av bildpunkter
(pixels). Små svarta punkter och/eller ljuspunkter
(pixels) på bildskärmen indikerar inte en felfunktion.
Ingen färg på färgprogram
• Välj ”Normalinst.” (sidan 23).
Ingen färg eller oregelbunden färg vid visning av
signal från
COMPONENT IN-kontakterna
• Kontrollera anslutningen för
COMPONENT IN-
kontakterna och kontrollera att alla kontakter sitter
ordentligt i sina respektive socklar.
Ljud
Inget ljud, men bra bild
• Tryck på
2
+ eller
%
(Mute).
• Kontrollera om ”Högtalare” är inställd på ”TV-
högtalare” (sidan 24).
Kanaler
Önskad kanal kan inte väljas
• Växla mellan digitalt och analogt läge och välj önskad
digital/analog kanal.
Vissa kanaler är tomma
• Kanal avsedd endast för kodade/abonnerade tjänster.
Abonnera på betal-TV-tjänsten.
• Kanal används endast för data (ingen bild eller inget
ljud).
• Kontakta TV-stationen för sändningsinformation.
Digitala kanaler visas inte
• Hör efter hos en lokal installatör om digitala sändningar
är tillgängliga i ditt område.
• Byt till en kraftigare antenn (bättre förstärkning).
Allmänt
TV:n stängs av automatiskt (TV:n ställs i standby-
läge)
• Kontrollera om ”Avstängn.timer” är aktiverad (sida 26).
• Om ingen signal tas emot, och TV:ns inställning inte
ändras på något sätt under 15 minuter, ställs TV:n
automatiskt i standby-läge.
Fjärrkontrollen fungerar inte
• Byt ut batterierna.
HDMI-apparater visas inte på ”HDMI-enhetslista”
• Kontrollera att din utrustning är kompatibel med
kontroll för HDMI.
2
GB
Thank you for choosing this Sony product.
Before operating the TV, please read this manual
thoroughly and retain it for future reference.
• Any functions related to Digital TV (
) will only
work in countries or areas where DVB-T (MPEG2)
digital terrestrial signals are broadcasted. Please confirm
with your local dealer if you can receive a DVB-T signal
where you live.
• Although this TV set follows DVB-T specifications,
compatibility with future DVB-T digital terrestrial
broadcasts cannot be guaranteed.
• Some Digital TV functions may not be available in some
countries.
•
is a registered trademark of the DVB Project
• HDMI, the HDMI logo and High-Definition Multimedia
Interface are trademarks or registered trademarks of
HDMI Licensing LLC.
The “xx” that appears on the model name, corresponds to
two numeric digits related to design or colour variation.
Introduction
Notice for Digital TV function
The manufacturer of this product is Sony
Corporation, 1-7-1 Konan Minato-ku Tokyo, 108-
0075 Japan. The Authorized Representative for EMC
and product safety is Sony Deutschland GmbH,
Hedelfinger Strasse 61, 70327 Stuttgart, Germany.
For any service or guarantee matters please refer to
the addresses given in separate service or guarantee
documents.
Trademark information
About the model name in this manual
3
GB
GB
Safety information.............................................................................................................8
Precautions......................................................................................................................10
Overview of the remote ..................................................................................................11
Overview of the TV buttons and indicators ..................................................................12
Watching TV ....................................................................................................................13
Checking the Digital Electronic Programme Guide (EPG)
.................................16
Using the Digital Favourite list
.............................................................................17
Connecting optional equipment ....................................................................................18
Viewing pictures from connected equipment ..............................................................19
Using control for HDMI ...................................................................................................20
Navigating through menus.............................................................................................21
Picture Adjustment menu...............................................................................................22
Sound Adjustment menu................................................................................................24
Features menu.................................................................................................................25
Set-up menu ....................................................................................................................27
Digital Set-up menu ........................................................................................................30
Installing the Accessories (Wall-Mount Bracket) .........................................................32
Specifications ..................................................................................................................35
Troubleshooting ..............................................................................................................37
Start-up Guide
4
Watching TV
Using Optional Equipment
Using MENU Functions
Additional Information
Table of Contents
: for digital channels only
4
GB
Start-up Guide
1: Checking the
accessories
Remote RM-ED014 (1)
Size AA batteries (R6 type) (2)
Stand (1)
Screws for stand (3)
Cable band (1)
To insert batteries into the remote
~
• Observe the correct polarity when inserting batteries.
• Do not use different types of batteries together or mix
old and new batteries.
• Dispose of batteries in an environmentally friendly way.
Certain regions may regulate disposal of batteries.
Please consult your local authority.
• Handle the remote with care. Do not drop or step on it,
or spill liquid of any kind onto it.
• Do not place the remote in a location near a heat source,
a place subject to direct sunlight, or a damp room.
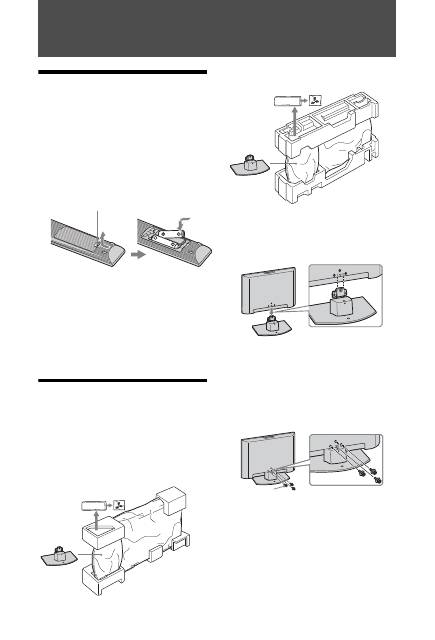
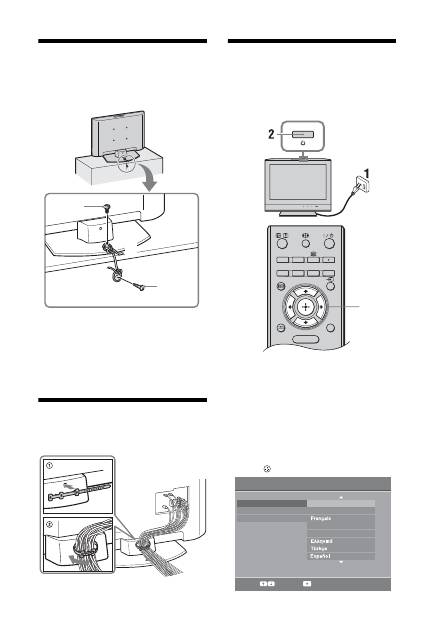
2: Attaching the stand
Follow the assembling steps required to place on a
TV stand.
1
Take out the Table-Top Stand and screws
from the carton. The screws are found in
the accessory bag.
KDL-32L40xx/KDL-26L40xx
KDL-19L40xx
2
Gently slide the TV unit onto the neck of
the Table-Top Stand and align the screws
holes.
~
• When you carry the TV, place your hand as illustrated
and hold it securely, see page 8. Do not put stress on the
LCD panel and the frame around the screen.
• Be careful not to pinch your hands or the mains lead
when you install the TV to the Table-Top Stand.
3
Use the supplied screws to attach the TV
unit to the Table-Top Stand.
~
• If an electric screw driver is used, set the torque to
tighten at approximately 1.5 N·m {15 kgf·cm}.
• Unless otherwise stated, illustrations here are for KDL-
32L40xx.
Push and slide to open.
Accessory bag
Screws
TV unit
Table-Top
Stand
Accessory bag
Screws
TV unit
Table-Top
Stand
Rear of TV
Screws
5
GB
St
art
-u
p
Gui
d
e
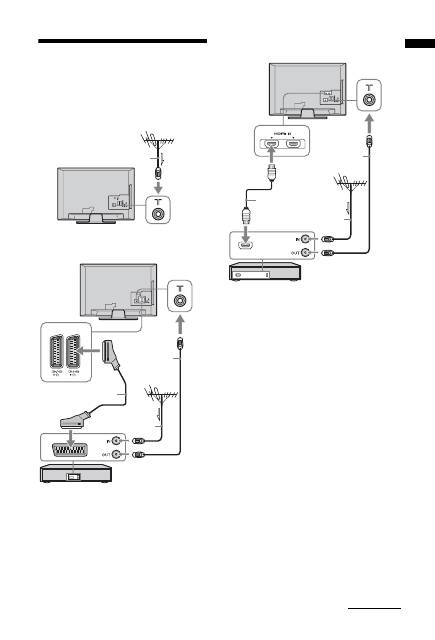
3: Connecting an
aerial/VCR/ DVD
recorder
~
• AV1 outputs available only for analogue TV.
• AV2 outputs to the current screen (except PC,
HDMI1,2, Component 1080i).
This product has been tested and found to compliant with the limits set out in the EMC Directive for using
connection cables not longer than 3 meters (9.8 feet).
Coaxial cable
Connecting an aerial only
AV1
AV2
Connecting an aerial/ VCR/ DVD recorder with SCART
Scart lead
VCR/ DVD recorder
Coaxial cable
Coaxial cable
1
2
Connecting an aerial/ VCR/ DVD recorder with HDMI
HDMI cable
Coaxial cable
Coaxial cable
VCR/ DVD recorder
Continued
6
GB
4: Preventing the TV
from toppling over
KDL-32L40xx, KDL-26L40xx only
1
Install a wood screw (4 mm in diameter,
not supplied) in the TV stand.
2
Install a machine screw (M6 × 12-14 mm,
not supplied) into the screw hole of the TV.
3
Tie the wood screw and the machine
screw with a strong cord.
5: Bundling the cables
You can bundle the connecting cables as illustrated
below.
~
Do not bundle the mains lead with other connecting cables.
6: Selecting the
language, country/region
and location
1
Connect the TV to your mains socket
(220-240V AC, 50Hz).
2
Press
1
on the top edge of the TV.
When you turn on the TV for the first time, the
Language menu appears on the screen.
~
When you turn on the TV, the power indicator flashes
in green.
3
Press
F
/
f
to select the language
displayed on the menu screens, then
press
.
2
1
3
3,4,5
RETURN
TOOLS
AUDIO
ANALOG
DIGITAL
GUIDE
MENU
Select:
Confirm:
Language
Country
Location
English
Nederlands
Italiano
Deutsch
Auto Start-up
7
GB
St
art
-u
p
Gui
d
e
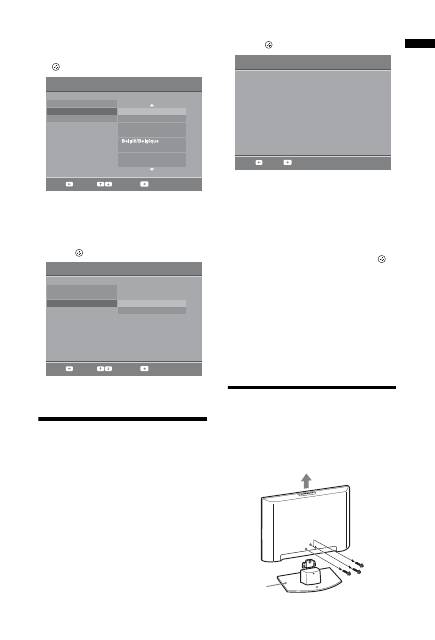
4
Press
F
/
f
to select the country/region in
which you will operate the TV, then press
.
If the country/region which you want to use on
the TV does not appear in the list, select “-”
instead of a country/region.
5
Press
F
/
f
to select the location type in
which you will operate the TV, then
press .
This option selects the initial picture mode
appropriate for the typical lighting condition in
these environments.
7: Auto-tuning the TV
1
Before you start auto-tuning the TV, insert
a pre-recorded tape into the VCR
connected to the TV (page 5) and start
play back.
The video channel will be located and stored on
the TV during auto-tuning.
If no VCR is connected to the TV, skip this step.
2
Press .
The TV starts searching for all available digital
channels, followed by all available analogue
channels. This may take some time, so do not
press any buttons on the TV or remote while
proceeding.
If a message appears for you to confirm the
aerial connection
No digital or analogue channels were found.
Check all the aerial connections and press
to
start auto-tuning again.
3
When the Programme Sorting menu
appears on the screen, follow the steps of
“Programme Sorting” (page 27).
If you do not change the order in which the
analogue channels are stored on the TV, go to
next step.
4
Press MENU to exit.
The TV has now tuned in all the available
channels.
Detaching the Table-
Top Stand from the TV
~
Do not remove the Table-Top Stand for any reason other
than to wall-mount the TV.
Select:
Back:
Confirm:
Language
Country
Location
-
United Kingdom
Ireland
Nederland
Luxembourg
France
Italia
Auto Start-up
Language
Country
Location
Home
Shop
Select:
Back:
Confirm:
Auto Start-up
Back:
Start:
Do you want to start Auto Tuning?
Auto Tuning
Table-Top
Stand
8
GB
Safety information
Installation/Set-up
Install and use the TV set in accordance with the
instructions below in order to avoid any risk of fire,
electrical shock or damage and/or injuries.
Installation
• The TV set should be installed near an easily accessible
mains socket.
• Place the TV set on a stable, level surface.
• Only qualified service personnel should carry out wall
installations.
• For safety reasons, it is strongly recommended that you
use Sony accessories, including:
KDL-32L40xx:
– Wall-mount bracket SU-WL500
KDL-26L40xx/KDL-19L40xx:
– Wall-mount bracket SU-WL100
• Be sure to use the screws supplied with the Wall-mount
bracket when attaching the mounting hooks to the TV
set.
The supplied screws are designed so that they are 8 mm
to 12 mm in length when measured from the attaching
surface of the mounting hook.
The diameter and length of the screws differ depending
on the Wall-mount bracket model. Use of screws other
than those supplied may result in internal damage to the
TV set or cause it to fall, etc.
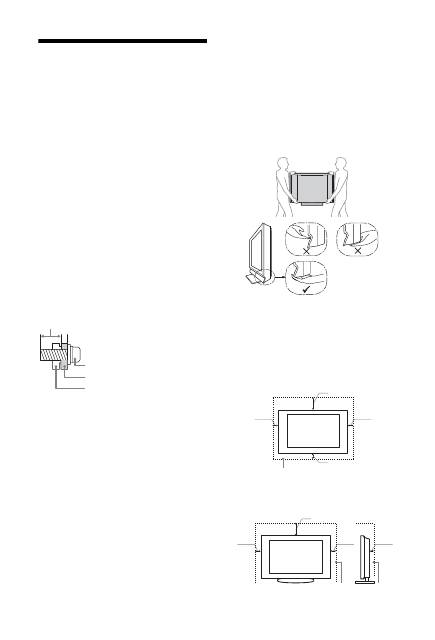
Transporting
• Before transporting the TV set, disconnect all cables.
• Two or more people are needed to transport a large TV
set.
• When transporting the TV set by hand, hold it as shown
below. Do not put stress on the LCD panel and the frame
around the screen.
• When lifting or moving the TV set, hold it firmly from
the bottom.
• When transporting the TV set, do not subject it to jolts
or excessive vibration.
• When transporting the TV set for repairs or when
moving, pack it using the original carton and packing
material.
Ventilation
• Never cover the ventilation holes or insert anything in
the cabinet.
• Leave space around the TV set as shown below.
• It is strongly recommended that you use a Sony wall-
mount bracket in order to provide adequate air-
circulation.
Installed on the wall
Installed with stand
Screw (supplied with the
Wall-mount bracket)
Mounting Hook
Hook attachment on rear of TV set
8-12 mm
30 cm
10 cm
10 cm
10 cm
Leave at least this space around the set.
30 cm
10 cm
10 cm
6 cm
Leave at least this space around the set.
9
GB
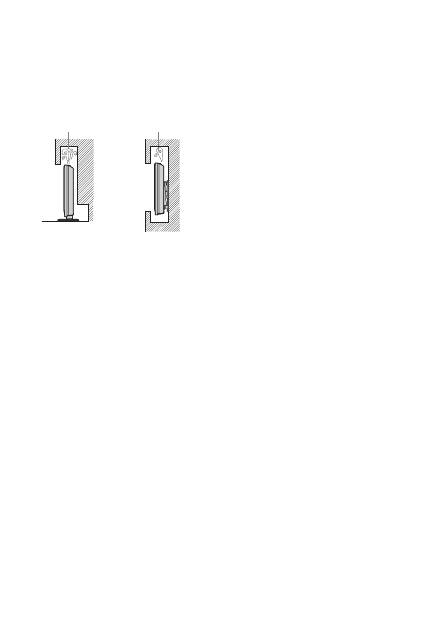
• To ensure proper ventilation and prevent the collection
of dirt or dust:
– Do not lay the TV set flat, install upside down,
backwards, or sideways.
– Do not place the TV set on a shelf, rug, bed or in a
closet.
– Do not cover the TV set with a cloth, such as curtains,
or items such as newspapers, etc.
– Do not install the TV set as shown below.
Mains lead
Handle the mains lead and socket as follows in order
to avoid any risk of fire, electrical shock or damage
and/or injuries:
– Use only mains leads supplied by Sony, not other
suppliers.
– Insert the plug fully into the mains socket.
– Operate the TV set on a 220-240 V AC supply only.
– When wiring cables, be sure to unplug the mains lead
for your safety and take care not to catch your feet on
the cables.
– Disconnect the mains lead from the mains socket
before working on or moving the TV set.
– Keep the mains lead away from heat sources.
– Unplug the mains plug and clean it regularly. If the
plug is covered with dust and it picks up moisture, its
insulation may deteriorate, which could result in a
fire.
Notes
• Do not use the supplied mains lead on any other
equipment.
• Do not pinch, bend, or twist the mains lead excessively.
The core conductors may be exposed or broken.
• Do not modify the mains lead.
• Do not put anything heavy on the mains lead.
• Do not pull on the mains lead itself when disconnecting
the mains lead.
• Do not connect too many appliances to the same mains
socket.
• Do not use a poor fitting mains socket.
Prohibited Usage
Do not install/use the TV set in locations,
environments or situations such as those listed
below, or the TV set may malfunction and cause a
fire, electrical shock, damage and/or injuries.
Location:
Outdoors (in direct sunlight), at the seashore, on a ship or
other vessel, inside a vehicle, in medical institutions,
unstable locations, near water, rain, moisture or smoke.
Environment:
Places that are hot, humid, or excessively dusty; where
insects may enter; where it might be exposed to mechanical
vibration, near flammable objects (candles, etc).
The TV set shall not be exposed to dripping or splashing
and no objects filled with liquids, such as vases, shall be
placed on the TV.
Situation:
Do not use when your hands are wet, with the cabinet
removed, or with attachments not recommended by the
manufacturer. Disconnect the TV set from mains socket
and aerial during lightning storms.
Broken pieces:
• Do not throw anything at the TV set. The screen glass
may break by the impact and cause serious injury.
• If the surface of the TV set cracks, do not touch it until
you have unplugged the mains lead. Otherwise electric
shock may result.
When not in use
• If you will not be using the TV set for several days, the
TV set should be disconnected from the mains for
environmental and safety reasons.
• As the TV set is not disconnected from the mains when
the TV set is just turned off, pull the plug from the mains
to disconnect the TV set completely.
• However, some TV sets may have features that require
the TV set to be left in standby to work correctly. The
instructions in this manual will inform you if this
applies.
For children
• Do not allow children to climb on the TV set.
• Keep small accessories out of the reach of children, so
that they are not mistakenly swallowed.
If the following problems occur...
Turn off
the TV set and unplug the mains lead
immediately if any of the following problems occur.
Ask your dealer or Sony service centre to have it
checked by qualified service personnel.
When:
– Mains lead is damaged.
– Poor fitting of mains socket.
– TV set is damaged by being dropped, hit or having
something thrown at it.
– Any liquid or solid object falls through openings in
the cabinet.
Air circulation
is blocked.
Air circulation
is blocked.
Wall
Wall

10
GB
Precautions
Viewing the TV
• View the TV in moderate light, as viewing the TV in
poor light or during long period of time, strains your
eyes.
• When using headphones, adjust the volume so as to
avoid excessive levels, as hearing damage may result.
LCD Screen
• Although the LCD screen is made with high-precision
technology and 99.99% or more of the pixels are
effective, black dots may appear or bright points of light
(red, blue, or green) may appear constantly on the LCD
screen. This is a structural property of the LCD screen
and is not a malfunction.
• Do not push or scratch the front filter, or place objects on
top of this TV set. The image may be uneven or the LCD
screen may be damaged.
• If this TV set is used in a cold place, a smear may occur
in the picture or the picture may become dark. This does
not indicate a failure. These phenomena disappear as the
temperature rises.
• Ghosting may occur when still pictures are displayed
continuously. It may disappear after a few moments.
• The screen and cabinet get warm when this TV set is in
use. This is not a malfunction.
• The LCD screen contains a small amount of liquid
crystal. Some fluorescent tubes used in this TV set also
contain mercury. Follow your local ordinances and
regulations for disposal.
Handling and cleaning the screen surface/cabinet
of the TV set
Be sure to unplug the mains lead connected to the TV set
from mains socket before cleaning.
To avoid material degradation or screen coating
degradation, observe the following precautions.
• To remove dust from the screen surface/cabinet, wipe
gently with a soft cloth. If dust is persistent, wipe with a
soft cloth slightly moistened with a diluted mild
detergent solution.
• Never use any type of abrasive pad, alkaline/acid
cleaner, scouring powder, or volatile solvent, such as
alcohol, benzene, thinner or insecticide. Using such
materials or maintaining prolonged contact with rubber
or vinyl materials may result in damage to the screen
surface and cabinet material.
• When adjusting the angle of the TV set, move it slowly
so as to prevent the TV set from moving or slipping off
from its table stand.
Optional Equipment
Keep optional components or any equipment emitting
electromagnetic radiation away from the TV set. Otherwise
picture distortion and/or noisy sound may occur.
Disposal of the TV set
Disposal of Old Electrical & Electronic
Equipment (Applicable in the European
Union and other European countries
with separate collection systems)
This symbol on the product or on its
packaging indicates that this product shall
not be treated as household waste. Instead it shall be
handed over to the applicable collection point for the
recycling of electrical and electronic equipment. By
ensuring this product is disposed of correctly, you will help
prevent potential negative consequences for the
environment and human health, which could otherwise be
caused by inappropriate waste handling of this product.
The recycling of materials will help to conserve natural
resources. For more detailed information about recycling
of this product, please contact your local Civic Office, your
household waste disposal service or the shop where you
purchased the product.
Disposal of waste batteries (applicable
in the European Union and other
European countries with separate
collection systems)
This symbol on the battery or on the
packaging indicates that the battery provided
with this product shall not be treated as
household waste.By ensuring these batteries are disposed
of correctly, you will help prevent potentially negative
consequences for the environment and human health which
could otherwise be caused by inappropriate waste handling
of the battery. The recycling of the materials will help to
conserve natural resources. In case of products that for
safety, performance or data integrity reasons require a
permanent connection with an incorporated battery, this
battery should be replaced by qualified service staff only.
To ensure that the battery will be treated properly, hand
over the product at end-of-life to the applicable collection
point for the recycling of electrical and electronic
equipment. For all other batteries, please view the section
on how to remove the battery from the product safely. Hand
the battery over to the applicable collection point for the
recycling of waste batteries. For more detailed information
about recycling of this product or battery, please contact
your local Civic Office, your household waste disposal
service or the shop where you purchased the product.
11
GB
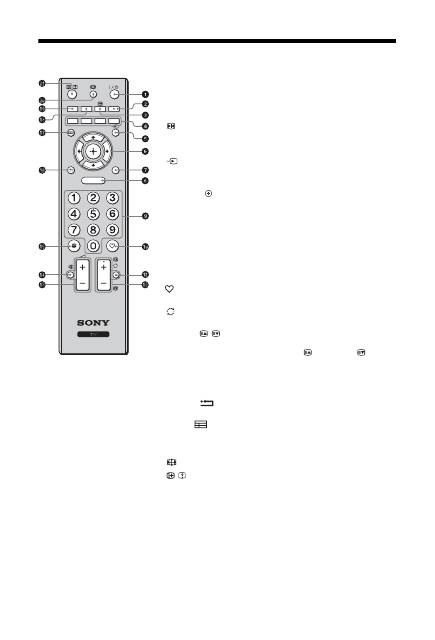
Overview of the remote
1
"/1
– TV standby
Turns the TV on and off from standby mode.
2
AUDIO
In analogue mode: Press to change the dual sound mode (page 24).
3
– Picture freeze (page 14)
Freezes the TV picture.
4
Coloured buttons (page 14, 17)
5
– Input select
Selects the input source from equipment connected to the TV sockets
(page 19).
6
F
/
f
/
G
/
g
/
7
TOOLS (page 15, 19)
Enables you to access various viewing options and change/make
adjustments according to the source and screen format.
8
MENU (page 21)
9
Number buttons
• In TV mode: Selects channels. For channel numbers 10 and above, press
the second and third digit in quick succession.
• In Text mode: Enters the three digit page number to select the page.
0
– Digital Favourite list
Press to display the Digital Favourite list that you have specified (page 17).
qa
– Previous channel
Returns to the previous channel watched.
qs
PROG +/-/
/
• In TV mode: Selects the next (+) or previous (-) channel.
• In Text mode (page 14): Selects the next (
) or previous (
) page.
qd
2
+/- – Volume
qf
%
– Mute the sound
qg
/
– Text (page 14)
qh
RETURN /
Returns to the previous screen of any displayed menu.
qj
GUIDE /
– EPG (Digital Electronic Programme Guide) (page 16)
qk
ANALOG – Analogue mode (page 13)
ql
DIGITAL – Digital mode (page 13)
w;
– Screen mode (page 14)
wa
/
– Info / Text reveal
• In digital mode: Displays brief details of the programme currently being
watched.
• In analogue mode: Displays information such as current channel number
and screen format.
• In Text mode (page 14): Reveals hidden information (e.g. answers to a
quiz).
z
The number 5, PROG + and AUDIO buttons have tactile dots. Use the tactile dots as
references when operating the TV.
RETURN
PROG
TOOLS
AUDIO
ANALOG
DIGITAL
GUIDE
MENU
12
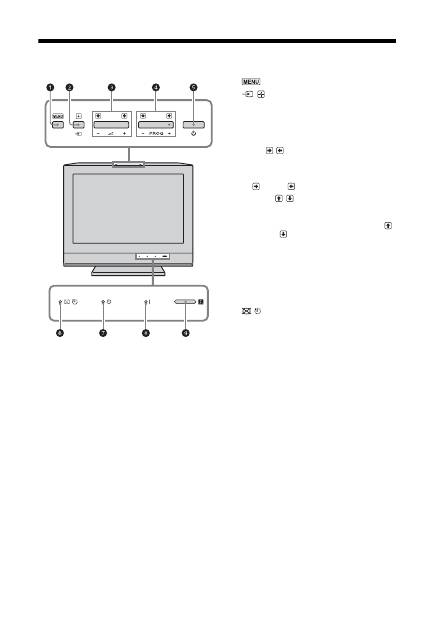
GB
Overview of the TV buttons and indicators
1
(page 21)
2
/
– Input select / OK
• In TV mode: Selects the input source from
equipment connected to the TV sockets
(page 19).
• In TV menu: Selects the menu or option, and
confirms the setting.
3
2
+/-/
/
• In TV mode: Increases (+) or decreases (-) the
volume.
• In TV menu: Moves through the options right
(
) or left (
).
4
PROG +/-/
/
• In TV mode: Selects the next (+) or previous (-)
channel.
• In TV menu: Moves through the options up (
)
or down (
).
5
1
– Power
Turns the TV on or off.
~
• To disconnect the TV completely, pull the plug
from the mains.
• When you turn on the TV, the power indicator
flashes in green.
6
– Picture Off / Sleep Timer indicator
• Lights up in green when the picture is switched
off (page 25).
• Lights up in orange when the sleep timer is set
(page 26).
7
1
– Standby indicator
Lights up in red when the TV is in standby mode.
8
"
– Power indicator
Lights up in green when the TV is turned on.
9
Remote control sensor
• Receives IR signals from the remote.
• Do not put anything over the sensor, as its
function may be affected.
~
Make sure that the TV is completely turned off before
unplugging the mains lead. Unplugging the mains lead
while the TV is turned on may cause the indicator to
remain lit or may cause the TV to malfunction.
13
GB
Wat
chi
ng T
V
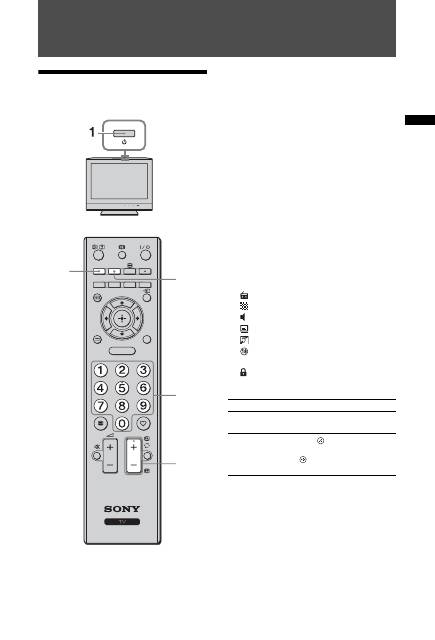
Watching TV
Watching TV
1
Press
1
on the top edge of the TV to turn
on the TV.
When the TV is in standby mode (the
1
(standby) indicator on the TV front panel is red),
press
"/1
on the remote to turn on the TV.
2
Press DIGITAL to switch to digital mode,
or ANALOG to switch to analogue mode.
The channels available vary depending on the
mode.
3
Press the number buttons or PROG +/- to
select a TV channel.
To select channel numbers 10 and above using
the number buttons, press the second and third
digits in quick succession.
To select a digital channel using the Digital
Electronic Programme Guide (EPG), see
page 16.
In digital mode
An information banner appears briefly. The
following icons may be indicated on the banner.
Additional operations
RETURN
PROG
TOOLS
AUDIO
ANALOG
DIGITAL
GUIDE
MENU
3
2
2
3
: Radio service
: Scrambled/Subscription service
:
Multiple audio languages available
: Subtitles available
: Subtitles available for the hearing impaired
: Recommended minimum age for current
programme (from 4 to 18 years)
:
Parental Lock
To
Do this
Adjust the volume
Press
2
+ (increase)/
- (decrease).
Access the
Programme index
table (in analogue
mode only)
Press
. To select an analogue
channel, press
F
/
f
, then press
.
14
GB
To access Text
Press
/
. Each time you press
/
, the display
changes cyclically as follows:
Text
t
Text over the TV picture (mix mode)
t
No
Text (exit the Text service)
To select a page, press the number buttons or
/
.
To reveal hidden information, press
.
z
When four coloured items appear at the bottom of the Text
page, Fastext is available. Fastext allows you to access
pages quickly and easily. Press the corresponding coloured
button to access the page.
Picture Freeze
Freezes the TV picture (e.g. to make a note of a
telephone number or recipe).
1
Press
on the remote control.
2
Press
again to return to normal TV
mode.
z
Not available for
Component,
HDMI1,
HDMI2 and
PC input.
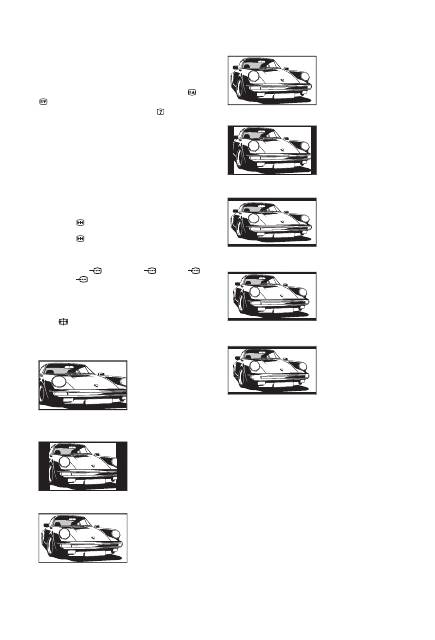
To change the screen format manually to
suit the broadcast
Press
repeatedly to select the desired screen
format.
* Parts of the top and bottom of the picture may be cut off.
~
• Depending on the signal, some screen formats may not
be selectable.
• Some characters and/or letters at the top and the bottom
of the picture may not be visible in “Smart”.
z
You can adjust the vertical position of the picture when
selecting “Smart”, “Zoom” or “14/9”. Press
F
/
f
to move
up or down (e.g. to read subtitles).
Smart
*
Displays
conventional 4:3
broadcasts with an
imitation wide screen
effect. The 4:3 picture
is stretched to fill the
screen.
4/3
Displays
conventional 4:3
broadcasts (e.g. non-
wide screen TV) in
the correct
proportions.
Wide (KDL-32L40xx/KDL-26L40xx only)
Displays wide screen
(16:9) broadcasts in
the correct
proportions.
Zoom
*
(KDL-32L40xx/KDL-26L40xx only)
Displays
cinemascopic (letter
box format)
broadcasts in the
correct proportions.
14/9
*
Displays 14:9
broadcasts in the
correct proportions.
As a result, black
border areas are
visible on the screen.
Subtitle
*
Displays
cinemascopic (letter
box format)
broadcasts with
subtitles on the
screen.
Wide (KDL-19L40xx only)
Displays 16:9
broadcasts in the
correct proportions.
As a result, black
border areas are
visible on the screen.
Zoom (KDL-19L40xx only)
Displays 4:3
cinemascopic (letter
box format)
broadcasts in the
correct proportions.
As a result, black
border areas are
visible on the screen.
Auto
• “Screen Format” is set to “Auto”, automatically changes
the screen format to suit the broadcast signal.
• “Auto” is available for PAL and SECAM signals only.
15
GB
Wat
chi
ng T
V
Using the Tools menu
Press TOOLS to display the following options when
viewing a TV programme.
Options
Description
Close
Closes the Tools menu.
Picture Mode
See page 22.
Sound Effect
See page 24.
Speaker
See page 24.
Audio Language (in
digital mode only)
See page 31.
Subtitle Setting (in
digital mode only)
See page 31.
Sleep Timer
See page 26.
Power Saving
See page 25.
System Information (in
digital mode only)
Displays the system
information screen.
16
GB
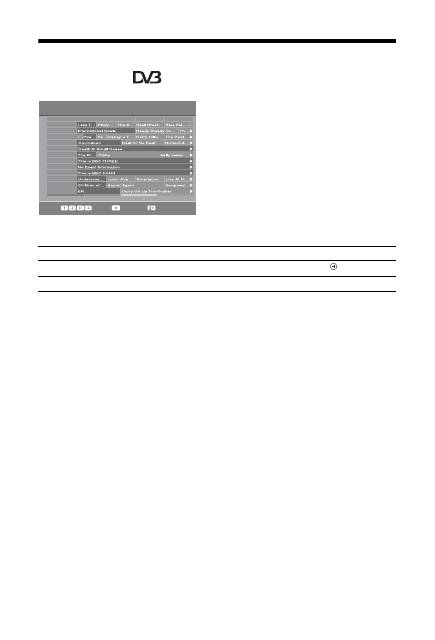
Checking the Digital Electronic Programme
Guide (EPG)
*
1
In digital mode, press GUIDE.
2
Perform the desired operation as shown
in the following table or displayed on the
screen.
~
Programme information will only be displayed if the TV
station is transmitting it.
* This function may not be available in some countries/regions.
~
If an age restriction for programmes has been selected, a message asking for a PIN code will appear on the screen. For details,
see “Parental Lock” on page 31.
Digital Electronic Programme Guide (EPG)
Select:
Tune:
Options:
Today
Previous
Next
+1 day
15:30 16:00
16:30
17:00
BBC ONE
BBC TWO
ITV 1
Channel 4
five
ITV 2
BBC THREE
Teletext
BBC FOUR
Sky Travel
UKTV History
More 4
001
002
003
004
005
006
007
009
010
011
012
013
Fri 3 Nov 15:39
To
Do this
Watch a programme
Press
F
/
f
/
G
/
g
to select the programme, then press
.
Turn off the EPG
Press GUIDE.


