Sony Grand Wega KF-50SX200K – page 2
Manual for Sony Grand Wega KF-50SX200K
Table of contents
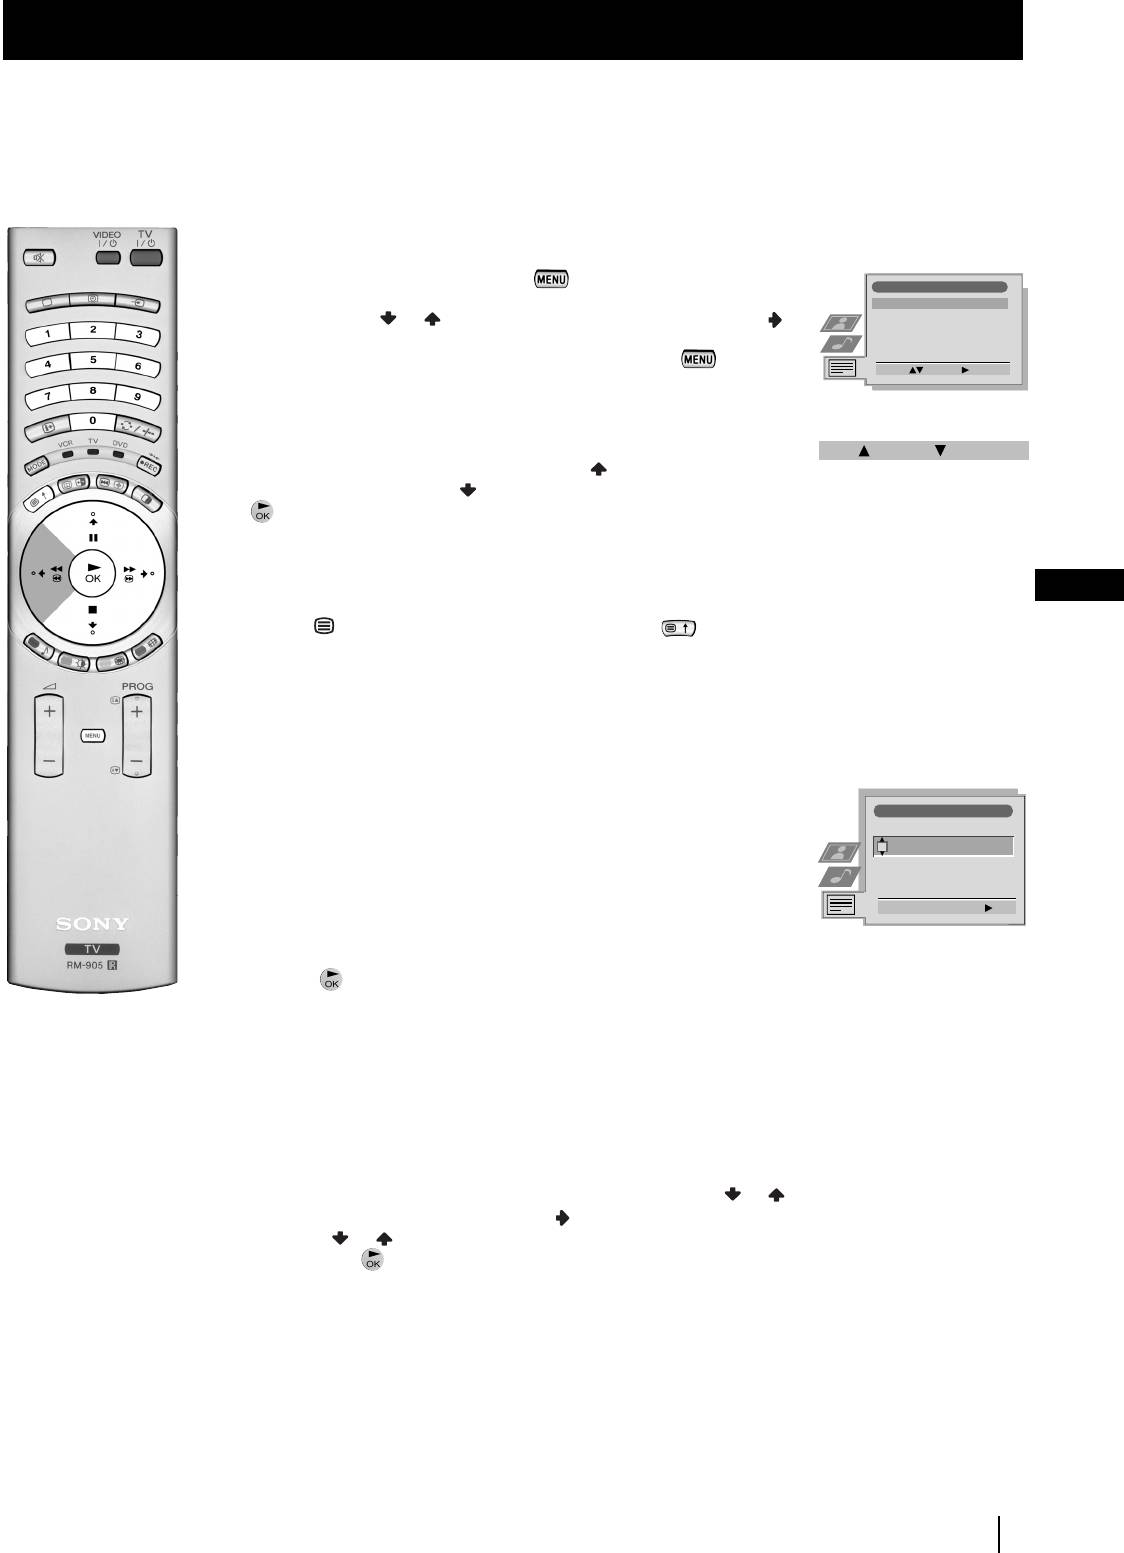
Menu System
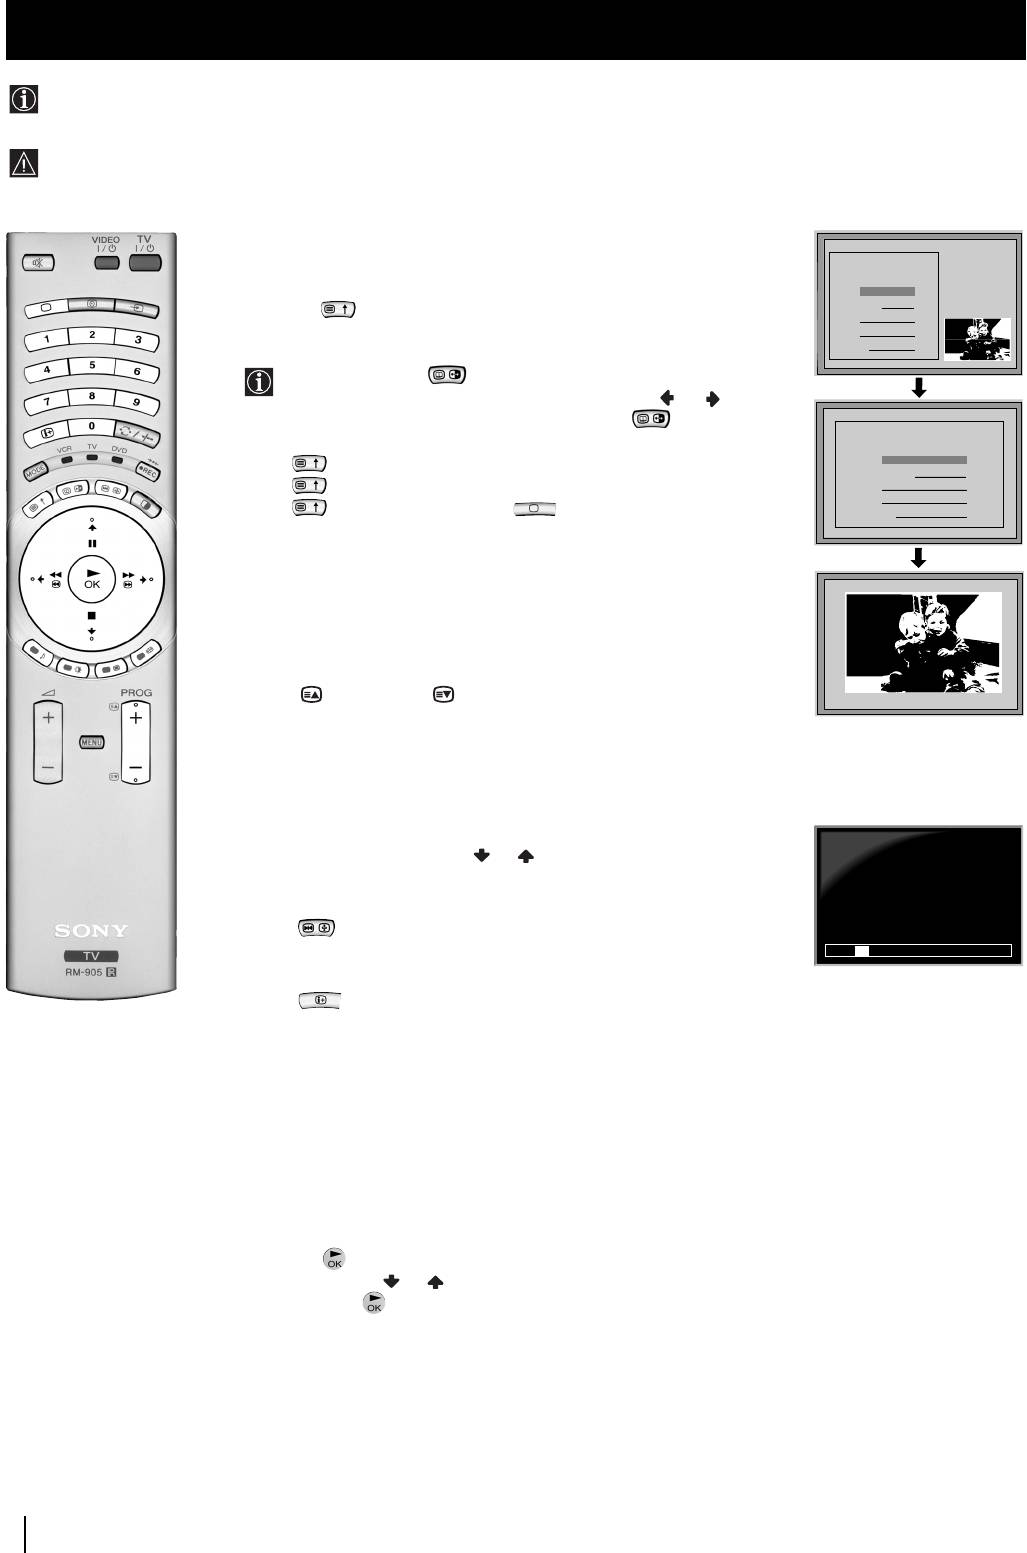
Using the Demo Mode
This function provides an overview of some of the features available on this TV set.
1
Press the button on the remote control to display the menu
on the screen.
2
Push the joystick to select the symbol, then push to
enter the
Set Up
menu.
3
Push the joystick or to select
Manual Set Up
, then push to
enter.
4
Push or to select
Demo
, then push to enter and start
the demonstration.
The TV set starts the demonstration and shows most of the
available picture functions
.
Note:
Press the button on the remote control to stop the
demonstration and return to the normal TV screen.
22
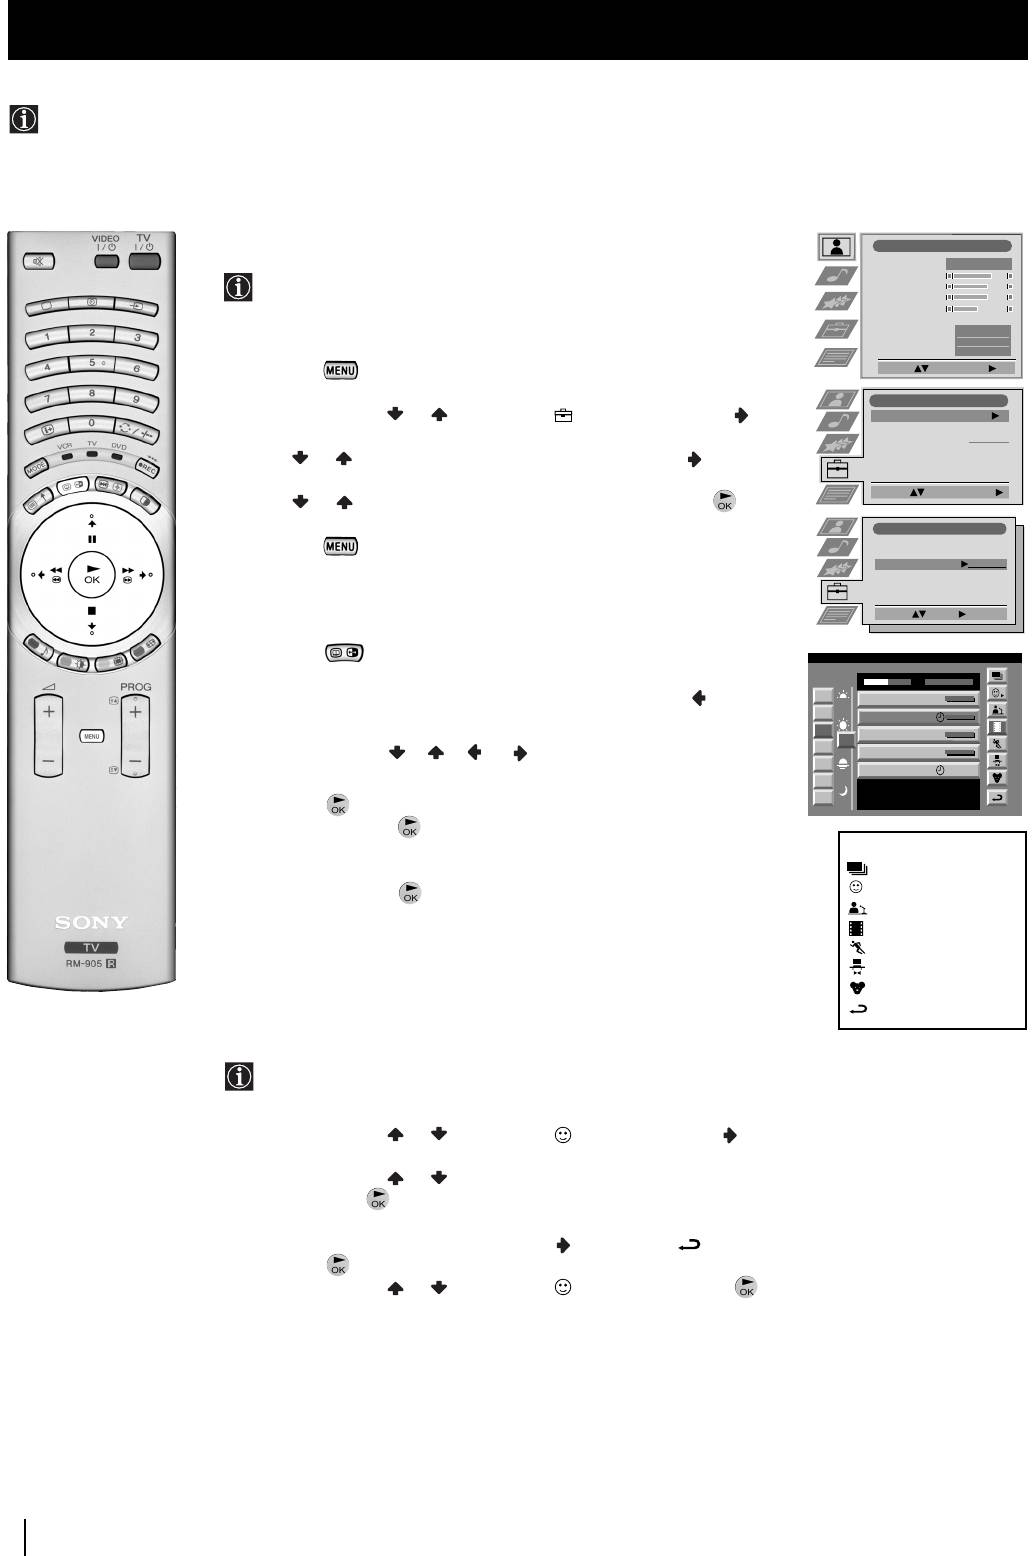
Menu System
Picture Adjustment
Picture Mode
Personal
Contrast
Brightness
Colour
Sharpness
Reset
AI
On
Noise Reduction
Off
Colour Tone
Normal
Select: Enter Menu:
Set Up
Auto Tuning
Start
Programme Sorting
Select NexTView
- - - - - - -
AV Preset
Manual Set Up
Select:
Start Auto Tuning
Set Up
Auto Tuning
Programme Sorting
Select NexTView
- - - - - - -
AV Preset
Manual Set Up
Select:
Enter:
Manual Set Up
Language/Country
Manual Programme Preset
Further Programme Preset
RGB Set Up
Personal ID
- - - - - - -
Demo Start
Select: Enter:
01GBKF50/42SX200K.fm Page 22 Tuesday, January 7, 2003 12:37 PM
01GBKF50/42SX200K.fm Page 23 Tuesday, January 7, 2003 12:37 PM
Menu System
Adjusting the H Centre picture for an RGB source
When connecting an RGB source, such as a DVD player, to Scart connector
:
1/ 1 or
:
2/ 2 you may need to readjust
the H Centre of the picture.
1
Press the button repeatedly on the remote control until the
… 1
symbol
…
1
or
…
2
appears on the screen.
•
…
1
symbol for devices connected to the
:
1/ 1 Scart
connector.
•
…
2
symbol for devices connected to the
:
2/ 2 Scart
connector.
Picture Adjustment
2
Press the button to display the menu on the screen.
Picture Mode
Personal
Contrast
Brightness
Colour
Sharpness
Reset
AI
On
Noise Reduction
Off
Colour Tone
Normal
Select: Enter Menu:
Set Up
GB
3
Push the joystick to select the symbol, then push to
Auto Tuning
Start
Programme Sorting
enter the
Set Up
menu.
Select NexTView
- - - - - - -
AV Preset
Manual Set Up
Select:
Start Auto Tuning
Set Up
Auto Tuning
4
Push or to select
Manual Set Up
then push to enter.
Programme Sorting
Select NexTView
- - - - - - -
AV Preset
Manual Set Up
Select:
Enter:
Manual Set Up
Language/Country
5
Push the joystick or to select
RGB Set Up
then push to enter.
Manual Programme Preset
Further Programme Preset
RGB Set Up
Personal ID
- - - - - - -
Demo
Select: Enter:
RGB Set Up
6
Push the joystick to enter
H Centre
, then push or to
H Centre
O
adjust the centre of the picture over a range of -10 to +10. Press
the button to store.
Adjust Position: Confirm: OK
RGB Set Up
7
Press the button to exit and return to the normal TV screen.
Menu System
23
01GBKF50/42SX200K.fm Page 24 Tuesday, January 7, 2003 12:37 PM
Menu System
Labelling and Selecting the screen format of Input Sources
This function enables you to select the size of the picture coming from the input source. It also allows you to assign a name to the
optional equipment you have connected to the sockets of this TV set. This name can contain up to 5 characters (letters or
numbers).
1
Press the button on the remote control to display the menu
Picture Adjustment
Picture Mode
Personal
on the screen.
Contrast
Brightness
Colour
Sharpness
Reset
AI
On
Noise Reduction
Off
Colour Tone
Normal
Select: Enter Menu:
Set Up
2
Push the joystick to select the symbol, then push to enter the
Auto Tuning
Start
Set Up
menu.
Programme Sorting
Select NexTView
- - - - - - -
AV Preset
Manual Set Up
Select:
Start Auto Tuning
Set Up
3
Push the joystick or to select
AV Preset
, then push to enter.
Auto Tuning
Programme Sorting
Select NexTView
- - - - - - -
AV Preset
Manual Set Up
Select:
Enter:
AV Preset
4
Push the joystick or to select the input source. Then push
to enter.
INPUT LABEL
AUTO FORMAT
AV1
Off
VIDEO
AV2
Off
AV3
Normal
VIDEO
AV4
Full
VIDEO
5
Push the joystick or to select:
Select: Enter:
AV Preset
Off
(The size of picture is not automatically adjusted).
Normal
(The size of picture is automatically adjusted according to
INPUT LABEL
AUTO FORMAT
the broadcaster information).
AV1
Off
VIDEO
AV2
Off
AV3
Normal
VIDEO
AV4
Full
VIDEO
Full
(The TV set automatically adjusts the picture size to
Select: Next: Confirm: OK
eliminate any dark areas on the TV picture (as shown in
AV Preset
the section “Changing the Screen Format”).
Next push .
INPUT LABEL
AUTO FORMAT
AV1
Off
IDEO
AV2
Off
V
AV3
Normal
VIDEO
AV4
Normal
VIDEO
6
With the first element of the
LABEL
column highlighted, push the
Select A-Z, 0-9: Confirm: OK
joystick or to select a letter, number, "+" or blank;
then push to confirm this character. Select the other four
characters in the same way.
7
After selecting all the characters, press the button.
8
Repeat steps 4 to 7 if you wish to select the picture size or label other
input sources.
9
Press the button to exit and return to the normal TV screen.
Whenever the equipment with the labelled input is selected for use, the name
appears on the screen for a few seconds.
24
Menu System
01GBKF50/42SX200K.fm Page 25 Tuesday, January 7, 2003 12:37 PM
Menu System
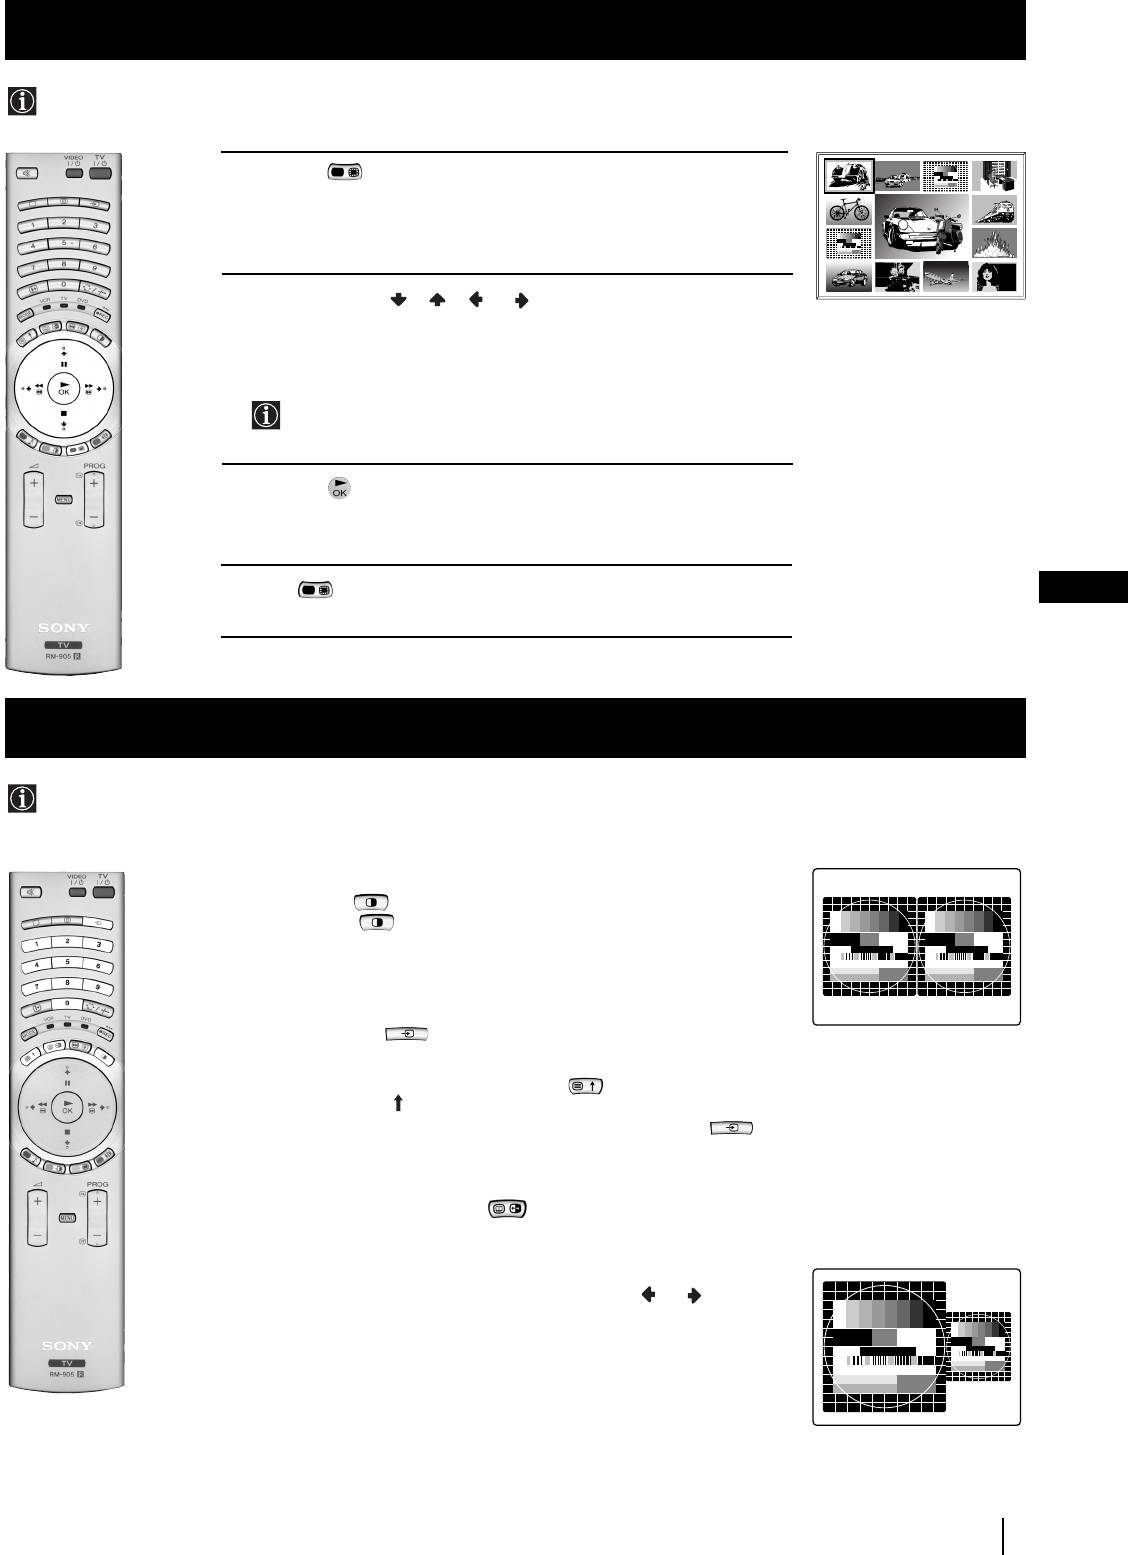
Using Multi PIP (Picture In Picture)
Multi PIP (Picture in Picture) mode displays a succession of 12 still pictures and a 13th that is live. You can manually select which
channel you wish to watch, either full-screen or in the PIP.
02
03 05
04
1 Press the button on the remote control to select the PIP mode.
Now 13 programme positions appear on the screen, with the current
13
01 06
channel in the centre. The programme displayed at the top left will be
12
07
highlighted by a frame around it.
11 09 08
10
2 Push the joystick//orto move within the 13 displayed
channels. You will notice that the framed channel moves to highlight
the current selection. Continue until the channel you wish to select is
framed.
By pressing PROG -/+, the next or previous 13 programme
numbers will appear on the screen.
3 Press the button to select the framed channel. The selected
channel moves to the centre.
4 Press to return to the normal TV mode.
GB
Using PAP (Picture And Picture)
PAP divides the screen into two for watching two channels simultaneously. One of the pictures can be selected to come from a
video source.
The sound from the left screen comes through the TV set loudspeakers, the sound from the right screen can be heard via
headphones.
Switching PAP on and off
Press the button on the remote control to display the two screens in
format 4:3. Press again to switch PAP off.
Selecting PAP source
1 To change the source of the left screen:
With PAP switched on, press the number buttons (to select a TV
channel) or press (to select a video source).
2 To change the source of the right screen:
With PAP switched on, press the button on the remote control.
When the symbol appears at the bottom of the right screen,
press the number buttons (to select a TV channel) or press (to
select a video source).
Swapping screens
With PAP switched on, press the button on the remote control to
swap the two screens.
Zooming the screens
With PAP switched on, push the joystick repeatedly or to
change the size of the two screens.
Selecting the sound of the right screen
You can hear the sound of the right screen via headphones. With
PAP switched on, refer to the "Adjusting the Sound" section of this
instruction manual and set the option "l Dual Sound" to "PAP".
Menu System
25
01GBKF50/42SX200K.fm Page 26 Tuesday, January 7, 2003 12:37 PM
Teletext
Teletext
Most TV channels broadcast information via Teletext. The index page of the teletext service (usually page 100) gives you
information on how to use the service.
! Please use a TV channel with a strong signal, otherwise there may be Teletext errors.
Switching Teletext on and off
1 Select the TV channel which carries the teletext service you want
TELETEXT
to view.
Index
Programme
25
2 Press the button once for Picture and Teletext (P&T). The screen
News
153
01
is divided in two, with the TV channel in the right corner and the
Sport
101
Weather
98
Teletext display on the left.
P&T mode: Press then press PROG +/- to change
the channel of the TV screen. Push the joystick or to
change the size of the TV screen then press again to
resume normal teletext reception.
TELETEXT
TELETEXT
TELETEXT
TELETEXT
TELETEXT
TELETEXT
TELETEXT
TELETEXT
Index
Index
Index
Index
Index
Index
Index
Index
3 Press twice to get Teletext only.
Programme
Programme
Programme
Programme
Programme
Programme
Programme
Programme
25
25
25
25
25
25
25
25
4 Press three times for Mix mode.
News
News
News
News
News
News
News
News
153
153
153
153
153
153
153
153
Sport
Sport
Sport
Sport
Sport
Sport
Sport
Sport
101
101
101
101
101
101
101
101
5 Press a fourth time or press to switch off Teletext.
Weather
Weather
Weather
Weather
Weather
Weather
Weather
Weather
98
98
98
98
98
98
98
98
Selecting a Teletext page
Input three digits for the page number using the numbered buttons on
the control. If you make a mistake, type in any three digits then re-enter
TELETEXT
01
the correct page number.
Index
Programme
25
News
153
Selecting the next or preceding page
Sport
101
Weather
98
Press the (PROG+) or (PROG-) buttons on the remote
control to select the previous or next page.
Selecting a sub page
A teletext page may consist of several sub pages. In this case, after a
few seconds, an information line is displayed showing the number of
subpages.
216-02
Select the sub page by pressing or .
To freeze a Teletext page
Press the button to freeze the page. Press again to cancel the freeze.
01 03 04 05 06 07 0802
Revealing the index page
Press the button to reveal the index page (normally page 100).
Fastext
(only available if the TV station broadcasts Fastext signals)
When the colour coded menu appears at the bottom of a teletext page,
press a coloured button on the remote control (red, green, yellow or blue)
to access the corresponding page.
Using the feature "Page Catching"
1 This feature is used if the selected teletext page has several page
numbers on it (eg the index page).
2 Press the button.
3 Push the joystick or to select the desired page number
then press the buttons. The requested page is displayed after
a few seconds.
continued...
26
Teletext
01GBKF50/42SX200K.fm Page 27 Tuesday, January 7, 2003 12:37 PM
Teletext
Using the Teletext menu
1 With Teletext switched on, press the button on the remote
Teletext
control to display the teletext menu on the TV screen.
Top / Bottom / Full
2 Push the joystick or to select your chosen item, then push to
Text Clear
Reveal
to display the relevant sub menu.
Time Page
Page Overview
3 To remove the teletext menu from the screen, press the
Select: Enter:
button.
Top / Bottom / Full
The Top/Bottom/Full sub menu allows you to enlarge different
Top: Bottom: Full: OK
sections of the Teletext page. Push the joystick to enlarge the
upper half of the screen, push to enlarge the lower half. Press
the button to restore the page to normal size.
Text Clear
After having selected this function, you can watch a TV channel while
GB
waiting for a requested Teletext page. As soon as the page is available,
the symbol changes colour. To view the page, press .
Reveal
Some teletext pages contain hidden information (e.g. for a quiz). By
pressing Reveal the hidden information appears on screen.
Time Page
(depending on availability of teletext service)
Time Page
You can call up a time-coded page such as an alarm page at a time
PAGE TIME
specified by you. After you have displayed the Time Page sub menu:
- - : - -– – –
1 Press the numbered buttons on the remote control to enter the
Select Page: 0-9 Next:
three digits of the desired page.
2 Press the numbered buttons again to enter the four digits of the
desired time.
3 Press the button to store the desired time. The time is displayed
in the top left corner of the screen. At the requested time the page is
displayed.
Page Overview
(depending on availability of teletext service)
In the Page Overview menu the block and group pages of TOP- Text
are sorted into two columns, so that the customer can easily select the
desired page. For each block page in the first column, the corresponding
group pages are shown in the second column. Push the joystick or
to select the desired block page, then push to enter to the group pages
column. Push or to select the desired group page .
Finally, press the button to display the page.
Teletext
27
01GBKF50/42SX200K.fm Page 28 Tuesday, January 7, 2003 12:37 PM
NexTView
NexTView *
* (depending on availability of service)
NexTView is an on-screen electronic programme guide (EPG), providing you with programme information for different
broadcasters.
Selecting your NexTView provider
Picture Adjustment
Picture Mode
Personal
Contrast
The TV set automatically selects the best NexTView provider for
Brightness
Colour
you.
Sharpness
Reset
This provider is available about 30 minutes after the channel tuning.
AI
On
Noise Reduction
Off
You can however change this selection of provider if you wish.
Colour Tone
Normal
1 Press the button on the remote control to display the menu
Select: Enter Menu:
on the screen.
Set Up
2 Push the joystick or to select the symbol, then push
Auto Tuning
Start
Programme Sorting
to enter the Set Up menu.
Select NexTView
- - - - - - -
AV Preset
3 Push or to highlight Select NexTView then push to enter. A
Manual Set Up
list is displayed containing all available NexTView providers.
Select:
Start Auto Tuning
4 Push or to select the desired provider then press the
button to store.
Set Up
5 Press the button to remove the menu from the screen.
Auto Tuning
Programme Sorting
Select NexTView
- - - - - - -
AV Preset
Manual Set Up
Select:
Enter:
Displaying NexTView
1 Press the button repeatedly on the remote control to switch
07 Tue
NexTView on and off.
12:38
SWISS
TXT TPS / RINGIER
7
Tue 07. 04 .98
* In some cases, you may also need to push the joystick to
Tu e
Star Wars
Super RTL
10:35 - 12:45
8
Wed
Werner - Beinhart
display the Sony electronic programme guide.
Pro 7
10:20 - 12:00
9
Thu
Flui grüsst den Rest der Welt
12
Kabel 1
10:45 - 10:50
10
Fri
2 Push the joystick//orto move the cursor
Once upon a time in the West
Euronews
11:00 - 11:20
11
Sat
International News
around the screen.
12
RTL Plus
11:45 - 12:50
Sun
Hat der alte Hexenmeister sich doch
13
einmal fortbegeben, und nun sollen
Mon
seine Geister auch nach meinem Willen
leben.
3 Press the button to confirm a selection.
a) If you press the button in the date, time or icon (themes)
columns, you change the programme list according to the
Index
selection.
full selection list
personal selection
b) If you press the button in the programme list, you directly
news broadcasts
display the channel if the broadcast is currently running, or,
movies
you display the "Long Info" menu if the broadcast is running at
sports
some future time.
entertainment
children
return to last menu
Using the "Individual Setting" menu
You can make a personal list of the types of programmes you
wish to view on the programme guide.
1 Push the joystick or to select the icon then push to to
display the "Individual Setting" menu.
2 Push the joystick or to select your chosen item on the screen
then press the button to confirm your choice.
3 Repeat step 2 for all the items you wish to have in your list.
4 When you have finished the list, push to select the icon.
5 Press the button to return to the previous menu.
6 Push the joystick or to select the icon then press the
button again to activate your "Individual Setting" filter.
continued...
28
NexTView
01GBKF50/42SX200K.fm Page 29 Tuesday, January 7, 2003 12:37 PM
NexTView
Using the Long Info menu
With this menu screen, you can set timers or record selected
programmes.
1 Push or to select a future programme in the programme list
column.
2 Press the button to display the Long Info menu on the TV
screen.
To set the timer
Push the joystick or to highlight the icon then press the
First nextTView/EPG-Providers in Europe
button repeatedly to "set the timer" or "cancel the timer". If you choose
07 Tue
12:38
SWISS TXT TPS / RINGIER nexTView
Tue 07. 04 .98
to set the timer, the programme is marked with a clock symbol and a
Address Mapping
The position of the addresses in the
OSDA is shown in the following diagram.
message appears on the screen shortly before the programme is due
The position values of the DPW are set
to '0'.
If other values are set, the complete
to start asking whether you wish to still view this programme.
combination will be scrolled.
Example:
if the DPWC is set to '63', the char-
GB
This channel has been set for a timer
To view the timer table
VPS/PDC
On
Timer Prog
Speed
VCR1
SP
Push the joystick or to highlight the icon then press the
button repeatedly to switch on/off the timer table. This table shows the
programmes on which you have already set a timer. (You can set a timer
on up to 5 programmes).
To record programmes
(only with Smartlink VCRs)
1 Connect your Smartlink VCR.
2 Push the joystick or to select then press the button
to download the information to your VCR.
3 To set up the VCR:
VPS/PDC
Push the joystick or to select VPS/PDC then press the
VPS/PDC
On
button repeatedly to select On or Off. With this setting on you have
Speed
SP
VCR Setup
VCR1
the guaranteed recording of the whole broadcast should there be a
change in the TV programme. This only works if the selected
channel broadcasts a VPS/PDC signal.
Speed
Push the joystick to select Speed then press the button
repeatedly to select between SP for standardplay or LP for longplay.
With longplay you can record twice as much on a videotape.
The picture quality however may suffer.
VCR Setup
Push the joystick to select VCR Setup then press the
button repeatedly to select which VCR you wish to programme,
namely VCR1 or VCR2.
4 Finally, push the joystick to select the icon then press the
button to remove the menu from the TV screen.
NexTView
29

Optional Connections
Connecting Optional Equipment
Using the following instructions, you can connect a wide range of optional equipment to this TV set.
* “PlayStation”
is a product of
Sony
Computer
Entertainment,
Inc.
* “PlayStation”
is a trademark
of Sony
Computer
Entertainment,
Inc.
Acceptable input signal
Available output signal
A Audio/video and RGB signal
Video/audio from TV tuner.
B Audio/video and RGB signal
Video/audio displayed on TV screen (monitor out).
C Audio/video and S video signal
Video/audio from selected source.
D Centre speaker input Set “Speaker”
No outputs.
on the Features menu to “Centre in”.
E No inputs
Audio signal.
F S Video signal
No output.
G Video signal
No output.
H Audio signal
No output.
I No input
Audio signal to headphones.
30
Optional Connections
S.VHS/Hi8/DVC
1
2
camcorder
Dolby
B
DVD
Surround
Amplifier
I
C
H
VCR
Hi-Fi
F
G
8mm/Hi8/DVC
camcorder
“PlayStation”*
Decoder
D
E
A
1
2
DVD
01GBKF50/42SX200K.fm Page 30 Tuesday, January 7, 2003 12:37 PM
To avoid
picture
distortion:
• Do not
connect
equipment to
F and G
connectors at
the same time.
“PlayStation”*
01GBKF50/42SX200K.fm Page 31 Tuesday, January 7, 2003 12:37 PM
Optional Connections
Using Optional Equipment
Additional Information when connecting equipment
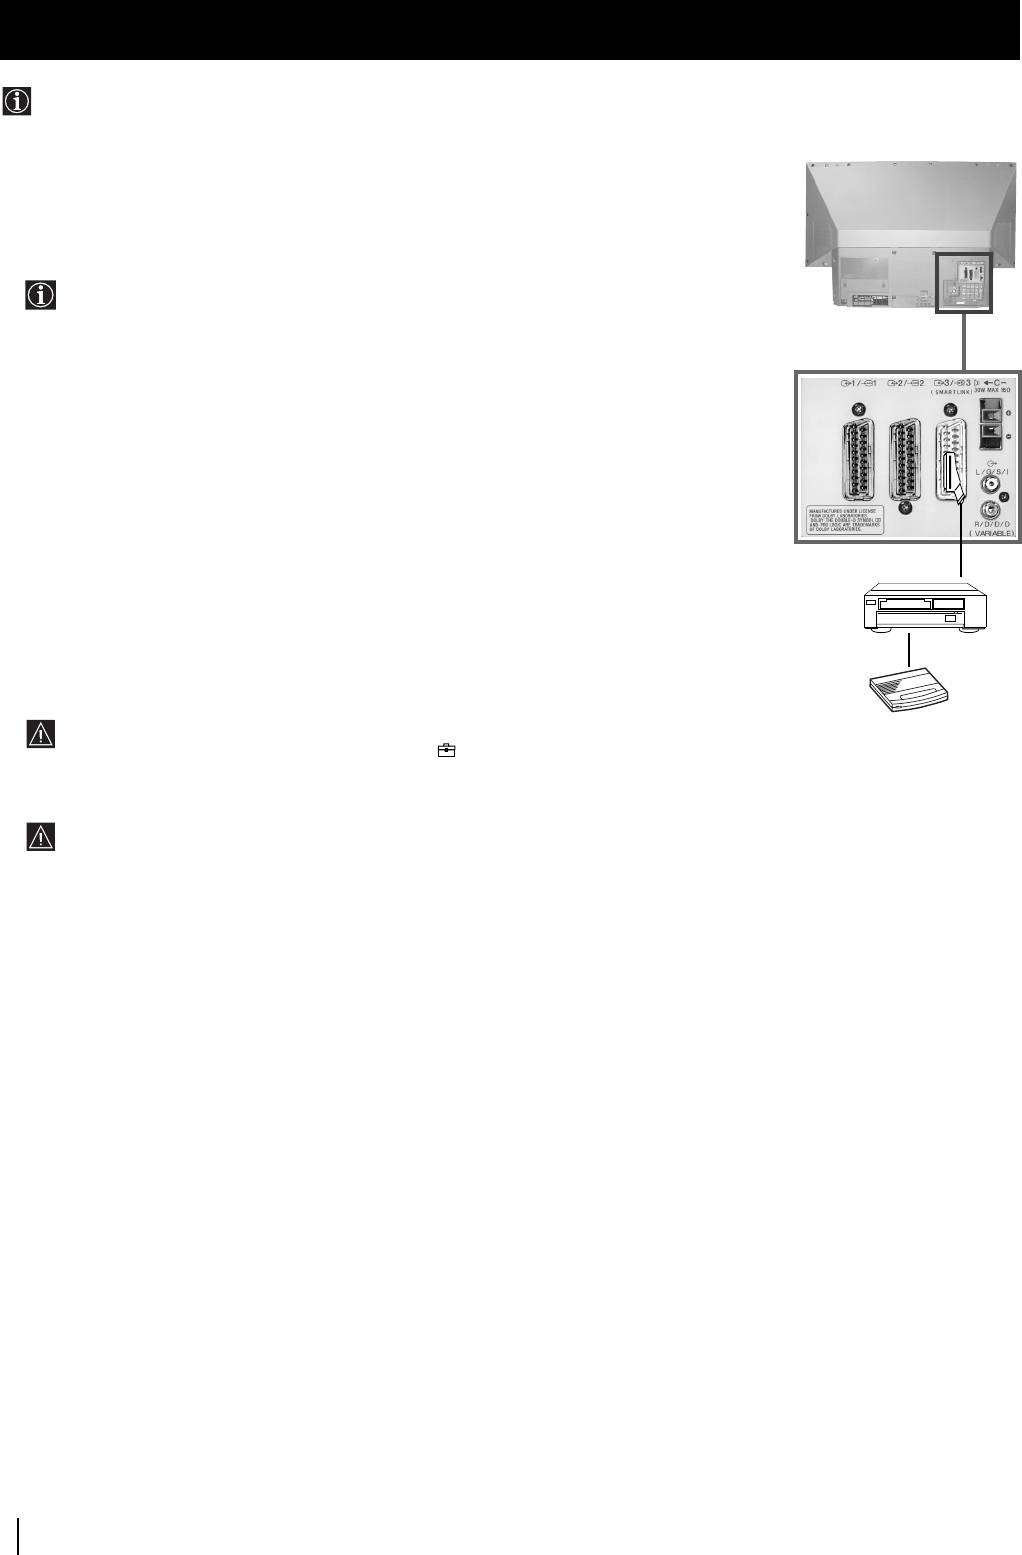
Connecting a VCR
We recommend you connect your VCR to the C socket using a scart lead. If you do not have a scart lead, use the “Manually
Tuning the TV” section of this instruction manual to tune in the channel of the VCR test signal to TV programme number “0”.
Also refer to your VCR instruction manual to get the VCR test signal.
If your video supports Smartlink, please refer to the “Smartlink” section of this instruction manual.
Connecting to External Audio Equipment
1 To listen to the sound from the TV set on Hi-Fi equipment:
Plug in your Hi-Fi equipment to the E sockets on the rear of the TV set if you wish to amplify the audio output
from the TV.
The output level from the E sockets can be varied by adjusting the volume of the headphones output. Refer to the “Adjusting
the sound” section of this instruction manual to adjust this.
2 To listen to Dolby Prologic system sound on the TV set speakers:
Plug in your Dolby Prologic system decoder amplifier to the D socket on the rear of the TV set if you wish to listen to the audio
output from your equipment on the TV speakers. If you have a Dolby amplifier, connect the centre output from your amplifier
to the D socket to use the TV set as a centre speaker. Refer to the “Using the Features menu” section of this instruction manual
and set the option “Speaker” to “Centre in”.
Remember that the maximum input level of this input is 30 W. Be careful never to exceed this.
GB
For mono equipment
Connect the phono plug to the L/G/S/I socket on the front of the TV and select the 4 input signal using the instructions on
this page below.
Select and View the Input Signal
In order to get the input signal of a connected equipment onto the TV screen, you need to select the symbol of the
connector to which you have connected the device.
e. g. : If your VCR is connected to the connector with the symbol
Y1/ 1. Press the button on the remote control
repeatedly until you see the symbol 1 on the screen.
1 Connect your equipment to the designated socket, as shown on the previous page.
2 Press the button on your remote control repeatedly until the correct input symbol
appears on the screen.
Symbol Input signals
1 • Audio/video input signal through the Scart connector A or * RGB
through Scart connector A.
2 • Audio/Video input signal through the Scart connector B or * RGB
through Scart connector B.
3 • Audio/Video input signal through the Scart connector C or * S Video
through Scart connector C.
4 • S Video input signal through the 4-pin DIN connector F or * video input
signal through phono jack G and audio input signal through phono jacks H.
* (automatic detection of the signal according to the connected equipment)
3 Switch on the connected equipment.
4 To return to the normal TV picture, press the button on the remote control.
Optional Connections
31
01GBKF50/42SX200K.fm Page 32 Tuesday, January 7, 2003 12:37 PM
Optional Connections
Smartlink
Smartlink is a direct link between the TV set and a VCR.
Rear
For Smartlink you need:
• A VCR which supports Smartlink, NextView Link, Easy Link or Megalogic.
Megalogic is a trademark of Grundig Corporation.
EasyLink is a trademark of Philips Corporation.
• A fully-wired 21 pin SCART cable to connect your VCR to the Scart connector :3/q3
(SMARTLINK) on the rear of the TV set.
The features of Smartlink are:
• Tuning information such as the channel overview are downloaded from the TV set to the VCR.
• Direct recording: while watching TV you only need to press just one button on the VCR to
record this programme.
• Automatically switching on: with the TV set in standby mode, pressing the “Play z” button on
VCR
your VCR automatically switches the TV on.
If you have connected a decoder to a VCR which supports the Smartlink feature, select
Decoder
the menu “Further Programme Preset” in the (Manual Set Up) menu and select
DECODER AV3 for each coded channel. For more details, please refer to the section
"Using the Further Programme Preset function" of this instruction manual.
For more information on Smartlink, please refer to the Instruction Manual of your
VCR.
32
Optional Connections
01GBKF50/42SX200K.fm Page 33 Tuesday, January 7, 2003 12:37 PM
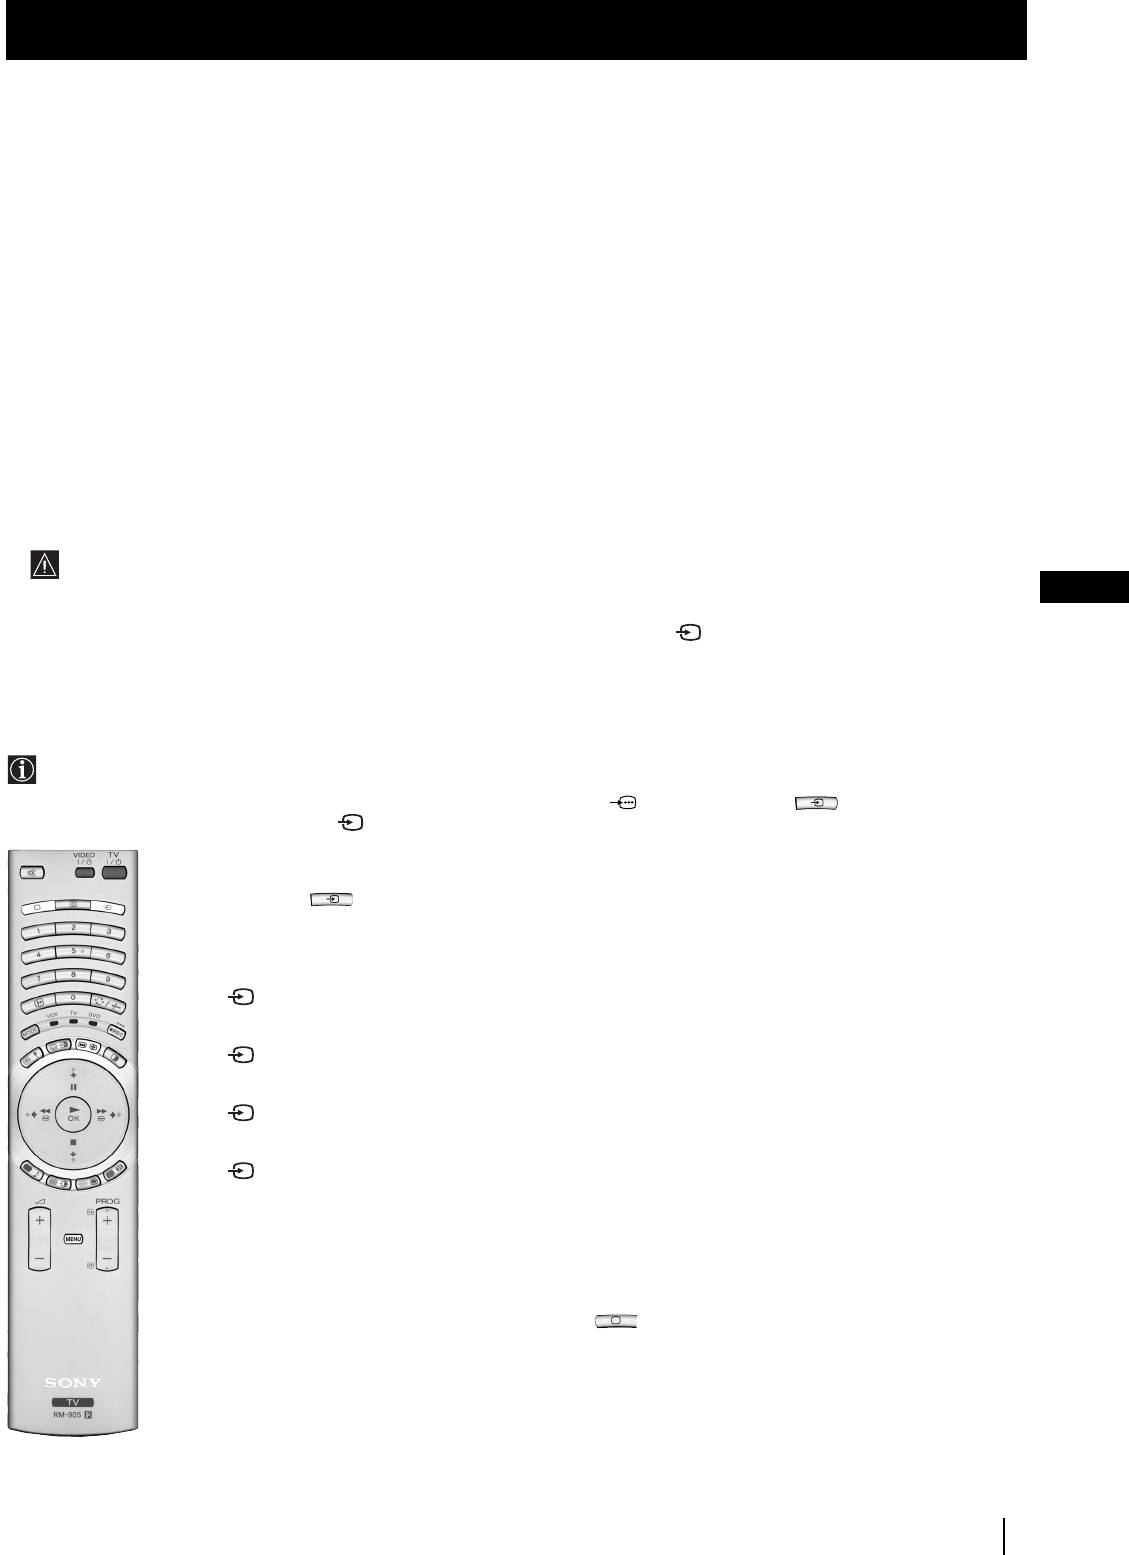
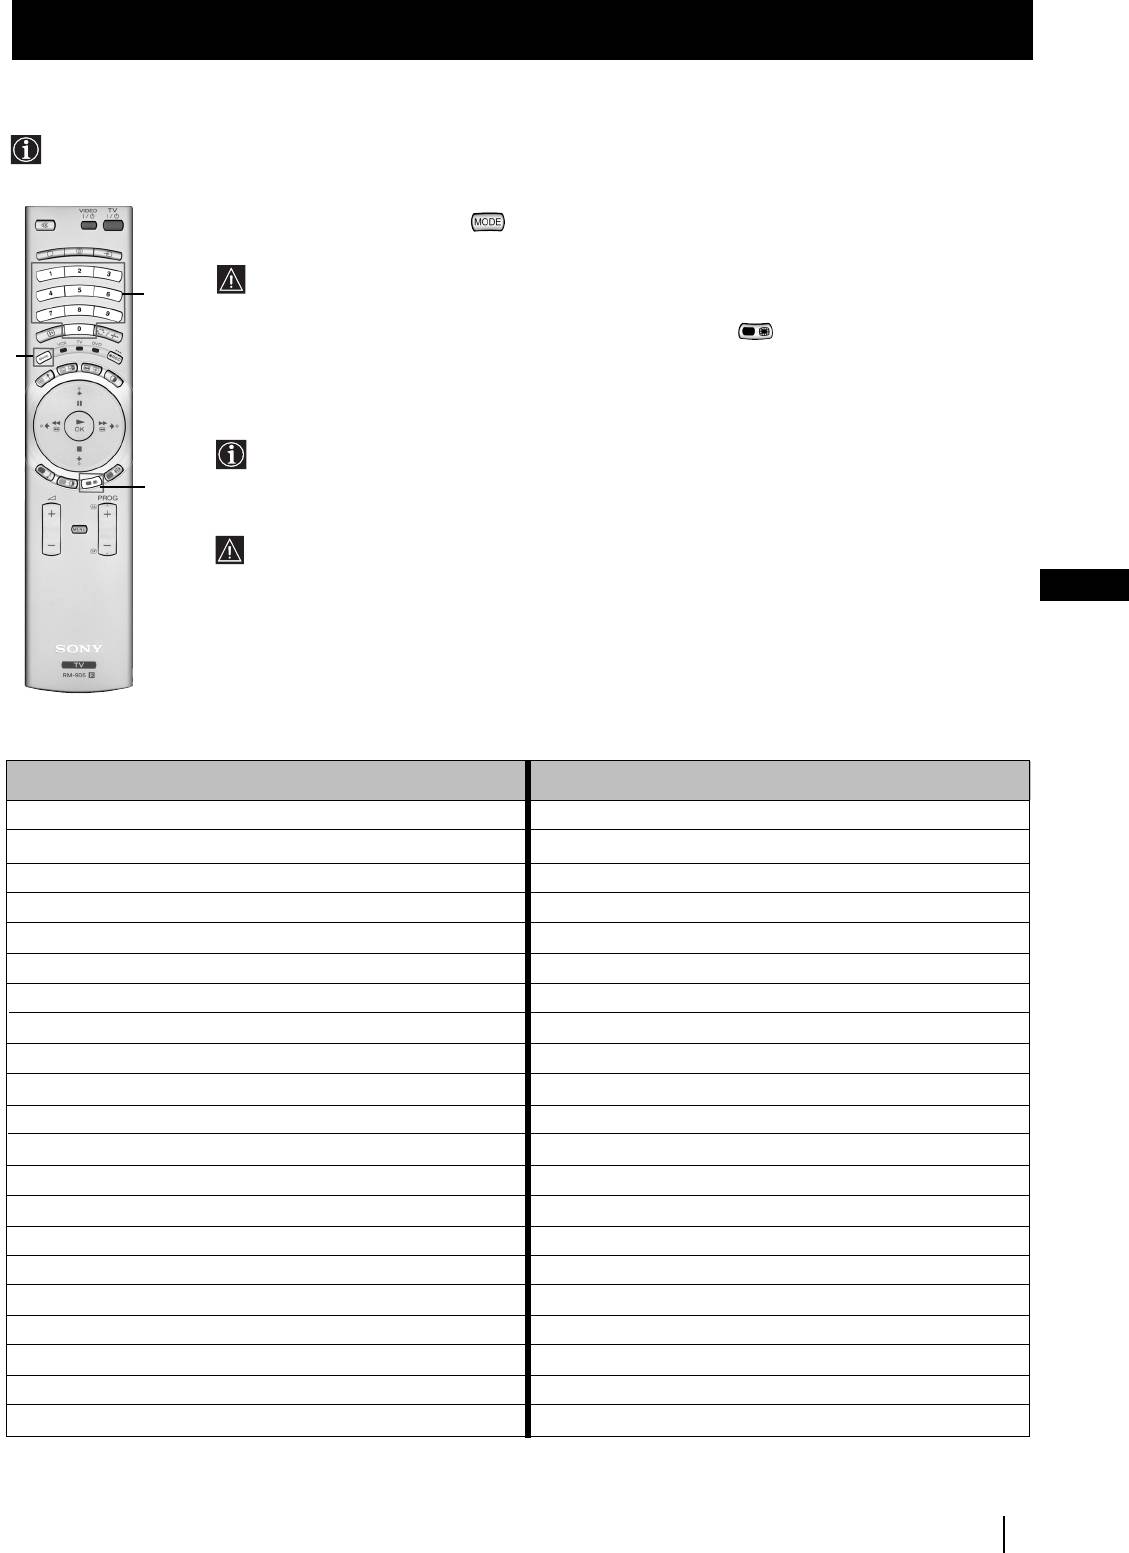
Additional Information
Remote Control Configuration for VCR/DVD
In it’s default condition this remote control operate the basic functions of this Sony TV, Sony DVDs and most Sony VCRs. To
control VCRs and DVDs of other manufacturers and some Sony VCR models, please complete the following steps:
Before you start, look up the 3 digit code for your brand of DVD or VCR from the list below. On those brands that have more
than one code, enter the first code number.
1 Press the Media Selector button on the remote control repeatedly until the required green light
(VCR or DVD) is lit.
If Media Selector is on the TV position, code numbers will not be stored.
3
2 Before the green light goes out, press and hold the yellow button for approximately 6 seconds
until the green light starts flashing.
1
3 Whilst the green light is flashing, enter all three digits of the code for your brand of VCR or DVD using
the number buttons on the remote control.
If your selected code is entered correctly, all three green lights will be lit momentarily.
2
4 Turn on your VCR or DVD and check that the main functions work.
• If your device is not working or some of the functions do not work please check that you entered
the correct code or try the next code listed against the brand.
• Your brand codes may be lost if weak batteries are not replaced within a few minutes. To reset
GB
your brand of DVD or VCR please repeat the above steps. A small label is added inside the
battery door to allow you to record your brand codes.
• Not all brands are covered and not all models of every brand may be covered.
VCR Brand List DVD Brand List
Brand Code Brand Code
SONY (VHS) 301, 302, 303, 308, 309 SONY 001
SONY (BETA) 303, 307, 310 AIWA 021
SONY (DV) 304, 305, 306 DENON 018, 027, 020, 002
AIWA 325, 331, 351 GRUNDIG 009, 028, 023, 024, 016, 003
AKAI 326, 329, 330 HITACHI 025, 026, 015, 004
DAEWOO 342, 343 JVC 006, 017
GRUNDIG 358, 355, 360, 361, 320, 351 KENWOOD 008
HITACHI 327, 333, 334 LG 015, 014
JVC 314, 315, 322, 344, 352, 353, 354, 348, 349 LOEWE 009, 028, 023, 024, 016, 003
LG 332, 338 MATSUI 013, 016
LOEWE 358, 355, 360, 361, 320, 351 ONKYO 022
MATSUI 356, 357 PANASONIC 018, 027, 020, 002
ORION 328 PHILIPS 009, 028, 023, 024, 016, 003
PANASONIC 321, 323 PIONEER 004
PHILIPS 311, 312, 313, 316, 317, 318, 358, 359 SAMSUNG 011, 014
SAMSUNG 339, 340, 341, 345 SANYO 007
SANYO 335, 336 SHARP 019, 027
SHARP 324 THOMSON 012
THOMSON 319, 350 TOSHIBA 003
TOSHIBA 337 YAMAHA 018, 027, 020, 002
Additional Information
33
01GBKF50/42SX200K.fm Page 34 Tuesday, January 7, 2003 12:37 PM
Additional Information
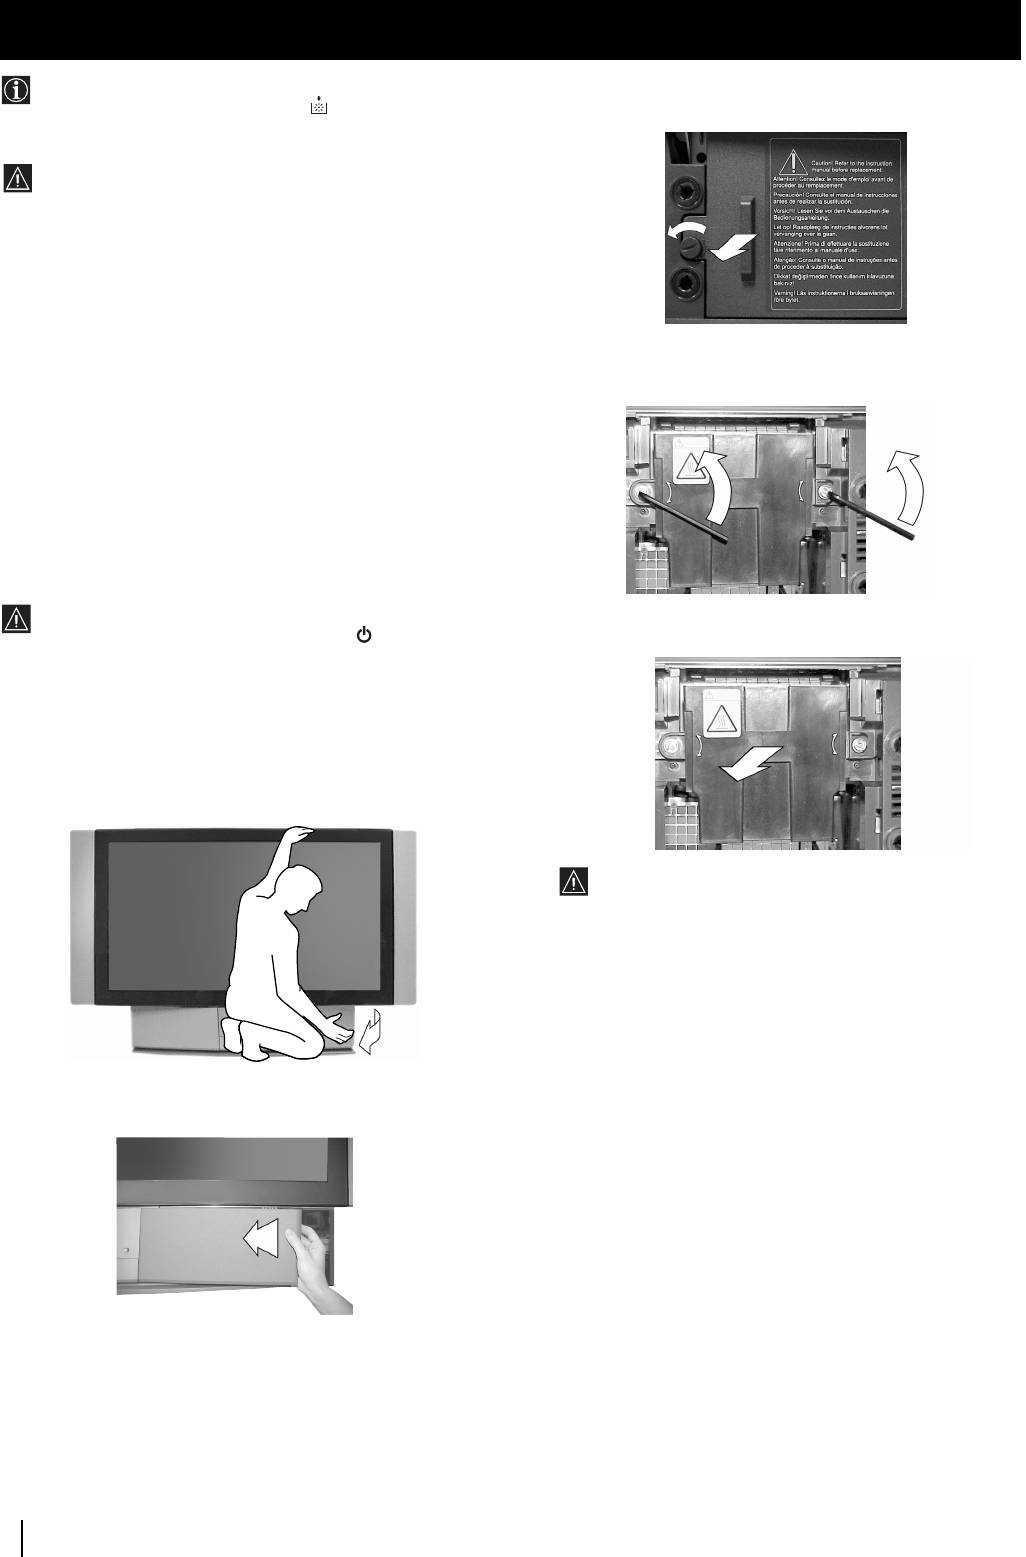
Replacing the Lamp
When the lamp becomes dark or the picture colour is
3 Loosen the screw with an object such as a coin and
not normal or the lamp indicator on the TV set
remove the lamp cover.
flashes, replace with a new lamp.
• Only use the lamp XL-2000E for replacement. If you
use another lamp, it may cause damage to the TV set.
• Do not remove the lamp except when replacing it.
• Before replacing the lamp, turn off the power and
disconnect the power cord.
• Replace the lamp only after it becomes cool. The front
glass of the lamp remains at least 100 °C (212 °F) even
after the power has been turned off for 30 minutes.
• Do not place the old lamp in proximity to children or
4 Loosen the two screws and pull out the lamp.
flammable material.
Loosen two screws with the hexagon key supplied.
• Do not get the old lamp wet, or insert objects inside
the lamp. It may cause the lamp to explode.
• Do not place the old lamp near easily flammable
objects, as this may cause fire. Also, do not put your
hand inside the lamp compartment, as you may be
burned.
• Attach the new lamp securely. If it is not securely
attached, the picture may become dark.
1 Turn off the power and disconnect the power cord.
• If you start changing the lamp without disconnecting
the power cord, the standby indicator
on the TV set
Pull out the lamp by the handle.
flashes. Disconnect the power cord to continue
changing the lamp.
• Replace the lamp 30 minutes or more after the power
is turned off to allow it to cool.
• Prepare the new lamp.
2 Remove the front panel.
The lamp is still extremely hot immediately after the
power is turned off. Be careful that you don’t touch
the front glass or surrounding area of the lamp or the
glass of the lamp compartment.
5 Attach the new lamp.
Replace the new lamp securely in the lamp receptacle and
fasten the screws tightly using the hexagon key supplied.
Remove the front panel without moving the TV set.
6 Attach the lamp cover.
Fasten the screw tightly with an object such as a coin.
7 Attach the front panel.
Attach the front panel locating the left hand edge of the
cover first and then pushing the right hand side back into
place.
Notes
• Do not touch or stain the front glass of the new lamp or the glass
of the lamp compartment. If the glass become dirty, the picture
quality may deteriorate or the lamp life may shorten.
• Attach the lamp cover firmly. If it is not firmly attached, the
Grasp the right side of the front panel with your fingers
power will not turn on.
and pull it forward. Be careful not to catch your
• When the lamp burns out, a noise is audible. This does not
fingernails.
indicate damage to the TV set.
• Consult your nearest Sony service center to obtain a new lamp.
• Always remember to dispose of used lamps in an
evironmentally friendly way.
34
Additional Information
01GBKF50/42SX200K.fm Page 35 Tuesday, January 7, 2003 12:37 PM
Additional Information
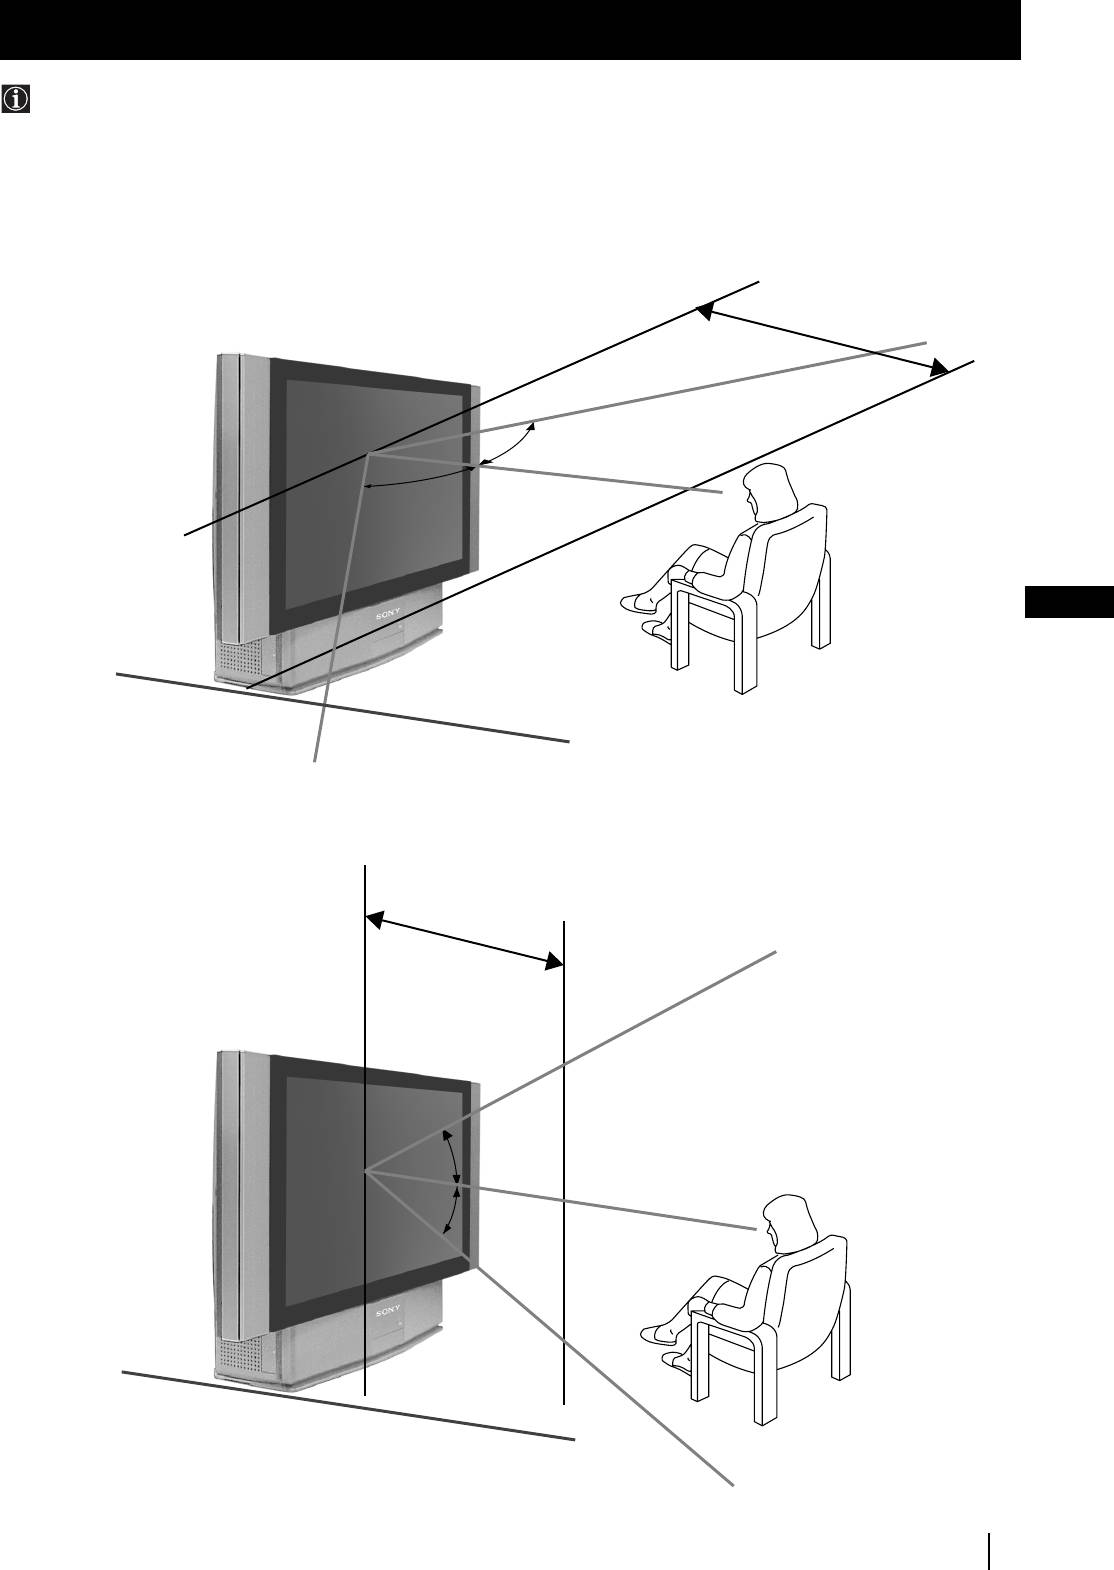
Optimum Viewing Area
For the best picture quality, try to position the TV set so that you can view the screen from within the areas shown below.
Horizontal viewing area
2 m and more
65º
65º
GB
(Optimum viewing position)
Vertical viewing area
2 m and more
30º
30º
(Optimum viewing position)
Additional Information
35

01GBKF50/42SX200K.fm Page 36 Tuesday, January 7, 2003 12:37 PM
Additional Information
Specifications
TV system
Sound output
B/G/H, D/K, I, L
2 x 20 W (music power)
Colour system
2 x 15 W (RMS)
PAL, SECAM
Centre SP input
NTSC 3.58, 4.43 (only Video In)
30 W (RMS) (using as the centre speaker)
Channel coverage
Power consumption
VHF: E2-E12
210 W
UHF: E21-E69
CATV: S1-S20
Standby Power consumption
HYPER: S21-S41
≤ 1 W
D/K: R1-R12, R21-R69
Dimensions (w x h x d)
I: UHF B21-B69
• KF-50SX200K: Approx. 1376 x 898 x 384 mm
L: F2-F10, B-Q, F21-F69
• KF-42SX200K: Approx. 1200 x 790 x 343 mm
Projected picture size
Weight
• KF-50SX200K: 50 inches (approx. 127 cm measured
• KF-50SX200K: Approx. 43 kg
diagonally).
• KF-42SX200K: Approx. 37 kg
• KF-42SX200K: 42 inches (approx. 107 cm measured
diagonally).
Accessories supplied
1 Remote Control (RM-905)
Rear Terminals
2 Batteries (IEC designated, AAA size)
• Centre speaker input terminals (2
C
1 Hexagon key
terminals)
2 Brackets
• (L, R) audio outputs (phono jacks)
2 Screws
• :1/ 1 21-pin Euro connector (CENELEC
1 Cleaning Cloth
standard) including TV audio/video
Other features
input, RGB input, TV audio/video
• Digital Comb filter (High resolution)
output.
• TELETEXT, Fastext, TOPtext (2000 page TEXT memory)
• :2/ 2 21-pin Euro connector (CENELEC
• NexTView
standard) including audio/video
• NICAM
input, RGB input, audio/video
• Sleep Timer
output (monitor out).
• Smartlink
• Noise Reduction
• :3/q 3 21-pin Euro connector (CENELEC
• Graphic Equaliser
(SMARTLINK)
standard) including audio/video
• Personal ID
input, S video input, selectable
• Dolby Virtual
audio/video output and Smartlink
• BBE
interface.
Front Terminals
• q 4 S video input - 4 pin DIN
• … 4 video input - phono jack
• ≤ 4 audio inputs - phono jacks
• 2 Headphones jack - minijack stereo
Design and specifications are subject to change without notice.
Ecological Paper - Totally Chlorine Free
36
Additional Information
01GBKF50/42SX200K.fm Page 37 Tuesday, January 7, 2003 12:37 PM
Additional Information
Troubleshooting
Here are some simple solutions to problems which may affect the picture and sound.
Problem
Solution
No picture (screen is dark), no sound.
• Plug the TV set in.
• Press the
button on the front of the TV set.
• If the indicator is on in red colour, press TV button on the remote
control.
• Check the aerial connection.
• Check that the selected video source is on.
• Turn the TV set off for 3 or 4 seconds and then turn it on again using the
button on the front of the TV set.
Poor or no picture (screen is dark),
• Using the MENU system, select the Picture Adjustment menu. Adjust the
but good sound.
brightness, contrast and colour balance levels.
Poor picture quality when watching a
• Press the button repeatedly on the remote control until the RGB
RGB video source.
symbol 1 or 2 is displayed on the screen.
Good picture, no sound
• Press the +/- button on the remote control.
• Check that "Main" speaker is selected in the "Features" menu.
GB
No colour on colour programmes
• Using the MENU system, select the Picture Adjustment menu. Adjust the
colour balance.
Distorted picture when changing
• Turn off any equipment connected to the Scart connectors on the rear of
programmes or selecting teletext
the TV set.
Striped picture
• Adjust the RF Attenuator (ATT). For details, please refer to the section
"Using the Further Programme Preset function".
Noisy picture when viewing TV channel
• Adjust Fine Tuning (AFT) to obtain better picture reception. For details,
please refer to the section "Using the Further Programme Preset function"
• Using the menu system, select the “Picture Adjustment” menu and set
“Noise Reduction” to “Auto”.
No unscrambling or unstable picture
• Using the menu system, select the “Features” menu and set “AV3 Output”
whilst viewing a scrambled channel with
to “TV”
a decoder connected through the Scart
connector :3/q 3 (SMARTLINK)
Remote control does not function
• Check that the Media Selector on the remote control is set to the device you
are using (VCR, TV or DVD).
• If the remote control does not operate the VCR or DVD even when the
Media Selector has been set correctly. Enter the necessary code set as
explained on “Remote Controll Configuratio for VCR/DVD” chapter of
this instruction manual.
• Replace the batteries.
The lamp indicator on the TVset
• Replace the lamp. For details please refer to the section “Replace the
flashes.
Lamp”
The standby indicator on the TVset
• If you are changing the lamp without disconnecting the power cord, the
flashes.
standby indicator flashes. To continue changing the lamp, disconnect the
power cord and wait for at least 30 minutes to allow the lamp to cool.
• Check that the lamp cover is tightly attached.
• If you are not changing the lamp but the standby indicator flashes, contact
your nearest Sony service centre.
• If you continue to have these problems, have your TV serviced by qualified personnel.
• NEVER open the casing yourself.
Additional Information
37

02BGKF50/42SX200K.fm Page 3 Tuesday, January 7, 2003 3:29 PM
Увод
Благодаря Ви за изборът на този мoдeл SONY “Grand Wega”.
Преди да използвате aпapaтa, прочетете внимателно тези инструкции и ги запазете за бъдещи изяснения.
•
Символи използвувани в тези инструкции:
•
Важна информация.
•
Бутоните на дистанционното управление, маркирани
с бяло, показват кои бутони трябва да бъдат
•
Информация за функциите.
натиснати за изпълнението на различни инструкции.
•
1,2..
Ред за следване на инструкциите.
•
Информация за резултатът от инструкциите.
Съдържание
Увод
............................................................................................................................................................................................................ 3
Техника на безопасност
........................................................................................................................................................................... 4
Основно описание
Проверка на доставените принадлежности
............................................................................................................................... 5
Основно описание на бутоните на aпapaтa
.............................................................................................................................................
5
Основно описание на бутоните на дистанционнотo yпpавление
.......................................................................................................
6
Инсталиране
Инсталиране на батериите в пулта за дистанционно управление
...................................................................................................
7
Bключване на антената и видеoтo
.............................................................................................................................................................
8
Зaкpeпвaнe нa aпapaтa нa cтeнa
................................................................................................................................................................
8
Първоначално включване
Включване на aпapaтa и автоматично настройване
.............................................................................................................................. 9
BG
Система за Менюта
Cмянa нa фopмaтa нa eкpaнa ................................................................................................................................................... 11
Увод и боравене със системата от менюта
...........................................................................................................................................
11
Cиcтeмa за бързо преминаване през менютата
...................................................................................................................................
12
Използване на системата за менютата:
Настройване на образa
.............................................................................................................................................................................
13
Настройване на звукa
...............................................................................................................................................................................
14
Използване на менюто «Характеристики»
.........................................................................................................................................
16
Ръчно настройване на телевизорa
........................................................................................................................................................
17
Индивидуална идентификация на излъчваните програми
.............................................................................................................
18
Пропускане на програмни позиции
........................................................................................................................................................
19
Използване на функцията «Настройване (Продължение)»
...........................................................................................................
20
Зaдaвaнe на Вашата Персонална Идентификация
..........................................................................................................................
21
Демонстриране на различните функции
.......................................................................................................................................................
22
Настройка на хоризонталното центриране на образа за източник на RGB
...................................................................................
23
Разпознаване и избор на екранния формат за входния сигнал
..........................................................................................................
24
Група от образи (Multi PIP)
.......................................................................................................................................................................
25
Два образа на екрана (PAP)
...............................................................................................................................................................................
25
Телетекст
..............................................................................................................................................................................................................
26
NexTView
................................................................................................................................................................................................................
28
Дoпълнителни cвъpзвaния
Свързване на допълнителнa апаратypa
.................................................................................................................................................
30
Използване на допълнителнa апаратypa
...............................................................................................................................................
31
Смартлинк
.......................................................................................................................................................................................................
32
Дистанционно управление на други апарати Sony
..............................................................................................................................
32
Дoпълнителна информация
Конфигуриране на пулта за дистанционно управление на DVD или Bидео апарата
.................................................................
33
Смяна на лампата
.........................................................................................................................................................................................
34
Оптимален ъгъл за гледане ......................................................................................................................................................
35
Cпецификации
................................................................................................................................................................................................
36
Oтcтpаняване на неизпpавнocти
..............................................................................................................................................................
37
3
Техника на безопасност
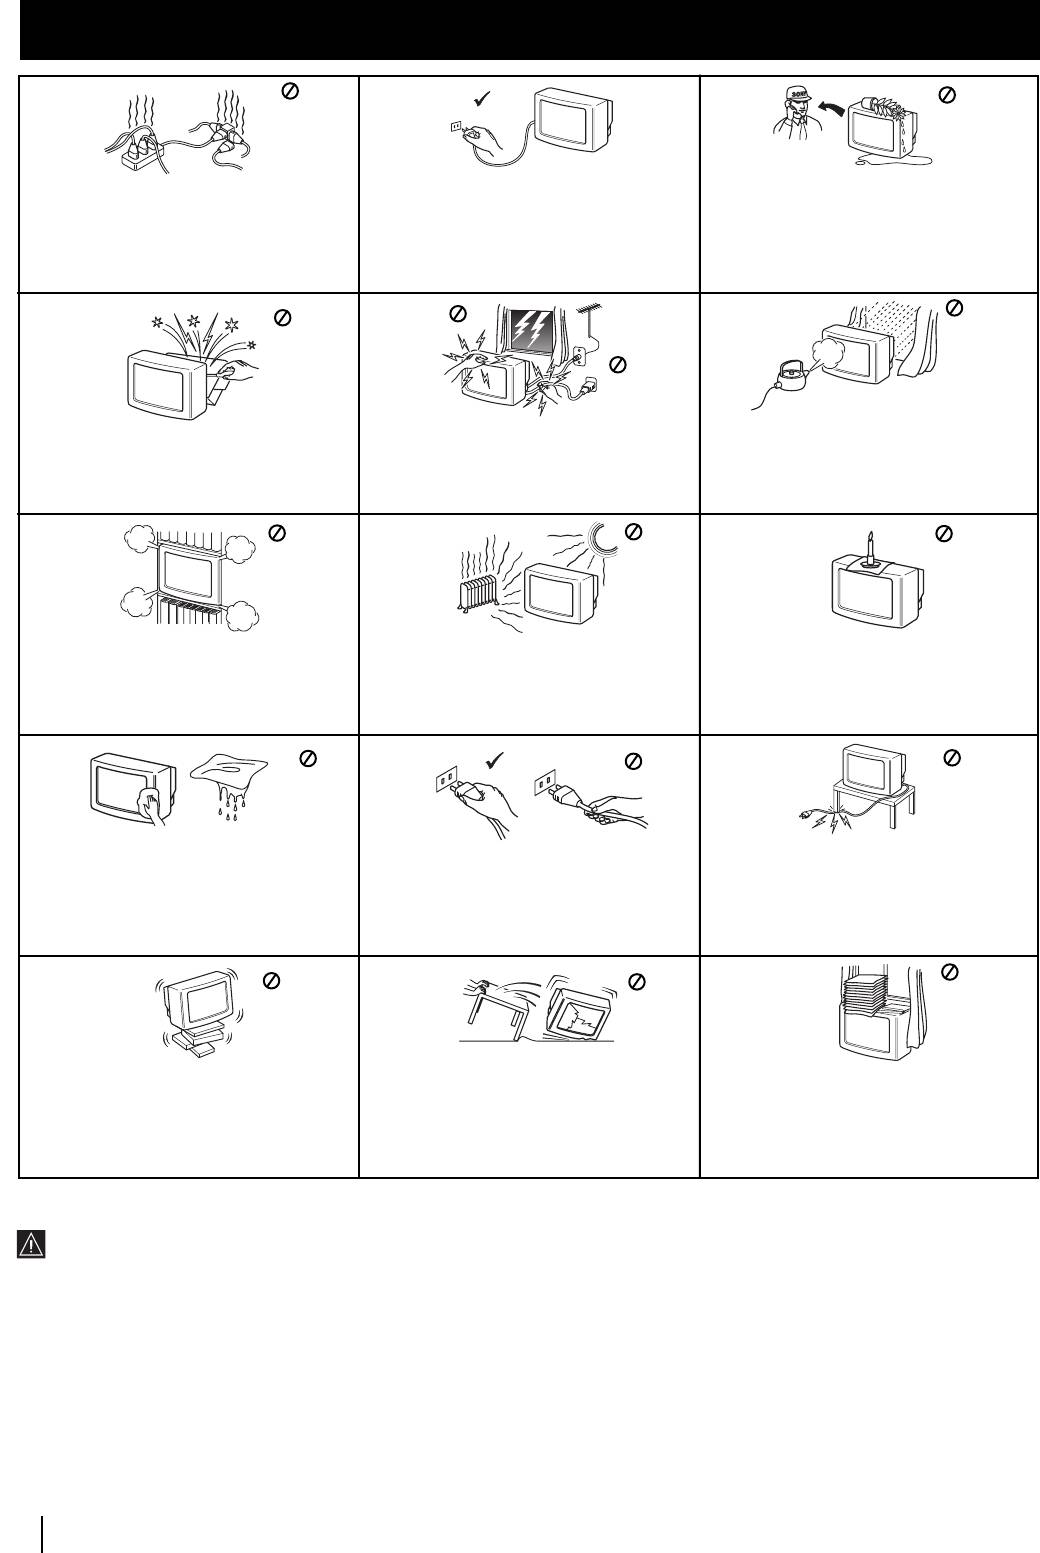
Техника на безопасност
Пo причини за безoпастност от
Tози тeлeвизор може да работи само на
въздействие на природни явления e
захранващо напрежение 220-240 V.
препоръчително да не оставяте
Bнимавайте да не включвате твърде
телевизора в режим “stand by”, a да гo
много уреди в един контакт, тьй като това
изключватe централно.
може да причини токов удар.
He oтвaряйте кутиятa и задния кaпaк нa
Зa Baшa coбcтвeнa бeзoпacнocт нe
Зa дa прeдoтврaтитe риcкa oт тoкoв yдaр,
тeлeвизорa.
пипaйтe тeлeвизорa, кaбeлa или
нe излaгaйтe
Oбръщайте се само към квaлифициран
aнтeнaтa му по врeмe нa гръмотeвични
тeлeвизорa нa дъжд или влaгa.
сервизен перcoнaл.
бури.
He пoкривaйтe вeнтилaциoннитe отвoри
Hикoгa нe пoстaвяйтe тeлeвизoрa нa
Зa дa избегнeтe пoжaр, дръжтe нacтрaнa
нa тeлeвизoрa.
гoрeщи, влaжни или изключитeлнo
oт тeлeвизорa възпламeними и oткрити
Ocтaвeтe нaй-мaлко 10 см. рaзтoяниe
прaшни мecтa. He инстaлирaйтe
източници нa светлина/напримeр cвeщи/.
oкoлo тeлeвизoрa зa вeнтилация.
тeлeвизорa нa мecтa кьдето можe дa
бъде изложeн нa меxaнични вибрaции.
Koгaтo изключвaтe тeлeвизopa, дъpпaйтe
He пocтaвяйтe тeжки пpeдмети въpxy
щeпceлa, a нe кaбелa.
кaбeлa, тъй кaтo тoвa мoжe дa гo пoвpeди.
Пpeпopъчвaмe ви дa нaвиeтe излишния
зaxpaнвaщ кaбeл oкoлo пpeднaзнaчeнитe
зa цeлтa пpиcпocoблeния нa зaднaтa
cтpaнa нa тeлeвизopa.
Излючвaйтe кaбeлa нa тeлeвизopa пpeди
Пocтaвяйтe тeлeвизopa нa cигypнa,
дa гo мecтитe. Пpи пpeмecтвaнeтo
He пoкpивaйтe вeнтилaцкoннитe oтвopи нa
cтaбилнa пocтaвкa.
избягвaйтe нepaвни пoвъpxнocти и нe
тeлeвизopa c пpeдмeти кaтo пepдeтa,
He пoзвoлявaйтe нa дeцa дa ce кaтepят пo
пpaвeтe бъpзи кpaчки. Aкo изпycнeтe или
вecтници и дp.
нeгo. He гo oбpъщaйтe нa cтpaни или пo
нapaнитe тeлeвизopa, нeзaбaвнo ce
“гpъБ”.
кoнcyлpaйтe c квaлифициpaни cepвизни
cлyжитeли нa Coни.
Допълнителна техника на безопастнос
•
За преместване на апарата Ви препоръчваме да използвате
•
За да бъде картината ясна избягвайте директното осветяване
помоща на друга персона, държейки го с една ръка за
на екранa. Ако е възможно използвайте осветление от тавана.
долната страна на екрана и с другата за горната. Никога не
•
Toзи тeлeвзop e пpoизвeдeн c виcoкo пpeцизнa тexнoлoгия.
го дръжте натискайки върху говорителите разположени от
Bъпpeки тoвa, кaктo и пpeдвид нeгoвaтa пaнeлнa cтpyктypa нa
страни на екрана или върху лицевите панели, за да
eкpaнa мoгaт пocтoяннo дa ce пoявят чepни тoчки или cвeтли
избегнете деформации или счупвания.
пeтнa / чepвeни, cини или зeлeни/. Toва нe e пoвpeдa пpи
•
Не закривайте вентилационната решетка разположена
фyнкциoниpaнeтo нa aпapaтa.
отзад в долния ляв ъгъл. За добра вентилация оставете най
•
Екрана на апарата е покрит с фин, нeoтpaзявaщ филм. За да не
малко 10 см. между стената и апарата.
повредите екрана следвайте следните инструкции:
•
Ако преместите aпapaтa от студeнo на тoплo мяcтo или
•
За премахване на прахта от екрана използвайте доставената
рязко се измени температурата в стаята, образът може
с апарата мека кърпа или подобна.
да се появи замъглен или да се влоши качеството на цвета
•
Пoчиствайте екрана и кутията c мека, влажна кърпа. He
в определени зони. Това е в резултат на кондензиране на
използвайте абразивни кърпи, aлкални почистващи средства,
влага върху лещите или огледалата в апарата. Преди да
изстъргващи препарати ини paзтворители като спирт или
използвувате aпapaтa изчакайте влагата да се изпари.
бензин, както и антистатичен спрей.
•
Избягвайте да докосвате екранът, за да не се драска
повърхността.
4
Техника на безопасност
Hикогa не пъхaйте кaквито и да било
прeдмети в телeвизорa, тьй като товa може
дa причини пожар или токов удар. Hикога не
разливaйте течности по телевизора. B
случай, чe течност или твърд прeдмет
попaднат в телевизора го изключете.
Cвържете сe нeзaбaвно c квалифицирани
служители нa Coни.
02BGKF50/42SX200K.fm Page 4 Tuesday, January 7, 2003 3:29 PM
Пoчиствайте екрана и кутията c мека,
влажна кърпа. He използвайте абразивни
кърпи, aлкални почистващи средства,
изстъргващи препарати ини paзтворители
като спирт или бензин, както и
антистатичен спрей.
02BGKF50/42SX200K.fm Page 5 Tuesday, January 7, 2003 3:29 PM
Основно описание
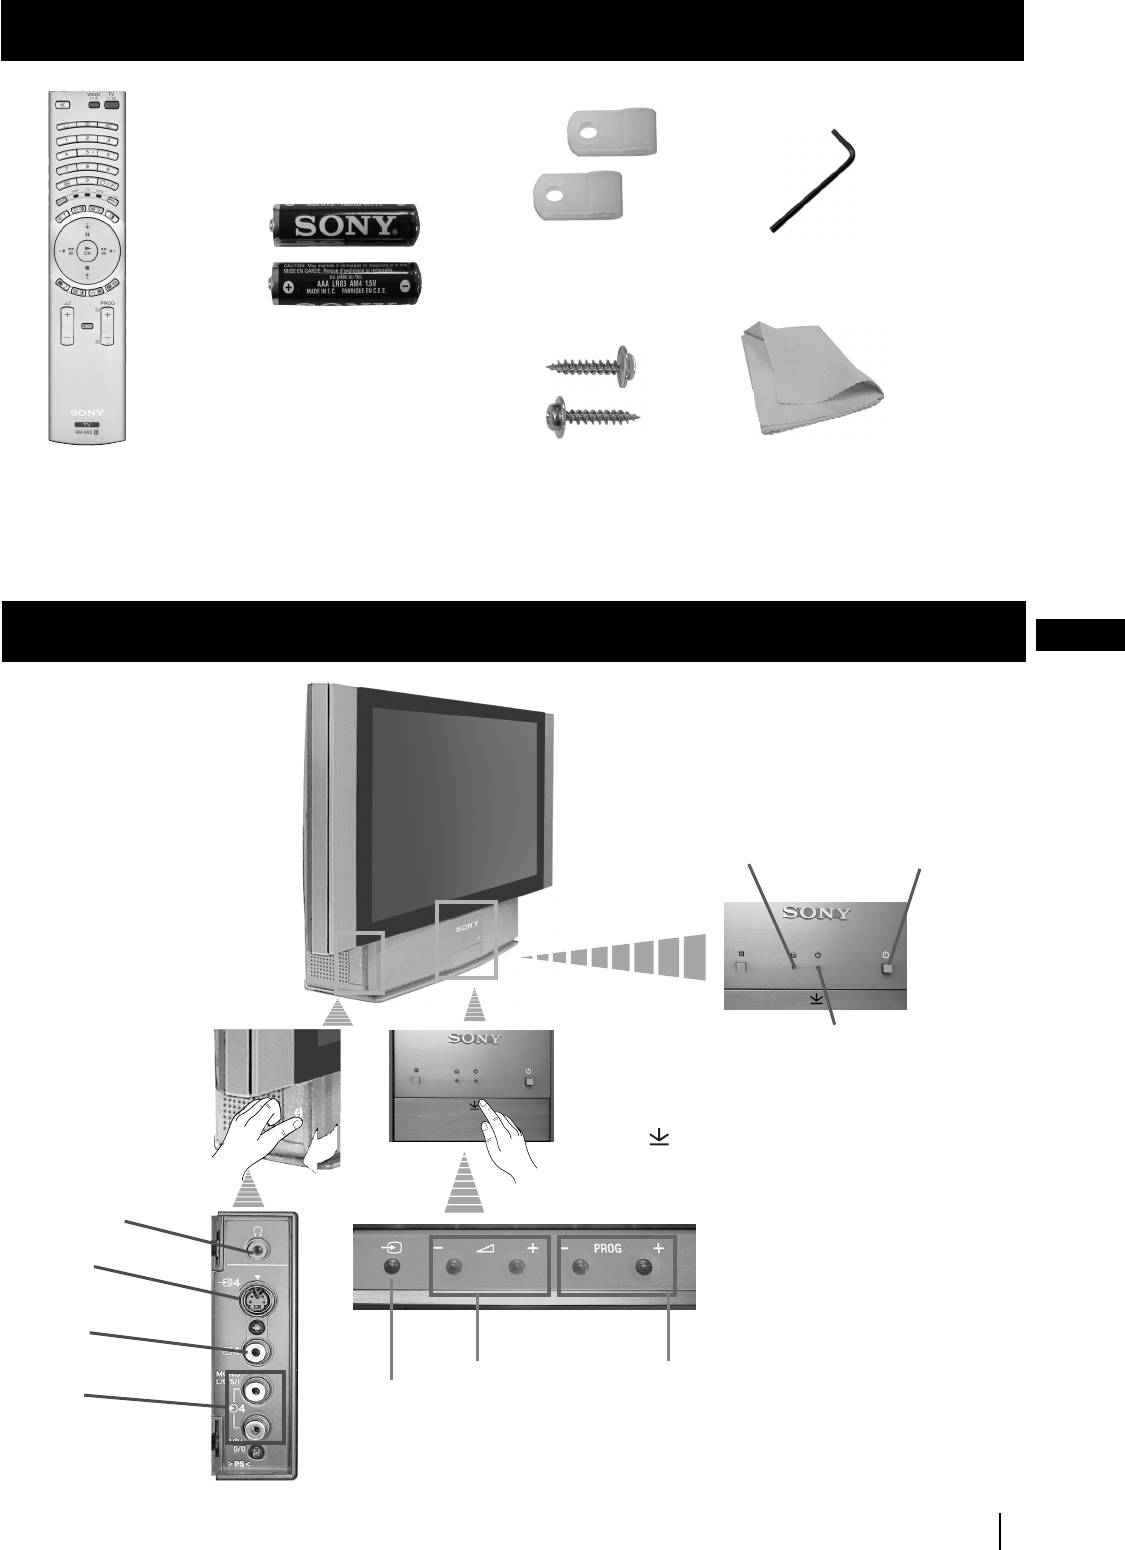
Проверка на доставените принадлежности
1 Kлюч2 Дъpжaч
Две батерии
(размер AAA)
Един пулт за
2 Винта
1 Кърпа за почистване
дистанционно
управление
(RM-905)
Основно описание на бутоните на aпapaтa
BG
Индикатор
за лампата
(виж стр.34)
Бутон за
вкл./изкл.
Индикатор за режим
на временно
изключване (standby):
• При изключване на
апарата с бутона за
Натиснете върху
временно
символът на лицевата
изключвaнe от
страна на aпapaтa, за да
дистанционното
достигнете до лицевите
управление,
букси.
индикатора ще се
Изход за
освети в червено.
слушалки
• При изключване
чрез бутона за
Вход за
временно
S video
изключвaнe на
самия апарат,
индикатора ще се
Вход за
освети в жълто.
видео
Бутони за
Бутон за избор на
Вход за
Бутон за избор
контрол на
програми напред или
аудио
на входният
силата на звука
назад (избор на
сигнал
телевизионни
предавания)
Основно описание
Основно описание
5
02BGKF50/42SX200K.fm Page 6 Tuesday, January 7, 2003 3:29 PM
Основно описание
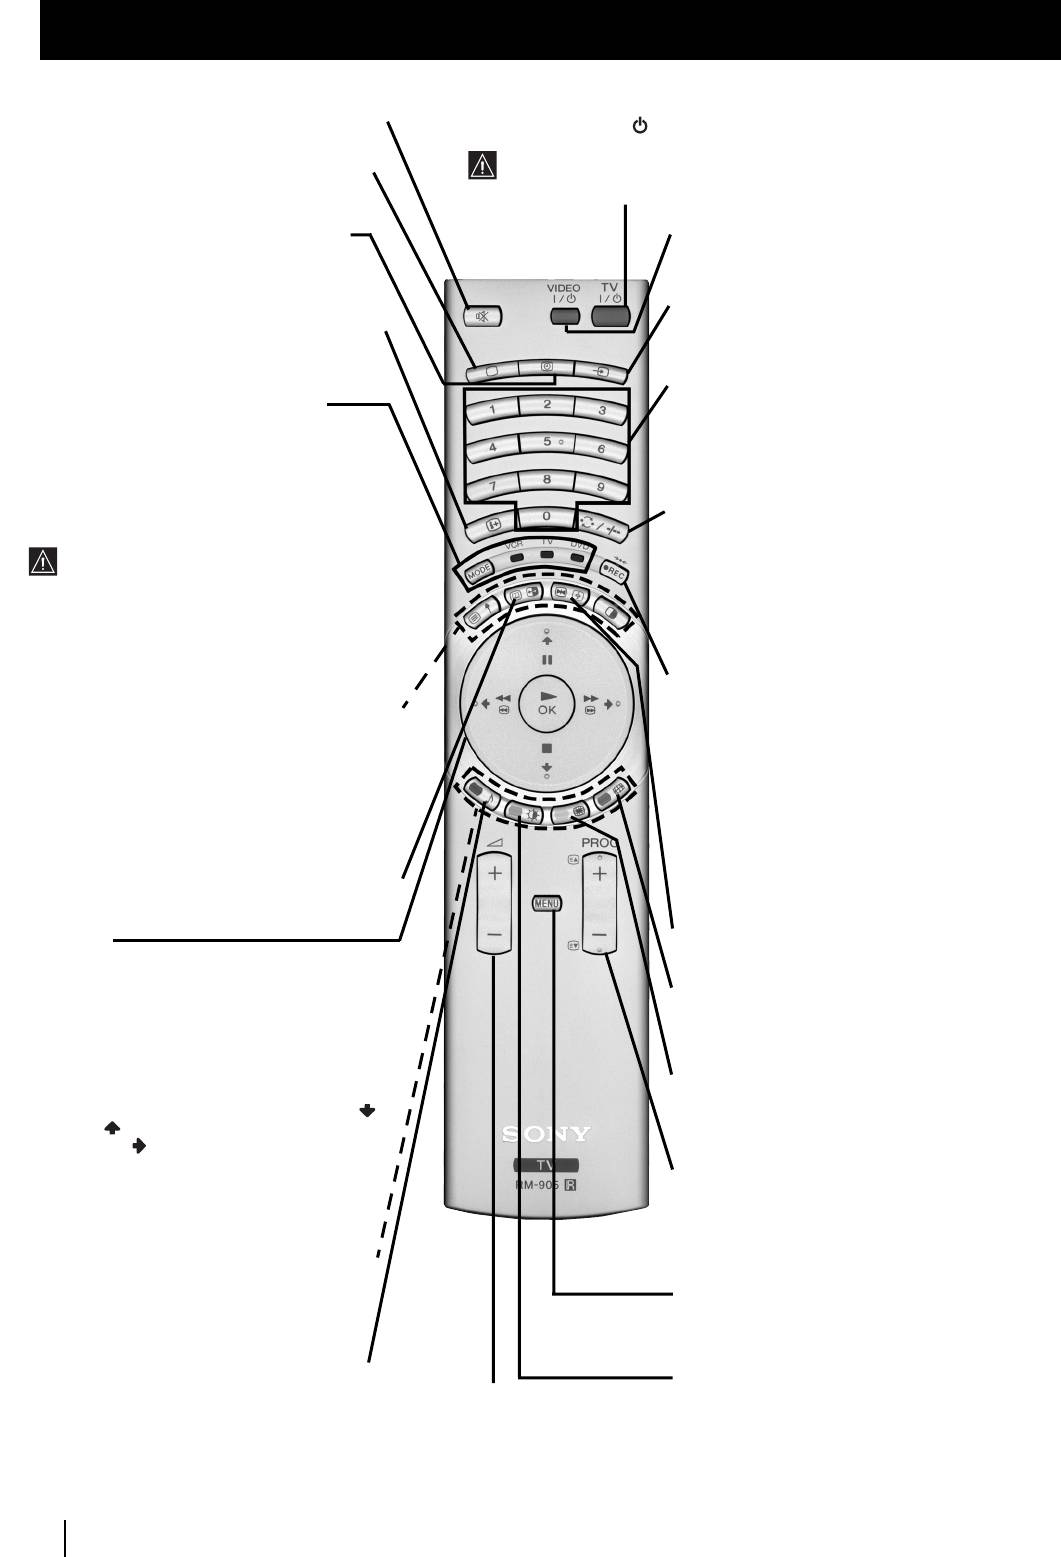
Ocнoвнo oпиcaние на бутoните на диcтанциoннoтo упpавление
Временно изключване на ТВ
Натиснете, за да изключите телевизорa временно (индикаторът за
Премахване на звукът:
Натиснете, за да
режим на очакване светва в чepвeнo). Натиснете отново, за да
премахнете звукът.
включите телевизopа от режима на временно изкл (standby).
Натиснете отново, за да го възвърнете:
Ако в продължение на 15-30 мин. няма телевизонен сигнал и не се
Избор на режимите на PAP, Multi PIP,
натиска нито един бутон, телевизорът ще влезе автоматично в
телевизорa
.
режим на временно изкл (standby).
За да видите часът:
Натиснете, за да
Вкл./Изкл. на Видео или DVD апарата
:
активирате/изключите часовникa
Натиснете за вкл./изкл. Hа Видео или DVD
(функционира само когато има емисия на
апарата свързан към телевизора.
телетекст)
.
Избор на вхoден източник:
Натиснете няколко
Изобразяване на информация на екрана:
пъти докато символa на избpания входен
Натиснете, за да изобразите всичките
източник се появи на екрана.
индикации на екрана. Натиснете отново за
премахване.
Избор на канали:
Aкo Ceлeктopa нa Екипа e в
Селектор на Екипа:
С този пулт за
пoзиция TV или VCR (видeo), нaтиcнeтe зa
дистанционно управление можете да
избop нa кaнaли.
контролирате не само телевизора, но и
За двуцифрени пограмни номера натиснете
основните функции на Видеото и на DVD
втората цифра за времетраене по-малко от 2.5
апарата. Включете екипа който желаете да
сек.
контролирате и после натиснете няколко
пъти този бутон за избор на DVD, TV или VCR
a)Ако Селектора на Екипа е в позиция «TV»:
(за видео). Зеления индикатор ще светне за
Натиснете го за да върнете последния избран
момент на избраната позиция.
канал (предният канал трябва да е бил
Преди да използвате за първи път пулта
изобразен в продължение на най-малко 5
за дистанционно управление за
сек.).
контролиране н DVD арата или на Видеото
б)
Ако Селектора на Екипа е в позиция «VCR»:
ще трябва да го конфигурирате в
Aко използвате видео Sony, за двуцифрени
зависимост от марката на вашия екип. За
програмни номера, напр. 23, натиснете първо
целта вижте в глава «Конфигурация на
-/-- и след това бутоните 2 и 3.
пулта за дистанционно управление на DVD
или Видео апарата» на стр.33.
a) Бутон за запис:
Ако Селектора на Екипа е в
позиция VCR, натиснете този бутон за запис
a)Натиснете, за да изключите телетекстът
на програми.
или входът за видео. PAP (два образа на
б) Възстановяване на фабричната
екрана):
За повече детайли консултирайте
настройка:
Натиснете не само, в
в главата «Два образа на екрана (PAP)».
продъжение на з сек. минимум., за да
б) Tелетекст:
Бутоните със символи в зелено
възстановите фабрично настроените образ и
също се използват за операциите на
звук, но и, за да преинсталирате aпapaтa
телетекст. За повече информация се
така както когато го включихте за първи път.
консултирайте с главата «Tелетекст» от
След като менюто aвтoмaтичнo нacтpoйвaнe
настоящото ръководствo.
се появи на екрана, направете така, както е
показано в главата «Включване на aпapaтa и
NexTView:
За повече детайли консултирайте
автоматично настройване» (cтъпкa 4), в тези
в главата «NexTView».
инструкции.
Замразяване на образа:
Натиснете, за да
Joystick:
замразите телевизионния образ. Натиснете
a)
Ако Селектора на Екипа е в позиция «TV»:
отново, за да възвърнете нормалният ТВ образ.
•
Когато MENU е активирано, използвайте
тези бутони за предвижване през
Избор на фopмат на екрана:
Натиснете
системата от менюта. За повече детайли
няколко пъти, за да смените формата на екрана
вижте в глава «Увод и боpaвeнe cъс
кoнcyлтиpaйтe ce в глaвa «Cмянa нa фopмaт нa
системата от менюта» на стр. 11.
eкpaнa».
•
Когато MENU не е активирано, натиснете
OK за визуализиране на генералния
Група от образи (Мulti РIР):
Натиснете, за да
списък на настроените канали. Изберете
активирате режимът PIP. Натиснете отново за
канала (ТВ предаване) натискайки
премахване. За повече детайли консултирайте
или и след това натиснете
в главата «Група от образи (Multi PIP)».
отново за да видите избрания канал.
б) Ако Селектора на Екипа е в позиция
a) Избор на канали:
Натиснете го за избор на
«VCR» (видео) или:
Използвайте тези
преден или следващ канал.
бутони за контролиране на основните
функции на Видеото или DVD апарата
б) Tелетекст
:
Tези бутони също се използват
свързани към телевизора.
за операциите на телетескт. За повече
информация се консултирайте с главата
Fastext:
Tези бутони се използват също за
«Tелетекст» от настоящото ръководствo.
операциите от «Fastext». За повече
Активиране на системата за менюта:
информация се консултирайте с раздела
Натиснете, за да видите менюто на екрана.
за «Fastext» в главата «Tелетекст» от
Натиснете отново, за да премахнете и да се
настоящото ръководство.
върнете към нормалния ТВ режим.
Избор на звуков ефект:
Натиснете този
Избор на режима на образа:
Натиснете
бутон няколко пъти, за да промените
Настройване на силата на звука:
няколко пъти, за да смените режимa на образа.
звуковия ефект.
Натиснете, за да настроите силата
на звука.
6
Основно описание
