Sony BRAVIA KDL-20S2020 – page 2
Manual for Sony BRAVIA KDL-20S2020
Table of contents
- Trademark information Introduction Notice for Digital TV function
- Table of Contents
- Start-up Guide 1: Checking the 2: Connecting an aerial/ accessories VCR
- 3: Bundling the cables 4: Preventing the TV from toppling over 5: Selecting the language and country/region
- 6: Auto-tuning the TV
- Safety information
- GB
- GB
- Precautions
- Overview of the remote
- Overview of the TV buttons and indicators
- Watching TV
- To access Text Picture Freeze PIP in PC Mode (Picture in Picture) To change the screen mode manually to suit the broadcast GB
- Checking the Digital Electronic Programme Guide To Do this
- To Do this
- Using the Favourite list To Do this
- Viewing pictures from connected equipment
- Navigating through menus
- Picture Adjustment menu
- Sound Adjustment menu
- TV Speakers
- Features menu
- Timer
- Set-up menu
- Manual Programme Preset
- Skip
- Digital Set-up menu Digital Tuning
- Digital Set-up
- Using Optional Equipment Connecting optional equipment Connecting to the TV (side)
- Connecting to the TV (rear)
- Additional Information Specifications
- Troubleshooting Picture
- Sound Channels General
010COV.book Page 21 Monday, June 12, 2006 3:29 PM
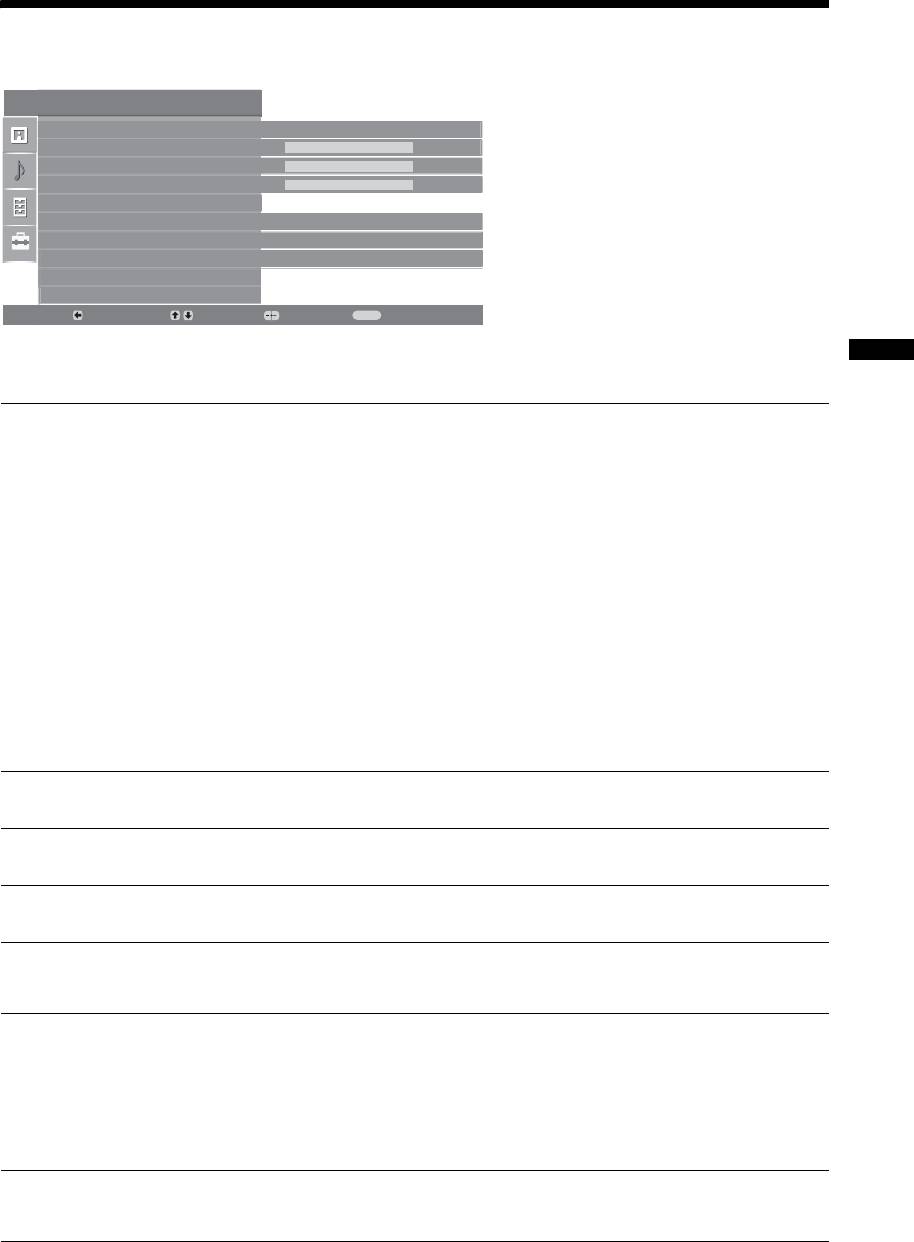
Sound Adjustment menu
You can select the options listed below on the
Sound Adjustment
Sound menu. To select options in “Settings”,
Sound Effect
Standard
see “Navigating through menus” (page 19).
Tr ebl e
50
Bass
50
Balance
0
Reset
Dual Sound
Mono
Auto Volume
On
TV Speakers
On
Back:
Select:
Enter:
Exit:
MENU
Using MENU Functions
Sound Effect
Selects the sound mode.
• “Standard”: Enhances clarity, detail, and sound presence by using “BBE High definition
Sound System.”
• “Dynamic”: Intensifies clarity and sound presence for better intelligibility and musical
realism by using the “BBE High definition Sound System.”
• “BBE ViVA”: BBE ViVA Sound provides musically accurate natural 3D image with Hi-Fi
sound. The clarity of the sound is improved by BBE while the width depth and height of
sound image are expanded by BBE’s proprietary 3D sound process. BBE ViVA Sound is
compatible with all TV programs including news, music, dramas, movies, sports and
electronic games.
• “Dolby Virtual
”
: Uses the TV speakers to simulate the surround effect produced by a multi
channel system.
• “Off”: Flat response.
Tips
• You can change sound effect by pressing 9 repeatedly.
• If you set “Auto Volume” to “On”, “Dolby Virtual” changes to “Natural”.
Treble
Adjusts higher-pitched sounds.
Bass
Adjusts lower-pitched sounds.
Balance
Emphasizes left or right speaker balance.
Reset
Resets all the sound settings to the factory settings.
Dual Sound
Selects the sound from the speaker for a stereo or bilingual broadcast.
• “Stereo”, “Mono”: For a stereo broadcast.
• “A”/“B”/“Mono”: For a bilingual broadcast, select “A” for sound channel 1, “B”
for sound channel 2, or “Mono” for a mono channel, if available.
Tip
If you select other equipment connected to the TV, set “Dual Sound” to “Stereo”, “A” or “B”.
Auto Volume
Keeps a constant volume level even when volume level gaps occur (e.g., adverts tend
to be louder than programmes).
21
GB
2-685-333-41(0)
KDL-20S2020

010COV.book Page 22 Monday, June 12, 2006 3:29 PM
TV Speakers
Turns off the TV speakers e.g. to listen to the sound through external audio
equipment connected to the TV.
• “On”: the sound is output from the TV speakers.
• “One Time Off”: the TV speakers are temporarily turned off allowing you to listen
to the sound from external audio equipment.
• “Permanently Off”: the TV speakers are permanently turned off allowing you to
listen to the sound from external audio equipment.
Tips
• To turn on the TV speakers again, change to on.
• The “One Time Off” option automatically returns to “On” when the TV set is
switched off.
• “Sound Adjustment” options are not available if “One Time Off” or “Permanent
Off” have been selected.
22
GB
2-685-333-41(0)
KDL-20S2020

010COV.book Page 23 Monday, June 12, 2006 3:29 PM
Features menu
Features
You can select the options listed below on the
Features menu. To select options in “Settings”,
Screen
Power Saving
Standard
see “Navigating through menus” (page 19).
AV2 Output
TV
RGB Center
0
PC Adjustment
Timer
Back:
Select:
Enter:
Exit:
MENU
Using MENU Functions
Screen
Changes the screen format.
• “Auto Format”: Automatically changes the screen format according to the
broadcast signal.
• “Screen Format”: For details about the screen format, see page 14
• “Vertical Size”: Adjusts the vertical size of the picture when the screen format is
set to Smart.
Tips
• Even if you have selected “On” or “Off” in “Auto Format”, you can always modify the
format of the screen by pressing repeatedly.
• “Auto Format” is available for PAL and SECAM signals only.
Power Saving
Selects the power saving mode to reduce the power consumption of the TV.
• “Standard”: Default settings.
• “Reduce”: Reduces the power consumption of the TV.
• “Picture Off”: Switches off the picture. You can listen to the sound with the picture
off.
AV2 Output
Sets a signal to be output through the socket labelled / 2 on the rear of the
TV. If you connect a VCR to the / 2 socket, you can then record from the
equipment connected to other sockets of the TV.
• “TV”: Outputs a broadcast.
• “Auto”: Outputs whatever is being viewed on the screen. Not available for
AV3, AV5 and AV6.
RGB Center
Adjusts the horizontal picture position so that the picture is in the middle of the
screen.
Tip
This option is only available if an RGB source has been connected to the Scarts connectors
1/ 1
or 2/ 2 on the rear of the TV.
23
GB
2-685-333-41(0)
KDL-20S2020
010COV.book Page 24 Monday, June 12, 2006 3:29 PM
PC Adjustment
Customizes the TV screen as a PC monitor.
Tip
This option is only available if you are in PC Mode.
• “Phase”: Adjust the screen when a part of a displayed text or image is not clear.
• “Pitch”: Enlarges or shrinkes the screen size horizontally.
• “H Center”: Moves the screen to the left or to the right.
• “V Lines”: Corrects the picture lines while viewing an RGB input signal from the
PC connector.
• “Power saving”: Turns to standby mode if no PC signal is received.
• “Reset”: Resets to the factory settings.
Timer
Sets the timer to turn on/off the TV.
•Sleep Timer
Sets a period of time after which the TV automatically switches itself into standby
mode.
When the Sleep Timer is activated, the (Timer) indicator on the TV (front)
lights up in orange.
Tips
• If you switch off the TV and switch it on again, “Sleep Timer” is reset to “Off”.
• “TV will soon turn off by sleep timer.” appears on the screen one minute before the TV
switches to standby mode.
• Clock Set
Allows you to adjust the clock manually. When the TV is receiving digital
channels, the clock cannot be adjusted manually since it is set to the time code of
the broadcasted signal.
•Timer
Sets the timer to turn on/off the TV.
“Timer Mode”: Selects the desired period.
“On Time”: Sets the time to turn on the TV.
“Off Time”: Sets the time to turn off the TV.
24
GB
2-685-333-41(0)
KDL-20S2020
010COV.book Page 25 Monday, June 12, 2006 3:29 PM
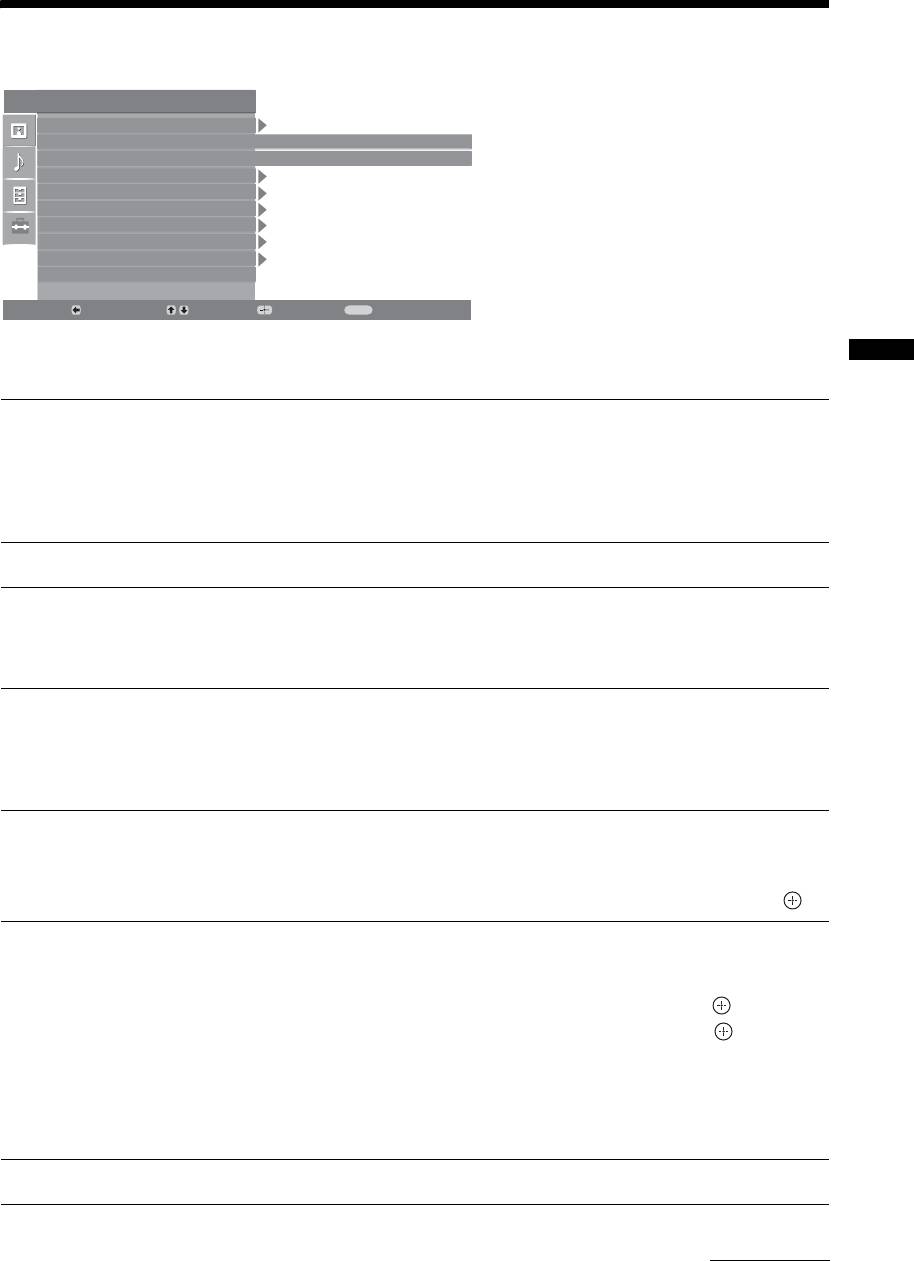
Set-up menu
You can select the options listed below on the
Set Up
Set-up menu. To select options in “Settings”, see
Auto Start Up
Language
English
“Navigating through menus” (page 19).
Country
-
Auto Tuning
Programme Sorting
AV Preset
Sound Offset
Manual Programme Preset
Digital Set Up
Back:
Select:
Enter:
Exit:
MENU
Using MENU Functions
Auto Start-up
Starts the “first time operation menu” to select the language and country/region, and
tune in all available digital and analogue channels. Usually, you do not need to do
this operation because the language and country/region will have been selected and
channels already tuned when the TV was first installed (page 5, 6). However, this
option allows you to repeat the process (e.g., to retune the TV after moving house,
or to search for new channels that have been launched by broadcasters).
Language
Selects the language in which the menus are displayed.
Country
Selects the country/region where you operate the TV.
Tip
The country/region in which you want to use the TV does not appear in the list, select
“-” instead of a country/region.
Auto Tuning
Tunes in all the available analogue channels.
Usually you do not need to do this operation because the channels are already tuned
when the TV was first installed (page 5, 6). However, this option allows you to
repeat the process (e.g., to retune the TV after moving house, or to search for new
channels that have been launched by broadcasters).
Programme Sorting
Changes the order in which the analogue channels are stored on the TV.
1 Press
F/f to select the channel you want to move to a new position,
then press
g.
2 Press
F/f to select the new position for your channel, then press .
AV Preset
Assigns a name to any equipment connected to the side and rear sockets. The name
will be displayed briefly on the screen when the equipment is selected. You can skip
an input source that is not connected to any equipment.
1 Press
F/f to select the desired input source, then press .
2 Press
F/f to select the desired option below, then press .
• AV1 (or AV2/ AV3/ AV4/ PC/ HDMI), VIDEO, DVD, CABLE, GAME, CAM, SAT:
Uses one of the preset labels to assign a name to connected equipment.
• “Edit”: Creates your own label.
• “Skip”: Skips an input source that is not connected to any equipment when you
press F/f to select the input source.
Sound Offset
Sets an independent volume level to each equipment connected to the TV.
Continued
25
GB
2-685-333-41(0)
KDL-20S2020

010COV.book Page 26 Monday, June 12, 2006 3:29 PM
Manual Programme
Before selecting “Label”/“AFT”/“Audio Filter”/“Skip”/“Decoder”, press F/f to
select the programme number you want to modify. Then, press .
Preset
System
/Channel
Presets programme channels manually.
1 Press
F/f to select “System”, then press .
2 Press
F/f to select one of the following TV broadcast systems, then
press
G.
B/G: For western European countries/regions
D/K: For eastern European countries/regions
L: For France
I: For the United Kingdom
Note
Depending on the country/region selected for “Country” (page 5), this option may not be
available.
3 Press F/f to select “Channel”, then press .
4 Press
F/f to select “S” (for cable channels) or “C” (for terrestrial
channels), then press
g.
5 Tune the channels as follows:
If you do not know the channel number (frequency)
Press F/f to search for the next available channel. When a channel has been found,
the search will stop. To continue searching, press
F/f.
If you know the channel number (frequency)
Press the number buttons to enter the channel number of the broadcast you want or
your VCR channel number.
6 Press to jump to “Confirm”, then press .
7 Press
f to select “OK”, then press .
Repeat the procedure above to preset other channels manually.
Label
Assigns a name of your choice, up to five letters or numbers, to the selected channel.
This name will be displayed briefly on the screen when the channel is selected.
AFT
Allows you to fine-tune the selected programme number manually if you feel that a
slight tuning adjustment will improve the picture quality.
You can adjust the fine tuning over a range of -15 to +15. When “On” is selected, the
fine tuning is performed automatically.
Audio Filter
Improves the sound for individual channels in the case of distortion in mono
broadcasts. Sometimes a non-standard broadcast signal can cause sound distortion or
intermittent sound muting when watching mono programmes.
If you do not experience any sound distortion, we recommend that you leave this
option set to the factory setting “Off”.
Notes
• You cannot receive stereo or dual sound when “Low” or “High” is selected.
• “Audio Filter” is not available when “System” is set to “L”.
26
GB
2-685-333-41(0)
KDL-20S2020

010COV.book Page 27 Monday, June 12, 2006 3:29 PM
Skip
Skips unused analogue channels when you press PROG +/- to select channels. (You
can still select a skipped channel using the number buttons.)
Decoder
Views and records the scrambled channel selected when using a decoder connected
directly to scart connector / 1, or to scart connector / 2 via a VCR.
Note
Depending on the country/region selected for “Country” (page 5), this option may not be
available.
Confirm
Saves changes made to the “Manual Programme Preset” settings.
Using MENU Functions
27
GB
2-685-333-41(0)
KDL-20S2020
010COV.book Page 28 Monday, June 12, 2006 3:29 PM
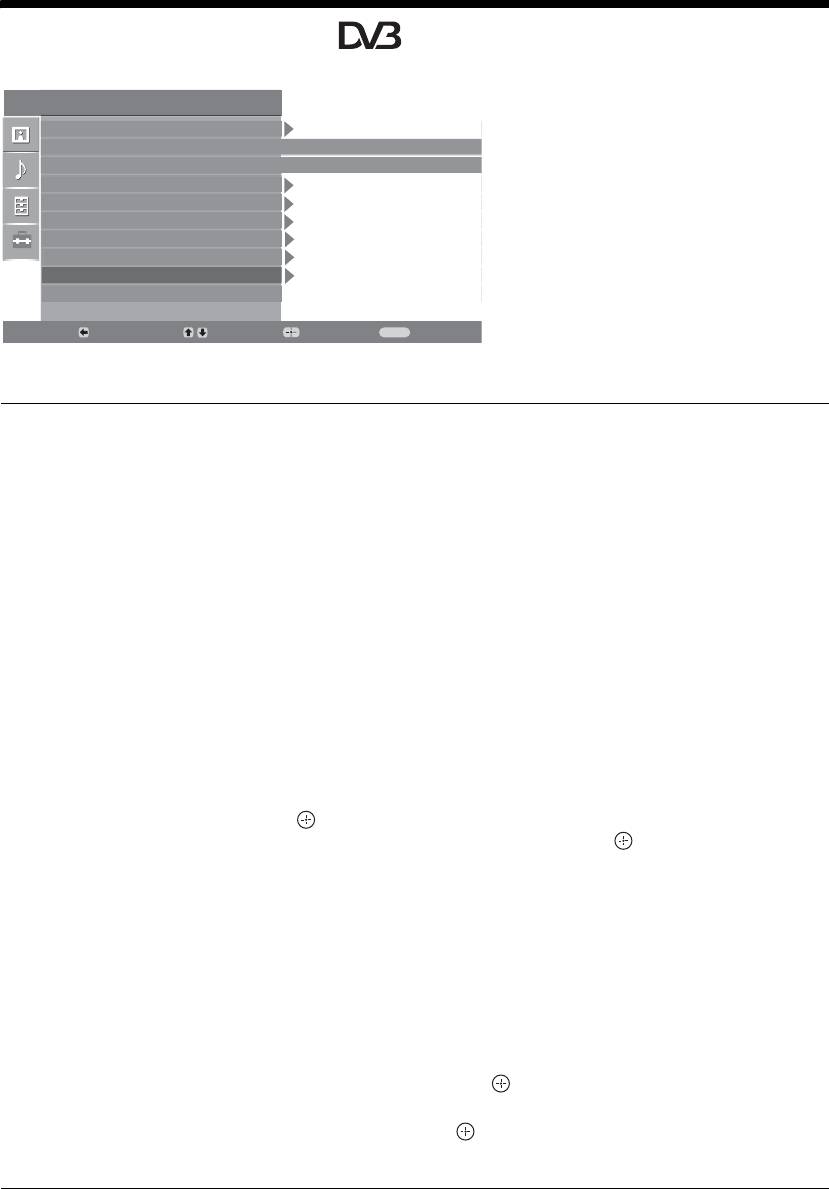
Digital Set-up menu
You can change/set the digital settings using the
Set Up
Digital Set-up menu. To select options in
Auto Start Up
“Settings”, see “Navigating through menus”
Language
English
(page 19).
Country
-
Auto Tuning
Programme Sorting
AV Preset
Sound Offset
Manual Programme Preset
Digital Set Up
Back:
Select:
Enter:
Exit:
MENU
Digital Tuning
Displays the “Digital Tuning” menu.
Digital Auto Tuning
Tunes in all the available digital channels.
Usually you do not need to do this operation because the channels are already tuned
when the TV was first installed (page 5). However, this option allows you to repeat
the process (e.g., to retune the TV after moving house, or to search for new channels
that have been launched by broadcasters).
Programme List Edit
Removes any unwanted digital channels stored on the TV, and changes the order of
the digital channels stored on the TV.
1 Press
F/f to select the channel you want to remove or move to a new
position.
If you know the programme number (frequency)
Press the number buttons to enter the three-digit programme number of the broadcast
you want.
2 Remove or change the order of the digital channels as follows:
To remove the digital channel
Press . A message that confirms whether the selected digital channel is to be
deleted appears. Press
G to select “Yes”, then press .
To change the order of the digital channels
Press g, then press F/f to select the new position for the channel and press G.
Repeat the procedure in steps 1 and 2 to move other channels if required.
3 Press RETURN.
Digital Manual Tuning
Tunes the digital channels manually.
1 Press the number button to select the channel number you want to
manually tune, then press
F/f to tune the channel.
2 When the available channels are found, press
F/f to select the channel
you want to store, then press .
3 Press
F/f to select the programme number where you want to store the
new channel, then press .
Repeat the procedure above to tune other channels manually.
28
GB
2-685-333-41(0)
KDL-20S2020

010COV.book Page 29 Monday, June 12, 2006 3:29 PM
Digital Set-up
Displays the “Digital Set-up” menu.
Subtitle Setting
Displays digital subtitles on the screen.
When “For Hard Of Hearing” is selected, some visual aids may also be displayed
with the subtitles (if TV channels broadcast such information).
Subtitle Language
Selects which language subtitles are displayed in.
Audio Language
Selects the language used for a programme. Some digital channels may broadcast
several audio languages for a programme.
Audio Type
Increases the sound level when “For Hard Of Hearing” is selected.
Parental Lock
Sets an age restriction for programmes. Any programme that exceeds the age
restriction can only be watched after a PIN Code is entered correctly.
Using MENU Functions
1 Press the number buttons to enter your existing PIN code.
If you have not previously set a PIN, a PIN code entry screen appears. Follow the
instruction of “PIN Code” below.
2 Press F/f to select the age restriction or “None” (for unrestricted
watching), then press .
3 Press RETURN.
PIN Code
Sets a PIN code for the first time, or allows you to change your PIN code.
1 Enter a PIN as follows:
If you have previously set a PIN
Press the number buttons to enter your existing PIN.
If you have not set a PIN
Press the number buttons to enter the factory setting PIN of 9999.
2 Press the number buttons to enter the new PIN code.
A message appears to inform you that the new PIN has been accepted.
3 Press RETURN.
Tip
PIN code 9999 is always accepted.
Technical Set-up
Displays the Technical Set-up menu.
“Auto Service Update”: Enables the TV to detect and store new digital services as
they become available.
“Software Download”: Enables the TV to automatically receive software updates,
free through your existing aerial (when issued). Sony recommends that this option is
set to “On” at all times. If you do not want your software to be updated, set this option
to “Off”.
“System Information”: Displays the current software version and the signal level.
“Time Zone”: Allows you to select the correct time zone for your country.
CA Module Set-up
Allows you to access a Pay Per View service once you obtain a Conditional Access
Module (CAM) and a view card. See page 30 for the location of the (PCMCIA)
socket.
29
GB
2-685-333-41(0)
KDL-20S2020

010COV.book Page 30 Monday, June 12, 2006 3:29 PM
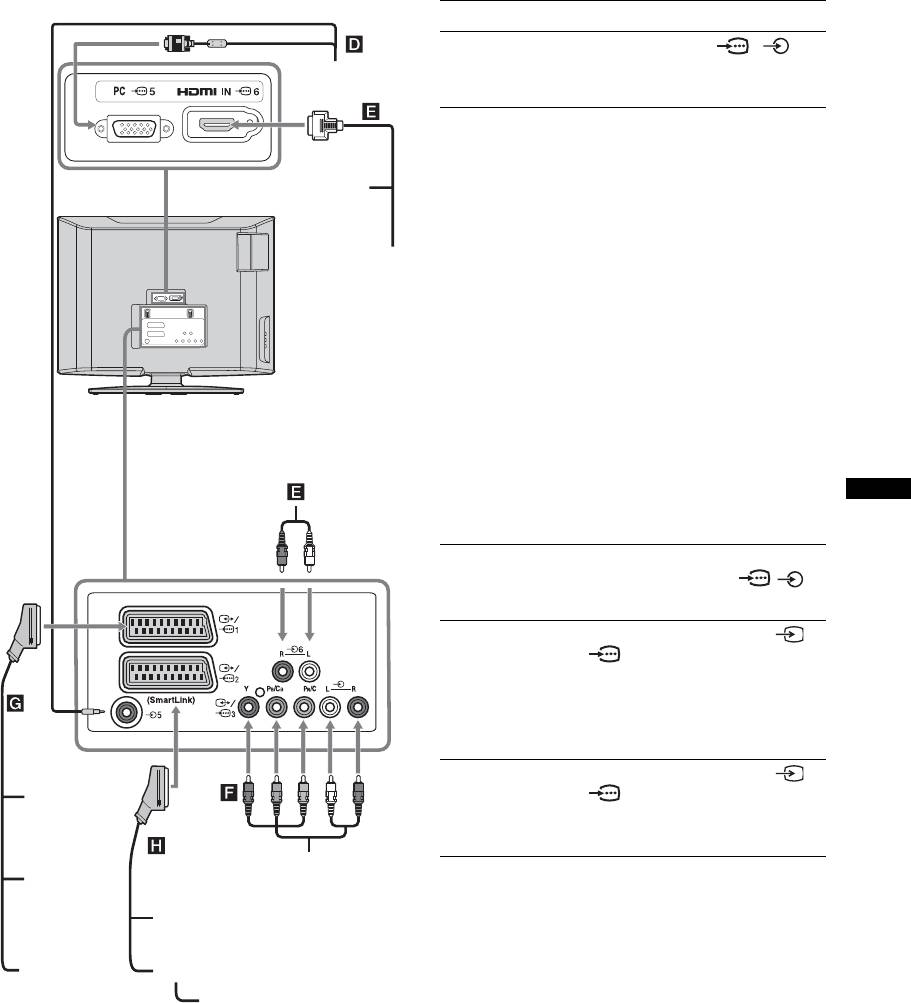
Using Optional Equipment
Connecting optional equipment
You can connect a wide range of optional equipment to your TV. Connecting cables are not supplied.
Connecting to the TV (side)
To connect Do this
Conditional Access
To use Pay Per View services.
Module (CAM) A
For details, refer to the instruction
manual supplied with your CAM.
To use the CAM, remove the
rubber cover from the CAM slot.
Switch off the TV when inserting
your CAM into the CAM slot.
When you do not use the CAM, we
recommend that you replace the
cover on the CAM slot.
S VHS/Hi8/DVC
Connect to the S video socket
camcorder B
4 or the video socket 4,
and the audio sockets 4. To
avoid picture noise, do not connect
the camcorder to the video socket
4 and the S video socket
4 at the same time. If you
connect mono equipment, connect
to the L socket 4, and set
“Dual Sound” to “A” (page 21).
Headphones C Connect to the i socket to listen to
sound from the TV on headphones.
S VHS/Hi8/DVC
camcorder
Headphones
30
GB
2-685-333-41(0)
KDL-20S2020
010COV.book Page 31 Monday, June 12, 2006 3:29 PM
Connecting to the TV (rear)
To connect Do this
PC D Connect to the PC 5/ 5
PC
sockets. It is recommended to use
a PC cable with ferrites.
Digital satellite
Connect to the HDMI IN 6 socket
receiver or DVD
if the equipment has a HDMI
player E
socket. The digital video and audio
DVD player
signals are input from the
equipment. If the equipment has a
DVI socket, connect the DVI
Digital satellite
socket to the HDMI IN 6 socket
receiver
through a DVI - HDMI adaptor
interface (not supplied), and
connect the equipment’s audio out
sockets to the audio in HDMI IN 6
sockets.
Notes
• The HDMI sockets only support
the following Video inputs: 480i,
480p, 576i, 576p, 720p and
1080i. To connect a PC, please
use the PC input socket.
• Use HDMI certified cable with
Using Optional Equipment
HDMI logo.
DVD player with
Connect to the component sockets
component output
and the audio sockets / 3.
F
Video game
Connect to the scart socket /
equipment, DVD
1. When you connect the
player or decoder
decoder, the scrambled signal from
G
the TV tuner is output to the
decoder, then the unscrambled
signal is output from the decoder.
Video game
DVD recorder or
Connect to the scart socket /
equipment
VCR that supports
2. SmartLink is a direct link
SmartLink H
between the TV and a VCR/DVD
recorder.
DVD player
DVD player
with component output
DVD recorder
Decoder
VCR
Decoder
31
GB
2-685-333-41(0)
KDL-20S2020
010COV.book Page 32 Monday, June 12, 2006 3:29 PM
Additional Information
Terminals
Specifications
/1
21-pin Scart connector (CENELEC standard) including
Display Unit
audio/video input, RGB input, and TV audio/video
Power Requirements:
output.
220–240 V AC, 50 Hz
/ 2 (SmartLink)
Screen Size:
21-pin Scart connector (CENELEC standard) including
20 inches
audio/video input, RGB input, selectable audio/video
Display Resolution:
output, and SmartLink interface.
1,366 dots (horizontal) × 768 lines (vertical)
3
Power Consumption:
Supported formats: 1080i, 720p, 576p, 576i, 480p, 480i
65 W or less
Y: 1 Vp-p, 75 ohms, 0.3V negative sync
Standby Power Consumption:
P
B/CB: 0.7 Vp-p, 75 ohms
1 W or less
P
R/CR: 0.7 Vp-p, 75 ohms
Dimensions (w × h × d):
3
Approx. 500 × 406 × 209 mm (with stand)
Audio input (phono jacks)
Approx. 500 × 370 × 100 mm (without stand)
500 mVrms
Mass:
Impedance: 47 kilo ohms
Approx. 8 kg (with stand)
4 S video input (4-pin mini DIN)
Approx. 7 kg (without stand)
4 Video input (phono jack)
Panel System
4 Audio input (phono jacks)
LCD (Liquid Crystal Display) Panel
PC 5 PC Input (15 Dsub) (see page 31)
TV System
G: 0.7 Vp-p, 75 ohms, non Sync on Green
B: 0.7 Vp-p, 75 ohms, non Sync on Green
Analogue: Depending on your country/region selection:
R: 0.7 Vp-p, 75 ohms, non Sync on Green
B/G/H, D/K, L, I
HD: 1-5 Vp-p
Digital: DVB-T
VD: 1-5 Vp-p
Colour/Video System
5 PC audio input (minijack)
Analogue: PAL, SECAM
HDMI IN 6
NTSC 3.58, 4.43 (only Video In)
Video: 1080i, 720p, 576p, 576i, 480p, 480i
Digital: MPEG-2 MP@ML
Audio: Two channel linear PCM
Aerial
32, 44.1 and 48 kHz, 16, 20 and 24 bits,
75 ohm external terminal for VHF/UHF
or analogue audio input (phono jacks)
i Headphones jack
Channel Coverage
CAM (Conditional Access Module) slot
Analogue: VHF: E2–E12
UHF: E21–E69
Sound Output
CATV: S1–S20
5 W + 5 W (RMS)
HYPER: S21–S41
Supplied Accessories
D/K: R1–R12, R21–R69
Refer to “1: Checking the accessories” on page 4.
L: F2–F10, B–Q, F21–F69
I: UHF B21–B69
Design and specifications are subject to change
Digital: VHF/UHF
without notice.
PC Input Signal Reference Chart
Horizontal
Vertical
Signals Horizontal (Pixel) Vertical (Line)
Standard
frequency (kHz)
frequency (Hz)
VGA 640 480 31.5 60 VGA
SVGA 800 600 37.9 60 VESA Guidelines
XGA 1024 768 48.4 60 VESA Guidelines
WXGA 1280 768 47.4 60 VESA
1280 768 47.8 60 VESA
• This TV’s PC input does not support Sync on Green or Composite Sync.
• This TV’s PC input does not support interlaced signals.
• This TV’s PC input supports signals in the above chart with a 60 Hz vertical frequency. For other signals, you will see the
message “NO SYNC”.
32
GB
2-685-333-41(0)
KDL-20S2020
010COV.book Page 33 Monday, June 12, 2006 3:29 PM
Troubleshooting
Check whether the 1 (standby) indicator is flashing in red.
When it is flashing
The self-diagnosis function is activated.
1 Measure how long the 1 (standby) indicator flashes and stops flashing.
For example, the indicator flashes for two seconds, stops flashing for one second, and flashes for two seconds.
2 Press 1 on the TV (top side) to switch it off, disconnect the mains lead, and inform your dealer or
Sony service centre of how the indicator flashes (duration and interval).
When it is not flashing
1 Check the items in the tables below.
2 If the problem still persists, have your TV serviced by qualified service personnel.
Picture
Problem Cause/Remedy
No picture (screen is dark) and
• Check the aerial connection.
no sound
• Connect the TV to the mains, and press 1 on the TV (top side).
•If the 1 (standby) indicator lights up in red, press "/1.
No picture or no menu
• Check that the optional equipment is on and press / repeatedly until
information from equipment
the correct input symbol is displayed on the screen.
connected to the scarts or
• Check the connection between the optional equipment and the TV.
HDMI IN socket
• When connecting any equipment to the HDMI IN 6 socket or when
changing the resolution, some dots can appear blinking on the screen for a
few seconds. HDMI signal decoding is in progress and it does not indicate a
malfunction.
Double images or ghosting
• Check aerial/cable connections.
Additional Information
• Check the aerial location and direction.
Only snow and noise appear
• Check if the aerial is broken or bent.
on the screen
• Check if the aerial has reached the end of its serviceable life (three to five
years in normal use, one to two years at the seaside).
Distorted picture (dotted lines
• Keep the TV away from electrical noise sources such as cars, motorcycles,
or stripes)
hair-dryers or optical equipment.
• When installing optional equipment, leave some space between the optional
equipment and the TV.
• Make sure that the aerial is connected using the supplied coaxial cable.
• Keep the aerial cable away from other connecting cables.
Picture noise when viewing a
• Select “Manual Programme Preset” in the “Set-Up” menu and adjust “AFT”
TV channel
(Automatic Fine Tuning) to obtain better picture reception (page 26).
Some tiny black points and/or
• The picture of a display unit is composed of pixels. Tiny black points and/or
bright points on the screen
bright points (pixels) on the screen do not indicate a malfunction.
No colour on programmes
• Select “Reset” in the “Picture Adjustment” menu to return to the factory
settings (page 20).
No colour or irregular colour
• Check the connection of the Y, PB/CB, PR/CR jacks of 3.
when viewing a signal from the
• Make sure that the Y, P
B/CB, PR/CR jacks of 3 are firmly seated in their
Y, P
B/CB, PR/CR jacks of 3
respective sockets.
33
GB
2-685-333-41(0)
KDL-20S2020

010COV.book Page 34 Monday, June 12, 2006 3:29 PM
Sound
Problem Cause/Remedy
No sound, but good picture
•Press 2 +/– or % (Mute).
• Check that “TV Speakers” is set to “On” in the “Sound Adjustment” menu
(page 22).
Noisy sound
• See the “Picture noise” causes/remedies on page 33.
Channels
Problem Cause/Remedy
The desired channel cannot be
• Switch between digital and analogue mode and select the desired digital/
selected
analogue channel.
Some channels are blank
• Scrambled/Subscription only channel. Subscribe to the Pay Per View
service.
• Channel is used only for data (no picture or sound).
• Contact the broadcaster for transmission details.
Digital channel is not displayed
• Check that the aerial is plugged directly into the TV (not through other
equipment).
• Contact a local installer to find out if digital transmissions are provided in
your area.
• Upgrade to a higher gain aerial.
General
Problem Cause/Remedy
The TV turns off automatically
• Check if the “Sleep Timer” is activated, or confirm the setting of “Off Time”
(the TV enters standby mode)
(page 24).
• If no signal is received and no operation is performed in the TV mode for
10 minutes, the TV automatically switches to standby mode.
The TV turns on automatically
• Check if the “On Time” is activated (page 24).
Some input sources cannot be
• Select “AV Preset” in the “Set-up” menu and cancel “Skip” of the input
selected
source (page 25).
The remote does not function
• Replace the batteries.
34
GB
2-685-333-41(0)
KDL-20S2020

010COV.book Page 35 Monday, June 12, 2006 3:29 PM
Index
Numerics
Features menu
23
Subtitle Setting
29
14:9 14
H
T
4:3
14
Headphones
Technical Set-up 29
A
connecting
30
Text
14
Aerial, connecting 4
Hue
20
Timer
24
AFT
26
Timer ( ) indicator
12
I
Audio Filter
26
Timer list
16
Input signal index table 18
Audio Language
29
Timer REC
15
Audio Type
29
L
Treble
21
Auto Start-up
25
Label 26
TV Speakers
22
Auto Tuning
Language
5, 25
V
analogue and digital channels
6
M
VCR
analogue channels only
25
connecting
4
digital channels only
28
Manual Programme Preset 26
recording
15
Auto Volume
21
Manual timer REC
16
AV Preset
25
MENU
19
W
AV2 Output
23
N
Wide 14
B
Noise Reduction 20
Z
Backlight 20
P
Zoom 14
Balance
21
Parental Lock 29
Bass
21
PC Adjustment
24
Batteries, inserting into the remote
4
Picture menu
20
BBE
21
Picture Mode
20
Brightness
20
Picture Off ( ) indicator
12
C
PIN Code
29
CA Module Set-up 29
PIP (Picture in Picture)
14
Category list
15
Power (") indicator
12
Channels
Power (1) switch
12
auto-tuning
6
Power Saving
23
selecting
13
Programme index table
13
Skip
27
Programme List Edit
28
Additional Information
Clock Set
24
Programme Sorting
25
Colour
20
R
Colour Tone
20
Reminder 16
Confirm
27
Remote control
Connecting
inserting batteries
4
an aerial/VCR
4
overview
11
optional equipment
30
sensor
12
Contrast
20
Reset
Country
5, 25
picture
20
D
sound
21
Digital Auto Tuning 28
RGB Center
23
Digital Manual Tuning
28
S
Digital Set-up
29
Screen 23
Digital Set-up menu
28
Screen mode
14
Digital Tuning
28
Set-up menu
25
Dolby Virtual
21
Sharpness
20
Dual Sound
21
Skip
25, 27
E
Smart
14
EPG (Digital Electronic Programme
Sound
11
Guide)
15
Sound Adjustment menu
21
Equipment labels
25
Sound Effect
21
Sound Offset
25
F
Specifications
32
Fastext 14
Standby (1) indicator
12
Favourite list
17
Subtitle Language
29
35
GB
2-685-333-41(0)
KDL-20S2020
010COV.book Page 2 Monday, June 12, 2006 3:30 PM
Информация о торговых марках
Введение
• является зарегистрированной торговой маркой
Благодарим Вас за то, что Вы выбрали этот
DVB Project
телевизор Sony.
• Произведено по лицензии компании BBE Sound, Inc.
Лицензия BBE Sound, Inc. зарегистрирована по
Перед первым включением телевизора внимательно
патентам США: 5510752, 5736897. Слово "BBE" и
ознакомьтесь с данной инструкцией по эксплуатации и
логотип BBE являются торговыми марками компании
сохраните ее для консультаций в будущем
.
BBE Sound, Inc.
• Произведено по лицензии компании Dolby
Примечание в отношении
Laboratories. "Dolby" и логотип с двойной буквой D
являются торговыми марками компании Dolby
Цифрового ТВ
Laboratories.
• Все функции, относящиеся к Цифровому ТВ (),
• В данном телевизоре
будут действовать только в тех странах или регионах,
используется технология
в которых ведется эфирная цифровая трансляция
High-Definition Multimedia Interface (HDMI™) .
сигнала DVB-T (MPEG2). Просим Вас уточнить у
HDMI, логотип HDMI и High-Definition Multimedia
своего дилера, можно ли принимать сигнал DVB-T
Interface являются зарегистрированными торговыми
там, где Вы живете.
марками
компании HDMI Licensing LLC.
• Хотя данный телевизор следует характеристикам
DVB-T, мы не можем гарантировать его
совместимость с будущим вещанием
в формате DVB-
T.
• Некоторые из функций Цифрового ТВ в некоторых
странах могут быть недоступными.
Иэготовлено в:
Manufactured in:
Сони Спзйн С.А. завод в Барселоне
Sony Spain S. A.
Пол. Кан Митьянс с/н 08232
Pol. Ind. Can Mitjans s/n
Виладекавальс, Барселона,
08232 Viladecavalls (Barcelona)
Испания
Spain
2
RU
2-685-333-41(0)
KDL-20S2020
010COV.book Page 3 Monday, June 12, 2006 3:30 PM
Содержание
Начало работы 4
Начало работы 4
Сведения по безопасности ....................................................................................................7
Меры предосторожности .....................................................................................................10
Описание пульта ДУ .............................................................................................................11
Описание кнопок и индикаторов телевизора...............................................................12
Просмотр телевизора
Просмотр телевизионных программ ...................................................................................13
Использование цифрового электронного экранного телегида (EPG) ...................15
Использование списка предпочитаемых программ
.................................................17
Просмотр изображения с устройств, подключенных к телевизору ................................18
Использование MENU функций
RU
Навигация по системе меню ................................................................................................19
Меню "Настройка изображения" ........................................................................................20
Меню "Настройка звука" .....................................................................................................21
Меню "Функции"....................................................................................................................23
Меню "Установка" ................................................................................................................25
Меню "Цифровая конфигурация" .............................................................................28
Использование дополнительных устройств
Подключение дополнительных устройств .........................................................................30
Дополнительные сведения
Технические характеристики ..............................................................................................32
Поиск неисправностей .........................................................................................................33
Указатель ..............................................................................................................................35
: только для цифровых каналов
3
RU
2-685-333-41(0)
KDL-20S2020
010COV.book Page 4 Monday, June 12, 2006 3:30 PM
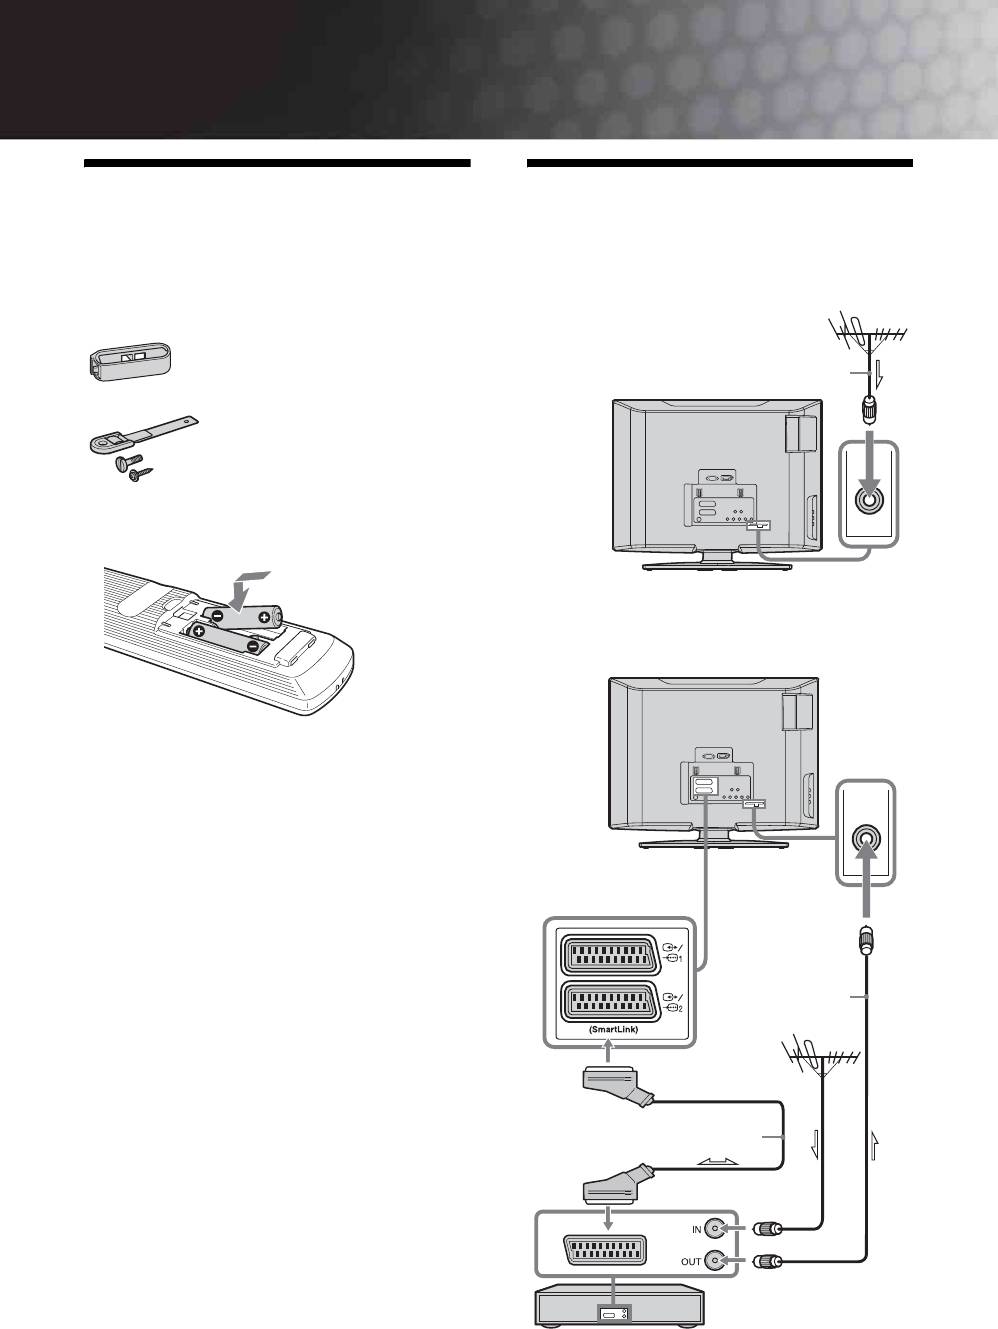
Начало работы
1: Проверка
2: Подключение
комплекта поставки
антенны/
Пульт ДУ RM-ED007 (1)
видеомагнитофона
Батарейки размера AA (типа R6) (2)
Подключения одной
Держатель кабеля (1)
антенны
Коаксиальный
кабель (не входит в
комплект поставки)
Ремень для крепления (1) и винты (2)
Установка батареек в пульт ДУ
Подключение антенны и
видеомагнитофона
Примечания
• Вставляя батарейки, соблюдайте полярность.
• При утилизации батареек всегда помните правила
защиты окружающей среды. В некоторых регионах
правила утилизации батареек могут быть
регламентированы. Просьба обращаться по этому
поводы в местные органы власти.
• Не используйте одновременно батарейки различных
типов или старые и новые батарейки.
• Бережно обращайтесь с пультом ДУ. Не бросайте
его, не становитесь на него и не лейте на него никаких
жидкостей.
• Не оставляйте пульт ДУ вблизи источников тепла
или в месте, подверженном прямому воздействию
солнечных лучей, или во влажном помещении.
ВЧ кабель
(не входит в
комплект
поставки)
Scart-кабель (не входит в
комплект поставки)
Видеомагнитофон
4
RU
2-685-333-41(0)
KDL-20S2020
010COV.book Page 5 Monday, June 12, 2006 3:30 PM
3: Крепление
4: Меры по
Начало работы
кабелей
предотвращению
падения телевизора
1
B
A
2
3
2
3
1
5:
Выбор языка и
страны/региона
2
1
2
3,4
Продолжение
5
RU
2-685-333-41(0)
KDL-20S2020
010COV.book Page 6 Monday, June 12, 2006 3:30 PM
1 Включите телевизор в сеть
(220-240 В переменного тока, 50 Гц).
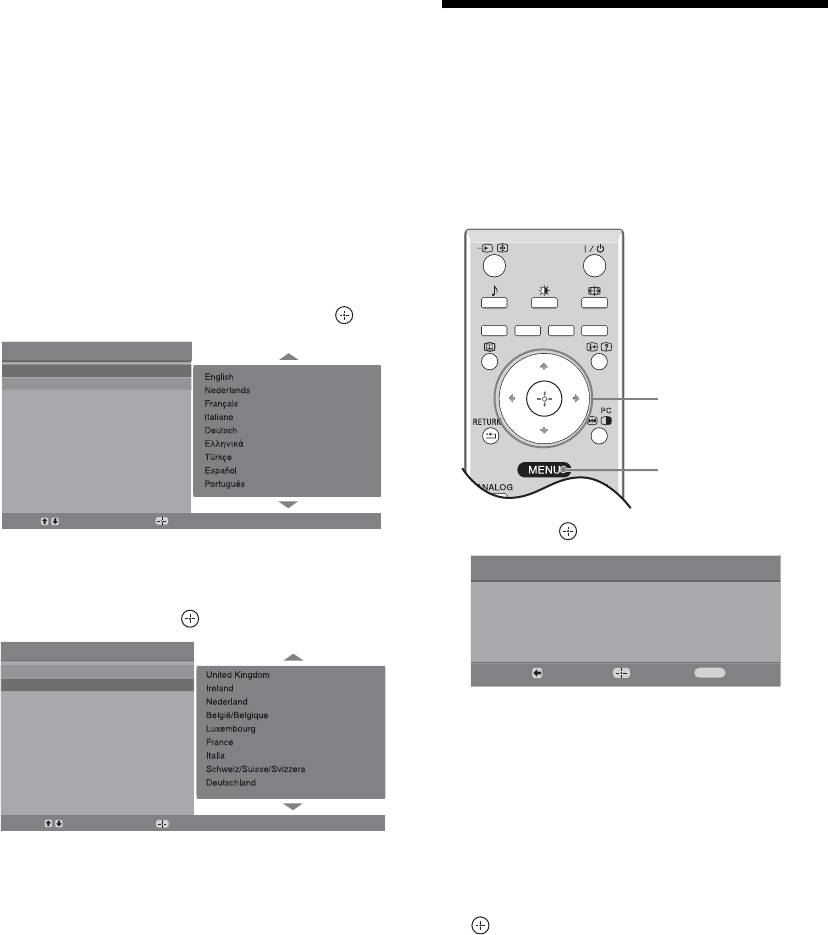
6: Автонастройка
2 Нажмите кнопку 1 на телевизоре (на
его верхней панели).
телевизора
При первом включении телевизора на его
экране автоматически появляется меню
После выбора языка и страны/региона экране
"Язык" (Language).
появляется сообщение с подтверждением
Если телевизор находится в дежурном
начала автонастройки.
режиме (индикатор дежурного режима
1
Телевизор начнет поиск и сохранение всех
на передней панели телевизора горит
доступных телевизионных каналов.
красным цветом), нажмите кнопку "/1 на
пульте ДУ для включения телевизора.
3 Нажимая F/f, выберите из
появившегося на экране меню нужный
Вам язык, затем нажмите кнопку .
Auto Start Up
Language
Country
1
3
Select:
Confirm:
1 Нажмитe .
4 С помощью кнопок F/f выберите
страну/регион, в которой Вы хотите
Автонастройка
использовать телевизор, затем
Вы хотите начать автоматическую настройку?
нажмите кнопку .
Автозапуск
Язык
Назад:
Запуск:
Oтказ:
MENU
Cтрана
Телевизор начнет автоматический поиск
всех доступных цифровых, а затем
аналоговых каналов. Это может занять
некоторое время. Пожалуйста, подождите
и не нажимайте никакие кнопки ни на
телевизоре, ни на пульте ДУ.
Выбр.:
Подтвер.:
В случае появления на экране
Если страны/региона, в которой Вы хотите
сообщения:
пользоваться телевизором, нет в списке,
"Ни один цифровой или аналоговый канал
вместо страны/региона выберите "-"
не найден" проверьте, правильно ли
На экране телевизора появится cообщение
подключена антенна, и нажмите кнопку
о начале выполнения автонастройки, см.
, чтобы запустить процедуру
раздел “6: Автонастройка телевизора”.
автонастройки повторно.
2 При появлении на экране меню
"Сортировка программ", выполните
операции, указанные в разделе
“Сортировка программ” (стр. 25) .
Если Вы не хотите менять порядок, в котором
аналоговые каналы сохранены в памяти
Вашего телевизора, перейдите к шагу 3.
3 Для выхода из меню нажмите кнопку
MENU.
Теперь телевизор настроен на прием всех
доступных каналов.
6
RU
2-685-333-41(0)
KDL-20S2020
