Whirlpool AWG 217 – страница 2
Инструкция к Стиральной Машине Whirlpool AWG 217

СЕРВИСНЫЙ ЦЕНТР
Прежде чем обращаться в сервисный центр:
1. Попробуйте устранить неисправность самостоятельно (см.
раздел "Поиск неисправностей").
2. Запустите программу еще раз, чтобы проверить, не устранилась
ли неисправность автоматически.
3. Если неисправность не исчезла, обратитесь в сервисный центр.
Сообщите:
•
Характер неисправности.
•
Модель стиральной машины.
•
Сервисный код (число после слова SERVICE).
Наклейка послереализационного обслуживания находится на
внутренней стороне дверцы.
•
Ваш полный адрес.
•
Ваш номер телефона и код города.
•
Номера телефонов и адреса мастерских послереализационного
обслуживания приведены в гарантийном талоне. В противном
случае обратитесь в магазин, где вы приобрели стиральную
машину.
ПЕРЕВОЗКА И ПЕРЕМЕЩЕНИЕ
При перемещении машины никогда не подымайте ее за
рабочую поверхность.
1. Выньте вилку из сети.
2. Закройте кран подачи воды.
3. Отсоедините наливной и сливной шланги.
4. Слейте всю воду из машины и шлангов (см. разделы "Снятие
фильтра", " Слив оставшейся воды").
5. Установите транспортировочные винты (обязательная операция).
19

CONTENTS
BEFORE USING THE WASHING MACHINE
•
Safety warning
•
Recommendations
INSTALLATION
•
Removal of transportation screws
•
Adjustment of feet
•
Electrical connection
•
Water supply connection
•
Water drain connection
DESCRIPTION OF THE WASHING MACHINE
WASH PREPARATION
•
First wash cycle
•
Sorting your laundry
•
Placing clothes into the machine
•
Filling detergent in the machine
MAINTENANCE AND CLEANING
•
Water inlet filters
•
Pump filter
•
Detergent drawer
•
Siphon plug
•
The cabinet
•
The drum
•
Removing lime from your machine
TROUBLESHOOTING GUIDE
•
Automatic failure detection system
AFTER-SALES SERVICE
TRANSPORT / HANDLING
20

BEFORE USING THE WASHING MACHINE
SAFETY WARNINGS
•
Do not use a multiple socket or extension cord.
•
Do not insert a plug with a damaged or broken cord into the socket.
•
If the cord is damaged, it should be replaced by the manufacturer or
appointed service agent in order to avoid a hazard.
•
Never remove the plug from the socket by pulling from the cord
section. Remove the plug by holding the head of the plug.
•
Do not plug the power supply with wet hands.
•
Never touch the machine with wet hands or feet.
•
Never open the detergent drawer while the device is running.
•
Never force open the door of the machine while the machine is
running.
•
Since the machine can reach high temperatures while running, do not
touch the drain hose or water during draining.
•
In case of any failure, first unplug the device and close the water tap.
Do not attempt to repair. Please consult your nearest authorized
service provider.
•
Do not forget that the packing material of your machine may be
hazardous for children.
•
Do not let your children play with the washing machine.
•
Keep your pet away from your machine.
•
Your machine should only be used by adults in accordance with the
instructions written in this manual.
•
Your machine is designed for use in a domestic environment.
Warranty will be invalid if machine is used for commercial purposes.
•
Never use or store flammable materials nearby the appliance.
•
To clean the appliance, do not use inflammable cleaning agents.
RECOMMENDATIONS
•
Detergent or softener which is in contact with air for a long time will
dry and stick to your detergent drawer. To avoid this, put your
detergent and softener into the detergent drawer just before washing.
•
It is recommended that you use pre-wash programme for only very
dirty clothes.
•
Please do not exceed the maximum load capacity.
•
If you do not intend to use your machine for a long time, unplug it, close
the water supply and leave the door open in order to keep the inside of the
machine dry and to prevent build-up of unpleasant odours.
21
•
As a result of quality control procedures, a certain amount of water
may remain in your machine. This is not harmful for your machine.
INSTALLATION
You must pay close attention to the following issues before using your
washing machine.
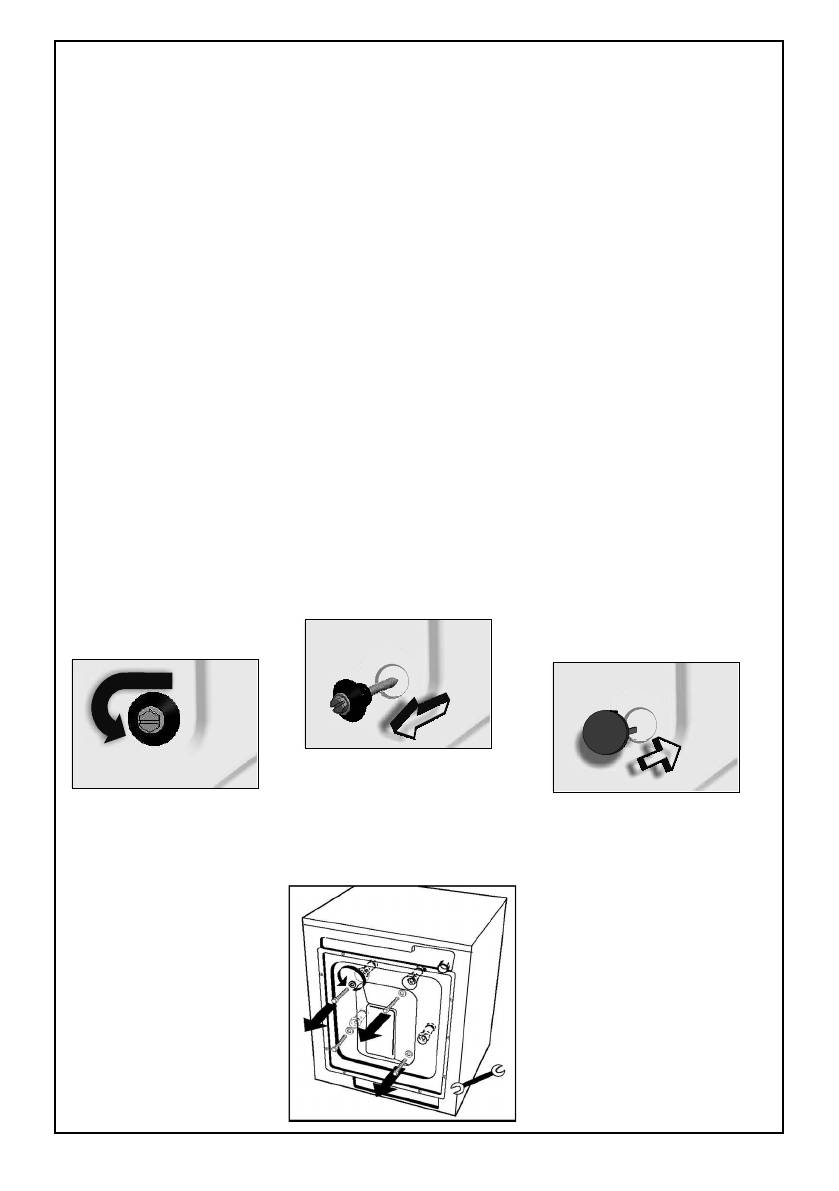
REMOVAL OF TRANSPORTATION SCREWS
•
Transportation screws, which are located at the rear side of the
machine, must be removed before running the machine.
•
Loosen the screws by rotating counter clockwise using a suitable
wrench. (DIAGRAM-1)
•
Remove the screws by pulling them.(DIAGRAM-2)
•
This will cause the plastic parts located in the interior part of your
machine to drop down under the appliance.
•
Lift the machine up slightly to pick up the plastic parts.
•
If all of the plastic parts from the screw groups have not dropped
down, open the door of your machine, move the drum until all plastic
parts drop down. Collect the parts that have fallen to the floor.
•
In the holes where the transport screws have been removed, insert
the plastic transport screw taps found in the accessories bag.
(DIAGRAM-3)
•
The transportation screws that have been removed from the machine
should be kept safe in the event of future transportation.
DIAGRAM-2
DIAGRAM-1 DIAGRAM-3
22
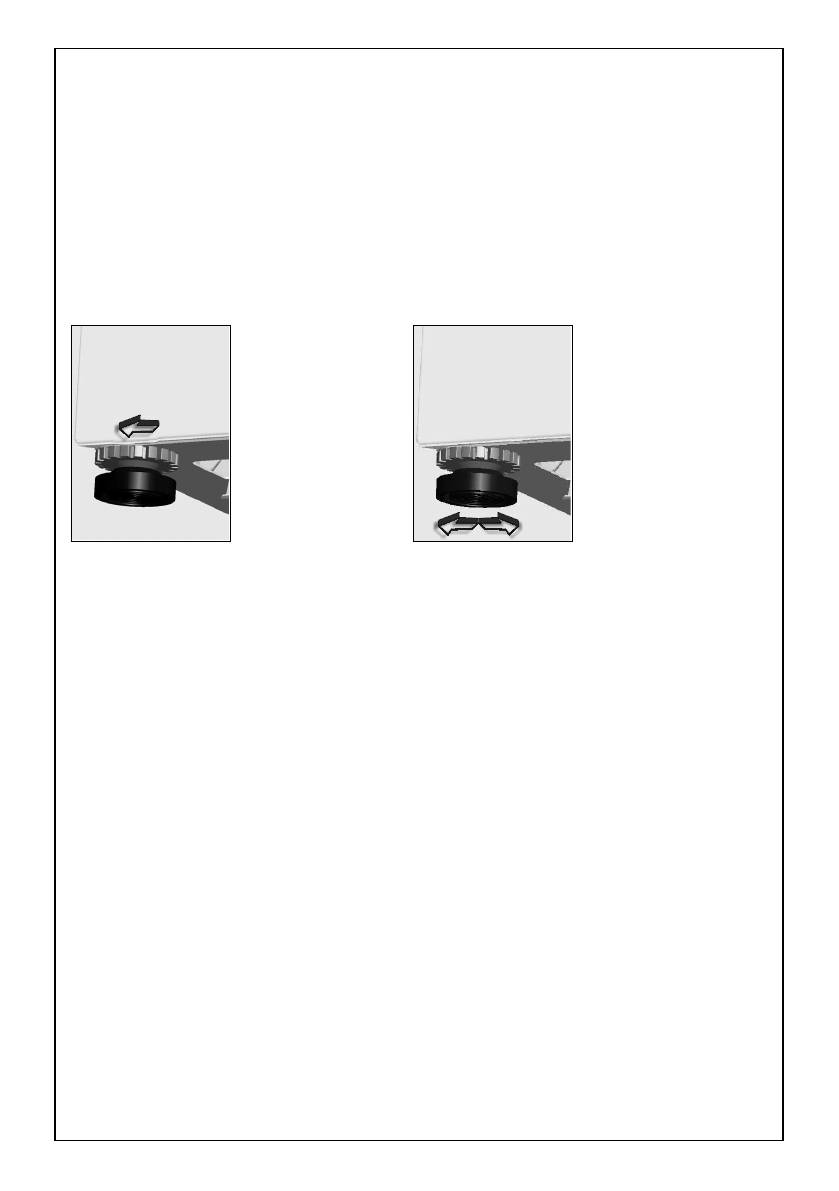
ADJUSTMENT OF FEET
•
Do not install your machine on rugs or similar surfaces.
•
For your machine to work silently and without vibrations, it should be
settled on a flat, non-slippery and tough surface.
•
You can adjust the balance of your machine from its feet.
•
First, loosen the plastic adjustment nut.
•
Adjust by rotating the feet upwards or downwards.
•
After balance has been achieved, tighten the plastic adjustment nut
again by rotating it upwards.
•
Never put cartons, wooden blocks or similar materials under the
machine to adjust the levelness of the machine with the ground.
ELECTRICAL CONNECTION
•
Your washing machine works with 220-240V and 50Hz.
•
A special grounded plug has been attached to the network cable of
your washing machine. This plug must be inserted to a grounded 10
amp socket. The currency rating of the attached electricity supply
should also be 10 amps. If you have no such sockets and fuses in
your house, the plug should be fitted by a qualified electrician.
•
Our company will not be held liable for any damage that may
occur as a result of usage without grounding.
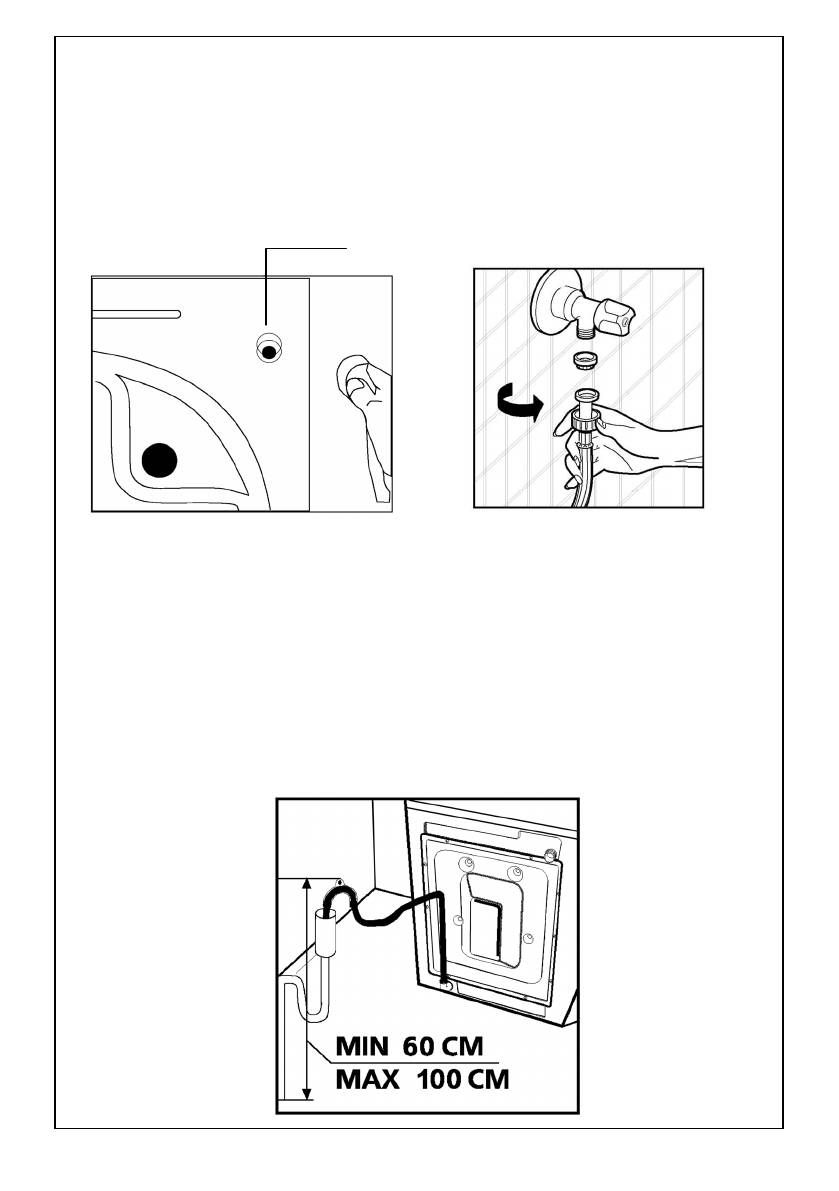
WATER SUPPLY CONNECTION
•
Depending on the specifications of your machine, it may be provided
with a single water inlet (cold) or double water inlet (cold/hot). The
white headed hose is for the cold water inlet and red headed hose is
for the hot water inlet (for machines with hot & cold water inlet).
•
To prevent leakage from the connection joints, 1 (valid for cold water
inlet) or 2 (valid for machines with hot & cold water inlet) seals are
included in the hose packaging. Fit these seals at the end of water
inlet hoses on the tap side.
•
Connect the white headed hose to the water inlet valve with white
filter and connect the red headed hose to the water inlet valve with
red filter (latter in the case of machines with hot & cold water inlet).
Manually tighten the connection parts. Please call a qualified plumber
for safer connections.
23
•
Water pressure of 1-10 bars from your tap will enable your machine
to work more efficiently (1 bar pressure means water flow of more
than 8 litres per minute from a fully opened tap).
•
After connections are secure, check for non-leakage of the
connection joints by turning on your tap fully.
•
Be sure that water inlet hoses are not folded, broken or crushed.
•
Mount the water inlet hoses to a 3”/4, geared water tap.
Cold water inlet (White filter valve)
WATER DRAIN CONNECTION
•
Be sure that water inlet hoses are not folded, twisted, crushed or
elongated by stretching.
•
Water drain hose should be mounted at a height of minimum 60 cm,
maximum 100 cm from the ground.
•
The end of the water drain hose may be directly fitted to the dirty
water outlet hole or a special apparatus mounted on the outlet
bracket of the wash-stand.
•
Never attempt to extend the water drain hose by adding extra parts.
24
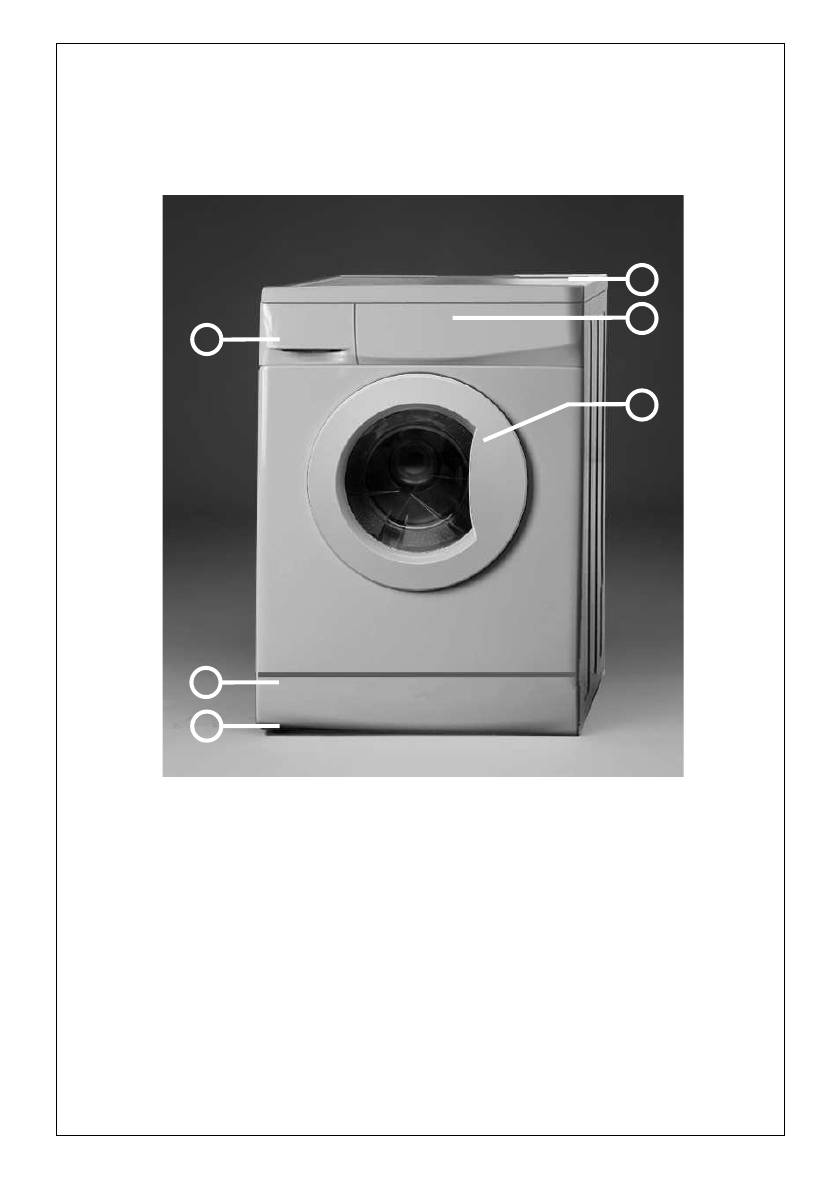
DESCRIPTION OF THE WASHING MACHINE
1
- Worktop
2
- Control panel
3
- Detergent dispenser
4
- Door
5
- Plinth covering pump access
6
- Adjustable feet
25
PREPARATION OF THE WASHING
•
Plug in the machine.
•
Open the water tap.
FIRST WASH CYCLE
There may be water left inside your machine after factory tests and trials. It is
recommended that the first wash cycle should be made without any laundry to
drain this water; pour half a measuring cup of normal all-purpose detergent
into compartment 2 and select cotton programme at 90°C.
SORTING YOUR LAUNDRY
•
Sort your clothes according to their types (cotton, synthetic, sensitive,
woollen, etc.), washing temperatures and level of dirtiness.
•
Never wash your white and coloured clothes together.
•
Since your new coloured clothes may shed dye on the first wash,
wash them separately.
•
Be careful that no metal pieces are found on or in the pockets of your
clothes, remove if necessary.
•
Zip and button your clothes.
•
Remove plastic or metal hooks from curtains and laces or place them
inside a washing bag and tie.
•
Turn textiles such as trousers, knitted fabrics, t-shirts and sweat shirts
inside out.
•
Wash small clothing items such as socks and handkerchiefs in a
washing bag.
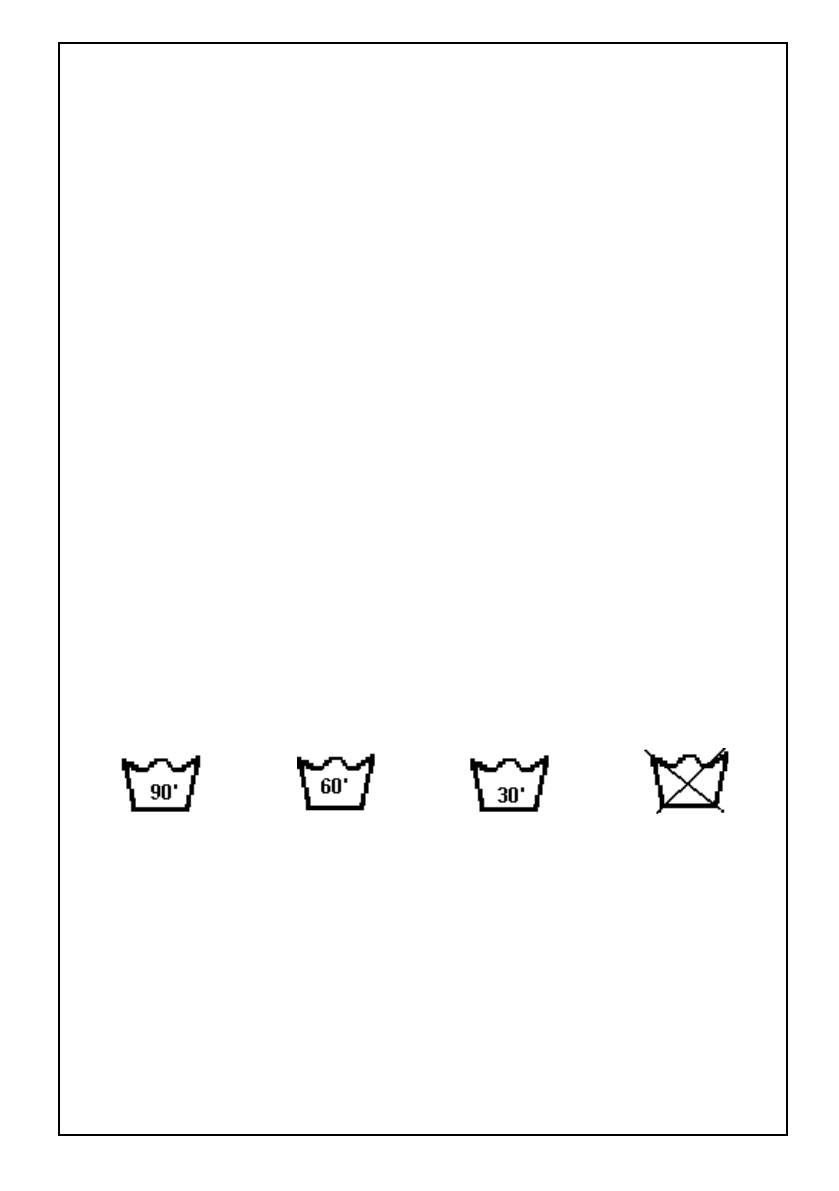
Wash up to 90
Û
C Wash up to 60 Û&:DVKXSWRÛ&1RWZDVKDEOHLQ
washing machine
PLACEMENT OF THE CLOTHES INTO THE MACHINE
•
Open the door of your machine.
•
Fill your clothes in your machine in an evenly-spread manner.
•
Place each clothing item into the machine separately.
•
When you shut the door of your machine, be careful that no clothing
item is jammed between the cover and the gasket.
•
Shut the door of your machine tightly otherwise your machine will not
begin the washing process.
26

FILLING DETERGENT IN THE MACHINE
The
quantity
of the detergent that you will fill in your machine depends on the
following criteria:
•
Your detergent consumption will change according to the level of
dirtiness of your clothes. For your slightly dirty clothes, do not pre-
wash and put a small amount of detergent in the compartment no.2
of the detergent drawer.
•
For your excessively dirty clothes, select a programme with pre-wash,
fill ¼ portion of the de tergent you will put in compartment 1 in the
detergent drawer and the remaining portion in compartment 2.
•
In your machine, use detergents developed especially for automatic
washing machines. The quantities that will be used for your clothes
are written on the packaging of the detergents.
•
As the hardness of your water increases, the amount of detergent to
be consumed will also increase.
•
As the amount of your clothes increases, the amount of detergent to
be consumed will also increase.
•
Pour your softener into the softener compartment of your detergent
drawer. Do not exceed the MAX level. Otherwise, the softener will
diffuse into the washing water via the siphon.
•
Concentrated softeners should be diluted with water before pouring
into the drawer. This is because concentrated softener obstructs the
siphon and prevents the flow of the softener.
•
You can use fluid detergents in all programmes without pre-
washing. For this, add the fluid detergent separator to the second
compartment of the detergent drawer and regulate the amount of
fluid detergent according to the levels on this plate.
WARNING!
In the event that power is cut off at any stage of the wash programmes and
then later reconnected, your machine will continue the programme from the
point it was interrupted at. Such a situation will not cause any harm to your
machine.
In the event that power is cut off during the wash operation, the door lock
mechanism will be released after two minutes. If there is water in the machine
do not open the door, in order to prevent water from pouring out. If you wish
to take out your laundry you can do so by draining the water inside the
machine.
27

MAINTENANCE AND CLEANING
•
Unplug your machine.
•
Close the water tap.
WATER INLET FILTERS
On the tap part of your machine’s water inlet hose and at the extremities of
the water inlet valves, there are filters to prevent entrance of dirt and foreign
bodies into the water to the machine. If the machine is unable to receive
sufficient water although your water tap is opened, these filters should be
cleaned.
•
Remove the water inlet hose.
•
Remove the filters found on the water inlet valves by using tweezers
or pliers and wash thoroughly with a brush.
•
Clean the filters of the water inlet hoses located on the tap side by
removing manually, together with the seal.
•
After cleaning the filters, they can be refitted by reversing the removal procedure.
PUMP FILTER
The pump filter system prolongs the life of your pump, which is used to drain
the dirty water. It prevents lint from entering the pump. Cleaning your pump
filter every 2-3 months is recommended. To clean your pump filter:
•
Remove the kickplate by pushing upwards with your hand from the
lower claws and pulling towards yourself.
•
Before opening the filter cover, place a cup in front of the filter cover
to prevent flow of the remaining water in the machine.
•
Loosen the filter cover by turning counter clockwise and drain the
water.
•
Remove the foreign bodies from the filter.
•
Check for the rotation of the pump manually.
•
After you have cleaned the pump, refit the filter cover by rotating
clockwise.
•
Refit the kickplate by holding from the claws and pushing it.
•
Do not forget that if the filter cover is not properly refitted, it will leak
water.
28

WARNING!
Danger of scalding!
Since the water inside the pump maybe hot, wait for it to cool.
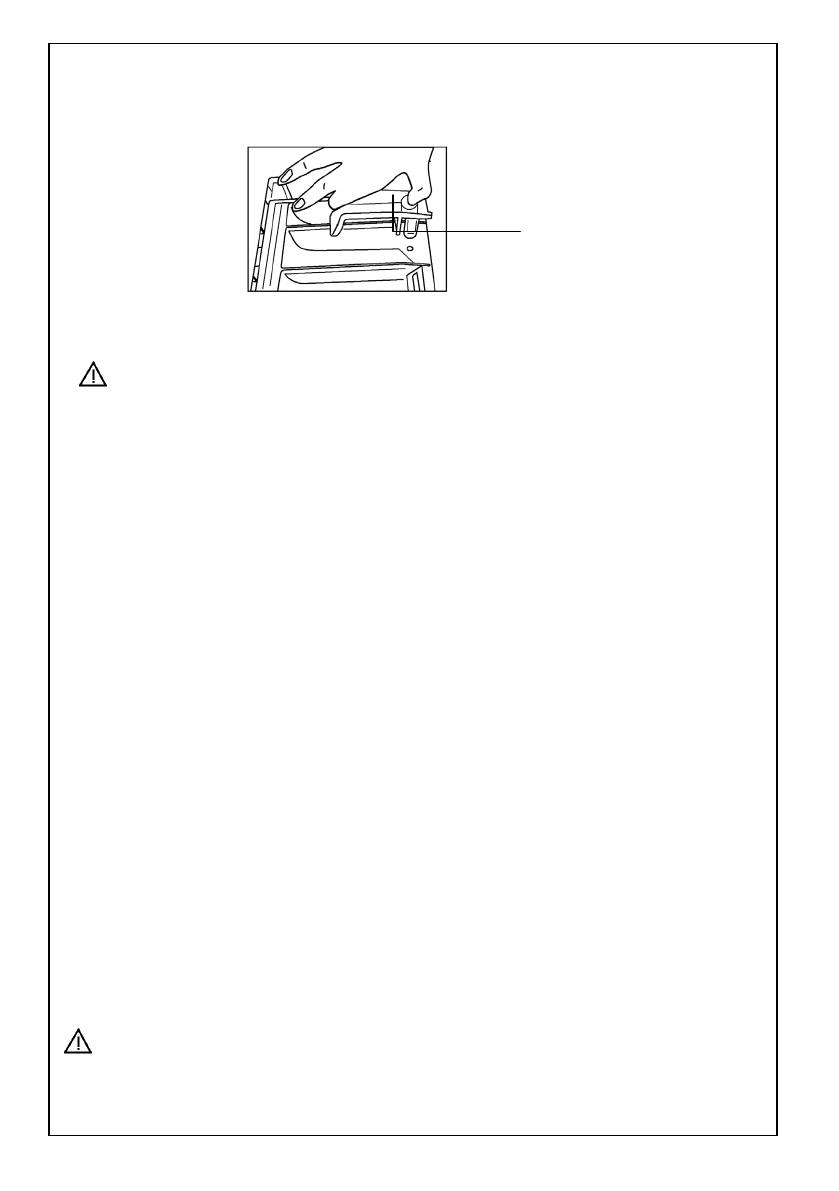
DETERGENT DRAWER
Detergents may cause residue build-up in the detergent drawer and its slot
over time. Take out the detergent drawer periodically to clean away the
accumulated residue. To remove the drawer, proceed as follows:
•
Pull the drawer to its end (DIAGRAM-1).
•
Keep pulling by pressing on the siphon lid inside the drawer which is
fully pulled to its end, and remove the drawer from its place
(DIAGRAM-2).
•
Wash it by rinsing with water and cleaning with an old toothbrush.
•
Collect the residue inside the drawer slot without letting it drop into
the machine.
•
After thoroughly drying the drawer, refit by reversing the removal
procedure.
DIAGRAM-1 DIAGRAM-2
29
SIPHON PLUG
Pull out the detergent drawer. Remove the siphon plug and thoroughly clean
any softener residue. Refit the cleaned siphon plug back in its place. Check
that it is fitted properly.
Siphon plug
THE CABINET
To clean the outside of the appliance, use a neutral detergent and a damp
cloth. Please be careful not to use material that could damage the exterior
surface of your machine.
WARNING!
If the machine is installed in a location where the ambient temperature can fall
below 0 Û&SURFHHGDVIROORZVZKHQQRWLQXVH
•
Plug in the machine.
•
Close the water tap and pull out the water inlet hose or hoses from
the tap.
•
Place the ends of the water drain and water inlet hoses in a cup on
the ground.
•
Adjust the programme knob to “Draining” programme.
•
The programme ready light will be on.
•
Run the programme by pressing the start/pause button.
•
Unplug your machine when the programme is over (programme end
light is on).
When this process is completed, the remaining water inside the machine will
be drained and thus formation of ice in the machine will be prevented. When
you operate your machine again, be sure that the ambient temperature is
above 0 Û&
THE DRUM
Do not leave metal parts such as needles, staples or coins inside your
machine. These pieces cause rust stains to form inside the drum. To
eliminate these rust stains, use a non-chlorine cleaning agent and follow the
warnings of the cleaning agent producer. Never use dish-washing scourers or
similar abrasive objects to clean rust stains.
REMOVE OF LIME FROM YOUR MACHINE
If you regulate the amount of detergent used in your machine properly, there
will be no need for lime removal. However, if you desire to apply the removal
procedure, use lime protectors readily available on the market and pay
attention to their warnings.
WARNING!
The lime-eliminating substances contain acids and this may cause colour
modifications in your clothes along with an adverse effect on your machine.
30
TROUBLESHOOTING GUIDE
All repairing which must be done on the machine should be performed by
authorized service personnel. When your machine requires repairs or you are
unable to eliminate the failure with the help of the information given below:
•
Unplug the machine.
•
Close the water tap.
•
Consult your nearest authorized service provider.
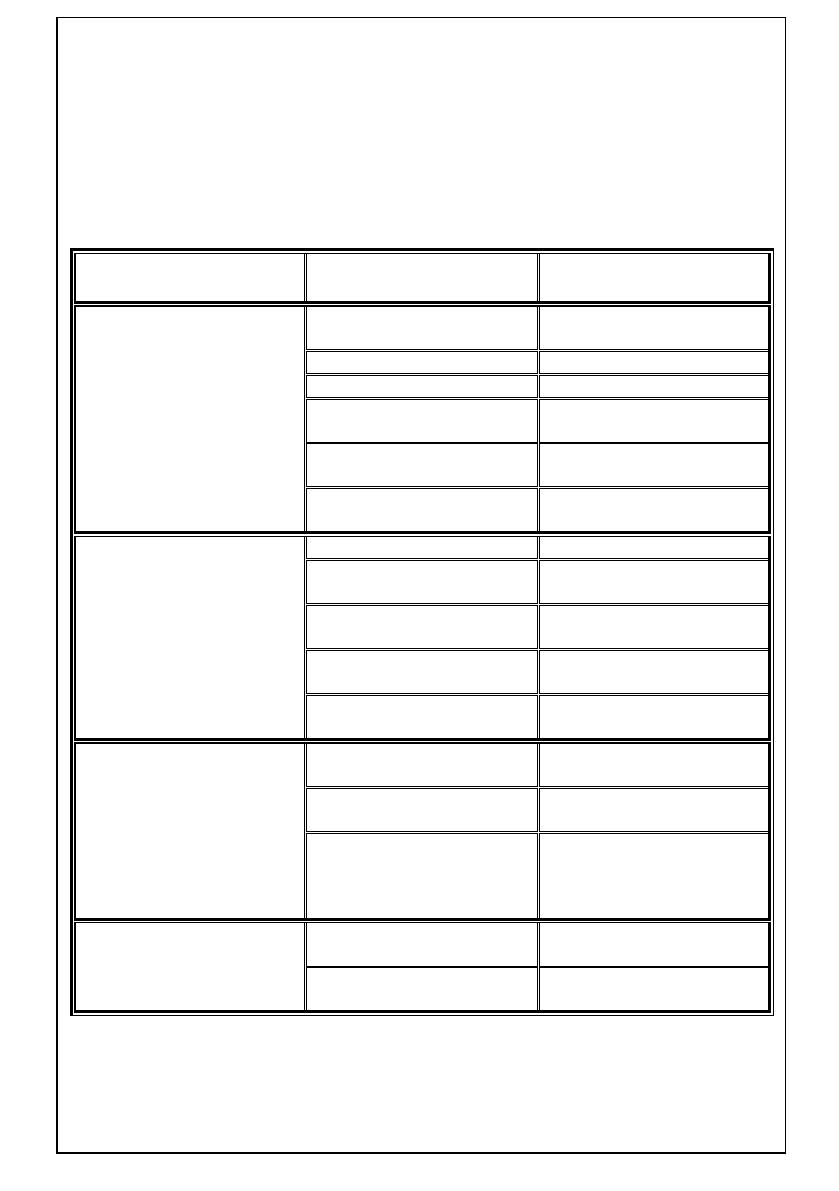
METHODS OF
FAILURE PROBABLE CAUSE
ELIMINATION
Insert the plug into the
It is unplugged.
socket.
Your fuse is defective. Change your fuse.
The electric power is off. Check the electric power.
Your machine does not
Start/pause button has
Press the start/pause
operate.
not been pressed.
button.
The programme knob is
Turn the programme knob
in O (off) mode.
to the desired mode.
The door is not shut
Shut the door properly.
properly.
You should hear it click.
Water tap is closed. Open water tap.
The water inlet hose may
Check the water inlet
be bent.
hose.
The water inlet hose is
Clean the filters of water
Your machine does not
obstructed.
inlet hose. (
*
)
receive water.
The valve inlet filter is
Clean the valve inlet
obstructed.
filters. (
*
)
The door is not shut
Shut the door properly.
properly.
You should hear it click.
The drain hose is
Check the drain hose.
obstructed or bent.
The pump filter is
Clean the pump filter. (
*
)
Your machine is not
obstructed.
draining water.
The clothes are not
Spread the clothes inside
placed inside the machine
the machine in an orderly
in an evenly-balanced
and evenly-balanced
manner.
manner.
The feet of your machine
Adjust the feet. (
**
)
are not adjusted.
Your machine is vibrating.
Transportation screws are
Remove transportation
not removed.
screws. (
**
)
(
*
) See the section concerning maintenance and cleaning of your
machine.
(
**
) See the section concerning installation of your machine.
31

METHODS OF
FAILURE PROBABLE CAUSE
ELIMINATION
There is a small
It does not prevent
amount of clothes in
operation of the
the device.
machine.
Do not exceed the
Excessive amount of
recommended quantity
clothes are filled in the
Your machine is
of clothes and spread
machine or the clothes
vibrating.
your clothes in the
are not placed in a
machine in a well-
well-balanced manner.
balanced manner.
Prevent your
Your machine touches
machine’s leaning on a
a ripid object.
tough place .
Press the start/pause
button.In order to stop
the foam,dilute one
table-spoon of softener
in half liter of water and
pour it in the detergent
Too much detergent
drawer.Press the
has been used.
start/pause button after
Excessive foam in the
5-10 minutes. Arrange
detergent drawer.
the amount of the
detergent properly in
the next washing
process.
Use only the
Wrong detergent has
detergents produced
been used.
for full automatic
machines.
Your laundry too dirty
Select a suitable
for the program you
program. (see Table-1)
have selected.
The washing result is
bad.
The amount of
Use more detergent
detergent used is not
according to the
sufficient.
detergent.
32
METHODS OF
FAILURE PROBABLE CAUSE
ELIMINATION
Load clothes into your
Machine load exceeds
machine so as to avoid
maximum capacity.
exceeding its
maximum capacity.
Regulate the amount of
detergent used
Washing quality is
Your water may be
according to the
poor.
hard.
detergent producer's
guidelines.
Distribution of the
Spread the clothes
clothes in your
inside the machine in
machine is not evenly-
an orderly and evenly-
balanced.
balanced manner .
The end of the water
The water is drained
Place the water drain
drain hose is
from the machine as
hose at an appropriate
positioned too low in
soon as it is filled.
height.(**)
relation to the machine.
No failure. The water is
No water is seen in the
in the lower part of the
-
drum during washing.
drum.
By calibrating your
machine for “Rinsing”
Undissolved fragments
programme, run an
There is detergent
of certain detergents
additional rinse or
residue on the clothes.
may stick to your
eliminate stains after
clothes as white stains.
drying with the help of
a brush.
Use the maximum
detergent amount
These stains may be
There are grey stains
recommended by the
caused by oil, cream or
on the clothes.
detergent producer
ointment.
during the next
washing operation.
(**) See the section concerning installation of your machine.
33
METHODS OF
FAILURE PROBABLE CAUSE
ELIMINATION
The unbalanced load
control system will try
to distribute your
clothes in a
homogenous manner.
No failure. The
The spinning process
After your clothes are
unbalanced load
is not done or starts
distributed, the
control may operate in
with delay.
spinning process will
that way.
begin. For the next
wash, place your
clothes into the
machine in an evenly-
balanced manner.
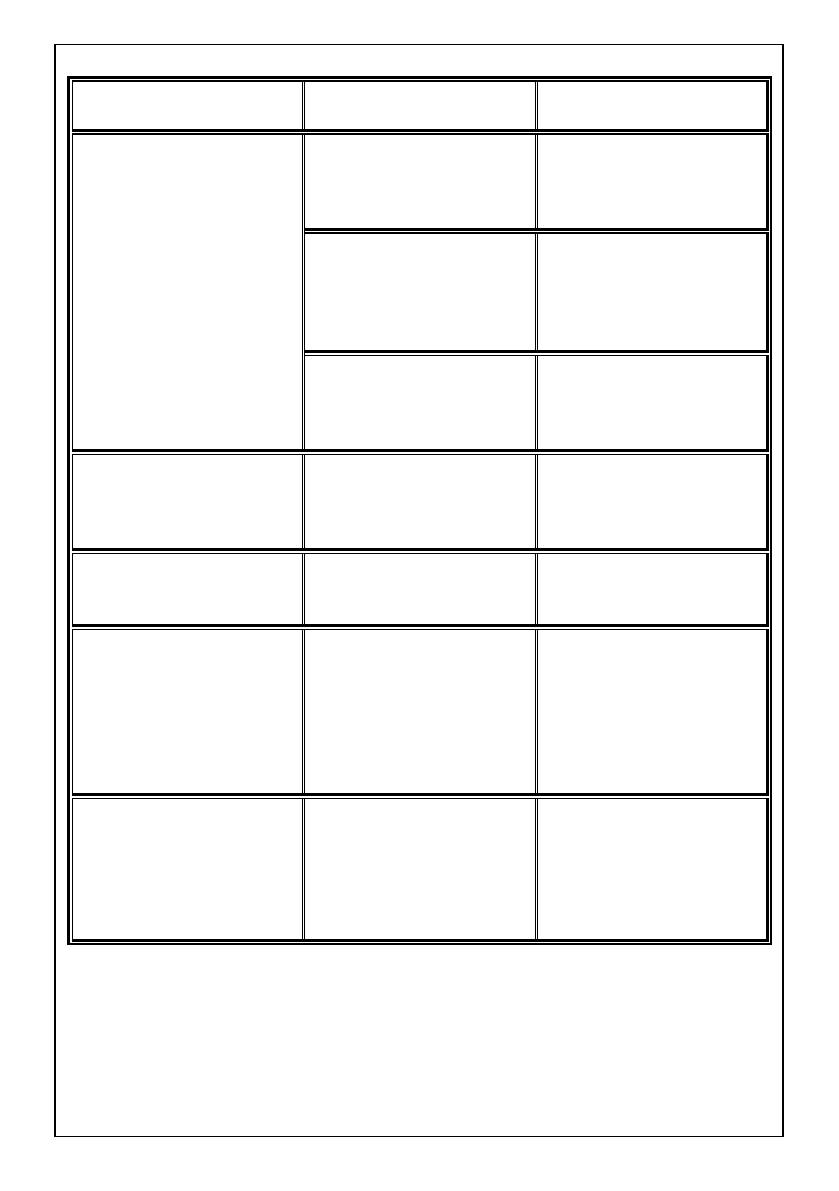
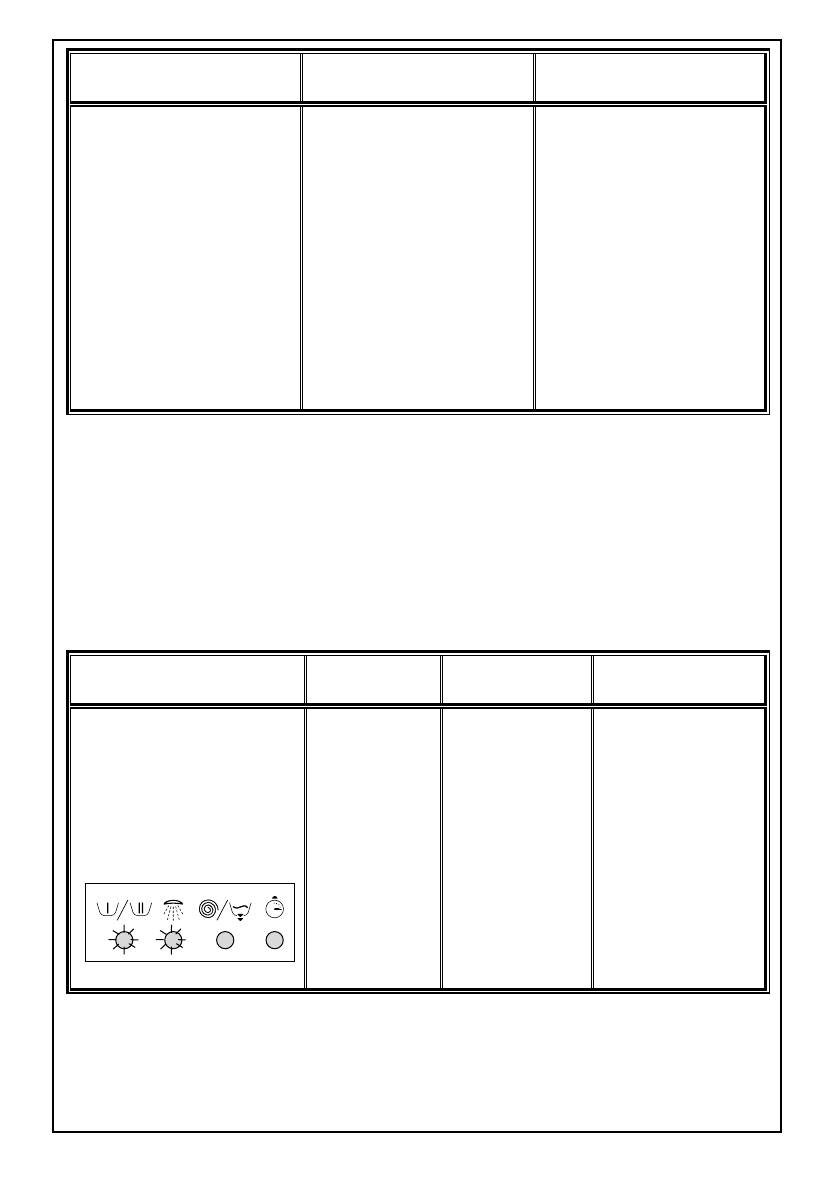
AUTOMATIC FAILURE DETECTION SYSTEM
Your machine is equipped with systems which will both take the necessary
precautions and warn you in case of any failure by continually monitoring the
washing processes.
FAILURE
PROBABLE
CORRECTIVE
FAILURE CODE
INDICATOR
FAILURE
MEASURES
Shut the door
properly so that
you hear it click.
If the problem
persists, turn off
The door is
Lights 1 and
the machine,
E01
not shut
2 blink.
unplug it and
properly.
consult your
nearest
authorized
service provider
immediately.
34
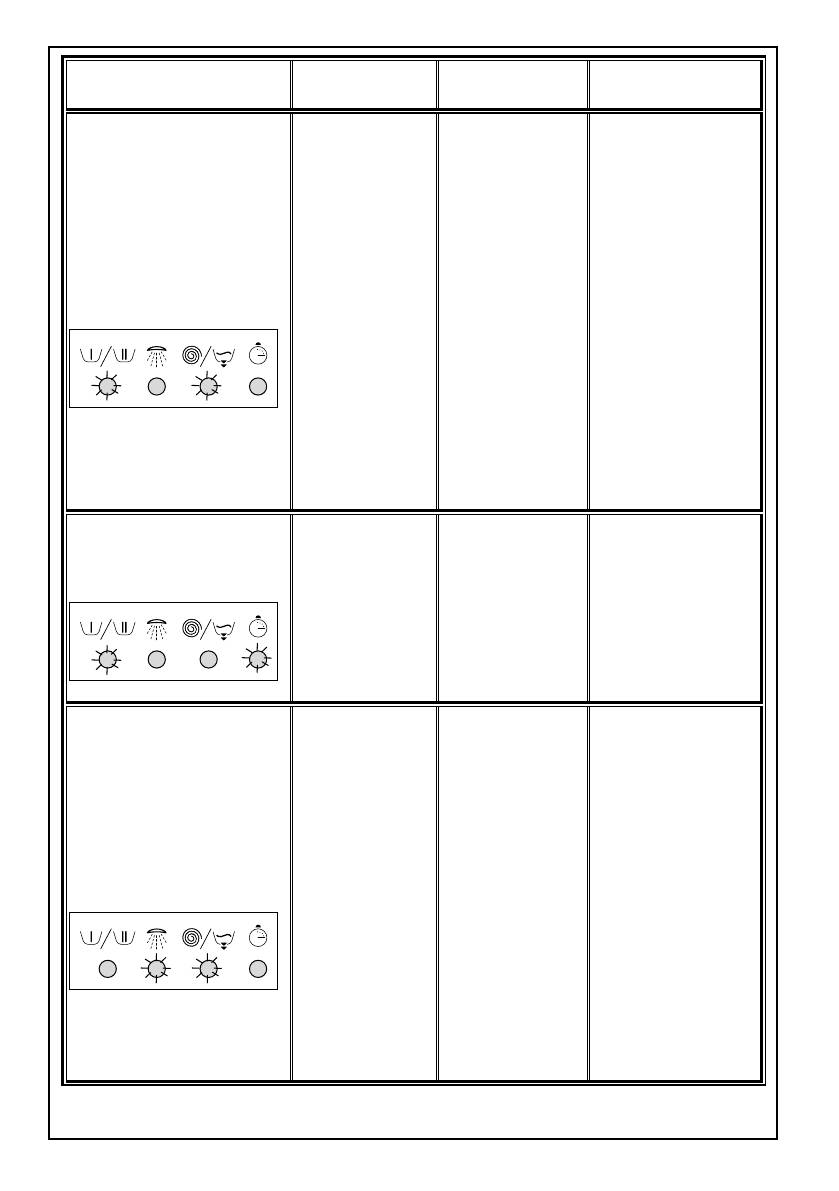
FAILURE
PROBABLE
CORRECTIVE
FAILURE CODE
INDICATOR
FAILURE
MEASURES
Turn on the tap
to the end.
Water supply
may be cut,
The water
check it. If the
level in your
problem still
machine is
exists, your
below heater.
machine will
Lights 1 and
E02
The pressure
automatically
3 blink.
of your water
stop after a
supply may
while. Unplug
be low or
your machine,
unstable.
turn off the tap
and consult your
nearest
authorized
service provider.
Clean the pump
filter. If the
E03
The pump
problem
Lights 1 and
has failed or
persists, consult
4 blink.
the pump filter
your nearest
is obstructed.
authorized
service
provider.(*)
Your machine
will automatically
drain the water.
After your
machine has
completed the
There is an
draining
excessive
Lights 2 and
process, shut
E04
amount of
3 blink.
down your
water in your
machine and
machine.
unplug. Close
the tap and
consult your
nearest
authorized
service provider.
(
*
)
See the section re
g
ardin
g
maintenance and cleanin
g
of
y
our machine.
35

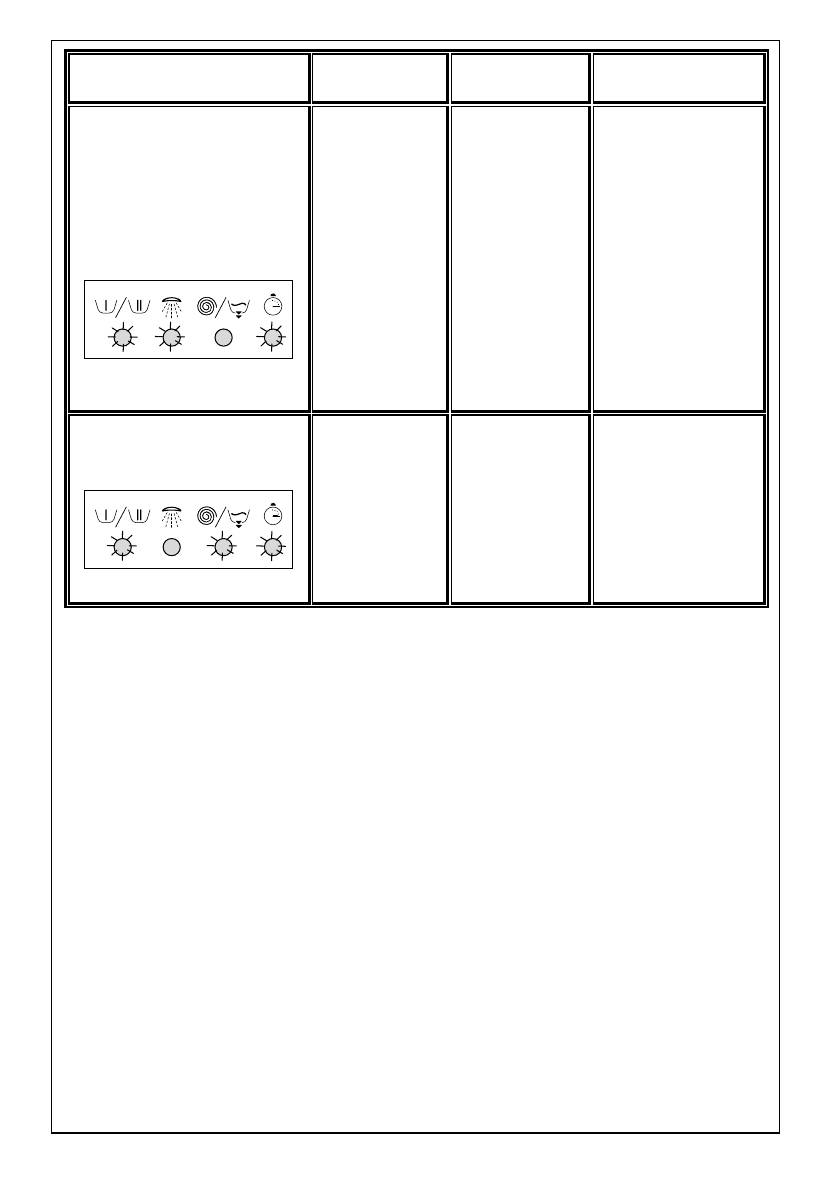
FAILURE
PROBABLE
CORRECTIVE
FAILURE CODE
INDICATOR
FAILURE
MEASURES
Shut down and
The heater
unplug your
E05
of your
machine. Turn
Lights 2 and
machine or
off your tap and
4 blink.
the heat
consult your
sensor has
nearest
failed.
authorized
service provider.
Shut down and
unplug your
E06
machine. Turn
Lights 3 and
The motor
off the tap and
4 blink.
has failed.
consult your
nearest
authorized
service provider.
Shut down and
unplug your
E07
machine. Turn
Electronic
Lights 1, 2
off the tap and
card has
and 3 blink.
consult your
failed.
nearest
authorized
service provider.
Shut down and
unplug your
E08
machine. Turn
Lights 2, 3
The motor
off the tap and
and 4 blink.
has failed.
consult your
nearest
authorized
service provider.
36
FAILURE
PROBABLE
CORRECTIVE
FAILURE CODE
INDICATOR
FAILURE
MEASURES
If the network
voltage is lower
than 150V or
higher than
260V, your
The network
machine will
Lights 1, 2
voltage is too
E09
automatically
and 4 blink.
high or too
stop. When the
low.
network voltage
is recovered,
your machine
will continue its
operation.
Shut down and
unplug your
E10
machine. Turn
Lights 1, 3
Communication
off the tap and
and 4 blink.
error
.
consult your
nearest
authorized
service provider.
37
AFTER-SALES SERVICE
Before contacting After-Sales Service:
1. Try to remedy the problem yourself (see “Troubleshooting Guide”).
2. Restart the programme to check whether the problem has solved itself.
3. If the washing machine continues to function incorrectly, call the After-
Sales Service.
Specify:
•
The nature of the problem.
•
The washing machine model.
•
The service code (number after the word SERVICE).
The After-Sales Service sticker can be found inside the door.
•
Your full address.
•
Your telephone number and area code.
•
After-Sales Service phone numbers and addresses are given on the
guarantee card. Alternatively, consult the dealer where you purchased
the appliance.
TRANSPORT / HANDLING
Never lift the appliance by the worktop when transporting.
1. Pull out the mains plug.
2. Turn off the tap.
3. Disconnect the inlet and drain hoses.
4. Drain all water from the hoses and from the appliance (see “Removing
the Filter”, “Draining Residual Water”).
5. Fit the transportation screws (obligatory).
38


