Sony SDM-S205K – page 14
Manual for Sony SDM-S205K
Table of contents
9
CS
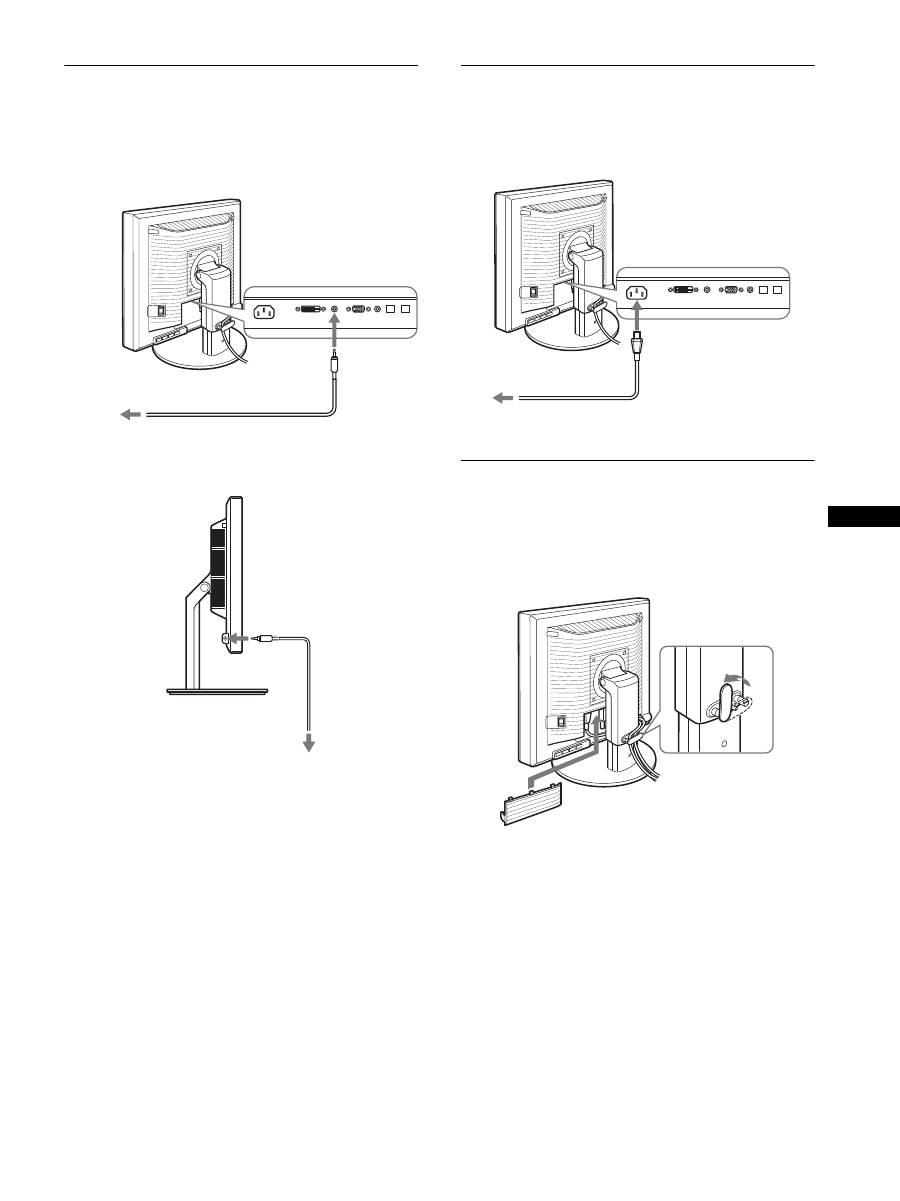
步骤 4: 连接音频线
如果不想输出音频,无需进行此连接。
1
用附带的音频电缆连接显示器的音频输入插孔和计算机
或其他音频设备的音频输出插孔。
2
将音频电缆 (不附带)牢牢地连接到显示器的音频输出
插孔。
当显示器的音频输入和音频输出连接完成后,音频输出将
被改变。
请连接显示器音频输入规格中所示的输入范围内的音频装
置。过高的输入可能会损坏显示器。
步骤 5: 连接电源线
1
将附带的电源线牢牢地连接到显示器的交流输入连接器。
2
将另一端牢牢地连接到电源插座。
步骤 6: 牢固连接电线,并关闭连接
器盖
1
如图所示,将电线和电缆穿过电缆支架。
2
关闭连接器盖。
注意
弯折电线和电缆时,务必先将电线和电缆松开一点。 电线和电线如
果拉得太紧,在调节屏幕角度时它们可能会从连接器或插头中掉
出。 如果电线和电缆拉得太紧可能会损坏。
至音频输入
至计算机或其它
音频设备的音频
输出
音频线 (附带)
至音频输出
音频电缆
( 不附带 )
至交流
输入
至电源插座
电源线 (附带)
1
2
10
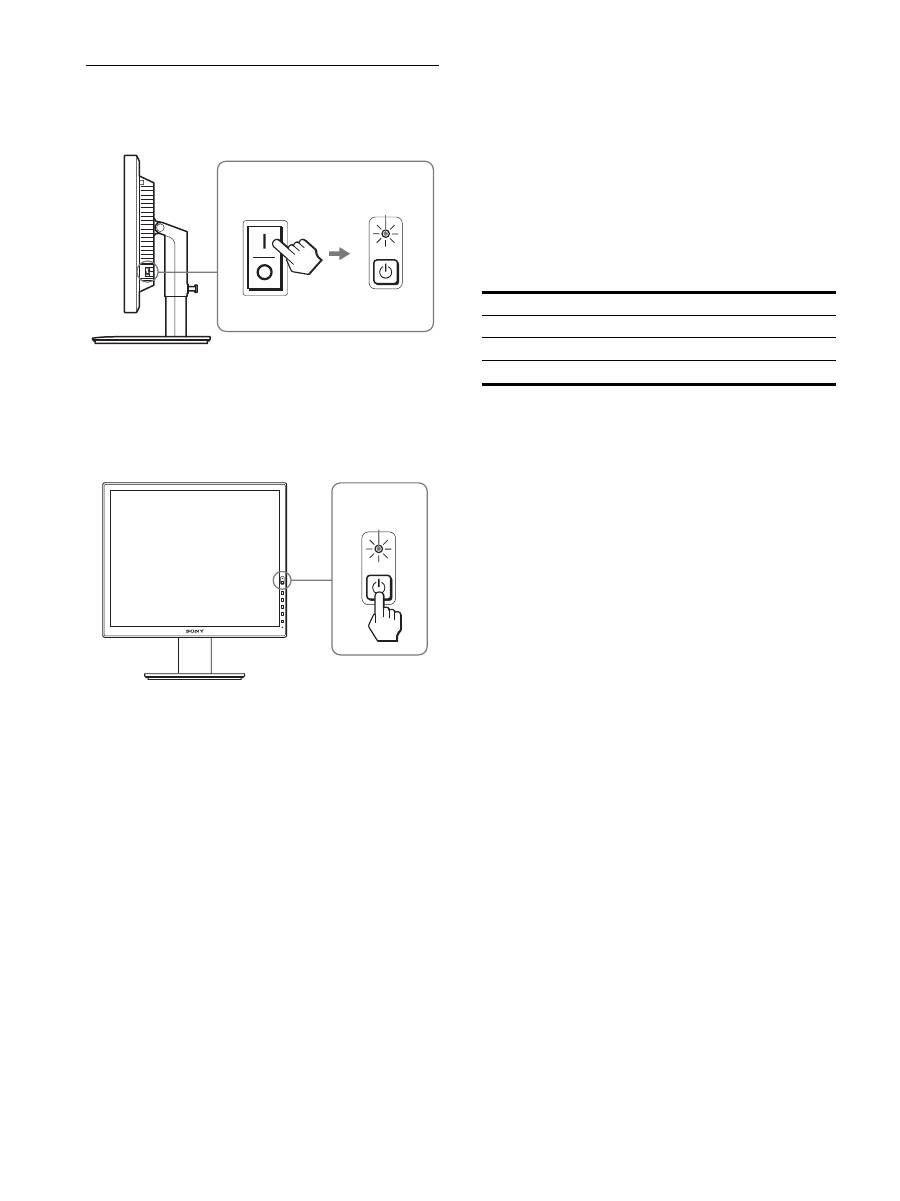
步骤 7: 打开显示器和计算机
1
确认
1
(电源)指示灯闪烁红色。购买时,MAIN POWER
(主电源)开关被设在
@
侧。
注意
如果显示器右侧的 MAIN POWER (主电源)开关没有被设在
@
侧,按
@
侧并检查
1
(电源)指示灯闪烁红色。
2
按显示器右前方的
1
(电源)开关。
1
(电源)指示灯以绿色点亮。
3
打开计算机。
如果屏幕上未出现图像
•
请检查电源线和视频信号电缆是否正确连接。
•
如果屏幕上出现 “没有输入信号”
:
–
计算机进入节电模式。 试着按键盘上任意键或移动鼠标。
–
按 OK 按钮检查输入信号设置是否正确 ( 第 12 页 )。
•
如果屏幕上出现 “未连接信号线”:
–
检查视频信号电缆是否正确连接。
–
按 OK 按钮检查输入信号设置是否正确 ( 第 12 页 )。
•
如果屏幕上出现 “超出范围” :
请重新连接旧显示器。 然后将计算机的显示卡调节至以
下范围内。
有关屏幕信息的更多说明,请参阅第 20 页 “故障现象和排
除方法”。
不需要特定的驱动程序
本显示器符合 “DDC”即插即用标准,并自动检测所有显示器信
息。 计算机不需要安装特定的驱动程序。
连接显示器后第一次打开计算机时,屏幕上会出现设定向导。 此
时,请按照屏幕指示进行操作。 即插即用显示器被自动选择,因此
您可以使用显示器。
垂直频率变为 60Hz。
如果显示器上闪烁不明显,您可以就这样使用。 您不需要将垂直频
率设定到更高的值。
MAIN POWER
呈红色点亮
呈绿色点亮
模拟 RGB
数字 RGB
水平频率
28-92 kHz
28-75 kHz
垂直频率
48-85 Hz
60 Hz
分辨率
1600
×
1200 或更小
11
CS
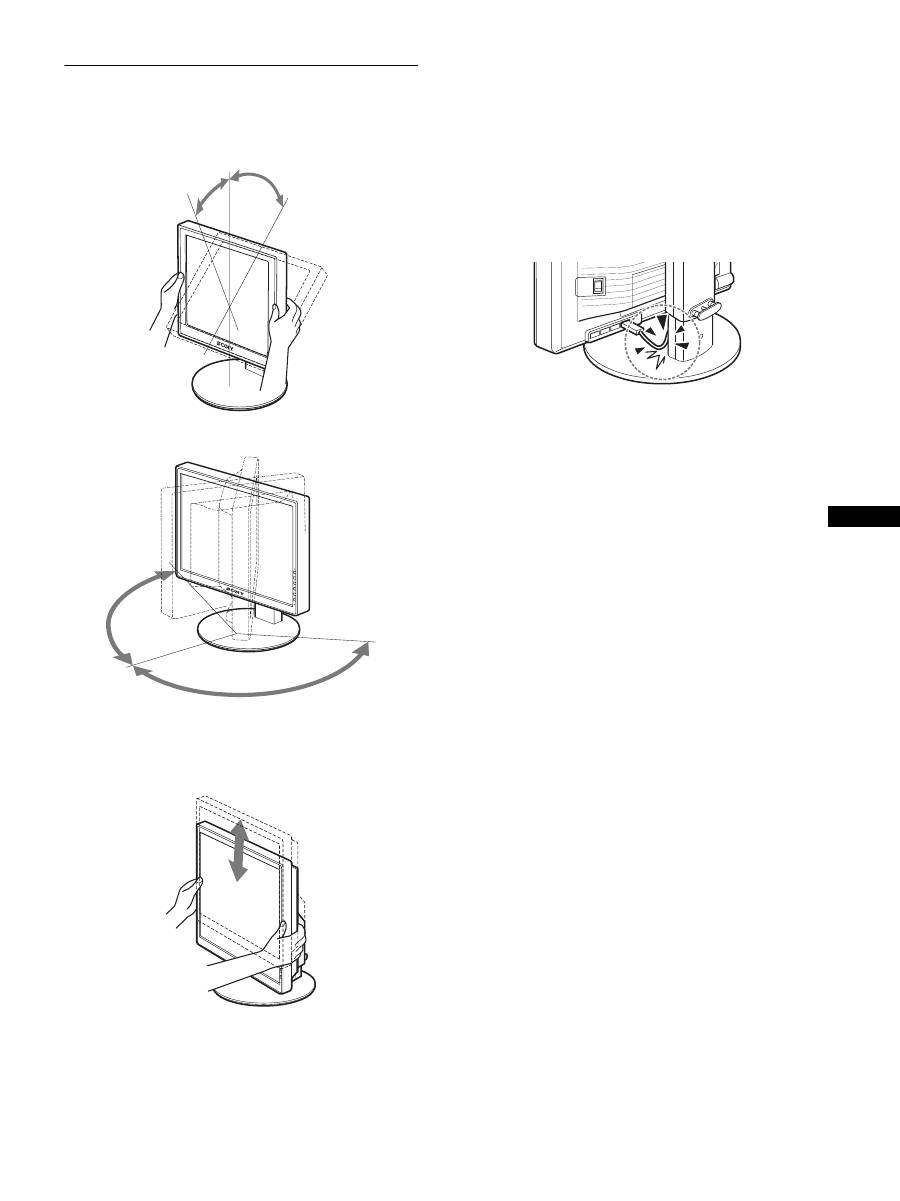
步骤 8: 调节倾斜度和高度
显示器可以在以下所示的角度内进行调整。
抓住液晶显示屏的两侧,然后调整屏幕角度。
使用高度可调底座时,也可以按如下方法进行高度调整。
抓住液晶显示屏的两侧,然后调整屏幕高度。
若要舒适地使用显示器
根据桌子和椅子的高度调整显示器的视角,使屏幕上的光
亮不会反射到您的眼睛。
注意
•
调整显示器位置时,切勿使显示器或电缆或其它 USB 设备碰撞到
其周围的物体。务必小心地移动显示器。
•
调整底座高度时,显示器下方不要放置任何物体。显示器可能会
意外损坏。
•
连接 USB 产品或 USB 设备至显示器时,切勿使其碰撞到底座。调整
显示器的倾斜度和高度时,由于产品或设备的大小不同,显示器
可能会受损 (仅适用于配备 USB 端口的机型)。
大约 5
°
大约 20
°
大约 175
°
大约 175
°
支架 (高度可调)
约 110 mm
Pivot 支架
约 130 mm
12
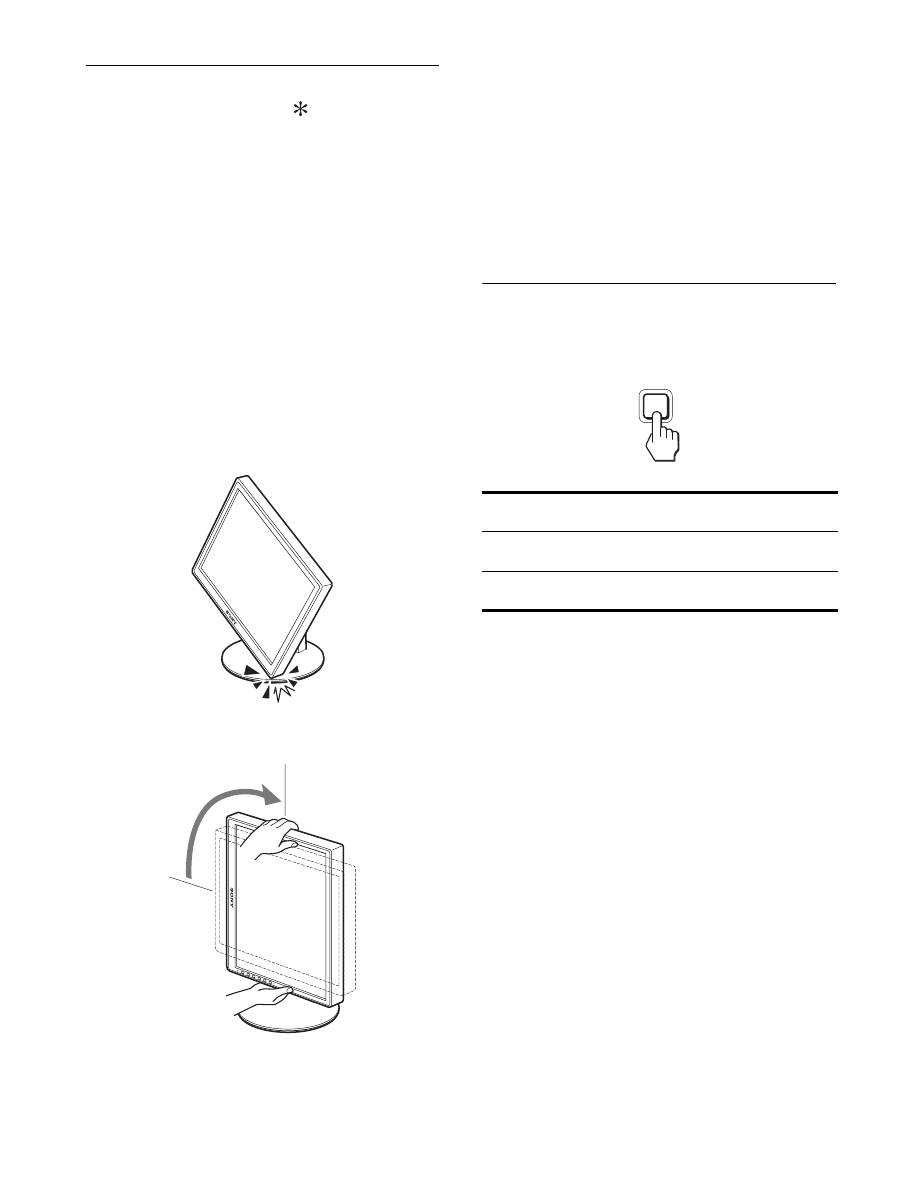
将图像切换至纵向 / 横向 (仅对于附
加 Pivot 支架的机型)
如果您的电脑具有纵向 / 横向画面切换功能,则您可以将
屏幕旋转 90
°
。
首先在您的电脑上将设定调整为图像切换,然后旋转屏幕。
将显示器旋转至纵向
1
调节您计算机上的设置以将屏幕逆时针旋转 90°。
2
按显示器上的 MENU 按钮,然后从选项菜单中选择“菜单
旋转”,并选择 “纵向”。
根据屏幕位置,您可以改变菜单显示位置。
3
抓住显示器两侧,然后慢慢将其上升至最高位置。
注意
•
如果您旋转连接着 USB 装置或 USB 兼容产品的显示器,则可能
会损坏显示器。
•
如果您要转动显示器,切勿使显示器或电缆或其它 USB 设备
碰撞到其周围的物体。务必小心地移动显示器。
•
若要旋转显示器,请先从电缆固定器中取出所有电缆,然后
小心移动电缆,切勿强行拉扯。
4
抓住显示器的两侧,然后缓缓将其顺时针旋转 90
°
。
您不能将显示器旋转 90
°
以上。
5
抓住显示器的两侧,并调整显示器的高度和倾斜度。
若要将显示器重新设置为水平位置
1
调节计算机的设置以将屏幕顺时针旋转 90°。
2
按显示器上的 MENU 按钮,然后从选项菜单中选择“菜单
旋转”,并选择 “横向”。
将菜单显示重新设定到水平位置。
3
抓住显示器的两侧,然后将其慢慢上升至最高位置。
4
抓住显示器的两侧,然后缓缓将其逆时针旋转 90
°
。
选择输入信号 (INPUT1/INPUT2)
按 OK 按钮。
每次按此按钮,输入信号都将发生改变。
屏幕信息
(在屏幕左上角显示 5 秒)
输入信号配置
输入 1: DVI-D
DVI-D 输入连接器
用于 INPUT1 (数字 RGB)
输入 2: HD15
HD15 输入连接器
用于 INPUT2 (模拟 RGB)
INPUT
OK
13
CS
设定显示器
可用屏幕显示菜单对显示器做许多调整。
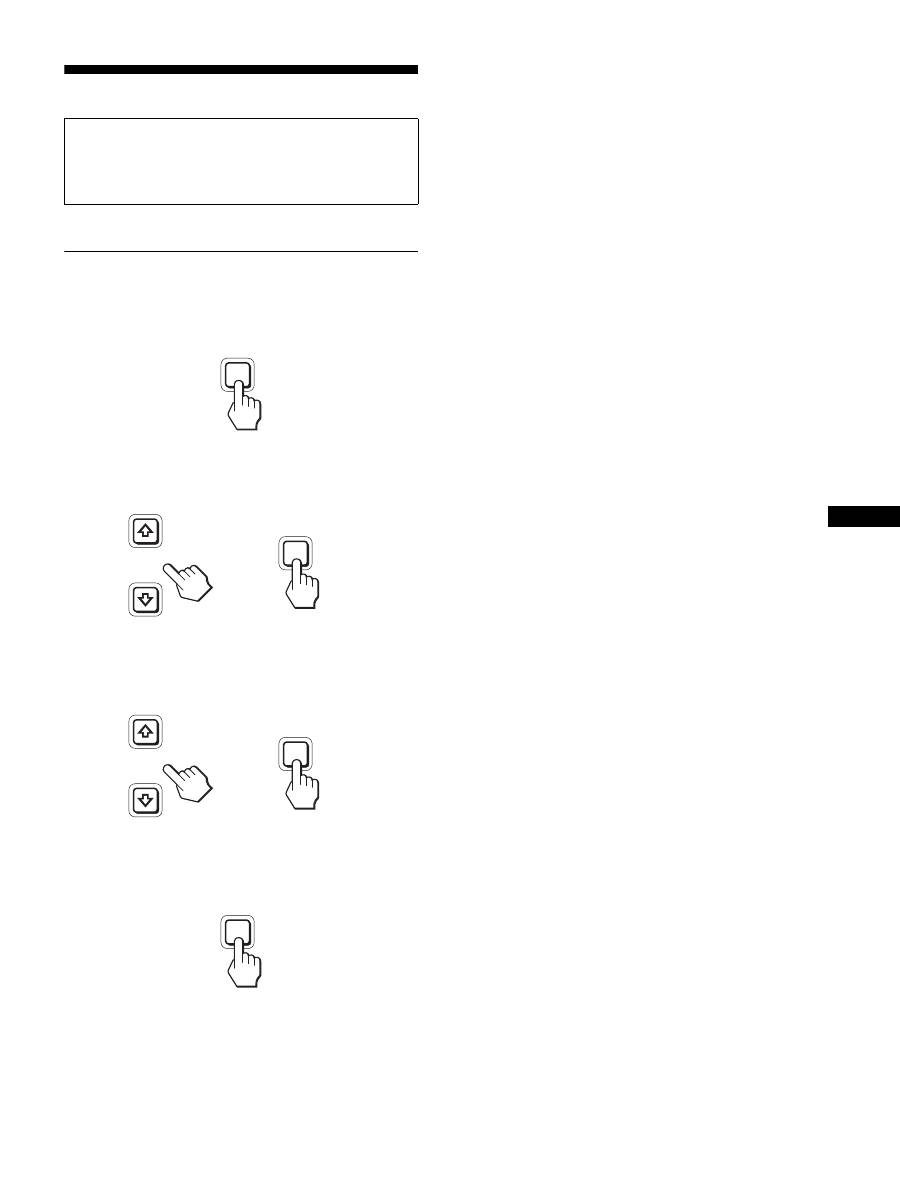
导航菜单
1
显示主菜单。
按 MENU 按钮在屏幕上显示主菜单。
2
选择您想要调整的菜单。
按
m
/
M
按钮以显示想要的菜单。 按 OK 按钮选择菜单项
目。
3
调整项目。
按
m
/
M
按钮进行调整,然后按 OK 按钮。
当您按 OK 按钮时,设置被储存,然后显示返回到上一
个菜单。
4
关闭菜单。
按一次 MENU 钮回到正常显示状态。 若未按任何按钮,
大约 45 秒后菜单将自动关闭。
x
将调整复原至默认设定
您可以用复原菜单将调整复原。 有关复原调整的更多信息,
请参阅第 16 页上的
0
(复原)。
进行调整之前
连接并开启显示器和计算机。
为获得最佳结果,将显示器连接到计算机并打开后,进
行任何调整前至少要等 30 分钟。
MENU
INPUT
OK
,
INPUT
OK
,
MENU
14
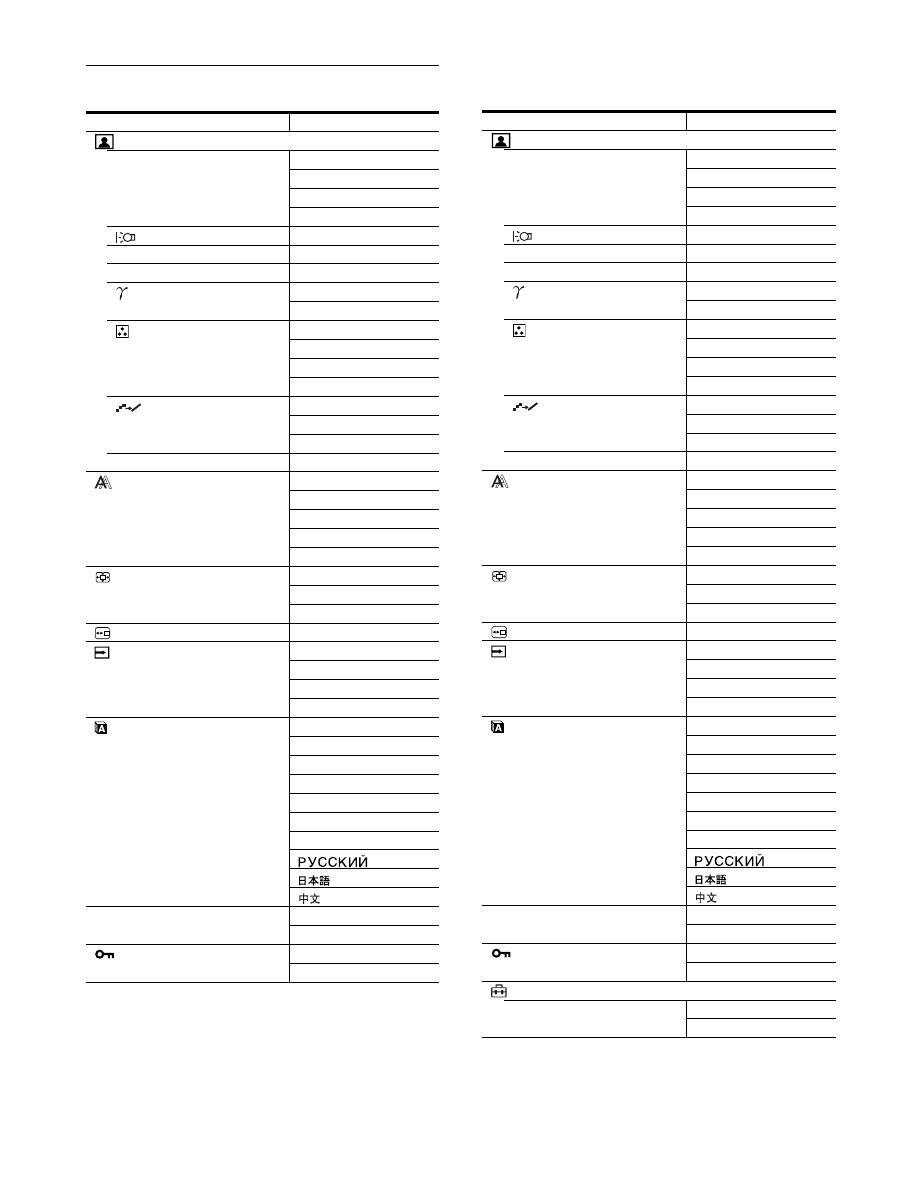
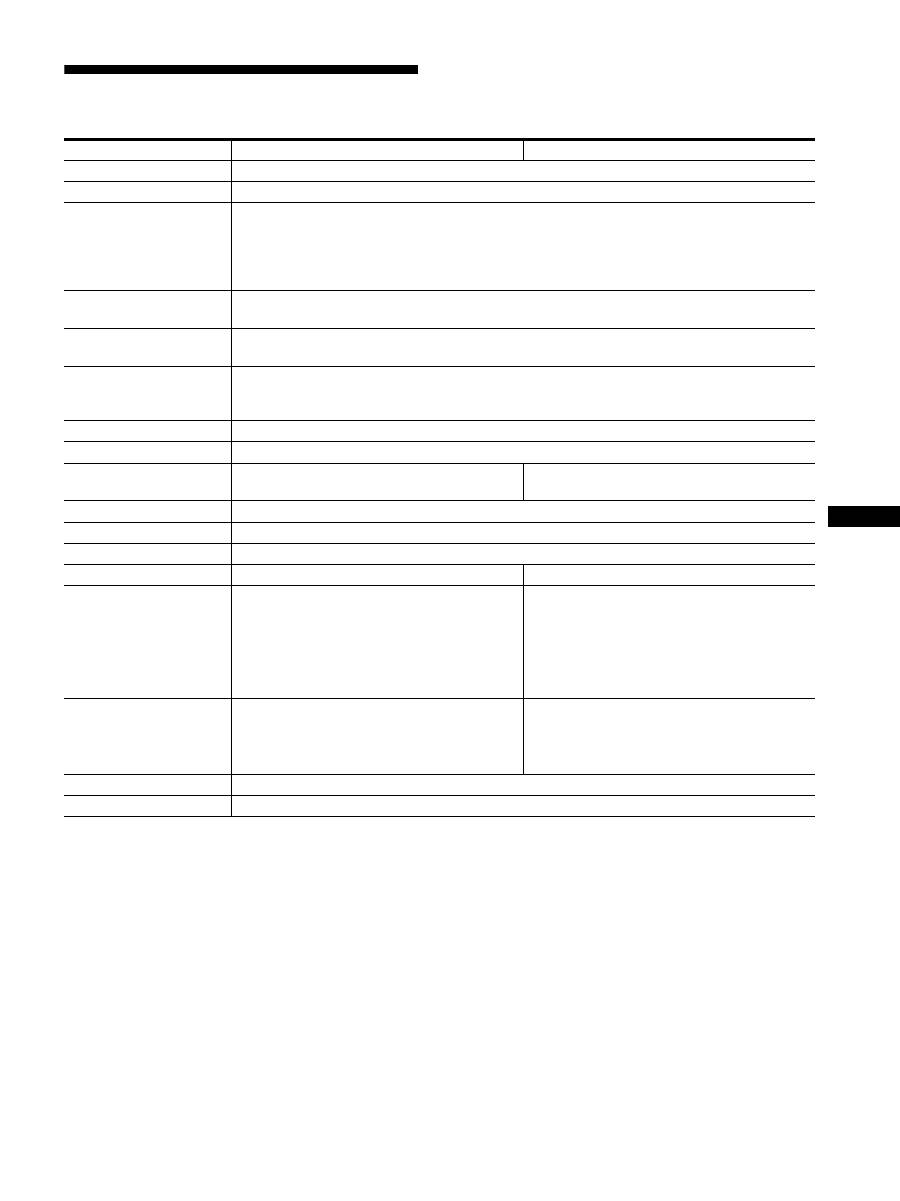
菜单选项列表
1)
当 ECO 模式被设定为 “自动”时,您将无法调节背光。
2)
选择 “sRGB”时,不能调整对比度、亮度和 GAMMA。
SDM-S205F
图像调整菜单
模式 (ECO mode)
高
中
低
自动
1)
背光
;
1)
6
对比度
;
1)2)
8
亮度
;
2)
GAMMA
用户
2)
CAL.
2)
色温
9300K
6500K
sRGB
2)
用户 (GAIN 和 BIAS)
平滑
文字
标准
图像
0
模式复原
;
屏幕效果
自动
相位
像素频率
水平中心
垂直中心
缩放
全屏显示
保持原有屏幕比例
真实显示
菜单位置
;
输入检测
开启自动输入检测
输入 1
输入 2
关闭自动输入检测
LANGUAGE
ENGLISH
FRANÇAIS
DEUTSCH
ESPAÑOL
ITALIANO
NEDERLANDS
SVENSKA
0
复原
确定
取消
菜单锁定
打开
关闭
SDM-S205K
图像调整菜单
模式 (ECO mode)
高
中
低
自动
1)
背光
;
1)
6
对比度
;
1)2)
8
亮度
;
2)
GAMMA
用户
2)
CAL.
2)
色温
9300K
6500K
sRGB
2)
用户 (GAIN 和 BIAS)
平滑
文字
标准
图像
0
模式复原
;
屏幕效果
自动
相位
像素频率
水平中心
垂直中心
缩放
全屏显示
保持原有屏幕比例
真实显示
菜单位置
;
输入检测
开启自动输入检测
输入 1
输入 2
关闭自动输入检测
LANGUAGE
ENGLISH
FRANÇAIS
DEUTSCH
ESPAÑOL
ITALIANO
NEDERLANDS
SVENSKA
0
复原
确定
取消
菜单锁定
打开
关闭
选项
菜单旋转
横向
纵向
15
CS
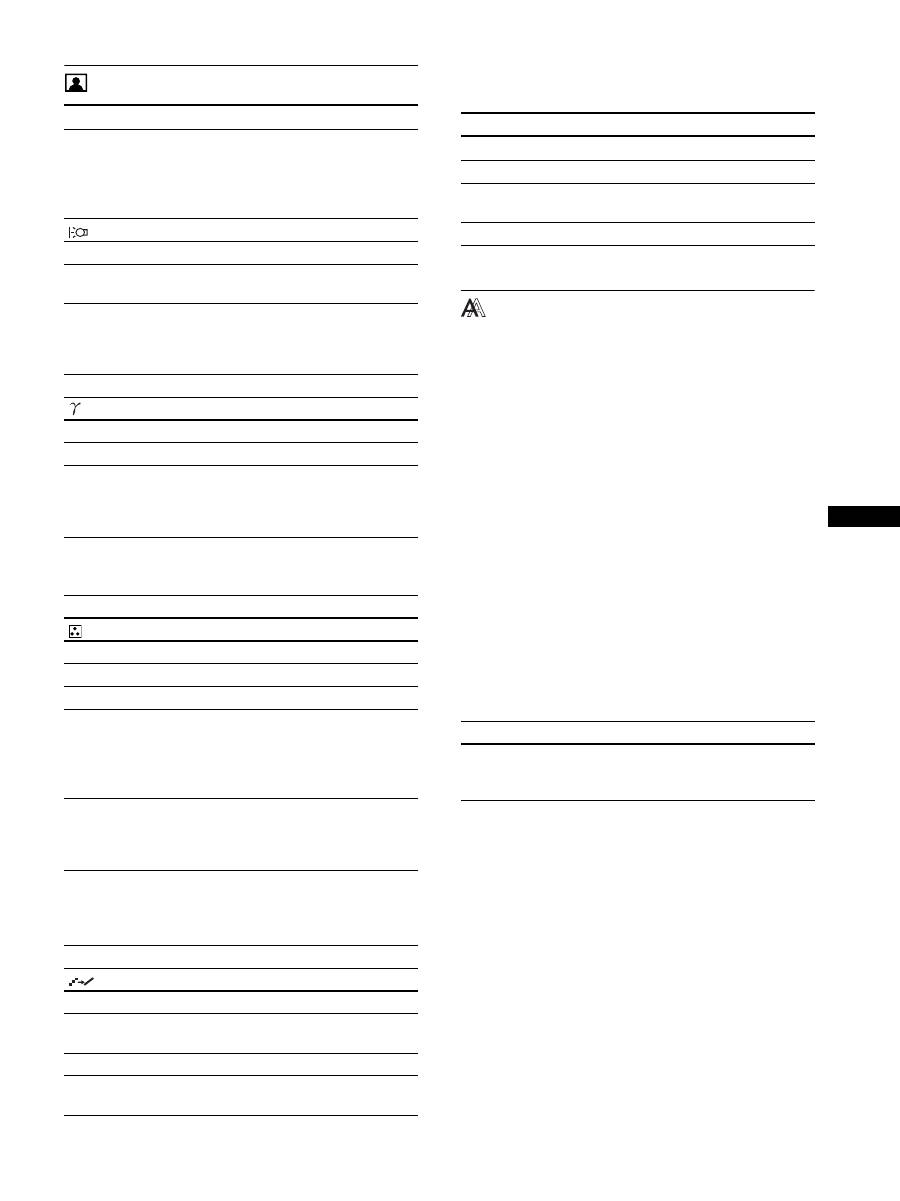
图像调整菜单
注意
•
当 ECO 模式被设定为 “自动”时,您将无法调节背光。
•
如果选择 “sRGB”,则无法调节对比度和亮度。
注意
如果选择 “sRGB”,则不能调整 GAMMA。
1)
如果计算机或连接到显示器上的其他设备与 sRGB 不兼容,则色
彩不能调整到 sRGB 色彩空间。
选择 “sRGB”时,就不能调整对比度、亮度和 GAMMA。
如果已将 ECO 模式设为 “自动”,则不能选择 “sRGB”。
注意
当信号分辨率为 1600 × 1200 时,您不能使用平滑功能。
屏幕效果菜单 (仅用于模拟 RGB 信
号)
x
自动图像质量调整功能
当显示器接收到输入信号时,自动调整图像位置和锐度
(相位 / 像素频率)。从而确保屏幕上出现清晰的图像 (第
18 页)。
注意
当自动图像质量调整功能启用时,仅
1
(电源)开关可以操作。
如果本显示器的自动图像质量调整功能似乎不能完全调整
图像
您可以对当前输入信号进一步进行图像质量的自动调整。
(参见下面的自动)
如果仍需要对图像质量进行细微的调整
您可以手动调整图像锐度 (相位 / 像素频率)和位置 (水
平 / 垂直位置 )。
这些调整保存在存储器中,显示器接收到同样的输入信号
时自动调出。 重新连接计算机后,如果输入信号改变,这
些设定可能需要重做。
x
手动调整图像的锐度和位置 (相位 / 像素频率 /
水平中心 / 垂直中心)
您可以按照以下步骤调整图像锐度和位置。
1
在计算机上将分辨率设定至 1600 × 1200。
2
放入 CD-ROM。
3
启动 CD-ROM,显示测试图案。
对于 Windows 用户
当操作自动运行时:
1
点击 “显示调整工具 (UTILITY)”。
2
点击 “Adjust”并确认分辨率,然后点击 “Next”。
依次出现像素频率、相位、水平中心和垂直中心的测试
图案。
项目
按
M
按钮
按
m
按钮
模式
高
中
低
自动
选择 ECO 模式。
在 “高”、“中”、“低”和 “自动”模
式中选择显示器亮度,以减少功率消耗。
通过设置输入,您可以选择各种模式。
背光
使屏幕变亮。
使屏幕变暗。
6
对比度
加深图像对比度。
减弱图像对比度。
8
亮度
调亮图像 (黑色电
平)。
调暗图像 (黑色电
平)。
项目
GAMMA
选项
功能
用户
调整图像色彩。
CAL.
此模式将显示器设定为 LCD 的 RAW 灰
度系数条件。
当使用外部色彩校准系统时应设定此
模式,以得到最佳校准结果。
项目
色温
选项
功能
9300K
浅蓝色色调
6500K
浅红色色调
sRGB
1)
选择 “sRGB”时,色彩被调整到
sRGB 色彩空间。(sRGB 色彩设定是为
计算机产品设计的工业标准色彩空间
协议。) 选择 “sRGB”时,计算机的
色彩设定必须设为 sRGB 色彩空间。
用户
可以对亮区 (GAIN:白色电平)和暗
区 (BIAS:黑色电平)进一步调整。
也可以将设置的色彩存储到存储器
中。
项目
平滑
选项
功能
文字
使字符显示清晰 (该模式适用于文本
应用程序)。
标准
标准平滑效果。
图像
使图像显示清晰 (该模式适用于照片
图像或插图)。
项目
0
模式复原
选项
功能
确定
可以将背光、对比度、亮度、GAMMA、
色温和平滑复原到默认设置。
取消
取消复原,并返回到菜单。
项目
功能
自动
对于当前的输入信号 , 进行适当的画
面相位、像素频率和水平 / 垂直位置
的调整,并保存。
16
当无法自动运行时:
1
打开 “我的电脑”并右击 CD-ROM 图标。 进入
“Explorer”,打开 CD-R0M 图标。
2
选择 [Windows] 然后打开 [Utility]。
3
启动 [Win_Utility.exe]。
显示出测试图案。
对 Macintosh 用户
1
打开 [Utility],然后选择 [Mac]。
2
启动 [Mac_Utility.exe]。
显示出测试图案。
缩放菜单
注意
当信号分辨率为 1600 × 1200 时,您无法使用此功能。图
像在屏幕上全屏显示。
菜单位置菜单
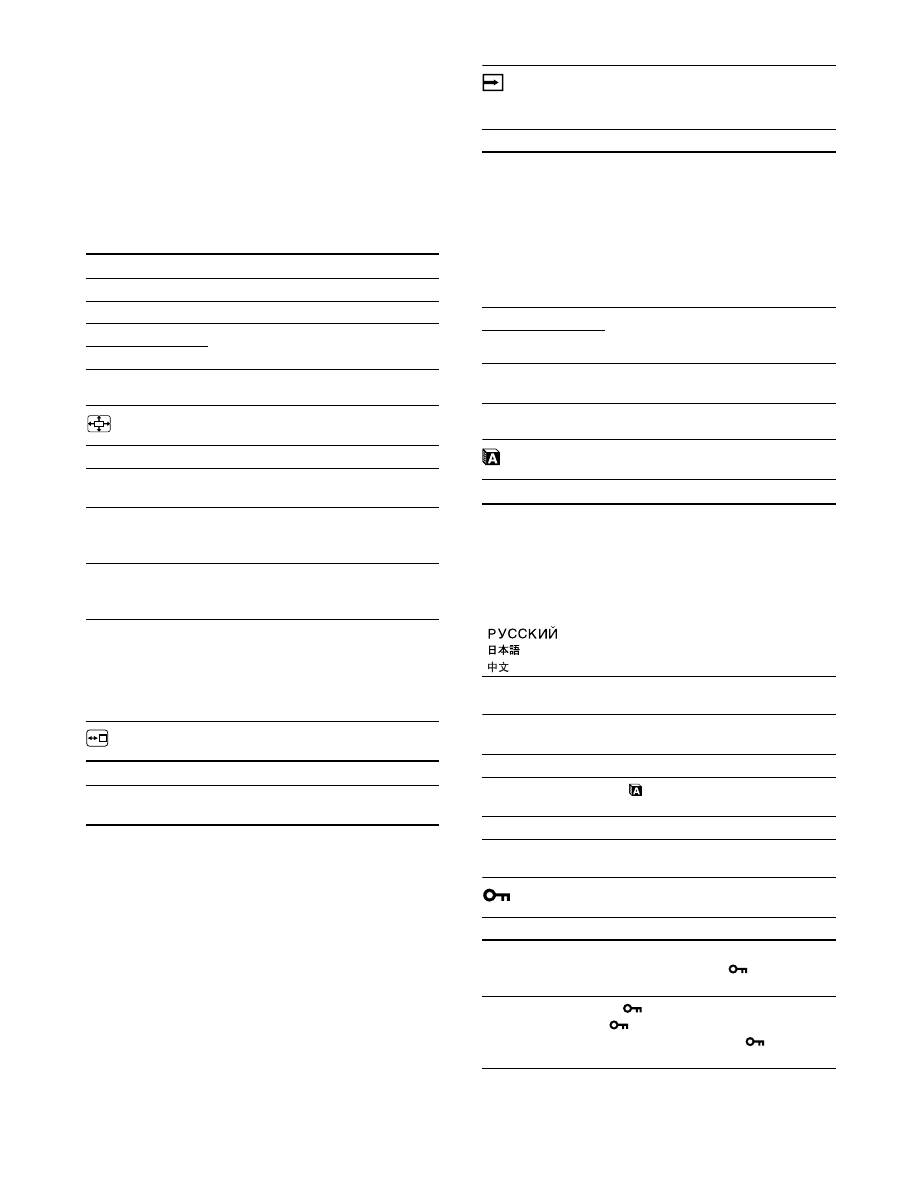
输入检测菜单
可以搜索输入信号,来回自动切换信号。
LANGUAGE 菜单
0
复原菜单 (复原至默认设定)
菜单锁定菜单
项目
按
m
/
M
按钮
相位
减少屏幕上的水平条纹。
像素频率
垂直条纹消失。
水平中心
图像没有出现在屏幕中间时调整图像
的位置。
垂直中心
项目
功能
全屏显示
输入信号在屏幕上全屏显示,与图像
模式或分辨率无关。
保持原有屏幕比例 输入信号在屏幕上以其实际纵横比显
示。因此,视信号而定,图像的顶部
和底部可能出现黑带。
真实显示
输入信号在屏幕上以其实际分辨率显
示。次级 1600 × 1200 信号被黑框环
绕显示在屏幕的中央。
项目
按
m
/
M
按钮
菜单位置
可以改变菜单在屏幕上的显示位置。
可以选择 9 个位置中的一个。
项目
功能
开启自动输入检测 所选的输入没有信号时,或用 OK 按
钮选择输入时没有输入信号,则出现
屏幕显示消息 ( 第 19 页 )。 然后显
示器检查输入信号,并自动地切换到
其他输入。
输入改变时,所选的输入显示在屏幕
的左上角。
如果仍没有输入信号,则显示器进入
省电模式。
输入 1
打开显示器时,输入 1 或输入 2 将作
为优先设定显示 (输入检测将无
效)。
输入 2
关闭自动输入检测 输入不会自动改变。按 OK 按钮改变
输入。
项目
按
m
/
M
按钮
ENGLISH
FRANÇAIS
DEUTSCH
ESPAÑOL
ITALIANO
NEDERLANDS
SVENSKA
英语
法语
德语
西班牙语
意大利语
荷兰语
瑞典语
俄语
日语
项目
功能
确定
除 (LANGUAGE)设定外,将所有的
调整数据复原到默认设定。
取消
取消复原,并返回到菜单屏幕。
项目
功能
打开
仅
1
(电源)开关可以操作。 如果
您想进行其它操作, (菜单锁定)
图标出现在屏幕上。
关闭
将
(菜单锁定)设为关闭。 如果
(菜单锁定)已经设为打开,则在
按菜单按钮时自动选择
(菜单锁
定)。
17
CS
选项菜单
技术特点
省电功能
本显示器符合 VESA 、ENERGY STAR 和 NUTEK 制定的省电原
则。 如果将显示器连接到计算机或与适用于模拟输入的
DPMS (显示电源管理标准)/ 适用于数字输入的 DMPM(DVI
数字监视器电源管理)兼容的视频显示卡,显示器将如下
所示自动减少功率消耗。
1)
当计算机进入 “休眠”模式时,输入信号切断,并在屏幕上出
现 “没有输入信号”。 5 秒钟后,显示器进入省电模式。
“深度睡眠”是环境保护局定义的省电模式。
减少功耗
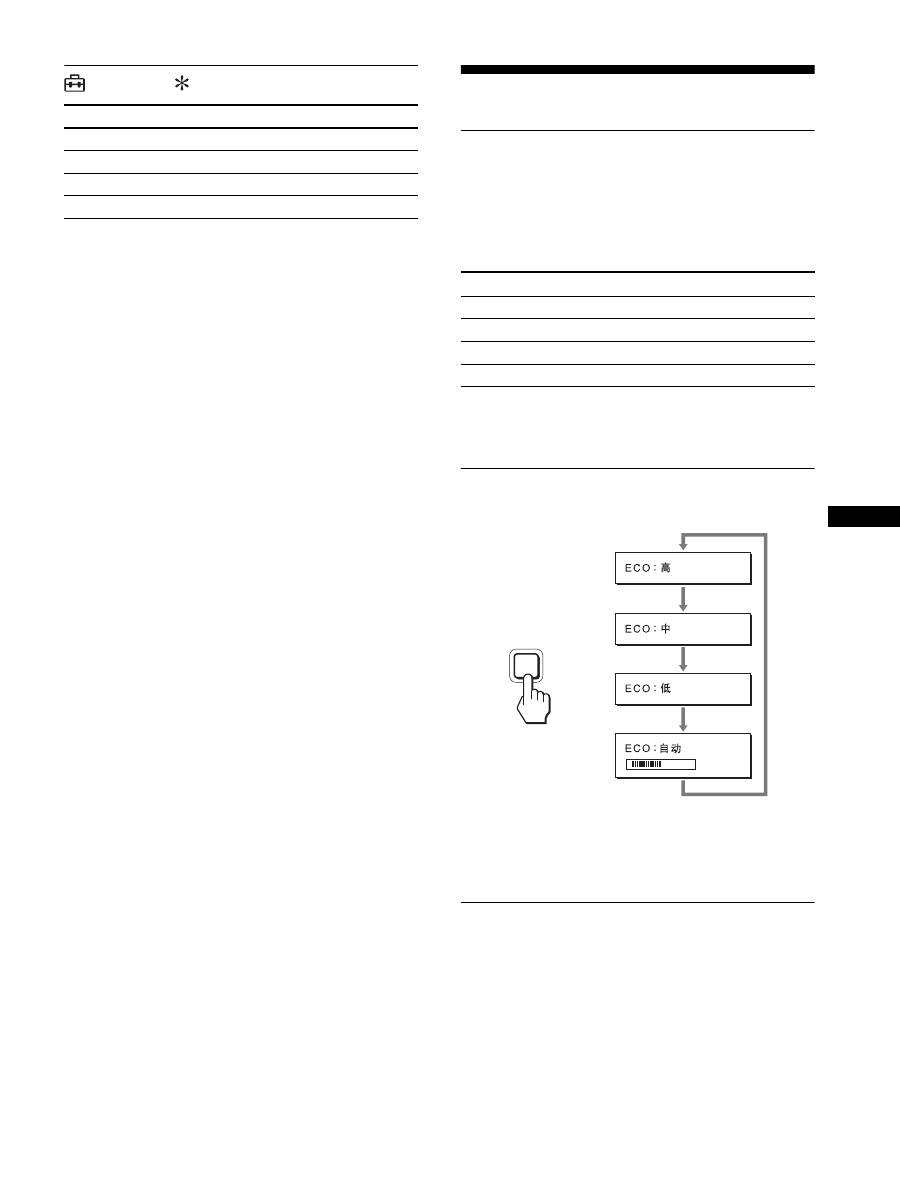
(ECO mode)
如果反复按显示器前面的 ECO 按钮,可以选择屏幕亮度。
每种模式显示在屏幕上,屏幕亮度按模式减弱。 5 秒钟后菜
单自动消失。
当模式从高变为中或低时,屏幕亮度和功耗降低。
屏幕亮度的默认设定为 “高”。
自动亮度调节功能 (光感器)
本显示器具有根据环境亮度自动调节屏幕亮度的功能。通
过使用显示器前面的 ECO 按钮或在图像调整菜单中,将 ECO
模式设定为自动,可将屏幕的亮度设为最适合的等级。屏
幕亮度的默认设定为高。此外当您用显视器前面的 ECO 按
钮将 ECO 模式设定为 “自动”时,也将显示调节条。您可
以用
m
/
M
按钮调节该条。屏幕亮度随着您设定的等级而改
变。
项目
菜单旋转
选项
功能
横向
以横向位置显示画面。
纵向
以纵向位置显示画面。
电源模式
1
(电源)指示灯
正常操作
绿色
休眠
1)
(深度睡眠)
橙色
电源关
红色
主电源关闭
关闭
5 0
ECO
,
18
自动图像质量调整功能 (仅用于模拟
RGB 信号)
当显示器接收到输入信号时,它会自动调整图像位置
和锐度 (相位 / 像素频率 ),确保屏幕上出现清晰的
图像。
工厂预设模式
当显示器接收到输入信号时,它会自动将信号与存储在显
示器存储器中的工厂预设模式之一相匹配,以便在屏幕中
心提供高质量图像。 如果输入信号与工厂预设模式相匹配,
图像将以适当的默认调整自动出现在屏幕上。
如果输入信号不符合工厂预设模式
当显示器接收到不符合工厂预设模式之一的输入信号时,
本显示器的自动图像质量调整功能将启动,以确保 (在以
下显示器频率范围内)图像清晰地出现在屏幕上 :
水平频率:28-92 kHz (模拟 RGB)
28-75 kHz (数字 RGB)
垂直频率:48-85 Hz (模拟 RGB)
60 Hz (数字 RGB)
因此当显示器第一次接收到不符合工厂预设模式之一的输
入信号时,显示器可能要花比普通情况下更长的时间才能
在屏幕上显示图像。 此调整数据自动储存在存储器中,下
次显示器将如同接收到符合工厂预设模式之一的输入信号
一样运行。
如果您手动调整相位、像素频率和图像位置
对于某些输入信号,本显示器的自动图像质量调整功能可
能无法完全调整图像位置、相位和像素频率。 如果这样,
您可以手动设定 (第 15 页)。 如果您手动设定,调整数据
将作为用户模式被储存,并在任何时候显示器接收到相同
输入信号时自动调用。
注意
当自动图像质量调整功能启用时,仅
1
(电源)开关可以操作。
KVM 功能 (键盘 - 视频 - 鼠标功能)
可以最多使用通过 USB 鼠标和 USB 键盘连接的两台计算机,
并来回切换 INPUT/OK 按钮 (第 8 页)。
关于 USB 端口
•
建议您将 USB 鼠标和 USB 键盘连接到显示器的 USB 端口上。
如果连接的不是上述设备,则显示器可能无法正常工作。
或者,与 Bluetooth 兼容的设备可能无法正常工作。
•
显示器上的 USB 端口兼容 USB 全速 (最大 12 Mbps)。
注意
•
即使当您按 INPUT/OK 按钮时,计算机也有可能无法正常来回切
换。
•
为了使用 USB 设备,请安装最新的 USB 驱动器。旧 USB 驱动器可能
无法正常工作。
•
使用 USB 集线器时,用输入检测菜单将输入信号设定成关闭自动
输入检测。
19
CS
故障排除
在与技术服务部门联系之前,请参考此部分。
屏幕信息
如果输入信号有误,屏幕上会出现下列信息之一。 若要解
决此问题,请参阅第 20 页 “故障现象和排除方法”。
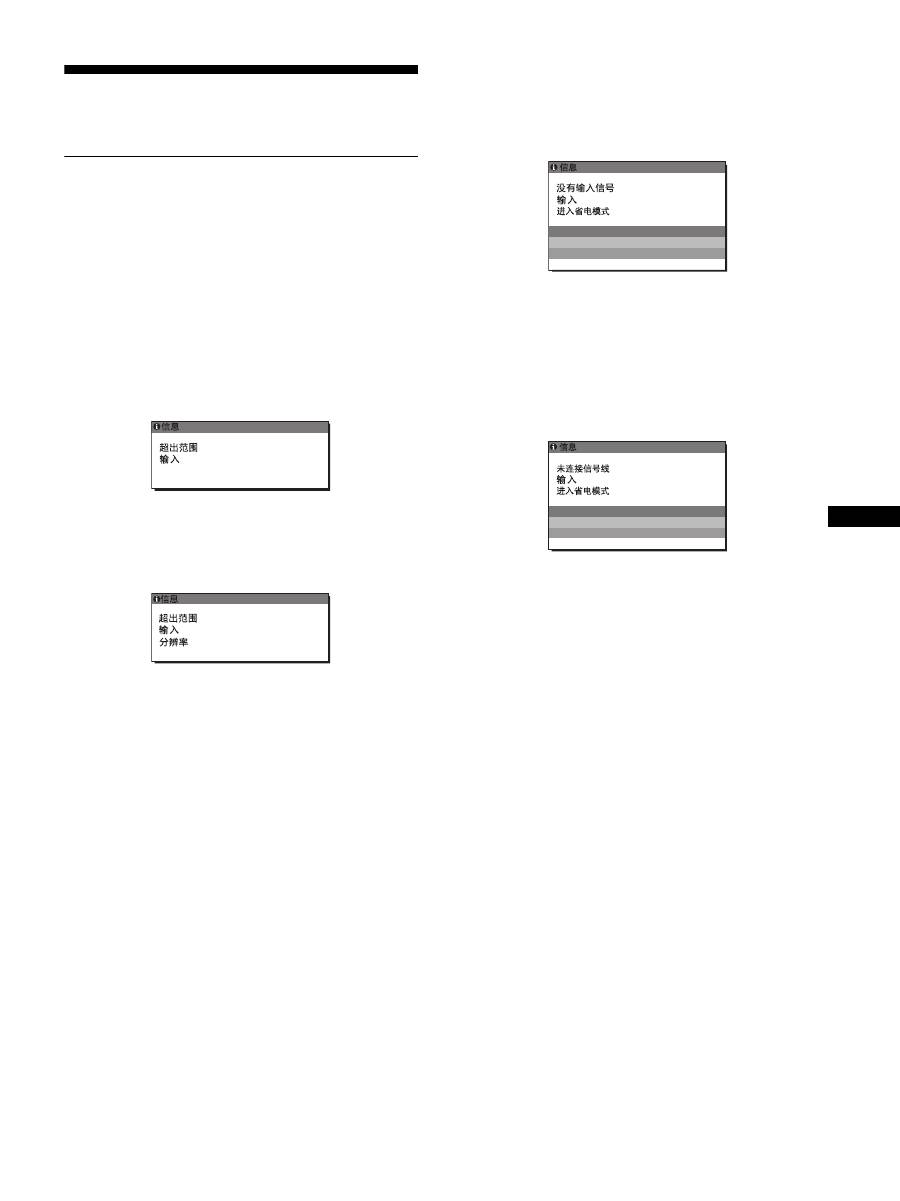
如果屏幕上出现 “超出范围”
此信息表示本显示器的规格不支持此输入信号。 请检查以
下项目。
有关屏幕信息的更多说明,请参阅第 20 页 “故障现象和排
除方法”。
如果显示 “xxx.x kHz/xxx Hz”
此信息表示本显示器的规格不支持水平或垂直频率。
此图表示当前输入信号的水平和垂直频率。
如果显示
“
分辨率 > 1600 × 1200
”
此信息表示本显示器的规格 (1600 × 1200 或更低 ) 不
支持此分辨率。
如果屏幕上显示 “没有输入信号”
此信息表示没有信号经当前所选的连接器输入。
当输入检测 (第 16 页)设定为开启时,显示器将自动找到
其他输入信号并改变输入。
当无法找到输入信号时,
“进入省电模式”
信息出现。大约 5 秒钟后,省电模式启动。
如果屏幕上出现 “未连接信号线”
此信息表示视频信号电缆与当前所选连接器已经断开。
当输入检测 (第 16 页)设定为开启时,显示器将自动找到
其他输入信号并改变输入。
当无法找到输入信号时,
“进入省电模式”
信息出现。大约 45 秒钟后,省电模式启动。
x x x . x k H z /
x x x H z
:
1 DV I - D
例如
>
6
1
0 0 X 1
0
0
2
:
1 DV I - D
例如
1 DV I - D
:
例如
1 : DV I - D
例如

20
故障现象和排除方法
如果问题是由所连接的计算机或其他设备引起的,请参照所连接计算机 / 设备的使用说明书。
现象
检查项目
没有画面
如果
1
(电源)指示灯不亮,或
当
1
(电源)开关按下后
1
(电源)指示灯不亮:
•
检查电源线的连接是否正确。
•
请检查显示器上的 MAIN POWER (主电源)开关是否打开 (第 10 页)。
如果
1
(电源)指示灯打开,并
显示红色:
•
检查
1
(电源)开关是否打开。
如果屏幕上出现 “未连接信号线”:
•
检查视频信号电缆是否连接正确,所有插头是否牢固地插在各自的插孔内
(第 7 页)。
•
检查视频输入连接器的针是否被弯曲或被挤入。
•
检查输入选择设定是否正确 (第 12 页)。
•
连接了非附带的视频信号电缆。 如果您连接了非附带的视频信号电缆,则屏幕上
显示 “未连接信号线”。 这并不是故障。
屏幕上出现 “没有输入信号”的
警告信息,或者
1
(电源)指示
灯变为橙色:
•
检查视频信号电缆是否连接正确,所有插头是否牢固地插在各自的插孔内
(第 7 页)。
•
检查视频输入连接器的针是否被弯曲或被挤入。
•
检查输入选择设定是否正确 (第 12 页)。
x
由所连接的计算机或其他设备引起的问题,不是由显示器引起的问题
•
计算机进入节电模式。 试着按键盘上任意键或移动鼠标。
•
检查显示卡是否正确安装。
•
检查计算机电源是否打开。
•
重启计算机。
如果屏幕上出现 “超出范围”
( 第 19 页 ):
x
由所连接的计算机或其他设备引起的问题,不是由显示器引起的问题
•
检查视频的频率范围是否在显示器制定的范围内。 如果用本显示器更换旧显示
器,请重新连接旧显示器,并把计算机显示卡调整到如下范围内:
水平: 28 - 92 kHz (模拟 RGB), 28 - 75 kHz (数字 RGB)
垂直: 48 - 85 Hz (模拟 RGB), 60 Hz (数字 RGB)
分辨率: 1600 × 1200 或更小
如果使用 Windows:
•
如果您用本显示器更换旧显示器,请重新连接旧显示器并进行以下操作。 在
Windows 设备选择画面中,从 “厂家”列表中选择 “SONY”,从 “型号”列表中
选择想要的型号名称。 如果本显示器的型号名称不出现在 “型号”列表中,请
试一下 “即插即用。”
如果使用 Macintosh 系统:
•
当连接 Macintosh 计算机时,如有必要请使用适配器 (不附带)。 连接视频信号
电缆之前,请将适配器连接到计算机。
画面闪烁、跳动、振荡或被扰频
•
调整像素频率和相位 (仅用于模拟 RGB 信号)(第 15 页)。
•
尝试将显示器电源插头插到另一个交流电源插座上,最好在不同线路上。
x
由所连接的计算机或其他设备引起的问题,不是由显示器引起的问题
•
查阅您的显示卡说明书以便正确地设定显示器。
•
确认本显示器是否支持图形模式 (VESA Macintosh 19" Color 等等)和输入信号
的频率。 即使频率在适当范围内,但有些显示卡的同步脉冲可能太窄而不足于让
显示器正确达成同步。
•
本显示器不处理隔行信号。 设置为处理逐行信号。
•
调整计算机的刷新率 (垂直频率)以获得最佳图像。
画面模糊
•
调整亮度和对比度 (第 15 页)
•
调整像素频率和相位 (仅用于模拟 RGB 信号)(第 15 页)。
x
由所连接的计算机或其他设备引起的问题,不是由显示器引起的问题
•
在计算机上将分辨率设定至 1600 × 1200。
画面出现重影
•
请勿使用视频电缆延长线和 / 或视频转换开关盒。
•
检查所有插头是否牢固地插在各自的插口内。
画面未居中或尺寸不当 (仅用于模拟
RGB 信号)
•
调整像素频率和相位 (第 15 页)。
•
调整图像位置 (第 15 页 )。 请注意有些视频模式不充满屏幕的边缘。
21
CS
画面太小
x
由所连接的计算机或其他设备引起的问题,不是由显示器引起的问题
•
在计算机上将分辨率设定至 1600
×
1200。
画面太暗
•
调节背光 (第 15 页)。
•
调节亮度 (第 15 页)。
•
用 GAMMA 菜单调节灰度系数 (第 15 页)。
•
打开显示器后要经过几分钟显示器才会变亮。
•
屏幕可能变暗,这取决于您选择的 ECO 模式。
可看到波纹或椭圆形图案 (摩尔效应)
•
调整像素频率和相位 (仅用于模拟 RGB 信号)(第 15 页)。
色彩不均匀
•
调整像素频率和相位 (仅用于模拟 RGB 信号)(第 15 页)。
白色看起来不白
•
调节色温 (第 15 页)。
显示器按钮不起作用
( 屏幕上出现
)
•
如果菜单锁定设为打开 , 请将其设为关闭 (第 16 页)。
通过 USB 电缆进行连接的设备无法进行
操作
•
检查 USB 电缆 (附带)连接是否正确 (第 8 页)。
•
按 MAIN POWER (主电源)开关来打开显示器,
1
(电源)指示灯亮。
x
由计算机或其它连接设备引起的问题
•
检查设备已打开。
•
重新安装升级后的 USB 驱动器。更多信息,请咨询您的产品的制造商。
•
如果您无法用安装到显示器上的键盘或鼠标操作您的计算机,请直接将键盘或鼠
标连接至计算机。重启计算机后,重新设置 USB 连接。结束此过程后,将键盘或
鼠标连接回显示器。显示器通过 USB 端口连接至计算机、键盘或鼠标时,可能无
法在计算机重启时使用它们操作您的计算机。
过一会儿显示器关闭
x
由所连接的计算机或其他设备引起的问题
•
将计算机的省电设定设为关。
显示在菜单屏幕上的分辨率是错误的
•
根据显示卡的设定,显示菜单屏幕上的分辨率可能与计算机上的设定不符。
关闭主电源后,
1
(电源)指示灯会
继续亮一段时间
•
主电源打开但未按下
1
(电源)开关时或显示器在省电模式时,如果您关闭 MAIN
POWER (主电源)开关,
1
(电源)指示灯可能不会立即关闭。这并不是故障。
现象
检查项目
22
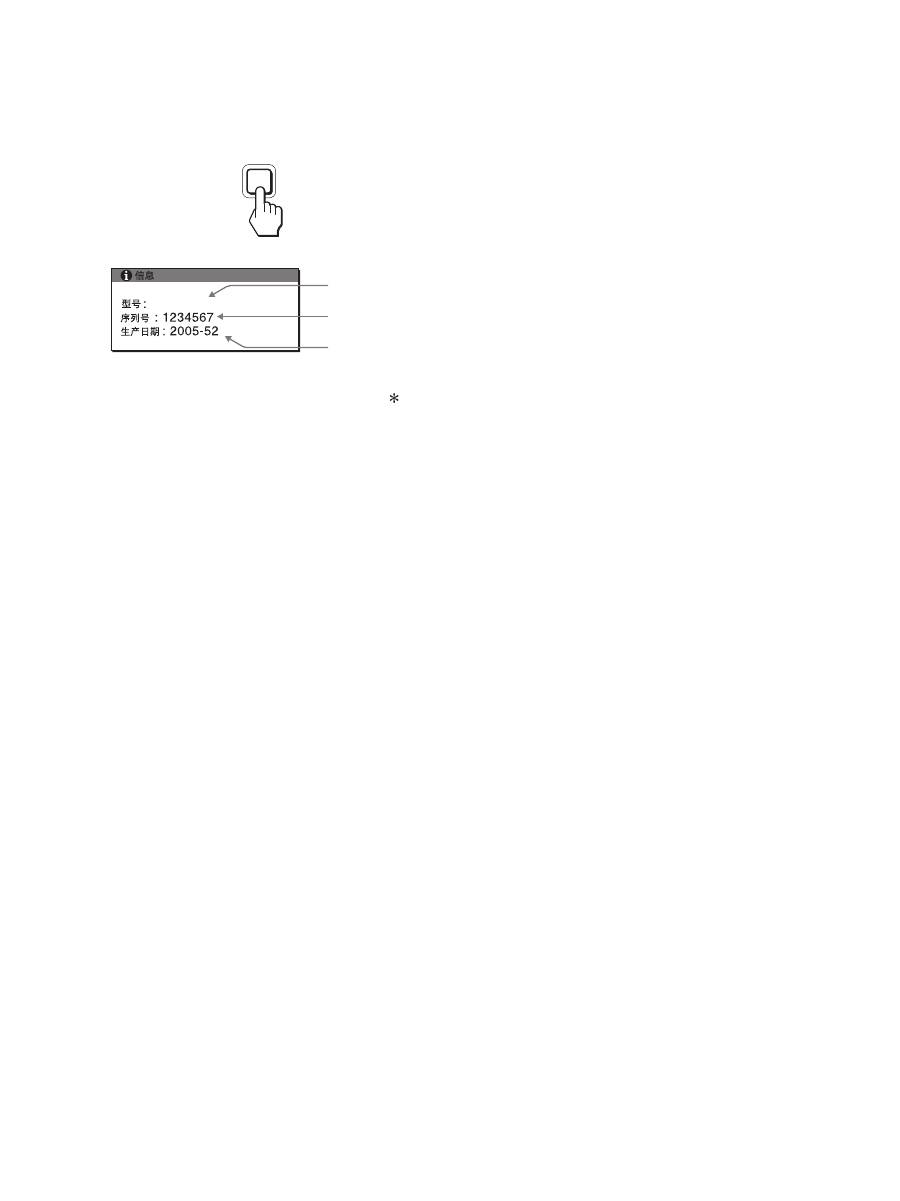
显示本显示器的信息
当显示器正在接收视频信号时,按住 MENU 按钮 5 秒钟以
上,直至信息框出现。
再次按 MENU 按钮,信息框消失。
虽然本显示器型号名称注册的安全标准为 SDM-S205 ,但
销售时使用 SDM-S205F/S205K 的名称。
如果问题仍然存在,请致电授权的 Sony 经销商,并提供下
列信息:
•
型号名称
•
序列号
•
故障的详细说明
•
购买日期
•
您的计算机和显示卡的名称和规格
•
输入信号种类 (模拟 RGB/ 数字 RGB)
MENU
例如
型号名称
序列号
生产年份和星期
SDM-S205F
23
CS
规格
1)
建议的水平和垂直计时条件
•
水平同步频宽比应该大于总水平计时的 4.8% 或 0.8
µ
sec(取最大
的一个)。
•
水平空白宽度应该大于 2.5
µ
sec。
•
垂直空白宽度应该大于 450
µ
sec。
设计和规格如有变动,恕不另行通知。
型号名称
SDM-S205F
SDM-S205K
液晶显示器面板
面板类型: a-Si TFT 有源矩阵
画面尺寸: 英寸
20.1
输入信号格式
RGB 工作频率
1)
水平: 28 - 92 kHz (模拟 RGB)
28 - 75 kHz (数字 RGB)
垂直: 48 - 85 Hz (模拟 RGB)
60 Hz (数字 RGB)
分辨率
水平: 最大 1600 点
垂直: 最大 1200 线
输入信号类型 (数字 /
模拟)
数字
×
1/ 模拟
×
1
输入信号等级
模拟 RGB 视频信号 0.7 Vp-p, 75
Ω
, 正极
SYNC 信号 TTL 级 , 2.2 k
Ω
,正极或负极
数字 RGB (DVI) 信号 TMDS (单独连接)
音频输入
立体声袖珍插孔,0.5 Vrms
音频输出
立体声袖珍插孔
USB 端口
-
USB 全速 (最大 12 Mbps)
A 端口
×
4,B 端口
×
2
电源规格
100-240 V, 50-60 Hz, 最大 1.2 A
功率消耗
最大 55 W
工作温度
5 - 35
°
C
底座类型
高度可调
Pivot
尺寸 (宽 / 高 / 深)
约 441.5
×
410.5 - 520.5
×
277.5 mm
(带底座)
约 441.5
×
356.5
×
74 mm
(不带底座 )
约 441.5
×
421 - 551
×
277.5 mm
(带底座 (一般情况))
约 356.5
×
470.5 - 600.5
×
277.5 mm
(带底座 (回转情况))
约 441.5
×
356.5
×
74 mm
(不带底座)
质量
约 9.6 kg
(带底座)
约 6.0 kg
(不带底座)
约 9.9 kg
(带底座)
约 6.1 kg
(不带底座)
即插即用
DDC2B
附件
参阅第 6 页。

i
TCO’99 Eco-document (for the black
model)
x
Congratulations!
You have just purchased a TCO’99 approved and labelled product! Your
choice has provided you with a product developed for professional use.
Your purchase has also contributed to reducing the burden on the
environment and also to the further development of environmentally
adapted electronics products.
x
Why do we have environmentally labelled comput-
ers?
In many countries, environmental labelling has become an established
method for encouraging the adaptation of goods and services to the
environment. The main problem, as far as computers and other electronics
equipment are concerned, is that environmentally harmful substances are
used both in the products and during their manufacture. Since it is not so
far possible to satisfactorily recycle the majority of electronics equipment,
most of these potentially damaging substances sooner or later enter nature.
There are also other characteristics of a computer, such as energy
consumption levels, that are important from the viewpoints of both the
work (internal) and natural (external) environments. Since all methods of
electricity generation have a negative effect on the environment (e.g.
acidic and climate-influencing emissions, radioactive waste), it is vital to
save energy. Electronics equipment in offices is often left running
continuously and thereby consumes a lot of energy.
x
What does labelling involve?
This product meets the requirements for the TCO’99 scheme which
provides for international and environmental labelling of personal
computers. The labelling scheme was developed as a joint effort by the
TCO (The Swedish Confederation of Professional Employees), Svenska
Naturskyddsforeningen (The Swedish Society for Nature Conservation)
and Statens Energimyndighet (The Swedish National Energy
Administration).
Approval requirements cover a wide range of issues: environment,
ergonomics, usability, emission of electric and magnetic fields, energy
consumption and electrical and fire safety.
The environmental demands impose restrictions on the presence and use
of heavy metals, brominated and chlorinated flame retardants, CFCs
(freons) and chlorinated solvents, among other things. The product must
be prepared for recycling and the manufacturer is obliged to have an
environmental policy which must be adhered to in each country where the
company implements its operational policy.
The energy requirements include a demand that the computer and/or
display, after a certain period of inactivity, shall reduce its power
consumption to a lower level in one or more stages. The length of time to
reactivate the computer shall be reasonable for the user.
Labelled products must meet strict environmental demands, for example,
in respect of the reduction of electric and magnetic fields, physical and
visual ergonomics and good usability.
Below you will find a brief summary of the environmental requirements
met by this product. The complete environmental criteria document may
be ordered from:
TCO Development
SE-114 94 Stockholm, Sweden
Fax: +46 8 782 92 07
Email (Internet): development@tco.se
Current information regarding TCO’99 approved and labelled
products may also be obtained via the Internet, using the address:
http://www.tco-info.com/
x
Environmental requirements
Flame retardants
Flame retardants are present in printed circuit boards, cables, wires,
casings and housings. Their purpose is to prevent, or at least to delay the
spread of fire. Up to 30% of the plastic in a computer casing can consist
of flame retardant substances. Most flame retardants contain bromine or
chloride, and those flame retardants are chemically related to another
group of environmental toxins, PCBs. Both the flame retardants
containing bromine or chloride and the PCBs are suspected of giving rise
to severe health effects, including reproductive damage in fish-eating
birds and mammals, due to the bio-accumulative
*
processes. Flame
retardants have been found in human blood and researchers fear that
disturbances in foetus development may occur.
The relevant TCO’99 demand requires that plastic components weighing
more than 25 grams must not contain flame retardants with organically
bound bromine or chlorine. Flame retardants are allowed in the printed
circuit boards since no substitutes are available.
Cadmium
**
Cadmium is present in rechargeable batteries and in the colour-generating
layers of certain computer displays. Cadmium damages the nervous
system and is toxic in high doses. The relevant TCO’99 requirement states
that batteries, the colour-generating layers of display screens and the
electrical or electronics components must not contain any cadmium.
Mercury
**
Mercury is sometimes found in batteries, relays and switches. It damages
the nervous system and is toxic in high doses. The relevant TCO’99
requirement states that batteries may not contain any mercury. It also
demands that mercury is not present in any of the electrical or electronics
components associated with the labelled unit.
CFCs (freons)
The relevant TCO’99 requirement states that neither CFCs nor HCFCs
may be used during the manufacture and assembly of the product. CFCs
(freons) are sometimes used for washing printed circuit boards. CFCs
break down ozone and thereby damage the ozone layer in the stratosphere,
causing increased reception on earth of ultraviolet light with e.g. increased
risks of skin cancer (malignant melanoma) as a consequence.
Lead
**
Lead can be found in picture tubes, display screens, solders and
capacitors. Lead damages the nervous system and in higher doses, causes
lead poisoning. The relevant TCO’99 requirement permits the inclusion of
lead since no replacement has yet been developed.
*
Bio-accumulative is defined as substances which accumulate within
living organisms.
** Lead, Cadmium and Mercury are heavy metals which are Bio-
accumulative.
ii
TCO’03 Eco-document (for the silver
model)
x
Congratulations!
The display you have just purchased carries the TCO’03
Displays label. This means that your display is designed,
manufactured and tested according to some of the strictest
quality and environmental requirements in the world. This
makes for a high performance product, designed with the
user in focus that also minimizes the impact on our natural
environment.
x
Ergonomics
• Good visual ergonomics and image quality in order to
improve the working environment for the user and to
reduce sight and strain problems. Important parameters
are luminance, contrast, resolution, reflectance, colour
rendition and image stability.
x
Energy
• Energy-saving mode after a certain time – beneficial
both for the user and the environment
• Electrical safety
x
Emissions
• Electromagnetic fields
• Noise emissions
x
Ecology
• The product must be prepared for recycling and the
manufacturer must have a certified environmental
management system such as EMAS or ISO 14 001
• Restrictions on
- chlorinated and brominated flame retardants and
polymers
- heavy metals such as cadmium, mercury and lead.
The requirements included in this label have been
developed by TCO Development in co-operation with
scientists, experts, users as well as manufacturers all over
the world. Since the end of the 1980s TCO has been
involved in influencing the development of IT equipment
in a more user-friendly direction. Our labelling system
started with displays in 1992 and is now requested by users
and IT-manufacturers all over the world.
For more information, please visit
www.tcodevelopment.com
Recycling Information
x
Customer in Europe
The collection and recycling of this product has been planned
according to your country’s relevant legislation. To ensure that
this product will be collected and recycled in way that minimizes
the impact on the environment, please do the following:
1. If you purchased this product for private use, contact your
municipality or the waste collection system and bring the
product to this collection point / have the product be picked up
by the waste collection system. Alternatively, your retailer
might take back this if you purchase new equivalent equipment;
please check with your retailer whether he will take back this
product before bringing it. For information on your country’s
recycling arrangements, please contact the Sony representation
in your country (contact details at: www.sony-europe.com).
Further details on specific recycling systems can be found at the
following addresses:
- Belgium: www.recupel.be
- Netherlands: www.nvmp.nl (consumer electronics)
www.ictmilieu.nl (IT equipment)
- Norway: www.elretur.no
- Sweden: www.el-kretsen.se
- Switzerland: www.swico.ch
2. If you use this product professionally, check the product’s
delivery contract for take back / recycling arrangements and
follow the procedures described therein. Alternatively, follow
the procedures described under point 1.
x
Customer in USA
We Sony as a member of EIA recommends to visit URL below
http://www.eiae.org/
x
Customer in Asia
http://www.sony.co.jp/SonyInfo/Environment/recycle/3R.html
2-649-019-
04
(1)
© 2005 Sony Corporation
TFT LCD Color Computer Display
SDM-S205

2
Owner’s Record
The model and serial numbers are located at the rear of the unit.
Record these numbers in the spaces provided below. Refer to them
whenever you call upon your dealer regarding this product.
Model No. Serial No.
To reduce the risk of fire or electric shock, do not
expose this apparatus to rain or moisture.
Dangerously high voltages are present inside the
unit. Do not open the cabinet. Refer servicing to
qualified personnel only.
FCC Notice
This equipment has been tested and found to comply with the limits
for a Class B digital device, pursuant to Part 15 of the FCC Rules.
These limits are designed to provide reasonable protection against
harmful interference in a residential installation. This equipment
generates, uses, and can radiate radio frequency energy and, if not
installed and used in accordance with the instructions, may cause
harmful interference to radio communications. However, there is no
guarantee that interference will not occur in a particular installation.
If this equipment does cause harmful interference to radio or
television reception, which can be determined by turning the
equipment off and on, the user is encouraged to try to correct the
interference by one or more of the following measures:
– Reorient or relocate the receiving antenna.
– Increase the separation between the equipment and receiver.
– Connect the equipment into an outlet on a circuit different from
that to which the receiver is connected.
– Consult the dealer or an experienced radio/TV technician for help.
You are cautioned that any changes or modifications not expressly
approved in this manual could void your authority to operate this
equipment.
Zkontrolujte krabici, ve které byl váš monitor dodán. Štítek s ID
vašeho monitoru je umístěn na zadní straně monitoru.
(for the black model)
(for the silver model)
WARNING
IMPORTANTE
Para prevenir cualquier mal funcionamiento y evitar daños, por
favor, lea detalladamente este manual de instrucciones antes
de conectar y operar este equipo.
If you have any questions about this product, you may call;
Sony Customer Information Services Center 1-800-222-7669
or http://www.sony.com/
Declaration of Conformity
Trade Name
: SONY
Model
: SDM-S205
Note
: means any number or alphanumeric
character.
Responsible Party
: Sony Electronics Inc.
Address
: 16530 Via Esprillo, San Diego, CA
92127 U.S.A.
Telephone Number : 858-942-2230
This device complies with part 15 of the FCC rules. Operation is
subject to the following two conditions: (1) This device may not
cause harmful interference, and (2) this device must accept any
interference received, including interference that may cause
undesired operation.
NOTICE
This notice is applicable for USA/Canada only.
If shipped to USA/Canada, install only a UL LISTED/CSA
LABELLED power supply cord meeting the following
specifications:
SPECIFICATIONS
Plug Type
Nema-Plug 5-15p
Cord
Type SVT or SJT, minimum 3
×
18 AWG
Length
Maximum 15 feet
Rating
Minimum 7 A, 125 V
NOTICE
Cette notice s’applique aux Etats-Unis et au Canada
uniquement.
Si cet appareil est exporté aux Etats-Unis ou au Canada, utiliser
le cordon d’alimentation portant la mention UL LISTED/CSA
LABELLED et remplissant les conditions suivantes:
SPECIFICATIONS
Type de fiche
Fiche Nema 5-15 broches
Cordon
Type SVT ou SJT, minimum 3
×
18 AWG
Longueur
Maximum 15 pieds
Tension
Minimum 7 A, 125 V
As an
E
NERGY
S
TAR Partner, Sony
Corporation has determined that this
product meets the
E
NERGY
S
TAR
guidelines for energy efficiency.
This monitor complies with the
TCO’99 guidelines.
This monitor complies with the
TCO’03 guidelines.
Obsah
• Macintosh je ochranná známka
společnosti Apple Computer, Inc.,
registrovaná v USA a v jiných
zemích.
• Windows
®
je registrovaná ochranná
známka společnosti Microsoft
Corporation ve Spojených státech a
jiných zemích.
• IBM PC/AT a VGA jsou
registrované ochranné známky
společnosti IBM Corporation v
USA.
• VESA a DDC
™
jsou ochranné
známky Video Electronics Standards
Association.
•
E
NERGY
S
TAR je registrovaná
známka v USA.
• Adobe a Acrobat jsou ochranné
známky společnosti Adobe Systems
Incorporated.
• Všechny ostatní uvedené názvy
produktů mohou být ochrannými
známkami nebo registrovanými
ochrannými známkami příslušných
vlastníků.
• Dále, „
™
“ a „
®
“ nejsou v této
příručce u každého případu uváděny.
3
CZ
http://www.sony.net/
Bezpečnostní opatření . . . . . . . . . . . . . . . . . . . . . . . . . . . . . . . . . . . 4
Kontrola názvu modelu displeje . . . . . . . . . . . . . . . . . . . . . . . . . . . . 5
Díly a ovládací prvky. . . . . . . . . . . . . . . . . . . . . . . . . . . . . . . . . . . . . 5
Instalace . . . . . . . . . . . . . . . . . . . . . . . . . . . . . . . . . . . . . . .6
Instalace 1:
Sestavte podstavec . . . . . . . . . . . . . . . . . . . . . . . . . . . 6
Instalace 2:
Zapojte kabely video signálu . . . . . . . . . . . . . . . . . . . . 7
Instalace 3:
Připojte USB myš, USB klávesnici nebo jiné zařízení
(pouze u modelů vybavených USB portem). . . . . . . . . 8
Instalace 4:
Připojte audio přívody . . . . . . . . . . . . . . . . . . . . . . . . . 9
Instalace 5:
Připojte napájecí kabel. . . . . . . . . . . . . . . . . . . . . . . . . 9
Instalace 6:
Zabezpečte kabely a zavřete kryt konektorů . . . . . . . . 9
Instalace 7:
Zapněte displej a počítač. . . . . . . . . . . . . . . . . . . . . . 10
Instalace 8:
Nastavte náklon a výšku . . . . . . . . . . . . . . . . . . . . . . 11
Přepínání obrazu na výšku nebo na šířku
(pouze pro modely s otočným podstavcem) . . . . . . . . . . . . . . . . . 12
Volba vstupního signálu (INPUT1/INPUT2) . . . . . . . . . . . . . . . . . . 12
Přizpůsobení vašeho displeje . . . . . . . . . . . . . . . . . . . . .13
Ovládání nabídky . . . . . . . . . . . . . . . . . . . . . . . . . . . . . . . . . . . . . . 13
Seznam možností nabídky . . . . . . . . . . . . . . . . . . . . . . . . . . . . . . . 14
Nabídka PICTURE ADJUST . . . . . . . . . . . . . . . . . . . . . . . . . . . 15
Nabídka SCREEN (pouze analogový signál RGB) . . . . . . . . . . 15
Nabídka ZOOM . . . . . . . . . . . . . . . . . . . . . . . . . . . . . . . . . . . . 16
Nabídka MENU POSITION. . . . . . . . . . . . . . . . . . . . . . . . . . . . 16
Nabídka INPUT SENSING . . . . . . . . . . . . . . . . . . . . . . . . . . . . 16
Nabídka LANGUAGE . . . . . . . . . . . . . . . . . . . . . . . . . . . . . . . . 17
0
Nabídka RESET (vynulování na výchozí nastavení) . . . . . . . . . 17
Nabídka MENU LOCK . . . . . . . . . . . . . . . . . . . . . . . . . . . . . . . 17
Nabídka OPTION . . . . . . . . . . . . . . . . . . . . . . . . . . . . . . . . . . . 17
Technické funkce. . . . . . . . . . . . . . . . . . . . . . . . . . . . . . .17
Úsporný režim. . . . . . . . . . . . . . . . . . . . . . . . . . . . . . . . . . . . . . . . . 17
Snížení spotřeby energie (ECO režim) . . . . . . . . . . . . . . . . . . . . . . 17
Funkce automatického nastavení jasu (světelný senzor) . . . . . . . . 18
Funkce automatického nastavení kvality obrazu
(pouze u analogového signálu RGB) . . . . . . . . . . . . . . . . . . . . . . . 18
KVM funkce (Keyboard-Video-Mouse function) . . . . . . . . . . . . . . . 18
Odstraňování problémů. . . . . . . . . . . . . . . . . . . . . . . . . .19
Zprávy na obrazovce . . . . . . . . . . . . . . . . . . . . . . . . . . . . . . . . . . . 19
Příznaky problémů a jejich odstranění . . . . . . . . . . . . . . . . . . . . . . 20
Technické údaje. . . . . . . . . . . . . . . . . . . . . . . . . . . . . . . .23
TCO’99 Eco-document (for the black model). . . . . . . . . . . . . . . . . . .i
TCO’03 Eco-document (for the silver model) . . . . . . . . . . . . . . . . . . ii
