Sony KDL-40R480B: 2 Attach the Attachment parts for Preparing for the installation Wall-Mount Bracket. Check the of the TV Attachment parts by referring to 1 Detach the Table-Top Stand “Supplied with SU-WL450” in from the TV. “Checking the parts” on page
2 Attach the Attachment parts for Preparing for the installation Wall-Mount Bracket. Check the of the TV Attachment parts by referring to 1 Detach the Table-Top Stand “Supplied with SU-WL450” in from the TV. “Checking the parts” on page: Sony KDL-40R480B
Table of contents
- Installation Information for Using Sony Wall-Mount Bracket (SU-WL450)
- On Safety
- Do not allow the AC power cord or the connecting cable to be pinched.
- Installing the TV onto the wall
- Deciding on the installation location 1 Decide on the installation location.
- 2 Select Wall mounting style. It is selectable as shown below. 3 Fit Base Adaptor by using Screw (PSW 4x10) to Base (20) when selecting 2-a.
- Installing the Base on the wall 4 Decide the positions of the screws for installing the Base (20) .
- 2 Attach the Attachment parts for Preparing for the installation Wall-Mount Bracket. Check the of the TV Attachment parts by referring to 1 Detach the Table-Top Stand “Supplied with SU-WL450” in from the TV. “Checking the parts” on page
- 3 Bundle the AC Adapter using Installing the TV on the wall the cable holders (supplied with the TV). Make sure that the 1 Connect the necessary cable(s) label is facing outwards when to the TV. bundling AC adapter. 2 Install the TV onto the Base.
- Confirming the completion of the installation Other information 3 Preventing the bottom of the TV from shifting.
- Specifications
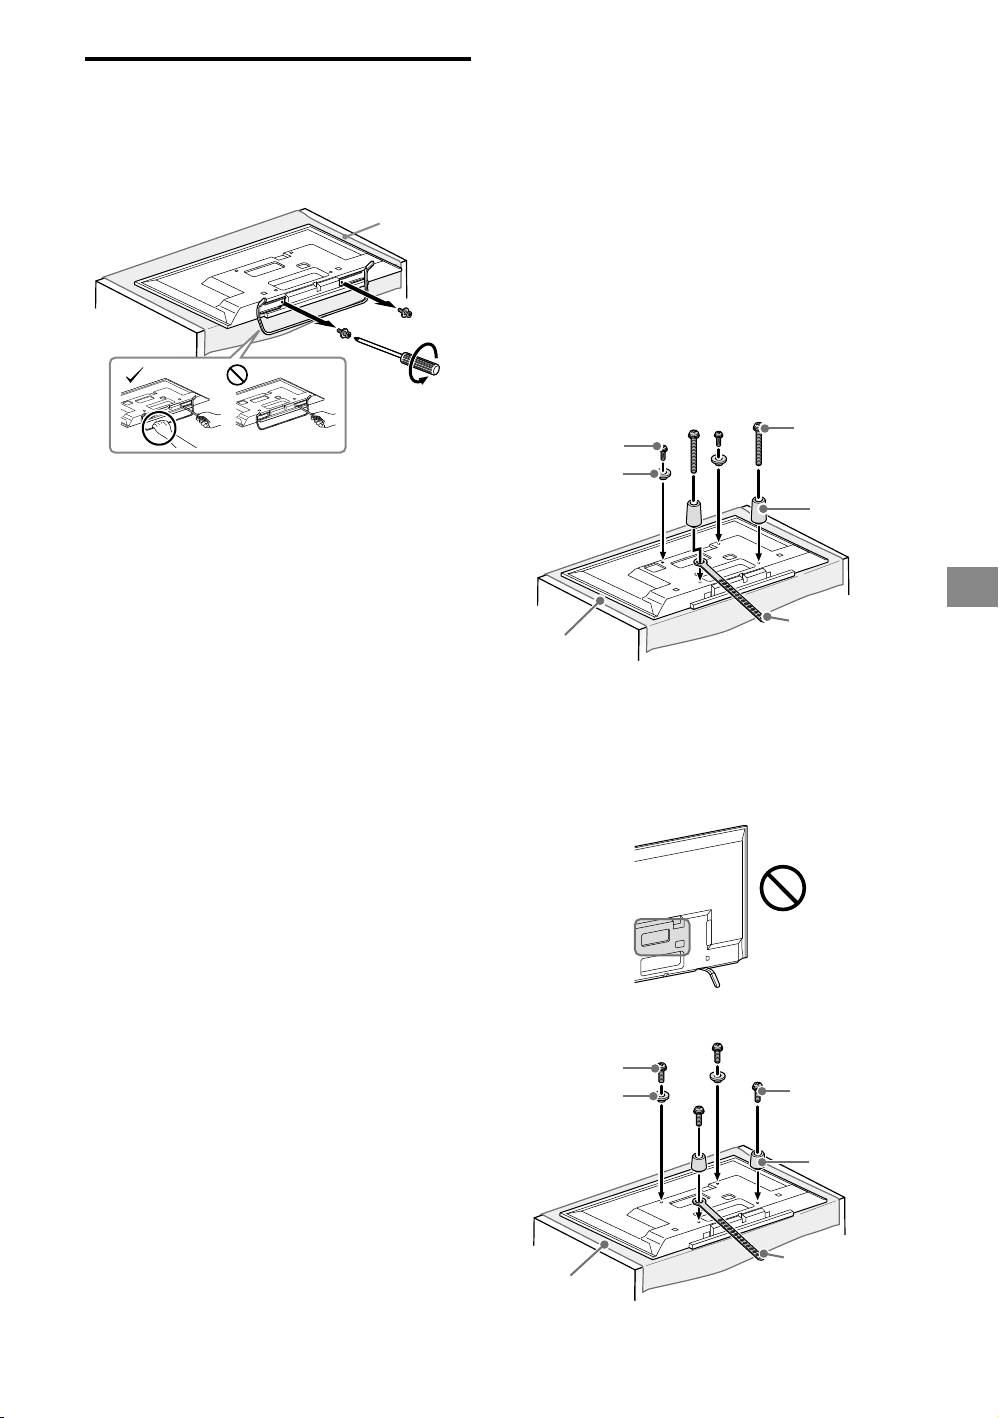
2 Attach the Attachment parts for
Preparing for the installation
Wall-Mount Bracket. Check the
of the TV
Attachment parts by referring to
1 Detach the Table-Top Stand
“Supplied with SU-WL450” in
from the TV.
“Checking the parts” on page
5.
Soft cloth
Note
Firmly secure the Attachment parts using screws.
When using an electric screwdriver, set the torque
setting to approximately 1.5 N·m {15 kgf·cm}.
Be sure to store the unused parts in a safe place for
future use. Retain this manual for future reference.
Standard mounting (2-a)
Screw
Screw
(+PSW 6 x 20)
(+PSW 6 x 50)
Pulley
Note
Spacer
Make sure to place TV on the place where you put a
(60 mm)
soft cloth on to prevent damaging display’s surface.
When installing the Wall-Mount Bracket, do not use
the screws removed from the Table-Top Stand.
Be sure to store the removed Table-top Stand and its
GB
screws in a safe place, keeping them away from
children. You will need them if you want to use the TV
Belt
on a table in the future. The Table-Top Stand cannot
Soft cloth
be purchased separately.
WARNING
Be sure the TV is on the vertical position before
switching on. TV set must not powered on with LCD
Slim mounting (2-b)
panel face down to avoid uneven picture uniformity.
If pressure or shock is applied to the surface of the
Note
TV, the TV may break or become damaged.
You cannot use some of the terminals on the rear of
Lay the TV face down on a stable and level surface
the TV when using this mounting style.
with the Table-Top Stand hanging over the edge of
the surface. Having the TV face and the base of the
Table-Top Stand on the same level surface will create
an unstable working condition and can damage the
TV.
When detaching the Table-Top Stand from the TV,
hold the Table-Top Stand securely with both hands.
Screw
(+PSW 6 x 20)
Screw
(+PSW 6 x 20)
Pulley
Spacer
(20 mm)
Belt
Soft cloth
− 9 (GB) −
