Ariston SB R 80 V: ГАРАНТІЙНИЙ ТАЛОН
ГАРАНТІЙНИЙ ТАЛОН: Ariston SB R 80 V
Використовується на території України
ГАРАНТІЙНИЙ ТАЛОН
ЕЛЕКТРИЧНІ ВОДОНАГРІВАЧІ
Просимо Вас зберігати талон протягом всього гарантійного терміну. При покупці виробу вимагайте
заповнення гарантійного талону. Просимо Вас оглянути водонагрівач і перевірити комплектність
перед заповненням гарантійного талону. Претензії щодо механічних ушкоджень зовнішньої поверхні
та некомплектності виробу після продажу не приймаються. Для гарантійного ремонту пред'являйте
гарантійний талон разом із чеком, де вказана дата купівлі. Без пред'явлення даного талону, його
неправильному заповненні чи відсутності печатки торгівельної організації претензії до якості не
приймаються і ремонт не проводиться.
Модель_ _ _ _ _ _ _ _ _ _ _ _ _ _ _ _ _ _ _ _ _ _ _ _ _ _ _ _ _ _ _ _ _ _ _ _ _ _ _ _ _
Код моделі_ _ _ _ _ _ _ _ _ _ _ _ _ _ _ _ _ _ _ _ _ _ _ _ _ _ _ _ _ _ _ _ _ _ _ _ _ _ _
Серійний номер_ _ _ _ _ _ _ _ _ _ _ _ _ _ _ _ _ _ _ _ _ _ _ _ _ _ _ _ _ _ _ _ _ _ _ _
Торгівельна організація_ _ _ _ _ _ _ _ _ _ _ _ _ _ _ _ _ _ _ _ _ _ _ _ _ _ _ _ _ _ _
(найменування, місце знаходження і печатка підприємства-продавця)
_ _ _ _ _ _ _ _ _ _ _ _ _ _ _ _ _ _ _ _ _ _ _ _ _ _ _ _ _ _ _ _ _ _ _ _ _ _ _ _ _ _ _ _ _ _
Перевірив та продав_ _ _ _ _ _ _ _ _ _ _ _ _ _ _ _ _ _ _ _ _ _ _ _ _ _ _ _ _ _ _ _ _ _
(ПІБ, підпис продавця)
Дата продажу «_ _ _ _» _ _ _ _ _ _ _ _ _ _ _ _ _ _ _ _ _ _ _ _ _ _ _ _ _ 20__ року
З умовами гарантії згоден_ _ _ _ _ _ _ _ _ _ _ _ _ _ _ _ _ _ _ _ _ _ _ _ _ _ _ _ _ _
(ПІБ, підпис покупця)
Гарантійний термін на всі водонагрівачі - 1 рік.
- SB R, SG -
3 роки;
- PRO R-
5 років;
- ABS BLU R, ABS PRO R -
5 років;
- ABS PRO R INOX -
7 років;
- ABS BLU R INOX -
7 років.
2. Умови гарантійного обслуговування
Даний гарантійний талон при дотриманні передбачених умов надає право на безкоштовний
гарантійний ремонт водонагрівача і його складових частин. Гарантійний ремонт здійснюється за
місцем установки водонагрівача силами авторизованого сервісного центру, інформація про який
знаходиться у додатку до даного талону. За її відсутності чи недостовірності, а також порушенні
сервісним центром умов гарантії, Ви можете звернутися до торгівельної організації або до
представництва компанії-виробника.
Зазначенні в п. 1 гарантійні терміни обчислюються з дня продажу виробу. Дата продажу виробу
вказується в гарантійному талоні та чеку покупки. За відсутності в талоні або у чеку дати продажу,
гарантійний термін обчислюється з моменту виготовлення виробу.
Дата виготовлення і технічні характеристики водонагрівача вказані на ідентифікаційній табличці,
розміщеній на корпусі виробу.
Магнієвий анод є витратним матеріалом і не підлягає заміні по гарантії.
15
ГАРАНТIЙНИЙ ТАЛОН 1
Модель
Серійний номер
Дата продажу
Фірма-продавець
заповнюється фірмою-продавцем
ГАРАНТIЙНИЙ ТАЛОН 2
Модель
Серійний номер
Дата продажу
Фірма-продавець
заповнюється фірмою-продавцем
ГАРАНТIЙНИЙ ТАЛОН 3
Модель
Серійний номер
Дата продажу
Фірма-продавець
заповнюється фірмою-продавцем
ГАРАНТIЙНИЙ ТАЛОН 4
Модель
Серійний номер
Дата продажу
Фірма-продавець
заповнюється фірмою-продавцем
3. Термін служби виробу
,
3 .
:
- SB R, SG - 3 роки;
- PRO R - 5 років;
- ABS BLU R, ABS PRO R - 5 років;
- ABS PRO R INOX, ABS PLT R - 7 років;
- ABS BLU R INOX - 7 років.
4. Дострокове припинення гарантійного терміну
. 1 ,
:
- , , ;
- , 24 , ,
( ’ 30%),
;
- , ;
- . ,
, ,
;
- ;
- - ;
- , ;
- ;
-
3 ;
- ,
.
5. Додаткова інформація
.
,
.
- :
-;
- ;
-;
- ;
- ;
- .
Перед установкою та використанням виробу уважно ознайомтесь з інструкцією, що додається.
: « », , 188676, , ,
. , , . , . 9, . .
, : « », , 03680, ,
. , 86, .6
16

ГАРАНТIЙНИЙ ТАЛОН 1
Модель
Серійний номер
Дата продажу
Фірма-продавець
заповнюється фірмою-продавцем
ГАРАНТIЙНИЙ ТАЛОН 2
Модель
Серійний номер
Дата продажу
Фірма-продавець
заповнюється фірмою-продавцем
ГАРАНТIЙНИЙ ТАЛОН 3
Модель
Серійний номер
Дата продажу
Фірма-продавець
заповнюється фірмою-продавцем
ГАРАНТIЙНИЙ ТАЛОН 4
Модель
Серійний номер
Дата продажу
Фірма-продавець
заповнюється фірмою-продавцем
17
Дата отримання
Дата видачi
Печатка
сервiсного центру
Дефект
Виконана робота
Майстер (П.I.Б.)
заповнюється сервiсним центром
Дата отримання
Дата видачi
Печатка
сервiсного центру
Дефект
Виконана робота
Майстер (П.I.Б.)
заповнюється сервiсним центром
Дата отримання
Дата видачi
Печатка
сервiсного центру
Дефект
Виконана робота
Майстер (П.I.Б.)
заповнюється сервiсним центром
Дата отримання
Дата видачi
Печатка
сервiсного центру
Дефект
Виконана робота
Майстер (П.I.Б.)
заповнюється сервiсним центром
ЗАГАЛЬНІ ВИМОГИ
1. Дана інструкція входить у комплект поставки водонагрівача. Зберігайте інструкцію в доступному
місці на випадок передачі приладу іншому користувачеві і / або переміщення на інше місце
експлуатації.
2. Уважно вивчіть дану інструкцію. У керівництві міститься необхідна інформація про заходи безпеки
при установці, експлуатації та обслуговуванні водонагрівача.
3. Монтаж приладу здійснюється за рахунок користувача.
4. Категорично забороняється використовувати прилад не за призначенням. Фірма-виробник не
несе відповідальності за пошкодження, що виникли в результаті невиконання вимог даної інструкції.
5. Всі роботи з монтажу та технічного обслуговування повинен виконувати кваліфікований фахівець
відповідно до діючих норм і правил, а також до вимог фірми-виробника.
6. Експлуатація неправильно встановленого приладу може призвести до травм і пошкодження
майна. Виробник не несе відповідальності за пошкодження, отримані в результаті неправильного
монтажу обладнання.
7. Зберігайте пакувальні матеріали (затискачі, поліетиленові пакети, пінополістирол і т.д.) в
недоступному для дітей місці. Пакувальний матеріал є шкідливий для здоров'я.
8. Прилад не призначений для використання особами (включаючи дітей) зі зниженими фізичними,
чуттєвими або розумовими здібностями або при відсутності у них життєвого досвіду або знань, якщо
вони не знаходяться під контролем або не проінструктовані про використання приладу особою,
відповідальною за їх безпеку.
9. Не торкайтеся приладу, якщо Ви без взуття або у Вас мокрі руки і / або ноги.
10. Ремонтні роботи повинен виконувати кваліфікований фахівець з використанням запасних частин,
вироблених фірмою-виробником. При недотриманні даної вимоги виробник знімає з себе всі
гарантійні зобов'язання.
11. Температура гарячої води регулюється термостатом, який виконує функції захисту від перегріву.
12. Водопостачання повинно виконуватися відповідно до пункту «Гідравлічне підключення».
13. Електромонтаж повинен виконуватися відповідно до пункту «Електричне підключення».
14. Суворо забороняється модифікувати або замінювати запобіжний клапан на інший, що не
відповідає чинним вимогам і нормам, якщо він не включений в комплект.
15. Не тримайте легкозаймисті речовини в безпосередній близькості від обладнання.
16. Водонагрівач є технічно складним електричним приладом побутового призначення.
17. Якщо встановлення електричного водонагрівача спричинить переобладнання (перебудову)
житлових та нежитлових приміщень в житлових будинках, то допускається виконувати його
встановлення тільки після отримання відповідних дозволів в установленому порядку.
18
Дата отримання
Дата видачi
Печатка
сервiсного центру
Дефект
Виконана робота
Майстер (П.I.Б.)
заповнюється сервiсним центром
Дата отримання
Дата видачi
Печатка
сервiсного центру
Дефект
Виконана робота
Майстер (П.I.Б.)
заповнюється сервiсним центром
Дата отримання
Дата видачi
Печатка
сервiсного центру
Дефект
Виконана робота
Майстер (П.I.Б.)
заповнюється сервiсним центром
Дата отримання
Дата видачi
Печатка
сервiсного центру
Дефект
Виконана робота
Майстер (П.I.Б.)
заповнюється сервiсним центром
ЗАГАЛЬНІ ВИМОГИ
1. Дана інструкція входить у комплект поставки водонагрівача. Зберігайте інструкцію в доступному
місці на випадок передачі приладу іншому користувачеві і / або переміщення на інше місце
експлуатації.
2. Уважно вивчіть дану інструкцію. У керівництві міститься необхідна інформація про заходи безпеки
при установці, експлуатації та обслуговуванні водонагрівача.
3. Монтаж приладу здійснюється за рахунок користувача.
4. Категорично забороняється використовувати прилад не за призначенням. Фірма-виробник не
несе відповідальності за пошкодження, що виникли в результаті невиконання вимог даної інструкції.
5. Всі роботи з монтажу та технічного обслуговування повинен виконувати кваліфікований фахівець
відповідно до діючих норм і правил, а також до вимог фірми-виробника.
6. Експлуатація неправильно встановленого приладу може призвести до травм і пошкодження
майна. Виробник не несе відповідальності за пошкодження, отримані в результаті неправильного
монтажу обладнання.
7. Зберігайте пакувальні матеріали (затискачі, поліетиленові пакети, пінополістирол і т.д.) в
недоступному для дітей місці. Пакувальний матеріал є шкідливий для здоров'я.
8. Прилад не призначений для використання особами (включаючи дітей) зі зниженими фізичними,
чуттєвими або розумовими здібностями або при відсутності у них життєвого досвіду або знань, якщо
вони не знаходяться під контролем або не проінструктовані про використання приладу особою,
відповідальною за їх безпеку.
9. Не торкайтеся приладу, якщо Ви без взуття або у Вас мокрі руки і / або ноги.
10. Ремонтні роботи повинен виконувати кваліфікований фахівець з використанням запасних частин,
вироблених фірмою-виробником. При недотриманні даної вимоги виробник знімає з себе всі
гарантійні зобов'язання.
11. Температура гарячої води регулюється термостатом, який виконує функції захисту від перегріву.
12. Водопостачання повинно виконуватися відповідно до пункту «Гідравлічне підключення».
13. Електромонтаж повинен виконуватися відповідно до пункту «Електричне підключення».
14. Суворо забороняється модифікувати або замінювати запобіжний клапан на інший, що не
відповідає чинним вимогам і нормам, якщо він не включений в комплект.
15. Не тримайте легкозаймисті речовини в безпосередній близькості від обладнання.
16. Водонагрівач є технічно складним електричним приладом побутового призначення.
17. Якщо встановлення електричного водонагрівача спричинить переобладнання (перебудову)
житлових та нежитлових приміщень в житлових будинках, то допускається виконувати його
встановлення тільки після отримання відповідних дозволів в установленому порядку.
19
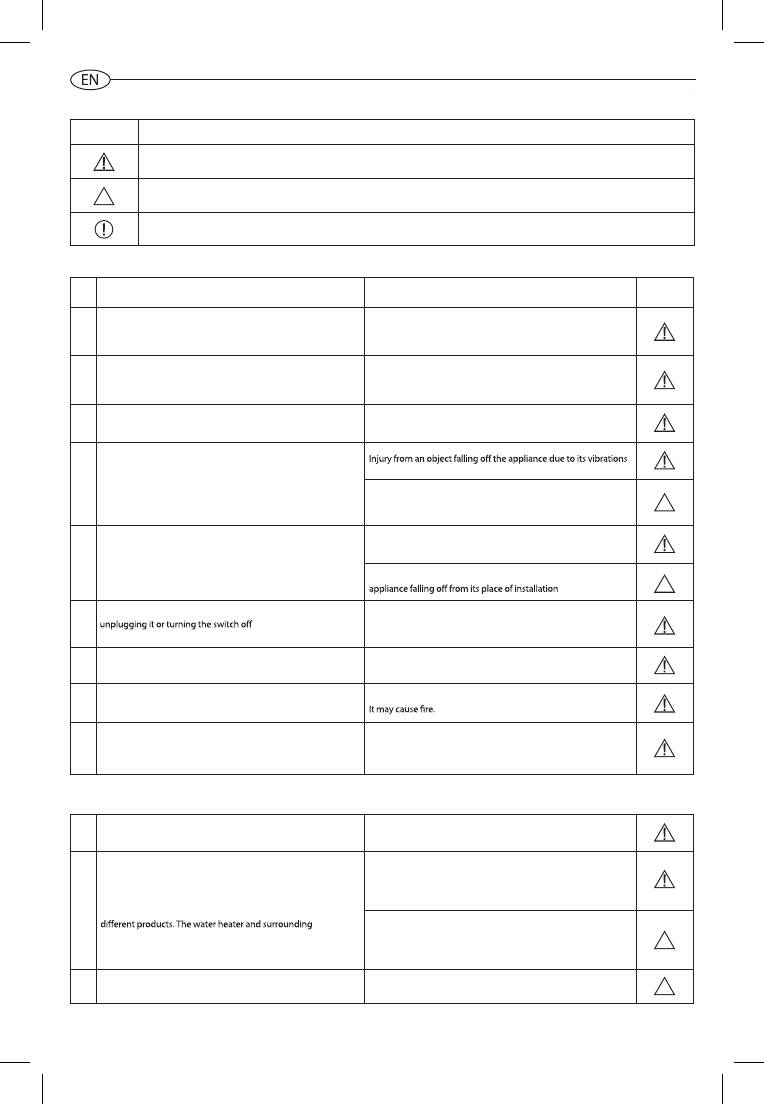
Символ Значення
Недотримання даних вимог може призвести до важких травм, аж до смертельного результату
При недотриманні даних вимог може бути завдана шкода майну, рослинам або тваринам
Загальні вимоги та правила безпечної експлуатації
ЗАГАЛЬНІ ПРАВИЛА БЕЗПЕЧНОЇ ЕКСПЛУАТАЦІЇ
№ Правило Небезпека Символ
Не відкривайте корпус водонагрівача
Ураження електричним струмом Отримання опіків при дотику
1
до гарячих компонентів. Отримання травм при дотику до
гострих країв і виступів
Не вмикайте і не вимикайте водонагрівач, вставляючи або
Ураження електричним струмом у разі пошкодження кабелю,
2
виймаючи штекер із розетки. Користуйтеся для цієї мети
вилки або розетки
вимикачем
Не використовуйте водонагрівач з пошкодженим кабелем
Ураження електричним струмом при дотику до дротів з
3
електроживлення
пошкодженою ізоляцією, що знаходяться під напругою
Не кладіть сторонні предмети на водонагрівач
Отримання травм при падінні предметів в результаті вібрації
водонагрівача
4
Пошкодження приладу або предметів, розташованих під ним,
при падінні сторонніх предметів внаслідок вібрації
Не вставайте на водонагрівач
Отримання травм при падінні приладу
5
Пошкодження приладу або предметів, розташованих під ним,
при падінні приладу
Перед очисткою водонагрівача відключіть його від мережі
Ураження електричним струмом
електроживлення, вийнявши штекер із розетки або
6
розімкнувши мережевий вимикач
Закріпіть прилад на міцній стіні, яка не сприяє
Підвищений рівень шуму
7
посиленню вібрації
Для електричних з'єднань використовуйте кабелі з жилами
Якщо переріз жил недостатній, то кабелі будуть перегріватися.
8
відповідного перерізу
Це може призвести до пожежі
Перед запуском приладу переконайтеся, що всі пристрої
Відключення або пошкодження приладу, як наслідок роботи
управління та захисту функціонують нормально і перебувають
з несправною або неврегульованою системою управління
9
у робочому стані
Перед переміщенням водонагрівача злийте гарячу воду
Отримання опіків
10
Очищення водонагрівача від накипу виконують згідно
Отримання травм унаслідок попадання кислот на шкіру або
з інструкцією, що знаходиться у відповідному документі.
в очі, а також вдихання шкідливих парів хімічних речовин
Приміщення повинно бути добре провітрено. Роботу слід
11
виконувати в захисному одязі, уникаючи змішування різних
компонентів. Водонагрівач і прилеглі до нього об'єкти
Пошкодження приладу або об'єктів, які його оточують,
повинні бути захищені від попадання засобів для чищення
внаслідок корозії, викликаної взаємодією з кислотами
Не використовуйте інсектициди, розчинники або агресивні
Пошкодження пластика і забарвлених частин
12
засоби для чищення водонагрівача
СИМВОЛИ, ЩО ВИКОРИСТОВУЮТЬСЯ В ІНСТРУКЦІЇ
ДОДАТКОВІ ПРАВИЛА ТЕХНІКИ БЕЗПЕКИ
20
СТРУКЦІЇ
СИМВОЛИ, ЩО ВИКОРИСТОВУЮТЬСЯ В ІН
Символ Значення
Недотримання даних вимог може призвести до важких травм, аж до смертельного результату
При недотриманні даних вимог може бути завдана шкода майну, рослинам або тваринам
Загальні вимоги та правила безпечної експлуатації
ЗАГАЛЬНІ ПРАВИЛА БЕЗПЕЧНОЇ ЕКСПЛУАТАЦІЇ
№ Правило Небезпека Символ
Не відкривайте корпус водонагрівача
Ураження електричним струмом Отримання опіків при дотику
до гарячих компонентів. Отримання травм при дотику до
1
гострих країв і виступів
Не вмикайте і не вимикайте водонагрівач, вставляючи або
Ураження електричним струмом у разі пошкодження кабелю,
2
виймаючи штекер із розетки. Користуйтеся для цієї мети
вилки або розетки
вимикачем
Ураження електричним струмом при дотику до дротів з
Не використовуйте водонагрівач з пошкодженим кабелем
3
електроживлення
пошкодженою ізоляцією, що знаходяться під напругою
Не кладіть сторонні предмети на водонагрівач
Отримання травм при падінні предметів в результаті вібрації
водонагрівача
4
Пошкодження приладу або предметів, розташованих під ним,
при падінні сторонніх предметів внаслідок вібрації
Не вставайте на водонагрівач
Отримання травм при падінні приладу
5
Пошкодження приладу або предметів, розташованих під ним,
при падінні приладу
Перед очисткою водонагрівача відключіть його від мережі
Ураження електричним струмом
електроживлення, вийнявши штекер із розетки або
6
розімкнувши мережевий вимикач
Закріпіть прилад на міцній стіні, яка не сприяє
Підвищений рівень шуму
7
посиленню вібрації
Якщо переріз жил недостатній, то кабелі будуть перегріватися.
Для електричних з'єднань використовуйте кабелі з жилами
відповідного перерізу
8
Це може призвести до пожежі
Перед запуском приладу переконайтеся, що всі пристрої
Відключення або пошкодження приладу, як наслідок роботи
управління та захисту функціонують нормально і перебувають
з несправною або неврегульованою системою управління
9
у робочому стані
ДОДАТКОВІ ПРАВИЛА ТЕХНІКИ БЕЗПЕКИ
Перед переміщенням водонагрівача злийте гарячу воду
Отримання опіків
10
Отримання травм унаслідок попадання кислот на шкіру або
Очищення водонагрівача від накипу виконують згідно
з інструкцією, що знаходиться у відповідному документі.
в очі, а також вдихання шкідливих парів хімічних речовин
Приміщення повинно бути добре провітрено. Роботу слід
виконувати в захисному одязі, уникаючи змішування різних
11
компонентів. Водонагрівач і прилеглі до нього об'єкти
Пошкодження приладу або об'єктів, які його оточують,
повинні бути захищені від попадання засобів для чищення
внаслідок корозії, викликаної взаємодією з кислотами
Не використовуйте інсектициди, розчинники або агресивні
Пошкодження пластика і забарвлених частин
12
засоби для чищення водонагрівача
, « ».
. -
, .
, .
.
1.
1.1. Комплект поставки та призначення
1.1.1.
1.1.2.
1.1.3.
1.1.4.
1.1.5.
1.1.6.
,
-
, ( ,
, ) .
’ .
1.2. Основні елементи
1.2.1.
1.2.2.
,
1.2.3.
1.2.4.
,
1.2.5.
,
1.2.6.
,
1.2 .7.
,
, .
ø350 ø450
’, 30 40 50 65 80 50 65 80 100 120 150
12 14 17 19 21 15 17 19 23 28 32
,
i
9 11 12 14 16 12 - 15 17 20 25
€ /89/336 3468-011-11182725-2006.
2.
Увага! Монтаж і налаштування водонагрівача повинен виконувати кваліфікований фахівець відповідно
до діючих правил та санітарно-гігієнічних норм, а також вимог, які наведені в цій інструкції.
2.1. Кріплення водонагрівача до стіни
2.1.1.
.
( ) 12 .
, 2 4 .
2.1.2.
.
2.1.3.
, .
2.1.4.
50
, - 10 .
2.1.5.
.
’ .
2.1.6.
()
, ,
, , .
2.1.7.
.
21

2.2. Гідравлічне підключення
Увага! Встановлення запобіжного клапану, що входить в комплект поставки, є обов'язковою вимогою.
Забороняється встановлювати будь-яку запірну арматуру між запобіжним клапаном та входом в бак, а також
блокувати зливний отвір запобіжного клапану.
Підключення водонагрівача до системи водопостачання повинно здійснюватися за допомогою роз'ємних
з'єднань.
Стандартне під'єднання (мал. 1)
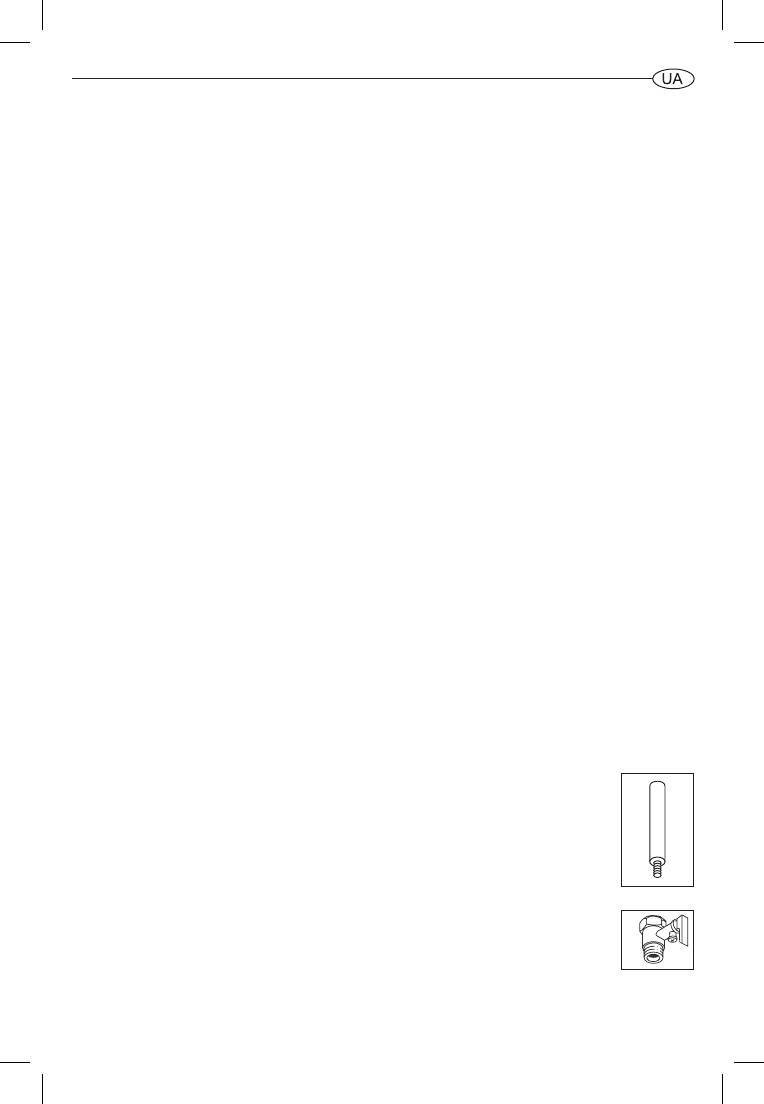
2.2.1. Запобіжний клапан, що входить в комплект поставки, необхідно встановити на вході холодної води у
водонагрівач (позначений синім кільцем). Запобіжний клапан рекомендується повертати не більше ніж на 3-4
обороти, забезпечивши таким чином герметичність будь-яким водоізолюючим матеріалом.
2.2.2. Приєднайте вхідний патрубок запобіжного клапана до магістралі холодної води за допомогою труби або
гнучкого шланга.
2.2.3. Підключіть до виходу гарячої води з водонагрівача (позначений червоним кільцем) трубу або гнучкий шланг
для відведення гарячої води до місця водорозбору.
2.2.4. Для зручності обслуговування водонагрівача рекомендується встановити зливний вентиль-трійник
між входом холодної води у водонагрівач і запобіжним клапаном. Даний трійник допоможе зливати воду з
водонагрівача, не викручуючи запобіжний клапан.
2.2.5. Для полегшення доступу повітря в бак при зливі води рекомендується встановити трійник з запорним краном
на виході гарячої води з водонагрівача.
2.2.6. При тиску водопровідної мережі вище 3 бар необхідно встановити перед запобіжним клапаном редуктор для
зниження тиску.
Під'єднання до відкритого резервуару з водою (мал. 2)
2.2.7. Вода надходить до водонагрівача самопливом із резервуару. Для цього трійник розведення води з резервуара
на водонагрівач та на інші потреби має бути вище верхньої точки водонагрівача. При даному варіанті під'єднання
запобіжний клапан не є обов'язковим.
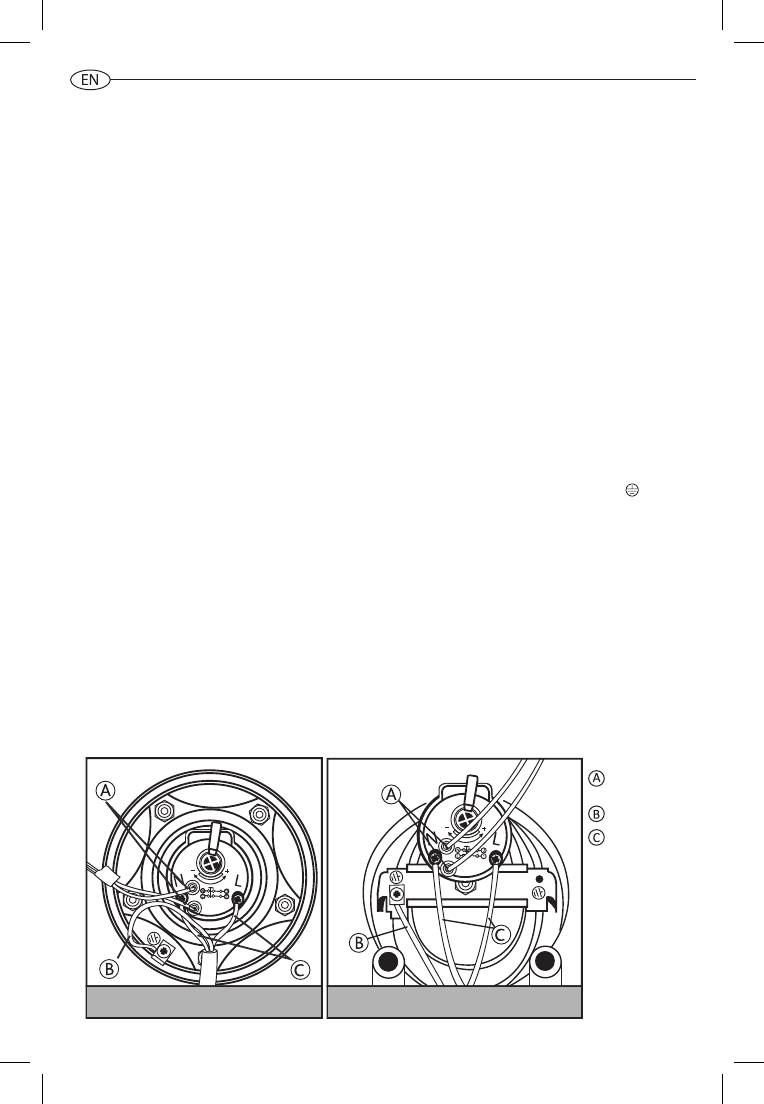
2.3. Електричне підключення
Електромонтаж приладу повинен виконувати кваліфікований фахівець, дотримуючись правил техніки
безпеки. Фірма-виробник не несе відповідальності за пошкодження приладу внаслідок неправильного
заземлення або неправильних параметрів джерела електроживлення.
2.3.1. Після заповнення бака водонагрівача водою і перевірки герметичності системи - увімкніть електричну вилку
водонагрівача в розетку.
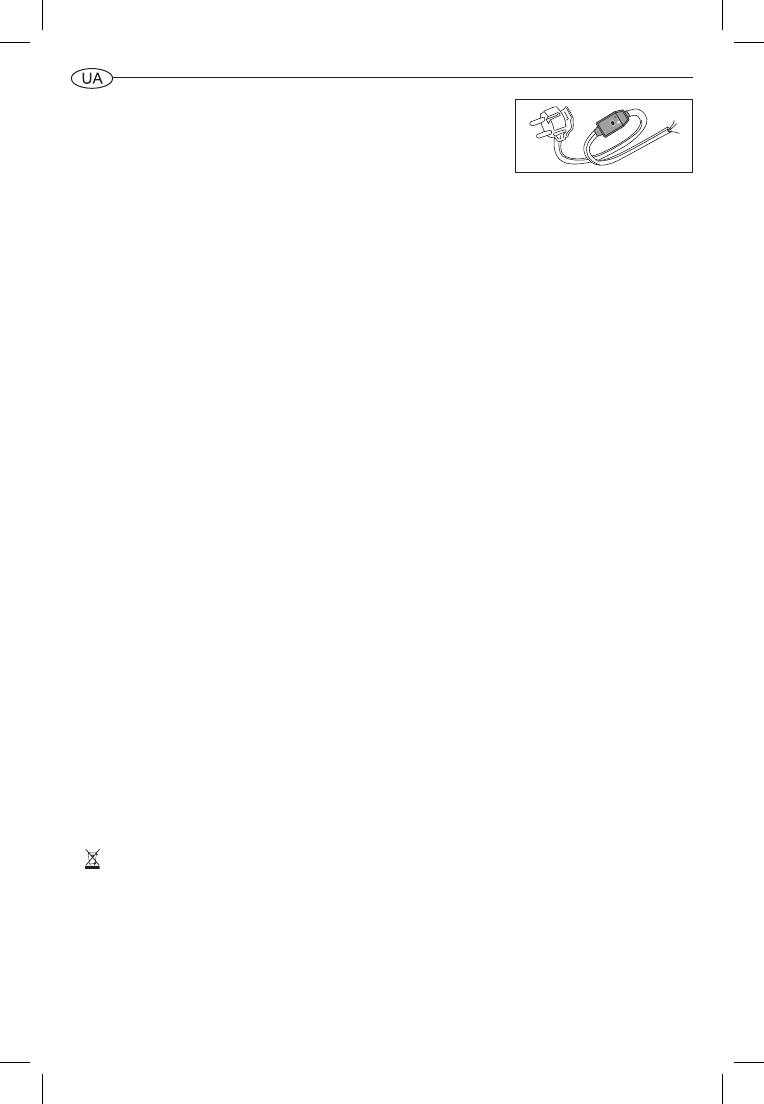
2.3.2. Якщо водонагрівач поставляється без кабелю електроживлення, для підключення до мережі електропостачання
2
використовуйте кабель відповідного типу (тип H05VV-F 3х1,5 мм
, Ø 8,5 мм). Протягніть кабель електроживлення у
отвір, який знаходиться на кришці приладу і приєднайте до клем на термостаті. Потім кожен дріт повинен
бути зафіксований відповідним гвинтом.
2.3.3. Водонагрівач повинен бути заземленим. Дріт заземлення (жовто-зеленого кольору) слід приєднати до клеми,
позначеної символом . Закріпите кабель електроживлення за допомогою кабельних затискачів.
2.3.4. Переконайтеся, що параметри джерела електроживлення відповідають технічним характеристикам приладу
водонагрівача, вказаними на ідентифікаційній табличці.
2.2. Гідравлічне підключення
Увага! Встановлення запобіжного клапану, що входить в комплект поставки, є обов’язковою вимогою.
Забороняється встановлювати будь-яку запірну арматуру між запобіжним клапаном та входом в бак, а
також блокувати зливний отвір запобіжного клапану.
Підключення водонагрівача до системи водопостачання повинно здійснюватися за допомогою
роз’ємних з’єднань.
Стандартне під1 єднання (мал. 1)
2.2.1.
, ,
( ). 3-4 ,
- .
2.2.2.
.
2.2.3.
( )
.
2.2.4.
-
. , -
.
2.2.5.
.
2.2.6.
3
.
Підключення до відкритого резервуара з водою (мал. 2)
2.2.7.
. ’
’.
2.3. Електричне підключення
Електромонтаж приладу повинен виконувати кваліфікований фахівець, дотримуючись правил техніки
безпеки. Фірма-виробник не несе відповідальності за пошкодження приладу внаслідок неправильного
заземлення або неправильних параметрів джерела електроживлення.
2.3.1.
,
2
( H05VV-F 3x1,5
, Ø 8,5 ). ,
.
.
2.3.2.
.
. (- ) ,
. .
2.3.3.
,
, .
А Контакти
індикаторної
лампи
B Заземлення
С Електроживлення
Фланець на 5-ти болтах Автоклавний фланець
22
2.2. Гідравлічне підключення
Увага! Встановлення запобіжного клапану, що входить в комплект поставки, є обов'язковою вимогою.
Забороняється встановлювати будь-яку запірну арматуру між запобіжним клапаном та входом в бак, а також
блокувати зливний отвір запобіжного клапану.
Підключення водонагрівача до системи водопостачання повинно здійснюватися за допомогою роз'ємних
з'єднань.
Стандартне під'єднання (мал. 1)
2.2.1. Запобіжний клапан, що входить в комплект поставки, необхідно встановити на вході холодної води у
водонагрівач (позначений синім кільцем). Запобіжний клапан рекомендується повертати не більше ніж на 3-4
обороти, забезпечивши таким чином герметичність будь-яким водоізолюючим матеріалом.
2.2.2. Приєднайте вхідний патрубок запобіжного клапана до магістралі холодної води за допомогою труби або
гнучкого шланга.
2.2.3. Підключіть до виходу гарячої води з водонагрівача (позначений червоним кільцем) трубу або гнучкий шланг
для відведення гарячої води до місця водорозбору.
2.2.4. Для зручності обслуговування водонагрівача рекомендується встановити зливний вентиль-трійник
між входом холодної води у водонагрівач і запобіжним клапаном. Даний трійник допоможе зливати воду з
водонагрівача, не викручуючи запобіжний клапан.
2.2.5. Для полегшення доступу повітря в бак при зливі води рекомендується встановити трійник з запорним краном
на виході гарячої води з водонагрівача.
2.2.6. При тиску водопровідної мережі вище 3 бар необхідно встановити перед запобіжним клапаном редуктор для
зниження тиску.
Під'єднання до відкритого резервуару з водою (мал. 2)
2.2.7. Вода надходить до водонагрівача самопливом із резервуару. Для цього трійник розведення води з резервуара
на водонагрівач та на інші потреби має бути вище верхньої точки водонагрівача. При даному варіанті під'єднання
запобіжний клапан не є обов'язковим.
2.3. Електричне підключення
Електромонтаж приладу повинен виконувати кваліфікований фахівець, дотримуючись правил техніки
безпеки. Фірма-виробник не несе відповідальності за пошкодження приладу внаслідок неправильного
заземлення або неправильних параметрів джерела електроживлення.
2.3.1. Після заповнення бака водонагрівача водою і перевірки герметичності системи - увімкніть електричну вилку
водонагрівача в розетку.
2.3.2. Якщо водонагрівач поставляється без кабелю електроживлення, для підключення до мережі електропостачання
2
використовуйте кабель відповідного типу (тип H05VV-F 3х1,5 мм
, Ø 8,5 мм). Протягніть кабель електроживлення у
отвір, який знаходиться на кришці приладу і приєднайте до клем на термостаті. Потім кожен дріт повинен
бути зафіксований відповідним гвинтом.
2.3.3. Водонагрівач повинен бути заземленим. Дріт заземлення (жовто-зеленого кольору) слід приєднати до клеми,
позначеної символом . Закріпите кабель електроживлення за допомогою кабельних затискачів.
2.3.4. Переконайтеся, що параметри джерела електроживлення відповідають технічним характеристикам приладу
водонагрівача, вказаними на ідентифікаційній табличці.
А Контакти
індикаторної
лампи
B Заземлення
С Електроживлення
Фланець на 5-ти болтах Автоклавний фланець
3.
3.1. Введення в експлуатацію
3.1.1.
’ .
, .
3.1.2.
, . .
, .
3.1.3.
.
3.1.4.
.
3.2. Регулювання температури
3.2.1.
, , , ’
.
3.2.2.
, ,
, ”+” ”-”.
3.2.3.
’ .
3.2.4.
, 75% -
. , .
4.
Увага! Не намагайтеся ремонтувати прилад самостійно. Усі роботи з технічного обслуговування і
ремонту повинен виконувати кваліфікований фахівець, дотримуючись правил техніки безпеки, а також
вимог, які наведені в цій інструкції.
4.1. Злив води
,
0°.
4.1.1.
.
4.1.2.
, .
4.1.3.
.
4.1.4.
.
4.1.5.
, ,
( ). ’
.
4.1.6.
,
( ) .
.
4.1. 7.
, .
Замерзання води всередині водонагрівача призводить до безповоротних змін і дефектів.
У цьому випадку виробник знімає з себе всі гарантійні зобов’язання.
4.2. Заміна внутрішніх елементів
. . ,
’ .
. , (
D
. 3),
(
S
. 3) (
F
. 3), . , -
.
5- , 5 (
С
. 4) (
F
. 4).
.
, .
.
Перед проведенням будь-якої операції з ремонту або обслуговування відключіть прилад від
електричної мережі.
Застосовуйте запасні частини, що випускаються тільки заводом-виробником.
4.3. Регулярне обслуговування
4.3.1. Магнієвий анод
’ .
.
. (
30%) .
. 1 24 (
).
Магнієвий анод є витратним матеріалом, і не підлягає заміні за гарантією.
4.3.2. Запобіжний клапан
, ( )
. .
,
.
23
GENERAL WARNINGS
1. This manual is included in water heater delivery set. It should be kept alongside the appliance even if the
latter is transferred to another user and/or moved to another location.
2. Read this manual carefully. It provides important safety precautions for installation, use and maintenance
of the water heater.
3. The appliance is installed at the expense of the user.
not to be held responsible for any damage due to failure to comply with the instructions set in the manual.
the current rules and regulations, as well as the directions provided by the manufacturer.
6. Incorrect installation can cause personal injury and property damage. The manufacturer is not to be held
responsible for damage due to incorrect installation.
7. Keep all packing material (clips, plastic bags, polystyrene foam, etc.) out of children's reach. The packing
material is hazardous for health.
8. The appliance is not intended for use by persons (including children) with reduced physical, sensory, or
mental capabilities, or lack of experience and knowledge, unless they have been given supervision or
instruction concerning use of the appliance by a person responsible for their safety.
9. It is strictly forbidden to touch the appliance barefoot or with wet hands and/or feet.
manufacturer. Failure to comply with this requirement invalidates all warranties on the part of the
manufacturer.
11. The temperature of the hot water is adjusted by a thermostat that acts as a protection against
overheating.
12. Water supply must be done in accordance with paragraph “Hydraulic Connection”.
13. Electric wiring must be done in accordance with paragraph “Electrical Connection”.
14. It is strictly forbidden to modify or replace the safety valve with the other one which does not meet the
current rules and regulations, if it is not included in the delivery set.
16. The water heater is a technically sophisticated electrical appliance for household purposes.
17. Whenever electrical water heater installation involves re-equipment (rearrangement) of residential and
non-residential premises in residential buildings, installation should be performed only after relevant
permissions have been obtained in a proper manner.
4.3.3. ПЗВ (пристрій захисного відключення)
(),
,
:
- «RESET» , ,
.
- «TEST». .
- «RESET». , ,
.
- «RESET» –
.
4.4. Зверніть увагу
4.4.1.
,
.
4.4.2.
.
4.4.3.
.
4.4.4.
50° , . ,
’ .
4.4.5.
3 , .
4.4.6.
, 0°, -
.
4.4.7
. .
4.4.8.
,
.
4.4.9.
.
4.4.10.
.
4.4.11.
, -
.
4.4.12
. , , , ’
.
З усіх питань гарантійного обслуговування звертайтеся до найближчого авторизований сервісний центр.
4.5. Забороняється
4.5.1.
.
4.5.2.
, - .
4.5.3.
.
4.5.4.
, .
4.5.5.
.
4.5.6.
, .
4.5.7.
.
4.5.8.
.
4.5.9.
.
4.5.10.
, .
4.5.11.
.
4.5.12.
3 .
4.5.13.
, 80° -
.
4.5.14.
, -
, .
4.5.15.
.
4.5.16.
.
4.5.17.
.
4.5.18.
.
Виробник залишає за собою право вносити незначні зміни в конструкцію, дизайн, комплектацію та інші
характеристики виробу без попереднього повідомлення.
Даний виріб відповідає вимогам Директиви ЄС 2002/96/ЕС-ЕІІ2002.95. ЕС
, ,
.
,
-
, .
24
GENERAL WARNINGS
1. This manual is included in water heater delivery set. It should be kept alongside the appliance even if the
latter is transferred to another user and/or moved to another location.
2. Read this manual carefully. It provides important safety precautions for installation, use and maintenance
of the water heater.
3. The appliance is installed at the expense of the user.
not to be held responsible for any damage due to failure to comply with the instructions set in the manual.
the current rules and regulations, as well as the directions provided by the manufacturer.
6. Incorrect installation can cause personal injury and property damage. The manufacturer is not to be held
responsible for damage due to incorrect installation.
7. Keep all packing material (clips, plastic bags, polystyrene foam, etc.) out of children's reach. The packing
material is hazardous for health.
8. The appliance is not intended for use by persons (including children) with reduced physical, sensory, or
mental capabilities, or lack of experience and knowledge, unless they have been given supervision or
instruction concerning use of the appliance by a person responsible for their safety.
9. It is strictly forbidden to touch the appliance barefoot or with wet hands and/or feet.
manufacturer. Failure to comply with this requirement invalidates all warranties on the part of the
manufacturer.
11. The temperature of the hot water is adjusted by a thermostat that acts as a protection against
overheating.
12. Water supply must be done in accordance with paragraph “Hydraulic Connection”.
13. Electric wiring must be done in accordance with paragraph “Electrical Connection”.
14. It is strictly forbidden to modify or replace the safety valve with the other one which does not meet the
current rules and regulations, if it is not included in the delivery set.
16. The water heater is a technically sophisticated electrical appliance for household purposes.
17. Whenever electrical water heater installation involves re-equipment (rearrangement) of residential and
non-residential premises in residential buildings, installation should be performed only after relevant
permissions have been obtained in a proper manner.
25
KEY TO SYMBOLS
Symbol Meaning
Failure to comply with this requirement can result in severe injuries and even death
Failure to comply with this requirement can result in damage to property, plants, or animals
General requirements and safety precautions for use
GENERAL SAFETY NORMS
Ref. Warning Risk Symbol
Electric shock. Burns due to the contact with hot
1
Do not open the water heater body
components. Injuries due to the contact with sharp edges or
protrusions
Do not start or stop the water heater by plugging it into or out of
2
Electric shock in case of cable, plug, or socket damage
the wall outlet. Use the power switch for this purpose
Do not use the water heater with a damaged power supply cable
3
Electric shock due contact with the wires with damaged insulation
4
Do not leave anything on top of the appliance
Damage to the appliance or any objects underneath it from
falling objects due to vibrations
Injury from the falling appliance
5
Do not climb onto the appliance
Damage to the appliance or any objects underneath it due to the
Before cleaning, isolate the appliance from the mains by
Electric shock
6
Install the appliance on a solid wall that is not subjected to
Excessive noise
7
any vibrations
Make electrical connections using cables with conductors
Incorrect conductor section results in cables overheating.
8
of suitable section
Make sure all control and protection functions operate correctly
Shutdown or damage of the appliance due to out-of-service
9
before start the appliance
or unregulated control system operation
ADDITIONAL SAFETY RULES
10
Before water heater handling, drain hot water
Burns
Injury due to contact of the skin or eyes with acidic substances,
Descale the components in accordance with the instructions
inhalation or swallowing of harmful chemical agents.
provided in the applicable document. Air the room.
11
Work is performed in protective clothing, avoiding mixing
Damage to the appliance or surrounding objects due to corrosion
objects shall be protected against ingress of cleansers
caused by acidic substances
Do not use any insecticides, solvents or aggressive detergents
Damage to the plastic and painted parts
12
to clean the appliance
26
KEY TO SYMBOLS
Symbol Meaning
Failure to comply with this requirement can result in severe injuries and even death
Failure to comply with this requirement can result in damage to property, plants, or animals
General requirements and safety precautions for use
GENERAL SAFETY NORMS
Ref. Warning Risk Symbol
Electric shock. Burns due to the contact with hot
components. Injuries due to the contact with sharp edges or
Do not open the water heater body
1
protrusions
Do not start or stop the water heater by plugging it into or out of
2
Electric shock in case of cable, plug, or socket damage
the wall outlet. Use the power switch for this purpose
Do not use the water heater with a damaged power supply cable
3
Electric shock due contact with the wires with damaged insulation
4
Do not leave anything on top of the appliance
Damage to the appliance or any objects underneath it from
falling objects due to vibrations
Injury from the falling appliance
Do not climb onto the appliance
5
Damage to the appliance or any objects underneath it due to the
Before cleaning, isolate the appliance from the mains by
Electric shock
6
Install the appliance on a solid wall that is not subjected to
Excessive noise
7
any vibrations
Incorrect conductor section results in cables overheating.
Make electrical connections using cables with conductors
8
of suitable section
Shutdown or damage of the appliance due to out-of-service
Make sure all control and protection functions operate correctly
9
before start the appliance
or unregulated control system operation
ADDITIONAL SAFETY RULES
Burns
Before water heater handling, drain hot water
10
Injury due to contact of the skin or eyes with acidic substances,
Descale the components in accordance with the instructions
inhalation or swallowing of harmful chemical agents.
provided in the applicable document. Air the room.
11
Work is performed in protective clothing, avoiding mixing
Damage to the appliance or surrounding objects due to corrosion
objects shall be protected against ingress of cleansers
caused by acidic substances
Do not use any insecticides, solvents or aggressive detergents
Damage to the plastic and painted parts
12
to clean the appliance
Congratulations on your purchase of an electric water heater manufactured by Ariston Thermo Group. The appliance is
designed in compliance with the European quality standards and conforms to declared technical characteristics. The water
heater is easy to use; it demonstrates great consumer properties and durability in operation. We hope that you will be
satised with its work
Please, read this manual carefully to ensure proper installation and operation of the water heater.
1.
GENERAL INFORMATION
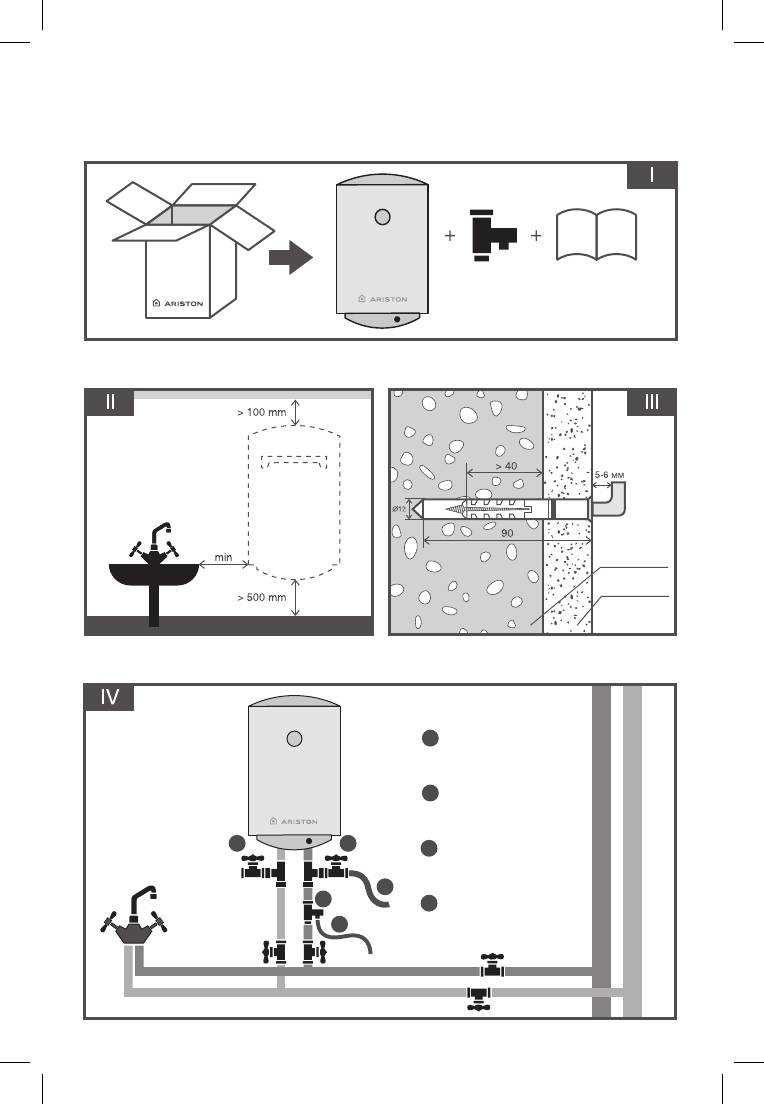
1.1. Delivery set and purpose
1.1.1.
Water heater
1.1.2.
Safety valve
1.1.3.
Bracket
1.1.4.
Installation and operation manual
1.1.5.
Warranty certicate
1.1.6.
Original packing
The appliance is designed for installation inside the buildings, in the household and utility premises. It is intended for water
heating to a temperature below boiling point, with the option of the hot water’s supply at several spots (bathroom, kitchen,
and toilet) and further maintenance of the set temperature in the automatic mode.
Water heating time depends on the volume of the water heater and the power of the heating element.
1.2. Main elements
1.2.1.
Inner tank
1.2.2.
Thermal insulation of polyurethane foam providing minimal heat dispersion even when the water heater power is o
1.2.3.
Heating element
1.2.4.
Temperature controller which allows you to set the desired temperature of the water heating
1.2.5.
Thermostat controlling the temperature of water in the tank
1.2.6.
Safety valve which is installed at the inlet of the water heater and serves to prevent the return of water to the water
line and protect the tank from excessive pressure
1.2 .7.
Magnesium anode rod providing additional protection of the inner tank from corrosion
TECHNICAL CHARACTERISTICS
For the technical characteristics of the water heater, please refer to the data plate located near the water inlet and outlet pipes.
ø350 ø450
Volume, l 30 40 50 65 80 50 65 80 100 120 150
Steel 12 14 17 19 21 15 17 19 23 28 32
Weight, kg
Stainless steel 9 11 12 14 16 12 - 15 17 20 25
This appliance conforms to EMC Directive EEC/89/336 on electromagnetic compatibility according to TU 3468-011-11182725-2006.
2.
INSTALLATION
Attention! The installation and set-up of the water heater must be carried out by a qualied technician in
conformity with the applicable rules and hygiene and sanitary standards in force and with any provisions set
forth in this manual.
2.1.
Hot-water boiler bonding against the wall
2.1.1. Water heater mounting is made on the main wall using brackets and fastening hooks. Fastening hooks (not includ-
ed in the supply) with a diameter of at least 12 mm are recommended. Depending on the model, you will need 2 or 4 of
the fastening hooks.
2.1.2. Prepared fastening must support a weight that is three times higher than the weight of the water heater lled
with water.
2.1.3. The appliance should be installed as close as possible to the point of water intake to limit heat dispersion.
2.1.4. Allow for a clearance of at least 50 cm under the appliance and a clearance of 10 cm from the ceiling for mainte-
nance.
2.1.5. Fastening of hooks to the wall must prevent inadvertent movement of the bracket of the water heater over them.
After installation, be sure to check security of the fastening.
2.1.6. To prevent the property of the customer and (or) third party from damage caused by failures of hot water supply
system, it is recommended to mount the water heater in the premises provided with waterproof oor and sewer drain.
Never put objects sensitive to water under the water heater.
2.1.7. During mounting water heater in the unprotected areas, you must install underneath the protective tray with
drainage into the sewer.
27
2.2. Hydraulic connection
Note! Installation of safety valve included in the delivery set is necessary.
Do not install any stop valve between the safety valve and the inlet of the tank and do not block the drain hole of the
safety valve.
Demountable connectors should be used for the water heater connection to the water supply system.
Standard connection (Fig. 1)
2.2.1. Safety valve supplied must be installed on the cold water inlet of the water heater (marked with the blue ring). It is
recommended to turn the safety valve no more than 3−4 turns, providing sealing with water-proof sealing material.
2.2.2.
2.2.3.
2.2.4.
safety valve of the water heater.
It will help to drain water from the water heater without safety valve removal.
2.2.5. To facilitate the access of air into the tank when draining water, it is recommended to install an additional T-piece with
2.2.6. When water pressure exceeds 5 bar, place before the safety valve a reducer to reduce the pressure.
2.2.7. Water is supplied to the water heater from the tank by gravity. For this purpose, the tank water outlet T-piece
supplying water to the heater and other places must be installed higher than the water heater top. Safety valve is not
necessary in this type of connection.
2.3. Electrical connection
manufacturer is not to be held responsible for any damage caused by the incorrect earthing of the system or for fault
defaults of the electricity supply.
2.3.1.
heater.
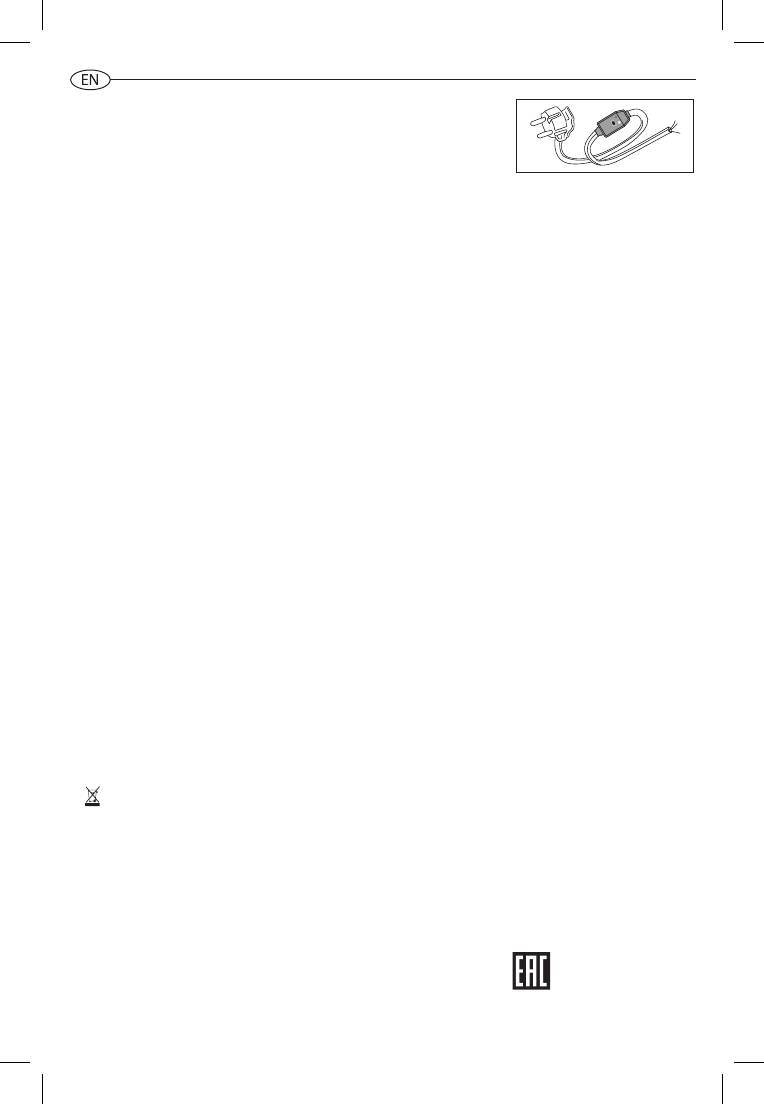
2.3.2. If the water heater is supplied without a power supply cable, use a cable featuring the same characteristics (type
2
H05VV-F 3x1,5 mm
, Ø 8,5 mm) for connection. The power supply cable should be threaded through the relevant hole on
corresponding screw.
2.3.3.
the symbol . Fix the power supply cable using the cable clamps.
2.3.4. Make sure that the power supply voltage conforms to the water heater technical characteristics indicated on the data
plate.
2.2. Hydraulic connection
Attention! Installation of safety valve Included In the delivery set Is necessary.
Do not Install any stop valve between the safety valve and the inlet of the tank and do not block the drain hole
of the safety valve.
Demountable connectors should be used for the water heater connection to the water supply system.
Standard connection (Fig. 1)
2.2.1.
Safety valve supplied must be installed on the cold water inlet of the water heater (marked with the blue ring). It is
recommended to turn the safety valve no more than 3-4 turns, providing sealing with water-proof sealing material.
2.2.2.
Connect the inlet of the safety valve to the cold water line with a tube or exible hose.
2.2.3.
Connect a tube or exible hose to the hot water outlet of the water heater (marked with the red ring) for hot water
removal to the draw-o point.
2.2.4.
For easy maintenance, it is recommended to install a T-piece with shut-o valve between the cold water inlet and safety
valve of the water heater.
It will help to drain water from the water heater without safety valve removal.
2.2.5.
To facilitate the access of air into the tank when draining water, it is recommended to install an additional T-piece with
shut-o valve at the hot water output.
2.2.6.
When water pressure exceeds 5 bar, place before the safety valve a reducer to reduce the pressure.
Connection to open tank lled with water (Fig. 2)
2.2.7.
Water is supplied to the water heater from the tank by gravity. Safety valve is not necessary in this type of connection.
2.3. Electrical connection
Attention! Electrical wiring should be done by a qualied technician, ensuring it complies with safety rules.
The manufacturer Is not to be held responsible for any damage caused by the Incorrect earthing of the system
or for fault defaults of the electricity supply.
2.3.1.
If the water heater is supplied without a power supply cable, use a cable featuring the same characteristics (type H05VV-F
3x1,5 mm, Ø 8,5 mm) for connection. The power supply cable should be threaded through the relevant hole on the cover of
the appliance and xed to the thermostat terminals. Then every wire should be xed in place by the corresponding screw.
2.3.2.
The water heater must be earthed. Grounding scheme should ensure the absence of electric potential on the body
of the water heater. The earth cable (of yellow-green color) should be xed to the terminal marked by the symbol . Fix the
power supply cable using the cable clamps.
2.3.3.
Make sure that the power supply voltage conforms to the water heater technical characteristics indicated on the data
plate.
Indicating light
contacts
Earthing
Power supply
Flange on the 5 bolts Autoclave ange
28
2.2. Hydraulic connection
Note! Installation of safety valve included in the delivery set is necessary.
Do not install any stop valve between the safety valve and the inlet of the tank and do not block the drain hole of the
safety valve.
Demountable connectors should be used for the water heater connection to the water supply system.
Standard connection (Fig. 1)
2.2.1. Safety valve supplied must be installed on the cold water inlet of the water heater (marked with the blue ring). It is
recommended to turn the safety valve no more than 3−4 turns, providing sealing with water-proof sealing material.
2.2.2.
2.2.3.
2.2.4.
safety valve of the water heater.
It will help to drain water from the water heater without safety valve removal.
2.2.5. To facilitate the access of air into the tank when draining water, it is recommended to install an additional T-piece with
2.2.6. When water pressure exceeds 5 bar, place before the safety valve a reducer to reduce the pressure.
2.2.7. Water is supplied to the water heater from the tank by gravity. For this purpose, the tank water outlet T-piece
supplying water to the heater and other places must be installed higher than the water heater top. Safety valve is not
necessary in this type of connection.
2.3. Electrical connection
manufacturer is not to be held responsible for any damage caused by the incorrect earthing of the system or for fault
defaults of the electricity supply.
2.3.1.
heater.
2.3.2. If the water heater is supplied without a power supply cable, use a cable featuring the same characteristics (type
2
H05VV-F 3x1,5 mm
, Ø 8,5 mm) for connection. The power supply cable should be threaded through the relevant hole on
corresponding screw.
2.3.3.
the symbol . Fix the power supply cable using the cable clamps.
2.3.4. Make sure that the power supply voltage conforms to the water heater technical characteristics indicated on the data
plate.
Indicating light
contacts
Earthing
Power supply
Flange on the 5 bolts Autoclave ange
3. STARTING AND OPERATION
3.1. Commissioning
3.1.1.
Before connect the appliance to power source, ll the tank up with mains water. To do this, turn on hot water mixer tap
and then tap of cold water supplied to the water heater.
3.1.2.
Once the water heater is full, the water will ow from the mixer tap. Check the ange for leakages. Center it and tighten
the nuts if necessary.
3.1.3.
Turn the hot water tap on the mixer o.
3.1.4.
Connect the appliance to power source.
3.2. Temperature control
3.2.1.
In models equipped with external control, water temperature can be controlled by a handle connected to the
thermostat in accordance with marks.
3.2.2.
If an appliance model does not have an external control, temperature can be set by turning the adjusting screw of the
thermostat in the range marked by”+” and ”-” signs.
3.2.3.
To do so, disconnect the water heater from the power supply and remove the plastic cover of the appliance.
3.2.4.
It is recommended to install the controller in a position corresponding approximately to 75% of the maximal value. In
this case, the appliance is operated in economy mode signicantly reducing the rate of scale formation.
4. MAINTENANCE AND REPAIR WORKS
Attention! Do not try to repair the appliance by yourself. All maintenance and repair works should be carried
out by a qualied technician in conformity with the safety norms and with any provisions set forth in this
manual.
4.1. Water Drain
If there is a possibility that the ambient temperature drops below 0°C in the room where the appliance is installed, drain
water from the water heater.
4.1.1.
Disconnect the appliance from the electrical supply;
4.1.2.
Make sure that the water in the appliance is of safe temperature;
4.1.3.
Turn o the tap of cold water supply to the water heater;
4.1.4.
Turn on the hot water tap on mixer for pressure relief inside the tank;
4.1.5.
Turn on the T-connector stop valve installed at hot water outlet (marked with red ring) for air access into the tank. If it is
absent, remove the connections at the water heater outlet;
4.1.6.
Connect drain hose directed into the sewer to the T-connector stop valve installed at the cold water inlet of the water
heater (marked with the blue ring) and open it. If there is no T-connector, connect the hose to water heater inlet;
4.1. 7.
After draining, make sure there is no water inside the water heater.
Freezing of water inside the water heater leads to irreversible changes and defects.
It invalidates all warranty liability on the part of the manufacturer.
4.2. Replacing internal parts
Disconnect the water heater from the electricity supply. Remove the appliance cover. To replace the thermostat pull it straight
out ot the cluster and disconnect from power supply.
Prior to work, the water heater must rst be emptied. For models with an autoclave ange, remove the nut (
D
in Fig. 3), remove
the ange holder (
S
in Fig. 3) and open the ange (
F
in Fig. 3) by pressing it inside. Remove the ange by turning it on its axis.
For models with a ange on the 5 bolts, remove 5 nuts (
C
in Fig. 4) and remove the ange (
F
in Fig. 4). The heating element
and anode rod are attached to the ange. During reassembly, make sure that the heating element, ange gasket and the
thermostat are put back in their original positions. We recommend replacing the ange gasket every time when reassembling.
Prior to any repair or maintenance procedure, disconnect the unit from power source.
Use original spare parts of the manufacturer only.
4.3. Periodical maintenance
4.3.1. Magnesium anode
The magnesium anode rod is an integral part of the protection system of water tank against corrosion.
It’s necessary to check the condition of the magnesium anode rod ANNUALLY.
In case of severe wear, the magnesium anode rod must be replaced.
The warranty for water tank with the worn magnesium anode rod (residual volume is less than 30%) is not
valid.
The magnesium anode rod should be replaced at least once in 24 months (except for the water heater with the
internal tank made of stainless steel).
The magnesium anode rod is a consumable item that cannot be replaced under warranty.
4.3.2. Safety valve
The safety valve (pressure safety device) must be inspected regularly to check that it is not blocked or
damaged. Replace the valve or remove limescale deposits if necessary. If the safety valve is equipped with a
lever, regular valve correct operation check procedure can be performed with its help.
29
Краткая инструкция по монтажу накопительного электроводонагревателя
Кратка iнструкцiя з монтажу накопичувального електроводонагрiвача
Quick manual on the storage water heater installation
Комплектация Supplied itemsКомплектацiя
В комплекте инструкция
и предохранительный клапан
В комплектi iнструкцiя
та запобiжний клапан
Manual and safety valve are included
Рекомендации по установке
Требования к крепежу
Рекомендацiї до установки
Вимоги до крiплення
Installation recommendations
Requirements for fasteners
Выбирайте место для установки
L-образный винт
как можно ближе к точке
водоразбора
L-образний гвинт
L-screw
Виберiть мiсце для установки як
найближче до найближче до точки
водорозбору
Choose installation location as close
as possible to the point of water use
Несущая часть стены
Несуча частина стiни
Supporting part
of the wall
Слой штукатурки
Шар штукатурки
Plaster coat
Схема подключения
Схема пiдключення
Connection diagram
1
Тройник (рекомендуется)
Трiйник (рекомендується)
"T" piece union (recommended)
2
Предохранительный клапан
Запобiжний клапан
Safety valve
1 1
3
Сливной шланг
Зливной шланг
Drain hose
3
2
4
Дренаж в канализацию
Дренаж у каналізацію
4
Draining into the sewer
ХОЛОДНАЯ ВОДА, ХОЛОДНА ВОДА, COLD WATER
ГОРЯЧАЯ ВОДА, ГОРЯЧА ВОДА, HOT WATER
4.3.3. RCD (Residual Current Device)
If the appliance comes with a residual current device (RCD) located on the power cord,
and then after the tankof the water heater Is lled with water and the system is checked
for leaks, put in the electrical plug of the water heater and do the following:
- Press «RESET» knob on the RCD body, LED will be lit indicating electricity supply.
- Then press «TEST» knob, power will be o, as well as LED.
- Press «RESET» knob again. If the power LED lit up, it means that the appliance is safe to use.
- If you press the «RESET» knob, but LED does not light up, contact the Technical Assistance Centre for advice by a qualied
technician.
4.4. Note:
4.4.1.
Manufacturer disclaims any liability for any da mage due to incorrect plug in and failure to comply with the
requirements set forth in this manual.
4.4.2.
Plumbing lines and stop valves must comply with the water supply pipelines.
4.4.3.
Water heater is a sophisticated technical household appliance.
4.4.4.
Hot water with temperature over 50°C may immediately cause severe burns or even death. Children, medically fragile
and elderly people are more exposed to the risk of burns.
4.4.5.
Water may drip from the water heater, so do not leave valuable items and equipment under the appliance.
4.4.6.
If there Is a possibility that the temperature drops below 0°C in the room where the appliance is installed, drain the water
from the water heater.
4.4.7.
Water heater installation and plug in are performed at customer’s own cost.
4.4.8.
Heat insulation marks on the outer casing of the item are a technological feature of the production process and are noi
considered as a defect.
4.4.9.
Any repair or maintenance procedures must be performed only after the heater Is disconnected from the power source.
4.4.10.
Any malfunctions must be repaired by professional repair service centers.
4.4.11.
If a malfunction appeared, disconnect the water heater from the power source, shut o cold water supply and contact
service center about it.
4.4.12.
Before making call to the service center, make sure that the problem is not related to water or power outages.
For warranty servicing, please contact the nearest authorized service center.
4.5. Do not:
4.5.1.
Modify the water heater construction.
4.5.2.
Install the vertical models horizontally, and horizontal models vertically.
4.5.3.
Use the water heater for purposes other than that intended.
4.5.4.
Tilt, move and turn water heater during operation.
4.5.5.
Cover or plug the drain hole of the safety valve.
4.5.6.
Connect the water heater to power source when there is no water in it.
4.5.7.
Remove the plastic cover when the appliance Is connected to power source.
4.5.8.
Switch the water heater on if the earthing is faulty or not arranged.
4.5.9.
Use central heating, cold or hot water line as earthing lines.
4.5.10.
UseT-connectors or extenders and adapters to connect the appliance to power source.
4.5.11.
Switch the water heater on in case of heating element or thermostat breakdown.
4.5.12.
Use water heater without pressure regulator with pressure of water line over 5 bar.
4.5.13. Connect the water heater to pipes and ttings not rated for operation at temperature of 80°C at maximum
pressure level.
4.5.14.
Connect the water heater to water line without a safety valve or with a safety valve with lower technical characteristics
than the valve in the delivery set.
4.5.15.
Connect the safety valve tothe hot water outlet of the water heater.
4.5.16.
Install the appliance in non-ventilated rooms with high humidity level.
4.5.17.
Operate the water heater at ambient temperatures below zero.
4.5.18.
Expose the appliance to direct sunlight.
Data and specications are subject to modication. The manufacturer preserves the right to make any
necessary changes without prior notice or replacement.
This product conrms to EU Directive 2002/96/EC-EU 2002/95/EC.
The’crossed-out wheeled bin’ symbol indicates that in accordance with the regulations of the applicable law this product should
be disposed of separately from normal household waste.
The user is responsible for pro per disposal of equipment thereby promoting environmental protection and ensuring the
reusing and recycling of materials used in product manufacturing.
Certicate n. TC-B.60719
valid from 21/11/2013 until 20/11/2016
Certicate n. TC-B.67604
valid from 28/01/2015 until 27/01/2018
30
Краткая инструкция по монтажу накопительного электроводонагревателя
Кратка iнструкцiя з монтажу накопичувального електроводонагрiвача
Quick manual on the storage water heater installation
Комплектация Supplied itemsКомплектацiя
В комплекте инструкция
и предохранительный клапан
В комплектi iнструкцiя
та запобiжний клапан
Manual and safety valve are included
Рекомендации по установке
Требования к крепежу
Рекомендацiї до установки
Вимоги до крiплення
Installation recommendations
Requirements for fasteners
Выбирайте место для установки
L-образный винт
как можно ближе к точке
водоразбора
L-образний гвинт
L-screw
Виберiть мiсце для установки як
найближче до найближче до точки
водорозбору
Choose installation location as close
as possible to the point of water use
Несущая часть стены
Несуча частина стiни
Supporting part
of the wall
Слой штукатурки
Шар штукатурки
Plaster coat
Схема подключения
Схема пiдключення
Connection diagram
1
Тройник (рекомендуется)
Трiйник (рекомендується)
"T" piece union (recommended)
2
Предохранительный клапан
Запобiжний клапан
Safety valve
1 1
3
Сливной шланг
Зливной шланг
Drain hose
3
2
4
Дренаж в канализацию
Дренаж у каналізацію
4
Draining into the sewer
ХОЛОДНАЯ ВОДА, ХОЛОДНА ВОДА, COLD WATER
ГОРЯЧАЯ ВОДА, ГОРЯЧА ВОДА, HOT WATER
31
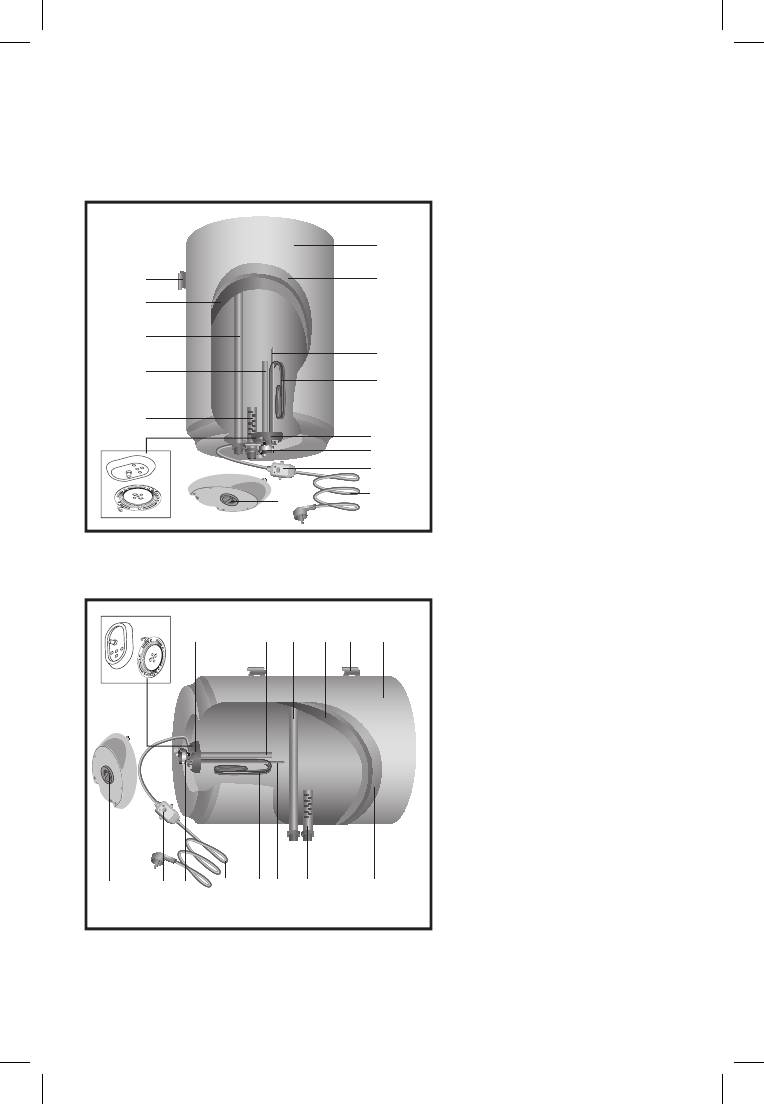
Устройство водонагревателя
Устрiй водонагрiвача
Water heater device
1. Внешний корпус
2. Кронштейн
3. Внутренний бак
1
4. Выход горячей воды
5. Магниевый анод
6. Вход холодной воды
2
7
7. Теплоизоляция
3
8. Гильза термостата
9. Нагревательный элемент
10. Фланец
4
11. Термостат
8
12. УЗО (опционально)
5
13. Кабель питания (опционально)
9
14. Ручка регулирования (опционально)
6
10
11
TEST
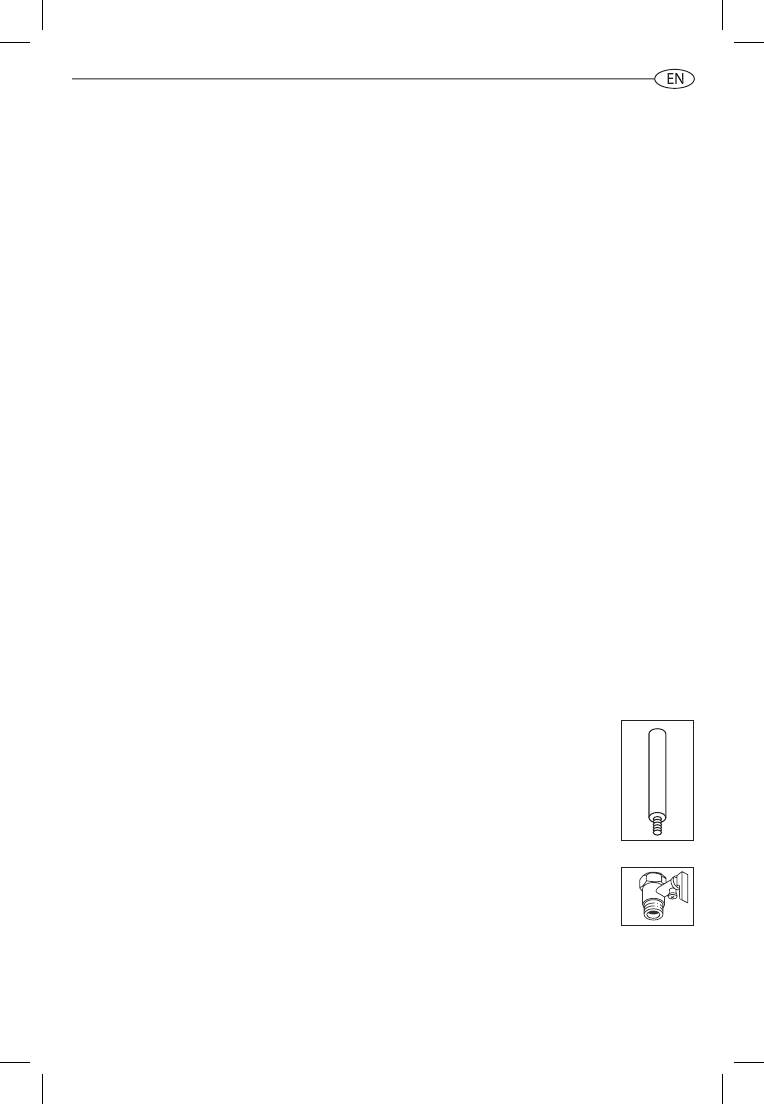
TEST
RES
E
E
T
LIGHT
LIGHT
RES
T
12
1. Зовнішній корпус
2. Кронштейн
13
14
3. Внутрішній бак
4. Вихід гарячої води
5. Магнієвий анод
6. Вхід холодної води
7. Теплоізоляція
8. Гільза термостата
9. Нагрівальний елемент
10. Фланець
11. Термостат
12. ПЗВ (опціонально)
10
23
145
13. Кабель живлення (опціонально)
14. Ручка регулювання (опціонально)
1. Outer housing
2. Bracket
3. Inner tank
4. Hot water outlet
5. Magnesium anode
TEST
TEST
LIGHT
LIGHT
E
RES
RES
E
T
T
6. Cold water inlet
7. Thermal insulation
8. Thermostat shell
9. Heating element
10. Flange
11. Thermostat
12 13
1114
9
6
78
12. RCD (optional)
13. Power supply cable (optional)
14. Кnob (optional)
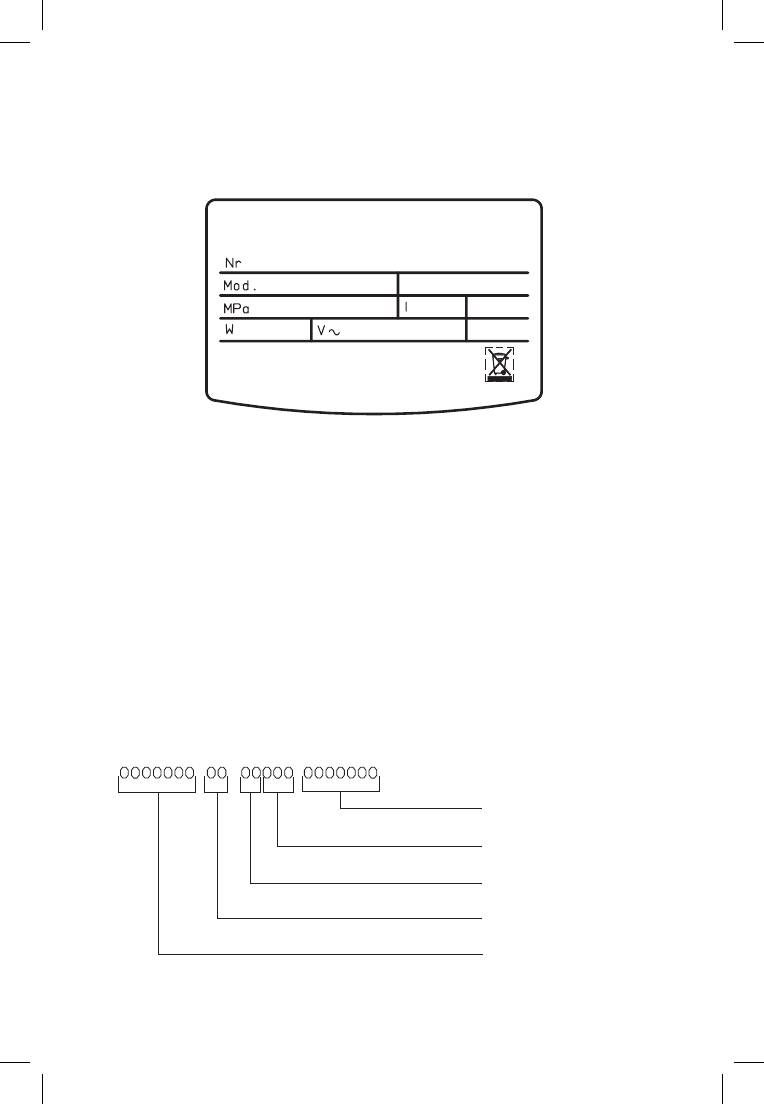
Идентификационная табличка
Iдентифiкацiйна табличка
Data plate
1
2
3 4
5 6
7 8
9
Hz
10
11
1. Торговая марка
1. Торгова марка
1. Brand
2. Серийный номер
2. Серійний номер
2. Serial Number
3. Модель
3. Модель
3. Model
4. Материал бака
4. Матеріал бака
4. Tank material
5. Максимальное давление
5. Максимальний тиск
5. Maximum pressure
6. Объем
6. Обсяг
6. Volume
7. Номинальная мощность
7. Номінальна потужність
7. Rated power
8. Напряжение
8. Напруга
8. Voltage
9. Частота тока
9. Частота струму
9. Current frequency
10. Страна-изготовитель
10. Країна-виробник
10. Country of origin
11. Класс защиты
11. Клас захисту
11. Protection rating
Серийный номер
Серiйний номер
Serial number
порядковый номер
порядковий номер
sequential number
день производства
день виробництва
day of production
год производства
рік виробництва
year of production
код завода
код заводу
code of the plant
код продукта
код продукту
product code
32
Устройство водонагревателя
Устрiй водонагрiвача
Water heater device
1. Внешний корпус
2. Кронштейн
3. Внутренний бак
1
4. Выход горячей воды
5. Магниевый анод
6. Вход холодной воды
7
2
7. Теплоизоляция
3
8. Гильза термостата
9. Нагревательный элемент
10. Фланец
4
11. Термостат
12. УЗО (опционально)
8
5
13. Кабель питания (опционально)
14. Ручка регулирования (опционально)
9
6
10
11
E
TEST
T
E
TEST
T
LIGHT
12
LIGHT
RES
RES
1. Зовнішній корпус
2. Кронштейн
13
3. Внутрішній бак
14
4. Вихід гарячої води
5. Магнієвий анод
6. Вхід холодної води
7. Теплоізоляція
8. Гільза термостата
9. Нагрівальний елемент
10. Фланець
11. Термостат
12. ПЗВ (опціонально)
10
145
23
13. Кабель живлення (опціонально)
14. Ручка регулювання (опціонально)
1. Outer housing
2. Bracket
3. Inner tank
4. Hot water outlet
5. Magnesium anode
TEST
TEST
6. Cold water inlet
L
T
RE
E
IG
T
E
S
RES
IGHT
L
HT
7. Thermal insulation
8. Thermostat shell
9. Heating element
10. Flange
11. Thermostat
12 13
9
6
78
1114
12. RCD (optional)
13. Power supply cable (optional)
14. Кnob (optional)
Идентификационная табличка
Iдентифiкацiйна табличка
Data plate
1
2
3 4
5 6
7 8
9
Hz
10
11
1. Торговая марка
1. Торгова марка
1. Brand
2. Серийный номер
2. Серійний номер
2. Serial Number
3. Модель
3. Модель
3. Model
4. Материал бака
4. Матеріал бака
4. Tank material
5. Максимальное давление
5. Максимальний тиск
5. Maximum pressure
6. Объем
6. Обсяг
6. Volume
7. Номинальная мощность
7. Номінальна потужність
7. Rated power
8. Напряжение
8. Напруга
8. Voltage
9. Частота тока
9. Частота струму
9. Current frequency
10. Страна-изготовитель
10. Країна-виробник
10. Country of origin
11. Класс защиты
11. Клас захисту
11. Protection rating
Серийный номер
Серiйний номер
Serial number
порядковый номер
порядковий номер
sequential number
день производства
день виробництва
day of production
год производства
рік виробництва
year of production
код завода
код заводу
code of the plant
код продукта
код продукту
product code
33
Схема установки
Installation scheme
ø
Модели для
вертикального монтажа
Моделi для
вертикального монтажу
Vertical models
Модели для
горизонтального монтажа
ø
Моделi для
горизонтального монтажу
Horizontal models
Размеры
Розміри
Dimensions
D
B
C
D
B
A
C
MOD. A B C D E F L M X Y Z T
Ø
30 V 588 145 - - 96,5 310 - - 100 383 - G1/2”
40 V 719 U5 - - 96,5 310 - - 100 383 - G1/2”
50 V 837 145 - - 96,5 310 - - 100 383 - G1/2”
65 V 981 145 - - 96,5 310 - - 100 383 - G1/2”
80 V 1178 145 - - 96.5 310 - - 100 383 - G1/2”
353
30 V 588 64,5 141 242 - 310 - - 100 383 196,5 G1/2”
40 Н 719 64,5 141 373 - 310 - - 100 383 196,5 G1/2”
50 H 837 64,5 141 491 - 310 - - 100 383 196.5 G1/2”
65 H 981 64,5 141 635 - 310 - - 100 383 196,5 G1/2”
80 Н 1178 64,5 141 832 - 310 - - 100 383 196,5 G1/2”
50 V 553 163 - - 165 310 - - 100 480 - G1/2”
65 V 666 163 141 635 165 310 - - 100 480 - G1/2”
80 V 758 163 - - 165 310 - - 100 480 - G1/2”
100 V 913 166 - - 165 310 - - 100 480 - G1/2”
120 V 1108 166 - - 165 310 - - 100 480 - G1/2”
150 V 1338 164 - 944 165 310 - - 100 480 - G1/2”
450
80 Т 758 163 - - 165 310 350 363 100 480 245 G1/2”
100 Т 913 166 - - 165 310 350 363 100 480 245 G1/2”
50 Н 553 113 159 160 _ 310 - - 100 480 245 G1/2”
80 Н 758 113 174 335 - 310 - - 100 480 245 G1/2”
100 Н 913 113 177 487 - 310 - - 100 480 245 G1/2”
120 Н 1108 113 177 682 - 310 - - 100 480 245 G1/2”
34
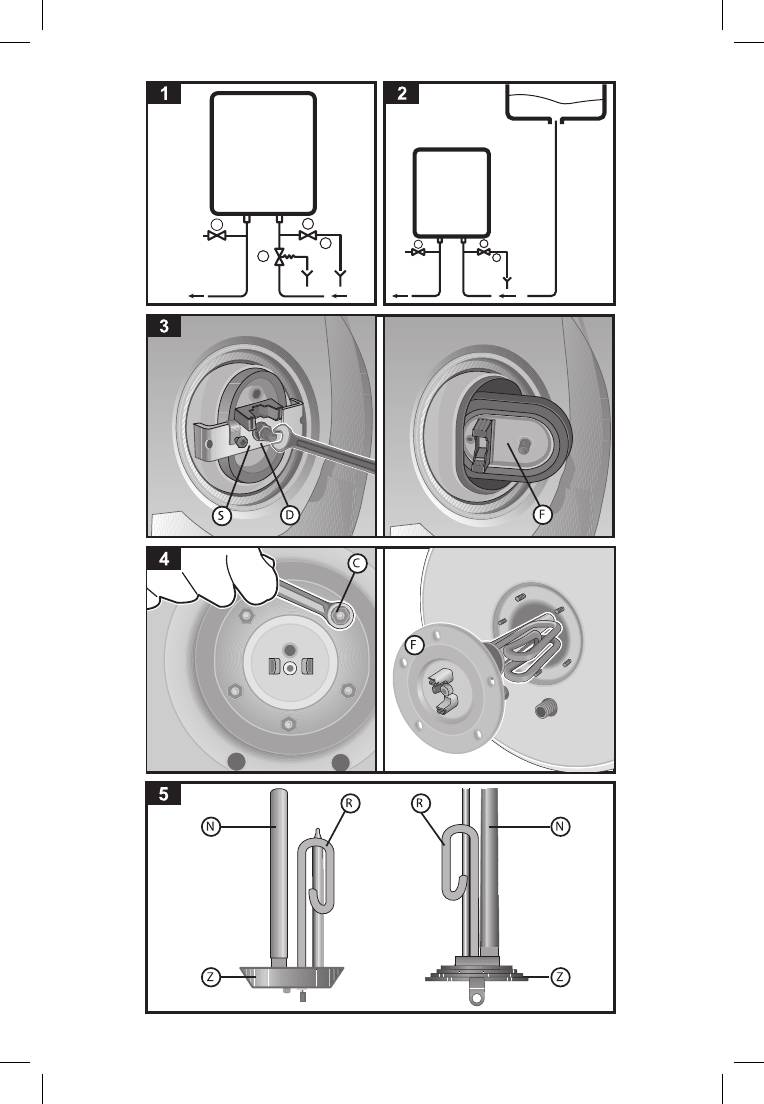
Схема установки
Installation scheme
ø
Модели для
вертикального монтажа
Моделi для
вертикального монтажу
Vertical models
Модели для
горизонтального монтажа
ø
Моделi для
горизонтального монтажу
Horizontal models
Размеры
Розміри
Dimensions
D
B
C
D
B
A
C
35
Для заметок / Notes
ООО «Аристон Термо Русь»
Россия, 188676, Ленинградская область,
Всеволожский район, г. Всеволожск,
Производственная зона г. Всеволожска,
ул. Индустриальная, д. № 9, лит. А
Тел. + 7 (812) 332 81 00
Горячая линия Аристон +7 (495) 777 33 00
e-mail: service.ru@aristonthermo.com
www.ariston.com/ru
ТОВ "АРІСТОН ТЕРМО УКРАЇНА"
Україна, 03680, Київ,
вул. Боженко, 86Е, корп.6
Тел. +380 44 496 25 18
е-mail: info.ua@aristonthermo.com
www.ariston.com/ua
Ariston Thermo SpA
Viale A. Merloni, 45
60044 Fabriano (AN)
Tel. 0732.6011
Telefax 0732.602331
Telex 560160
www.aristonthermo.it
info.it@aristontermo.com
420010536603 04/15
Оглавление
- ГАРАНТИЙНЫЙ ТАЛОН
- ГАРАНТИЙНЫЙ ТАЛОН
- ГАРАНТІЙНИЙ ТАЛОН
- ГАРАНТІЙНИЙ ТАЛОН


