Sharp R-770B: OPERATION OF TOUCH CONTROL PANEL
OPERATION OF TOUCH CONTROL PANEL: Sharp R-770B

OPERATION OF TOUCH CONTROL PANEL
The operation of the oven is controlled by pressing the appropriate pads arranged on the surface of the
control panel.
An entry signal tone should be heard each time you press the control panel to make a correct entry.
In addition the oven will beep for approximately 2 seconds at the end of the cooking cycle, or 4 times when
a cooking procedure is required.
Control Panel Display
JCN
FDBNM
TURNOVER ADD STAND
COVER STIR DEFROST HELP
Indicator
1
%
2
KG PCS
AUTO
COOK
3
ru in. fdnj
ghbujnjd
1. TOP HEATER SYMBOL
The symbol will light when the top heater is in use.
2. BOTTOM HEATER SYMBOL
The symbol will light when the bottom heater is in use.
3. MICROWAVE SYMBOL
The symbol will light during microwave cooking.
E – 4

Touch Control Panel Layout
AUTO COOK PAD
PIZZA PAD
Press to select 4 popular
Press to select 3 pizza
menus.
menus.
AUTO GRILL PAD
CRISPY SNACK PAD
Press to select 5 popular
Press to select 5 popular
grill menus.
snack menus.
AUTO COOK
RICE COOK PAD
REHEAT PAD
Press to cook rice, con-
Press to reheat dish,
gee or porridge.
soup, beverage or bread.
Grilled Chicken
Potato Skin
MORE(
), LESS( )
STEAM MENU PAD
PADS
Grilled Lobster
Garlic Bread
Press to steam fish, meat
Press to adjust the done-
Grilled Fish
Chicken
Wings
or dumpling.
ness of food in one minute
Steak
Salty Peanuts
increments during cook-
Fish Cake
Convenient Food
ing or to increase/de-
HELP PAD
crease the time whilst pro-
Press to select auto start,
gramming the automatic
child lock, language or
operations.
demonstration modes.
REHEAT STEAM MENU
RICE COOK
Press to get cooking in-
formation.
SLOW COOK PAD
Press to cook slowly and
HELP
EASY DEFROST PAD
longer time.
Press to defrost meat by
entering weight.
SLOW COOK
GRILL PAD
Press to select GRILL
POWER LEVEL PAD
GRILL
mode.
Press to select micro-
wave power setting.
If not pressed, HIGH is
NUMBER PADS
12345
automatically selected.
Press to enter cooking
times, clock time, weight
GRILL MIX PAD
or quanity of food.
67890
Press to select GRILL MIX
mode.
STOP/CLEAR PAD
Press to clear during pro-
INSTANT COOK/START
gramming.
PAD
STOP/
Press once to stop oper-
Press once to cook for 1
ation of oven during
minute at HIGH or in-
cooking; Press twice to
crease by 1 minute mul-
cancel cooking pro-
tiples each time this pad
gramme.
is pressed during cook-
ing.
Press to start oven after
CLOCK PAD
setting programs.
Press to set clock time.
E – 5
/
CLEAR
INSTANT COOK/
/
PIZZA
AUTO GRILL
CRISPY SNACK
POWER LEVEL EASY DEFROST
GRILL MIX
START
Before Operating
* This oven is preset with the OPERATION GUIDE in Russian.
To assist you in programming your oven, the operation guide will appear in the display.
In this manual, the display of operation guide is abbreviated.
* You can get operation guide in Russian, English or Malay.
To change the language, see page E-33.
Getting Started
Step
Procedure Pad Order Display
Plug the oven into a power point.
Ensure the oven door is closed.
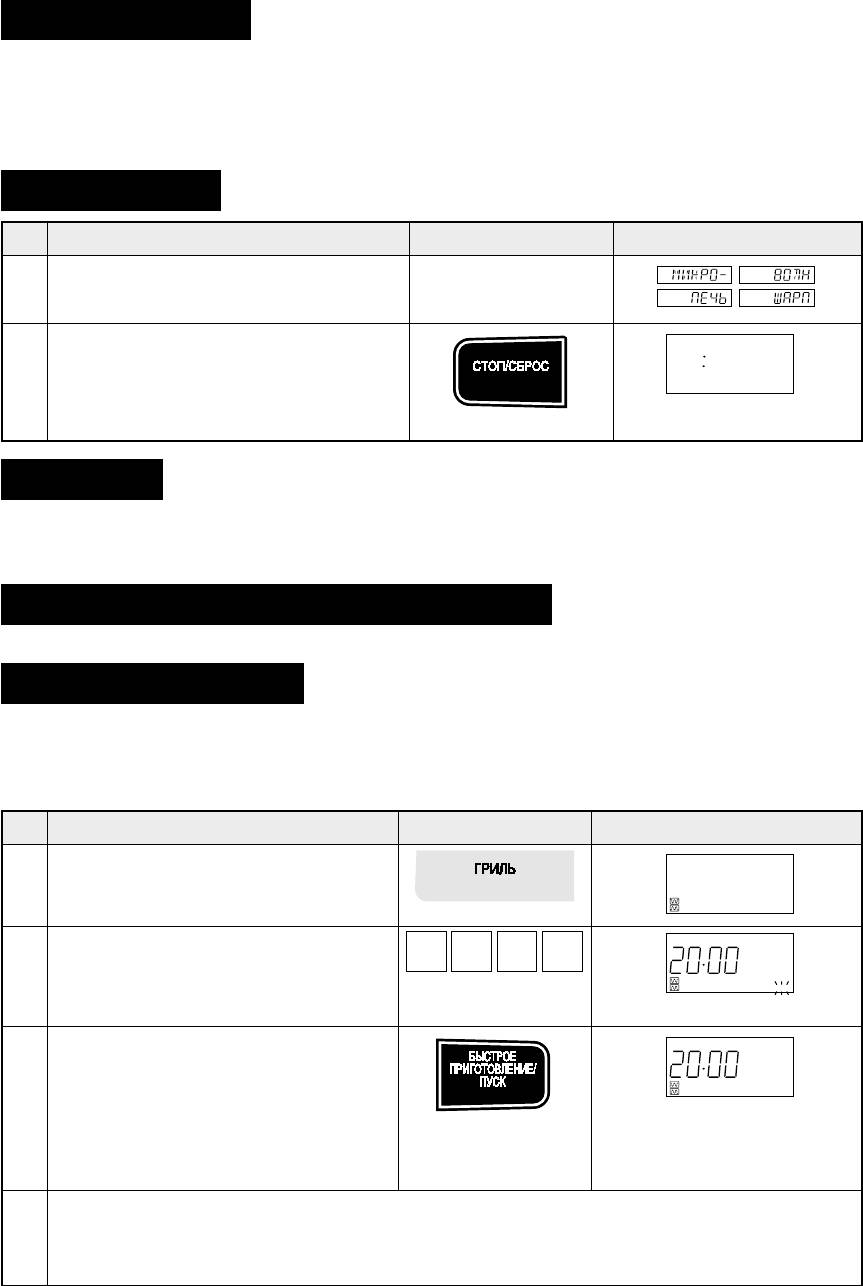
Stop/Clear
Use the STOP/CLEAR pad to:
1. Stop the oven temporarily during cooking.
2. Clear if you make a mistake during programming.
To Cancel a Programme During Cooking
Press the STOP/CLEAR pad twice.
Heating without Food
Some smoke and odor may occur for a while at the beginning of GRILL, GRILL MIX, PIZZA, CRISPY
SNACK or AUTO GRILL mode, but the oven is not out of order.
To remove the cause of the smoke and odor, operate the oven without food for 20 min. on Grill using
top and bottom heaters before the first use and after cleaning.
Step
Procedure Pad Order Display
Ensure that no food is in the oven.
Press the GRILL pad 3 times.
GRILL
x 3
0 002
COOK is flashing.
Press the INSTANT COOK/START pad.
IMPORTANT:
During this operation, some smoke and
INSTANT COOK/
odor will occur. Therefore open the win-
The timer will begin to count
dows or run the ventillation fan in the
down. When it reaches zero,
room.
all indicators will go out and
audible signal will sound.
Open the door to cool the oven cavity.
WARNING:
The oven door, outer cabinet and oven cavity will become hot and pay attention to avoid burn
when cooling the oven.
E – 6
/
1
Press the STOP/CLEAR pad so that the
oven beeps.
STOP/
Only the dots will remain.
1
Enter the heating time (20 min.).
2
COOK
ghbujnjd
START
COOK
ghbujnjd
3
4
/
2
CLEAR

Clock Setting
This is a 12 hour clock.
* To enter the present time of day 11:34 (AM or PM).
Step
Procedure
Pad Order Display
Press the CLOCK pad once.
1
The dots (:) will flash on
and off.
Enter the correct time of day by press-
ing the numbers in sequence.
1 431
2
Press the CLOCK pad again.
3
If you attempt to enter an incorrect clock time (Ex. 13:45),
will appear in the display.
Press the STOP/CLEAR pad and re-enter the time of day (Ex. 1:45).
The clock of the oven works based on the frequency of power source. So it may gain or lose in some area
where the frequency varies. It is recommended that you should adjust the time occasionally.
If you wish to know the time of day during the cooking mode, press the CLOCK pad. As long as your finger
is pressed the CLOCK pad, the time of day will be displayed.
E – 7
Оглавление
- HR
- VTHS GHTLJCNJHJÖZJCNB
- JCJ>ST ERFPFZBY
- BZCNHERWBY GJ ECNFZJDRT
- HF>JNF C CTZCJHZJQ GFZTKM* EGHFDKTZBY
- JCJ>ST ERFPFZBY
- FDNJVFNBXTCRBT JGTHFWBB
- PZ-2
- HTWTGNS LJVFIZTQ GBWWS
- CS-1
- AG-1
- R-1
- S-1
- HTWTGNS LKY >K*L ZF GFHE HTWTGNS LKY >K*L ZF GFHE HTWTGNS LKY >K*L ZF GFHE HTWTGNS LKY >K*L ZF GFHE HTWTGNS LKY >K*L ZF GFHE
- AC-1
- LHEUBT ELJ>ZST AEZRWBB
- EÜJL PF GTXM*
- GTHTL NTV RFR DSPDFNM VFCNTHF
- WARNING
- SPECIAL NOTES
- INSTALLATION INSTRUCTIONS
- OPERATION OF TOUCH CONTROL PANEL
- MANUAL OPERATIONS
- AUTOMATIC OPERATIONS
- HOMEMADE PIZZA RECIPES
- R-1
- S-1
- STEAM MENU RECIPES (Meat)
- OTHER CONVENIENT FEATURES
- CARE AND CLEANING
- SERVICE CALL CHECK


