Sharp R-770B: MANUAL OPERATIONS
MANUAL OPERATIONS: Sharp R-770B

MANUAL OPERATIONS
Microwave Cooking Techniques
Arrange food carefully
Place thickest areas toward outside of dish.
Cook for the shortest amount of time indicated and add more time
Watch cooking time
as needed.
Food severely overcooked can smoke or ignite.
Check recipe for suggestions: paper towels, microwave plastic
wrap or a lid.
Cover foods before cooking
Covers prevent spattering and help foods to cook evenly.
(Helps keep oven clean)
Use small pieces of aluminium foil to cover thin areas of meat or
Shield foods
poultry in order to avoid overcooking.
From outside to center of dish once or twice during cooking, if
Stir foods
possible.
Foods such as chicken, hamburgers or steaks should be turned
Turn foods
over once during cooking.
Like meatballs halfway through cooking both from top to bottom
Rearrange foods
and from the center of the dish to the outside.
After cooking ensure adequate standing time.
Remove food from oven and stir if possible.
Allow standing time
Cover during standing time can allow the food to finish cooking
completely.
Look for signs indicating that cooking temperature has been
reached. Doneness signs include:
– Steam emits throughout the food, not just at edge;
– Joints of poultry can be torn apart easily;
Check for doneness
– Pork and poultry show no pinkness;
– Fish is opaque and flakes easily with a fork.
A normal part of microwave cooking. The humidity and moisture
in food will influence the amount of moisture in the oven. Gener-
Condensation
ally, covered foods will not cause as much condensation as
uncovered foods. Ensure that the ventilation openings are not
blocked.
Microwave safe plastic wrap
For cooking food with high fat content, do not bring the wrap in
contact with the food as it may melt.
Microwave safe plastic
Some microwave safe plastic cookware are not suitable for cook-
cookware
ing foods with high fat and sugar content.
E – 8

Microwave Time Cooking
This is a manual cooking feature, first enter the cooking time then the power level.
You can programme up to 99 minutes, 99 seconds. There are five different power levels.
Power level
–
–
–
–
–
–
–
–
–
–
–
–
–
LOW HIGHMEDIUM
–
M•LOW M•HIGH
–
–
–
–
–
–
–
–
–
–
–
–
–
–
–
–
Approximate percentage
–
–
–
–
–
–
–
–
–
–
of microwave power
–
10% 30% 50% 70% 100%
–
–
–
–
–
Examples of foods typi-
Keeping food
–
Defrost
–
Fruit
–
–
cally cooked on micro-
warm
–
Softening
–
Vegetable
–
–
wave oven power level
–
butter
–
Rice/Pasta
–
–
–
–
This variable cooking control allows you to select the rate of microwave cooking.
If a power level is not selected, then HIGH power is automatically used.
*Suppose you want to time cook for 10 minutes on HIGH power.
Step
Procedure Pad Order Display
Enter desired cooking time.
0 001
COOK will flash on and off.
Press the INSTANT COOK/START pad.
INSTANT COOK/
The timer begins to count
down.
To lower the power press the POWER LEVEL pad once. Note the display will indicate “100%”. To lower
to “70%” press the POWER LEVEL pad again. Repeat as necessary to select “50%”, “30%” or “10%”
power levels.
* Suppose you want to cook Fish Fillets for 10 minutes on MEDIUM power.
Step
Procedure Pad Order Display
Select power level by pressing the POW-
ER LEVEL pad as required (for MEDIUM
press three times).
2
Press the INSTANT COOK/START pad.
3
The timer begins to count
down.
If the door is opened during cooking process, the cooking time in the readout automatically stops. The
cooking time starts to count down again when the door is closed and the INSTANT COOK/START pad
is pressed.
If you want to check the power level during the cooking, press POWER LEVEL pad.
As long as your finger is pressing the POWER LEVEL pad, the power level will be displayed.
E – 9
/
START
INSTANT COOK/
/
–
–
Cakes
–
–
–
Casseroles
–
Muffins
–
–
–
–
Slices
–
–
–
–
–
–
–
–
–
–
–
–
–
–
–
–
–
–
–
–
–
–
–
–
Seafood
–
1
COOK
ghbujnjd
COOK
2
ghbujnjd
1
START
COOK
ghbujnjd
POWER LEVEL
%
x 3
Enter desired cooking time.
0 001
COOK
ghbujnjd
COOK will flash on and off.

Sequence Cooking
Your oven can be programmed for up to 4 automatic cooking sequences, switching from one variable
power setting to another automatically.
Note that POWER LEVEL must be entered first when programming sequence cooking.
* Suppose you want to cook for 10 minutes on MEDIUM followed by 5 minutes on HIGH.
Step
Procedure Pad Order Display
Select desired power level by pressing
the POWER LEVEL pad (for MEDIUM press
1
three times).
Enter desired cooking time.
0 001
2
For second sequence, select microwave
cooking and power level (for HIGH press
3
the POWER LEVEL pad once).
Enter desired cooking time.
5 00
4
COOK will flash on and off.
The timer begins to count
down to zero. When it
reaches zero,
5
the second sequence will
appear and the timer will
begin counting down to
zero again.
Instant Cook™
For your convenience Sharp’s Instant Cook allows you to easily cook for one minute on HIGH power.
Step
Procedure Pad Order Display
Press the INSTANT COOK/START pad.
Within one minute of closing the door.
1
The timer begins to count
down.
Press the INSTANT COOK/ START pad until desired time is displayed.
Each time the pad is pressed, the cooking time is increased by 1 minute.
E – 10
POWER LEVEL
POWER LEVEL
INSTANT COOK/
/
START
INSTANT COOK/
/
%
x 3
COOK
ghbujnjd
COOK will flash on and off.
%
x 1
COOK
ghbujnjd
Press the INSTANT COOK/START pad.
COOK
ghbujnjd
COOK
ghbujnjd
START
COOK
ghbujnjd

Slow Cook
The SLOW COOK setting is designed for foods which cook longer time. For example, stewing, braising,
boiling soup or chinese desserts of liquid type. The SLOW COOK setting provides two choices: SLOW
COOK HIGH or SLOW COOK LOW. The maximum cooking time is 2 hours for each choice when cook
manually.
To select SLOW COOK HIGH, press the SLOW COOK pad once.
To select SLOW COOK LOW, press the SLOW COOK pad twice.
* Suppose you want to cook stew chicken on SLOW COOK HIGH for 1 hour 30 min.
Step
Step Procedure Pad Order Displa
Procedure Pad Order Display
SLOW COOK
COOK will flash on and off.
INSTANT COOK/
3
The cooking time will count
down to zero. After cooking an
audible signal will sound. All
indicators will go out. The time
of day will reappear on display.
NOTE 1. If you need to check the food doneness during cooking, you can open the oven door or pressing
the STOP/CLEAR once, then check and stir. After that close the door and touch INSTANT COOK/
START pad to resume cooking.
2. Combination between HIGH and LOW is free until 2 stages. But combination between SLOW
COOK and other features is not possible.
3. You can get a cooking hint whenever HELP is lit in the display. See page E-33.
SPECIAL NOTES ON SLOW COOKING
For better cooking result, always try to:
1. Cut the ingredients into smaller pieces.
2. Add in adequate liquid medium (eg: water, sauce) and try to submerge the ingredients into the liquid medium
in order to avoid scorching. This is especially important when stew or chicken soup is prepared.
1
3. When soup or large quantity is prepared, make sure that the water level is at least 1
/2 inches (3.8cm) from
the rim of casserole, otherwise spill over may result.
4. Do not add too much seasonings or salt at the initial stage of cooking. Try to add (especially salt) soon after
or just after finish.
5. Cook with the casserole lid on. Also please do not open the lid during cooking as this may disturb the cooking
sequence.
6. Stir and stand for 10 minutes after cooking.
E – 11
/
Press the SLOW COOK pad once.
1
x 1
Enter desired cooking time.
HELP
1 03
2
COOK
ghbujnjd
Press the INSTANT COOK/START pad.
HELP
START
COOK
ghbujnjd
Grill Cooking
Your oven has three grill cooking modes. Select the desired grill mode by pressing the GRILL pad.
For the top heater mode, press the GRILL pad once.
For the bottom heater mode, press the GRILL pad twice.
For the top and bottom heaters mode, press the GRILL pad three times.
It is not necessary to preheat for grill cooking.
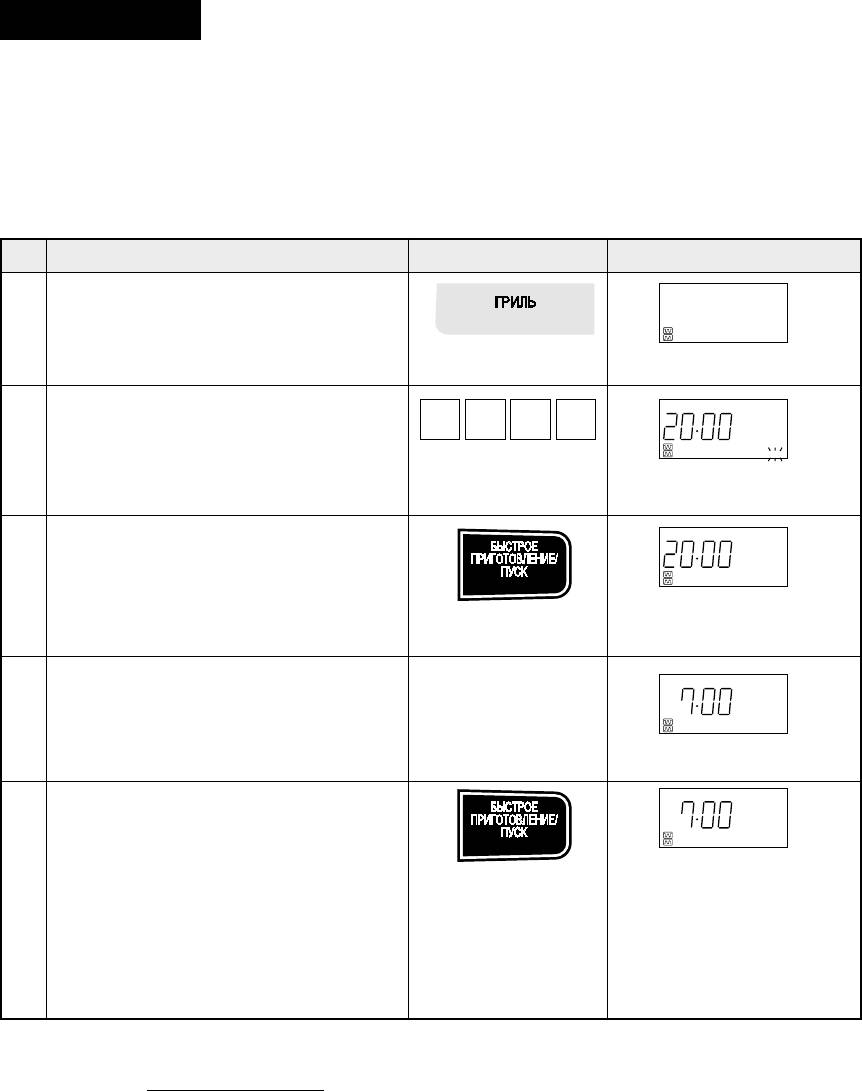
* Suppose you want to cook 1.0 kg of steak for 20 minutes using the top and bottom heaters.
Step
Procedure Pad Order Display
Press the GRILL pad three times.
GRILL
1
x 3
Enter desired cooking time.
0 002
2
COOK will flash on and off.
Press the INSTANT COOK/START pad.
INSTANT COOK/
3
The timer begins to count
down.
When the timer reaches about 2/3 of the
way through the cooking time, open the
door and turn over the steak. And then
4
close the door.
Press the INSTANT COOK/START pad.
The timer begins to count
down again. When it reaches
5
zero, all indicators will go off
and the oven will "beep". The
cooling fan will remain on
until the oven cavity has
cooled.
Warning:
The oven cavity, door, turntable, turntable support, racks, dishes and especially bottom heater will
become very hot, use thick oven gloves when removing the food or turntable from the oven to PREVENT
BURNS.
E – 12
/
COOK
ghbujnjd
START
COOK
ghbujnjd
INSTANT COOK/
COOK
ghbujnjd
/
START
Grill Mix Cooking
Your Grill Microwave Oven has four preprogrammed settings that make it easy to cook with both grill
heaters and microwave.
Select the desired mix setting by pressing the GRILL MIX pad. It is not necessary to preheat for the mix
cooking.
Preset programme
The times
pressing
Microwave
Setting
Grill heater
GRILL MIX pad
power
Grill mix High with Top heater Once 50% Top heater
Grill mix Low with Top heater Twice 10% Top heater
Grill mix High with Bottom heater Three times 50% Bottom heater
Grill mix Low with Bottom heater Four times 10% Bottom heater
* Suppose you want to reheat 4 pieces of pizza (approx. 360g) for 6 minutes on Grill mix Low with Top
heater.
Step
Procedure Pad Order Display
Press the GRILL MIX pad twice.
GRILL MIX
1
x 2
Enter desired cooking time.
6 00
2
COOK will flash on and off.
Press the INSTANT COOK/START pad.
INSTANT COOK/
The timer begins to count down.
3
When it reaches zero, all indica-
tors will go off and the oven will
"beep". The cooling fan will re-
main on until the oven cavity
has cooled.
E – 13
/
COOK
ghbujnjd
START
COOK
ghbujnjd
Warning:
The oven cavity, door, turntable, turntable support, racks, dishes and especially bottom heater will
become very hot, use thick oven gloves when removing the food or turntable from the oven to PREVENT
BURNS.
Оглавление
- HR
- VTHS GHTLJCNJHJÖZJCNB
- JCJ>ST ERFPFZBY
- BZCNHERWBY GJ ECNFZJDRT
- HF>JNF C CTZCJHZJQ GFZTKM* EGHFDKTZBY
- JCJ>ST ERFPFZBY
- FDNJVFNBXTCRBT JGTHFWBB
- PZ-2
- HTWTGNS LJVFIZTQ GBWWS
- CS-1
- AG-1
- R-1
- S-1
- HTWTGNS LKY >K*L ZF GFHE HTWTGNS LKY >K*L ZF GFHE HTWTGNS LKY >K*L ZF GFHE HTWTGNS LKY >K*L ZF GFHE HTWTGNS LKY >K*L ZF GFHE
- AC-1
- LHEUBT ELJ>ZST AEZRWBB
- EÜJL PF GTXM*
- GTHTL NTV RFR DSPDFNM VFCNTHF
- WARNING
- SPECIAL NOTES
- INSTALLATION INSTRUCTIONS
- OPERATION OF TOUCH CONTROL PANEL
- MANUAL OPERATIONS
- AUTOMATIC OPERATIONS
- HOMEMADE PIZZA RECIPES
- R-1
- S-1
- STEAM MENU RECIPES (Meat)
- OTHER CONVENIENT FEATURES
- CARE AND CLEANING
- SERVICE CALL CHECK


