Sony KV-36FS70K – page 2
Manual for Sony KV-36FS70K
Table of contents
19
Using the TV menu system:
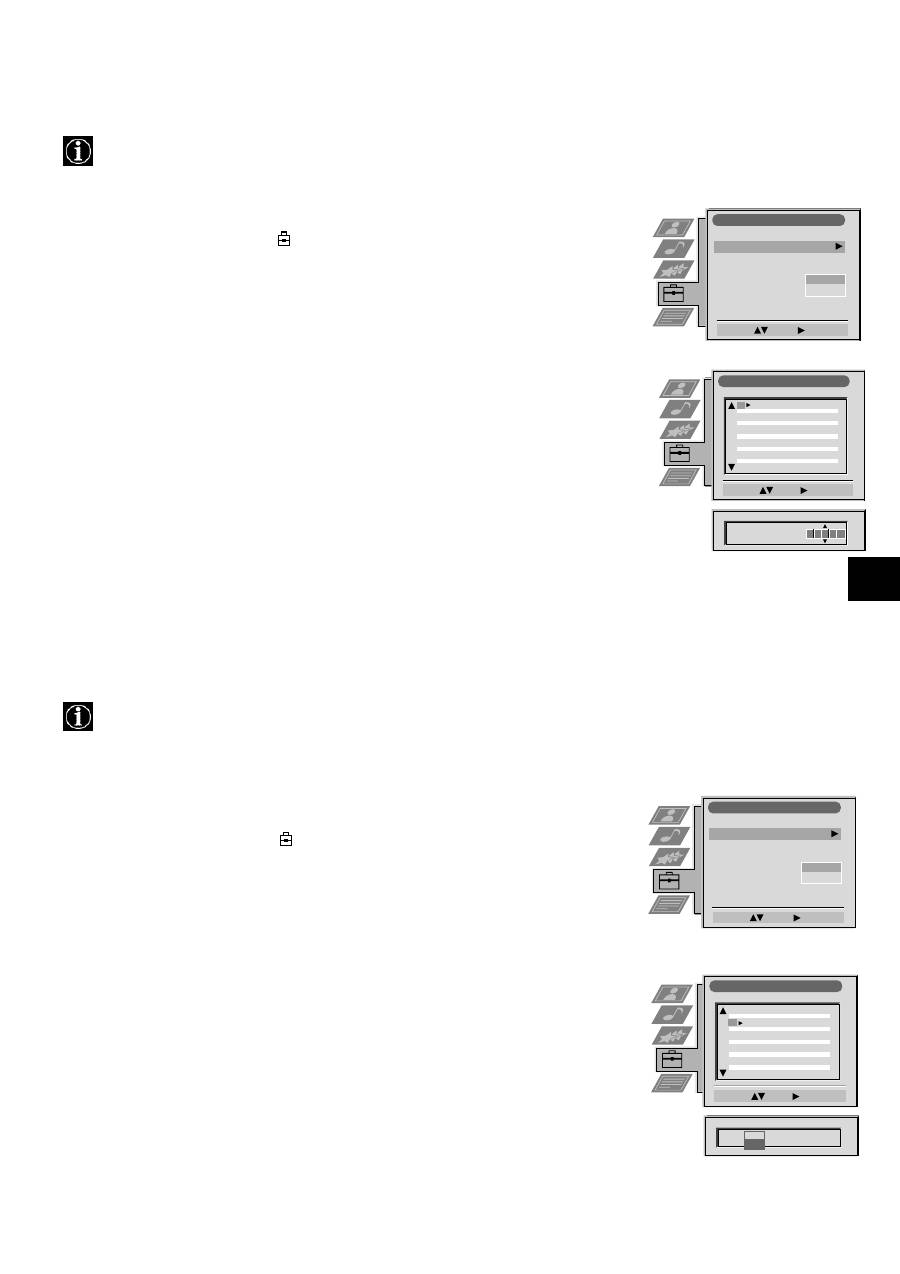
Naming a channel
Names for channels are usually taken automatically from Teletext if available. You can however name a channel or an
input video source using up to five characters (letters or numbers).
Skipping programme positions
This function enables you to skip unused programme positions when selecting them with the PROGR+/- buttons.
However, by using the number buttons you can still select the skipped programme position.
1. Press the MENU button on the remote control to display the menu on the TV screen.
2. Press the
V
button to select the
symbol on the menu screen then press
B
to enter the ‘Set
Up’ menu.
3. Press the
V
button to select ‘Manual Set Up’ then press
B
to enter the ‘Manual Set Up’
menu.
4. Press the
V
button to select ‘Manual Programme Preset’ then press
B
to enter the ‘Manual
Programme Preset’ menu.
5. Press the
v
or
V
buttons to select the channel you wish to name.
6. Press the
B
button repeatedly until the first element of the ‘LABEL’ column is highlighted.
7. Press the
v
or
V
buttons to select a letter or number (select ‘-’ for a blank) then press
B
to
confirm. Select the other four characters in the same way.
8. After selecting all the characters, press the OK button.
9. Repeat steps 5 to 8 if you wish to label other channels.
10. Press the MENU button to remove the menu from the TV screen.
1. Press the MENU button on the remote control to display the menu on the TV screen.
2. Press the
V
button to select the
symbol on the menu screen then press
B
to enter the
‘Set Up’ menu.
3. Press the
V
button to select ‘Manual Set Up’ then press
B
to enter the ‘Manual Set Up’
menu.
4. Press the
V
button to select ‘Manual Programme Preset’ then press
B
to enter the ‘Manual
Programme Preset’ menu.
5. Press the
v
or
V
buttons to select the programme position then press
B
to highlight the
‘SKIP’ column.
6. Press the
v
or
V
buttons to select ‘Off’ or ‘On’ (if you wish to skip this programme
position) then press the OK button to store.
7. Repeat steps 5 and 6 if you wish to skip or unskip further programme positions.
8. Press the MENU button to remove the menu from the TV screen.
Manual Programme Preset
Select:
Enter:
PROG
CH
SYS
SKIP
LABEL
PROG
CH
SYS
SKIP
LABEL
53
I
F189
- - -
Off
On
C09
C10
BBC1
BBC
I
I
Off
Off
Off
Off
Off
Off
Off
Off
Off
Off
Off
51
52
53
54
55
56
57
58
59
60
61
Manual Programme Preset
Select:
Enter:
PROG
CH
SYS
SKIP
LABEL
C09
C10
ARD
BBC
B/G
B/G
Off
Off
Off
Off
Off
Off
Off
Off
Off
Off
Off
1
2
3
4
5
6
7
8
9
10
11
PROG
CH
SYS
Off
SKIP
LABEL
6
I
C07
T E
Manual Set Up
Select:
Enter:
Language/Country
Manual Programme Preset
Further Programme Preset
RGB Set Up
Picture Rotation
Personal ID
Demo
O
- - - - - - -
Manual Set Up
Select:
Enter:
Language/Country
Manual Programme Preset
Further Programme Preset
RGB Set Up
Picture Rotation
Personal ID
Demo
O
- - - - - - -
Manual Set Up
Select:
Enter:
Language/Country
Manual Programme Preset
Further Programme Preset
RGB Set Up
Picture Rotation
Personal ID
Demo
O
- - - - - - -
20
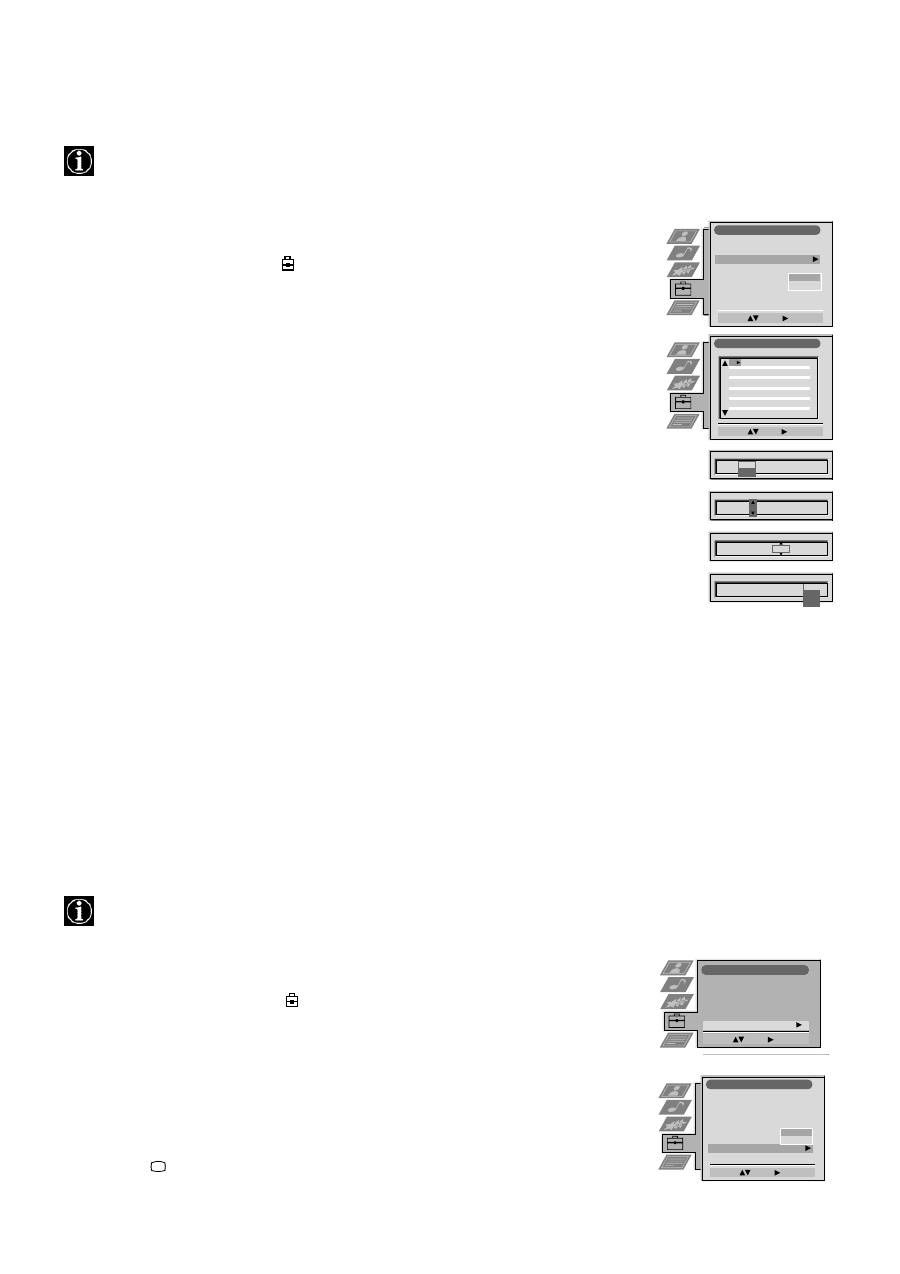
Using the TV menu system:
Using the Further Programme Preset feature
With this feature you can a) adjust the attenuation of each channel, b) individually adjust the volume level of each channel,
c) manually fine-tune the TV to obtain a better picture reception if the picture is distorted or d) preset the AV output for
the programme positions of channels with scrambled signals (eg from a pay TV decoder). In this way a connected VCR
records the unscrambled signal.
Manual Set Up
Select:
Enter:
Language/Country
Manual Programme Preset
Further Programme Preset
RGB Set Up
Picture Rotation
Personal ID
Demo
O
- - - - - - -
Further Programme Preset
Select:
Enter:
PROG
AFT
VOL
DECODER
On
On
On
0
0
0
1
2
3
4
5
6
7
8
9
10
11
PROG
AFT
VOL
ATT
DECODER
1
Off
On
PROG
AFT
VOL
DECODER
1
0
PROG
AFT
VOL
DECODER
1
-5
PROG
AFT
VOL
DECODER
1
-5
On
On
Off
AV1
AV2
ATT
Off
Off
Off
Off
Off
Off
Off
Off
Off
Off
Off
0
0
0
0
0
0
0
0
Off
Off
Off
Off
Off
Off
Off
Off
Off
Off
Off
On
On
On
On
On
On
On
On
1. Press the MENU button on the remote control to display the menu on the TV screen.
2. Press the
V
button to select the
symbol on the menu screen then press
B
to enter the ‘Set
Up’ menu
3. Press the
V
button to select ‘Manual Set Up’ then press
B
to enter the ‘Manual Set Up’ menu.
4. Press the
V
button to select ‘Further Programme Preset’ then press
B
to enter the ‘Further
Programme Preset’ menu.
5. Press the
v
or
V
buttons to select the relevant programme number then press the
B
button
repeatedly to select a) ATT b) VOL c) AFT or d) DECODER. The selected item changes
colour.
6. a)
ATT - RF Attenuator
Press the
v
or
V
buttons to switch attenuator ‘on’ or ‘off’. Press the OK button to confirm the
selection. Repeat steps 5 and 6a if you wish to adjust the attenuation of the other channels.
b)
VOL - Volume Offset
Press the
v
or
V
buttons to adjust the volume level (range -7 to +7) of the channel. Store by
pressing the OK button. Repeat steps 5 and 6b if you wish to adjust the volume level of the
other channels.
c)
AFT - Automatic Fine Tuning
Press the
v
or
V
buttons to fine tune the channel frequency over a range of -15 to +15. Press
the OK button to confirm. Repeat steps 5 and 6c if you wish to fine tune other channels.
d)
DECODER
Press the
v
or
V
buttons to select AV1 or AV2 for the programme position then press the OK
button to confirm. You can now attach a decoder to the AV1 or the AV2 socket on the back
of the TV and the picture from that decoder will appear on this programme number. Repeat
steps 5 and 6d to preset the AV output for other programme positions.
7. Press the MENU button to remove the menu from the TV screen.
Selecting the ‘Demo’ feature
This function provides an overview of some of the features available on the TV.
1. Press the MENU button on the remote control to display the menu on the TV screen.
2. Press the
V
button to select the
symbol on the menu screen then press
B
to enter the
‘Set Up’ menu
3. Press the
V
button to select ‘Manual Set Up’ then press
B
to enter the ‘Manual Set Up’
menu.
4. Press the
V
button to select ‘Demo’ then press
B
to start the demonstration (which lasts for
approximately 5 minutes).
5. Press the
button to remove the demonstration from the TV screen.
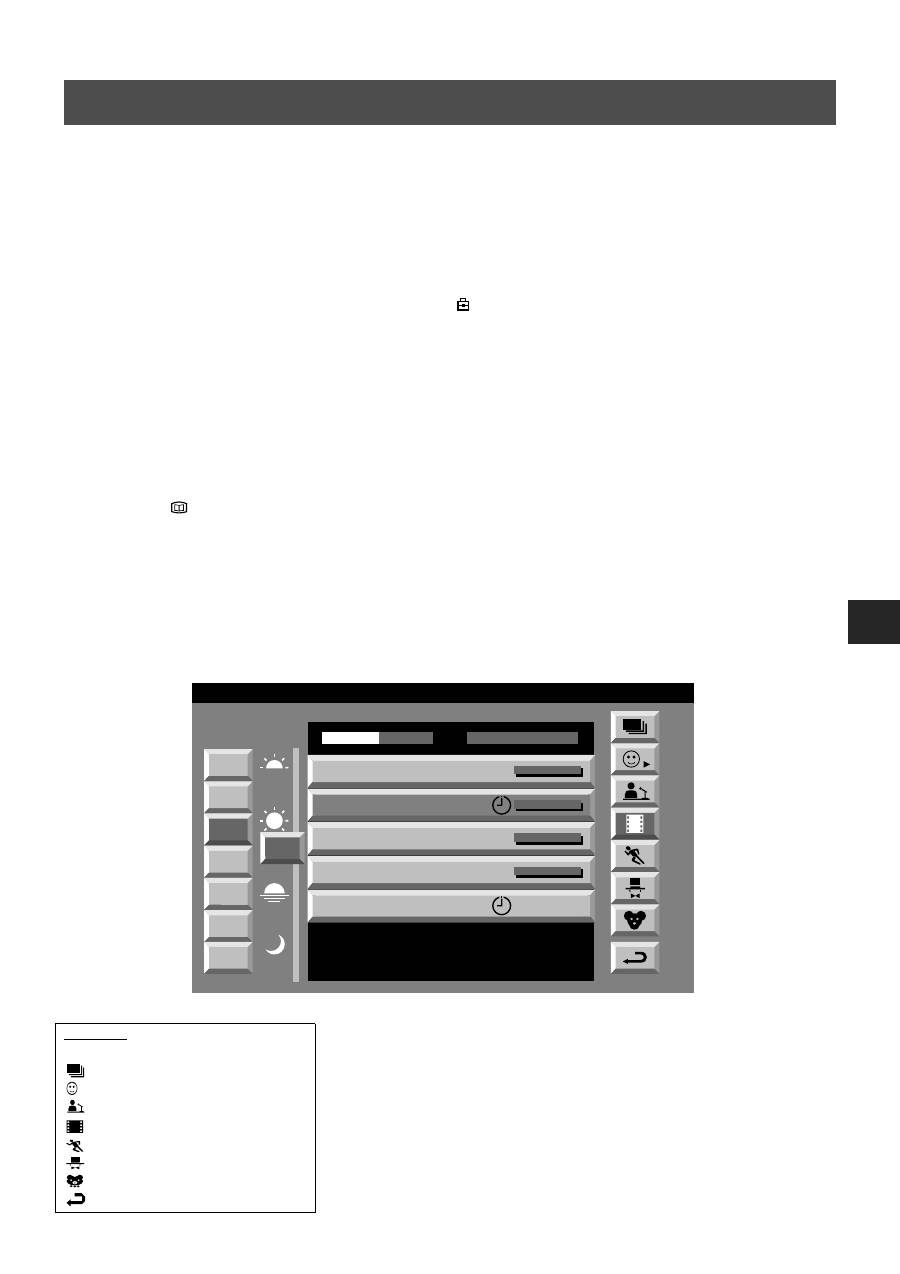
Set Up
Auto Tuning
Programme Sorting
Select Next View
Dolby Surround Set Up
AV Preset
Manual Set Up
Select:
Enter:
Manual Set Up
Select:
Enter:
Language/Country
Manual Programme Preset
Further Programme Preset
RGB Set Up
Picture Rotation
Personal ID
Demo
O
- - - - - - -
21
Using the TV menu system:
Adjusting the picture geometry for an RGB source
When connecting an RGB source such as a Sony playstation you may need to readjust the geometry of the picture.
RGB Set Up
Adjust Size:
Confirm: OK
H Centre
O
H Size
O
RGB Set Up
Adjust Position:
Confirm: OK
H Centre
O
H Size
O
1. Press the
button on the remote control to select the connected RGB source
.
2. Press the MENU button to display the menu on the TV screen.
3. Press the
V
button to select the
symbol on the menu screen then press
B
to enter the ‘Set
Up’ menu
4. Press the
V
button to select ‘Manual Set Up’ on the menu screen then press
B
to enter the
‘Manual Set Up’ menu
5. Press the
V
button to select ‘RGB Set Up’ on the menu screen then press
B
to enter the
‘RGB Set Up’ sub menu.
6. Press
B
to select H Centre then press
v
or
V
to adjust the centre of the picture over a range
of -10 to +10. Store the new range by pressing the OK button.
7. Press
B
to select H Size then press
v
or
V
to adjust the horizontal coordinates over a range
of -10 to +10. Store the new range by pressing the OK button.
8. Press the MENU button to remove the menu from the TV screen.
1
Adjusting the picture rotation
Because of the earth’s magnetism the picture might slant. In this case you can readjust the picture.
1. Press the MENU button on the remote control to display the menu on the TV screen.
2. Press the
V
button to select the
symbol on the menu screen then press
B
to enter the
‘Set Up’ menu
3. Press the
V
button to select ‘Manual Set Up’ then press
B
to enter the ‘Manual Set Up’
menu.
4. Press the
V
button to select ‘Picture Rotation’ then press
B
to enter the ‘Picture Rotation’
sub menu.
5. Press the
v
or
V
buttons to rotate the picture over a range of -5 to +5 then press the OK
button to store.
6. Press the MENU button to remove the menu from the TV screen.
Manual Set Up
Rotate:
Confirm: OK
Language/Country
Manual Programme Preset
Further Programme Preset
RGB Set Up
Picture Rotation
Personal ID
Demo
O
Set Up
Auto Tuning
Programme Sorting
Select Next View
Dolby Surround Set Up
AV Preset
Manual Set Up
Select:
Enter:
22
Using the TV menu system:
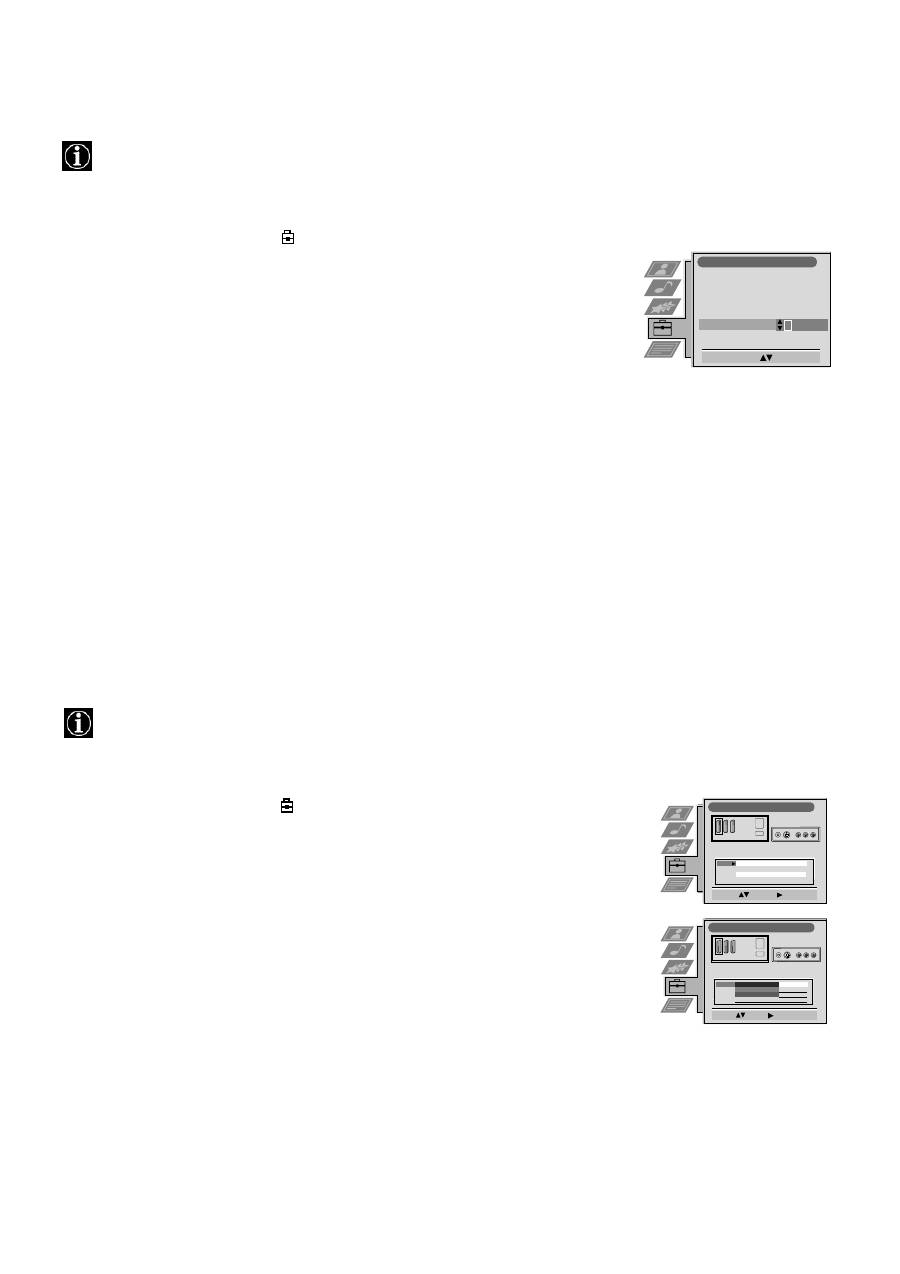
Inputting your personal ID
With this feature, you can allocate a safety code to your TV which will enable you to be traced if the TV is stolen and
recovered. The safety code however can only be input once - please make a note of it!
1. Press the MENU button on the remote control to display the menu on the TV screen.
2. Press the
V
button to select the
symbol on the menu screen then press
B
to enter the
‘Set Up’ menu
3. Press the
V
button to select ‘Manual Set Up’ on the menu screen then press
B
to enter the
‘Manual Set Up’ menu.
4. Press the
V
button to select ‘Personal ID’ on the menu screen then press
B
to enter the
‘Personal ID’ sub menu.
5. Press the
v
or
V
buttons to select the first of a total of 11 characters (letter, number, + or
a blank) then press
B
to go to the next character.
6. Repeat step 5 to input all the characters for the code.
7. Press the OK button to store. A status box appears on screen requesting you to re-enter
your code.
8. Press the OK button to store the code or press
b
to cancel.
9. Press the MENU button to remove the menu from the TV screen.
Presetting and naming input signals
Using this feature, you can automatically format and label input sources.
1. Press the MENU button on the remote control to display the menu on the TV screen.
2. Press the
V
button to select the
symbol on the menu screen then press
B
to enter the ‘Set
Up’ menu
3. Press the
V
button to select ‘AV Preset’ on the menu screen then press
B
to enter the ‘AV
Preset’ menu.
4. Press the
v
or
V
buttons to select the desired AV input (AV1, 2, 3 or 4)..
5. Press the
B
button to select ‘Auto Format’ then press the
v
or
V
buttons to select ‘Off’,
‘Normal’ or ‘Full’.
6. Press the
B
button to select ‘Label’.
7. Press the
v
or
V
buttons to select the first character of the name then press the
B
button to
move to the next character.
8. Repeat step 7 to select the other 4 characters then store by pressing the OK button.
9. Repeat steps 4-8 for the other AV input sources then press the MENU button to remove the
menu from the TV screen.
Manual Set Up
Select A-Z, 0-9:
Confirm: OK
Language/Country
Manual Programme Preset
Further Programme Preset
RGB Set Up
Picture Rotation
Personal ID
Demo
- - - - - -
AV Preset
Select :
Enter:
Input Auto Format Label
AV 1
AV 2
AV 3
AV 4
Full
Off
Normal
Normal
AV 1
AV 2
AV 3
AV 4
AV Preset
Select :
Confirm: OK
Input Auto Format Label
AV 1
AV 2
AV 3
AV 4
Next :
AV 1
AV 2
AV 3
AV 4
Off
Normal
Full
Full
23
D E F
G
R/D/D/D
L/G/S/I
R/D
D/D
L/G
S/I
1
2
DVD
VHS
R/D/D/D
L/G/S/I
R/D
D/D
L/G
S/I
C
-
-
-
s
s
1
1
2
S
2
3
S 3
C
-
-
-
s
s
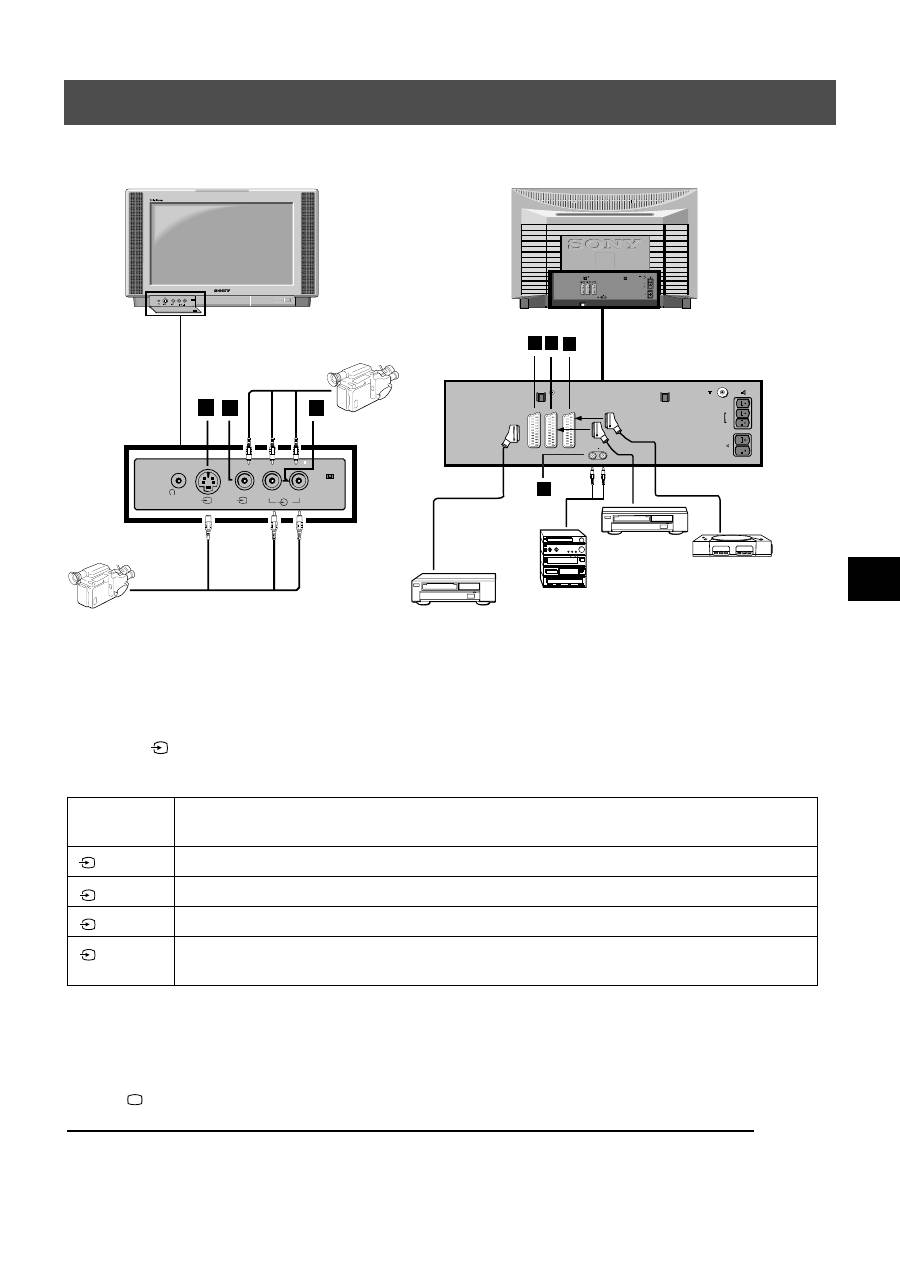
Additional Equipment
Using the illustrations below, you can connect a wide range of audio and video equipment to your TV.
Connecting additional equipment to the TV
In order to get the input signal of a connected equipment on to the TV screen, you need to select the symbol of the connector, to
which you have connected the device.
1. Using the illustrations above, connect your equipment to the appropriate TV socket.
2. Press the
button repeatedly on the remote control until the correct input symbol for your equipment appears on the TV
screen (see table below):
* automatic detection of the signal according to the connected equipment
3. Switch on the connected equipment.
4. Press
to return to the normal TV screen.
Note: To avoid picture distortion, do not connect equipment to the
A
and
B
sockets at the same time.
Symbol on
the TV screen
Input signals from connector
•
Audio/video input signal through scart connector
D
or* RGB through scart connector
D
•
Audio/video input signal through scart connector
E
or* S-video through scart connector
E
•
Audio/video input signal through scart connector
F
or* S-video through scart connector
F
•
S-video input signal through the 4-pin DIN connector
A
or* video input signal through phono jack
B
and audio input signal through phono jacks
C
1
2
3
4
A
B
C
L/G/S/I R/D/D/D
MONO
s
4
4
4
L/G/S/I
R/D/D/D
S
4
4
4

24
Optional Equipment
*
If the picture or sound is distorted, move the VCR away from the TV set.
*
When connecting a monaural VCR, connect only the white jack to both the TV set and the VCR.
*
For information on how to select the output signal of the scart 2
/
, see page 16.
*
When connecting external hi-fi equipment, you can adjust the volume level by adjusting the headphones setting in the
sound menu - please refer to the ‘Adjusting picture and sound’ section of this manual.
Additional information when connecting equipment
2
s
2
Smartlink is a direct link between your TV and VCR.
For Smartlink you need:
*
A VCR which supports Smartlink, NexTView Link, Easy Link or Megalogic.
*
A fully-wired 21-pin scart cable to connect your VCR to scart 2
/
connector.
The features of Smartlink are:
*
Tuning information such as the channel overview are downloaded from the TV set to the VCR.
*
With NexTView you can programme your VCR easily.
*
Direct TV recording : while watching TV you need to press just one button on the VCR to record this programme.
For more information on Smartlink please refer to your VCR instruction manual.
Smartlink
2
s
2
Using the buttons underneath the cover of the remote control you can control other Sony equipment.
1. Open the cover of the remote control.
2. Set the selector VTR 1234 DVD according to the equipment you want to control:
VTR1 Beta VCR
VTR2 8mm VCR
VTR3 VHS VCR
VTR4 Digital Video (DCR-VX 1000/9000E,VHR-1000)
DVD Digital Video Disk
3. Use the buttons on the remote control to operate the equipment.
*
If your equipment has a COMMAND MODE selector, set this selector to the same position as the VTR 1234 DVD
selector on the TV remote control.
*
If the equipment does not have a certain function, the corresponding button on the remote control does not work.
Remote control of other Sony equipment
25
Additional Information
Specifications
TV system
B/G/H, D/K, I, L
Colour system
PAL, SECAM
NTSC 3.58, 4.43 (only Video In)
Channel coverage
See the ‘Channel Display Table’ below.
Picture tube
FD Trinitron WIDE
Approx 91cm (36 inches), 102° deflection
Rear Terminals
/
21-pin Euro connector (CENELEC standard) including audio/
video input, RGB input, TV audio/video output.
/
21-pin Euro connector (CENELEC standard) including audio/
video input, S-video input, Monitor audio/video output.
/
21-pin Euro connector (CENELEC standard) including audio/
video input, S-video input, Monitor audio/video output.
L/G/S/I
RCA connectors, variable output for audio signals
R/D/D/D
External speaker terminals : 2-pin DIN (5)
RF In
Front Terminals
Video input -phono jacks
Audio inputs - phono jacks
S video input - 4 pin DIN
Headphones jack - minijack stereo
1
1
2
s
2
3
s
3
4
4
s
4
Sound output
Left and Right speaker: 2x30W (music power)
2x15W (RMS)
Centre speaker:
1x20W (music power)
1x10W (RMS)
Surround speakers:
2x10W (music power)
2x5W (RMS)
Power consumption
170W
Dimensions (wxhxd)
Approx. 972 x 613.5 x 591 mm
Weight
Approx. 90.0kg
Accessories supplied
RM-892 remote control (1)
IEC designated size AA batteries (2)
Surround speaker (2)
Surround speaker lead (2)
Other features
Flat display Trinitron tube, noise detection, DRC 50Hz
picture, DRC 100Hz picture, PAP, PAT, graphic equaliser,
personal ID, sleep timer, NexTView, Dolby Surround, Digital
Comb Filter, second tuner.
Design and specifications are subject to change
without notice.
Channel Display Table
Receivable Channels
Channel Displays
B/G/H
E2..12, 21..69
C02..C12, C21..69
CABLE TV (1)
S1..S41
S01..S41
CABLE TV (2)
S01..S05
S42..S46
M1..M10
S01..S10
U1..U10
S11..S20
ITALIA
A..H, H1, H2
C13..C20
D/K
R01..R12, R21..R69
C01..C12, C21..C69
S01..S05
S42..S46
L
F2..F10, F21..F69
C01..C12, C21..C69
I
B21..B69
C21..C69
26
Additional Information
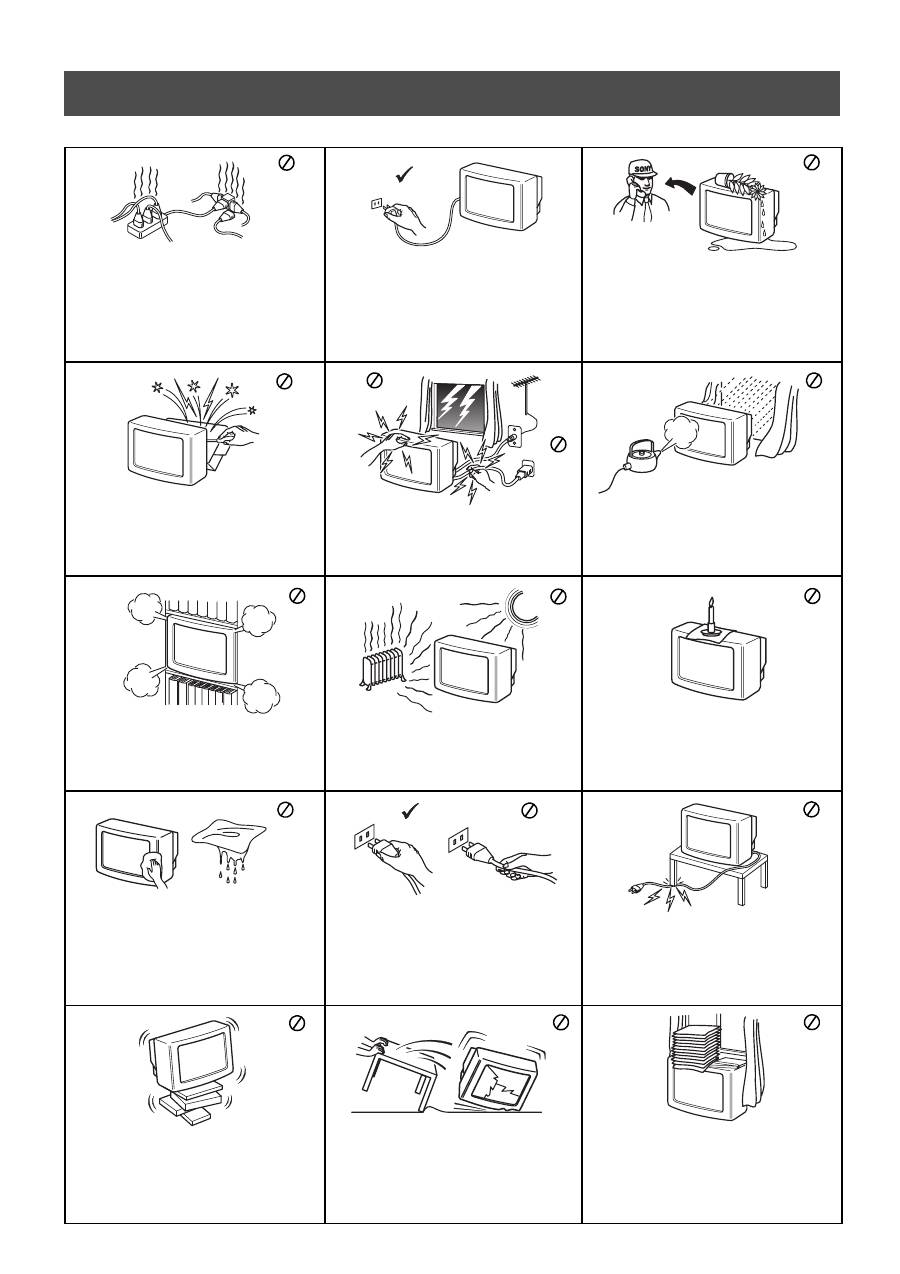
Here are some simple solutions to problems which may affect the picture and sound.
•
If you continue to have problems, have your TV serviced by qualified personnel.
•
NEVER open the casing yourself.
Troubleshooting
Problem
Suggested remedy
No picture (screen is dark), no sound
•
Plug the TV in.
•
Press the
button on the front of the TV.
•
If the
indicator is on press the
button or a numbered
button on the remote control.
•
Check the aerial connection.
•
Turn the TV off for 3 or 4 seconds and then turn it on again
using the
button on the front of the TV.
Poor or no picture (screen is dark), but
good sound.
•
Using the MENU system, select the Picture
Adjustment display. Adjust the brightness, picture and colour
balance levels.
•
From the Picture Adjustment display select RESET to return
to the factory settings.
Good picture, no sound
•
Press the
button on the remote control.
•
If
is displayed on the screen, press the
button on the
remote control.
No colour on colour programmes
•
Using the MENU system, select the Picture Adjustment
display and adjust the colour setting.
•
From the Picture Adjustment display select RESET to return
to the factory settings.
distorted picture when changing
programmes or selecting Teletext
•
Turn off any equipment connected to the scart connectors on
the rear of the TV.
Remote control does not function
•
Replace the batteries.
The standby indicator
on the TV
flashes
•
Contact your nearest Sony service centre.
/

27
Informacje dotyczące bezpieczeństwa
Bezpieczeństwo
Telewizor jest przystosowany do zasilania tylko
napi
ę
ciem przemiennym 220 – 240 V. Nie w
łą
cza
ć
zbyt du
ż
ej liczby urz
ą
dze
ń
do jednego gniazdka
sieciowego grozi to po
ż
arem lub pora
ż
eniem
pr
ą
dem.
Ze wzgl
ę
du na bezpiecze
ń
stwo i ochron
ę
ś
rodowiska naturalnego zaleca si
ę
, aby telewizor,
który nie jest u
ż
ywany, nie pozostawa
ł
w trybie
czuwania, lecz by
ł
wy
łą
czany z sieci.
Nigdy nie wpycha
ć
do telewizora
ż
adnych
przedmiotów. Grozi to po
ż
arem lub pora
ż
eniem
pr
ą
dem. Nigdy nie wylewa
ć
na telewizor
ż
adnych
p
ł
ynów. Je
ś
li do wn
ę
trza telewizora dostanie si
ę
jaki
ś
p
ł
yn lub przedmiot, nie u
ż
ywa
ć
urz
ą
dzenia,
zanim zostanie ono skontrolowane przez
odpowiednio wykwalifikowan
ą
osob
ę
.
Nie otwiera
ć
obudowy ani nie zdejmowa
ć
pokrywy
z ty
ł
u telewizora. Naprawy powierza
ć
tylko
wykwalifikowanym osobom.
Aby unikn
ąć
ryzyka po
ż
aru lub pora
ż
enia pr
ą
dem,
nie wystawia
ć
telewizora na deszcz i chroni
ć
go
przed wilgoci
ą
.
Dla w
ł
asnego bezpiecze
ń
stwa, w czasie burzy nie
dotyka
ć
ż
adnych elementów telewizora, jego
przewodu zasilaj
ą
cego ani przewodu antenowego.
Nie zakrywa
ć
otworów wentylacyjnych na
telewizorze. Dla zapewnienia w
ł
a
ś
ciwej wentylacji,
pozostawi
ć
wokó
ł
telewizora przynajmniej
1
0 cm
wolnego miejsca.
Nigdy nie stawia
ć
telewizora w miejscach
gor
ą
cych, wilgotnych lub nadmiernie zapylonych.
Nie instalowa
ć
telewizora w miejscach, w których
b
ę
dzie on nara
ż
ony na wibracje mechaniczne.
Aby unikn
ąć
po
ż
aru, przechowywa
ć
ł
atwopalne
przedmioty z dala od telewizora i nie zbli
ż
a
ć
si
ę
do
niego z otwartym ogniem (na przyk
ł
ad
ś
wiec
ą
).
Do czyszczenia telewizora u
ż
ywa
ć
mi
ę
kkiej, lekko
zwil
ż
onej
ś
ciereczki. Nie czy
ś
ci
ć
telewizora
benzyn
ą
, rozcie
ń
czalnikiem ani innymi
ś
rodkami
chemicznymi. Nie rysowa
ć
ekranu telewizora. Dla
bezpiecze
ń
stwa, przed czyszczeniem telewizora
wy
łą
czy
ć
go z sieci.
Przy wy
łą
czaniu przewodu zasilaj
ą
cego z gniazdka
sieciowego chwyta
ć
wtyczk
ę
. Nie ci
ą
gn
ąć
samego
przewodu.
Dba
ć
, aby nie stawia
ć
na przewodzie zasilaj
ą
cym
ci
ęż
kich przedmiotów, poniewa
ż
mog
ą
one
uszkodzi
ć
przewód.
Zalecamy nawini
ę
cie nadmiaru przewodu na
zaczepy znajduj
ą
ce si
ę
z ty
ł
u telewizora.
Ustawi
ć
telewizor na bezpiecznej, stabilnej
podstawie. Nie pozwala
ć
, aby wspina
ł
y si
ę
na niego
dzieci. Nie k
ł
a
ść
telewizora na boku ani ekranem
do góry.
Przed przenoszeniem telewizora wy
łą
czy
ć
go z
sieci. Unika
ć
nierównych powierzchni, szybkiego
marszu i u
ż
ywania nadmiernej si
ł
y. Je
ś
li telewizor
zosta
ł
upuszczony lub uszkodzony, natychmiast
zleci
ć
jego kontrol
ę
odpowiednio
wykwalifikowanej osobie z serwisu.
Nie zakrywa
ć
otworów wentylacyjnych na
telewizorze takimi przedmiotami jak zas
ł
ony czy
gazety.
1
Spis Treści
Spis Treści
Instalowanie
1. Sprawdzanie załączonych akcesoriów
2. Wkładanie baterii do pilota
3. Podłączanie telewizora
4. Włączanie telewizora
5. Używanie przycisku sterującego
6. Programowanie telewizora
7. Znajdywanie kanału wideo
2
2
3
5
5
6
6
Obsługa
Przegląd przycisków telewizora
Przegląd przycisków pilota
NexTView
Telegazeta
Posługiwanie się systemem menu telewizora
Regulacja obrazu
Regulacja dźwięku
Ustawienie 'Dolby Surround'
Używanie menu Funkcje
Zmienianie wielkości obrazu
Posługiwanie się trybem Multi PIP
Działanie trybu PAP (Obraz i obraz)
Zamiana pozycji programów
Ręczne programowanie telewizora
Nadawanie nazw programom
Pomijanie pozycji programów
Posługiwanie się menu "Dalsze nastawianie"
Włączanie trybu "Demo"
Regulacja obrotu obrazu
Regulacja geometrii obrazu dla sygnałów RGB
Wprowadzanie identyfikatora osobistego
Ustawianie i nadawanie nazw urządzeniom zewnętrznym
7
8
9
11
13
13
14
15
16
16
17
17
18
18
19
19
20
20
21
21
22
22
Dodatkowy osprzęt
Podłączanie urządzeń dodatkowych
Informacje dodatkowe dotyczące podłączania urządzeń
Smartlink
Zdalne sterowanie innym sprzętem Sony
23
24
24
24
Informacje dodatkowe
Dane techniczne
Tabela programów
Problemy i ich usuwanie
25
25
26
2
Wykonaj czynności 1-7, aby dokonać instalacji telewizora i zacząć oglądać programy. Instalowanie
1. Sprawdzanie załączonych akcesoriów
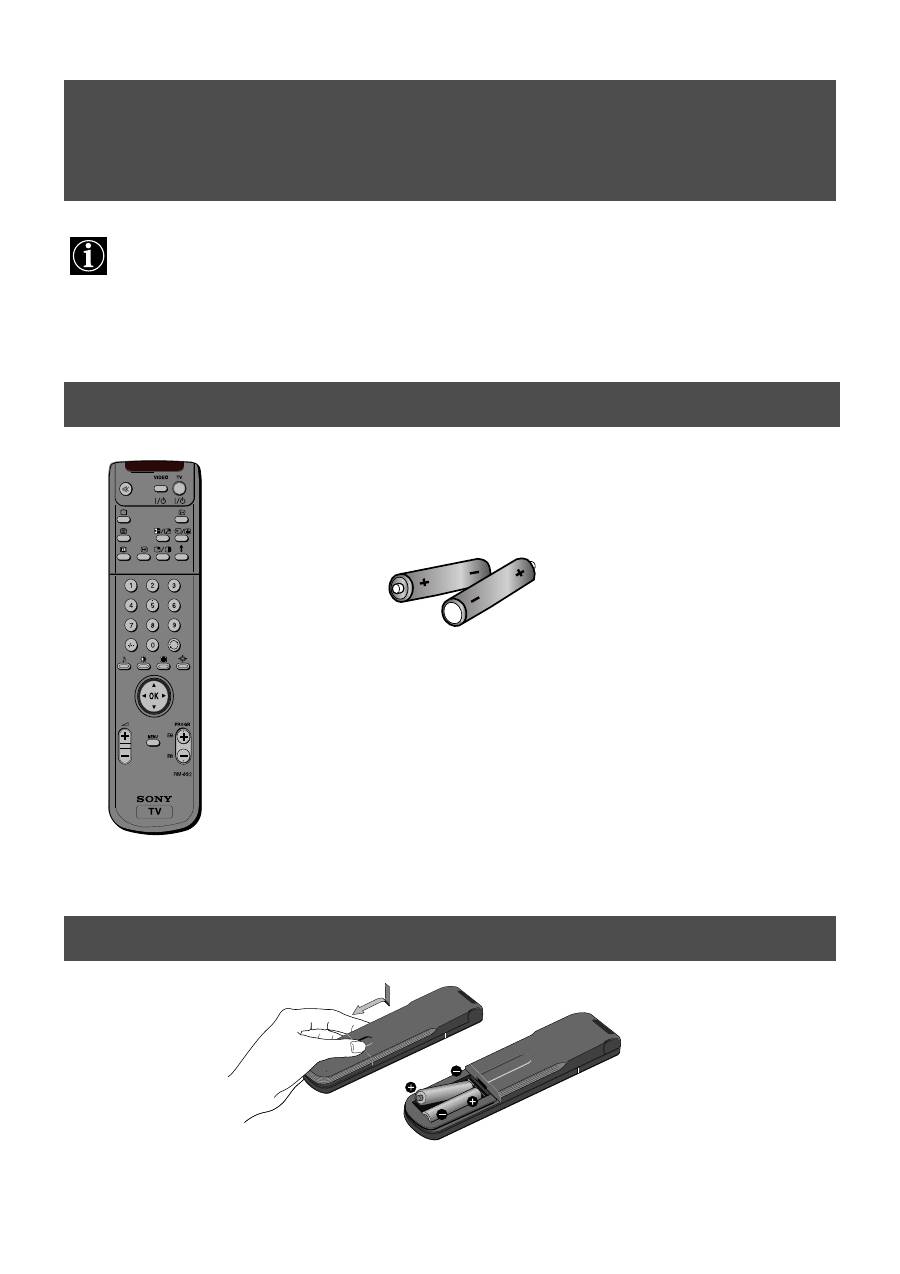
2. Wkładanie baterii do pilota
Pilot
Baterie
Pamiętaj, aby pozbywać się niepotrzebnych baterii w sposób przyjazny dla środowiska.
3
Instalowanie
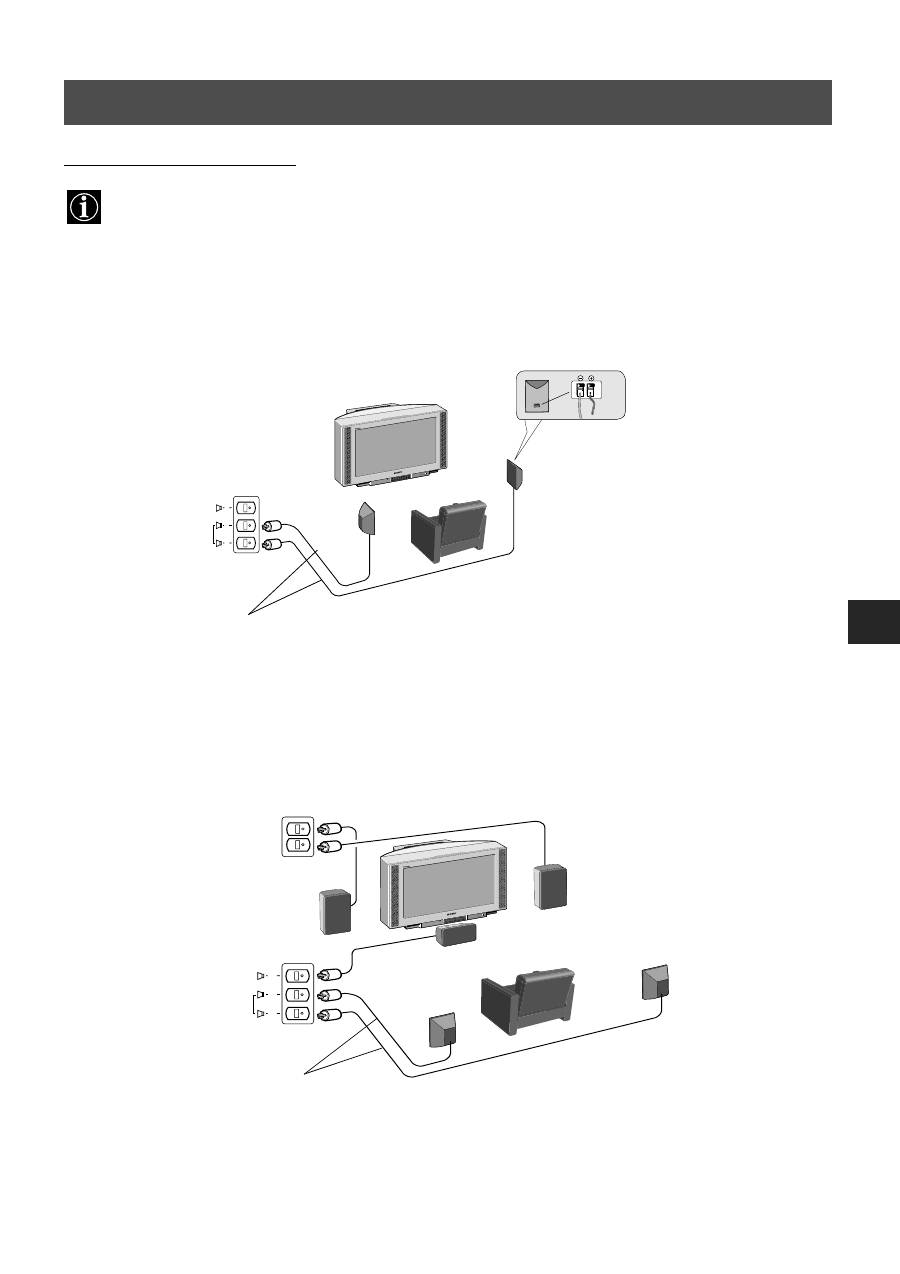
System Dolby* Pro Logic Surround wymaga użycia 5 głośników:
- głośnika centralnego (zainstalowanego w telewizorze), dzięki któremu dialogi itp. zdają się dobiegać z ekranu
telewizora,
- lewego i prawego przedniego głośnika (zainstalowanych w telewizorze), służących do normalnej reprodukcji
audycji stereofonicznych,
- głośników surround, używanych do wytworzenia specjalnych efektów, jakie zapewnia kanał surround.
Podłączanie dostarczonych głośników
Podłączanie własnych głośników
(Upewnij się, że głośniki mają co najmniej 8 omów impedancji i są magnetycznie ekranowane. W przeciwnym wypadku
mogą wystąpić zakłócenia obrazu).
*Wyprodukowano na licencji Dolby Laboratories Licensing Corporation. Dolby, ProLogic oraz podwójne D są
znakami handlowymi Dolby Laboratories Licensing Corporation.
3. Podłączanie telewizora
Podłączanie głośników
S
C
S
R/D/D/D
L/G/S/I
prawy głośnik
lewy głośnik
głośniki surround
S
C
S
głośniki surround

4
R/D/D/D
L/G/S/I
R/D
D/D
L/G
S/I
R/D/D/D
L/G/S/I
R/D
D/D
L/G
S/I
OUT
IN
AC IN
Instalowanie
3. Podłączanie telewizora
Kabel Euro nie jest
wymagany. Jeżeli
jednak zostanie
użyty, to dodatkowe
połączenie może
polepszyć obraz i
dźwięk podczas
odtwarzania.
Jeżeli nie podłączasz
telewizora do
magnetowidu, wówczas
należy podłączyć antenę,
tak jak to pokazano na
ilustracji, po lewej i
przejść do sekcji
"4. Włączanie
telewizora".
Jeżeli natomiast
podłączasz telewizor do
magnetowidu, wówczas
należy przejść do sekcji
znajdującej się poniżej.
(istniejąca antena)
1. Podłącz antenę do magnetowidu, tak jak to pokazano.
2. Połącz gniazdo magnetowidu RF OUT, znajdujące się z tyłu magnetowidu, z
gniazdkiem antenowym telewizora, tak jak to pokazano na rysunku.
3. Podłącz magnetowid do gniazdka sieciowego i włącz go.
4. Włóż nagraną kasetę do magnetowidu i przyciśnij 'PLAY'.
1. Podłącz antenę do gniazda oznaczonego
, znajdującego się z tyłu odbiornika.
(łączówka Euro -
nie ma w wyposażeniu)
Podłączanie anteny do telewizora
Podłączanie anteny i magnetowidu do telewizora
5
Instalowanie
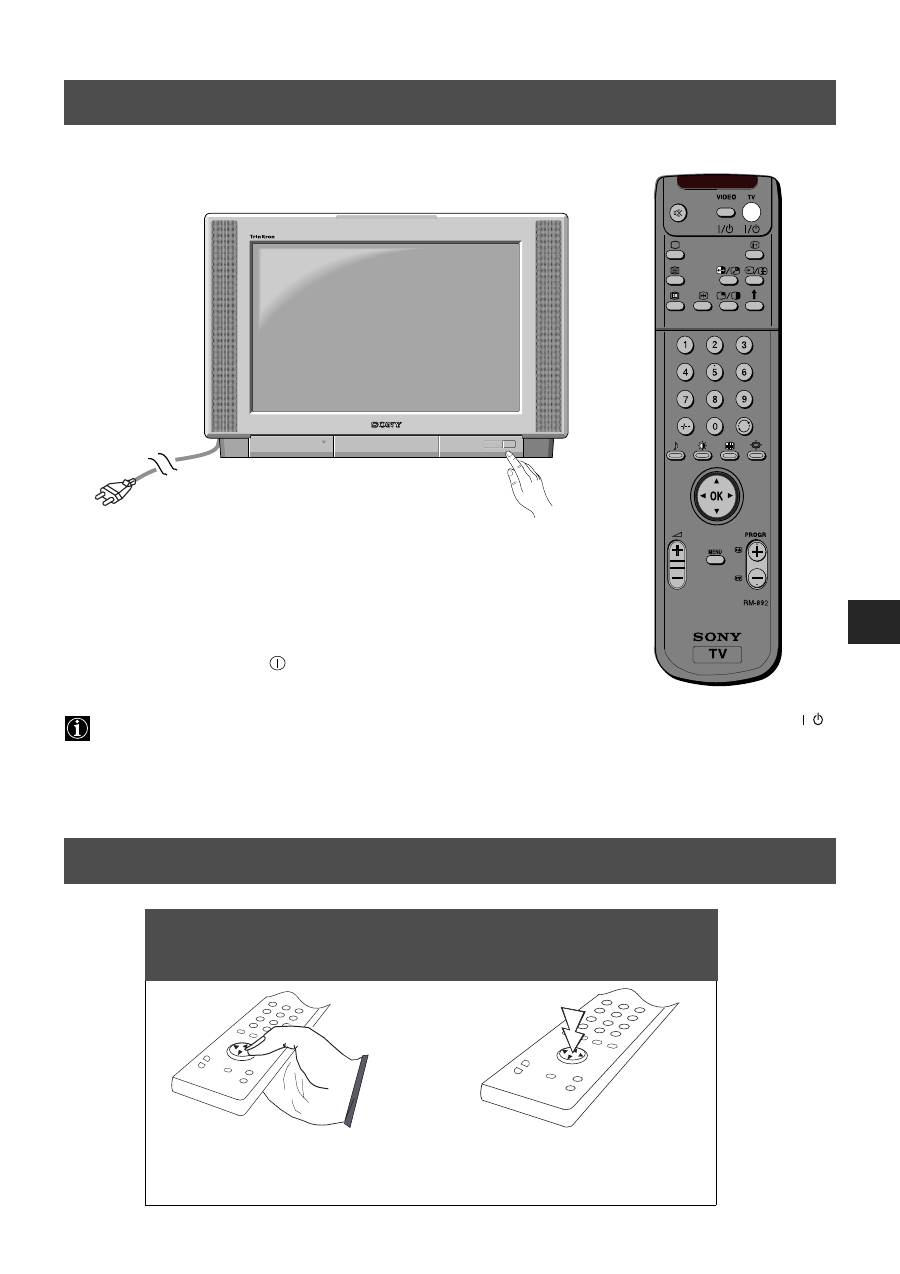
1. Podłącz wtyczkę kabla telewizora do gniazdka zasilania (220-240V AC, 50Hz).
2. Wciśnij wyłącznik zasilania
znajdujący się z przodu telewizora.
Jeżeli świeci się kontrolka trybu czuwania, znajdująca się z przodu telewizora, należy nacisnąć przycisk TV
znajdujący się na pilocie, aby włączyć odbiornik TV. Należy zachować cierpliwość; obraz może pojawić się na
ekranie dopiero po kilku chwilach.
4. Włączanie telewizora
5. Używanie przycisku sterującego
/
Aby wybrać wariant z menu,
przyciśnij środek przycisku
sterującego.
Aby poruszać się po menu,
wciśnij odpowiedni przycisk
kierunku.
Przemieszczanie wskaźnika Przyciskanie
przyciskiem sterującym
przycisku sterującego
6
Instalowanie
Przed przystąpieniem do strojenia telewizora należy wybrać język i kraj.
6. Programowanie telewizora
Language country
Select language:
Confirm:
Language
Country
Türkçe
Suomi
Svenska
Português
Polski
Norsk
Nederlands
Great Britain
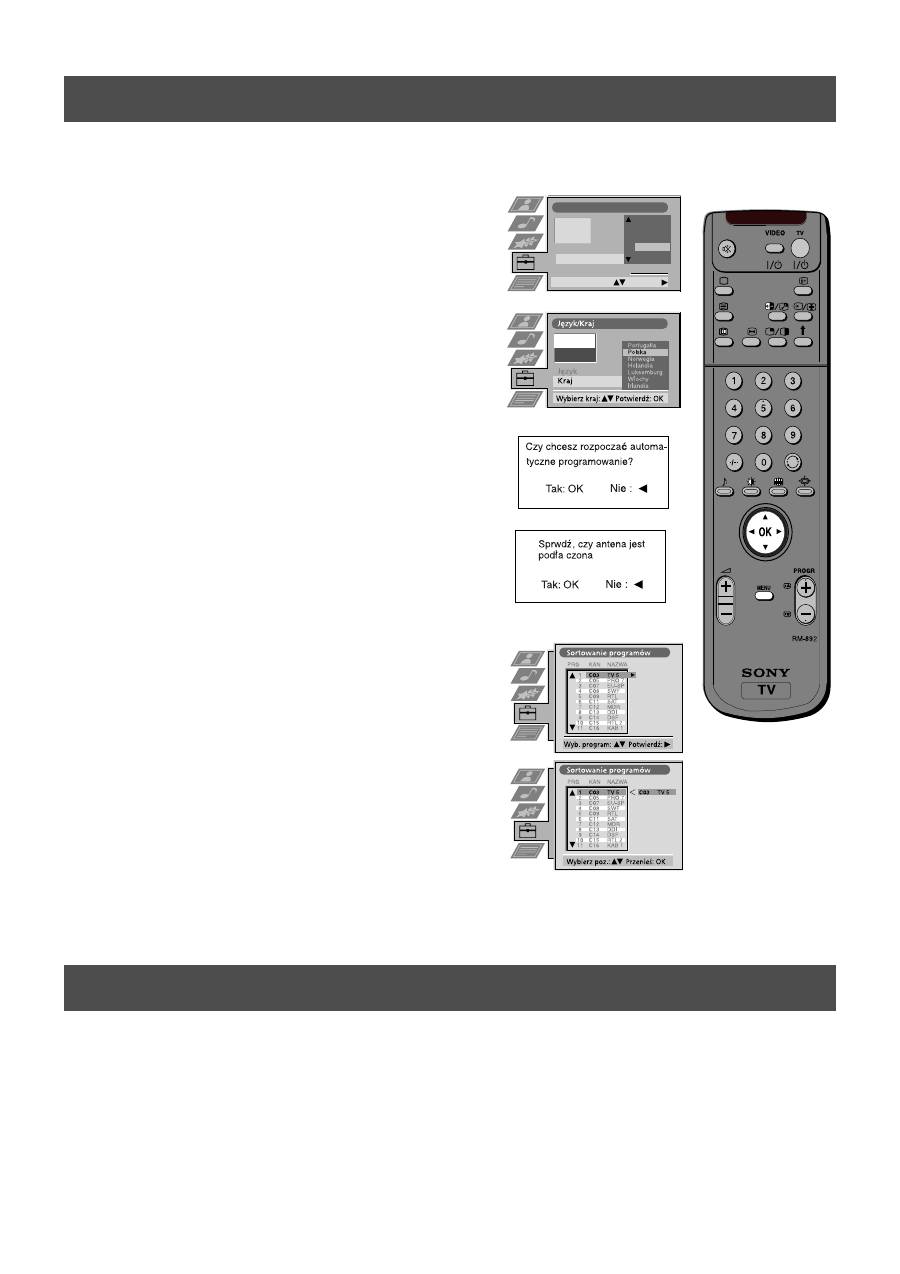
1. Na ekranie pojawia się menu Język/Kraj z podświetlonym
słowem "English".
2.
Przyciskami
v
oraz
V
pilota wybierz język, a następnie
przyciśnij OK, aby zatwierdzić. Pojawia się menu Kraj z
podświetlonym słowem "Wyłączony". Wybierz "Wyłączony",
jeżeli nie chcesz, aby kanały zostały kolejno zaprogramowa-
ne, począwszy od pozycji 1.
3.
Wciśnij
v
lub
V
, aby wybrać kraj, w którym będzie używany
telewizor i przyciśnij OK, aby potwierdzić swój wybór.
4. Pojawia się menu "Automatyczne Strojenie" w wybranym
języku. Przyciśnij OK, aby potwierdzić.
5. Sprawdź, czy antena jest podłączona zgodnie z instrukcjami i
przyciśnij OK, aby zatwierdzić. Telewizor zacznie
automatycznie wyszukiwać i programować dostępne kanały.
Operacja ta może potrwać kilka minut - należy zachować
cierpliwość i nie przyciskać żadnych przycisków.
6.
Po zakończeniu strojenia wszystkich dostępnych kanałów, na
ekranie pojawia się menu "Sortowanie programów", które
pozwala zmienić porządek zaprogramowanych kanałów.
Jeżeli chcesz zmienić kolejność programów, przyciśnij
v
lub
V
, aby wybrać kanał, który chcesz przesunąć, następnie
przyciśnij
B
. Przy pomocy przycisków
v
lub
V
wybierz nową
pozycję dla danego programu i przyciśnij OK, aby
potwierdzić. Wybrany program zostanie przeniesiony w
nowe miejsce, a inne programy zostaną odpowiednio
przesunięte. Powtarzaj tę procedurę, jeżeli chcesz zmienić
kolejność pozostałych programów.
7. Naciśnij przycisk MENU, aby usunąć menu z ekranu
telewizora.
8. Naciskaj PROGR+/- lub numerowane przyciski, aby oglądać
programy telewizyjne.
Uwaga: Aby w dowolnym momencie zatrzymać proces
automatycznego strojenia, naciśnij przycisk OK.
Podłączywszy już magnetowid do telewizora, musisz znaleźć kanał wideo.
1. Naciskaj przyciski PROGR+/-, aż kanał wideo pokaże się na ekranie telewizora.
Uwaga: Jeżeli chcesz zmienić pozycję kanału wideo wśród programów, przejdź do sekcji "Zapamiętywanie
kanałów TV".
7. Znajdywanie kanału wideo
7
+
–
+
–
PROGR
CONTROL
Obsługa
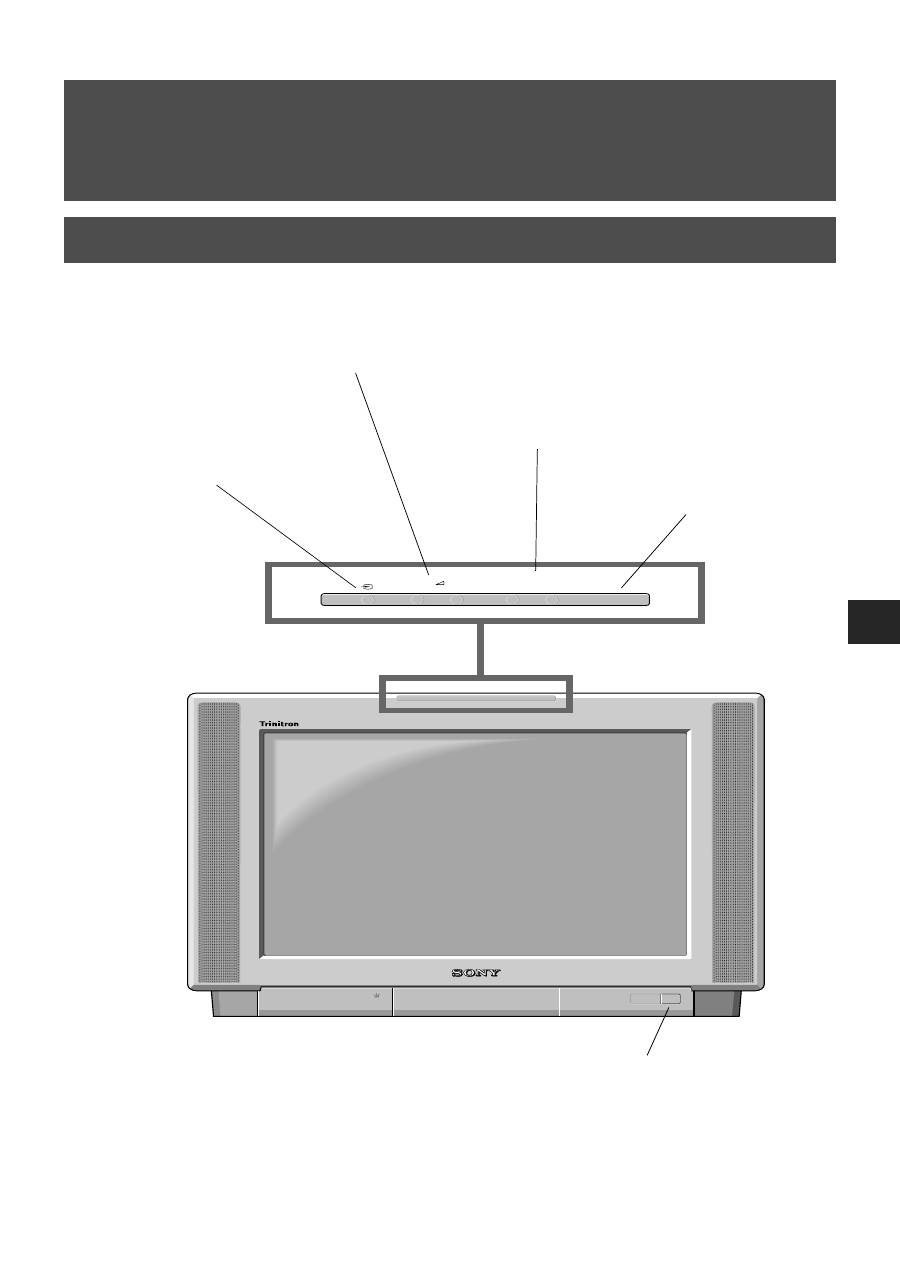
Przegląd przycisków telewizora
Przyciski regulacji głośności.
Przyciśnij, aby zwiększyć (+) /
zmniejszyć ( ) głośność.
Przycisk wejścia Video.
Przyciśnij, aby wybrać
sygnał wejściowy z
magnetowidu lub innych
Przycisk CONTROL
Wciśnij, aby włączyć i
podświetlić panel
sterowania.
Wyłącznik zasilania.
Przyciśnij, aby włączyć lub
wyłączyć telewizor.
Przyciski zmiany
programu (+) i (-).
Przyciśnij, aby
zmienić program.
8
Obsługa
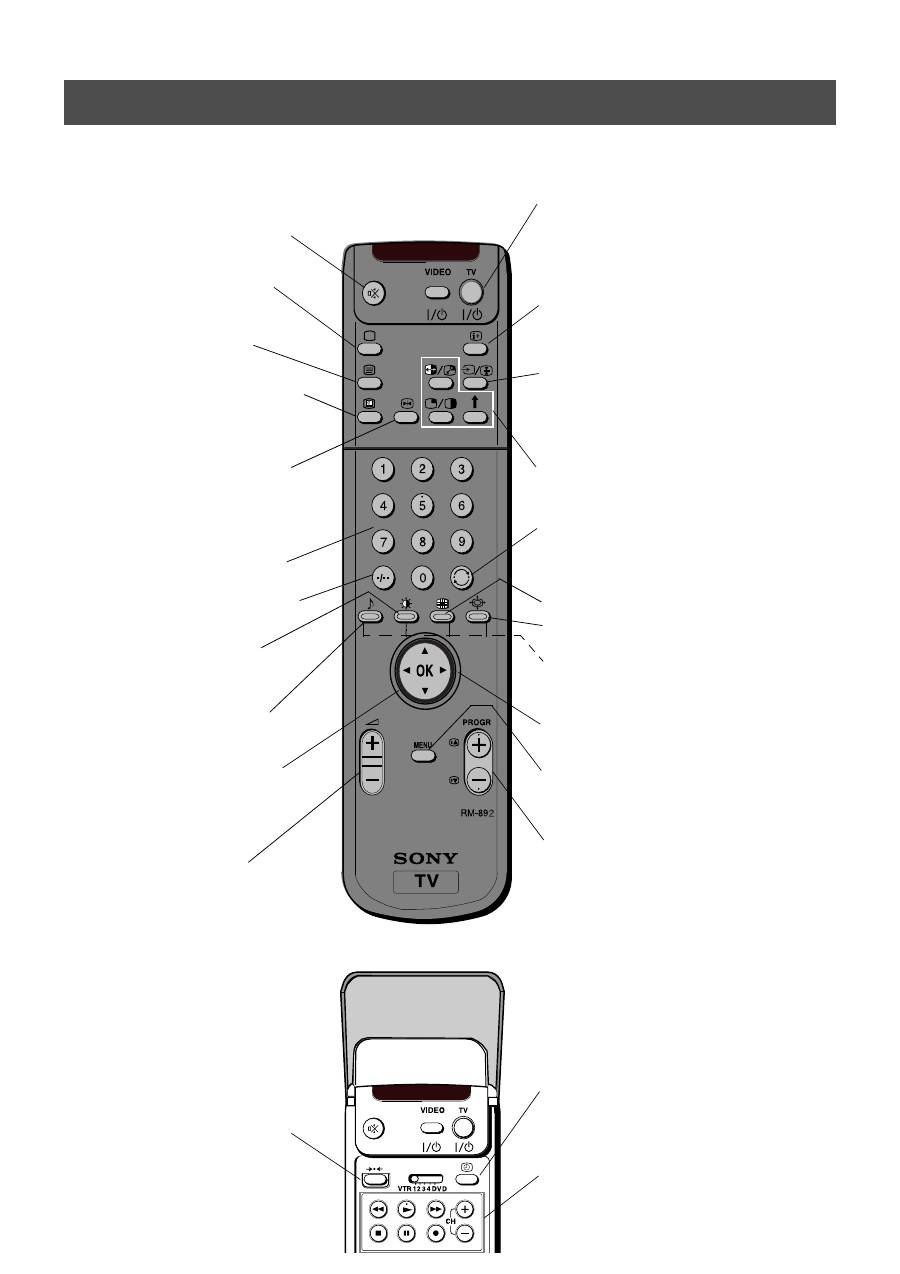
Przegląd przycisków pilota
Aby chwilowo wyłączyć telewizor
Przyciśnij w celu chwilowego wyłączenia telewizora.
Aby włączyć telewizor, należy ponownie nacisnąć ten
przycisk. Aby oszczędzać energię, znależy wyłączać nie
używany telewizor z sieci. UWAGA: Jeśli przez 15-30
minut nie jest odbierany sygnał TV i nie zostanie
naciśnięty żaden przycisk, telewizor automatycznie
przełączy się w tryb oczekiwania.
Aby pokazać informacje
Naciśnij w celu pokazania wszystkich ekranowych
wskaźników. Naciśnij ponownie, aby je ukryć. Naciśnij w
trybie telegazety, aby przejść do spisu treści (przeważnie
strona 100), naciśnij ponownie, aby skasować.
Aby wybrać sygnał wejściowy lub zatrzymać
telegazetę
Wciśnij w celu wyboru sygnału wejściowego z gniazd
(patrz sekcja "Używanie dodatkowego sprzętu").
Naciśnij w trybie telegazety, aby zatrzymać wyświetlaną
stronę. Naciśnij ponownie, aby skasować.
Wi
ę
cej szczegó
ł
ów znajduje si
ę
w sekcji "Pos
ł
ugiwanie si
ę
trybem PAP".
Aby powrócić do poprzedniego kanału
Wciśnij w celu przejścia do ostatnio oglądanego
programu. Uwaga: Operacja ta może zostać wykonana
tylko wtedy, gdy obecny kanał był oglądany przez 5
sekund.
Naciśnij, aby włączyć i wyłączyć tryb Multi PIP.
Aby zmienić format obrazu
Wciśnij w celu zmiany wielkości obrazu.
Przyciski Fastext
Aby zapoznać się ze szczegółami: patrz sekcja
Telegazeta.
Aby wybrać podpunkty menu
Użyj przycisku OK oraz przycisków kierunkowych, aby
wybrać opcje dostępne w systemie menu telewizora.
Aby wyświetlić menu
Naciśnij, jeżeli chcesz dokonać ustawień w menu
telewizora. Naciśnij ponownie, aby menu zniknęło z
ekranu.
Aby wybrać kanał
Wcisnąć w celu wybrania kanału.
Aby wyłączyć dźwięk
Wcisnąć w celu wyłączenia dźwięku telewizora.
Wcisnąć ponownie, aby przywrócić dźwięk.
Aby powrócić do normalnego trybu TV
Przyciśnij w celu powrotu do normalnego
działania z telegazety lub z trybu czuwania.
Aby włączyć telegazetę
Wciśnij w celu włączenia i wyłączenia
telegazety.
Aby wybrać Elektroniczny program TV
(EPG)
Wciśnij w celu włączenia i wyłączenia EPG.
Aby zatrzymać obraz
Przyciśnij, jeżeli chcesz zanotować jakąś
informację z ekranu telewizora, np. numer
telefonu. Przyciśnij ponownie, aby powrócić do
normalnego obrazu telewizyjnego.
Aby wybrać program
Przyciśnij jeden z numerowanych przycisków.
Dla programów dwucyfrowych, np. 23, najpierw
należy przycisnąć -/--, a następnie 2 oraz 3.
Aby wyświetlić menu obrazu
Przyciśnij, aby zmienić ustawienia obrazu.
Przyciśnij przycisk OK, aby usunąć menu.
Aby wyświetlić menu dźwięku
Przyciśnij, aby zmienić ustawienia dźwięku.
Przyciśnij przycisk OK, aby usunąć menu.
W celu wyświetlenia tabeli programów
Wciśnij przycisk OK. Wciśnij
v
lub
V
w celu
wyboru żądanego programu, a następnie
B
, aby
potwierdzić.
Aby ustawić głośność
Przycisnąć w celu ustawienia głośności
telewizora.
Aby przywrócić ustawienia fabryczne.
Otwórz pokrywkę pilota i naciśnij, aby
przywrócić fabryczne ustawienia obrazu i
dźwięku. Po pojawieniu się menu
"Instalacja", przejdź do sekcji "Wybieranie
języka i kraju", aby zmienić, jeżeli to
potrzebne, język i kraj.
Aby wyświetlić godzinę.
Otwórz pokrywkę pilota i naciśnij w celu
wyświetlenia na ekranie aktualnej godziny.
Aby obsługiwać wyposażenie wideo
Otwórz pokrywkę pilota i użyj tych przycisków w
celu obsługi sprzętu wideo (proszę zapoznać się ze
szczegółami w instrukcji magnetowidu).
9
Obsługa
NexTView jest elektronicznym przewodnikiem po programach telewizyjnych, który dostarcza informacji o programach
nadawanych przez różne stacje.
NexTView
Wybieranie usługodawcy NexTView
Telewizor automatycznie wybiera najlepszego usługodawcę NexTView. Wybór usługodawcy zostaje dokonany po
mniej więcej 30 minutach od zaprogramowania kanałów. Można jednak samodzielnie wybrać innego usługodawcę.
1. Naciśnij przycisk MENU na pilocie, aby wyświetlić menu na ekranie telewizora.
2. Naciskaj
v
lub
V
, aby wskazać na ekranie menu symbol
, po czym naciśnij
B
, aby wyświetlić menu
Ustawienia .
3. Naciskaj
v
lub
V
, aby wskazać wariant Select NexTView , i potwierdź, naciskając
B
. Pojawi się lista wszystkich
usługodawców NexTView.
4. Naciskaj
v
lub
V
, aby wybrać żądanego usługodawcę NexTView, po czym naciśnij przycisk OK, aby zachować
ustawienie.
5. Naciśnij przycisk MENU, aby usunąć menu z ekranu.
Uruchamianie NexTView
1. Przyciskiem
na pilocie można włączyć lub wyłączyć NexTView.
2.
Naciskaj przyciski
v
,
V
,
b
lub
B
, aby przesuwać kursor po ekranie.
3. Naciśnij OK, aby potwierdzić wybór.
a. Jeżeli przyciśniesz OK w kolumnie daty, godziny lub ikony (tematu), lista programów będzie zmieniać się, w
zależności od wyboru.
b. Jeżeli natomiast naciśniesz OK na liście programów, to dany kanał zostanie włączony, jeżeli program ten jest
aktualnie wyświetlany, lub wyświetlone zostanie menu dalszych informacji "Long Info", jeżeli program
nadawany będzie w przyszłości.
Legenda
pełna lista
osobisty wybór
programy informacyjne
filmy
sport
programy rozrywkowe
programy dla dzieci
powrót do poprzedniego menu
7
Tue
07 Tue
12:38
8
Wed
10
Fri
11
Sat
12
Sun
13
Mon
9
Thu
12
SWISS
Star Wars
Super RTL
Hat der alte Hexenmeister sich doch
einmal fortbegeben, und nun sollen
seine Geister auch nach meinem Willen
leben.
Werner - Beinhart
Pro 7
Flui grüsst den Rest der Welt
Kabel 1
Once upon a time in the West
Euronews
International News
RTL Plus
10:35 - 12:45
10:20 - 12:00
10:45 - 10:50
11:00 - 11:20
11:45 - 12:50
TXT
TPS / RINGIER
Tue 07. 04 .98

10
Używanie menu "Ustawienia indywidualne"
Możesz dokonać osobistego wyboru tematów, wśród których dokonywane będzie wyszukiwanie.
1.
Naciśnij
v
lub
V
, aby wybrać ikonę
, a następnie
B
, aby wyświetlić menu "Ustawienia indywidualne".
2.
Naciśnij
v
lub
V
, aby wybrać punkt na ekranie, a następnie naciśnij OK, aby potwierdzić swój wybór.
3. Powtarzaj czynność z kroku 2 dla wszystkich tematów, które chcesz mieć w swojej liście.
4.
Kiedy skończysz swoją listę, naciśnij
B
, aby wybrać
z menu.
5. Wciśnij przycisk OK, aby powrócić do poprzedniego menu.
6. Naciskaj
v
lub
V
, aby wybrać ikonę
, po czym ponownie naciśnij przycisk OK, aby włączyć filtr Ustawienia
indywidualne
.
Używanie menu "Long Info"
Menu Long Info umożliwia programowanie układów czasowych oraz nagrywanie wybranych programów.
1.
Naciśnij
v
lub
V
, aby wybrać z listy programów pozycję, która będzie nadawana w przyszłości.
2. Naciśnij OK, aby wyświetlić menu "Long Info".
Aby zaprogramować układ czasowy
Naciskaj przycisk
b
lub
B
, aby wskazać ikonę
, po czym naciskaj przycisk OK, aby
zaprogramować lub wyłączyć układ czasowy.
Jeśli zaprogramujesz układ czasowy, program
zostanie oznaczony ikoną zegara. Na krótko
przed rozpoczęciem programu pojawi się
pytanie, czy rzeczywiście chcesz go obejrzeć.
Aby wyświetlić tabelę układów czasowych
Naciskaj przycisk
b
lub
B
, aby wskazać ikonę
, po czym naciskaj przycisk OK, aby
wyświetlać lub ukrywać tabelę układów
czasowych. Tabela ta zawiera programy, dla
których został zaprogramowany układ
czasowy. (Za pomocą układów czasowych
można zaprogramować do 5 programów.)
Aby nagrywać programy
*
(dotyczy tylko magnetowidów z systemem Smartlink)
1
Podłącz magnetowid Smartlink.
2. Naciskaj
b
lub
B
, aby wybrać
. Następnie naciśnij przycisk OK, aby wczytać informacje do magnetowidu.
3. Aby wybrać ustaw
ienia dla magnetowidu
:
VPS/PDC
Naciskaj
b
, aby wybrać VPS/PDC, następnie naciśnij OK, aby wybrać "Wł." lub "Wył.". Jeżeli zostanie wybrana
ta opcja, wówczas wybrany program na pewno zostanie nagrany, nawet wówczas, gdy nastąpi zmiana w programie
telewizyjnym. Funkcja ta działa jednak tylko wtedy, gdy dany kanał jest nadawany z sygnałem VPS/PDC
Szybkość
Wciśńij
V
, aby wybrać "szybkość", a następnie naciśnij OK, aby wybrać "SP" dla normalnej szybkości lub "LP" dla
obniżonej szybkości nagrywania. Przy obniżonej szybkości (LP) można nagrać na kasecie dwa razy więcej.
Wówczas jakość obrazu może być obniżona.
Wybór magnetowidu
Naciskaj
V
, aby wybrać "VCR Setup", następnie naciśnij OK, aby wybrać magnetowid który chcesz
zaprogramować, to znaczy magnetowid 1 (VCR1) lub ' magnetowid 2 (VCR2).
4.
Na koniec naciśnij
B
, aby wybrać ikonę
, a następnie OK, aby usunąć menu z ekranu telewizora.
Obsługa
NexTView
07 Tue
12:38
Address Mapping
The position of the addresses in the
OSDA is shown in the following diagram.
The position values of the DPW are set
to '0'.
If other values are set, the complete
combination will be scrolled.
Example:
if the DPWC is set to '63', the char-
Speed
Timer Prog
VPS/PDC
SP
VCR1
On
This channel has been set for a timer
First nextTView/EPG-Providers in Europe
SWISS
TXT
TPS / RINGIER
nexTView
Tue 07. 04 .98
