Sony KDL-40S2510 – page 2
Manual for Sony KDL-40S2510
Table of contents

010COV.book Page 21 Monday, November 13, 2006 9:42 AM
Sharpness
Sharpens or softens the picture.
Noise Reduction
Reduces the picture noise (snowy picture) in a weak broadcast signal.
“Auto”: Automatically reduces the picture noise.
“High”/“Medium”/“Low”: Modifies the effect of the noise reduction.
“Off”: Turns off the Noise Reduction feature.
Advanced Settings
Customizes the Picture function in more detail. When you set “Picture Mode” to
“Custom”, you can set/change these settings.
“Reset”: Resets all the advanced video settings to the factory settings.
“Black Corrector”: Enhances black areas of the picture for stronger contrast.
“Adv. Contrast Enhancer”: Automatically adjusts “Contrast” to the most suitable
settings judging from the brightness of the screen. This setting is especially effective
for dark images, increasing vibrancy in the picture.
“Gamma”: Adjusts the balance between bright and dark areas of the picture.
“Clear White”: Emphasizes white colours.
“Live Colour”: Makes colours more vivid and reproduce clear skin tones.
Using MENU Functions
Tip
This function is only available when "Colour Space" is set to "Wide".
“Colour Space”: Changes colour range (only for KDL-46S2510, KDL-46S2530,
KDL-40S2510, KDL-40S2530).
“MPEG Noise Reduction”: Reduces the picture noise in MPEG-compressed video
(in digital mode only).
21
GB
KDL-46/40/32S2510
2-670-908-43(1)

010COV.book Page 22 Monday, November 13, 2006 9:42 AM
Sound menu
You can select the options listed below on the Sound
menu. To select options in “Settings”, see “Navigating
through menus” (page 19).
Target Inputs
Selects whether to apply settings made in the Sound menu to all inputs, or only to the
input currently being watched.
“All”: Applies settings to all inputs.
“Viewing Only”: Applies settings only to the current input.
Sound Mode
Selects the sound mode.
“Dynamic”: Enhances treble and bass.
“Standard”: For standard sound. Recommended for home entertainment.
“Custom”: Flat response. Also allows you to store your preferred settings.
Reset
Resets the sound settings except “Sound Mode”, “Dual Sound” and “i Speaker
Link” to the factory settings.
Treble
Adjusts higher-pitched sounds.
Bass
Adjusts lower-pitched sounds.
Balance
Emphasizes left or right speaker balance.
Auto Volume
Keeps a constant volume level even when volume level gaps occur (e.g., adverts tend
to be louder than programmes).
Volume Offset
Adjusts the volume level of the current input relative to other inputs, when “Target
Inputs” is set to “Viewing Only”.
Surround
Selects the surround mode.
“TruSurround XT”: For surround sound (for stereo programmes only).
“Simulated Stereo”: Adds a surround-like effect to mono programs.
“Off”: For normal stereo or mono reception.
BBE
Gives sound more impact by compensating for phase effects in speakers using the
“BBE High Definition Sound System”.
22
GB
KDL-46/40/32S2510
2-670-908-43(1)

010COV.book Page 23 Monday, November 13, 2006 9:42 AM
Dual Sound
Selects the sound from the speaker for a stereo or bilingual broadcast.
“Stereo”, “Mono”: For a stereo broadcast.
“A”/“B”/“Mono”: For a bilingual broadcast, select “A” for sound channel 1, “B” for
sound channel 2, or “Mono” for a mono channel, if available.
Tip
If you select other equipment connected to the TV, set “Dual Sound” to “Stereo”, “A” or “B”.
i Speaker Link
Switches the TV’s internal speakers on/off when headphones are connected.
“On”: Sound is output only from headphones.
(headphone speaker
“Off”: Sound is output from both the TV and headphones.
link)
Tip
“Treble”, “Bass”, “Balance”, “Auto Volume”, “Surround” and “BBE” cannot be used for headphones and audio output sockets.
Using MENU Functions
23
GB
KDL-46/40/32S2510
2-670-908-43(1)
010COV.book Page 24 Monday, November 13, 2006 9:42 AM
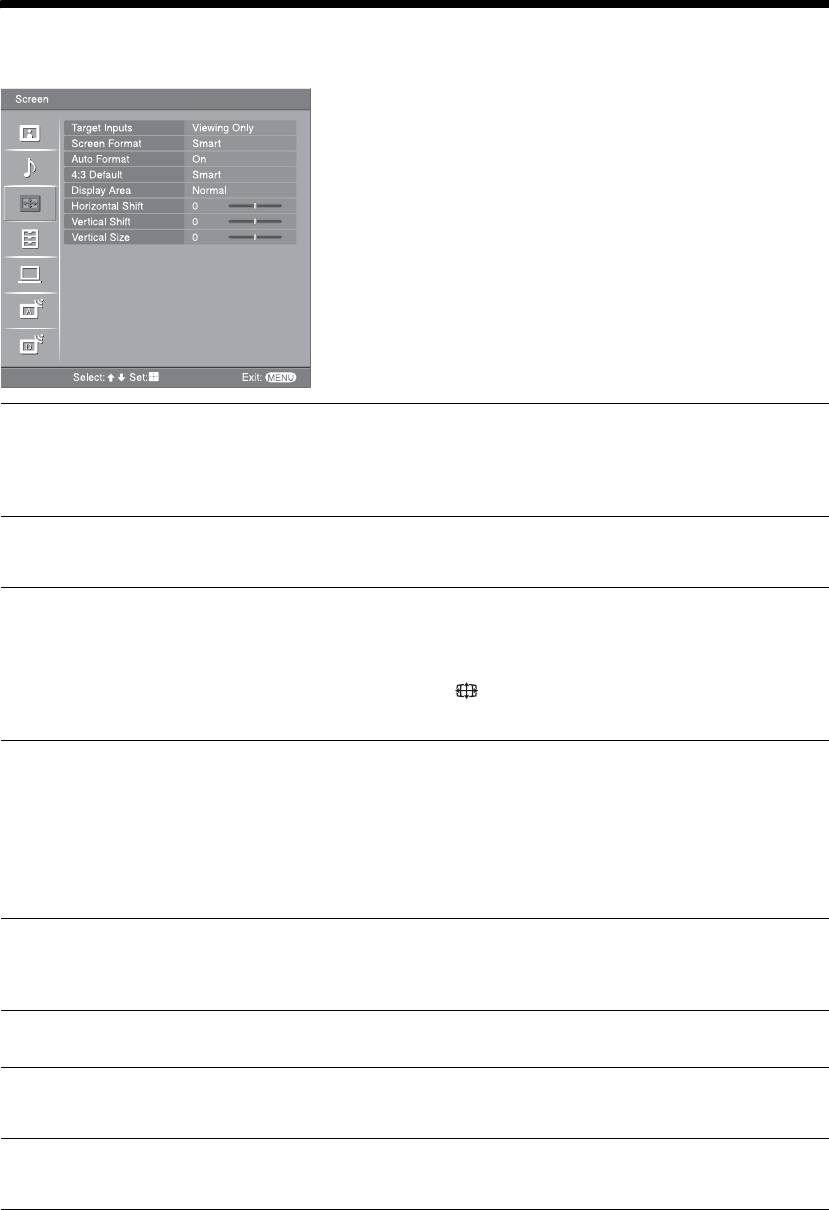
Screen menu
You can select the options listed below on the Screen
menu. To select options in “Settings”, see “Navigating
through menus” (page 19).
Target Inputs
Selects whether to apply settings made in the Screen menu to all inputs, or only to
the input currently being watched.
“All”: Applies settings to all inputs.
“Viewing Only”: Applies settings only to the current input.
Screen Format
For details about the screen format, see “To change the screen mode manually to suit
the broadcast” (page 14).
Auto Format
Automatically changes the screen format according to the broadcast signal. To keep
your setting, select “Off”.
Tips
• Even if you have selected “On” or “Off” in “Auto Format”, you can always modify the
format of the screen by pressing repeatedly.
• “Auto Format” is available for PAL and SECAM signals only.
4:3 Default
Selects the default screen mode for use with 4:3 broadcasts.
“Smart”: Displays conventional 4:3 broadcasts with an imitation wide screen effect.
“4:3”: Displays conventional 4:3 broadcasts in the correct proportions.
“Off”: Keeps the current “Screen Format” setting when the channel or input is
changed.
Tip
This option is available only if “Auto Format” is set to “On”.
Display Area
Adjusts the screen area displaying the picture.
“Normal”: Displays the picture in the original size.
“–1”/“–2”: Enlarges the picture to hide the edge of the picture.
Horizontal Shift
Adjusts the horizontal position of the picture for each screen format.
Vertical Shift
Adjusts the vertical position of the picture when the screen format is set to Smart (50
Hz), Zoom or 14:9.
Vertical Size
Adjusts the vertical size of the picture when the screen format is set to Smart, Zoom
or 14:9.
24
GB
KDL-46/40/32S2510
2-670-908-43(1)
010COV.book Page 25 Monday, November 13, 2006 9:42 AM
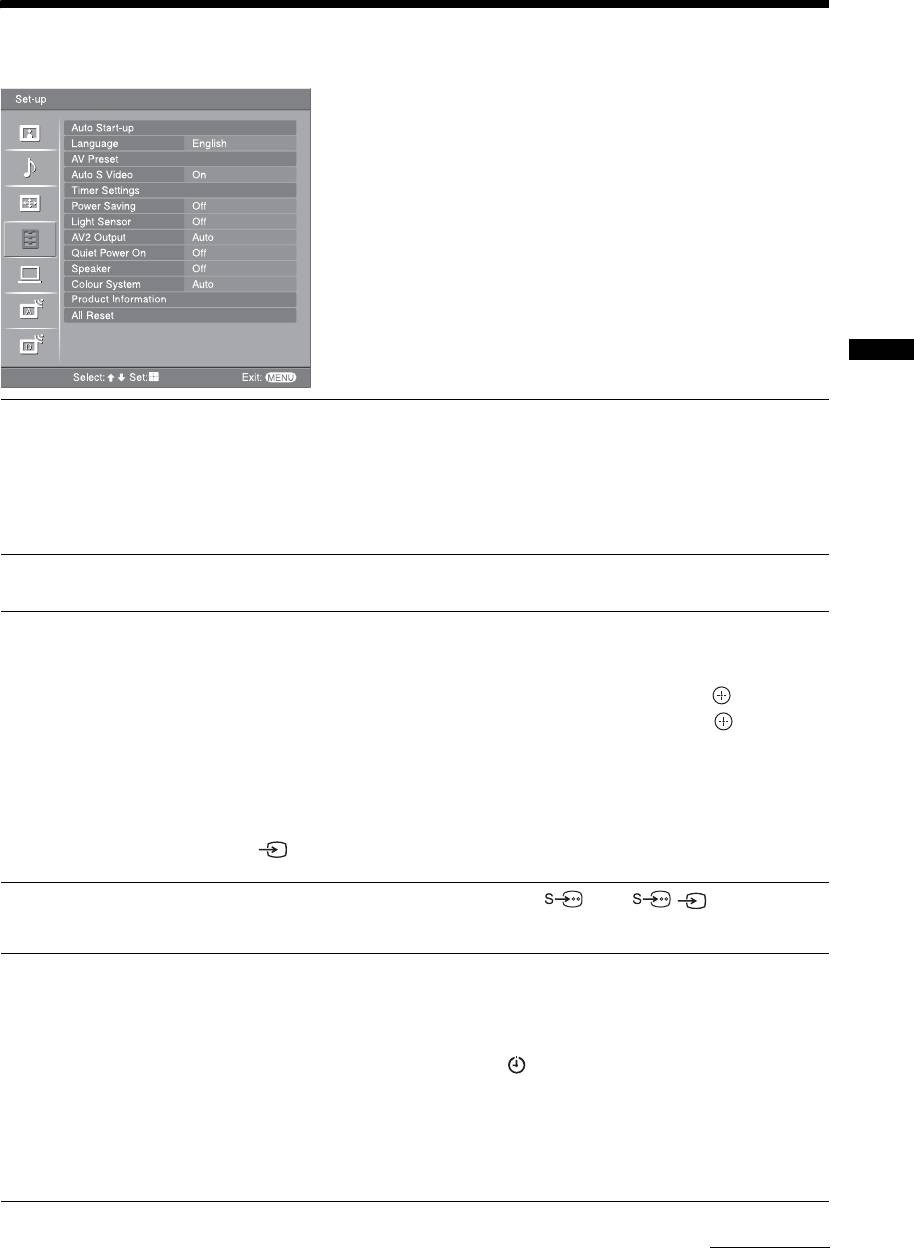
Set-up menu
You can select the options listed below on the Set-up
menu. To select options in “Settings”, see “Navigating
through menus” (page 19).
Using MENU Functions
Auto Start-up
Starts the “first time operation menu” to select the language and country/region, and
tune in all available digital and analogue channels. Usually, you do not need to do
this operation because the language and country/region will have been selected and
channels already tuned when the TV was first installed (page 5, 6). However, this
option allows you to repeat the process (e.g., to retune the TV after moving house,
or to search for new channels that have been launched by broadcasters).
Language
Selects the language in which the menus are displayed.
AV Preset
Assigns a name to any equipment connected to the side and rear sockets. The name
will be displayed briefly on the screen when the equipment is selected. You can skip
an input source that is not connected to any equipment.
1 Press
F/f to select the desired input source, then press .
2 Press
F/f to select the desired option below, then press .
Equipment labels: Uses one of the preset labels to assign a name to connected
equipment.
“Edit”: Creates your own label. Follow steps 2 to 4 of “Programme Labels”
(page 28).
“Skip”: Skips an input source that is not connected to any equipment when you press
to select the input source.
Auto S Video
Selects the input signal from S video sockets 6 when / 6 sockets are both
connected.
Timer Settings
Sets the timer to turn on/off the TV.
Sleep Timer
Sets a period of time after which the TV automatically switches itself into standby
mode.
When the Sleep Timer is activated, the (Timer) indicator on the TV (front) lights
up in orange.
Tips
• If you switch off the TV and switch it on again, “Sleep Timer” is reset to “Off”.
• “TV will soon turn off by sleep timer.” appears on the screen one minute before the TV
switches to standby mode.
Continued
25
GB
KDL-46/40/32S2510
2-670-908-43(1)
010COV.book Page 26 Monday, November 13, 2006 9:42 AM
On Timer
Sets the timer to turn on the TV.
“Day”: Selects the day on which you want to activate the On Timer.
“Time”: Sets the time to turn on the TV.
“Duration”: Selects the time period after which the TV automatically switches to
standby mode again.
“Volume Set-up”: Sets the volume for when the timer turns on the TV.
Clock Set
Allows you to adjust the clock manually. When the TV is receiving digital channels,
the clock cannot be adjusted manually since it is set to the time code of the
broadcasted signal.
Power Saving
Selects the power saving mode to reduce the power consumption of the TV.
When “Picture Off” is selected, the picture is switched off and the (Picture Off)
indicator on the TV (front) lights up in green. The sound remains unchanged.
Light Sensor
Automatically optimizes the picture settings according to the ambient light in the
room.
AV2 Output
Sets a signal to be output through the socket labelled / 2 on the rear of the
TV. If you connect a VCR or other recording equipment to the / 2 socket,
you can then record from the equipment connected to other sockets of the TV.
“TV”: Outputs a broadcast.
“AV1”: Outputs signals from equipment connected to the / 1 socket.
“AV6”: Outputs signals from equipment connected to the / 6 socket.
“Auto”: Outputs whatever is being viewed on the screen (except signals from the
/ 3, HDMI IN 4/5 and PC sockets).
Quiet Power On
Sets the volume control at a low level when the TV is first turned on, gradually
increasing the sound to a preset level.
Speaker
Switches on/off the TV’s internal speakers.
“On”: The TV speakers are turned on in order to listen to the TV’s sound through
TV’s speakers.
“Off”: The TV speakers are turned off in order to listen to the TV’s sound only
through your external audio equipment connected to the audio output sockets.
Colour System
Selects the colour system (“Auto”, “PAL”, “SECAM”, “NTSC3.58”, “NTSC4.43”,
or “PAL60”) according to the input signal from the input source.
Product Information
Displays your TV’s system information.
All Reset
Resets all the Set-up settings to the factory settings and then launches the Auto Start-
up screen.
26
GB
KDL-46/40/32S2510
2-670-908-43(1)
010COV.book Page 27 Monday, November 13, 2006 9:42 AM
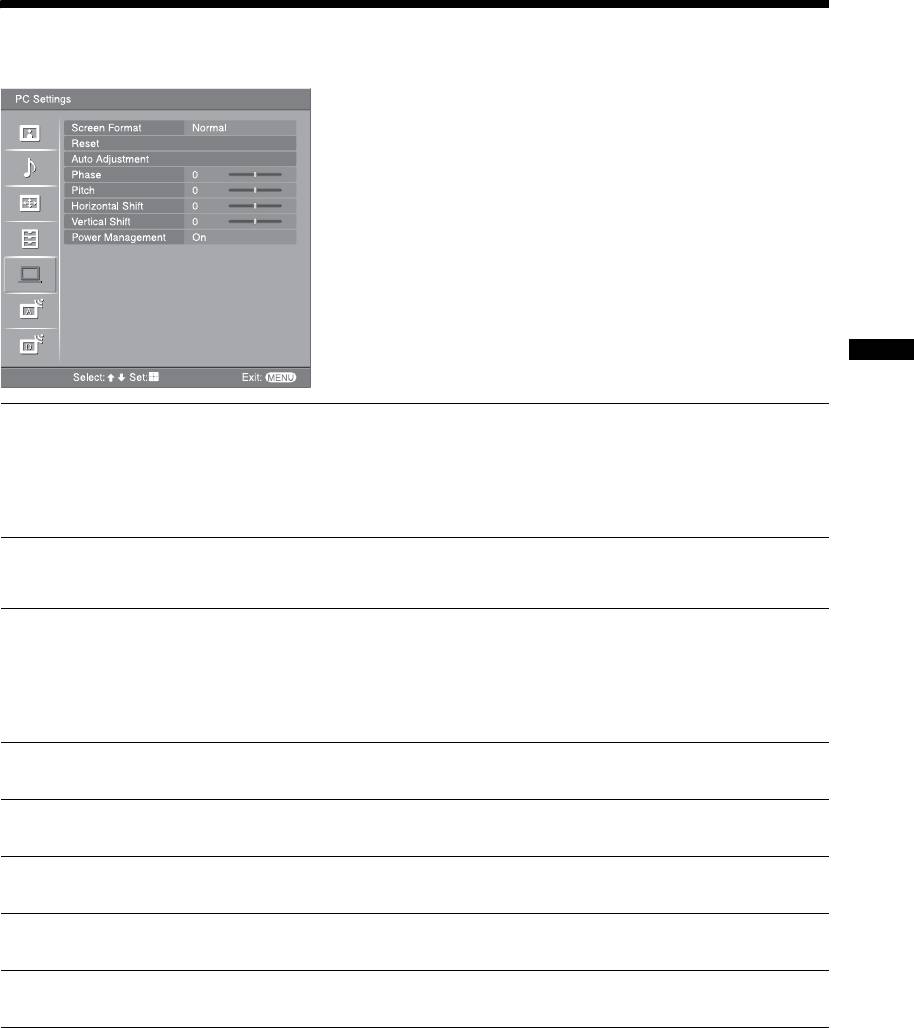
PC Settings menu
You can select the options listed below on the PC
Settings menu. To select options in “Settings”, see
“Navigating through menus” (page 19).
Using MENU Functions
Screen Format
Selects a screen mode for displaying input from your PC.
“Normal”: Displays the picture in its original size.
“Full1”: Enlarges the picture to fill the display area, keeping its original horizontal-
to-vertical aspect ratio.
“Full2”: Enlarges the picture to fill the display area.
Reset
Resets the PC settings except “Screen Format” and “Power Management” to the
factory settings.
Auto Adjustment
Automatically adjusts the display position and phase of the picture when the TV
receives an input signal from the connected PC.
Tip
Auto Adjustment may not work well with certain input signals. In such cases, manually adjust
“Phase”, “Pitch”, “Horizontal Shift” and “Vertical Shift”.
Phase
Adjusts the phase when the screen flickers.
Pitch
Adjusts the pitch when the picture has unwanted vertical stripes.
Horizontal Shift
Adjusts the horizontal position of the picture for each screen format.
Vertical Shift
Adjusts the vertical position of the picture for each screen format.
Power Management
Switches the TV to standby mode if no signal is received for 30 seconds.
27
GB
KDL-46/40/32S2510
2-670-908-43(1)
010COV.book Page 28 Monday, November 13, 2006 9:42 AM
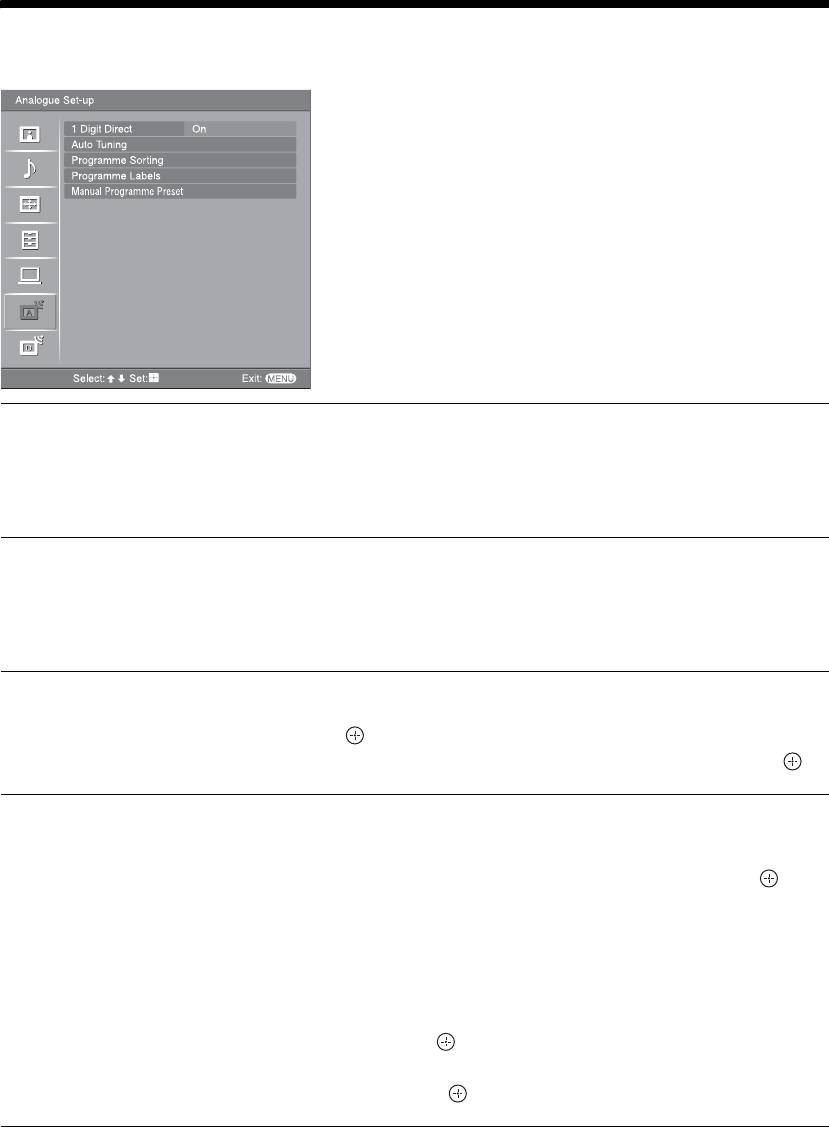
Analogue Set-up menu (Analogue mode only)
You can change/set the analogue settings using the
Analogue Set-up menu. To select options in
“Settings”, see “Navigating through menus”
(page 19).
1 Digit Direct
When “1 Digit Direct” is set to “On”, you can select an analogue channel using one
preset number button (0 - 9) on the remote.
Note
When “1 Digit Direct” is set to “On”, you cannot select channel numbers 10 and above entering
two digits using the remote.
Auto Tuning
Tunes in all the available analogue channels.
Usually you do not need to do this operation because the channels are already tuned
when the TV was first installed (page 5, 6). However, this option allows you to
repeat the process (e.g., to retune the TV after moving house, or to search for new
channels that have been launched by broadcasters).
Programme Sorting
Changes the order in which the analogue channels are stored on the TV.
1 Press
F/f to select the channel you want to move to a new position,
then press .
2 Press
F/f to select the new position for your channel, then press .
Programme Labels
Assigns a channel name of your choice up to five letters or numbers. The name will
be displayed briefly on the screen when the channel is selected. (Names for channels
are usually taken automatically from Text (if available).)
1 Press
F/f to select the channel you want to name, then press .
2 Press
F/f to select the desired letter or number (“_” for a blank space),
then press
g.
If you input a wrong character
Press G/g to select the wrong character. Then, press F/f to select the correct
character.
To delete all the characters
Select “Reset”, then press .
3 Repeat the procedure in step 2 until the name is complete.
4 Select “OK”, then press .
28
GB
KDL-46/40/32S2510
2-670-908-43(1)

010COV.book Page 29 Monday, November 13, 2006 9:42 AM
Manual Programme
Before selecting “Label”/“AFT”/“Audio Filter”/“Skip”/“Decoder”, press PROG +/-
to select the programme number with the channel. You cannot select a programme
Preset
number that is set to skip (page 30).
Programme
/System/Channel
Presets programme channels manually.
1 Press
F/f to select “Programme”, then press .
2 Press
F/f to select the programme number you want to manually tune
(if tuning a VCR, select channel 00), then press RETURN.
3 Press
F/f to select “System”, then press .
4 Press
F/f to select one of the following TV broadcast systems, then
press
G.
B/G: For western European countries/regions
D/K: For eastern European countries/regions
L: For France
I: For the United Kingdom
5 Press F/f to select “Channel”, then press .
Using MENU Functions
6 Press
F/f to select “S” (for cable channels) or “C” (for terrestrial
channels), then press
g.
7 Tune the channels as follows:
If you do not know the channel number (frequency)
Press F/f to search for the next available channel. When a channel has been found,
the search will stop. To continue searching, press
F/f.
If you know the channel number (frequency)
Press the number buttons to enter the channel number of the broadcast you want or
your VCR channel number.
8 Press to jump to “Confirm”, then press .
9 Press
f to select “OK”, then press .
Repeat the procedure above to preset other channels manually.
Label
Assigns a name of your choice, up to five letters or numbers, to the selected channel.
This name will be displayed briefly on the screen when the channel is selected.
To input characters, follow steps 2 to 4 of “Programme Labels” (page 28).
AFT
Allows you to fine-tune the selected programme number manually if you feel that a
slight tuning adjustment will improve the picture quality.
You can adjust the fine tuning over a range of -15 to +15. When “On” is selected, the
fine tuning is performed automatically.
Audio Filter
Improves the sound for individual channels in the case of distortion in mono
broadcasts. Sometimes a non-standard broadcast signal can cause sound distortion or
intermittent sound muting when watching mono programmes.
If you do not experience any sound distortion, we recommend that you leave this
option set to the factory setting “Off”.
Notes
• You cannot receive stereo or dual sound when “Low” or “High” is selected.
• “Audio Filter” is not available when “System” is set to “L”.
Continued
29
GB
KDL-46/40/32S2510
2-670-908-43(1)

010COV.book Page 30 Monday, November 13, 2006 9:42 AM
Skip
Skips unused analogue channels when you press PROG +/- to select channels. (You
can still select a skipped channel using the number buttons.)
Decoder
Views and records the scrambled channel selected when using a decoder connected
directly to scart connector / 1, or to scart connector / 2 via a VCR.
Note
Depending on the country/region selected for “Country” (page 6), this option may not be
available.
Confirm
Saves changes made to the “Manual Programme Preset” settings.
30
GB
KDL-46/40/32S2510
2-670-908-43(1)
010COV.book Page 31 Monday, November 13, 2006 9:42 AM
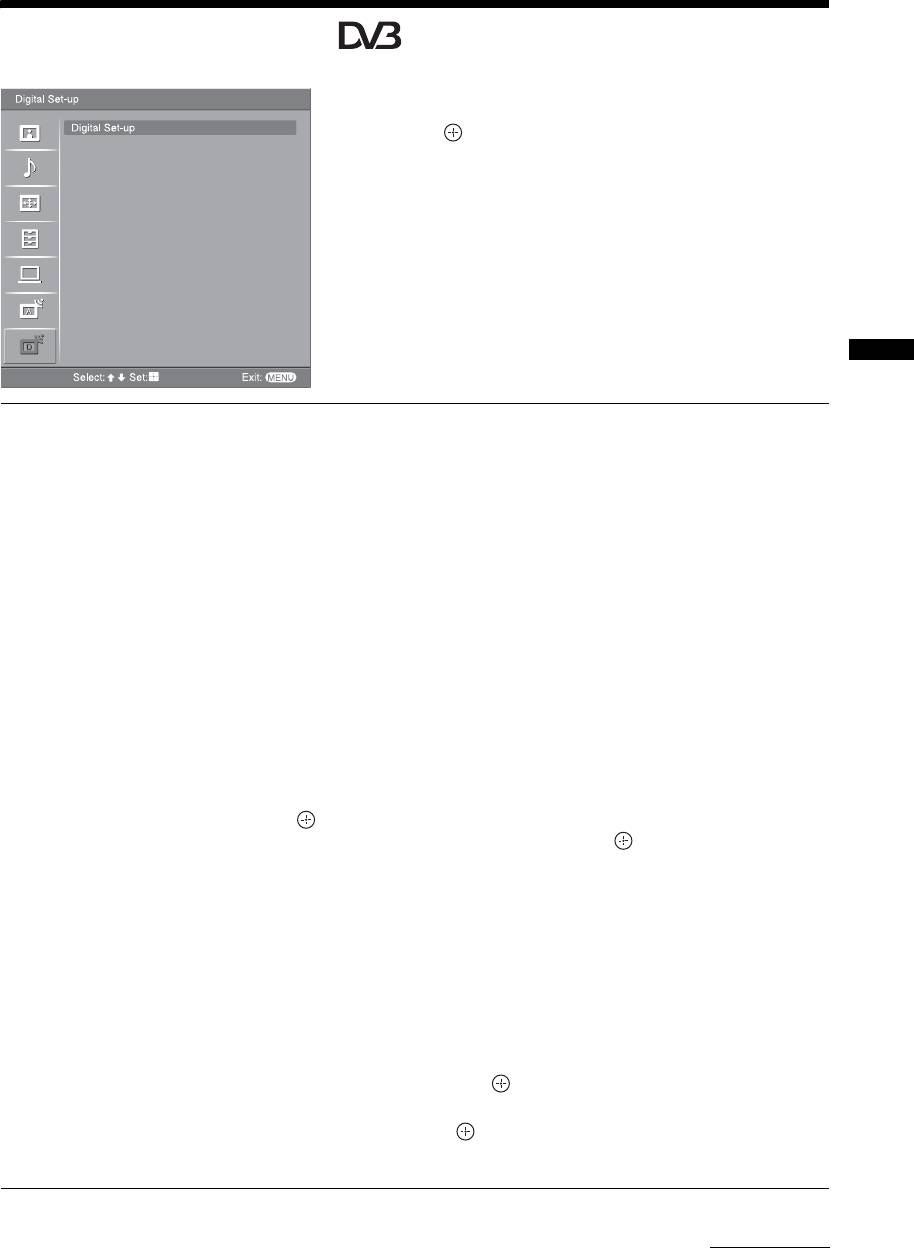
Digital Set-up menu
You can change/set the digital settings using the
Digital Set-up menu. Select “Digital Set-up” and press
to display the following menus. To select options
in “Settings”, see “Navigating through menus”
(page 19).
Using MENU Functions
Digital Tuning
Displays the “Digital Tuning” menu.
Digital Auto Tuning
Tunes in all the available digital channels.
Usually you do not need to do this operation because the channels are already tuned
when the TV was first installed (page 6). However, this option allows you to repeat
the process (e.g., to retune the TV after moving house, or to search for new channels
that have been launched by broadcasters).
Programme List Edit
Removes any unwanted digital channels stored on the TV, and changes the order of
the digital channels stored on the TV.
1 Press
F/f to select the channel you want to remove or move to a new
position.
If you know the programme number (frequency)
Press the number buttons to enter the three-digit programme number of the broadcast
you want.
2 Remove or change the order of the digital channels as follows:
To remove the digital channel
Press . A message that confirms whether the selected digital channel is to be
deleted appears. Press
G to select “Yes”, then press .
To change the order of the digital channels
Press g, then press F/f to select the new position for the channel and press G.
Repeat the procedure in steps 1 and 2 to move other channels if required.
3 Press RETURN.
Digital Manual Tuning
Tunes the digital channels manually.
1 Press the number button to select the channel number you want to
manually tune, then press
F/f to tune the channel.
2 When the available channels are found, press
F/f to select the channel
you want to store, then press .
3 Press
F/f to select the programme number where you want to store the
new channel, then press .
Repeat the procedure above to tune other channels manually.
Continued
31
GB
KDL-46/40/32S2510
2-670-908-43(1)

010COV.book Page 32 Monday, November 13, 2006 9:42 AM
Digital Set-up
Displays the “Digital Set-up” menu.
Subtitle Setting
*
Displays digital subtitles on the screen.
When “For Hard Of Hearing” is selected, some visual aids may also be displayed
with the subtitles (if TV channels broadcast such information).
Subtitle Language
*
Selects which language subtitles are displayed in.
Audio Language
*
Selects the language used for a programme. Some digital channels may broadcast
several audio languages for a programme.
Audio Type
*
Increases the sound level when “For Hard Of Hearing” is selected.
Parental Lock
*
Sets an age restriction for programmes. Any programme that exceeds the age
restriction can only be watched after a PIN Code is entered correctly.
1 Press the number buttons to enter your existing PIN code.
If you have not previously set a PIN, a PIN code entry screen appears. Follow the
instruction of “PIN Code” below.
2 Press F/f to select the age restriction or “None” (for unrestricted
watching), then press .
3 Press RETURN.
PIN Code
*
Sets a PIN code for the first time, or allows you to change your PIN code.
1 Enter a PIN as follows:
If you have previously set a PIN
Press the number buttons to enter your existing PIN.
If you have not set a PIN
Press the number buttons to enter the factory setting PIN of 9999.
2 Press the number buttons to enter the new PIN code.
A message appears to inform you that the new PIN has been accepted.
3 Press RETURN.
Tip
PIN code 9999 is always accepted.
Technical Set-up
Displays the Technical Set-up menu.
“Auto Service Update”: Enables the TV to detect and store new digital services as
they become available.
“Software Download”: Enables the TV to automatically receive software updates,
free through your existing aerial (when issued). Sony recommends that this option is
set to “On” at all times. If you do not want your software to be updated, set this option
to “Off”.
“System Information”: Displays the current software version and the signal level.
“Time Zone”: Allows you to manually select the time zone you are in, if it is not the
same as the default time zone setting for your country.
CA Module Set-up
Allows you to access a Pay Per View service once you obtain a Conditional Access
Module (CAM) and a view card. See page 33 for the location of the (PCMCIA)
socket.
* Please note that this function may not be available in some countries.
32
GB
KDL-46/40/32S2510
2-670-908-43(1)
010COV.book Page 33 Monday, November 13, 2006 9:42 AM
Using Optional Equipment
Connecting optional equipment
You can connect a wide range of optional equipment to your TV. Connecting cables are not supplied.
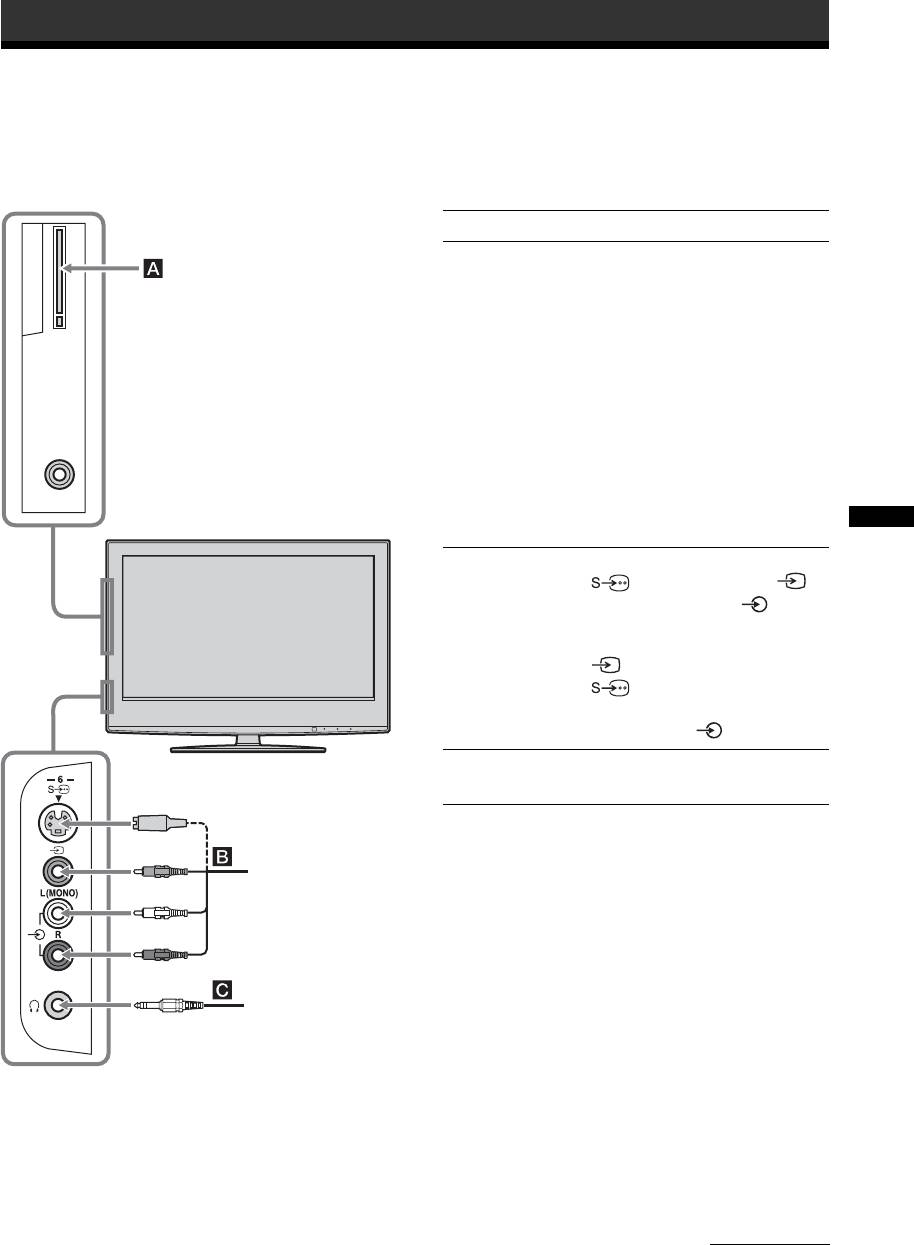
Connecting to the TV (side)
To connect Do this
Conditional Access
To use Pay Per View services.
Module (CAM) A
For details, refer to the instruction
manual supplied with your CAM.
To use the CAM, remove the
rubber cover from the CAM slot.
Switch off the TV when inserting
your CAM into the CAM slot.
When you do not use the CAM, we
recommend that you replace the
cover on the CAM slot.
Note
CAM is not supported in all
countries. Please check with your
authorized dealer.
Using Optional Equipment
S VHS/Hi8/DVC
Connect to the S video socket
camcorder B
6 or the video socket 6,
and the audio sockets 6. To
avoid picture noise, do not connect
the camcorder to the video socket
6 and the S video socket
6 at the same time. If you
connect mono equipment, connect
to the L socket 6.
Headphones C Connect to the i socket to listen to
sound from the TV on headphones.
S VHS/Hi8/DVC
camcorder
Headphones
Continued
33
GB
KDL-46/40/32/26S2000
2-670-908-43(1)
010COV.book Page 34 Monday, November 13, 2006 9:42 AM
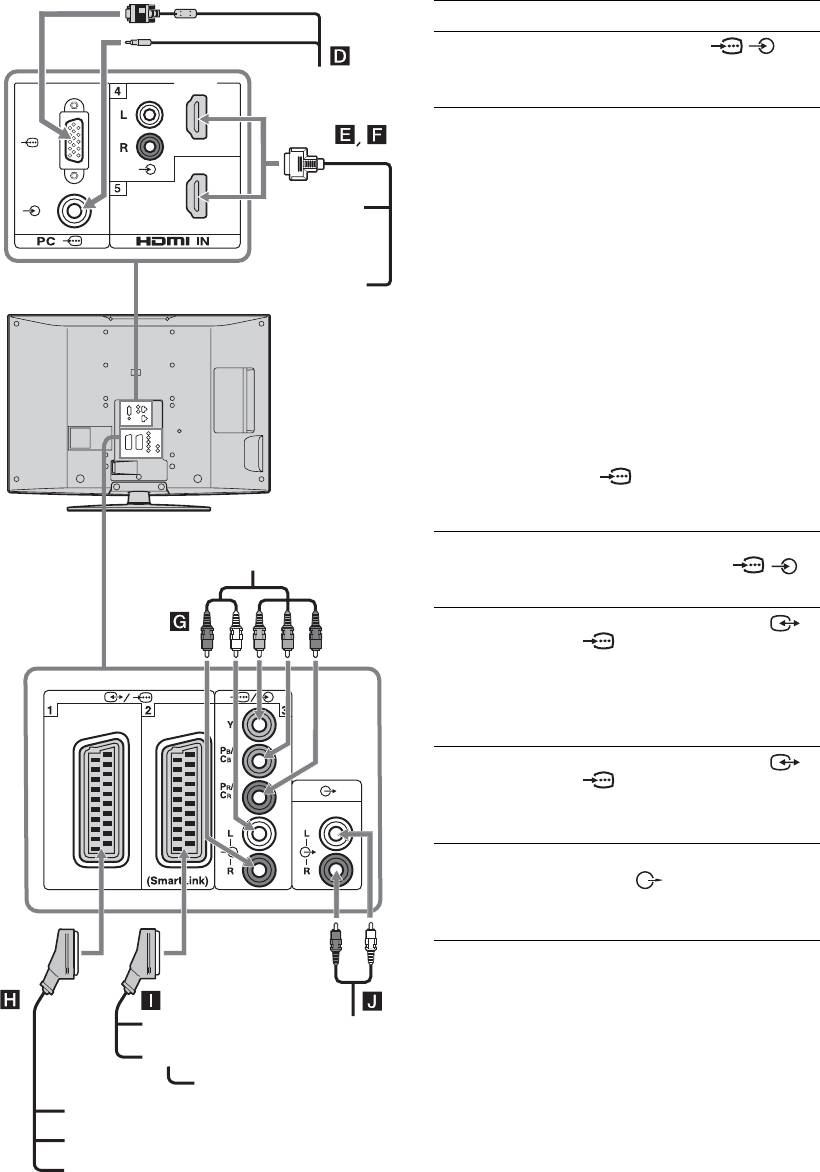
Connecting to the TV (rear)
To connect Do this
PC D Connect to the PC /
PC
sockets. It is recommended to use
a PC cable with ferrites.
Digital satellite
Connect to the HDMI IN 4 or 5
receiver or DVD
socket if the equipment has a
player E, F
HDMI socket. The digital video
and audio signals are input from
DVD player
the equipment. If the equipment
has a DVI socket, connect the DVI
socket to the HDMI IN 4 socket
through a DVI - HDMI adaptor
Digital satellite receiver
interface (not supplied), and
connect the equipment’s audio out
sockets to the audio in HDMI IN 4
sockets.
Notes
• The HDMI sockets only support
the following video inputs: 480i,
480p, 576i, 576p, 720p and 1080i.
To connect a PC, please use the PC
socket.
• Be sure to use only an HDMI cable
that bears the HDMI logo.
DVD player
DVD player with
Connect to the component sockets
with component output
component output
and the audio sockets / 3.
G
Video game
Connect to the scart socket /
equipment, DVD
1. When you connect the
player or decoder
decoder, the scrambled signal from
H
the TV tuner is output to the
decoder, then the unscrambled
signal is output from the decoder.
DVD recorder or
Connect to the scart socket /
VCR that supports
2. SmartLink is a direct link
SmartLink I
between the TV and a VCR/DVD
recorder.
Hi-Fi audio
Connect to the audio output
equipment J
sockets to listen to the sound
from the TV on Hi-Fi audio
equipment.
DVD recorder
Hi-Fi
VCR
Decoder
Video game equipment
DVD player
Decoder
34
GB
KDL-46/40/32/26S2000
2-670-908-43(1)

010COV.book Page 35 Monday, November 13, 2006 9:42 AM
Using the Tools menu in PC input mode
Press TOOLS to display the following options when
viewing pictures input from the connected PC.
Options Description
Power Saving See page 26.
Picture Mode See page 20.
Sound Mode See page 22.
Auto Adjustment See page 27.
Horizontal Shift See page 27.
Vertical Shift See page 27.
Auto Clock Set (in
Allows you to switch to digital
analogue mode only)
mode and obtain the time.
i Volume
Adjusts the volume of the
headphones.
Using Optional Equipment
35
GB
KDL-46/40/32/26S2000
2-670-908-43(1)
090ADD.fm Page 36 Wednesday, December 27, 2006 6:33 PM
Additional Information
Channel Coverage
Specifications
Analogue: VHF: E2–E12
UHF: E21–E69
Display Unit
CATV: S1–S20
Power Requirements:
HYPER: S21–S41
220–240 V AC, 50 Hz
D/K: R1–R12, R21–R69
Screen Size:
L: F2–F10, B–Q, F21–F69
KDL-46S2510/KDL-46S2530:
I: UHF B21–B69
46 inches (Approx. 116.9 cm measured diagonally)
Digital: VHF/UHF
KDL-40S2510/KDL-40S2530:
40 inches (Approx. 101.6 cm measured diagonally)
Terminals
KDL-32S2510/KDL-32S2520/KDL-32S2530:
/1
32 inches (Approx. 80.1 cm measured diagonally)
21-pin Scart connector (CENELEC standard) including
Display Resolution:
audio/video input, RGB input, and TV audio/video
1,366 dots (horizontal) × 768 lines (vertical)
output.
Power Consumption:
/ 2 (SmartLink)
KDL-46S2510/KDL-46S2530: 220 W
21-pin Scart connector (CENELEC standard) including
KDL-40S2510/KDL-40S2530: 180 W
audio/video input, RGB input, selectable audio/video
KDL-32S2510/KDL-32S2520/KDL-32S2530: 125 W
output, and SmartLink interface.
Standby Power Consumption*:
3
0.3 W
Supported formats: 1080i, 720p, 576p, 576i, 480p, 480i
* Specified standby power is reached after the TV
Y: 1 Vp-p, 75 ohms, 0.3V negative sync
finishes necessary internal processes.
P
B/CB: 0.7 Vp-p, 75 ohms
Dimensions (w × h × d):
P
R/CR: 0.7 Vp-p, 75 ohms
KDL-46S2510/KDL-46S2530:
3
Approx. 1,120 × 805 × 334 mm (with stand)
Audio input (phono jacks)
Approx. 1,120 × 755 × 116 mm (without stand)
500 mVrms
KDL-40S2510/KDL-40S2530:
Impedance: 47 kilo ohms
Approx. 988 × 716 × 334 mm (with stand)
HDMI IN 4, 5
Approx. 988 × 664 × 103 mm (without stand)
Video: 1080i, 720p, 576p, 576i, 480p, 480i
KDL-32S2510/KDL-32S2520/KDL-32S2530:
Audio: Two channel linear PCM
Approx. 792 × 593 × 219 mm (with stand)
32, 44.1 and 48 kHz, 16, 20 and 24 bits
Approx. 792 × 546 × 99 mm (without stand)
Analogue audio (phono jacks):
Mass:
500 mVrms, Impedance 47 kilohms
KDL-46S2510/KDL-46S2530:
(HDMI IN 4 only)
Approx. 34 kg (with stand)
6 S video input (4-pin mini DIN)
Approx. 28 kg (without stand)
6 Video input (phono jack)
KDL-40S2510/KDL-40S2530:
6 Audio input (phono jacks)
Approx. 27 kg (with stand)
Audio output (Left/Right) (phono jacks)
Approx. 21 kg (without stand)
PC PC Input (15 Dsub) (see page 37)
KDL-32S2510/KDL-32S2520/KDL-32S2530:
G: 0.7 Vp-p, 75 ohms, non Sync on Green
Approx. 17 kg (with stand)
B: 0.7 Vp-p, 75 ohms, non Sync on Green
Approx. 15 kg (without stand)
R: 0.7 Vp-p, 75 ohms, non Sync on Green
HD: 1-5 Vp-p
Panel System
VD: 1-5 Vp-p
LCD (Liquid Crystal Display) Panel
PC audio input (minijack)
TV System
i Headphones jack
Analogue: Depending on your country/region selection:
CAM (Conditional Access Module) slot
B/G/H, D/K, L, I
Digital: DVB-T
Colour/Video System
Analogue: PAL, SECAM
NTSC 3.58, 4.43 (only Video In)
Digital: MPEG-2 MP@ML
Aerial
75 ohm external terminal for VHF/UHF
36
GB
KDL-46/40/32/26S2000
2-894-287-42(1)

010COV.book Page 37 Monday, November 13, 2006 9:42 AM
Sound Output
Optional Accessories
10 W + 10 W
• Wall-Mount Bracket
SU-WL51 (for KDL-46S2510/KDL-46S2530
Supplied Accessories
KDL-40S2510/KDL-40S2530:)
Refer to “1: Checking the accessories” on page 4.
SU-WL31 (for KDL-32S2510/KDL-32S2520/
KDL-32S2530)
Design and specifications are subject to change
without notice.
PC Input Signal Reference Chart
Horizontal
Vertical
Signals Horizontal (Pixel) Vertical (Line)
frequency
Standard
frequency (Hz)
(kHz)
VGA 640 480 31.5 60 VGA
640 480 37.5 75 VESA
720 400 31.5 70 VGA-T
SVGA 800 600 37.9 60 VESA Guidelines
800 600 46.9 75 VESA
XGA 1024 768 48.4 60 VESA Guidelines
1024 768 56.5 70 VESA
1024 768 60 75 VESA
WXGA 1280 768 47.4 60 VESA
1280 768 47.8 60 VESA
1360 768 47.7 60 VESA
• This TV’s PC input does not support Sync on Green or Composite Sync.
Additional Information
• This TV’s PC input does not support interlaced signals.
• This TV’s PC input supports the boldfaced signals in the above chart with a 60 Hz vertical frequency.
• For the best picture quality, it is recommended to use signals with a 60 Hz vertical frequency from a personal computer. In plug
and play, signals with a 60 Hz vertical frequency will be selected automatically.
37
GB
KDL-46/40/32/26S2000
2-670-908-43(1)
010COV.book Page 38 Monday, November 13, 2006 9:42 AM
Troubleshooting
Check whether the 1 (standby) indicator is flashing in red.
When it is flashing
The self-diagnosis function is activated.
1 Measure how long the 1 (standby) indicator flashes and stops flashing.
For example, the indicator flashes for two seconds, stops flashing for one second, and flashes for two seconds.
2 Press 1 on the TV (top side) to switch it off, disconnect the mains lead, and inform your dealer or
Sony service centre of how the indicator flashes (duration and interval).
When it is not flashing
1 Check the items in the tables below.
2 If the problem still persists, have your TV serviced by qualified service personnel.
Picture
Problem Cause/Remedy
No picture (screen is dark) and
• Check the aerial connection.
no sound
• Connect the TV to the mains, and press 1 on the TV (top side).
•If the 1 (standby) indicator lights up in red, press "/1.
No picture or no menu
• Check that the optional equipment is on and press / repeatedly until
information from equipment
the correct input symbol is displayed on the screen.
connected to the scart
• Check the connection between the optional equipment and the TV.
connector
Double images or ghosting
• Check aerial/cable connections.
• Check the aerial location and direction.
Only snow and noise appear
• Check if the aerial is broken or bent.
on the screen
• Check if the aerial has reached the end of its serviceable life (three to five
years in normal use, one to two years at the seaside).
Distorted picture (dotted lines
• Keep the TV away from electrical noise sources such as cars, motorcycles,
or stripes)
hair-dryers or optical equipment.
• When installing optional equipment, leave some space between the optional
equipment and the TV.
• Make sure that the aerial is connected using the supplied coaxial cable.
• Keep the aerial cable away from other connecting cables.
Picture noise when viewing a
• Select “Manual Programme Preset” in the “Analogue Set-up” menu and
TV channel
adjust “AFT” (Automatic Fine Tuning) to obtain better picture reception
(page 29).
Some tiny black points and/or
• The picture of a display unit is composed of pixels. Tiny black points and/or
bright points on the screen
bright points (pixels) on the screen do not indicate a malfunction.
No colour on programmes
• Select “Reset” in the “Picture” menu to return to the factory settings
(page 20).
No colour or irregular colour
• Check the connection of the Y, PB/CB, PR/CR jacks of 3.
when viewing a signal from the
• Make sure that the Y, P
B/CB, PR/CR jacks of 3 are firmly seated in their
Y, P
B/CB, PR/CR jacks of 3
respective sockets.
38
GB
KDL-46/40/32/26S2000
2-670-908-43(1)
010COV.book Page 39 Monday, November 13, 2006 9:42 AM
Sound
Problem Cause/Remedy
No sound, but good picture
•Press 2 +/– or % (Mute).
• Check that “Speaker” is set to “On” in the “Set-up” menu (page 26).
Noisy sound
• See the “Picture noise” causes/remedies on page 38.
Channels
Problem Cause/Remedy
The desired channel cannot be
• Switch between digital and analogue mode and select the desired digital/
selected
analogue channel.
Some channels are blank
• Scrambled/Subscription only channel. Subscribe to the Pay Per View
service.
• Channel is used only for data (no picture or sound).
• Contact the broadcaster for transmission details.
Digital channel is not displayed
• Contact a local installer to find out if digital transmissions are provided in
your area.
• Upgrade to a higher gain aerial.
General
Problem Cause/Remedy
The TV turns off automatically
• Check if the “Sleep Timer” is activated, or confirm the “Duration” setting of
(the TV enters standby mode)
“On Timer” (page 25).
• If no signal is received and no operation is performed in the TV mode for
10 minutes, the TV automatically switches to standby mode.
Additional Information
The TV turns on automatically
• Check if the “On Timer” is activated (page 26).
Some input sources cannot be
• Select “AV Preset” in the “Set-up” menu and cancel “Skip” of the input
selected
source (page 25).
The remote does not function
• Replace the batteries.
39
GB
KDL-46/40/32/26S2000
2-670-908-43(1)

010COV.book Page 40 Monday, November 13, 2006 9:42 AM
Index
Numerics
D
Product Information
26
1 Digit Direct 28
Digital Auto Tuning 31
Programme index table
13
14:9
14
Digital Manual Tuning
31
Programme Labels
28
4:3 Default
24
Digital Set-up
32
Programme List Edit
31
4:3
14
Digital Set-up menu
31
Programme Sorting
28
Digital Tuning
31
A
Q
Display Area
24
Adv. Contrast Enhancer 21
Quiet Power On 26
Dual Sound
23
Advanced Settings
21
R
Aerial, connecting
4
E
Reminder 16
AFT
29
EPG (Digital Electronic Programme
Remote control
All Reset
26
Guide)
15
inserting batteries
4
Analogue Set-up menu
28
Equipment labels
25
overview
11
Audio Filter
29
F
sensor
12
Audio Language
32
Reset
Audio Type
32
Fastext 14
Auto Adjustment
27
Favourite list
17
PC settings
27
picture
20
Auto Clock Set
14, 18, 35
G
sound
22
Auto Format
24
Gamma 21
Auto S Video
25
S
Auto Start-up
25
H
Screen Format 24, 27
Auto Tuning
Headphones
Screen menu
24
analogue and digital channels
6
connecting
33
Screen mode
14
analogue channels only
28
Speaker Link
23
Set-up menu
25
digital channels only
31
Horizontal Shift
24, 27
Sharpness
21
Auto Volume
22
Hue
20
Skip
25, 30
AV Preset
25
I
Sleep Timer
25
AV2 Output
26
Input signal index table 18
Smart
14
Sound menu
22
B
L
Sound Mode
22
Backlight 20
Label 29
Speaker
26
Balance
22
Language
5, 25
Specifications
36
Bass
22
Light Sensor
26
Standby (1) indicator
12
Batteries, inserting into the remote
4
Live Colour
21
Subtitle Language
32
BBE
22
Subtitle Setting
32
Black Corrector
21
M
Surround
22
Brightness
20
Manual Programme Preset 29
Manual timer REC
16
T
C
MENU
19
Target Inputs
CA Module Set-up 32
MPEG Noise Reduction
21
picture
20
Category list
15
screen
24
Channels
N
sound
22
auto-tuning
6
Noise Reduction 21
Technical Set-up
32
selecting
13
O
Text
14
Skip
30
Clear White
On Timer 26
Timer ( ) indicator
12
21
Timer list
16
Clock Set
26
P
Timer REC
15
Colour
20
Parental Lock 32
Timer Settings
25
Colour System
26
PC Settings menu
27
Tools
14, 18, 35
Colour Temperature
20
Phase
27
Treble
22
Confirm
30
Picture menu
20
Connecting
Picture Mode
20
V
an aerial/VCR
4
Picture Off ( ) indicator
12
VCR
optional equipment
33
PIN Code
32
connecting
4
Contrast
20
Pitch
27
recording
15
Country
5
Power (") indicator
12
Vertical Shift
24, 27
Power (1) switch
12
Vertical Size
24
Power Management
27
Volume Offset
22
Power Saving
26
40
GB
KDL-46/40/32/26S2000
2-670-908-43(1)
