Dell OptiPlex 320: Desktop Computer — Back View
Desktop Computer — Back View: Dell OptiPlex 320
Table of contents
- Notes, Notices, and Cautions
- Contents
- Finding Information What Are You Looking For? Find It Here
- What Are You Looking For? Find It Here
- What Are You Looking For? Find It Here
- Setting Up Your Computer Set Up Your Keyboard and Mouse
- Set Up Your Monitor
- Power Connections
- System Views Mini Tower Computer — Front View 3 floppy drive Insert a floppy disk into this drive.
- 9 headphone connector Use the headphone connector to attach headphones.
- Mini Tower Computer — Back View
- Mini Tower Computer — Back-Panel Connectors
- 7 microphone connector
- Desktop Computer — Front View
- Desktop Computer — Back View
- Desktop Computer — Back-Panel Connectors
- 9 video connector
- Removing the Computer Cover Before You Begin Before Working Inside Your Computer
- Mini Tower Computer
- 1 security cable slot
- Desktop Computer
- Inside Your Computer Mini Tower Computer
- System Board Components
- Jumper Settings Mini Tower Computer
- Jumper Setting Description Desktop Computer
- System Board Components
- Jumper Settings Desktop Computer
- Jumper Setting Description Solving Problems Dell Diagnostics When to Use the Dell Diagnostics
- Starting the Dell Diagnostics From Your Hard Drive Starting the Dell Diagnostics From the Drivers and Utilities CD
- Dell Diagnostics Main Menu Option Function Tab Function
- System Lights Power Light Problem Description Suggested Resolution
- Diagnostic Lights Light Pattern Problem Description Suggested Resolution
- Light Pattern Problem Description Suggested Resolution
- Light Pattern Problem Description Suggested Resolution
- Beep Codes Code Cause Code Cause
- Resolving Software and Hardware Incompatibilities Using Microsoft Windows XP System Restore Creating a Restore Point Restoring the Computer to an Earlier Operating State
- Undoing the Last System Restore Enabling System Restore Reinstalling Microsoft Windows XP Before You Begin
- Reinstalling Windows XP Booting From the Operating System CD
- Windows XP Setup
- Using the Drivers and Utilities CD Drivers for Your Computer
5 power light The power light illuminates and blinks or remains solid to indicate different
operating states:
• No light — The computer is turned off.
• Steady green — The computer is in a normal operating state.
• Blinking green — The computer is in a power-saving mode.
• Blinking or solid amber — See "Power Problems" in your online
User’s Guide
.
To exit from a power-saving mode, press the power button or use the keyboard or
the mouse if it is configured as a wake device in the Windows Device Manager.
For a description of light codes that can help you troubleshoot problems with your
computer see "System Lights" on page 33.
6 diagnostic lights Use the lights to help you troubleshoot a computer problem based on the
diagnostic code. For more information, see "Diagnostic Lights" on page 34.
7 link integrity light
• Green — A good connection exists between a 10-Mbps network and the
computer.
• Orange — A good connection exists between a 100-Mbps network and the
computer.
• Off — The computer is not detecting a physical connection to the network.
8 headphone connector Use the headphone connector to attach headphones.
9 floppy drive Insert a floppy disk into this drive.
10 CD/DVD drive Insert a CD or DVD (if supported) into this drive.
11 location of Service Tag Use the Service Tag to identify your computer when you access the Dell Support
website or call technical support.
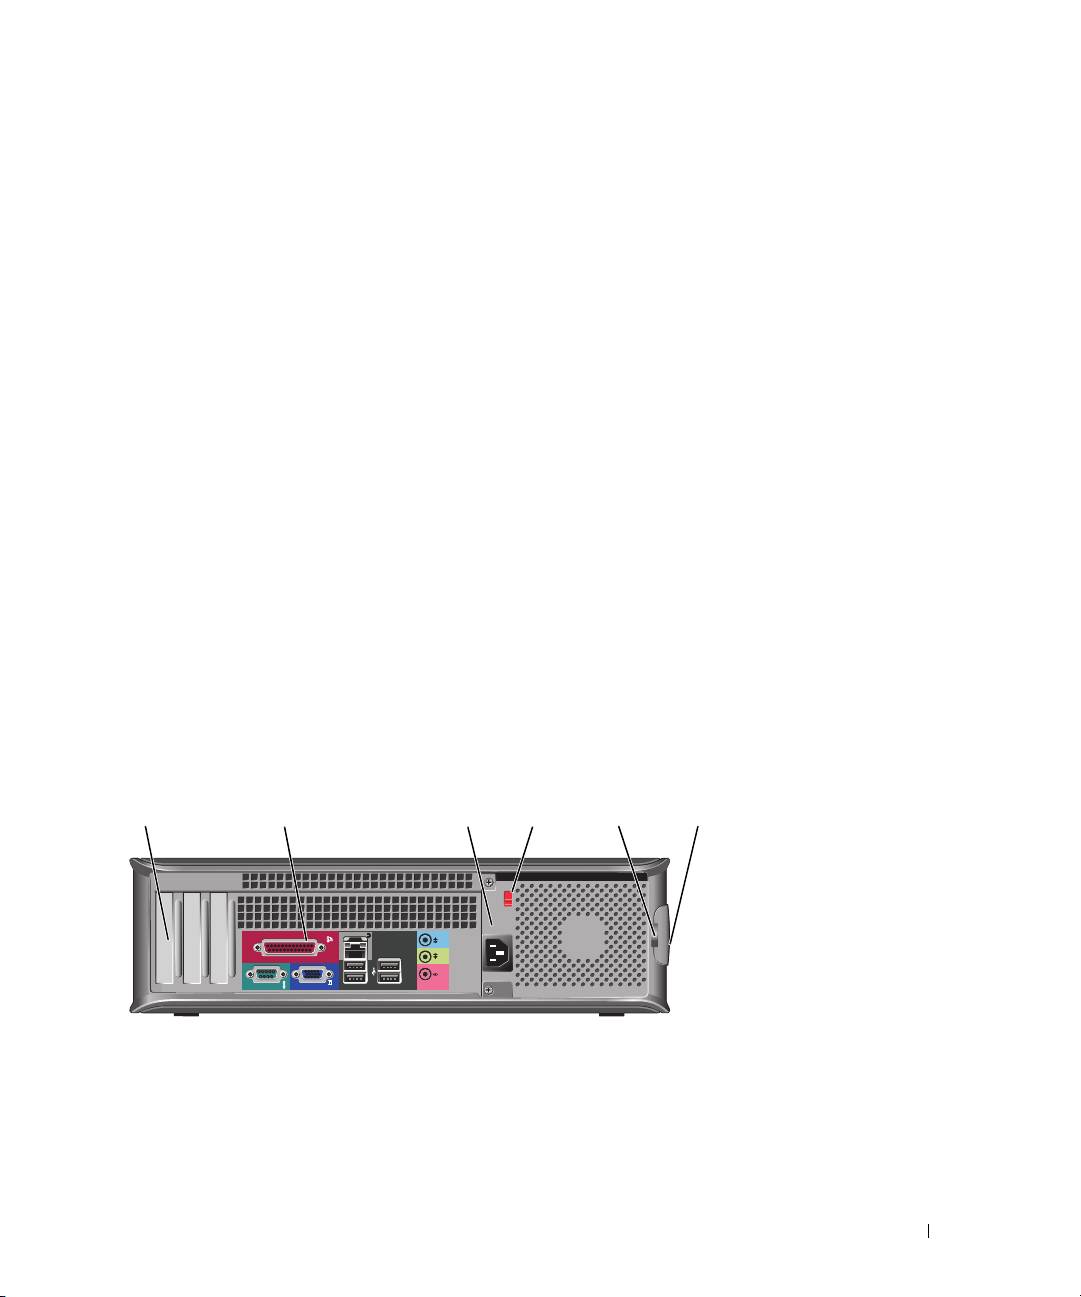
Desktop Computer — Back View
1
2 3 4 6
5
1 card slots Access connectors for any installed PCI and PCI Express Cards.
2 back-panel connectors Plug serial, USB, and other devices into the appropriate connector.
See "Desktop Computer — Back-Panel Connectors" on page 18.
3 power connector Insert the power cable into this connector.
Quick Reference Guide 17
