Fagor MO-23DG: 7. DESCRIPTION (Fig. A) 8. FUNCTIONING
7. DESCRIPTION (Fig. A) 8. FUNCTIONING: Fagor MO-23DG

15
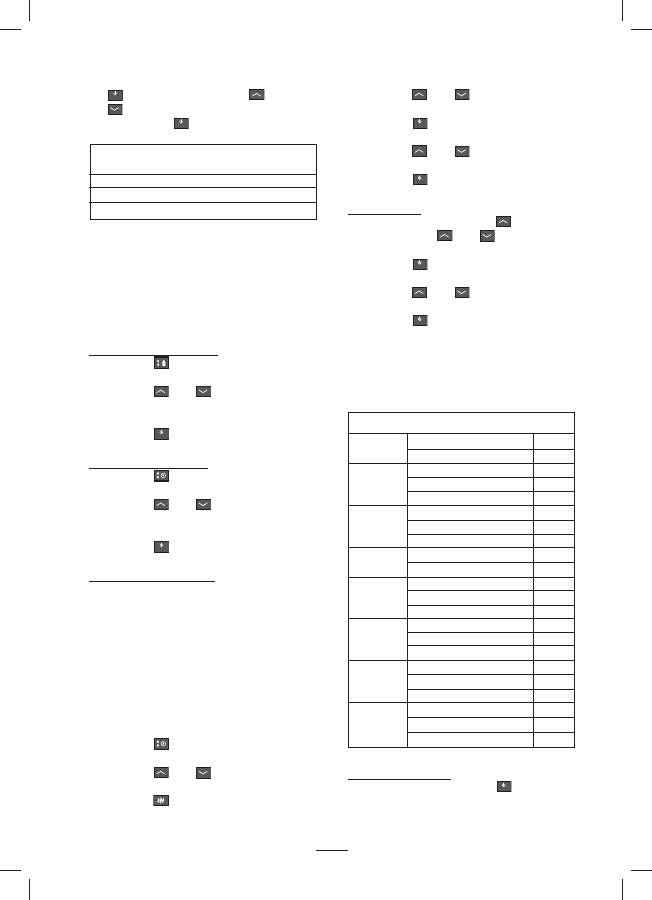
1.
Door
2.
Window
3.
Turntable
4.
Wheel support
5.
Control board
6.
Door handle
7.
Grill
8.
Rack
a.
MICROWAVE button
b.
GRILL/COMBI button
c.
DEFROST by weight button
d.
DEFROST by time button
e.
Hour/Chronometer button
f.
STOP/CANCEL button
g.
INCREASE button
h.
DECREASE button
j.
START/ACCEPT/increase 30 seconds
•
TURNTABLE (5):
This allows the food
to be evenly cooked without needing to
turn it.
- Its rotation is guided by the drive
shaft and the roller support. It turns
in either direction.
- If it is not turning, check all the
elements are correctly positioned.
- It can be used as a cooking dish.
•
ROLLER SUPPORT (3):
Do not attempt
to turn the roller support manually, as
this could damage the drive system. If it
is not rotating correctly, make sure there
are no obstructions under the turntable.
7. DESCRIPTION (Fig. A) 8. FUNCTIONING
1. Clock Setting (e)
1)
Press "
" once, the hour figure flash;
2)
Press "
" or "
" to adjust the hour
figures,the input time should be within
0--23
.
3)
Press "
", the minute figures will
flash.
4)
Press "
" or "
" to adjust the
minute figures, the input time should
be within
0--59
.
5)
Press "
" to finish clock setting
":" will flash, the "
" indicator will
go out. The clock setting has been
finished.
Note:
1) If the clock is not set, it would not
function when powered.
2) During the process of clock setting,
if you press " STOP ", the oven
will go back to the previous status
automatically.
2. Microwave Cooking (a)
1)
Press the "
" key once, and "
P100
"
will display.
2)
Press "
" for times or press "
" and "
" to select the microwave
power from100% to 10%. "
P100
",
"
P80
", "
P50
", "
P30
", "
P10
" swill display
in order.
3)
Press "
+30˝ / OK
" to confirm.
4)
Press "
" or "
" to adjust the
cooking time. (The time setting should
be
0:05- 95:00
).
5)
Press "
+30˝ / OK
" to start cooking.
Note:
The step quantities for the adjustment
time of the coding switch are as
follow:
0---1 min. : 5 seconds
1---5 min. : 10 seconds
5---10 min. : 30 seconds
10---30 min. : 1 minute
30---95 min. : 5 minutes
Microwave Power Chart
Microwave
100% 80% 50% 30% 10%
power
Display
P100 P80 P50 P30 P10
3. Grill or Combi. Cooking (b)
Press "
" the LED will display "
G
", and
press "
" for times or press the "
" or
"
" to choose the power you want, and
"
G
","
C-1
" or "
C-2
" will display. Then press
•
Thin strips of tin foil can be used to prevent
overcooking of exposed areas. However,
be careful not to use too much tin foil and
make sure it is at a minimum distance of 2.5
cm from the inside walls of the microwave.
16
"
+30˝ / OK
" to confirm, and press "
" or
"
" to set cooking time from
0:05
to
95:00
. Press "
+30˝ / OK
" again to start cooking.
Order Display Microwave
Grill
power
power
1
G
0%
100%
2
C-1
55%
45%
3
C-2
36%
64%
Note:
If half the grill time passes, the oven
sounds twice, and this is normal. In
order to have a better effect of grilling
food, you should turn the food over,
close the door, and then if no operation
the oven will continue cooking.
4. Defrost By Weight (c)
1)
Press "
" once, the screen will
display "
dEF1
".
2)
Press "
" or "
" to select the food
weight. The range of weight is 100-
2000g.
3)
Press "
+30˝ / OK
" key to start defrosting.
5. Defrost By Time (d)
1)
Press "
" once, the screen will
display "
dEF2
".
2)
Press "
" or "
" to select the
cooking time. The maximum time is 95
minutes.
3)
Press "
+30˝ / OK
" key to start defrosting.
6. Multi-Stage Cooking
Two stages can be maximumly set. If one
stages is defrosting, it should be put in
the first stage. The buzzer will ring once
after each stage and the next stage will
begin.
Note:
Auto menu cannot be set as one
of the multi-stage.
Example:
If you want to defrost the food
for 5 minutes, then to cook with 80%
microwave power for 7 minutes. The
steps are as following:
1)
Press "
" twice, the LED display
"
dEF2
".
2)
Press "
" or "
" to adjust the
defrost time of 5 minutes;
3)
Press "
" once,LED will dispaly
"
P100
".
4)
Press "
" or "
" to choose
microwave power till "
P80
" display;
5)
Press "
+30˝ / OK
" to confirm,LED will display
"
P80
".
6)
Press "
" or "
" to adjust the
cooking time of 7 minutes;
7)
Press "
+30˝ / OK
" to start cooking.
7. Auto Menu
1)
In waiting state, press "
" first and
then press "
" or "
" to choose the
menu from "
A-1
" to "
A-8
".
2)
Press "
+30˝ / OK
" to confirm the menu you
choose.
3)
Press "
" or "
" to choose the
food weight.
4)
Press "
+30˝ / OK
" to start cooking.
5)
After cooking finish, the buzzer
sounds five times.The LED display
"
0:00
".
If the time has been set, current time
will be displayed.
Menu Weight
Display
200
g
200
400
g
400
250
g
250
350
g
350
450
g
450
200
g
200
300
g
300
400
g
400
50 g. (with 450 ml cold water) 50
100 g. (with 800 ml cold water) 100
200
g
200
400
g
400
600
g
600
250
g
250
350
g
350
450
g
450
1 cup (120 ml)
1
2 cups (240 ml)
2
3 cups (360 ml)
3
50
g
50
85
g
85
100
g
100
A-1
Pizza
A-2
Meat
A-3
Vegetable
A-4
Pasta
A-5
Potato
A-6
Fish
A-7
Beverage
A-8
Popcorn
8. Speedy Cooking
1)
In waiting state, press "
+30˝ / OK
" key to
cook with 100% power level for 30
seconds. Each press on the same
Оглавление
- 4. PRINCIPIOS BÁSICOS
- 6. GUÍA DE UTENSILIOS
- 9. SI EL HORNO NO FUNCIONA…
- 3. ADVERTÊNCIAS DE SEGURANÇA
- 4. PRINCÍPIOS BÁSICOS
- 6. GUIA DE UTENSÍLIOS
- 9. SE O FORNO NÃO FUNCIONAR…
- 10. LIMPEZA E MANUTENÇÃO
- 3. SAFETY PRECAUTIONS
- 4. BASIC PRINCIPLES
- 7. DESCRIPTION (Fig. A) 8. FUNCTIONING
- 9. IF THE MICROWAVE IS NOT WORKING…
- 11. INFORMATION FOR THE CORRECT DISPOSAL OF ELECTRICAL AND ELECTRONIC APPLIANCES
- 3. PRESCRIPTIONS DE SÉCURITÉ
- 4. PRINCIPES DE BASE
- 7. DESCRIPTION (Fig. A) 8. FONCTIONNEMENT
- 9. SI LE FOUR NE FONCTIONNE PAS…
- 3. BIZTONSÁGI FIGYELMEZTETÉSEK
- 4. ALAPELVEK
- 7. LEÍRÁS (A. Ábra) 8. M Ű KÖDÉS
- 9. HA A SÜT Ő NEM M Ű KÖDIK…
- 10. TISZTÍTÁS ÉS KARBANTARTÁS
- 3. BEZPE Č NOSTNÍ POKYNY
- 4. ZÁKLADNÍ PRAVIDLA
- 7. POPIS (Obr. A) 8. CHOD MIKROVLNNÉ TROUBY
- 9. KDYŽ TROUBA NEFUNGUJE…
- 11. INFORMACE, TÝKAJÍCÍ SE SPRÁVNÉHO NAKLÁDÁNÍ S ODPADEM Z ELEKTRICKÝCH A ELEKTRONICKÝCH SPOT Ř EBI ČŮ
- 3. BEZPE Č NOSTNÉ POKYNY
- 4. ZÁKLADNÉ PRAVIDLÁ
- 7. OPIS (Obr. A) 8. CHOD MIKROVLNNEJ RÚRY
- 9. AK RÚRA NEFUNGUJE…
- 11. INFORMÁCIA, TÝKAJÚCA SA SPRÁVNEHO NAKLADANIA S ODPADOM Z ELEKTRICKÝCH A ELEKTRONICKÝCH SPOTREBI Č OV
- 3. Ś RODKI OSTRO Ż NO Ś CI
- 4. PODSTAWOWE ZASADY
- 6. ZALECENIA DOTYCZ Ą CE NACZY Ń
- 9. GDY KUCHENKA NIE DZIA Ł A …
- 11. INFORMACJA DOTYCZ Ą CA PRAWID Ł OWEGO ZARZ Ą DZANIA ODPADAMI URZ Ą DZE Ń ELEKTRYCZNYCH I ELEKTRONICZNYCH"
- 3. МЕРЫ ПРЕДОСТОРОЖНОСТИ
- 4. ОСНОВНЫЕ РЕКОМЕНДАЦИИ
- 7. ОБОЗНАЧЕНИЯ (РИС. A) 8. УПРАВЛЕНИЕ
- 9. ЕСЛИ ПЕЧЬ НЕ РАБОТАЕТ…
- ΔϳΪδΠϟΔϗΎϋϹϱϭΫϝΎϔσϷϢϬϴϓΎϤΑιΎΨηϸϟϢϤμϣϭϪΟϮϣήϴϏίΎϬΠϟάϫ ϢϬϨϣΏήϘϟΎΑΐϗήϣϙΎϨϫϥϮϜϳΎϣΪϨϋϻ·ΓήΒΨϟϲϓκϘϧϭΔϴγΎδΤϟϭΔϴϠϘόϟ Ϸΐϗέ ίΎϬΠϟΎΑϥϮΒόϠϳϻϲϜϟϝΎϔσ
- 11
- 1. INSTALAZIOA 3. SEGURTASUN OHARRAK 2. EZAUGARRI TEKNIKOAK
- 4. OINARRIZKO PRINTZIPIOAK
- 7. DESKRIPZIOA (A irudia) 8. FUNTZIONAMENDUA
- 9. LABEAK FUNTZIONATZEN EZ BADU…
- 11. APARATU ELEKTRIKOEN ETA ELEKTRONIKOEN HONDAKINEN GESTIO EGOKIRAKO INFORMAZIOA
