Fagor 9CFB91X – страница 2
Инструкция к Вытяжке Fagor 9CFB91X

1 / NOTICES TO THE USER EN
• ENVIRONMENTAL PROTECTION
— This appliance’s packaging material is recyclable. Help recycle it and protect the environ-
ment by dropping it off in the municipal receptacles provided for this purpose.
— Your appliance also contains a great amount of recyclable material. It is marked with this
label to indicate the used appliances that should not be mixed with other waste. This way,
the appliance recycling organised by your manufacturer will be done under
the best possible conditions, in compliance with European Directive 2002/96/
EC on Waste Electrical and Electronic Equipment. Contact your town hall or
your retailer for the used appliance collection points closest to your home.
— We thank you doing your part to protect the environment.
Warning
Installation should only be performed by installers and qualifi ed technicians.
Warning
Remove the protective fi lm from the cartridge fi lter before use.
21
1 / NOTICES TO THE USEREN
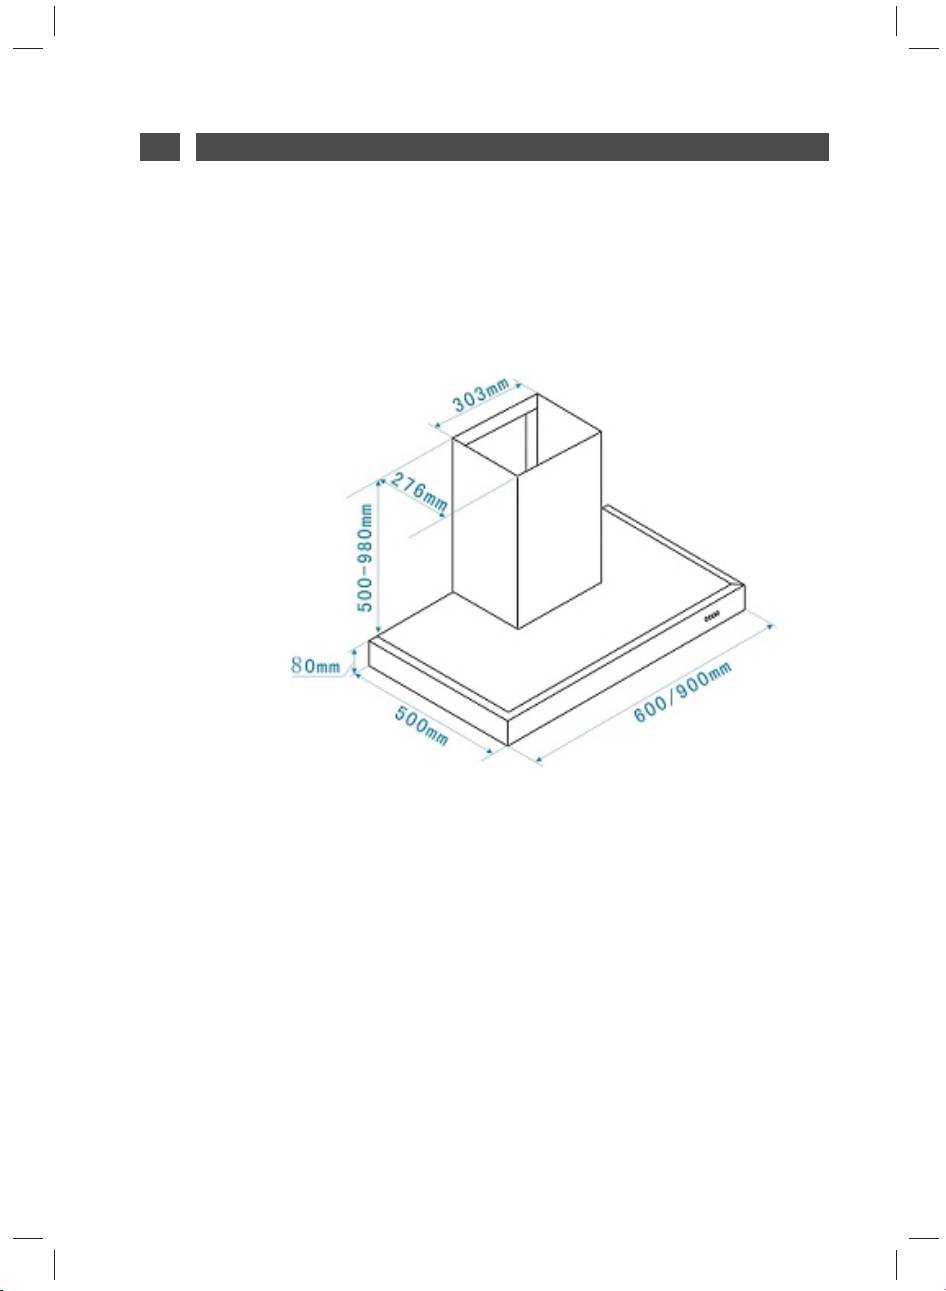
• DESCRIPTION OF YOUR APPLIANCE
22
2 / INSTALLING YOUR APPLIANCE EN
— The appliance must be unplugged during installation or when any repairs or maintenance
work is being performed.
— Ensure that the network voltage corresponds to the voltage noted on the identi cation
plate located inside the hood.
— If the electrical installation at your residence requires any changes in order to hook up
your Appliance, call upon a professional electrician.
— If the hood is being used in evacuation mode, do not connect the appliance to a
combustion gas exhaust duct (boiler, chimney, etc.) or to a CMV (controlled mechanical
ventilation) system.
— Under no circumstances should the exhaust duct empty into the attic.
— Install the hood at a safe distance of at least 70 cm from an electric, gas or combined
cooking hob.
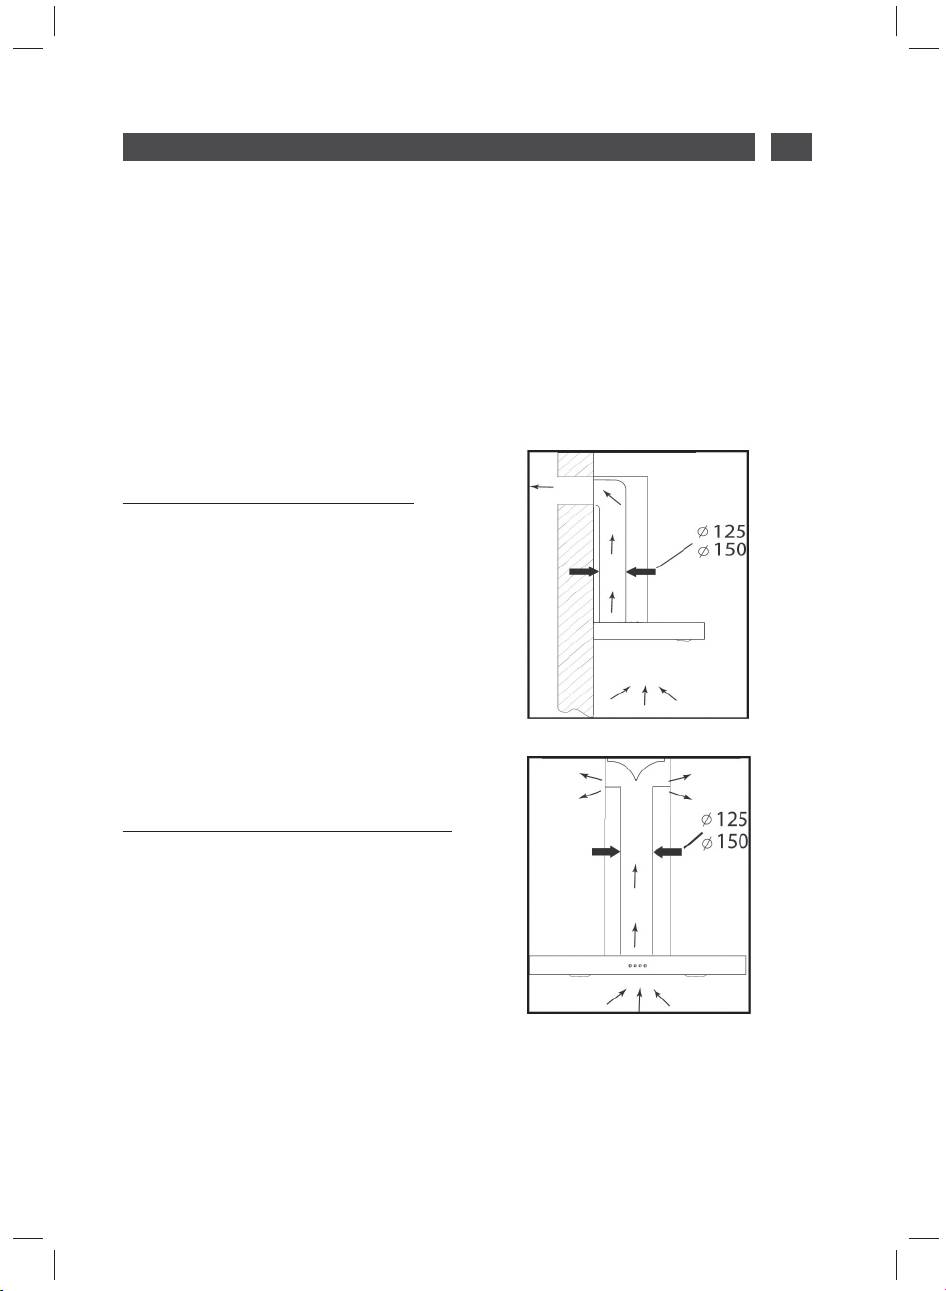
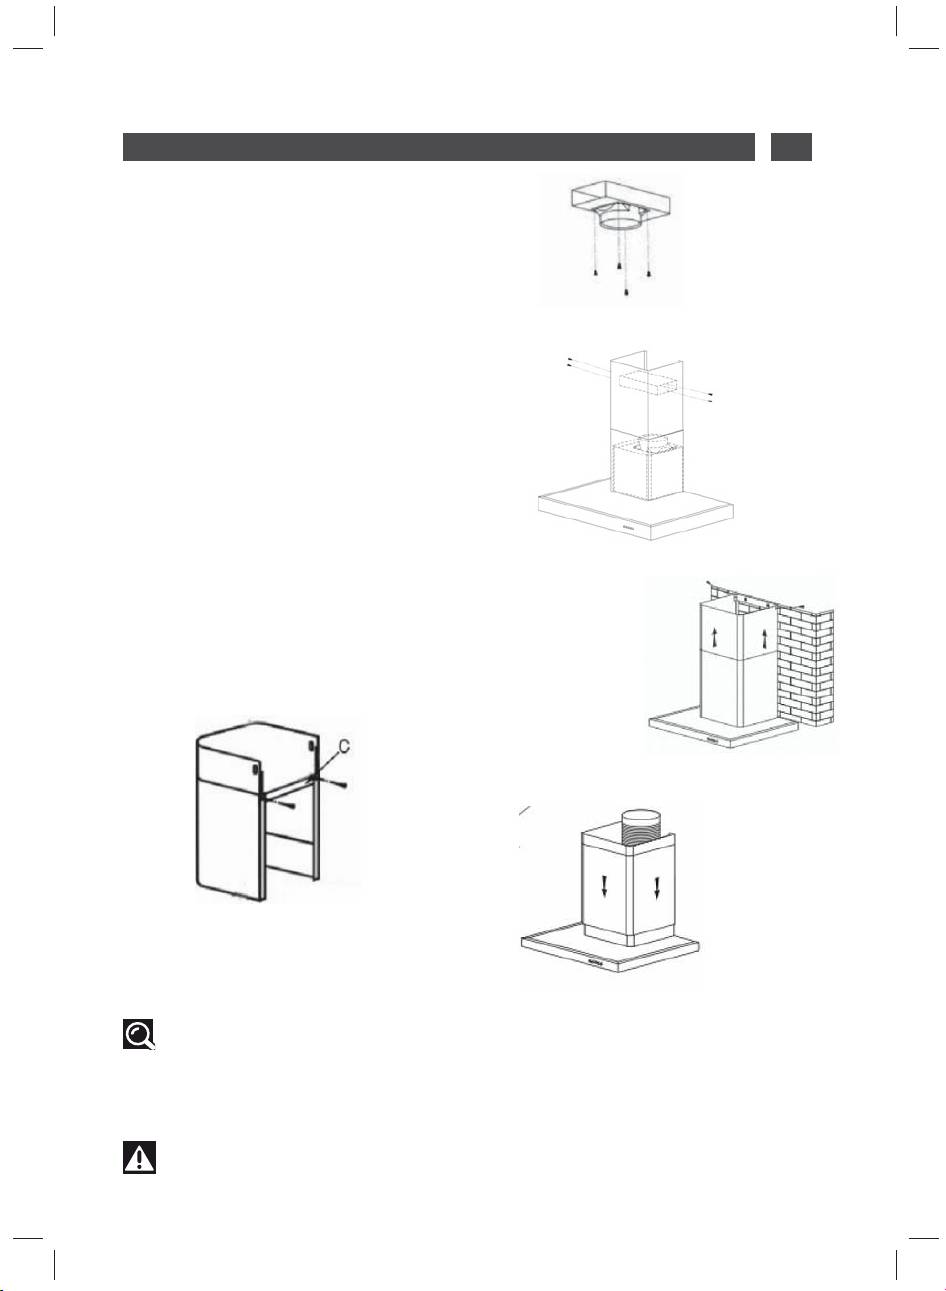
• USING THE EVACUATION MODE
If you possess an outlet to the exterior
(pic. 1)
Your hood can be connected to this outlet
using a ue (minimum diameter Ø mm that
is enamelled, in aluminium, exible or made
of in ammable material). If your ue is less
than 125 mm in diameter, you must use the
recycling mode.
pic.1
• USING THE RECYCLING MODE
If you do not possess an outlet to the exterior
(pic. 2)
All of our appliances can be used in recycling
mode.
In this case, you should add an active
carbon lter which will keep in odours. (See
Chapter 4: Changing the carbon lter.)
pic.2
23

2 / INSTALLING YOUR APPLIANCEEN
• ELECTRICAL CONNECTIONS
During installation and maintenance
operations, the appliance must be
unplugged from the electrical grid; fuses
must be cut off or removed.
The electrical connections are made before
the appliance is installed in its housing.
Ensure that:
— the electrical installation has suf cient
voltage,
— the electrical wires are in good
condition,
— the diameter of the wires complies with
the installation requirements.
Warning
This appliance is delivered with a H 05
2
VVF power cord that has three- 0.75 mm
conductors (neutral, phase and ground).
It must be connected to the main power
supply (which should be a 220-240 V single
phase current) via a CEI 60083 standardised
socket that should remain accessible after
installation, in keeping with installation
guidelines.
We cannot be held responsible for any
accident resulting from an inexistent,
defective or incorrect ground lead. The fuse
for your installation must be 10 or 16A. If
the power cable is damaged, call the after-
sales service department in order to avoid
danger.
Warning
If the electrical installation at your
residence requires any changes in order
to hook up your appliance, call upon a
professional electrician.
Warning
If the hood displays any malfunctions,
unplug the appliance or remove the fuse
corresponding to the electrical socket
where your appliance is plugged in.
24
2 / INSTALLING YOUR APPLIANCE EN
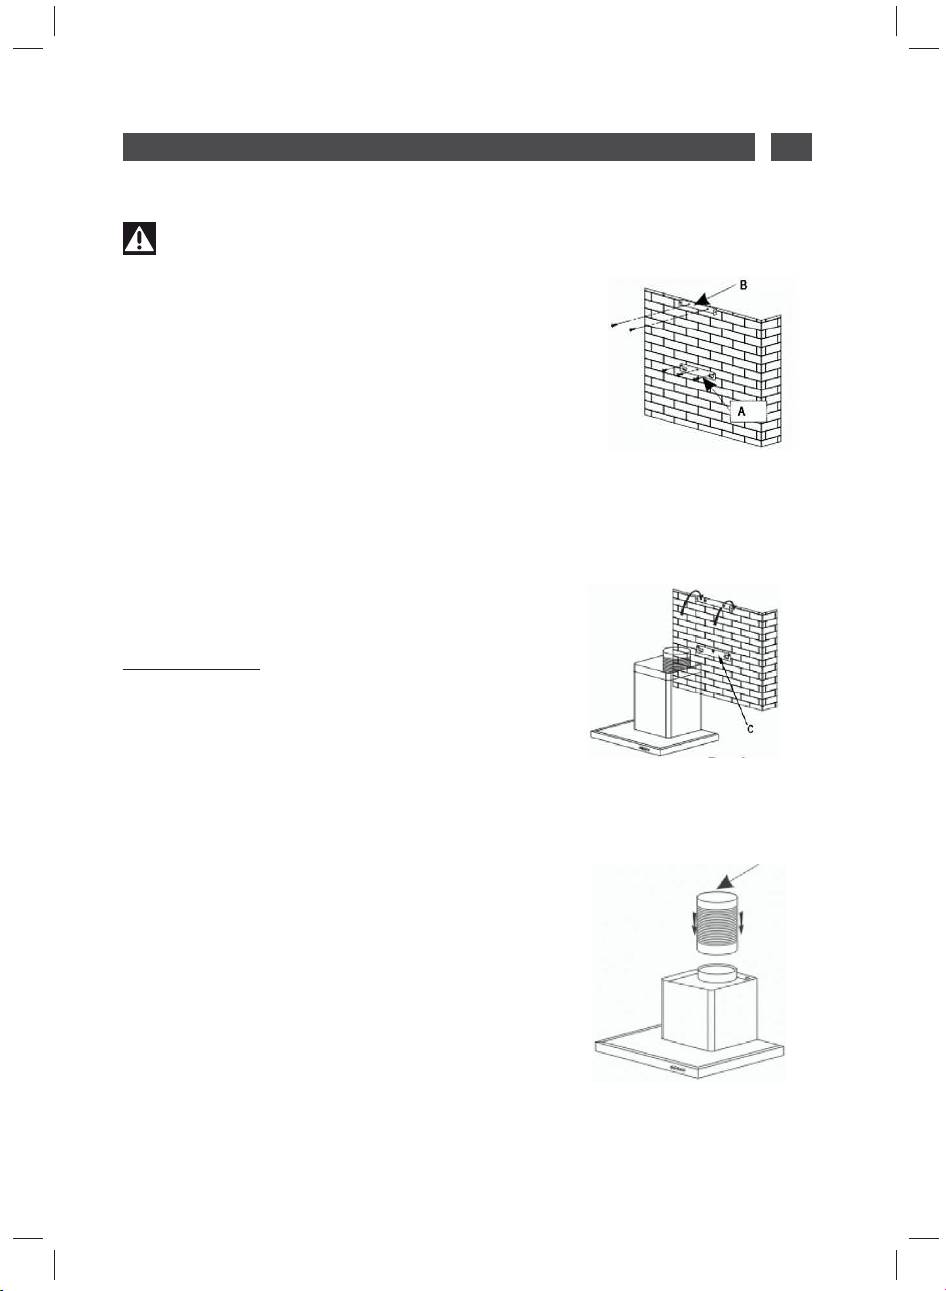
• ASSEMBLING THE HOOD
Warning
The hood must be installed
in compliance with all applicable
regulations concerning the ventilation of
premises. In France these regulations are
described in DTU 61.1 from the CSTB. In
particular, the evacuated air should never
be conveyed to a duct used to evacuate
smoke from appliances that use gas or
other combustible fuels. Unused ducts
may only be used after approval from a
competent specialist.
Pict 1
The minimum distance between the cooking
surface and the lowest part of the hood
must be 70 cm at least. If the instructions
for the hob installed under the hood
specify a distance of more than 70 cm, this
requirement must be respected.
Fixing to the wall :
— Mark a vertical line on the wall centred
on the cooktop.
— Mark on the wall the three holes that
have to be drilled, using the supplied
hood suspension hook and observing the
recommended distance. (part A Pic. 1)
— Drill the three 8 mm diameter holes in a
suitable position and insert the plugs.
— Before xing the hood, mount the non-
Pict 2
return valve on the motor outlet -Secure
the hood’s xing support, ensuring that it is
perfectly level. (part A Pic. 1)
— Fix the extendable evacuation sleeve
(not included) to the motor outlet without
impeding the movement of the non-return
valve.(Pic. 3)
— Fit and secure the body of the hood on
this support with the screws provided for
this purpose. (Pic. 2)
Pict 3
25
2 / INSTALLING YOUR APPLIANCEEN
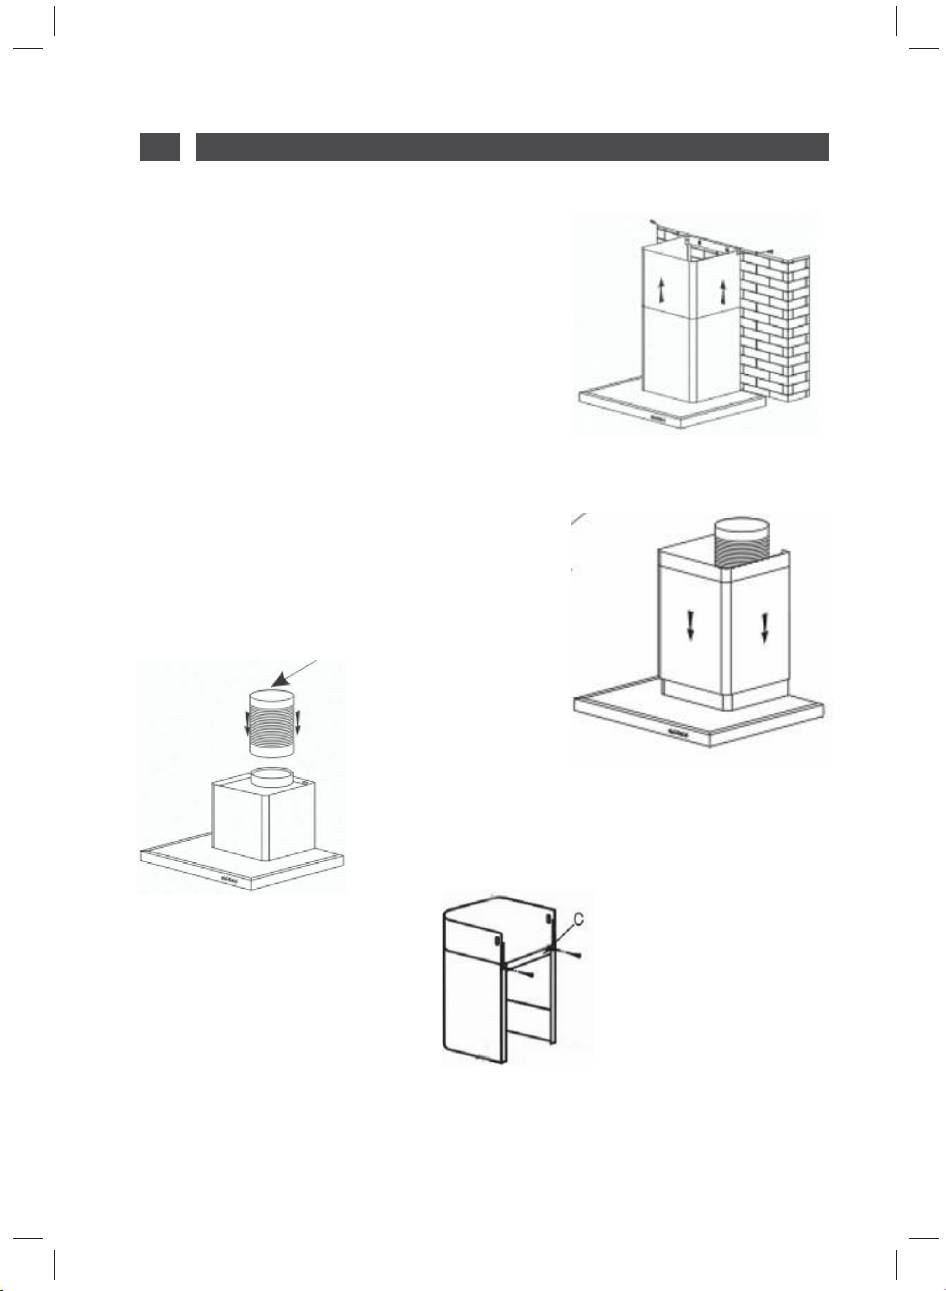
• ASSEMBLING THE VENTILATION
SHAFT
• Outdoor evacuation
— Calculate the nal height for xing the
duct support U-bracket (part B Pic. 1)
— Mark the two holes accordingly
— Drill 8 mm diameter holes and secure
the duct support bracket, ensuring that it is
xed on the same axis as the hood (part B
Pic. 1)
— Fix the at bracket behind the lower
duct.
Pict 6
— Fix the two ducts to the hood.(Pic. 5)
— Connect the sleeve to the air outlet to the
outside.
— Make the electrical connection to the
hood using the mains supply cable.
— Lift the upper duct up to the ceiling and
x it to the bracket using the screws.
Pict 5
Pict 3
Pict 4
26
2 / INSTALLING YOUR APPLIANCE EN
• Recycling
— Calculate the nal height for xing the
duct support U-bracket.
— Mark the two holes.
— Drill 8 mm diameter holes and secure
Pict 8
the duct support bracket, ensuring that it is
xed in the same axis as the hood.
— Fix the at bracket behind the lower
duct.
— Fit the sleeve adapter on the de ector
(Pic. 8).
— Connect the extendable sleeve to the
de ector.
— Fit the two parts of the duct on to the
hood (Pic. 5).
— Fit the de ector (Pic. 8) into the upper
duct by the ventilation inlets (Pic. 6)
— Make the electrical connection to the
hood using the mains supply cable.
— Lift the upper duct up to the ceiling and
x it to the bracket using the two screws.
Pict 6
Pict 4
Pict 5
Tip
For optimal use of your appliance, we recommend that you connect the hood to a 150
mm-diameter fl ue (not delivered with the appliance). Minimise the number of angles and
bends and the lengths of the fl ue. In the event that the hood will be operated using outdoor
evacuation, you should ensure a suffi cient infl ow of fresh air to avoid a pressure defi ciency
in the room.
Warning
Do not use tools to remove the safety fi lm of hood.
27
3 / USING YOUR APPLIANCEEN
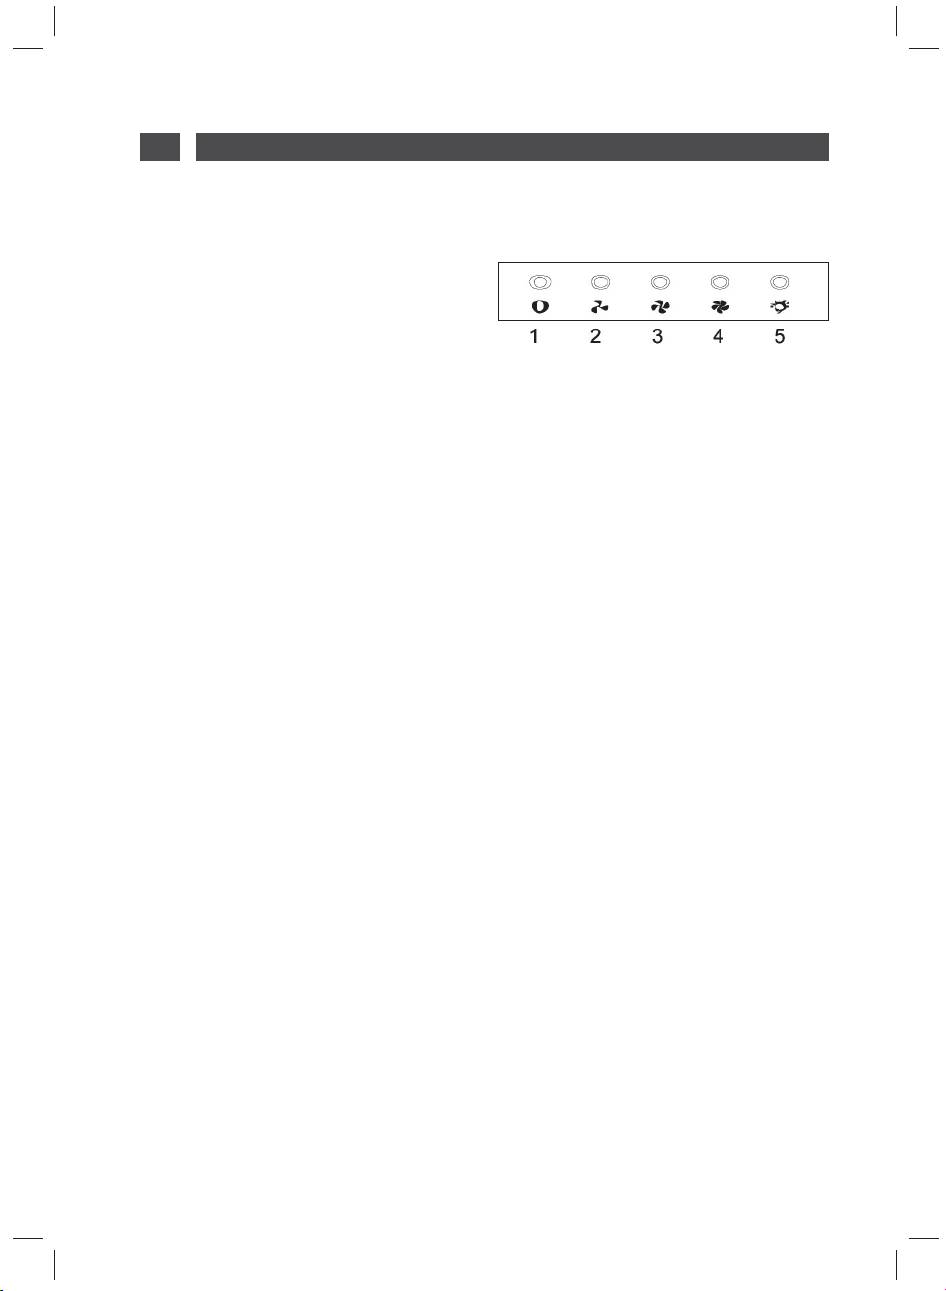
• DESCRIPTION OF CONTROL PANEL
Push button
1. Push stop button, and the motor will
stop.
2. Push the Low button, the buzzer will buzz
once, and the motor runs at low speed.
3. Push the Mid button, the buzzer will buzz
once, and the motor runs at mid speed.
4. Push the High button, the buzzer will
buzz once, and the motor runs at high
speed.
5. Push the light button and the two lights
will come on. Push it again and the light will
turn off.
28
4 / CARING FOR AND CLEANING YOUR APPLIANCE EN
Warning
Always unplug the hood before cleaning it or performing other maintenance acts.
Regular maintenance of your appliance is a guarantee of proper functioning, good
performance and durability.
Warning
Failure to respect the guidelines for cleaning the appliance and fi lters may cause
fi res. Please carefully adhere to the maintenance recommendations.
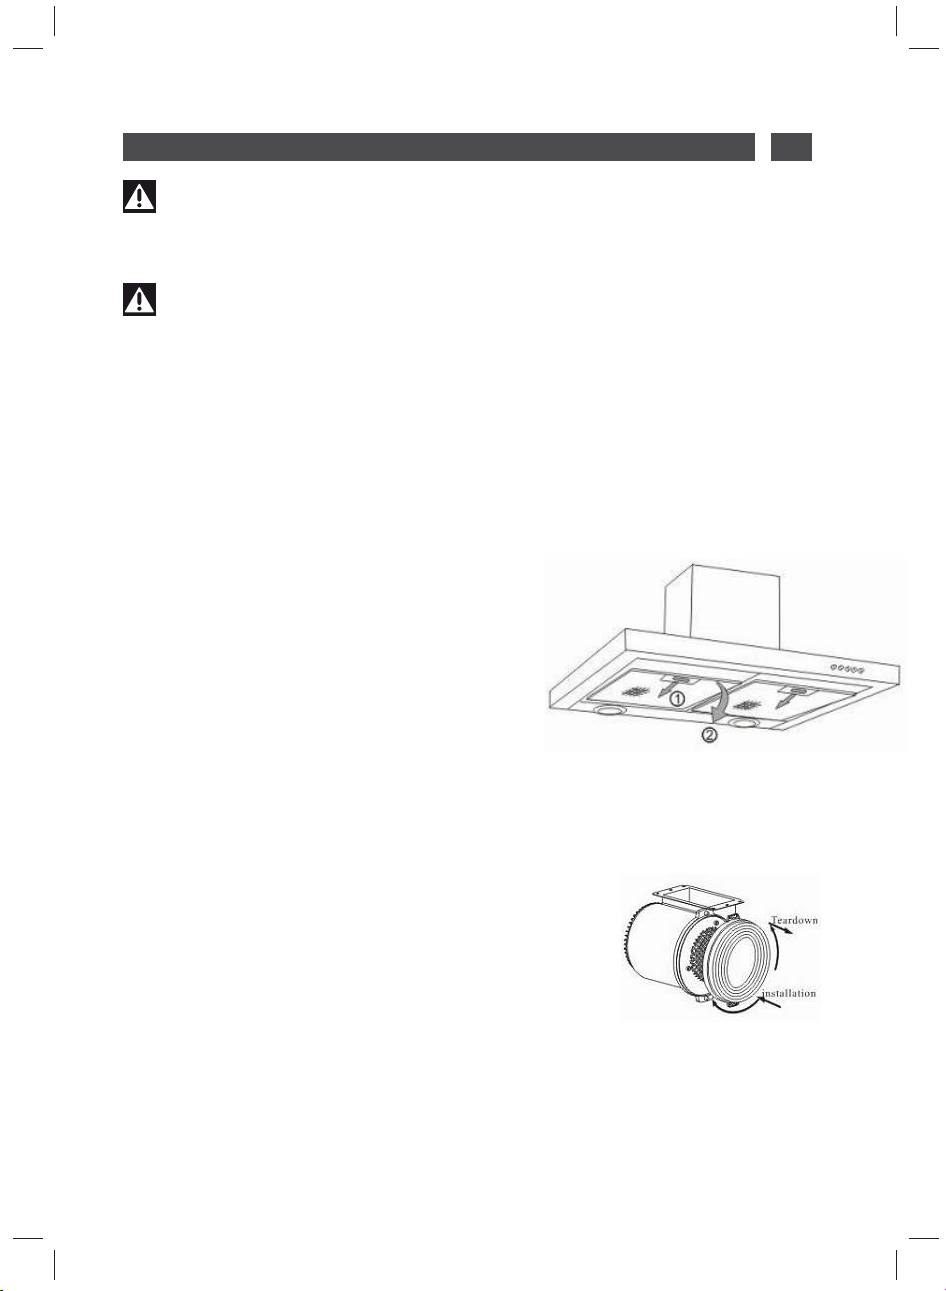
• CLEANING THE FILTER
CARTRIDGES
They must be cleaned after approximately
30 hours of use or at least once a month.
These lters can be cleaned in a vertical
position in your dishwasher.
Use a brush, hot water and mild detergent.
Rinse and dry them thoroughly before
returning them to the hood.
• Dismantling the fi lter cartridge
— Turn the built-in lter cartridge handle.
— Tilt the lter cartridge downward.
• CHANGING THE CARBON
FIL
TER (optional)
Replace it after approximately 120 hours of
use.
— Remove the lter cartridge.
— Turn the carbon lter to remove it.
— Do the operation in the reverse order to
put a new lter back.
— Put the lter cartridges back.
29
4 / CARING FOR AND CLEANING YOUR APPLIANCEEN
• CLEANING THE OUTER SURFACES
To clean the outside of your hood, use soapy water, but never use abrasive creams, corrosive
detergents, scrubbing sponges or brushes. Wipe down with a soft, damp cloth.
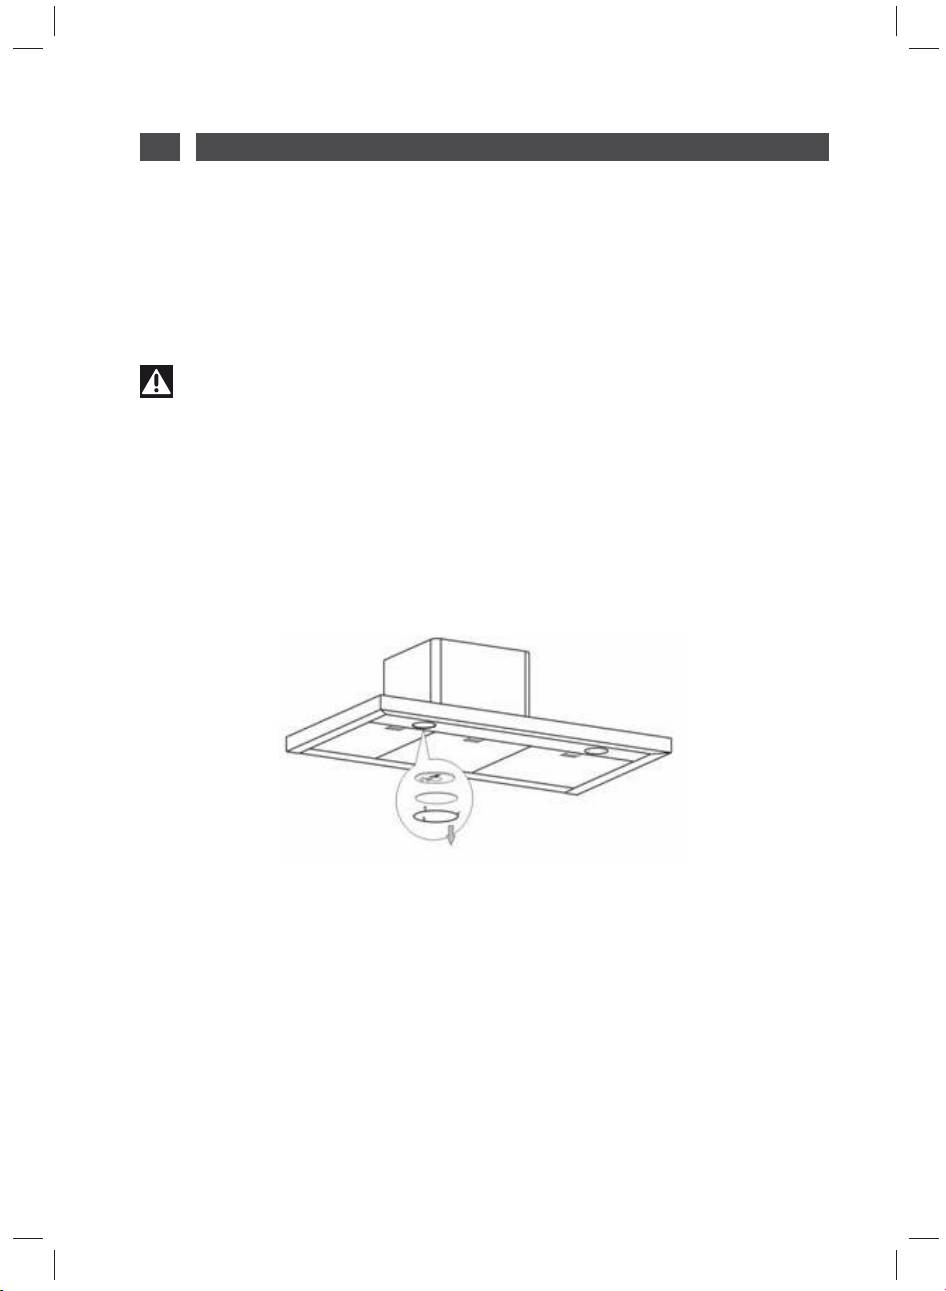
• CHANGING THE LIGHT BULB
Warning
Before carrying out any work, the power supply to the hood must be turned off, either
by unplugging it or by using the circuit breaker switch.
Model with halogen bulb
— Remove the lighting port
— Change the halogen bulb.
— Replace the bulb by repeating these
steps in reverse order.
30
4 / CARING FOR AND CLEANING YOUR APPLIANCE EN
Warning
Before carrying out any work, the power supply to the hood must be turned off, either
by unplugging it or by using the circuit breaker switch.
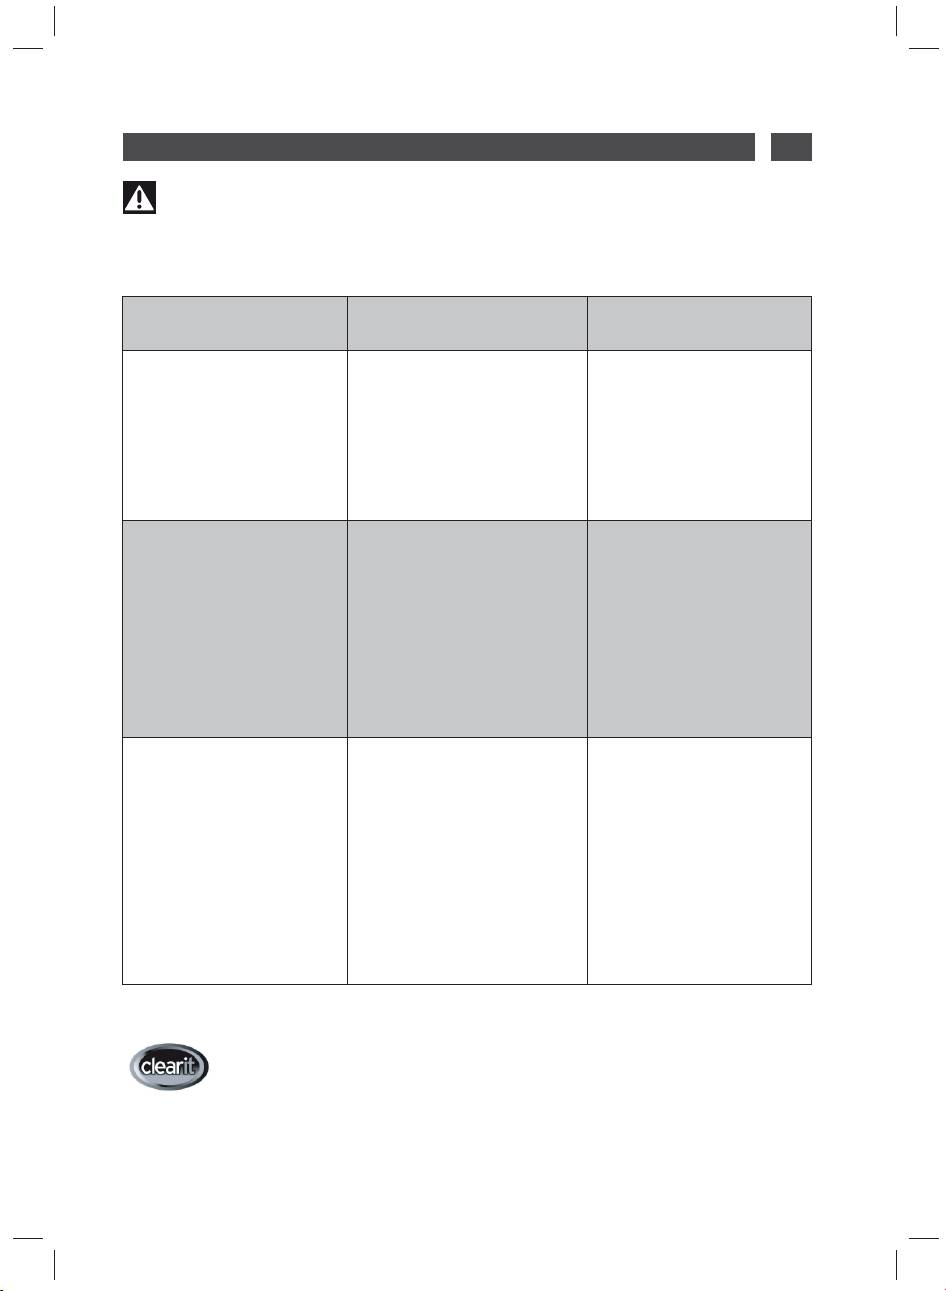
• MAINTAINING YOUR APPLIANCE
PRODUCTS/ACCESSORIES
MAINTENANCE WHAT TO DO
TO USE
Never use metal scouring
To clean the body and the
pads, abrasive products or
lighting port, you should
excessively stiff brushes.
use only commercial
Top surface and
household cleaning
accessories
products diluted in water
and then rinse using clean
water, drying with a soft
cloth.
This fi lter traps fatty vapours
Use a commercial
and dust. This component
household cleaning
plays an important role in
product then rinse
ensuring the effectiveness
abundantly and dry. These
of your hood.
fi lters can be cleaned in
Filter cartridge
In the event of tough stains,
a vertical position in your
use a non-abrasive cream,
dishwasher.
then rinse with clean water.
(Do not allow them to
touch dirty dishes or
silverware.)
This fi lter traps odours and
must be changed at least
once a year depending on
your level of use.
You should order these
fi lters from your dealer
Activated carbon fi lter
(quoting the reference
shown on the identifi cation
plate located inside the
hood) and note the date the
fi lter was changed.
To preserve your appliance, we recommend that you use Clearit cleaning products.
Professional expertise
serving individuals
Clearit offers you professional products and solutions designed for the daily care of your
household appliances and kitchens.
They are on sale at your regular retailer, along with a complete line of accessories and
consumable products.
31
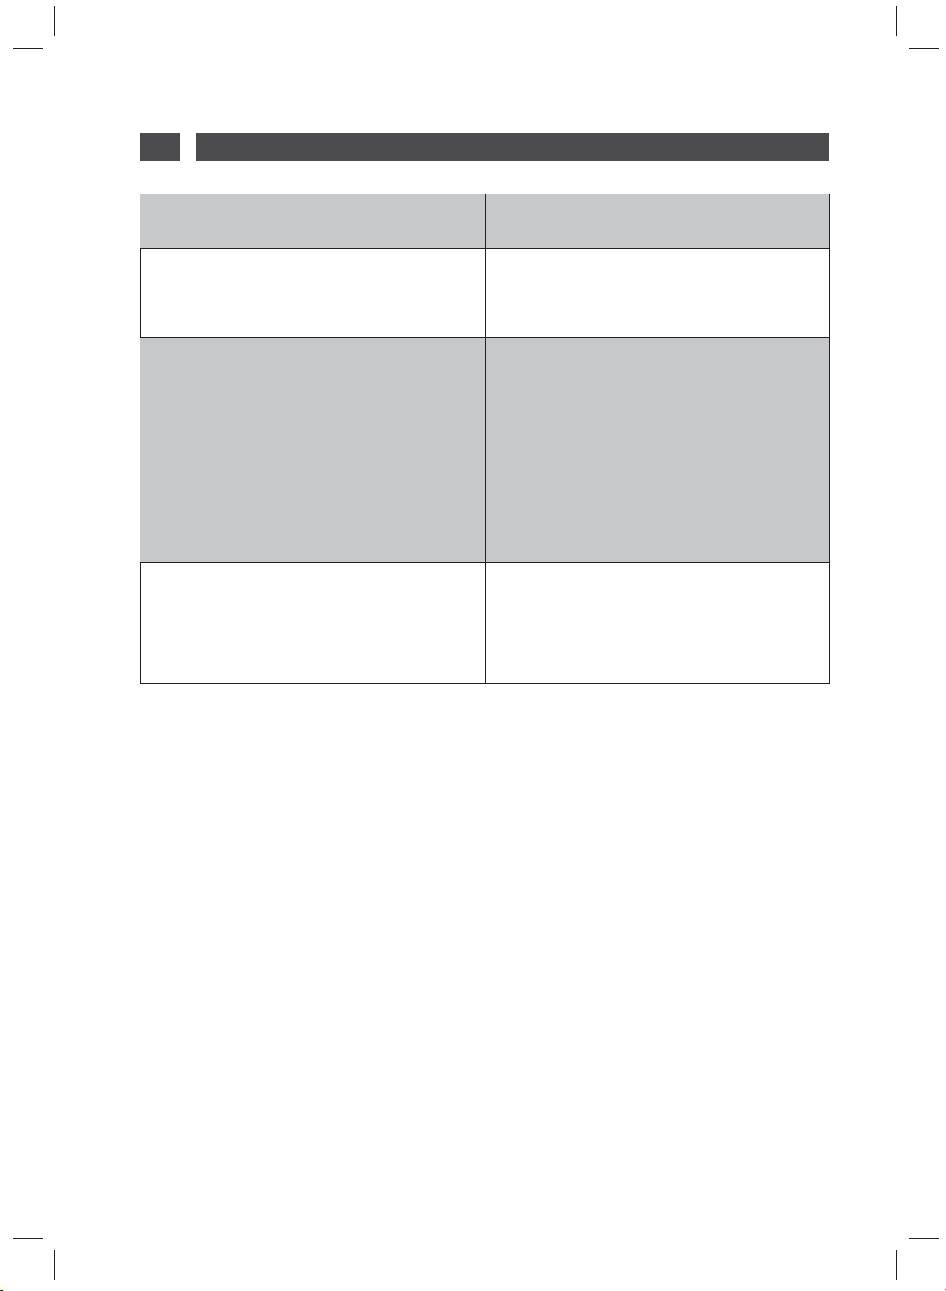
5 / TROUBLESHOOTINGEN
SYMPTOMS SOLUTIONS
Ensure that:
The hood is not working...
• The power is not cut off.
• A speed has been selected.
Ensure that:
• The selected motor speed is suffi cient
for the quantity of smoke and vapours to
be cleared.
The hood is not operating effectively...
• The kitchen is suffi ciently ventilated to
allow for fresh air intake.
• The carbon fi lter is not worn (hood
operating in recycling mode).
Ensure that:
• The power is not cut off.
The hood stopped working.
• The single-pole cut-off device was not
activated.
32

6 / AFTER-SALES SERVICE EN
Any maintenance on your equipment should be undertaken by :
— either your dealer,
— or another quali ed mechanic who is an authorized agent for the brand appliances.
When making an appointment, state the full reference of your equipment (model, type and
serial number). This information appears on the manufacturer’s nameplate attached to your
equipment.
33
FR 34
Dans le souci d’une amélioration constante de nos produits, nous nous réservons le
droit d’apporter à leurs caractéristiques techniques, fonctionnelles ou esthétiques
toutes modifi cations liées à leur évolution.
Important :
Avant de mettre votre appareil en marche, veuillez lire attentivement ce guide
d’installation et d’utilisation afi n de vous familiariser plus rapidement avec son
fonctionnement.
34

FRSOMMAIRE
1 / A L’ATTENTION DE L’UTILISATEUR
• Consignes de sécurité _______________________________________ 36
• Respect de l’environnement __________________________________ 37
• Description de votre appareil __________________________________ 38
2 / INSTALLATION DE VOTRE APPAREIL
• Utilisation en version évacuation ______________________________ 39
• Utilisation en version recyclage ________________________________ 39
• Raccordement électrique _____________________________________ 40
• Montage de la hotte _________________________________________ 41
• Montage de la cheminée
º Evacuation extérieure _____________________________________ 42
º Recyclage _______________________________________________ 43
3 / UTILISATION DE VOTRE APPAREIL
• Description des commandes __________________________________ 44
4 / ENTRETIEN ET NETTOYAGE DE VOTRE APPAREIL
• Nettoyage des ltres cassettes ________________________________ 45
• Changement du ltre charbon _________________________________ 45
• Nettoyage de la surface extérieure _____________________________ 46
• Changement de la lampe _____________________________________ 46
• Entretenir votre appareil ______________________________________ 47
5 / ANOMALIES DE FONCTIONNEMENT _____________________________ 48
6 / SERVICE APRES-VENTE
• Interventions ________________________________________________ 49
• Relations consommateurs ____________________________________ 49
35
1 / A L’ATTENTION DE L’UTILISATEURFR
Important
Conservez cette notice d’utilisation avec votre appareil. Si l’appareil devait être ven-
du ou cédé à une autre personne, assurez- vous que la notice d’utilisation l’accompagne.
Merci de prendre connaissance de ces conseils avant d’installer et d’utiliser votre appareil.
Ils ont été rédigés pour votre sécurité et celle d’autrui.
• CONSIGNES DE SÉCURITÉ
— Cet appareil a été conçu pour être uti-
— Il est interdit de amber des mets ou de
lisé par des particuliers dans leur lieu
faire fonctionner des foyers gaz sans réci-
d’habitation.
pients de cuisson, au dessous de la hotte
— Cet appareil doit être utilisé par des adul-
(les ammes aspirées risqueraient de dété-
tes. Veillez à ce que les enfants n’y touchent
riorer l’appareil).
pas et ne l’utilisent pas comme un jouet.
— Les fritures effectuées sous l’appareil
Assurezvous qu’ils ne manipulent pas les
doivent faire l’objet d’une surveillance cons-
commandes de l’appareil.
tante. Les huiles et graisses portées à très
— A la réception de l’appareil, déballez-le
haute température peuvent prendre feu.
ou faites le déballer immédiatement. Véri-
— Respectez la fréquence de nettoyage et
ez son aspect général. Faites les éventue-
de remplacement des ltres. L’accumulation
lles réserves par écrit sur le bon de livraison
de dépôts de graisse risque d’occasionner
dont vous gardez un exemplaire.
un incendie.
— Votre appareil est destiné à un usage
— Le fonctionnement au dessus d’un foyer
domestique normal. Ne l’utilisez pas à des
à combustible (bois, charbon…) n’est pas
ns commerciales ou industrielles ou pour
autorisé.
d’autres buts que celui pour lequel il a été
— N’utilisez jamais d’appareils à vapeur ou
conçu.
à haute pression pour nettoyer votre appa-
— Ne modi ez pas ou n’essayer pas de
reil (exigences relatives à la sécurité élec-
modi er les caractéristiques de cet appareil.
trique).
Cela représenterait un danger pour vous.
— Dans le souci d’une amélioration cons-
— Les réparations doivent être exclusive-
tante de nos produits, nous nous réservons
ment effectuées par un spécialiste agréé.
le droit d’apporter à leurs caractéristiques
— Débranchez toujours la hotte avant de
techniques, fonctionnelles ou esthétiques
procéder à son nettoyage ou à son entre-
toutes modi cations de leurs caractéristi-
tien.
ques liées à l’évolution technique.
— Aérez convenablement la pièce en cas
— A n de retrouver aisément à l’avenir les
de fonctionnement simultané de la hotte et
références de votre appareil, nous vous
d’autres appareils alimentés par une source
conseillons de les noter en page “Service
d’énergie différente de l’énergie électrique.
Après-Vente et Relations Consommateurs”.
Ceci a n que la hotte n’aspire pas les gaz
(Cette page vous explique également où les
de combustion.
trouver sur votre appareil).
Attention
Dans le cas d’une cuisine chauffée avec un appareil raccordé à une cheminée (ex :
poêle), il faut installer la hotte en version recyclage. Ne pas utilisez la hotte sans les fi ltres
cassettes. Une ventilation convenable de la pièce doit être prévue lorsqu’une hotte de cui-
sine est utilisée simultanément avec des appareils utilisants du gaz ou un autre combus-
tible.
36
1 / A L’ATTENTION DE L’UTILISATEUR FR
• RESPECT DE L’ENVIRONNEMENT
— Les matériaux d’emballage de cet appareil sont recyclables. Participez à leur recyclage
et contribuez ainsi à la protection de l’environnement en les déposant dans les conteneurs
municipaux prévus à cet effet.
— Votre appareil contient également de nombreux matériaux recyclables. Il est donc mar-
qué de ce logo a n de vous indiquer que les appareils usagés ne doivent pas
être mélangés avec d’autres déchets. Le recyclage des appareils qu’organise
votre fabricant sera ainsi réalisé dans les meilleures conditions, conformé-
ment à la directive européenne 2002/96/CE sur les déchets d’équipements
électriques et électroniques.
Adressez vous à votre mairie ou à votre revendeur pour connaître les points
de collecte des appareils usagés les plus proches de votre domicile.
— Nous vous remercions pour votre collaboration à la protection de
l’environnement.
Attention
L’installation est réservée aux installateurs et techniciens qualifi és.
Attention
Avant la première utilisation du fi ltre cassette, retirez le fi lm de protection.
37

1 / A L’ATTENTION DE L’UTILISATEURFR
• DESCRIPTION DE VOTRE APPAREIL
38

2 / INSTALLATION DE VOTRE APPAREIL FR
— L’appareil doit être débranché pendant l’installation ou dans l’éventualité d’une
intervention.
— Véri ez que la tension du réseau correspond à la tension mentionnée sur la plaque
signalétique située à l’intérieur de la hotte.
— Si l’installation électrique de votre habitation nécessite une modi cation pour le
branchement de votre appareil, faites appel à un électricien quali é.
— Si la hotte est utilisée en version évacuation, ne raccordez pas l’appareil à un conduit
d’évacuation de fumées de combustion (chaudière, cheminée, etc…) ou à une VMC
(ventilation mécanique contrôlée.
— Le conduit d’évacuation, quel qu’il soit ne doit pas déboucher dans les combles.
— Installez la hotte à une distance de sécurité d’au moins 70cm d’un plan de cuisson
électrique, gaz ou mixte.
• UTILISATION EN VERSION
EVACUATION
Vous possédez une sortie vers l’extérieur
(fi g. 1)
Votre hotte peut être raccordée sur celle-ci
par l’intermédaire d’une gaine d’évacuation
(minimum Ø 125 mm, émaillée, en alu,
exible ou en matière inin ammable). Si
votre gaine est inférieure à 125 mm de
diamètre, passez obligatoirement en
mode recyclage.
fi g. 1
• UTILISATION EN VERSION
RECYCLAGE
Vous ne possédez pas de sortie vers l’extérieur
(fi g. 2)
Tous nos appareils ont la possibilité de
fonctionner en mode recyclage.
Dans ce cas, ajoutez un ltre à charbon actif
qui retiendra les odeurs.
(voir Chapitre 4: Changement du ltre
charbon)
fi g. 2
39
2 / INSTALLATION DE VOTRE APPAREILFR
• RACCORDEMENT ELECTRIQUE
Lors de l’installation et des opérations
d’entretien, l’appareil doit être débranché
du réseau électrique, les fusibles doivent
être coupés ou retirés.
Le raccordement électrique est à réaliser
avant la mise en place de l’appareil dans le
meuble.
Véri ez que:
— la puissance de l’installation est
suf sante,
— les lignes d’alimentation sont en bon
état
— le diamètre des ls est conforme aux
règles d’installation.
Attention
Este aparato se suministra con un
cable Cet appareil est livré avec un câble
d’alimentation H 05 VVF à 3 conducteurs de
2
0,75 mm
(neutre, phase et terre). Il doit être
branché sur réseau 220-240 V monophasé
par l’intermédiaire d’une prise de courant
normalisée CEI 60083 qui doit rester
accessible après installation, conformément
aux règles d’installation.
Notre responsabilité ne saurait être engagée
en cas d’accident consécutif à une mise à
la terre inexistante ou incorrecte. Le fusible
de votre installation doit être de 10 ou 16 A.
Si le câble d’alimentation est endommagé,
faites appel au service aprèsvente afi n
d’éviter un danger.
Attention
Si l’installation électrique de votre
habitation nécessite une modifi cation pour
le branchement de votre appareil, faites
appel à un électricien qualifi é.
Attention
Si la hotte présente une quelconque
anomalie, débranchez l’appareil ou enlevez
le fusible correspondant à la ligne de
branchement de l’appareil.
40
