Sony VPL-VW1100ES: About the Quick Reference Manual
About the Quick Reference Manual: Sony VPL-VW1100ES
Table of contents
- About the Quick Reference Manual

US
2
This Quick Reference Manual explains the installation and basic operations for projecting
pictures. It also describes important notes and cautions to which you have to pay attention when
handling and using this unit.
Refer to “Warning Indicators” and “Replacing the Lamp,” as necessary.
For details on the operations, refer to the Operating Instructions contained in the supplied CD-
ROM.
About the Quick Reference Manual
Preparing
....................................................Page 9
Installing the Unit
..................................Page 11
Connecting the Unit
.............................Page 12
Selecting the Menu Language
........Page 16
Projecting
..................................................Page 17
Error Handling
Warning Indicators
.........................................Page 19
Maintenance
Replacing the Lamp
.......................................Page 21
Step 1 Step 2 Step 3 Step 4 Step 5
3
US
Before operating the unit, please read this
manual thoroughly and retain it for future
reference.
WARNING
To reduce the risk of fire or electric
shock, do not expose this apparatus
to rain or moisture.
To avoid electrical shock, do not open
the cabinet. Refer servicing to
qualified personnel only.
WARNING
THIS APPARATUS MUST BE
EARTHED.
WARNING
When installing the unit, incorporate a
readily accessible disconnect device in the
fixed wiring, or connect the power plug to an
easily accessible socket-outlet near the unit.
If a fault should occur during operation of
the unit, operate the disconnect device to
switch the power supply off, or disconnect
the power plug.
CAUTION
About the LAN connector
For safety, do not connect the connector for
peripheral device wiring that might have
excessive voltage to this port.
For the customers in the U.S.A.
This equipment has been tested and found to
comply with the limits for a Class B digital
device, pursuant to part 15 of the FCC Rules.
These limits are designed to provide
reasonable protection against harmful
interference in a residential installation. This
equipment generates, uses and can radiate
radio frequency energy and, if not installed
and used in accordance with the instructions,
may cause harmful interference to radio
communications. However, there is no
guarantee that interference will not occur in
a particular installation. If this equipment
does cause harmful interference to radio or
television reception, which can be
determined by turning the equipment off and
on, the user is encouraged to try to correct
the interference by one or more of the
following measures:
- Reorient or relocate the receiving antenna.
- Increase the separation between the
equipment and receiver.
- Connect the equipment into an outlet on a
circuit different from that to which the
receiver is connected.
- Consult the dealer or an experienced
radio/TV technician for help.
You are cautioned that any changes or
modifications not expressly approved in this
manual could void your authority to operate
this equipment.
All interface cables used to connect
peripherals must be shielded in order to
comply with the limits for a digital device
pursuant to Subpart B of part 15 of FCC
Rules.
If you have any questions about this product,
you may call;
Sony Customer Information Service Center
1-800-222-7669 or http://www.sony.com/
For the customers in Canada
CAN ICES-3 (B)/NMB-3(B)
For the customers in Europe
This product has been manufactured by or
on behalf of Sony Corporation, 1-7-1 Konan
Minato-ku Tokyo, 108-0075 Japan. Inquiries
related to product compliance based on
Declaration of Conformity
Trade Name:
SONY
Model:
VPL-VW1100ES
Responsible party: Sony Electronics Inc.
Address:
16530 Via Esprillo,
San Diego, CA 92127
U.S.A.
Telephone Number:858-942-2230
This device complies with part 15 of the
FCC Rules. Operation is subject to the
following two conditions: (1) This device
may not cause harmful interference, and
(2) this device must accept any interference
received, including interference that may
cause undesired operation.
US
US
4
European Union legislation shall be
addressed to the authorized representative,
Sony Deutschland GmbH, Hedelfinger
Strasse 61, 70327 Stuttgart, Germany. For
any service or guarantee matters, please
refer to the addresses provided in the
separate service or guarantee documents.
For kundene i Norge
Dette utstyret kan kobles til et IT-
strømfordelingssystem.
For the customers in Taiwan only
For the Customers in Brazil only
DESCARTE DE PILHAS E BATERIAS
Pilhas e Baterias não recarregáveis
Atenção:
Verifique as instruções de uso do aparelho
certificando-se de que as polaridades (+) e
(-) estão no sentido indicado. As pilhas
poderão vazar ou explodir se as polaridades
forem invertidas, expostas ao fogo,
desmontadas ou recarregadas.
Evite misturar com pilhas de outro tipo ou
com pilhas usadas, transportá-las ou
armazená-las soltas, pois aumenta o risco de
vazamento.
Retire as pilhas caso o aparelho não esteja
sendo utilizado, para evitar possíveis danos
na eventualidade de ocorrer vazamento.
As pilhas devem ser armazenadas em local
seco e ventilado.
No caso de vazamento da pilha, evite o
contato com a mesma.
Lave qualquer parte do corpo afetado com
água abundante.
Ocorrendo irritação, procure auxílio médico.
Não remova o invólucro da pilha.
Mantenha fora do alcance das crianças. Em
caso de ingestão procure auxílio médico
imediatamente.
DESCARTE DE PILHAS E BATERIAS
Este produto contém bateria de alimentação
integrada (não removível pelo usuário) que
só deve ser substituída por profissionais
qualificados. Ao fim da vida útil do
equipamento, disponha-o em um ponto de
coleta na Rede Autorizada Sony ou nas lojas
Sony, de forma a garantir o tratamento
adequado da bateria.
Note on use of the USB charging
AC power adaptor AC-UD10
For the customer in the U.S.A.
The following FCC statement applies only to
the version of this model manufactured for
safe in the USA.
Other versions may not comply with FCC
technical regulations.
This device complies with part 15 of the
FCC Rules. Operation is subject to the
following two conditions: (1) This device
may not cause harmful interference, and (2)
this device must accept any interference
received, including interference that may
cause undesired operation.
5
US
Precautions
On safety
• Check that the operating voltage of your
unit is identical with the voltage of your
local power supply.
• Should any liquid or solid object fall into
the cabinet, unplug the unit and have it
checked by qualified personnel before
operating it further.
• Unplug the unit from the wall outlet if it is
not to be used for several days.
• To disconnect the cord, pull it out by the
plug. Never pull the cord itself.
• The wall outlet should be near the unit and
easily accessible.
• The unit is not disconnected to the AC
power source (mains) as long as it is
connected to the wall outlet, even if the
unit itself has been turned off.
• Do not look into the lens while the lamp is
on.
• Do not place your hand or objects near the
ventilation holes. The air coming out is
hot.
On preventing internal heat build-
up
After you turn off the power with the
?
/
1
(ON/STANDBY) button, do not disconnect
the unit from the wall outlet while the
cooling fan is still running.
Caution
This unit is equipped with ventilation holes
(intake) and ventilation holes (exhaust). Do
not block or place anything near these holes,
or internal heat build-up may occur, causing
picture degradation or damage to the unit.
On repacking
Save the original shipping carton and
packing material; they will come in handy if
you ever have to ship your unit. For
maximum protection, repack your unit as it
was originally packed at the factory.
For the customers in the U.S.A.
SONY LIMITED WARRANTY
- Please
visit http://www.sony.com/psa/warranty
for important information and complete
terms and conditions of Sony’s limited
warranty applicable to this product.
For the customers in Canada
SONY LIMITED WARRANTY
- Please
visit http://www.sonybiz.ca/solutions/
Support.do for important information and
complete terms and conditions of Sony’s
limited warranty applicable to this product.
For the customers in Europe
Sony Professional Solutions Europe -
Standard Warranty and Exceptions on
Standard Warranty.
Please visit http://www.pro.sony.eu/
warranty for important information and
complete terms and conditions.
For the customers in Korea
SONY LIMITED WARRANTY
- Please
visit http://bpeng.sony.co.kr/handler/
BPAS-Start for important information and
complete terms and conditions of Sony’s
limited warranty applicable to this product.

US
6
Safety precautions when using 3D
Glasses
Warning
• Do not put the 3D Glasses in a fire.
• Do not disassemble the 3D Glasses.
• Do not use, charge, store, or leave the 3D
Glasses near a fire, or in places with a high
temperature, e.g., in direct sunlight, or in
sun-heated cars.
• Use only the supplied USB cable.
• Do not charge the 3D Glasses with
anything other than the supplied USB
charging AC power adaptor.
• Do not allow water or foreign material to
enter the 3D Glasses.
Safety precautions
• Use only the type of 3D glasses included
with this unit. You should only use the 3D
glasses for watching 3D video images. Do
not use the 3D Glasses with other
equipment, such as TV.
• If you observe flickering or flashing, turn
off the lighting in the room.
• Not for use by children without proper
adult supervision.
• Be careful not to pinch your fingers in
hinges of the 3D glasses when bending the
temple frames.
• Do not drop or modify these 3D glasses.
• If these glasses are broken, keep broken
pieces away from your mouth or eyes.
On LCD Projector
The LCD projector is manufactured using
high-precision technology. You may,
however, see tiny black points and/or bright
points (red, blue, or green) that continuously
appear on the LCD projector. This is a
normal result of the manufacturing process
and does not indicate a malfunction.
Also, when you use multiple LCD projectors
to project onto a screen, even if they are of
the same model, the color reproduction
among projectors may vary, since color
balance may be set differently from one
projector to the next.
On condensation
If the room temperature where the projector
is installed changes rapidly, or if the
projector is moved suddenly from a cold to a
warm place, condensation in the projector
may occur. As the condensation may cause
malfunction, be careful in adjusting
temperature settings of the air conditioner. If
condensation occurs, leave the projector
turned on for about two hours before use.
SONY WILL NOT BE LIABLE FOR
DAMAGES OF ANY KIND
RESULTING FROM A FAILURE TO
IMPLEMENT PROPER SECURITY
MEASURES ON TRANSMISSION
DEVICES, UNAVOIDABLE DATA
LEAKS RESULTING FROM
TRANSMISSION SPECIFICATIONS,
OR SECURITY PROBLEMS OF ANY
KIND.
7
US
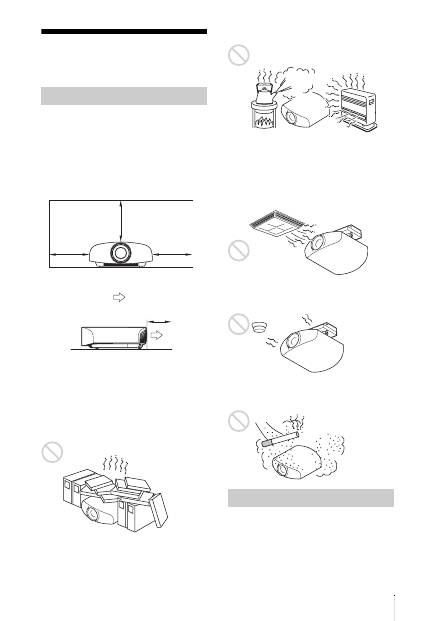
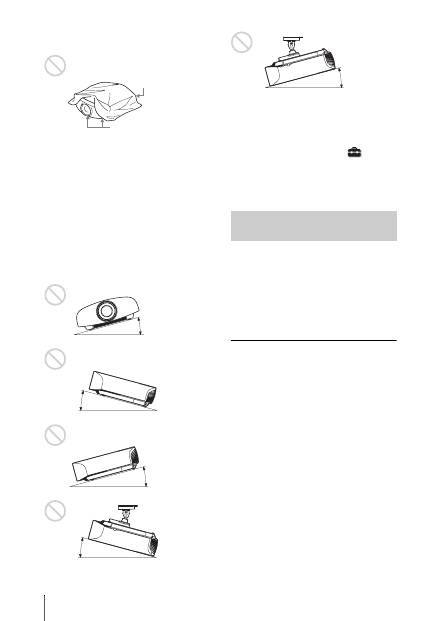
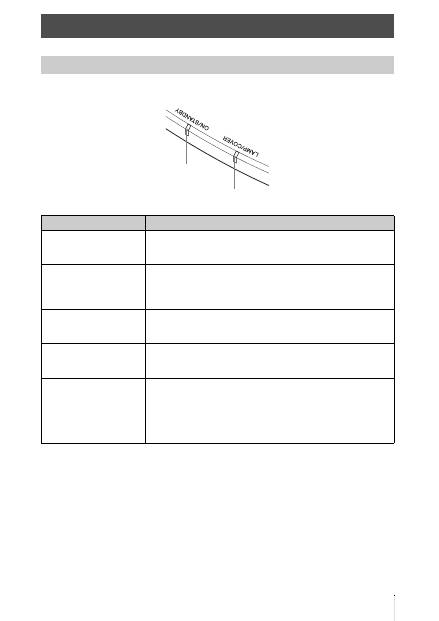
Notes on Installation and Usage
Do not place the unit in the following
situations, which may cause malfunction or
damage to the unit.
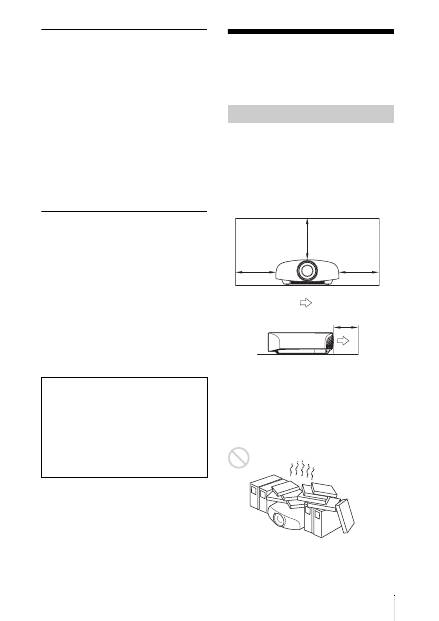
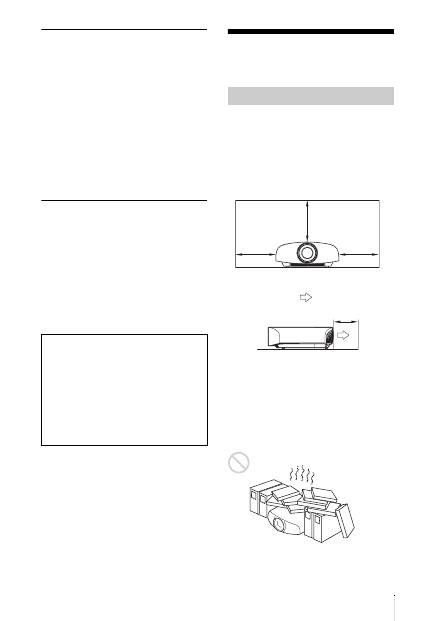
Near walls
To maintain the performance and reliability
of the unit, leave space between walls and
the unit as illustrated.
Leave a space of at least 5 cm (2 inches)
between the wall and the exhaust port side of
the unit. Note that the wall behind the unit
may become hot.
Poorly ventilated location
Leave space of more than 30 cm (11
7
/
8
inches) around the unit.
Hot and humid
Locations subject to direct cool or
warm air from an air-conditioner
Installing the unit in such a location may
cause a malfunction of the unit due to
moisture condensation or rise in
temperature.
Near a heat or smoke sensor
Malfunction of the sensor may occur.
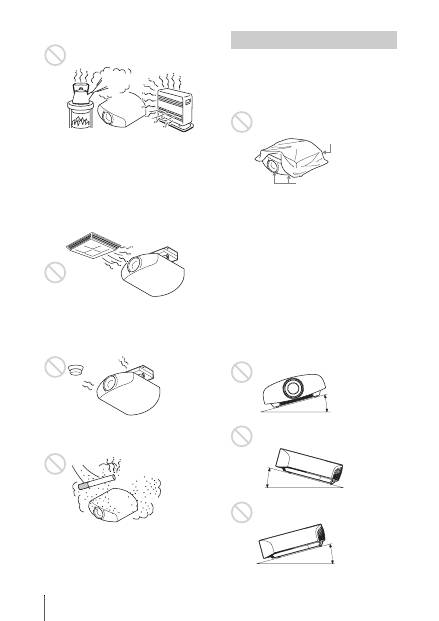
Very dusty and extremely smoky
locations
Do not do any of the following while using
the unit.
Unsuitable installation
30 cm
(11
7
/
8
inches)
30 cm
(11
7
/
8
inches)
30 cm
(11
7
/
8
inches)
5 cm (2 inches)
: Exhaust
Unsuitable Conditions
US
8
Blocking the ventilation holes (intake
or exhaust)
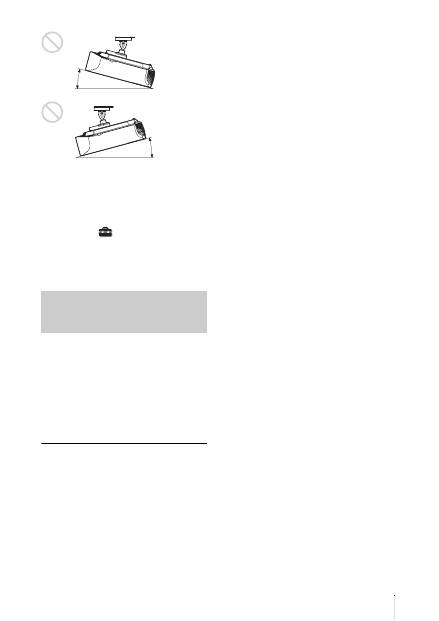
Tilting front/rear and left/right
Avoid using the unit tilted at an angle of
more than 15 degrees.
Do not install the unit anywhere other than
on a level surface or on the ceiling. Installing
the unit in such a location may result in
uneven color uniformity or reduce the
reliability of the effects of the lamp.
If the unit is tilted up or down, the image on
the screen may be trapezoidal.
Position the unit so that the lens is parallel to
the screen.
When installing the unit at high
altitudes
When using the unit at an altitude of
1,500 m (approx. 4,900 ft) or higher, set
“Cooling Setting” on the Setup
menu to
“High”. Failing to set this mode when using
the unit at high altitudes could have adverse
effects, such as reducing the reliability of
certain components.
• Never mount the projector on the ceiling
or move it by yourself. Be sure to consult
with qualified Sony personnel (charged).
• When installing the unit on a ceiling, be
sure to use a safety wire, etc., to prevent
the unit from falling. Entrust the
installation to an experienced contractor or
installer.
For dealers
• When the projector is mounted on the
ceiling, a Sony bracket or recommended
equivalent must be used for installation.
• Be sure to secure the cabinet cover firmly
when installing to the ceiling firmly.
Ventilation holes
(intake)
Ventilation holes
(exhaust)
15° or more
15° or
more
15° or more
15° or
more
Safety precautions for
installing the unit on a ceiling
15° or more

9
US
Check the carton to make sure it contains the
following items:
• Remote control RM-PJ22 (1)
• Size AA (R6) manganese batteries (2)
• AC power cord for the projector (1)
• Plug holder (1)
• AC inlet cover (1)
• 3D glasses (2)
• Pouch for the 3D glasses (2)
• USB charging AC power adaptor (AC-
UD10) (1)
Specifications
Input voltage: AC 100 to 240 V, 0.2 A,
50/60 Hz
Rated output voltage: DC 5 V, 1.5 A
Please use the above power requirements.
• AC power cord for USB charging AC
power adaptor (1)
For the customers in the U.S.A. and
Canada
WARNING:
Using this unit at a voltage other than
120 V may require the use of a different
line cord or attachment plug, or both. To
reduce the risk of fire or electric shock,
refer servicing to qualified service
personnel.
• USB charging cable (G2551-0077-00/-01
or APY5244-010020/SONY) (1.2 m) (1)
• Quick Reference Manual (this manual) (1)
• Operating Instructions (CD-ROM) (1)
CAUTION
Danger of explosion if battery is incorrectly
replaced.
Replace only with the same or equivalent
type recommended by the manufacturer.
When you dispose of the battery, you must
obey the law in the relative area or country.
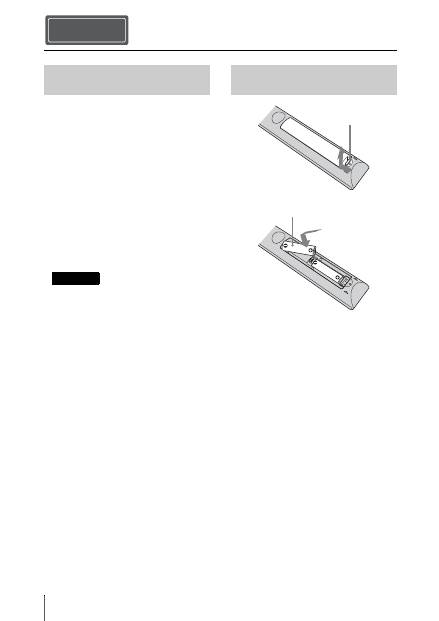
Installing batteries
Two size AA (R6) batteries are supplied for
Remote Control.
To avoid risk of explosion, use size AA (R6)
manganese or alkaline batteries.
Caution about handling the remote
control
• Handle the remote control with care. Do
not drop or step on it, or spill liquid of any
kind onto it.
• Do not place the remote control in a
location near a heat source, a place subject
to direct sunlight, or a damp room.
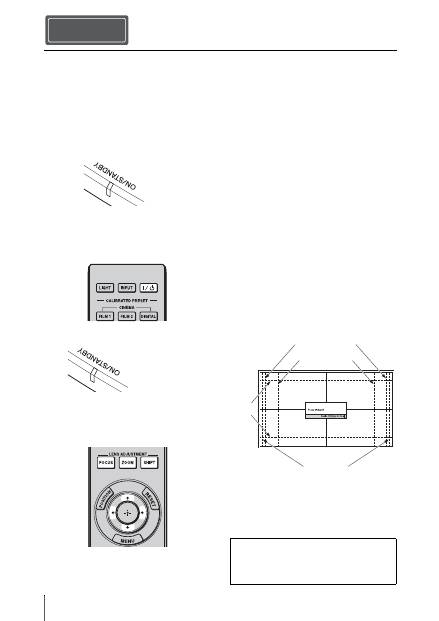
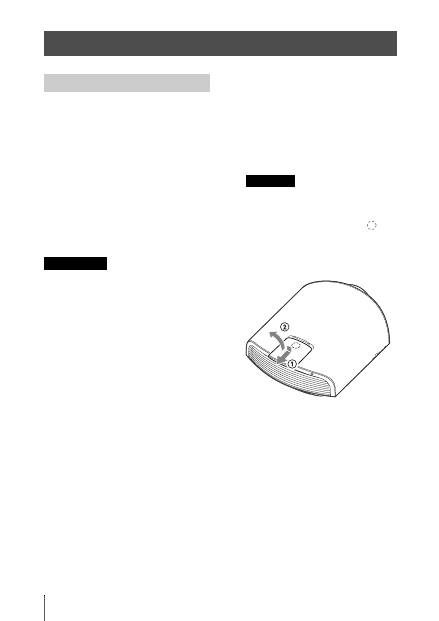
Preparing Step 1
Checking the Supplied
Accessories
Note
Inserting the Batteries into
the Remote Control
Push and slide to
open.
Insert the batteries
E
side first.
US
10
The manual can be read on a computer with
Adobe Reader installed.
You can download Adobe Reader free from
the Adobe website.
1
Open the index.html file in the CD-
ROM.
2
Select and click on the manual that
you want to read.
If you have lost or damaged the CD-ROM, you
can purchase a new one from your Sony dealer
or Sony service counter.
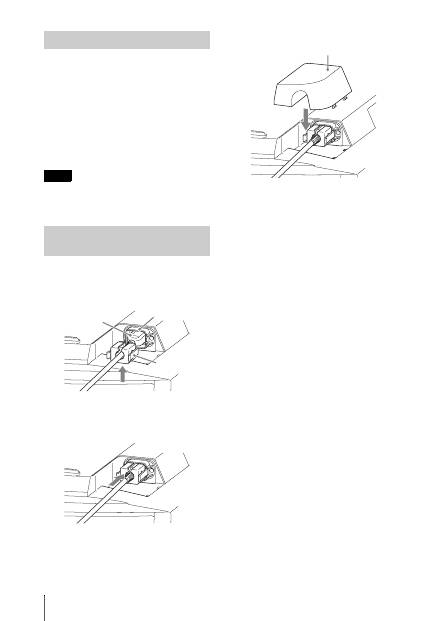
1
Plug the AC power cord into the AC
IN socket, then attach the plug holder
to the AC power cord.
2
Slide the plug holder over the AC
power cord to fix to the unit.
3
Attach the AC inlet cover to the unit.
Using the CD-ROM manual
Note
Connecting the AC Power
Cord
Plug holder
(supplied)
AC power cord
(supplied)
AC IN socket
AC inlet cover (supplied)
11
US
1
Position the unit parallel to the screen.
2
After connecting the AC power cord to
the unit, plug the AC power cord into
a wall outlet.
3
Press the
?
/
1
(ON/STANDBY) button
to turn on the unit.
4
Project an image on the screen, then
adjust the focus, size, and position.
a
Adjust the focus.
Press the LENS ADJUSTMENT
(FOCUS) button to display the Lens
Focus adjustment window (test pattern).
Then adjust the focus of the picture by
pressing the
M
/
m
/
<
/
,
buttons.
b
Adjust the picture size.
Press the LENS ADJUSTMENT
(ZOOM) button to display the Lens
Zoom adjustment window (test pattern).
Then adjust the size of the picture by
pressing the
M
/
m
/
<
/
,
buttons.
c
Adjust the picture position.
Press the LENS ADJUSTMENT
(SHIFT) button to display the Lens Shift
adjustment window (test pattern). Then
adjust to the proper position of the
picture by pressing the
M
/
m
/
<
/
,
buttons.
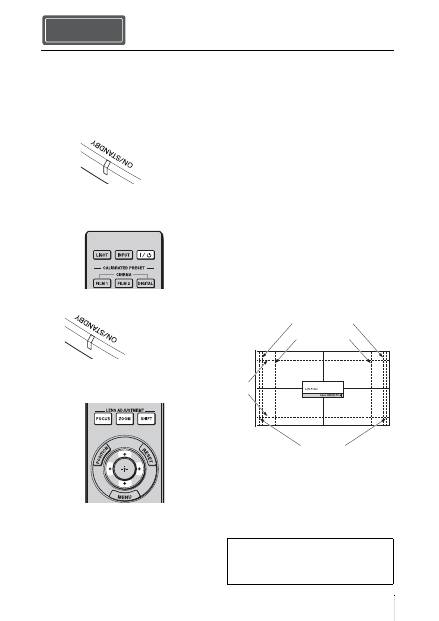
Lens adjustment window (test
pattern)
Installing the Unit Step 2
Lights in red.
Front of the unit
Flashes in green for
tens of seconds and
then lights in green.
Front of the unit
1.78:1 (16:9)
2.35:1
1.85:1
1.33:1 (4:3)
The dashed lines show the screen sizes of each
aspect ratio.
For more information, refer to
“Connections and Preparations” in the
Operating Instructions contained in the
supplied CD-ROM.
US
12
When making connections, be sure to do the following:
• Turn off all equipment before making any connections.
• Use the proper cables for each connection.
• Insert the cable plugs properly; poor connection at the plugs may cause a malfunction or poor
picture quality. When pulling out a cable, be sure to pull it out from the plug, not the cable
itself.
• Refer to the operating instructions of the connected equipment.
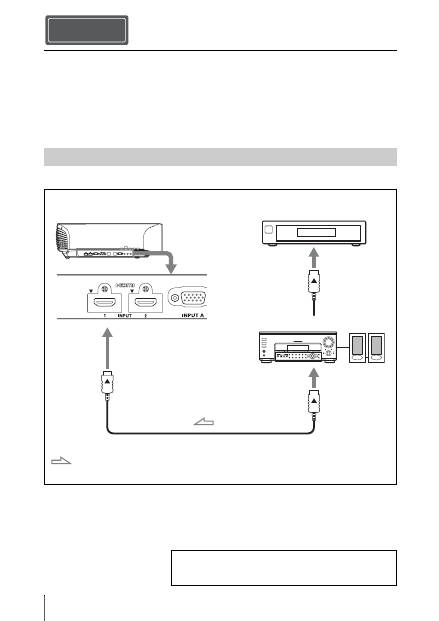
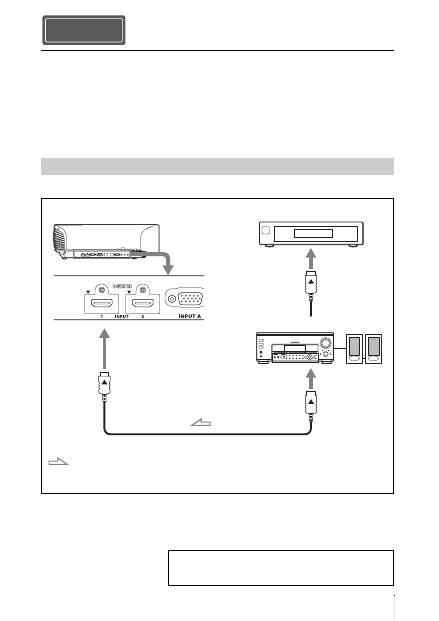
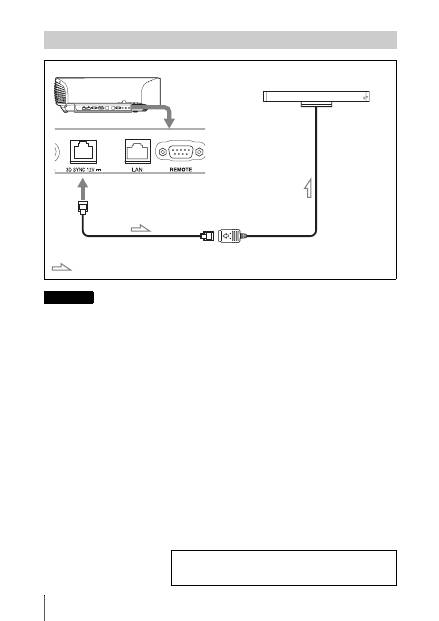
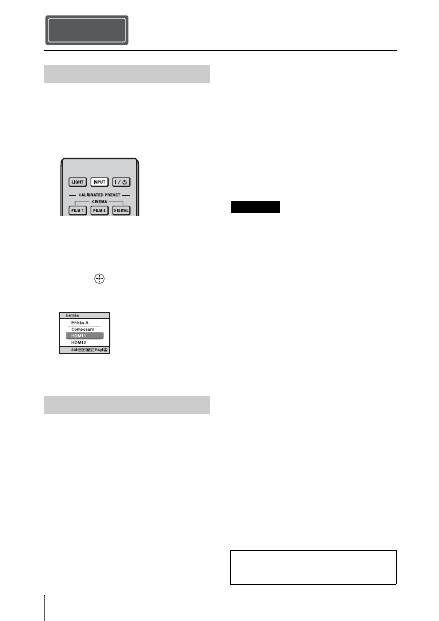
To connect to equipment with HDMI output connectors
Connecting the Unit Step 3
Connecting to a VCR
HDMI cable (not supplied)
: Video signal flow
Right side of the unit
Equipment with HDMI output
connectors
to HDMI output
AV amplifier
Speakers
When using an optional HDMI cable, be sure to use a Sony
HDMI cable or other cable that has the HDMI logo.
For more information, refer to “Connections and
Preparations” in the Operating Instructions contained in
the supplied CD-ROM.

13
US
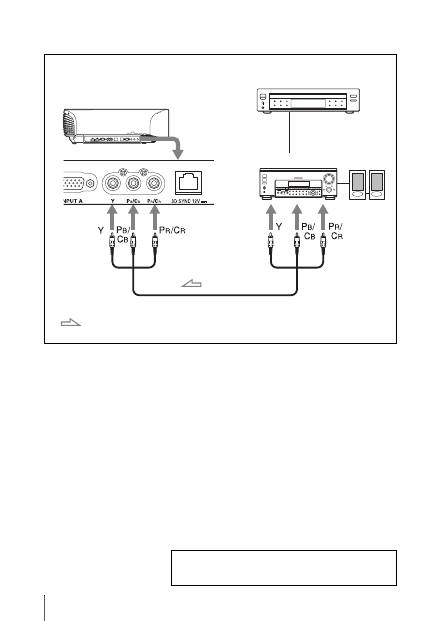
To connect to equipment with component video output connectors
Component video cable (not supplied)
: Video signal flow
Equipment with component
video output connectors
Right side of the unit
AV amplifier
Speakers
For more information, refer to “Connections and
Preparations” in the Operating Instructions contained in
the supplied CD-ROM.
US
14
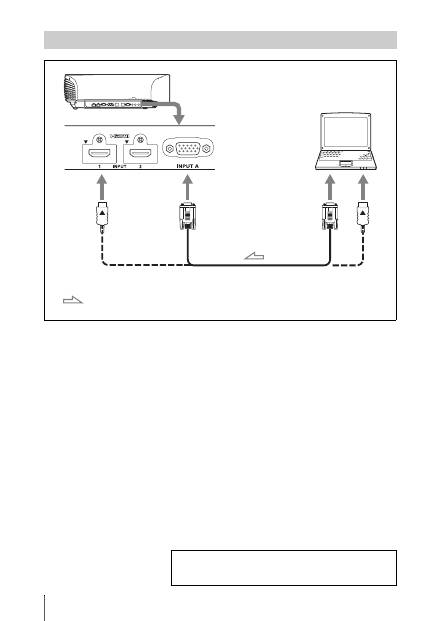
Connecting to a Computer
HD-Dsub15 pin cable (not supplied) or HDMI cable (not supplied)
: Video signal flow
Right side of the unit
to monitor output
Computer
When using an optional HDMI cable, be sure to use a Sony HDMI
cable or other cable that has the HDMI logo.
For more information, refer to “Connections and
Preparations” in the Operating Instructions contained in
the supplied CD-ROM.
15
US
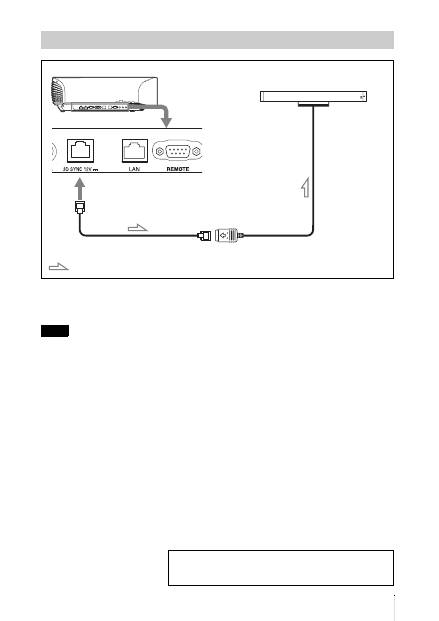
CAUTION
Be sure to use straight-type LAN cable of up to 15 m labeled TYPE CM, and do not use an
extension cord.
You can use a 3D Sync Transmitter separate from this unit, using an optional LAN cable (straight-
type).
If the usage environment has interference of a continuous specific frequency, synchronization of 3D
image signals and the 3D glasses may be lost. In this case, use a LAN cable labeled Category 7.
When watching 3D images in an environment that has even more interference, use the internal
transmitter.
Connecting to a 3D Sync Transmitter
Note
Right side of the unit
3D Sync Transmitter (not supplied)
LAN cable (not supplied)
: 3D sync signal flow
For more information, refer to “Connections and
Preparations” in the Operating Instructions contained in
the supplied CD-ROM.
US
16
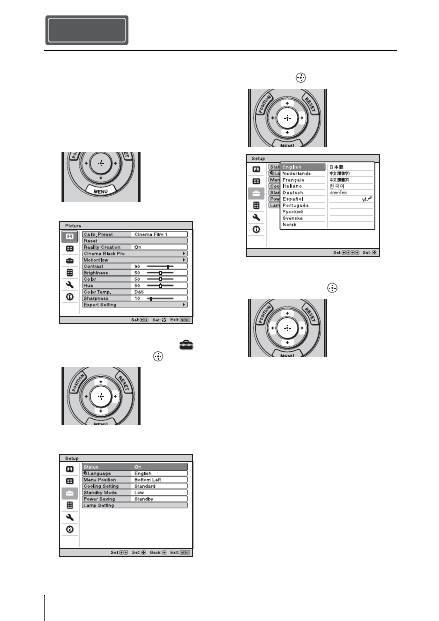
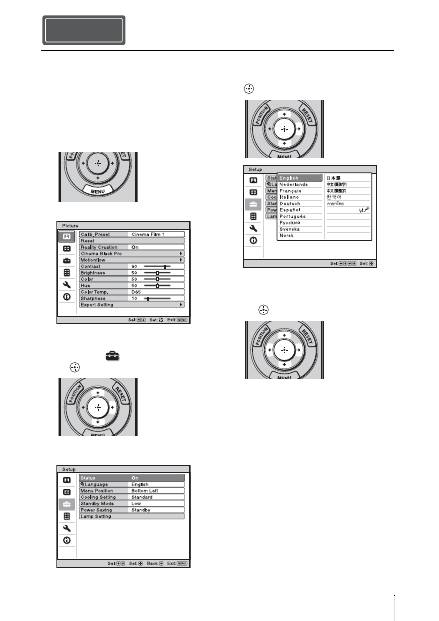
You can select one of 16 languages for
displaying the menu and other on-screen
displays. The factory default setting is
English. To change the current menu
language, set the desired language with the
menu screen.
1
Press MENU.
The menu appears.
2
Press
M
/
m
to select the Setup
menu, and press
,
or
.
The setting items of the selected menu
appear.
3
Press
M
/
m
to select “Language,” and
press
,
or
.
4
Press
M
/
m
/
<
/
,
to select a
language, and press
.
The menu changes to the selected
language.
To clear the menu
Press MENU.
Selecting the Menu Language Step 4
17
US
1
Turn on both the unit and the
equipment connected to the unit.
2
Press INPUT to display the input
palette on the screen.
3
Select the equipment from which you
want to display images.
Press INPUT repeatedly or press
M
/
m
/
(enter) to select the equipment from
which to project.
1
Press the
?
/
1
(ON/STANDBY)
button.
A message “POWER OFF?” appears on
the screen.
2
Press the
?
/
1
(ON/STANDBY) button
again before the message disappears.
The lens protector will close. Be careful
not to catch your fingers or any objects.
The ON/STANDBY indicator flashes in
green and the fan continues to run to
reduce the internal heat. First, the ON/
STANDBY indicator flashes quickly,
during which you will not be able to
light up the ON/STANDBY indicator
with the
?
/
1
(ON/STANDBY) button.
The fan stops and the ON/STANDBY
indicator changes from flashing green to
remaining red.
The power is turned off completely, and you
can disconnect the AC power cord.
Never disconnect the AC power cord while the
indicator is flashing.
You can turn off the unit by holding the
?
/
1
(ON/STANDBY) button for about 1 second,
instead of performing the above steps.
Projecting Step 5
Projecting the Picture
Turning Off the Power
Example: To view the picture from the
video equipment connected to the HDMI
1 connector of this unit.
Note
For more information, refer to
“Projecting” in the Operating Instructions
contained in the supplied CD-ROM.
US
18
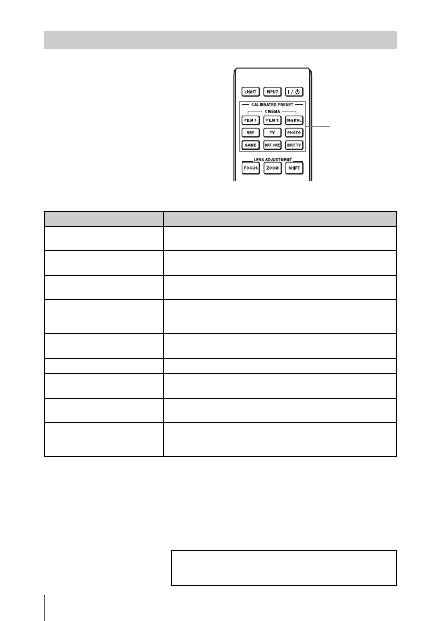
Press one of the CALIBRATED PRESET
buttons.
Selecting the Picture Viewing Mode
CALIBRATED
PRESET buttons
Setting items
Description
CINEMA FILM 1
Picture quality suited to reproducing the highly dynamic and
clear images typical of master positive film.
CINEMA FILM 2
Picture quality suited to reproducing the rich tone and color
typical of a movie theater.
CINEMA DIGITAL
Picture quality suited to reproducing digital cinema-like images
resembling DCI specifications.
REF
A picture quality setup suitable for when you want to reproduce
faithfully the original image quality, or for enjoying image
quality, without any adjustment.
TV
Picture quality suited for watching TV programs, sports,
concerts, etc.
PHOTO
Ideal for projecting still images taken with a digital camera.
GAME
Picture quality suited to gaming, with well-modulated colors
and fast response.
BRT CINE
Picture quality suited for watching movies in a bright
environment, such as a living room.
BRT TV
Picture quality suited for watching TV programs, sports,
concerts, and other video images in a bright environment, such
as a living room.
For more information, refer to “Projecting” in the
Operating Instructions contained in the supplied CD-
ROM.
19
US
The ON/STANDBY or LAMP/COVER indicator lights up or flashes if there is any trouble with
your projector.
Error Handling
Warning Indicators
Symptom
Cause and Remedy
LAMP/COVER flashes in
red. (A repetition rate of 2
flashes)
c
Close the lamp cover securely, then tighten the screws securely.
LAMP/COVER flashes in
red. (A repetition rate of 3
flashes)
c
The temperature of lamp is unusually high. Turn off the power
and wait for the lamp to cool, then turn on the power again.
c
If the symptom persists, the lamp may be at the end of its
service life. In this case, replace the lamp with a new one.
ON/STANDBY flashes in
red. (A repetition rate of 4
flashes)
c
The fan is broken. Consult with qualified Sony personnel.
ON/STANDBY flashes in
red. (A repetition rate of 2
flashes)
c
The internal temperature is unusually high. Check to ensure that
if nothing is blocking the ventilation holes or whether or not the
unit is being used at high altitudes.
ON/STANDBY flashes in
red. (A repetition rate of 6
flashes)
c
Press the
?
/
1
(ON/STANDBY) button to turn on the unit. If the
power is not turned on, disconnect the AC power cord, then
confirm the ON/STANDBY lamp is turned off. After about 10
seconds, reconnect the AC power cord and turn on the power
again. If the indicators still light up, the electrical system has a
problem. Consult with qualified Sony personnel.
ON/STANDBY indicator
LAMP/COVER indicator
US
20
When a warning indicator other than the above starts flashing, and the symptom persists even after
carrying out the above methods, consult with qualified Sony personnel.
ON/STANDBY flashes in
red. (A repetition rate of 5
flashes)
c
The lens protector is not fully open. Turn the power of the unit
off and then on again. If the lens protector still does not fully
open, consult with qualified Sony personnel.
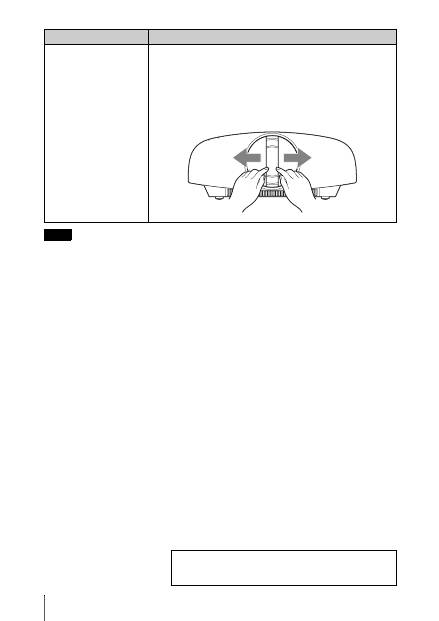
Tip
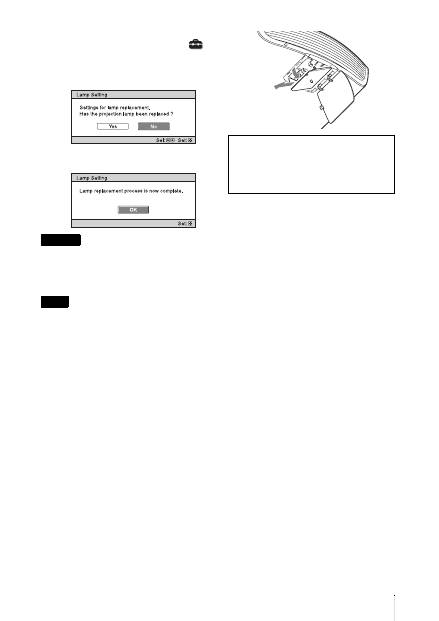
In an urgent situation, refer to the illustration below to open the lens
protector with your hands. Press the
?
/
1
(ON/STANDBY) button to
turn the power on and operate the unit.
Note
Symptom
Cause and Remedy
If there is any problem or an error message appears on the
screen, refer to “Troubleshooting” in the Operating
Instructions contained in the supplied CD-ROM.
21
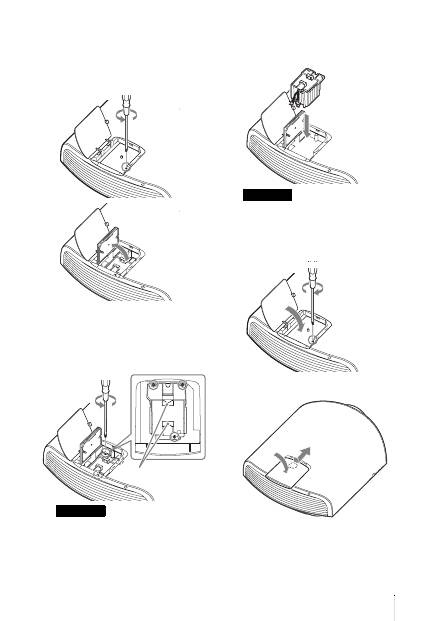
US
The lamp used for the light source has a
certain lifespan. When the lamp dims, the
color balance of the picture becomes
strange, or “Please replace the Lamp.”
appears on the screen, the lamp may be
exhausted. Replace the lamp with a new one
(not supplied) without delay.
Tools you need to get started:
•
Projector Lamp LMP-H330 (Optional)
•
Standard Phillips screwdriver
•
Cloth (for scratch protection)
• The lamp remains hot after the unit is turned
off with the
?
/
1
(ON/STANDBY) button. If
you touch the lamp, you may burn your
fingers. When you replace the lamp, wait for
at least 1 hour for the lamp to cool.
• Do not touch the surface of the lens. If you
touch it, wipe off the fingerprints with a soft
cloth.
• Pay special attention to replacing the lamp
when the unit is installed on the ceiling.
• When replacing the lamp of a unit which is
on the ceiling, do not stand directly under the
lamp cover. When removing the lamp door
(inner cover), avoid twisting it.
If the lamp explodes, fragments may cause
injury.
• When removing the lamp unit, make sure it
remains horizontal, then pull straight up. Do
not tilt the lamp unit. If you pull out the lamp
unit while tilted and if the lamp breaks, the
pieces may scatter, causing injury.
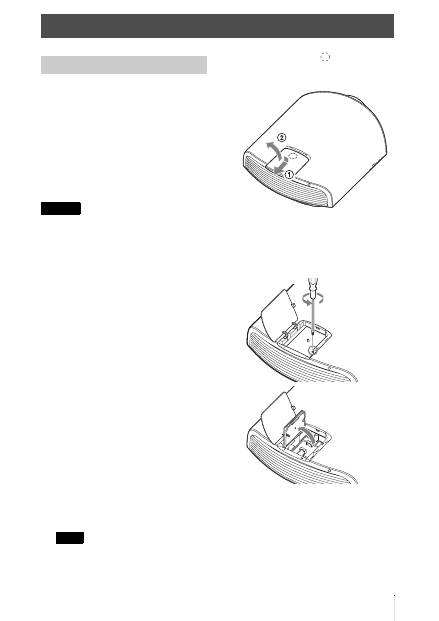
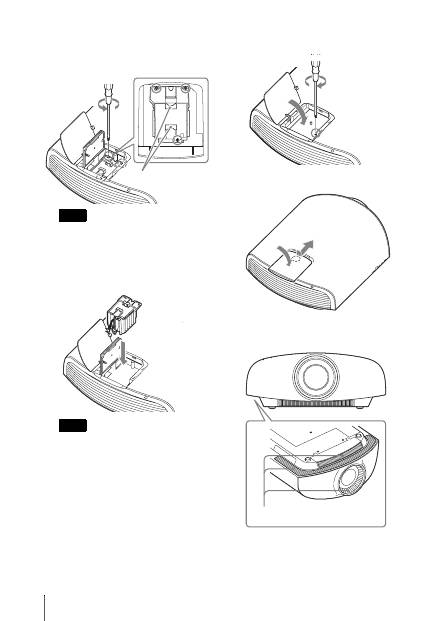
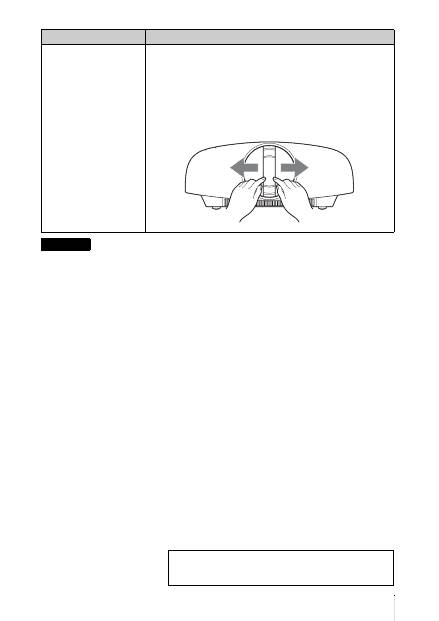
1
Turn off the unit and unplug the AC
power cord.
2
When setting the unit on a flat surface
such as a desk etc., put a cloth to
prevent the surface from being
scratched. Place the unit on the cloth.
Be sure that the unit is placed on a stable
surface.
3
While pressing the
part indicated
in the lamp cover illustration, slide
1
and then open
2
the lamp cover.
4
Loosen the lamp door (inner cover)
screw with a Phillips screwdriver, and
then open the lamp door.
Maintenance
Replacing the Lamp
Caution
Note
US
22
5
Loosen the 3 screws on the lamp with
the Phillips screwdriver. Hold up the
handle, then pull the lamp straight out.
Hold the lamp by the handle to remove and
attach it.
6
Push in the new lamp by the handle
securely until it reaches the end, and
then tighten the 3 screws.
Be careful not to touch the optical block
inside the unit.
7
Close the lamp door, (inner cover) and
then tighten the screw.
8
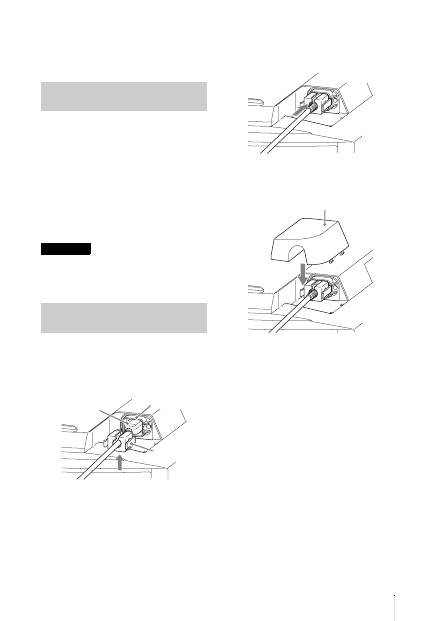
Close the lamp cover.
9
Wipe dust off the ventilation holes
(intake) with a soft cloth.
Note
Note
Handle
Ventilation holes (intake)
23
US
10
Turn on the unit, then select the
desired setting item on the Setup
menu.
The menu screen below will be
appeared.
11
Select “Yes.”
Do not put your hands into the lamp
replacement slot, and do not allow any liquid or
other objects into the slot to avoid electrical
shock or fire.
• Be sure to use an LMP-H330 Projector Lamp
for replacement. If you use lamps other than
the LMP-H330, the unit may malfunction.
• Be sure to turn off the unit and unplug the
power cord before replacing the lamp, then
check the ON/STANDBY indicator has
already been turned off.
• The unit will not turn on unless the lamp is
securely installed in place.
• The unit will not turn on unless the lamp
cover are securely closed.
• To cancel a message displayed on the screen,
press either the button on the remote control
or the one on the control panel on the unit.
Note on replacing the lamp when
broken, in the case of a ceiling
installation
If the lamp breaks, broken lamp pieces may
scatter and cause injury.
When the unit is on the ceiling, remove the
lamp door (inner cover) by sliding it
horizontally slowly after raising it with 30
degree opened. Avoid twisting the lamp door
(inner cover).
Disposal of the used lamp
For the customers in the USA
Lamp in this product contains mercury.
Disposal of these materials may be
regulated due to environmental
considerations. For disposal or
recycling information, please contact
your local authorities or the
Telecommunications Industry
Association (www.eiae.org).
Caution
Notes
Note
The lamp contains mercury. The disposal
rules for used fluorescent tubes depend on
where you live. Follow the waste disposal
policy in your area.
30°
FR
2
Ce Guide de référence rapide décrit l’installation et les procédures de base de projection des
images. Vous y trouverez également des mises en garde et des remarques importantes qu’il
convient de respecter au cours de la manipulation et de l’utilisation de cet appareil.
Reportez-vous à « Indicateurs d’avertissement » et « Remplacement de la lampe », le cas
échéant.
Pour plus d’informations sur l’utilisation, reportez-vous au Mode d’emploi que vous trouverez
sur le CD-ROM fourni.
A propos du Guide de référence rapide
Préparation
................................................Page 8
Installation de l’appareil
....................Page 10
Raccordement de l’appareil
.............Page 11
Sélection de la langue du menu
....Page 15
Projection
..................................................Page 16
Gestion des
erreurs
Indicateurs d’avertissement
..........................Page 18
Entretien
Remplacement de la lampe
............................Page 20
Etape 1 Etape 2 Etape 3 Etape 4 Etape 5
3
FR
Avant d’utiliser l’appareil, veuillez lire
attentivement ce manuel et le conserver pour
future référence.
AVERTISSEMENT
Afin de réduire les risques d’incendie
ou d’électrocution, ne pas exposer
cet appareil à la pluie ou à l’humidité.
Afin d’écarter tout risque
d’électrocution, garder le coffret
fermé. Ne confier l’entretien de
l’appareil qu’à un personnel qualifié.
AVERTISSEMENT
CET APPAREIL DOIT ÊTRE RELIÉ À
LA TERRE.
AVERTISSEMENT
Lors de l’installation de l’appareil,
incorporer un dispositif de coupure dans le
câblage fixe ou brancher la fiche
d’alimentation dans une prise murale
facilement accessible proche de l’appareil.
En cas de problème lors du fonctionnement
de l’appareil, enclencher le dispositif de
coupure d’alimentation ou débrancher la
fiche d’alimentation.
ATTENTION
À propos du connecteur LAN
Par mesure de sécurité, ne raccordez pas le
connecteur pour le câblage de périphériques
pouvant avoir une tension excessive à ce
port.
AVERTISSEMENT
1
Utilisez un cordon d’alimentation (câble
secteur à 3 fils)/fiche femelle/fiche mâle
avec des contacts de mise à la terre
conformes à la réglementation de sécurité
locale applicable.
2
Utilisez un cordon d’alimentation (câble
secteur à 3 fils)/fiche femelle/fiche mâle
avec des caractéristiques nominales
(tension, ampérage) appropriées.
Pour toute question sur l’utilisation du
cordon d’alimentation/fiche femelle/fiche
mâle ci-dessus, consultez un technicien du
service après-vente qualifié.
Pour les clients au Canada
CAN ICES-3 (B)/NMB-3(B)
Pour les clients en Europe
Ce produit a été fabriqué par ou pour le
compte de Sony Corporation, 1-7-1 Konan
Minato-ku Tokyo, 108-0075 Japon. Toutes
les questions relatives à la conformité des
produits basées sur la législation européenne
doivent être adressées à son représentant,
Sony Deutschland GmbH, Hedelfinger
Strasse 61, 70327 Stuttgart, Allemagne.
Pour toute question relative au Service
Après-Vente ou à la Garantie, merci de bien
vouloir vous référer aux coordonnées qui
vous sont communiquées dans les
documents « Service (SAV) » ou Garantie.
Pour les clients au Canada
GARANTIE LIMITÉE DE SONY
-
Rendez-vous sur http://www.sonybiz.ca/
solutions/Support.do pour obtenir les
informations importantes et l’ensemble des
termes et conditions de la garantie limitée
de Sony applicable à ce produit.
FR

FR
4
Précautions
Sécurité
• S’assurer que la tension de service de votre
projecteur est identique à la tension locale.
• Si du liquide ou un objet quelconque
venait à pénétrer dans le boîtier,
débrancher le projecteur et le faire vérifier
par un technicien qualifié avant la remise
en service.
• Débrancher le projecteur de la prise
murale en cas de non-utilisation pendant
plusieurs jours.
• Pour débrancher le cordon, le tirer par la
fiche. Ne jamais tirer sur le cordon lui-
même.
• La prise murale doit se trouver à proximité
du projecteur et être facile d’accès.
• Le projecteur n’est pas déconnecté de la
source d’alimentation tant qu’il reste
branché à la prise murale, même s’il a été
mis hors tension.
• Ne pas regarder dans l’objectif lorsque la
lampe est allumée.
• Ne pas placer la main ou des objets à
proximité des orifices de ventilation. L’air
expulsé est brûlant.
Prévenir l’accumulation de chaleur
interne
Après avoir mis l’appareil hors tension au
moyen du bouton
?
/
1
(marche/veille), ne
pas le débrancher de la prise murale tant que
le ventilateur de refroidissement tourne.
Mise en garde
Cet appareil est doté d’orifices de ventilation
(prise d’air et sortie d’air). Ne pas obstruer
ces orifices et ne rien placer à proximité car
ceci risquerait de provoquer une surchauffe
interne pouvant entraîner une altération de
l’image ou un endommagement de
l’appareil.
Remballage
Conserver le carton d’emballage original et
le matériel d’emballage ; ils seront très utiles
si l’on doit un jour expédier l’appareil. Pour
assurer une protection maximale, remballer
l’appareil tel qu’il avait été emballé en usine.
Consignes de sécurité relatives à
l’utilisation des lunettes 3D
Avertissement
• Ne jetez pas les lunettes 3D au feu.
• Ne démontez pas les lunettes 3D.
• N’utilisez pas, ne chargez pas, ne rangez
pas et ne laissez pas les lunettes 3D près du
feu ou dans des endroits où la température
est élevée, notamment sous les rayons
directs du soleil ou dans un véhicule en
plein soleil.
• Utilisez uniquement le câble USB fourni.
• Ne chargez pas les lunettes 3D avec un
appareil autre que l’adaptateur secteur de
charge USB fourni.
• Empêchez toute pénétration d’eau ou de
corps étranger dans les lunettes 3D.
Consignes de sécurité
• Utilisez uniquement les lunettes 3D
fournies avec cet appareil. Vous devez
seulement porter les lunettes 3D pour
regarder des images vidéo 3D. N’utilisez
pas les lunettes 3D avec un autre appareil,
par exemple un téléviseur.
• Si vous observez des scintillements ou des
éclairs, éteignez l’éclairage.
• Cet appareil n’est pas destiné à être utilisé
par des enfants sans la surveillance d’un
adulte.
• Veillez à ne pas vous pincer les doigts dans
les charnières des lunettes 3D lorsque vous
repliez les branches.
• Ne laissez pas tomber ou ne modifiez pas
ces lunettes 3D.
• Si ces lunettes sont cassées, éloignez les
débris de la bouche ou des yeux.
5
FR
Projecteur LCD
Le projecteur LCD est fabriqué au moyen
d’une technologie de haute précision. Il se
peut toutefois que vous constatiez que de
petits points noirs et/ou lumineux (rouges,
bleus ou verts) apparaissent continuellement
sur le projecteur LCD. Ceci est un résultat
normal du processus de fabrication et n’est
pas le signe d’un dysfonctionnement.
Si vous utilisez plusieurs projecteurs LCD
pour projeter sur un écran, la reproduction
des couleurs peut varier selon les
projecteurs, même s’ils sont du même
modèle. Ceci est dû au fait que l’équilibre
des couleurs peut être réglé différemment
sur les projecteurs.
Remarque concernant la
condensation
Si la pièce dans laquelle le projecteur est
installé subit de brusques changements de
températures ou si vous déplacez le
projecteur d’un endroit froid à un endroit
chaud, de la condensation peut se former à
l’intérieur du projecteur. Étant donné que la
condensation peut provoquer un
dysfonctionnement, réglez la température de
votre climatiseur avec précaution. Si de la
condensation se forme, laissez le projecteur
allumé pendant deux heures avant de
l’utiliser.
Remarques sur l’installation et l’utilisation
Ne pas placer l’appareil dans les positions
suivantes, ce qui risquerait de provoquer un
dysfonctionnement ou des dommages.
Murs proches
Afin de maintenir les performances et la
fiabilité de l’appareil, laisser un dégagement
entre les murs et l’appareil tel qu’illustré.
Laisser un dégagement d’au moins 5 cm
(2 pouces) entre le mur et le côté du port de
prise d’air de l’appareil. Remarque : le mur
situé derrière l’appareil peut devenir chaud.
Mauvaise ventilation
Laisser un dégagement de plus de 30 cm
(11
7
/
8
pouces) autour de l’appareil.
Sony ne peut être tenue responsable de
tout dommage, de quelque nature que
ce soit, résultant d'une incapacité à
mettre en place des mesures de sécurité
adaptées pour les dispositifs de
transmission, de fuites de données
inévitables dues aux spécifications de
transmission ou de tout autre problème
de sécurité.
Installation déconseillée
30 cm
(11
7
/
8
pouces)
30 cm
(11
7
/
8
pouces)
30 cm
(11
7
/
8
pouces)
5 cm (2 pouces)
: sortie d’air
FR
6
Endroits chauds et humides
Endroits directement exposés au
souffle froid ou chaud d’un
climatiseur
L’installation de l’appareil dans de tels
endroits pourrait provoquer un
dysfonctionnement sous l’effet de la
condensation d’humidité ou de l’élévation
de température.
Proximité d’un détecteur de chaleur
ou de fumée
Il pourrait en résulter un dysfonctionnement
du capteur.
Endroits très poussiéreux ou
enfumés
Éviter ce qui suit pendant l’utilisation de
l’appareil.
Bloquer les orifices de ventilation
(prise ou sortie d’air)
Inclinaison vers l’avant/arrière et vers
la gauche/droite
Éviter d’incliner l’appareil à un angle
supérieur à 15 degrés pour l’utiliser.
Ne pas installer l’appareil ailleurs que sur
une surface de niveau ou au plafond.
L’installation de l’appareil dans un tel
emplacement peut affecter l’uniformité des
couleurs ou réduire la fiabilité des effets de
la lampe.
Si l’appareil est incliné vers le haut ou le bas,
l’image à l’écran peut être trapézoïdale.
Positionner l’appareil de façon à ce que
l’objectif soit parallèle à l’écran.
Conditions inappropriées
Orifices de ventilation
(prise d’air)
Orifices de ventilation
(sortie d’air)
15° ou plus
15° ou
plus
15° ou plus
7
FR
Lors de l’installation de l’appareil à
haute altitude
Lorsque vous utilisez l’appareil à une
altitude de 1 500 m (environ 4 900 pi) ou
plus, réglez « Régl. refroidssmnt » dans le
menu Réglage
sur « Haut ». Si vous
n’activez pas ce mode lors d’une utilisation
à haute altitude, ceci pourra affecter le
projecteur (diminution de la fiabilité de
certaines pièces, par exemple).
• N’installez jamais le projecteur au plafond
et ne le déplacez jamais par vos propres
moyens. Veillez à vous adresser à un
technicien Sony agréé (service payant).
• Lorsque vous installez l’appareil au
plafond, veillez à utiliser un fil de sécurité,
par exemple, pour l’empêcher de tomber.
Confiez l’installation à un professionnel
ou à un installateur expérimenté.
Pour les revendeurs
• Quand le projecteur est fixé au plafond, un
support Sony ou un support équivalent
recommandé doit être utilisé pour
l’installation.
• Vous devez fermer le couvercle du cabinet
solidement lors de l’installation au
plafond.
Précautions de sécurité
relatives à l’installation de
l’appareil au plafond
15° ou
plus
15° ou plus
FR
8
Vérifiez si le carton renferme bien tous les
éléments suivants :
• Télécommande RM-PJ22 (1)
• Piles de format AA (R6) au manganèse (2)
• Cordon d’alimentation secteur du
projecteur (1)
• Porte-fiche (1)
• Couvercle de la prise secteur (1)
• Lunettes 3D (2)
• Étui pour les lunettes 3D (2)
• Adaptateur secteur de charge USB
(AC-UD10) (1)
Spécifications
Tension d’entrée : 100 V à 240 V CA,
0,2 A, 50/60 Hz
Tension de sortie : 5 V CC, 1,5 A
Veuillez respecter les caractéristiques
d’alimentation ci-dessus.
• Cordon d’alimentation pour adaptateur
secteur de charge USB (1)
Pour les clients au Canada
AVERTISSEMENT
L’utilisation de l’appareil avec une tension
autre que 120 V peut nécessiter l’utilisation
d’un autre cordon d’alimentation ou d’une
autre prise ou les deux à la fois. Pour réduire
le risque d’incendie et d’électrocution,
confiez toute réparation à un personnel
qualifié.
• Câble de charge USB (G2551-0077-00/-
01 ou APY5244-010020/SONY) (1,2 m)
(1)
• Guide de référence rapide (ce manuel) (1)
• Mode d’emploi (CD-ROM) (1)
ATTENTION
Il y a danger d’explosion s’il y a
remplacement incorrect de la batterie.
Remplacer uniquement avec une batterie du
même type ou d’un type équivalent
recommandé par le constructeur.
Lorsque vous mettez la batterie au rebut,
vous devez respecter la législation en
vigueur dans le pays ou la région où vous
vous trouvez.
Mise en place des piles
Deux piles de format AA (R6) sont fournies
pour la télécommande.
Pour éviter tout risqué d’explosion, utilisez
des piles de format AA (R6) au manganèse
ou des piles alcalines.
Précautions relatives à la
manipulation de la télécommande
• Manipulez la télécommande avec
précautions. Ne renversez aucun liquide
sur la télécommande, ne la laissez pas
tomber et ne marchez pas dessus.
Préparation Etape 1
Vérification des accessoires
fournis
Remarque
Insertion des piles dans la
télécommande
Appuyez et faites
glisser pour ouvrir.
Insérez le côté
E
des
piles en premier.
9
FR
• Ne placez pas la télécommande à
proximité d’une source de chaleur, dans un
endroit exposé aux rayons directs du soleil
ou dans une pièce humide.
Vous devez installer Adobe Reader sur votre
ordinateur pour pouvoir lire ce manuel.
Vous pouvez télécharger Adobe Reader
gratuitement depuis le site Web d’Adobe.
1
Ouvrez le fichier index.htm situé sur le
CD-ROM.
2
Sélectionnez le manuel que vous
souhaitez lire, puis cliquez sur ce
dernier.
Si vous avez perdu ou endommagé le
CD-ROM, vous pouvez acheter un CD-ROM
de remplacement auprès de votre représentant
Sony ou du service clientèle Sony.
1
Branchez le cordon d’alimentation
dans la prise AC IN, puis fixez le
support de fiche au cordon
d’alimentation.
2
Faites glisser le support de fiche le
long du cordon d’alimentation pour le
fixer à l’unité.
3
Fixez le cache de la prise
d’alimentation à l’unité.
Utilisation du manuel sur
CD-ROM
Remarque
Raccordement du cordon
d’alimentation
Support de
fiche (fourni)
Cordon
d’alimentation
(fourni)
Prise AC IN
Cache de la prise d’alimentation (fourni)
FR
10
1
Positionner l’appareil parallèlement à
l’écran.
2
Après avoir branché le cordon
d’alimentation à l’appareil, branchez
le cordon d’alimentation secteur à une
prise murale.
3
Appuyez sur le bouton
?
/
1
(marche/
veille) pour mettre l’appareil sous
tension.
4
Projetez une image sur l’écran, puis
réglez la mise au point, la taille et la
position.
a
Réglez la mise au point.
Appuyez sur le bouton LENS
ADJUSTMENT (FOCUS) pour afficher
la fenêtre de réglage Focus d’objectif
(mire d’essai). Réglez ensuite la mise au
point de l’image en appuyant sur les
boutons
M
/
m
/
<
/
,
.
b
Réglez la taille de l’image.
Appuyez sur le bouton LENS
ADJUSTMENT (ZOOM) pour afficher
la fenêtre de réglage Zoom d’objectif
(mire d’essai). Réglez ensuite la taille de
l’image en appuyant sur les boutons
M
/
m
/
<
/
,
.
c
Réglez la position de l’image.
Appuyez sur le bouton LENS
ADJUSTMENT (SHIFT) pour afficher
la fenêtre de réglage Déplac. objectif
(mire d’essai). Réglez ensuite la position
correcte de l’image en appuyant sur les
boutons
M
/
m
/
<
/
,
.
Fenêtre de réglage de l’objectif (mire
d’essai)
Installation de l’appareil Etape 2
S’allume en
rouge.
Avant de l’appareil
Clignote en vert
pendant dix
secondes, puis
s’allume en vert.
Avant de l’appareil
Pour plus d’informations reportez-vous à
« Raccordements et préparatifs » dans le
Mode d’emploi que vous trouverez sur le
CD-ROM fourni.
1,78:1 (16:9)
2,35:1
1,85:1
1,33:1 (4:3)
Les lignes pointillées indiquent les tailles
d’écran de chaque rapport de format.
11
FR
Lors de l’exécution des raccordements, il faut procéder comme suit :
• Mettre tous les appareils hors tension avant tout raccordement.
• Utiliser les câbles appropriés pour chaque raccordement.
• Insérer correctement les fiches de câble ; le mauvais raccordement des fiches peut entraîner
un dysfonctionnement ou une piètre qualité d’image. Débrancher les câbles en les tenant par
leur fiche. Ne pas tirer sur le câble lui-même.
• Se reporter au mode d’emploi de l’appareil à raccorder.
Pour raccorder à un appareil avec des connecteurs de sortie HDMI
Raccordement de l’appareil
Raccordement à un magnétoscope
Etape 3
Câble HDMI (non fourni)
: Flux du signal vidéo
Côté droit de l’appareil
Appareil avec des
connecteurs de sortie HDMI
vers la sortie HDMI
Amplificateur AV
Haut-
parleurs
Lorsque vous utilisez un câble HDMI en option, veillez à
utiliser un câble HDMI Sony ou un autre câble portant le
logo HDMI.
Pour plus d’informations reportez-vous à « Raccordements
et préparatifs » dans le Mode d’emploi que vous trouverez
sur le CD-ROM fourni.
FR
12
Pour raccorder à un appareil avec des connecteurs de sortie vidéo de
composant
Câble vidéo à composantes (non fourni)
: Flux du signal vidéo
Appareil avec des
connecteurs de sortie vidéo
de composant
Côté droit de l’appareil
Amplificateur AV
Haut-
parleurs
Pour plus d’informations reportez-vous à « Raccordements
et préparatifs » dans le Mode d’emploi que vous trouverez
sur le CD-ROM fourni.

13
FR
Raccordement à un ordinateur
Câble Dsub HD avec 15 broches (non fourni) ou câble HDMI (non fourni)
: Flux du signal vidéo
Côté droit de l’appareil
vers sortie moniteur
Ordinateur
Lorsque vous utilisez un câble HDMI en option, veillez à utiliser
un câble HDMI Sony ou un autre câble portant le logo HDMI.
Pour plus d’informations reportez-vous à « Raccordements
et préparatifs » dans le Mode d’emploi que vous trouverez
sur le CD-ROM fourni.
FR
14
Vous pouvez utiliser un émetteur de synchronisation 3D distinct de cet appareil, en utilisant un câble
LAN en option (de type droit).
Si des interférences d’une fréquence spécifique continue existent dans l’environnement d’utilisation
de l’appareil, la synchronisation des signaux d’image 3D et des lunettes 3D peut être perdue. Dans
ce cas, utilisez un câble LAN référencée Catégorie 7.
Lorsque vous visionnez des images 3D dans un environnement où les interférences sont encore plus
nombreuses, utilisez l’émetteur interne.
Raccordement à un émetteur de synchronisation 3D
Côté droit de l’appareil
Émetteur de synchronisation 3D
(non fourni)
Câble LAN (non fourni)
Flux du signal de synchronisation 3D
Remarque
Pour plus d’informations reportez-vous à « Raccordements
et préparatifs » dans le Mode d’emploi que vous trouverez
sur le CD-ROM fourni.
15
FR
Vous pouvez sélectionner l’une des
16 langues d’affichage du menu et d’autres
affichages à l’écran. Le réglage en usine par
défaut est l’anglais. Pour changer la langue
actuelle du menu, choisissez la langue
désirée grâce à l’écran de menu.
1
Appuyer sur MENU.
Le menu apparaît.
2
Appuyer sur
M
/
m
pour sélectionner le
menu Setup
, puis appuyer sur
,
ou .
Les options de réglage du menu
sélectionné apparaissent.
3
Appuyer sur
M
/
m
pour sélectionner
« Language », puis appuyer sur
,
ou
.
4
Appuyer sur
M
/
m
/
<
/
,
pour
sélectionner une langue, puis appuyer
sur .
La langue du menu devient celle que
vous avez sélectionnée.
Pour faire disparaître le menu
Appuyer sur MENU.
Sélection de la langue du menu Etape 4
FR
16
1
Mettez sous tension cet appareil et
l’appareil qui y est raccordé.
2
Appuyez sur INPUT pour afficher la
palette d’entrée sur l’écran.
3
Sélectionnez le périphérique à partir
duquel vous voulez afficher les
images.
Appuyez plusieurs fois sur INPUT ou
sur
M
/
m
/
(entrée) pour sélectionner
le périphérique à utiliser pour la
projection.
1
Appuyez sur le bouton
?
/
1
(marche/
veille).
Le message « METTRE HORS
TENSION? » apparaît sur l’écran.
2
Appuyez une nouvelle fois sur le
bouton
?
/
1
(marche/veille) avant que
le message disparaisse.
Le protecteur d’objectif se ferme. Faire
attention à ne pas se coincer les doigts ou
tout autre objet.
L’indicateur ON/STANDBY clignote en
vert et le ventilateur continue à tourner
pour abaisser la température interne.
D’abord, l’indicateur ON/STANDBY
clignote rapidement et à ce moment il
n’est pas possible d’allumer l’indicateur
ON/STANDBY avec le bouton
?
/
1
(marche/veille).
Le ventilateur s’arrête et l’indicateur
ON/STANDBY cesse de clignoter en
vert pour briller en rouge.
L’alimentation s’arrête complètement et
vous pouvez débrancher le cordon
d’alimentation.
Ne jamais débrancher le cordon d’alimentation
lorsque l’indicateur clignote.
Vous pouvez mettre l’appareil hors tension en
maintenant le bouton
?
/
1
(marche/veille)
enfoncé pendant 1 seconde environ, plutôt
qu’en suivant les étapes ci-dessus.
Projection Etape 5
Projection de l’image
Mise hors tension
Exemple : Pour afficher l’image provenant
de l’équipement vidéo raccordé au
connecteur HDMI 1 de cet appareil.
Remarque
Pour plus d’informations reportez-vous à
« Projection » dans le Mode d’emploi que
vous trouverez sur le CD-ROM fourni.

17
FR
Appuyez sur un des boutons
CALIBRATED PRESET.
Sélection du mode d’affichage de l’image
Boutons
CALIBRATED
PRESET
Paramètres
Description
CINEMA FILM 1
Qualité d’image adaptée à la reproduction d’images hautement
dynamiques et nettes, typiques d’un chef-d’œuvre du cinéma.
CINEMA FILM 2
Qualité d’image adaptée à la reproduction de tons riches et de
couleurs dignes du cinéma.
CINEMA DIGITAL
Qualité d’image adaptée à la reproduction d’images comme au
cinéma ressemblant aux spécifications DCI.
REF
Configuration de qualité d’image appropriée lorsque vous
souhaitez reproduire fidèlement la qualité d’image d’origine
ou pour profiter de la qualité d’image sans aucun réglage.
TV
Qualité d’image adéquate pour regarder des programmes TV,
du sport, des concerts, etc.
PHOTO
Idéal pour la projection d’images fixes provenant d’un
appareil photo numérique.
GAME
Qualité d’image adaptée aux jeux, avec des couleurs bien
modulées et une réponse rapide.
BRT CINE
Qualité d’image adéquate pour regarder les films dans un
environnement lumineux, comme un séjour.
BRT TV
Qualité d’image adéquate pour regarder des programmes TV,
du sport, des concerts et d’autres images vidéo dans un
environnement lumineux, comme un séjour.
Pour plus d’informations reportez-vous à « Projection »
dans le Mode d’emploi que vous trouverez sur le CD-ROM
fourni.

FR
18
L’indicateur ON/STANDBY ou LAMP/COVER s’allume ou clignote en cas de problème
quelconque sur le projecteur.
Gestion des erreurs
Indicateurs d’avertissement
Symptôme
Cause et remède
LAMP/COVER clignote
en rouge (un taux de
répétition de 2
clignotements).
c
Fermez bien le couvercle de la lampe, puis vissez-le solidement.
LAMP/COVER clignote
en rouge (un taux de
répétition de 3
clignotements).
c
La température de la lampe est anormalement élevée. Mettre
hors tension et attendre que la lampe se refroidisse, puis
remettre sous tension.
c
Si ce symptôme persiste, la lampe a peut-être atteint la fin de sa
durée de service. Dans ce cas, remplacez la lampe par une
neuve.
ON/STANDBY clignote en
rouge (un taux de
répétition de 4
clignotements).
c
Le ventilateur est défectueux. Consultez le service après-vente
Sony.
ON/STANDBY clignote en
rouge (un taux de
répétition de 2
clignotements).
c
La température à l’intérieur du projecteur est anormalement
élevée. S’assurer que rien ne bouche les orifices de ventilation et
que l’appareil n’est pas utilisé à haute altitude.
ON/STANDBY clignote en
rouge (un taux de
répétition de 6
clignotements).
c
Appuyer sur le bouton
?
/
1
(marche/veille) pour mettre
l’appareil sous tension. S’il ne se met pas sous tension,
débrancher le cordon d’alimentation secteur, puis confirmer que
l’indicateur ON/STANDBY est éteint. Rebrancher le cordon
d’alimentation secteur après environ 10 secondes et remettre le
projecteur sous tension. Si les indicateurs s’allument toujours,
cela signifie que le problème vient de la source d’alimentation.
Consultez le service après-vente Sony.
Indicateur ON/STANDBY
Indicateur LAMP/COVER
19
FR
Lorsqu’un indicateur d’avertissement autre que celui ci-dessus commence à clignoter et que le
symptôme persiste même après avoir effectué les opérations ci-dessus, consultez le service après-
vente Sony.
ON/STANDBY clignote en
rouge (cadence de
répétition de 5
clignotements).
c
Le protecteur d’objectif n’est pas complètement ouvert. Mettre
l’appareil hors tension, puis à nouveau sous tension. Si le
protecteur d’objectif ne s’ouvre toujours pas complètement,
consulter un personnel Sony qualifié.
Conseil
En cas d’urgence, se reporter à l’illustration ci-dessous pour ouvrir le
protecteur d’objectif à la main. Appuyer sur le bouton
?
/
1
(marche/
veille) pour mettre l’appareil sous tension et l’utiliser.
Symptôme
Cause et remède
Remarque
En cas de problème ou si un message d’erreur apparaît à
l’écran, reportez-vous à « Dépannage » dans le Mode
d’emploi que vous trouverez sur le CD-ROM fourni.
FR
20
La durée de service de la lampe utilisée
comme source de lumière est limitée.
Lorsque la lampe faiblit, la balance des
couleurs de l’image devient bizarre, ou bien
« Remplacer la lampe. » apparaît sur l’écran
et la lampe est peut-être épuisée. Remplacer
la lampe par une neuve (non fournie) sans
tarder.
Voici les outils dont vous avez besoin pour
commencer :
•
Lampe pour projecteur LMP-H330 (en
option)
•
Un tournevis cruciforme standard
•
Un chiffon (pour protéger des éraflures)
• La lampe reste chaude après la mise hors
tension de l’appareil avec le bouton
?
/
1
(marche/veille). Ne pas la toucher car
vous pourriez vous brûler les doigts. Avant
de remplacer la lampe, attendre au moins
1 heure pour lui permettre de se refroidir.
• Ne pas toucher la surface de l’objectif. Si on
l’a touché, essuyer les empreintes digitales
avec un chiffon doux.
• Prêter une attention spéciale au
remplacement de la lampe lorsque l’appareil
est installé au plafond.
• Lors du remplacement de la lampe d’un
appareil installé au plafond, ne pas se tenir
directement sous le couvercle de la lampe.
Lors du retrait du couvercle de la lampe
(couvercle intérieur), évitez de le dévisser.
Si la lampe explose, les morceaux peuvent
entraîner des blessures.
• Lorsque vous retirez la lampe, assurez-vous
qu’elle reste en position horizontale, puis
soulevez-la directement vers le haut.
N’inclinez pas la lampe. Si vous retirez la
lampe alors qu’elle est inclinée et si elle se
casse, des morceaux peuvent s’éparpiller et
entraîner des blessures.
1
Mettez l’appareil hors tension et
débranchez le cordon d’alimentation
secteur.
2
Lorsque vous disposez l’appareil sur
une surface plane comme un bureau,
etc., mettez un chiffon sur la surface
pour éviter de la rayer. Placez
l’appareil sur le chiffon.
S’assurer que l’appareil est posé sur une
surface stable.
3
Tout en appuyant sur la partie
indiquée sur l’illustration du
couvercle de la lampe, faire glisser
1
,
puis ouvrir
2
le couvercle de la
lampe.
Entretien
Remplacement de la lampe
Mise en garde
Remarque
21
FR
4
Desserrer la vis du couvercle de la
lampe (couvercle intérieur) avec un
tournevis cruciforme, puis ouvrir le
couvercle de lampe.
5
Dévisser les 3 vis de la lampe à l’aide
du tournevis cruciforme. Maintenir la
poignée vers le haut, et retirer la
lampe.
Tenir la lampe par la poignée pour la retirer
et la fixer.
6
Insérer fermement et à fond la
nouvelle lampe à l’aide de la poignée,
puis resserrer les 3 vis.
Prendre garde de toucher le bloc optique à
l’intérieur du projecteur.
7
Fermer le couvercle de la lampe
(couvercle intérieur), puis le visser.
8
Ouvrir le couvercle de la lampe.
Remarque
Poignée
Remarque
FR
22
9
Dépoussiérer les orifices de
ventilation (aspiration) à l’aide d’un
chiffon.
10
Mettre l’appareil sous tension, puis
sélectionner l’élément de réglage
désiré dans le menu Réglage
.
L’écran du menu ci-dessous s’affiche.
11
Sélectionner « Oui ».
Ne pas introduire les doigts dans la fente de
remplacement de la lampe et veiller à ce
qu’aucun liquide ou objet ne tombe à
l’intérieur de la fente pour éviter tout risque
d’électrocution ou d’incendie.
• Il faut utiliser une lampe pour projecteur
LMP-H330 pour le remplacement. Si une
lampe autre que LMP-H330 est utilisée,
l’appareil risque de mal fonctionner.
• Mettre l’appareil hors tension et débrancher
le cordon d’alimentation secteur avant de
remplacer la lampe, puis vérifier que
l’indicateur ON/STANDBY a déjà été éteint.
• L’appareil ne se mettra sous tension que si la
lampe est bien mise en place.
• L’appareil ne se mettra sous tension que si le
couvercle de la lampe est bien fermé.
• Pour annuler un message affiché à l’écran,
appuyez soit sur le bouton de la
télécommande, soit sur celui du panneau de
contrôle de l’appareil.
Remarque concernant le
remplacement d’une lampe brisée
pour une installation au plafond
Si la lampe se brise, les morceaux de lampe
risquent de se disperser et vous pouvez vous
blesser.
Lorsque l’appareil est fixé au plafond, retirer le
couvercle de la lampe (couvercle intérieur) en
le faisant lentement glisser horizontalement
après l’avoir soulevé avec une ouverture de 30
degrés. Éviter de dévisser le couvercle de la
lampe (couvercle intérieur).
Mettre à disposition de la lampe
usagée
Pour les clients aux États-Unis
La lampe dans ce produit contient du
mercure. La disposition de ces
matériaux peut être réglementée suite à
des considérations environnementales.
Pour obtenir des informations de
disposition ou de recyclage, veuillez
Mise en garde
Remarques
Orifices de ventilation (prise d’air)
Remarque
La lampe contient du mercure. La
réglementation en matière de mise au rebut
pour les tubes fluorescents dépend de votre
lieu de résidence. Respectez la politique
d’élimination des déchets de votre région.
30°

23
FR
communiquer avec vos autorités locales
ou la Telecommunications Industry
Association (www.eiae.org).

ES
2
Este Manual de referencia rápida explica la instalación y las operaciones básicas para proyectar
imágenes. También presenta notas y precauciones importantes que deben tenerse muy en
cuenta al manipular y utilizar esta unidad.
Consulte los “Indicadores de aviso” y “Sustitución de la lámpara”, según corresponda.
Para obtener más información sobre las operaciones, consulte el Manual de instrucciones que
se incluye en el CD-ROM suministrado.
Acerca del Manual de referencia rápida
Preparación
........................................... Página 8
Instalación de la unidad
................ Página 10
Conexión de la unidad
.................... Página 11
Selección del idioma del menú
................................................................... Página 15
Proyección
........................................... Página 16
Gestión de
errores
Indicadores de aviso
.................................. Página 18
Mantenimiento
Sustitución de la lámpara
.......................... Página 20
Paso 1 Paso 2 Paso 3 Paso 4 Paso 5
3
ES
Antes de poner en funcionamiento la unidad,
lea detenidamente este manual y consérvelo
para referencias futuras.
ADVERTENCIA
Para reducir el riesgo de
electrocución, no exponga este
aparato a la lluvia ni a la humedad.
Para evitar descargas eléctricas, no
abra el aparato. Solicite asistencia
técnica únicamente a personal
especializado.
ADVERTENCIA
ESTE APARATO DEBE CONECTARSE
A TIERRA.
ADVERTENCIA
Al instalar la unidad, incluya un dispositivo
de desconexión fácilmente accesible en el
cableado fijo, o conecte el enchufe de
alimentación a una toma de corriente
fácilmente accesible cerca de la unidad. Si se
produce una anomalía durante el
funcionamiento de la unidad, accione el
dispositivo de desconexión para desactivar la
alimentación o desconecte el enchufe de
alimentación.
PRECAUCIÓN
Acerca del conector LAN
Por razones de seguridad, no enchufe a este
puerto un conector de cableado de
dispositivo periférico que pueda tener una
tensión excesiva.
ADVERTENCIA
1
Utilice un cable de alimentación (cable de
alimentación de 3 hilos)/conector/enchufe
del aparato recomendado con toma de
tierra y que cumpla con la normativa de
seguridad de cada país, si procede.
2
Utilice un cable de alimentación (cable de
alimentación de 3 hilos)/conector/enchufe
del aparato que cumpla con los valores
nominales correspondientes en cuanto a
tensión e intensidad.
Si tiene alguna duda sobre el uso del cable de
alimentación/conector/enchufe del aparato,
consulte a un técnico de servicio cualificado.
Para los clientes de Europa
Este producto ha sido fabricado por, o en
nombre de Sony Corporation, 1-7-1 Konan
Minato-ku Tokyo, 108-0075 Japón. Las
consultas relacionadas con la conformidad
del producto basadas en la legislación de la
Unión Europea deben dirigirse al
representante autorizado, Sony Deutschland
GmbH, Hedelfinger Strasse 61, 70327
Stuttgart, Alemania. Para cualquier asunto
relacionado con el servicio o la garantía, por
favor diríjase a la dirección indicada en los
documentos de servicio o garantía
adjuntados con el producto.
ES

ES
4
Precauciones
Seguridad
• Compruebe que la tensión de
funcionamiento de la unidad sea la misma
que la del suministro eléctrico local.
• Si se introduce algún objeto sólido o
líquido en la unidad, desenchúfela y haga
que sea revisada por personal
especializado antes de volver a utilizarla.
• Desenchufe la unidad de la toma mural
cuando no vaya a utilizarla durante varios
días.
• Para desconectar el cable, tire del enchufe.
Nunca tire del propio cable.
• La toma mural debe encontrarse cerca de
la unidad y ser de fácil acceso.
• La unidad no estará desconectada de la
fuente de alimentación de CA mientras
esté conectada a la toma mural, aunque
haya apagado la unidad.
• No mire al objetivo mientras la lámpara
esté encendida.
• No coloque la mano ni ningún objeto cerca
de los orificios de ventilación. El aire que
sale es caliente.
Prevención del calentamiento
interno
Después de apagar la alimentación con el
botón
?
/
1
(encendido/espera), no
desconecte la unidad de la toma mural
mientras el ventilador de refrigeración esté
en funcionamiento.
Precaución
Esta unidad está equipada con orificios de
ventilación de entrada y de salida. No
bloquee dichos orificios ni coloque nada
cerca de ellos, ya que si lo hace puede
producirse un recalentamiento interno,
causando el deterioro de la imagen o daños a
la unidad.
Embalaje
Guarde la caja y los materiales de embalaje
originales, ya que resultarán útiles cuando
tenga que embalar la unidad. Para obtener
una máxima protección, vuelva a embalar la
unidad como se embaló originalmente en
fábrica.
Precauciones de seguridad al
utilizar las gafas 3D
Advertencia
• No deseche las gafas 3D en el fuego.
• No desmonte las gafas 3D.
• No utilice, ni cargue, ni almacene, ni deje
las gafas 3D cerca del fuego, ni en lugares
expuestos a altas temperaturas como, por
ejemplo, bajo la luz solar directa o en el
interior de un vehículo estacionado al sol.
• Utilice únicamente el cable USB
suministrado.
• Utilice únicamente el adaptador de
alimentación de CA de carga USB
suministrado para cargar las gafas 3D.
• No permita que en las gafas 3D se
introduzca agua ni ningún tipo de
sustancia extraña.
Precauciones de seguridad
• Utilice sólo el tipo de gafas 3D incluidas
con la unidad. Sólo debe utilizar las gafas
3D para ver imágenes de vídeo en 3D. No
utilice las gafas 3D con ningún otro
equipo, como un televisor.
• Si observa efectos de oscilación o
parpadeo, apague la iluminación de la sala.
• No es adecuado para que lo usen los niños
sin la supervisión de un adulto.
• Vigile que los dedos no le queden
atrapados en la articulación de las gafas
3D al abrir las varillas.
• No deje caer ni modifique estas gafas 3D.
• Si estas gafas se rompieran, aleje las
piezas rotas de la boca y de los ojos.
5
ES
Proiettore LCD
El proyector LCD está fabricado con
tecnología de alta precisión. No obstante, es
posible que se observen pequeños puntos
negros o brillantes (rojos, azules o verdes), o
ambos, de forma continua en el proyector. Se
trata de un resultado normal del proceso de
fabricación y no indica fallo de
funcionamiento.
Además, si utiliza varios proyectores LCD
para proyectar en una pantalla, es posible
que la reproducción de colores no sea igual
en todos los proyectores, incluso si son del
mismo modelo, ya que el balance de color
puede estar configurado de manera distinta.
Acerca de la condensación
Si la temperatura de la habitación en la que
se instala el proyector cambia rápidamente,
o si el proyector se traslada súbitamente de
un lugar muy frío a uno muy cálido, es
posible que se produzca condensación en el
proyector. La condensación puede provocar
errores de funcionamiento, por lo que debe
prestarse atención al ajustar la temperatura
del aire acondicionado. Si se produce
condensación, deje el proyector encendido
durante dos horas antes de utilizarlo.
Notas sobre la instalación y el uso
No ponga la unidad en las siguientes
situaciones, en las que puede sufrir daños o
averías.
Cerca de paredes
Para conservar el rendimiento y la fiabilidad
de la unidad, deje espacio suficiente entre las
paredes y la unidad, tal como se ilustra.
Deje un espacio de al menos 5 cm entre la
pared y el lateral del puerto de salida de aire
de la unidad. Tenga en cuenta que se
calentará la pared que quede detrás de la
unidad.
Ubicaciones escasamente ventiladas
Deje un espacio superior a 30 cm alrededor
de la unidad.
SONY NO SE HACE RESPONSABLE
POR DAÑOS DE NINGÚN TIPO
DEBIDOS A LA OMISIÓN DE LAS
MEDIDAS DE SEGURIDAD
ADECUADAS EN DISPOSITIVOS DE
TRANSMISIÓN, FUGAS DE DATOS
INEVITABLES DERIVADAS DE LAS
ESPECIFICACIONES DE
TRANSMISIÓN O PROBLEMAS DE
SEGURIDAD DE CUALQUIER TIPO.
Instalación inadecuada
30 cm
30 cm
30 cm
5 cm
: salida
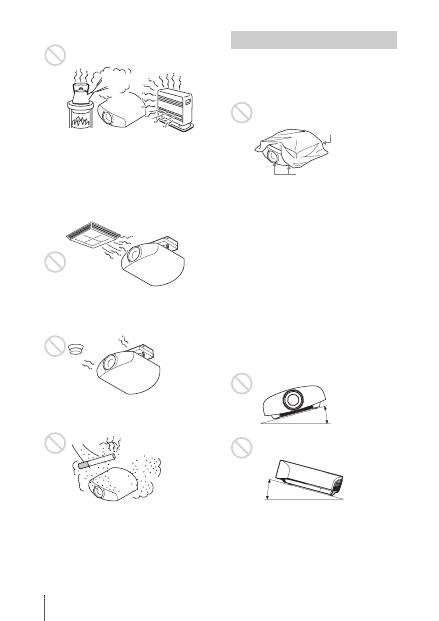
ES
6
Lugares cálidos y húmedos
Lugares expuestos a un flujo directo
de aire frío o caliente procedente de
un aparato de climatización
Si instala la unidad en una ubicación de estas
características, la unidad puede averiarse
debido a la condensación de humedad o al
aumento de temperatura.
Cerca de un sensor de calor o de
humo
Puede producirse una avería del sensor.
Lugares con mucho polvo o humo
excesivo
No haga lo siguiente mientras usa la unidad.
Bloqueo de los orificios de
ventilación (entrada o salida)
Inclinación adelante/atrás e
izquierda/derecha
Evite usar la unidad inclinada con un ángulo
de más de 15 grados.
No instale la unidad en un lugar que no sea
una superficie horizontal o el techo. La
instalación de la unidad en tal ubicación
puede provocar irregularidades en la
uniformidad del color, o reducir la fiabilidad
de los efectos de la lámpara.
Si la unidad está inclinada hacia arriba o
hacia abajo, pueden producirse distorsiones
trapezoidales en la imagen visualizada en la
pantalla.
Coloque la unidad de modo que el objetivo
quede paralelo a la pantalla.
Condiciones inadecuadas
Orificios de ventilación
(entrada)
Orificios de
ventilación (salida)
15° o más
15° o
más
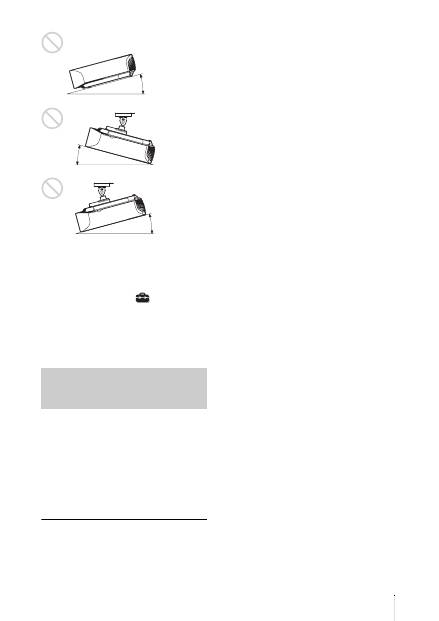
7
ES
Instalación de la unidad a grandes
altitudes
Si utiliza la unidad a altitudes de 1.500 m o
más, ajuste la opción “Config. refrigeración”
del menú Configuración
en “Alto”. Si
no se establece este modo cuando se utiliza
la unidad a altitudes elevadas pueden
producirse efectos adversos, tales como la
reducción de la fiabilidad de determinados
componentes.
• Nunca instale el proyector en el techo ni lo
desplace sin ayuda. Pida siempre consejo a
un técnico de Sony cualificado (servicio de
pago).
• Si instala la unidad en el techo, utilice un
cable de seguridad o un sistema similar
para evitar que la unidad se desprenda.
Confíe siempre la instalación a un
proveedor o instalador experimentado.
Para los distribuidores
• Si se instala el proyector en el techo, es
necesario utilizar un soporte Sony o un
soporte equivalente recomendado.
• Cierre firmemente la tapa de la carcasa
cuando lo instale en el techo.
Precauciones de seguridad
para instalar la unidad en el
techo
15° o más
15° o
más
15° o más
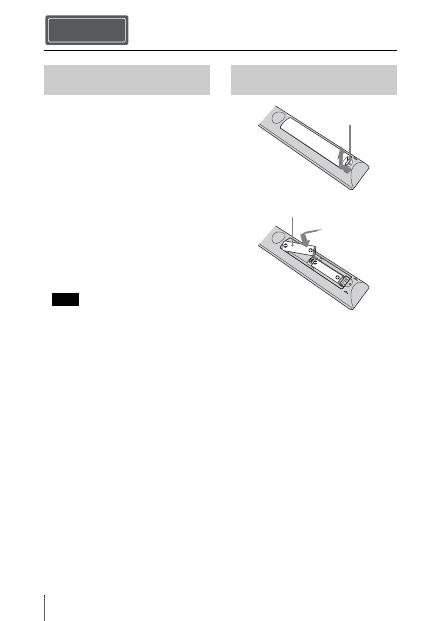
ES
8
Compruebe que la caja contenga los
siguientes elementos:
• Mando a distancia RM-PJ22 (1)
• Pilas de manganeso de tamaño AA (R6)
(2)
• Cable de alimentación de CA para el
proyector (1)
• Sujeta-enchufe (1)
• Tapa de entrada CA (1)
• Gafas 3D (2)
• Funda para las gafas 3D (2)
• Adaptador de alimentación de CA de
carga USB (AC-UD10) (1)
Especificaciones
Tensión de entrada: 100 V a 240 V CA,
0,2 A, 50/60 Hz
Tensión de salida nominal: 5 V CC,
1,5 A
Utilice los requisitos de alimentación
indicados arriba.
• Cable de alimentación de CA del
adaptador de alimentación de CA de carga
USB (1)
• Cable de carga USB (1,2 m) (1)
• Manual de referencia rápida (este manual)
(1)
• Manual de instrucciones (CD-ROM) (1)
PRECAUCIÓN
Peligro de explosión si se sustituye la batería
por una del tipo incorrecto. Reemplace la
batería solamente por otra del mismo tipo o
de un tipo equivalente recomendado por el
fabricante.
Cuando deseche la batería, debe cumplir con
las leyes de la zona o del país.
Colocación de las pilas
Se suministran dos pilas de tamaño AA (R6)
para el mando a distancia.
Para evitar el riesgo de explosión, utilice
pilas alcalinas o de manganeso de tamaño
AA (R6).
Precauciones para la manipulación
del mando a distancia
• Manipule con cuidado el mando a
distancia. No lo deje caer, ni lo pise, ni
derrame ningún líquido sobre él.
• No ponga el mando a distancia cerca de
fuentes de calor, bajo la luz directa del sol
ni en lugares húmedos.
Preparación Paso 1
Comprobación de los
accesorios suministrados
Nota
Introducción de las pilas en el
mando a distancia
Empuje y deslice
para abrir.
Introduzca primero el
lado
E
de la pila.

9
ES
El manual puede leerse en un ordenador con
Adobe Reader instalado.
Puede descargar la aplicación Adobe Reader
de forma gratuita desde el sitio web de
Adobe.
1
Abra el archivo index.htm en el CD-
ROM.
2
Seleccione y haga clic en el manual
que desee leer.
Si ha perdido el CD-ROM o se le ha
estropeado, podrá adquirir uno de
sustitución en su distribuidor Sony o en un
punto de asistencia Sony.
1
Enchufe el cable de alimentación de
CA en el zócalo AC IN; seguidamente,
fije el sujeta-enchufe al cable de
alimentación de CA.
2
Deslice el sujeta-enchufe por el cable
de alimentación de CA para fijarlo a la
unidad.
3
Coloque la tapa de entrada CA en la
unidad.
Utilización del manual en CD-
ROM
Nota
Conexión del cable de
alimentación de CA
Sujeta-enchufe
(suministrado)
Cable de alimentación
de CA (suministrado)
Zócalo AC IN
Tapa de entrada CA (suministrada)
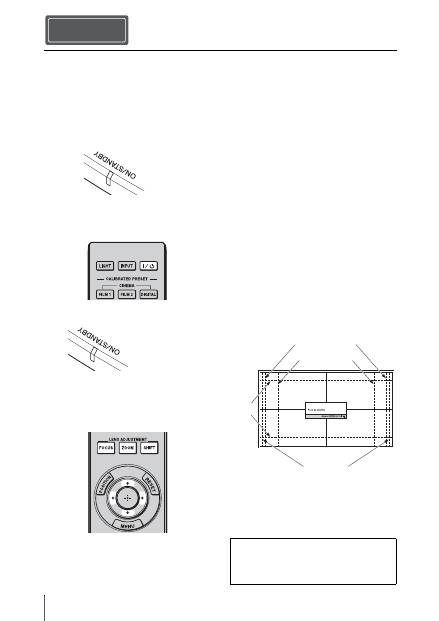
ES
10
1
Coloque la unidad de forma paralela a
la pantalla.
2
Después de conectar el cable de CA a
la unidad, enchufe el cable de CA en
una toma mural.
3
Pulse el botón
?
/
1
(encendido/espera)
para encender la unidad.
4
Proyecte una imagen en la pantalla y,
a continuación, ajuste el enfoque, el
tamaño y la posición.
a
Ajuste el foco.
Pulse el botón LENS ADJUSTMENT
(FOCUS) para acceder a la ventana de
ajuste de Foco de objetivo (patrón de
prueba). A continuación, ajuste el
enfoque de la imagen pulsando los
botones
M
/
m
/
<
/
,
.
b
Ajuste el tamaño de la imagen.
Pulse el botón LENS ADJUSTMENT
(ZOOM) para acceder a la ventana de
ajuste de Zoom de objetivo (patrón de
prueba). A continuación, ajuste el
tamaño de la imagen pulsando los
botones
M
/
m
/
<
/
,
.
c
Ajuste la posición de la imagen.
Pulse el botón LENS ADJUSTMENT
(SHIFT) para acceder a la ventana de
ajuste de Despl. Objetivo (patrón de
prueba). A continuación, ajuste la
posición adecuada de la imagen
pulsando los botones
M
/
m
/
<
/
,
.
Ventana de ajuste del objetivo (patrón
de prueba)
Instalación de la unidad Paso 2
Se ilumina en
rojo.
Parte frontal de la unidad
Parpadea en verde
décimas de
segundo y, a
continuación, se
ilumina en verde.
Parte frontal de la unidad
1,78:1 (16:9)
2,35:1
1,85:1
1,33:1 (4:3)
Las líneas de puntos indican los tamaños de
pantalla de cada relación de aspecto.
Para obtener más información, consulte
“Conexiones y preparativos” en el Manual
de instrucciones que contiene el CD-ROM
suministrado.

11
ES
Cuando haga las conexiones, asegúrese de hacer lo siguiente:
• Apague todos los equipos antes de realizar cualquier conexión.
• Utilice los cables apropiados para cada conexión.
• Introduzca los enchufes de los cables correctamente; una mala conexión de las clavijas puede
provocar una avería o una mala calidad de imagen. Cuando desconecte un cable, asegúrese
de tirar del enchufe, no del cable.
• Consulte las instrucciones de funcionamiento del equipo conectado.
Conexión al equipo con conectores de salida de vídeo HDMI
Conexión de la unidad Paso 3
Conexión a una videograbadora
Cable HDMI (no suministrado)
: Flujo de la señal de vídeo
Lado derecho de la unidad
Equipo con conectores de
salida HDMI
a la salida HDMI
Amplificador AV
Altavoces
Cuando utilice un cable HDMI opcional, asegúrese de
utilizar un cable HDMI de Sony u otro cable que tenga el
logotipo HDMI.
Para obtener más información, consulte “Conexiones y
preparativos” en el Manual de instrucciones que contiene
el CD-ROM suministrado.
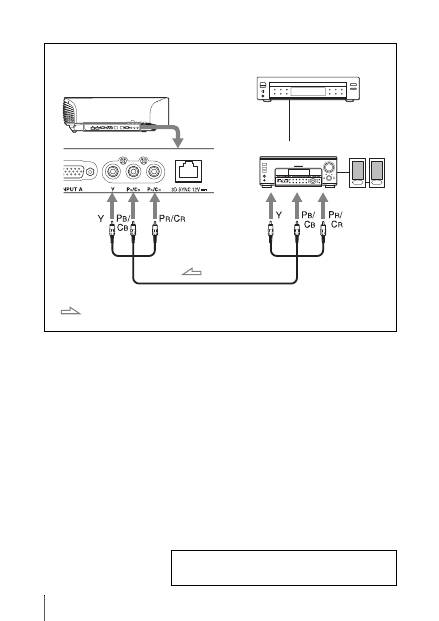
ES
12
Conexión al equipo con conectores de salida de vídeo de componentes
Cable de vídeo de componentes (no suministrado)
: Flujo de la señal de vídeo
Equipo con conectores de
salida de vídeo de
componentes
Lado derecho de la unidad
Amplificador AV
Altavoces
Para obtener más información, consulte “Conexiones y
preparativos” en el Manual de instrucciones que contiene
el CD-ROM suministrado.
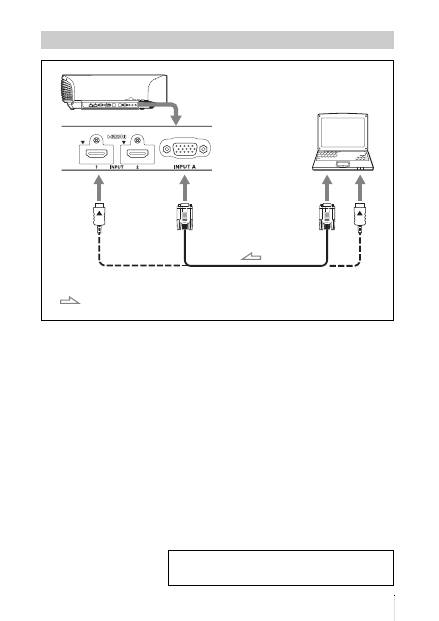
13
ES
Conexión a un ordenador
Cable HD-Dsub de 15 terminales (no suministrado) o cable HDMI
(no suministrado)
: Flujo de la señal de
vídeo
Lado derecho de la unidad
a salida de monitor
Ordenador
Cuando utilice un cable HDMI opcional, asegúrese de utilizar un
cable HDMI de Sony u otro cable que tenga el logotipo HDMI.
Para obtener más información, consulte “Conexiones y
preparativos” en el Manual de instrucciones que contiene
el CD-ROM suministrado.

ES
14
Puede utilizar un transmisor de sincronización 3D no integrado en esta unidad, a través de un cable
LAN opcional (tipo recto).
Si el entorno de uso sufre interferencias de una determinada frecuencia específica, es posible que se
pierda la sincronización entre las señales de imagen 3D y las gafas 3D. En ese caso, use un cable
LAN de la categoría 7.
Cuando visualice imágenes 3D en un entorno con mayores interferencias, utilice el transmisor
interno.
Conexión a un transmisor de sincronización 3D
Nota
Lado derecho de la unidad
Transmisor síncrono 3D
(no suministrado)
Cable LAN (no suministrado)
Flujo de señal de sincronización 3D
Para obtener más información, consulte “Conexiones y
preparativos” en el Manual de instrucciones que contiene
el CD-ROM suministrado.
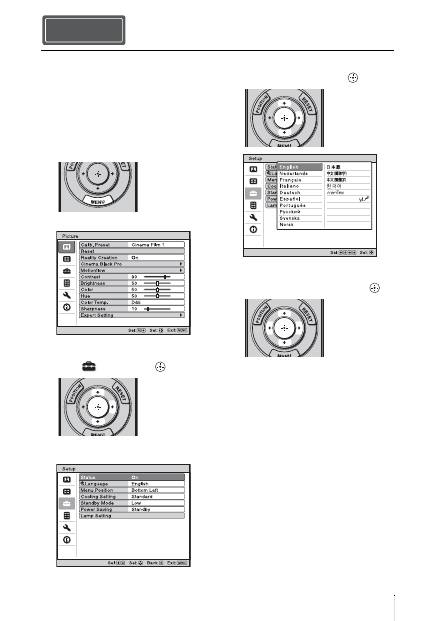
15
ES
Es posible seleccionar el idioma que se
desee entre los 16 existentes para el menú y
demás indicaciones en pantalla. La
configuración predeterminada de fábrica es
el idioma inglés. Para cambiar el idioma del
menú actual, establezca el idioma que desee
con la pantalla de menús.
1
Pulse MENU.
Aparecerá el menú.
2
Pulse
M
/
m
para seleccionar el menú
Setup
y pulse
,
o
.
Aparecerán los elementos de
configuración del menú seleccionado.
3
Pulse
M
/
m
para seleccionar
“Language” y pulse
,
o
.
4
Pulse
M
/
m
/
<
/
,
para seleccionar un
idioma y, a continuación, pulse
.
El menú aparecerá en el idioma
seleccionado.
Para que el menú desaparezca
Pulse MENU.
Selección del idioma del menú Paso 4
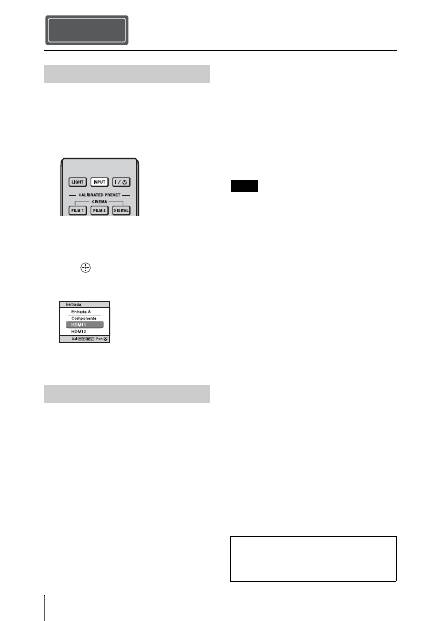
ES
16
1
Encienda la unidad y el equipo
conectado a la unidad.
2
Pulse INPUT para visualizar la paleta
de entrada en la pantalla.
3
Seleccione el equipo desde el que
desea visualizar las imágenes.
Pulse INPUT repetidamente o pulse
M
/
m
/
(entrar) para seleccionar el
equipo desde el que desea realizar la
proyección.
1
Pulse el botón
?
/
1
(encendido/
espera).
En la pantalla aparece el mensaje
“DESACTIVAR?”.
2
Pulse de nuevo el botón
?
/
1
(encendido/espera) antes de que
desaparezca el mensaje.
El protector del objetivo se cerrará.
Tenga cuidado para no atraparse los
dedos ni ningún otro objeto.
El indicador ON/STANDBY parpadeará
en verde y el ventilador seguirá
funcionando para reducir el
calentamiento interno. En primer lugar,
el indicador ON/STANDBY parpadea
rápidamente, y en este momento no
podrá encender el indicador ON/
STANDBY con el botón
?
/
1
(encendido/espera).
El ventilador se detiene y el indicador
ON/STANDBY deja de parpadear en
verde y se ilumina en rojo fijo.
Una vez apagado el equipo por completo,
puede desconectar el cable de alimentación.
No desconecte nunca el cable de alimentación
mientras el indicador esté parpadeando.
Puede apagar la unidad manteniendo pulsado el
botón
?
/
1
(encendido/espera)
aproximadamente durante 1 segundo, en lugar
de realizar los pasos anteriormente descritos.
Proyección Paso 5
Proyección de la imagen
Apagado de la alimentación
Ejemplo: para ver la imagen del equipo
de vídeo conectado al conector HDMI 1
de esta unidad.
Nota
Para obtener más información, consulte
“Proyección” en el Manual de
instrucciones que contiene el CD-ROM
suministrado.
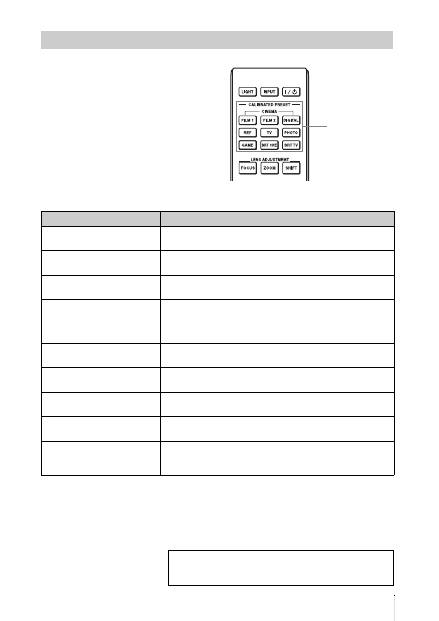
17
ES
Pulse uno de los botones CALIBRATED
PRESET.
Selección del modo de visualización de la imagen
Botones
CALIBRATED
PRESET
Elementos de configuración
Descripción
CINEMA FILM 1
Calidad de imagen adecuada para reproducir imágenes con gran
dinamismo y claridad; calidad habitual del positivo de película.
CINEMA FILM 2
Calidad de imagen adecuada para reproducir los colores densos
y de gran tonalidad; calidad habitual en salas de cine.
CINEMA DIGITAL
Calidad de imagen adecuada para reproducir imágenes de cine
digital según las especificaciones de DCI.
REF
Una configuración de calidad de imagen adecuada para
reproducir de forma fiel la calidad original de la imagen, o para
disfrutar de buena calidad de imagen sin tener que realizar
ningún ajuste.
TV
Calidad de imagen adecuada para ver programas de televisión,
deportes, conciertos, etc.
PHOTO
Calidad de imagen adecuada para proyectar imágenes fijas
tomadas con una cámara digital.
GAME
Calidad de imagen adecuada para juegos; colores de alta
modulación y respuesta rápida.
BRT CINE
Calidad de imagen adecuada para ver películas en entornos
luminosos, como el salón.
BRT TV
Calidad de imagen adecuada para ver programas de televisión,
conciertos, deportes y otras imágenes de vídeo en un entorno
luminoso, como el salón.
Para obtener más información, consulte “Proyección” en
el Manual de instrucciones que contiene el CD-ROM
suministrado.
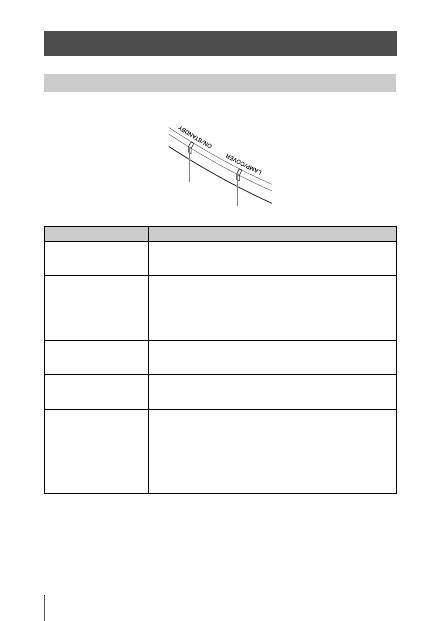
ES
18
El indicador ON/STANDBY o LAMP/COVER se enciende o parpadea si el proyector tiene
algún problema.
Gestión de errores
Indicadores de aviso
Síntoma
Causa y solución
LAMP/COVER parpadea
en rojo. (Una frecuencia de
repetición de 2 flashes)
c
Cierre firmemente la cubierta de la lámpara y, a continuación,
apriete los tornillos.
LAMP/COVER parpadea
en rojo. (Una frecuencia de
repetición de 3 flashes)
c
La temperatura de la lámpara suele ser alta. Apague la unidad y
espere a que se enfríe la lámpara; a continuación, vuelva a
encender la unidad.
c
Si el síntoma no desaparece, es posible que la lámpara haya
llegado al final de su vida útil. Si es así, sustituya la lámpara por
una nueva.
ON/STANDBY parpadea
en rojo. (Una frecuencia de
repetición de 4 flashes)
c
El ventilador está averiado. Consulte con personal especializado
de Sony.
ON/STANDBY parpadea
en rojo. (Una frecuencia de
repetición de 2 flashes)
c
La temperatura interna es anormalmente alta. Compruebe que
no haya nada bloqueando los orificios de ventilación y si la
unidad se está utilizando a altitudes elevadas.
ON/STANDBY parpadea
en rojo. (Una frecuencia de
repetición de 6 flashes)
c
Pulse el botón
?
/
1
(encendido/espera) para encender la unidad.
Si no está encendida la alimentación, desconecte el cable de
alimentación CA y, a continuación confirme que la lámpara ON/
STANDBY esté apagada. Después de unos 10 segundos,
conecte de nuevo el cable de alimentación de CA y encienda de
nuevo la alimentación. Si los indicadores continúan
iluminándose, hay un problema en el sistema eléctrico. Consulte
con personal especializado de Sony.
Indicador ON/STANDBY
Indicador LAMP/COVER

19
ES
Si empieza a parpadear un indicador de advertencia diferente de los anteriores y el síntoma persiste
incluso después de completar los métodos anteriores, consulte al personal cualificado de Sony.
ON/STANDBY parpadea
en rojo. (Una frecuencia de
repetición de 5 flashes)
c
El protector del objetivo no está abierto por completo. Apague
la alimentación de la unidad y, a continuación, enciéndala de
nuevo. Si el protector del objetivo continúa sin abrirse por
completo, consulte con personal cualificado de Sony.
Sugerencia
En una situación de urgencia, consulte la ilustración siguiente para
abrir el protector del objetivo con sus propias manos. Pulse el botón
?
/
1
(encendido/espera) para encender la alimentación y hacer
funcionar la unidad.
Nota
Síntoma
Causa y solución
Si se produce algún problema o aparece un mensaje de
error en la pantalla, consulte “Solución de problemas” en
el Manual de instrucciones que incluye el CD-ROM
suministrado.
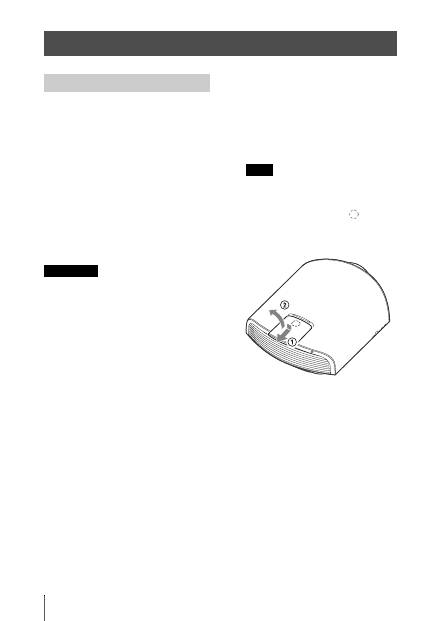
ES
20
La lámpara que se utiliza como fuente de luz
tiene una determinada vida útil. Cuando la
luz de la lámpara pierde intensidad, el
balance de color de la imagen se vuelve
extraño, o aparece el mensaje “Por favor,
cambie la lámpara.”, es posible que la
lámpara esté agotada. Sustituya
inmediatamente la lámpara por una nueva
(no suministrada).
Herramientas que necesita para empezar:
•
Lámpara de proyección LMP-H330
(opcional)
•
Destornillador Phillips estándar
•
Paño (como protección contra
arañazos)
• La lámpara continúa estando caliente
después de haber apagado la unidad con el
botón
?
/
1
(encendido/espera). Si toca la
lámpara, puede quemarse los dedos. Antes
de sustituir la lámpara, espere al menos 1
hora hasta que se enfríe.
• No toque la superficie del objetivo. Si la
toca, limpie las huellas con un paño suave.
• Ponga especial cuidado al reemplazar la
lámpara cuando la unidad esté instalada en
el techo.
• Si cambia la lámpara de una unidad
instalada en el techo, no se coloque
directamente debajo de la cubierta de la
lámpara. Cuando quite la trampilla de la
lámpara (tapa interior), evite doblarla.
Si la lámpara explotase, los fragmentos
podrían herirle.
• Al retirar la unidad de la lámpara,
asegúrese de que se encuentra en posición
horizontal y tire hacia arriba. No incline la
unidad de la lámpara. Si tira hacia fuera de
la unidad de la lámpara mientras se
encuentra inclinada y la lámpara se rompe,
los fragmentos pueden dispersarse y
provocar lesiones.
1
Apague la unidad y desenchufe el
cable de alimentación de CA.
2
Cuando coloque la unidad sobre una
superficie plana tal como una mesa de
escritorio, etc., coloque un paño para
evitar rayar la superficie. Coloque la
unidad sobre el paño.
Asegúrese de que la unidad se encuentra en
una superficie estable.
3
Mientras presiona la parte
indicada
en la ilustración de la cubierta de la
lámpara, deslice
1
y, a continuación,
abra la cubierta de la lámpara
2
.
Mantenimiento
Sustitución de la lámpara
Precaución
Nota
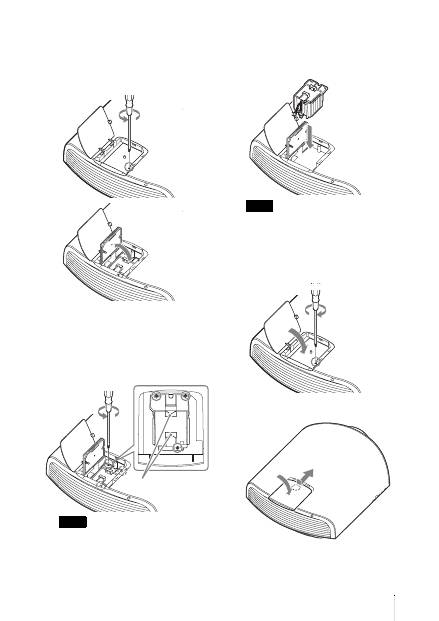
21
ES
4
Afloje el tornillo de la trampilla de la
lámpara (tapa interior) con un
destornillador de estrella y abra la
trampilla.
5
Afloje los 3 tornillos de la unidad de la
lámpara con el destornillador de
estrella. Levante el asa y, a
continuación, tire de la lámpara para
extraerla.
Sujete la lámpara por el asa para extraerla
y agárrela.
6
Sujete la nueva lámpara por el asa con
firmeza y presione hasta que llegue al
fondo. Seguidamente, apriete los
3 tornillos.
Tenga cuidado de no tocar el bloque óptico
del interior de la unidad.
7
Cierre la trampilla de la lámpara (tapa
interior) y, a continuación, apriete el
tornillo.
8
Cierre la cubierta de la lámpara.
Nota
Asa
Nota
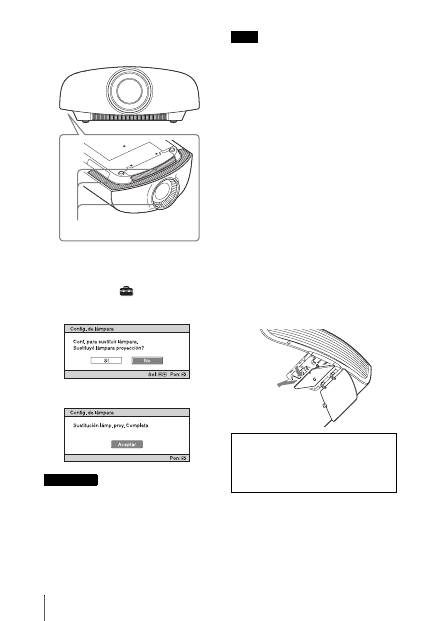
ES
22
9
Limpie el polvo de los orificios de
ventilación (entrada) con un paño
suave.
10
Encienda la unidad y, a continuación,
seleccione el elemento de
configuración que desee en el menú
Configuración .
Se mostrará la pantalla de menú
siguiente.
11
Seleccione “Sí”.
Para evitar descargas eléctricas o incendios,
no introduzca las manos en el
compartimento de sustitución de la lámpara,
ni permita que se introduzcan líquidos ni
ningún otro objeto.
• Asegúrese de utilizar la lámpara de proyector
LMP-H330 para la sustitución. Si utiliza
otras lámparas que no sean la LMP-H330, la
unidad podría averiarse.
• No olvide apagar la unidad y desenchufar el
cable de alimentación antes de sustituir la
lámpara; a continuación, compruebe que el
indicador ON/STANDBY está apagado.
• La unidad no se encenderá si la lámpara no
está bien instalada.
• La unidad no se encenderá si la cubierta de la
lámpara no está bien cerrada.
• Para cancelar un mensaje que se muestra en
la pantalla, pulse el botón del mando a
distancia o del panel de control de la unidad.
Nota sobre la sustitución de la
lámpara si se rompe, en caso de
instalación en el techo
Si la lámpara se rompe, los fragmentos rotos
podrían salir disparados y provocar heridas.
Si la unidad está instalada en el techo, quite
la trampilla de la lámpara (tapa interior)
deslizándola en horizontal y levantando
suavemente cuando esté abierta a 30 grados.
Evite doblar la trampilla de la lámpara (tapa
interior).
Precaución
Orificios de ventilación (entrada)
Notas
Nota
Esta lámpara contiene mercurio. Las reglas
para desechar tubos fluorescentes usados
dependen de donde viva. Siga la normativa de
desecho de residuos de su zona.
30°


DE
2
Diese Kurzreferenz beschreibt die Installation und die grundlegenden Bedienungsvorgänge
zum Projizieren von Bildern. Es werden auch wichtige Hinweise und Vorsichtsmaßnahmen
erläutert, die Sie bei Handhabung und Gebrauch dieses Geräts beachten müssen.
Schlagen Sie bei Bedarf unter „Warnanzeigen“ und „Austauschen der Lampe“ nach.
Einzelheiten zu den Bedienungsvorgängen finden Sie in der Bedienungsanleitung auf der
mitgelieferten CD-ROM.
Informationen zur Kurzreferenz
Vorbereitung
.....................................Seite 8
Installieren des Geräts
..............Seite 10
Anschließen des Geräts
...........Seite 11
Wählen der Menüsprache
........Seite 15
Projizieren
.......................................Seite 16
Störungsbehebung
Warnanzeigen
.......................................Seite 18
Wartung
Austauschen der Lampe
.......................Seite 20
Schritt 1 Schritt 2 Schritt 3 Schritt 4 Schritt 5
3
DE
Bitte lesen Sie dieses Handbuch vor der
Benutzung des Geräts sorgfältig durch und
bewahren Sie es zum späteren Nachschlagen
auf.
WARNUNG
Um die Gefahr von Bränden oder
elektrischen Schlägen zu verringern,
darf dieses Gerät nicht Regen oder
Feuchtigkeit ausgesetzt werden.
Um einen elektrischen Schlag zu
vermeiden, darf das Gehäuse nicht
geöffnet werden. Überlassen Sie
Wartungsarbeiten stets nur
qualifiziertem Fachpersonal.
WARNUNG
DIESES GERÄT MUSS GEERDET
WERDEN.
WARNUNG
Beim Einbau des Geräts ist daher im Festkabel
ein leicht zugänglicher Unterbrecher
einzufügen, oder der Netzstecker muss mit
einer in der Nähe des Geräts befindlichen,
leicht zugänglichen Wandsteckdose verbunden
werden. Wenn während des Betriebs eine
Funktionsstörung auftritt, ist der Unterbrecher
zu betätigen bzw. der Netzstecker abzuziehen,
damit die Stromversorgung zum Gerät
unterbrochen wird.
VORSICHT
Hinweis zum LAN-Anschluss
Aus Sicherheitsgründen nicht mit einem
Peripheriegerät-Anschluss verbinden, der zu
starke Spannung für diese Buchse haben
könnte.
WARNUNG
1
Verwenden Sie ein geprüftes Netzkabel
(3-adriges Stromkabel)/einen geprüften
Geräteanschluss/einen geprüften Stecker
mit Schutzkontakten entsprechend den
Sicherheitsvorschriften, die im
betreffenden Land gelten.
2
Verwenden Sie ein Netzkabel (3-adriges
Stromkabel)/einen Geräteanschluss/einen
Stecker mit den geeigneten
Anschlusswerten (Volt, Ampere).
Wenn Sie Fragen zur Verwendung von
Netzkabel/Geräteanschluss/Stecker haben,
wenden Sie sich bitte an qualifiziertes
Kundendienstpersonal.
Für Kunden in Europa
Dieses Produkt wurde von oder für Sony
Corporation, 1-7-1 Konan Minato-ku Tokio,
108-0075 Japan hergestellt.
Bei Fragen zur Produktkonformität auf
Grundlage der Gesetzgebung der
Europäischen Union kontaktieren Sie bitte
den Bevollmächtigten Sony Deutschland
GmbH, Hedelfinger Strasse 61, 70327
Stuttgart, Deutschland. Für Kundendienst
oder Garantieangelegenheiten wenden Sie
sich bitte an die in den Kundendienst- oder
Garantiedokumenten genannten Adressen.
Für Kunden in Deutschland
Entsorgungshinweis: Bitte werfen Sie nur
entladene Batterien in die Sammelboxen
beim Handel oder den Kommunen. Entladen
sind Batterien in der Regel dann, wenn das
Gerät abschaltet und signalisiert „Batterie
leer“ oder nach längerer Gebrauchsdauer der
Batterien „nicht mehr einwandfrei
funktioniert“. Um sicherzugehen, kleben Sie
die Batteriepole z.B. mit einem
Klebestreifen ab oder geben Sie die
Batterien einzeln in einen Plastikbeutel.
DE

DE
4
Vorsichtsmaßnahmen
Info zur Sicherheit
• Vergewissern Sie sich, dass die
Betriebsspannung Ihres Gerätes mit der
Spannung Ihrer örtlichen
Stromversorgung übereinstimmt.
• Sollten Flüssigkeiten oder Fremdkörper in
das Gehäuse gelangen, ziehen Sie das
Netzkabel ab, und lassen Sie das Gerät von
qualifiziertem Fachpersonal überprüfen,
bevor Sie es wieder benutzen.
• Soll das Gerät einige Tage lang nicht
benutzt werden, trennen Sie es von der
Netzsteckdose.
• Ziehen Sie zum Trennen des Kabels am
Stecker. Niemals am Kabel selbst ziehen.
• Die Netzsteckdose sollte sich in der Nähe
des Gerätes befinden und leicht
zugänglich sein.
• Das Gerät ist auch im ausgeschalteten
Zustand nicht vollständig vom Stromnetz
getrennt, solange der Netzstecker noch an
der Netzsteckdose angeschlossen ist.
• Blicken Sie bei eingeschalteter Lampe
nicht in das Objektiv.
• Halten Sie Ihre Hände oder Gegenstände
von den Lüftungsöffnungen fern. Die
austretende Luft ist heiß.
Info zur Verhütung eines internen
Wärmestaus
Nachdem Sie den Projektor mit der Taste
?
/
1
(Ein/Bereitschaft) ausgeschaltet haben,
trennen Sie ihn nicht von der Netzsteckdose,
solange der Lüfter noch läuft.
Vorsicht
Dieses Gerät ist mit Lüftungsöffnungen
(Einlass und Auslass) ausgestattet. Der
Luftstrom durch diese Öffnungen darf nicht
blockiert oder durch in der Nähe abgestellte
Gegenstände behindert werden, weil es
sonst zu einem internen Wärmestau
kommen kann, der eine Verschlechterung
der Bildqualität oder Beschädigung des
Geräts zur Folge haben kann.
Info zur Wiederverpackung
Bewahren Sie den Originalkarton und das
Verpackungsmaterial gut auf für den Fall,
dass Sie das Gerät später einmal
transportieren müssen. Am besten geschützt
ist das Gerät beim Transport, wenn Sie es
wieder so verpacken, wie es geliefert wurde.
Sicherheitshinweise zur
Verwendung einer 3D-Brille
Achtung
• Halten Sie die 3D-Brille von Feuer fern.
• Zerlegen Sie die 3D-Brille nicht.
• Verwenden, laden und lagern Sie die 3D-
Brille nicht in der Nähe eines Feuers oder
an Orten mit hohen Temperaturen, z. B. in
direktem Sonnenlicht oder in durch die
Sonne aufgewärmten Autos, und lassen
Sie sie nicht an solchen Orten liegen.
• Verwenden Sie ausschließlich das
mitgelieferte USB-Kabel.
• Laden Sie die 3D-Brille ausschließlich mit
dem mitgelieferten USB-Ladegerät/
Netzteil.
• Achten Sie darauf, dass kein Wasser und
keine Fremdkörper in die 3D-Brille
hineingeraten können.
Sicherheitshinweise
• Verwenden Sie nur den im Lieferumfang
des Geräts enthaltenen 3D-Brillentyp.
Verwenden Sie die 3D-Brille
ausschließlich zum Betrachten von 3D-
Videobildern. Verwenden Sie die 3D-
Brille nicht mit anderen Geräten,
beispielsweise einem Fernsehgerät.
• Wenn Sie Flimmern oder Flackern
bemerken, schalten Sie die
Raumbeleuchtung aus.
• Nicht geeignet für Kinder ohne
angemessene Aufsicht durch Erwachsene.
• Achten Sie darauf, sich nicht die Finger in
den Scharnieren der 3D-Brille
einzuklemmen, wenn Sie die Brillenbügel
einklappen.
• Lassen Sie die 3D-Brille nicht fallen und
nehmen Sie keine Veränderungen daran
vor.
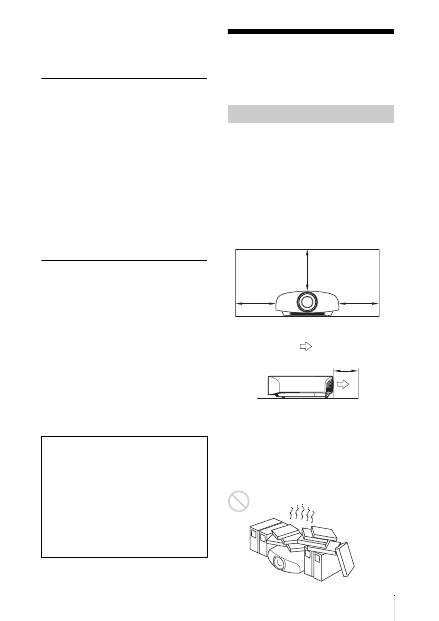
5
DE
• Wenn ein Brillenglas springt, achten Sie
darauf, sich durch die Bruchstücke keine
Verletzungen an Mund oder Augen
zuzuziehen.
Info zum LCD-Projektor
Der LCD-Projektor wurde unter Einsatz von
Präzisionstechnologie hergestellt. Es kann
jedoch sein, dass im Projektionsbild des
LCD-Projektors ständig winzige schwarze
und/oder helle Punkte (rote, blaue oder
grüne) enthalten sind. Dies ist ein normales
Ergebnis des Herstellungsprozesses und ist
kein Anzeichen für eine Funktionsstörung.
Wenn Sie mehrere LCD-Projektoren für die
Projizierung auf einer Leinwand verwenden,
kann außerdem selbst bei identischen
Modellen die Farbwiedergabe bei den
verschiedenen Projektoren variieren, da für
jeden Projektor eigene Einstellungen der
Farbbalance vorgenommen werden können.
Hinweis zur Kondensation
Wenn sich die Temperatur in dem Raum, in
dem der Projektor aufgestellt ist, schnell
ändert oder wenn der Projektor plötzlich von
einem kalten an einen warmen Ort gebracht
wird, kann es im Inneren des Projektors zu
einer Kondensation kommen. Da die
Kondensation zu einer Fehlfunktion führen
kann, sollten Sie bei den
Temperatureinstellungen einer Klimaanlage
vorsichtig sein.
Lassen Sie den Projektor vor der
Verwendung ungefähr zwei Stunden
eingeschaltet, wenn es zu einer
Kondensation gekommen ist.
Hinweise zu Installation und Gebrauch
Stellen Sie das Gerät nicht an folgenden
Orten auf, weil es sonst zu einer
Funktionsstörung oder Beschädigung des
Geräts kommen kann.
In der Nähe einer Wand
Um die Leistung und Zuverlässigkeit
aufrecht zu erhalten, lassen Sie zwischen
dem Gerät und einer vorhandenen Wand so
viel Abstand wie in der Abbildung
dargestellt.
Lassen Sie mindestens 5 cm Platz zwischen
der Wand und der Luftauslassseite des
Geräts. Beachten Sie, dass die Wand hinter
dem Gerät heiß werden kann.
Schlecht belüftete Orte
Halten Sie einen Abstand von mindestens
30 cm um das Gerät ein.
SONY KANN KEINE HAFTUNG FÜR
SCHÄDEN JEDER ART DURCH
UNTERLASSENE GEEIGNETE
SICHERHEITSMASSNAHMEN AN
ÜBERTRAGUNGSGERÄTEN, DURCH
UNVERMEIDBARE
DATENPREISGABE AUFGRUND DER
ÜBERTRAGUNGSSPEZIFIKATIONEN
ODER DURCH
SICHERHEITSPROBLEME
JEGLICHER ART ÜBERNEHMEN.
Ungeeignete Installation
30 cm
30 cm
30 cm
5 cm
: Luftauslass
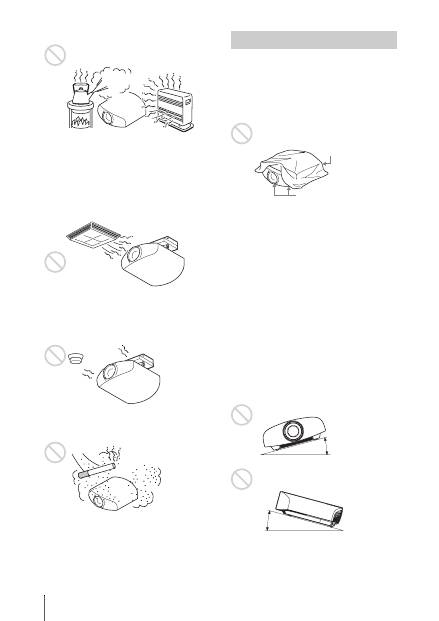
DE
6
Heiße und feuchte Orte
Orte, die direkter Kalt- oder Warmluft
von einer Klimaanlage ausgesetzt
sind
Die Installation des Geräts an einem solchen
Ort kann zu einer Funktionsstörung führen,
die durch Feuchtigkeitskondensation oder
Temperaturanstieg verursacht wird.
In der Nähe eines Wärme- oder
Rauchsensors
Es kann zu einer Funktionsstörung des
Sensors kommen.
Sehr staubige oder extrem rauchige
Orte
Führen Sie während der Benutzung des
Geräts keinen der folgenden Vorgänge
durch.
Blockieren der Lüftungsöffnungen
(Einlass oder Auslass)
Neigen nach vorn/hinten und links/
rechts
Vermeiden Sie die Benutzung des Geräts bei
einer Neigung von mehr als 15°.
Installieren Sie das Gerät nur auf einer
ebenen Fläche oder an der Decke.
Andernfalls kann es zu
Farbunregelmäßigkeiten oder einer
Reduzierung der Zuverlässigkeit der
Lampeneffekte führen.
Wenn das Gerät nach oben oder unten
geneigt ist, wird das Bild auf der Leinwand
möglicherweise trapezförmig verzerrt
angezeigt.
Positionieren Sie das Gerät so, dass das
Objektiv parallel zur Leinwand ausgerichtet
ist.
Ungeeignete Bedingungen
Lüftungsöffnungen
(Einlass)
Lüftungsöffnungen
(Auslass)
15° oder mehr
15° oder
mehr

7
DE
Bei Installation des Gerätes in
Höhenlagen
Wenn Sie das Gerät in Höhenlagen über
1.500 m benutzen, setzen Sie
„Kühlungseinstellung“ im Menü
Einrichtung
auf „Hoch“. Wird dieser
Modus bei Verwendung des Geräts in
Höhenlagen nicht aktiviert, kann dies
negative Folgen haben, wie z.B. die
Verschlechterung der Zuverlässigkeit
bestimmter Komponenten.
• Montieren Sie den Projektor auf keinen
Fall selbst an der Decke und hängen Sie
ihn nicht alleine um. Wenden Sie sich dazu
unbedingt an qualifizierte Sony-Fachleute
(kostenpflichtig).
• Verwenden Sie bei der Montage des
Geräts an der Decke unbedingt einen
Sicherungsdraht o. Ä., damit das Gerät
nicht herunterfallen kann. Beauftragen Sie
erfahrenes Fachpersonal mit der Montage.
Für Händler
• Wenn der Projektor an der Decke
montiert wird, muss zur Installation eine
Sony-Halterung oder eine gleichwertige,
empfohlene Vorrichtung verwendet
werden.
• Sorgen Sie bei Deckenmontage für eine
einwandfreie Sicherung der
Gehäuseabdeckung.
Sicherheitshinweise zur
Montage des Geräts an der
Decke
15° oder mehr
15° oder
mehr
15° oder mehr
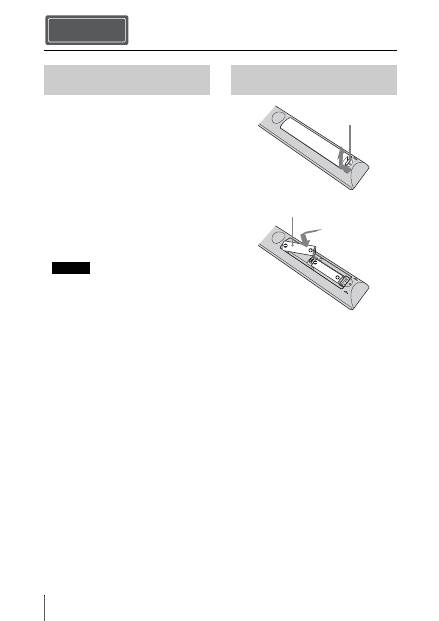
DE
8
Prüfen Sie die Verpackung und vergewissern
Sie sich, dass sie folgende Elemente enthält:
• Fernbedienung RM-PJ22 (1)
• R6-Manganbatterien der Größe AA (2)
• Netzkabel für den Projektor (1)
• Steckerhalter (1)
• Abdeckung für Netzeingang (1)
• 3D-Brille (2)
• Beutel für die 3D-Brille (2)
• USB-Ladegerät/Netzteil (AC-UD10) (1)
Technische Daten
Eingangsspannung: 100 V bis 240 V
Wechselstrom, 0,2 A, 50/60 Hz
Nennausgangsspannung: 5 V
Gleichstrom, 1,5 A
Bitte beachten Sie die oben stehenden
Anforderungen an die Stromversorgung.
• Netzkabel für USB-Ladegerät/Netzteil (1)
• USB-Ladekabel (1,2 m) (1)
• Kurzreferenz (diese Anleitung) (1)
• Bedienungsanleitung (CD-ROM) (1)
VORSICHT
Explosionsgefahr bei Verwendung falscher
Batterien. Batterien nur durch den vom
Hersteller empfohlenen oder einen
gleichwertigen Typ ersetzen.
Wenn Sie die Batterie entsorgen, müssen Sie
die Gesetze der jeweiligen Region und des
jeweiligen Landes befolgen.
Einlegen der Batterien
Zwei R6-Batterien der Größe AA werden
für die Fernbedienung mitgeliefert.
Verwenden Sie R6-Mangan- oder -
Alkalibatterien der Größe AA. Andernfalls
besteht Explosionsgefahr.
Vorsichtshinweis zum Umgang mit
der Fernbedienung
• Gehen Sie sorgfältig mit der
Fernbedienung um. Lassen Sie sie nicht
fallen, treten Sie nicht darauf und
verschütten Sie keine Flüssigkeiten
darauf.
Vorbereitung Schritt 1
Überprüfen des mitgelieferten
Zubehörs
Hinweis
Einlegen der Batterien in die
Fernbedienung
Zum Öffnen drücken
und schieben.
Die Batterien mit der
E
-
Seite zuerst einschieben.
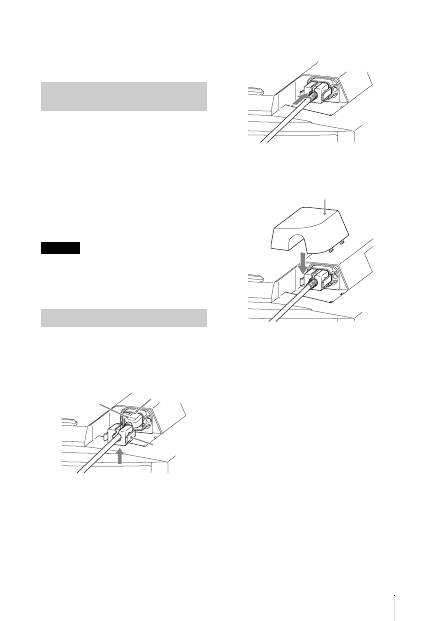
9
DE
• Legen Sie die Fernbedienung nicht an
einem Ort in der Nähe einer Wärmequelle,
in direktem Sonnenlicht oder in einem
feuchten Raum ab.
Die Anleitung kann auf einem Computer,
auf dem der Adobe Reader installiert ist,
gelesen werden.
Sie können den Adobe Reader kostenlos von
der Adobe-Website herunterladen.
1
Öffnen Sie die Datei index.htm auf der
CD-ROM.
2
Wählen Sie die Anleitung aus, die Sie
lesen möchten, und klicken Sie darauf.
Wenn Sie die CD-ROM nicht mehr besitzen,
oder wenn sie beschädigt ist, können Sie Ersatz
bei Ihrem Sony-Händler oder der Sony-
Servicevertretung bestellen.
1
Stecken Sie das Netzkabel an die
Netzeingangsbuchse an und bringen
Sie dann den Steckerhalter am
Netzkabel an.
2
Schieben Sie den Steckerhalter zum
Befestigen auf das Netzkabel.
3
Bringen Sie die
Netzeingangsabdeckung am Gerät an.
Verwenden der Anleitungen
auf der CD-ROM
Hinweis
Anschließen des Netzkabels
Steckerhalter
(mitgeliefert)
Netzkabel
(mitgeliefert)
Netzeingangsbuchse
Netzeingangsabdeckung (mitgeliefert)
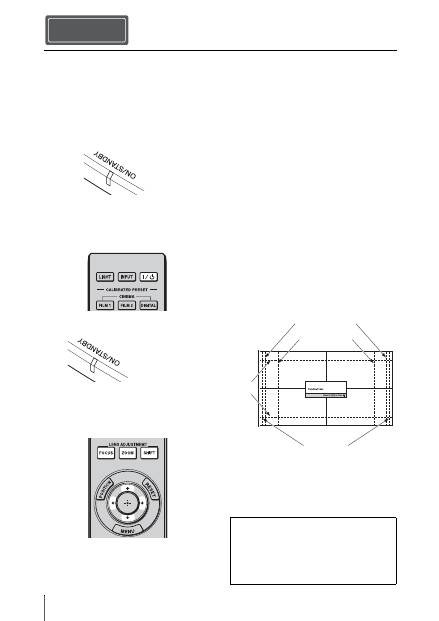
DE
10
1
Positionieren Sie das Gerät so, dass es
parallel zur Leinwand ausgerichtet ist.
2
Schließen Sie das Netzkabel erst an
das Gerät und dann an eine
Netzsteckdose an.
3
Drücken Sie die Taste
?
/
1
(Ein/
Bereitschaft), um das Gerät
einzuschalten.
4
Projizieren Sie ein Bild auf die
Projektionsfläche und passen Sie
Fokus, Format und Position an.
a
Stellen Sie den Fokus ein.
Rufen Sie mit der Taste LENS
ADJUSTMENT (FOCUS) das
Objektiv-Fokus-Einstellfenster
(Testmuster) auf. Stellen Sie dann mit
den Tasten
M
/
m
/
<
/
,
den Fokus des
Bildes ein.
b
Stellen Sie die Bildgröße ein.
Rufen Sie mit der Taste LENS
ADJUSTMENT (ZOOM) das Objektiv-
Zoom-Einstellfenster (Testmuster) auf.
Stellen Sie dann mit den Tasten
M
/
m
/
<
/
,
die Größe des Bildes ein.
c
Stellen Sie die Bildposition ein.
Rufen Sie mit der Taste LENS
ADJUSTMENT (SHIFT) das
Objektivlage-Einstellfenster
(Testmuster) auf. Stellen Sie dann mit
den Tasten
M
/
m
/
<
/
,
die korrekte
Position des Bildes ein.
Objektiv-Einstellfenster (Testmuster)
Installieren des Geräts Schritt 2
Leuchtet in Rot.
Vorderseite des Geräts
Blinkt zehn
Sekunden lang in
Grün, und leuchtet
dann in Grün.
Vorderseite des
Vorderseite des Geräts
1,78:1 (16:9)
2,35:1
1,85:1
1,33:1 (4:3)
Die gestrichelten Linien zeigen die
Leinwandgröße beim jeweiligen
Seitenverhältnis.
Falls Probleme auftreten oder eine
Fehlermeldung angezeigt wird, schlagen
Sie unter „Anschlüsse und
Vorbereitungen“ in der
Bedienungsanleitung auf der
mitgelieferten CD-ROM nach.

11
DE
Achten Sie bei der Herstellung der Anschlüsse auf Folgendes:
• Schalten Sie alle Geräte aus, bevor Sie irgendwelche Anschlüsse vornehmen.
• Verwenden Sie die korrekten Kabel für jeden Anschluss.
• Stecken Sie die Kabelstecker einwandfrei ein; lockerer Anschluss der Stecker kann eine
Funktionsstörung oder schlechte Bildqualität verursachen. Ziehen Sie beim Abtrennen eines
Kabels am Stecker, nicht am Kabel selbst.
• Schlagen Sie in der Bedienungsanleitung des angeschlossenen Gerätes nach.
So schließen Sie Geräte mit HDMI-Ausgangsbuchsen an
Anschließen des Geräts
Anschließen an einen Videorecorder
Schritt 3
HDMI-Kabel (nicht mitgeliefert)
: Videosignalfluss
Rechte Seite des Geräts
Geräte mit HDMI-
Ausgangsbuchsen
an HDMI-Ausgang
AV-Verstärker
Lautsprecher
Achten Sie bei Verwendung eines optionalen HDMI-Kabels
darauf, dass es sich um ein Sony HDMI-Kabel oder um ein
anderes Kabel, das mit dem HDMI-Logo versehen ist, handelt.
Falls Probleme auftreten oder eine Fehlermeldung
angezeigt wird, schlagen Sie unter „Anschlüsse und
Vorbereitungen“ in der Bedienungsanleitung auf der
mitgelieferten CD-ROM nach.
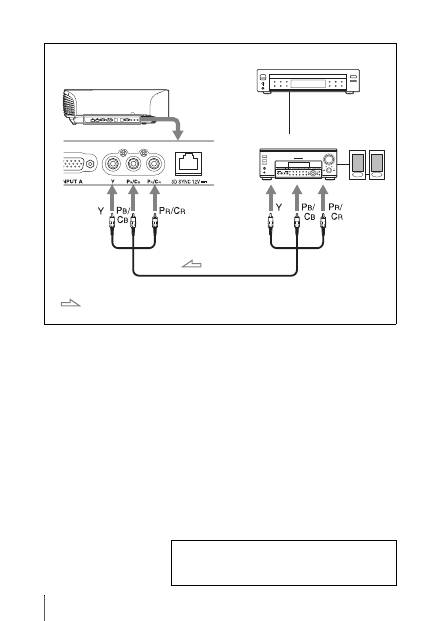
DE
12
So schließen Sie Geräte mit Komponenten-Videoausgangsbuchsen an
Komponenten-Videokabel (nicht mitgeliefert)
: Videosignalfluss
Geräte mit Komponenten-
Videoausgangsbuchsen
Rechte Seite des Geräts
AV-Verstärker
Lautsprecher
Falls Probleme auftreten oder eine Fehlermeldung
angezeigt wird, schlagen Sie unter „Anschlüsse und
Vorbereitungen“ in der Bedienungsanleitung auf der
mitgelieferten CD-ROM nach.
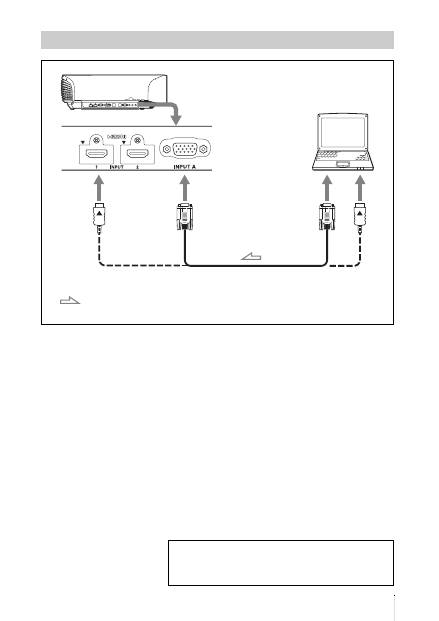
13
DE
Anschluss eines Computers
15-poliges HD-D-Sub-Kabel (nicht mitgeliefert) oder HDMI-Kabel (nicht mitgeliefert)
: Videosignalfluss
Rechte Seite des Geräts
an Monitorausgang
Computer
Achten Sie bei Verwendung eines optionalen HDMI-Kabels
darauf, dass es sich um ein Sony HDMI-Kabel oder um ein
anderes Kabel, das mit dem HDMI-Logo versehen ist, handelt.
Falls Probleme auftreten oder eine Fehlermeldung
angezeigt wird, schlagen Sie unter „Anschlüsse und
Vorbereitungen“ in der Bedienungsanleitung auf der
mitgelieferten CD-ROM nach.
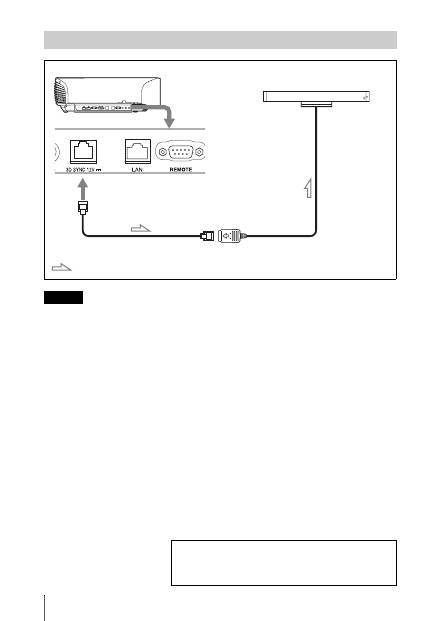
DE
14
Wenn Sie einen anderen 3D-Synchronsender als den mitgelieferten benutzen, verwenden Sie ein
optionales LAN-Kabel (ohne Überkreuzung).
Wenn es in der Umgebung, in der Sie das Gerät benutzen, zu Störungen durch eine kontinuierliche
spezielle Frequenz kommt, geht die Synchronisierung der 3D-Bildsignale und der 3D-Brille
möglicherweise verloren. Verwenden Sie in diesem Fall ein LAN-Kabel der Kategorie 7.
Wenn Sie die 3D-Bilder in einer Umgebung anschauen, die sogar noch mehr Störungen aufweist,
verwenden Sie den internen Sender.
Anschließen an einen 3D-Synchronsender
Hinweis
Rechte Seite des Geräts
3D-Synchronsender
(nicht mitgeliefert)
LAN-Kabel (nicht mitgeliefert)
3D-Synchronsignalfluss
Falls Probleme auftreten oder eine Fehlermeldung
angezeigt wird, schlagen Sie unter „Anschlüsse und
Vorbereitungen“ in der Bedienungsanleitung auf der
mitgelieferten CD-ROM nach.
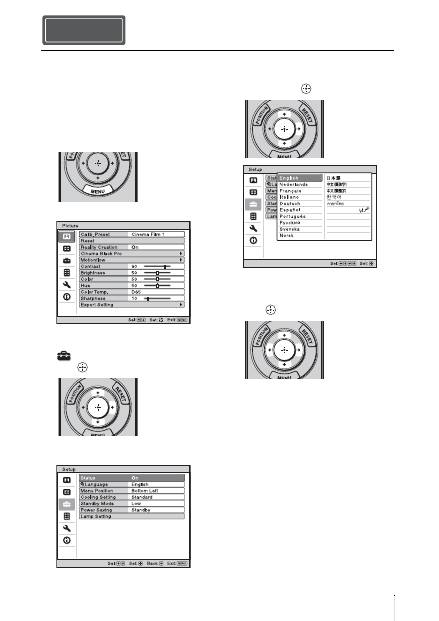
15
DE
Für die Menüanzeige und die anderen
Bildschirmanzeigen können Sie eine von
16 Sprachen auswählen. Die Werksvorgabe
ist Englisch. Um die aktuelle Menüsprache
zu ändern, stellen Sie die gewünschte
Sprache auf dem Menübildschirm ein.
1
Drücken Sie MENU.
Das Menü erscheint.
2
Rufen Sie mit
M
/
m
das Menü Setup
auf, und drücken Sie dann
,
oder .
Die Einstellungsposten des
ausgewählten Menüs werden angezeigt.
3
Wählen Sie mit
M
/
m
den Posten
„Language“ aus, und drücken Sie
dann
,
oder
.
4
Wählen Sie mit
M
/
m
/
<
/
,
die
gewünschte Sprache, und drücken Sie
dann .
Die Menüsprache wechselt zu der
ausgewählten Sprache.
So wird das Menü ausgeblendet
Drücken Sie MENU.
Wählen der Menüsprache Schritt 4
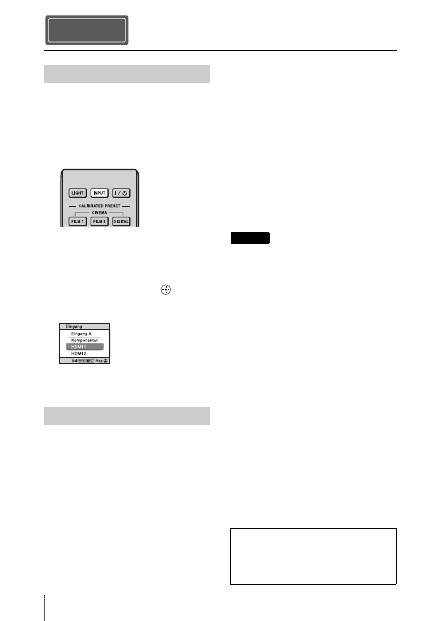
DE
16
1
Schalten Sie sowohl das Gerät als
auch die angeschlossenen Geräte ein.
2
Drücken Sie INPUT, um auf dem
Bildschirm eine Liste der
Eingabegeräte anzuzeigen.
3
Wählen Sie das Gerät, auf dem sich
die Bilder befinden, die angezeigt
werden sollen.
Drücken Sie wiederholt auf INPUT,
oder drücken Sie auf
M
/
m
/
(Eingabe), um das gewünschte Gerät zu
wählen.
1
Drücken Sie die Taste
?
/
1
(Ein/
Bereitschaft).
Die Meldung „AUSSCHALTEN?“
erscheint auf der Leinwand.
2
Drücken Sie die Taste
?
/
1
(Ein/
Bereitschaft) erneut, bevor die
Meldung ausgeblendet wird.
Der Objektivschutz wird geschlossen.
Achten Sie darauf, dass Ihre Finger oder
andere Gegenstände nicht eingeklemmt
werden.
Die Anzeige ON/STANDBY blinkt grün
und der Lüfter läuft weiter, um die
interne Wärme abzuleiten. Zuerst blinkt
die Anzeige ON/STANDBY schnell.
Während dieser Phase ist es nicht
möglich, die Anzeige ON/STANDBY
mit der Taste
?
/
1
(Ein/Bereitschaft) zum
Leuchten zu bringen.
Der Lüfter hält an, und die Anzeige ON/
STANDBY blinkt nicht mehr grün,
sondern leuchtet dauerhaft rot.
Der Strom ist nun vollkommen
ausgeschaltet, und das Netzkabel kann
gezogen werden.
Während die Anzeige blinkt, darf das
Netzkabel auf keinen Fall abgezogen werden.
Anstatt die obigen Schritte auszuführen,
können Sie das Gerät auch ausschalten, indem
Sie die Taste
?
/
1
(Ein/Bereitschaft) etwa 1
Sekunde lang gedrückt halten.
Projizieren Schritt 5
Projizieren des Bildes
Ausschalten des Geräts
Beispiel: Wiedergeben des Bildes vom
am Anschluss HDMI 1 dieses Geräts
angeschlossenen Videogerät.
Hinweis
Falls Probleme auftreten oder eine
Fehlermeldung angezeigt wird, schlagen
Sie unter „Projizieren“ in der
Bedienungsanleitung auf der
mitgelieferten CD-ROM nach.

17
DE
Drücken Sie eine der Tasten
CALIBRATED PRESET.
Wahl des Bildbetrachtungsmodus
CALIBRATED
PRESET-Tasten
Einstellungsposten
Beschreibung
CINEMA FILM 1
Bildqualität, die sich für die Reproduktion der äußerst
dynamischen und klaren Bilder eignet, die für einen Master-
Positivfilm typisch sind.
CINEMA FILM 2
Bildqualität, die sich für die Reproduktion der satten Töne und
Farben eignet, die für ein Kino typisch sind.
CINEMA DIGITAL
Bildqualität, die sich für die Reproduktion digitaler
kinoähnlicher Bilder eignet, die den DCI-Spezifikationen
entsprechen.
REF
Eine Bildqualitätseinstellung, die sich eignet, wenn Sie die
Originalbildqualität genau reproduzieren möchten oder die
Bildqualität ohne Anpassungen beibehalten möchten.
TV
Bildqualität, die sich für die Wiedergabe von
Fernsehprogrammen, Sport, Konzerten usw. eignet.
PHOTO
Ideal zum Projizieren von Standbildern, die mit einer
Digitalkamera aufgenommen wurden.
GAME
Bildqualität, die sich zum Spielen eignet, mit gut regulierten
Farben und einer schnellen Reaktion.
BRT CINE
Bildqualität für die Darstellung von Filmen in einer sehr hellen
Umgebung, wie in einem Wohnzimmer.
BRT TV
Bildqualität für die Darstellung von Fernsehprogrammen, Sport,
Konzerten und anderen Videobildern in einer hellen Umgebung,
wie in einem Wohnzimmer.
Falls Probleme auftreten oder eine Fehlermeldung
angezeigt wird, schlagen Sie unter „Projizieren“ in der
Bedienungsanleitung auf der mitgelieferten CD-ROM
nach.
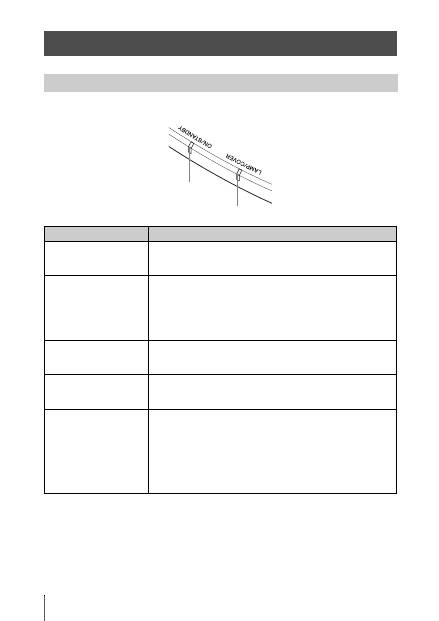
DE
18
Die Anzeige ON/STANDBY oder LAMP/COVER leuchtet auf oder blinkt, falls eine Störung
in Ihrem Projektor vorliegt.
Störungsbehebung
Warnanzeigen
Symptom
Ursache und Abhilfemaßnahme
LAMP/COVER blinkt in
Rot. (jeweils 2
Blinkzeichen)
c
Schließen Sie die Lampenabdeckung einwandfrei, und ziehen
Sie die Schrauben fest an.
LAMP/COVER blinkt in
Rot. (jeweils 3
Blinkzeichen)
c
Die Temperatur der Lampe ist ungewöhnlich hoch. Schalten Sie
die Stromversorgung aus und warten Sie, bis die Lampe
abgekühlt ist, bevor Sie den Projektor wieder einschalten.
c
Wenn das Symptom weiterhin besteht, hat die Lampe
möglicherweise das Ende ihrer Nutzungsdauer erreicht.
Tauschen Sie in diesem Fall die Lampe gegen eine neue aus.
ON/STANDBY blinkt in
Rot. (jeweils 4
Blinkzeichen)
c
Der Lüfter ist defekt. Konsultieren Sie qualifiziertes Sony-
Personal.
ON/STANDBY blinkt in
Rot. (jeweils 2
Blinkzeichen)
c
Die Innentemperatur ist ungewöhnlich hoch. Prüfen Sie, ob die
Lüftungsöffnungen blockiert sind oder ob das Gerät in
Höhenlagen verwendet wird.
ON/STANDBY blinkt in
Rot. (jeweils 6
Blinkzeichen)
c
Drücken Sie die Taste
?
/
1
(Ein/Bereitschaft), um das Gerät
einzuschalten. Falls der Projektor nicht eingeschaltet wird,
ziehen Sie das Netzkabel ab, und prüfen Sie dann, ob die
Anzeige ON/STANDBY erloschen ist. Schließen Sie das
Netzkabel nach etwa 10 Sekunden wieder an, und schalten Sie
die Stromversorgung wieder ein. Falls die Anzeigen noch
immer aufleuchten, liegt eine Störung im elektrischen System
vor. Konsultieren Sie qualifiziertes Sony-Personal.
Anzeige ON/STANDBY
Anzeige LAMP/COVER
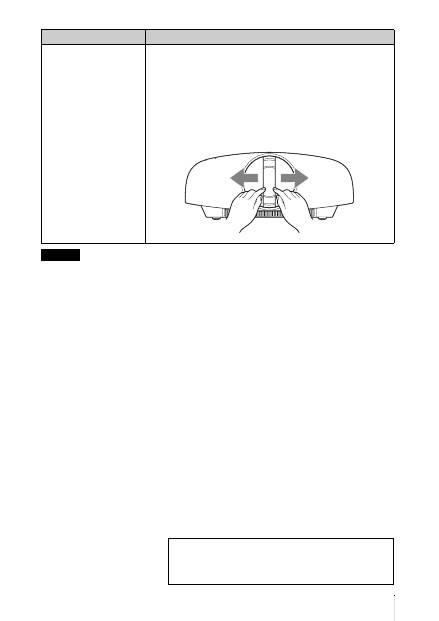
19
DE
Falls eine andere Warnanzeige außer der obigen zu blinken beginnt und das Symptom trotz Ausführung
der obigen Maßnahmen bestehen bleibt, wenden Sie sich an qualifiziertes Sony-Personal.
ON/STANDBY blinkt in
Rot. (jeweils 5
Blinkzeichen)
c
Der Objektivschutz ist nicht vollständig geöffnet. Schalten Sie
das Gerät aus und wieder ein. Falls sich der Objektivschutz noch
immer nicht vollständig öffnet, konsultieren Sie qualifiziertes
Sony-Personal.
Tipp
In einer Notsituation können Sie den Objektivschutz gemäß der
nachstehenden Abbildung von Hand öffnen. Schalten Sie den
Projektor durch Drücken der Taste
?
/
1
(Ein/Bereitschaft) ein, und
bedienen Sie das Gerät.
Symptom
Ursache und Abhilfemaßnahme
Hinweis
Falls Probleme auftreten oder eine Fehlermeldung
angezeigt wird, schlagen Sie unter „Fehlerbehebung“ in
der Bedienungsanleitung auf der mitgelieferten CD-ROM
nach.
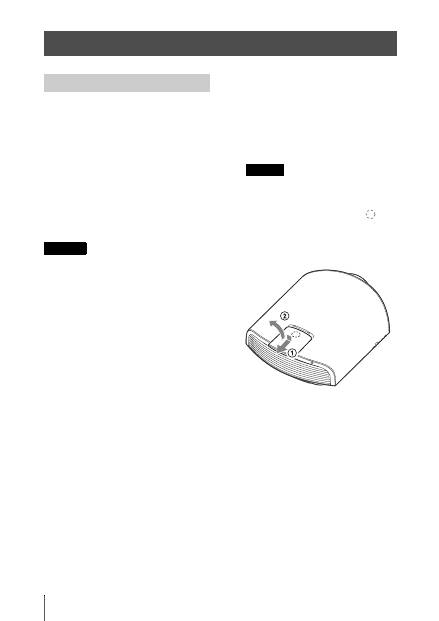
DE
20
Die als Lichtquelle verwendete Lampe hat
eine begrenzte Lebensdauer. Wenn die
Lampe schwächer wird, die Farbbalance des
Bilds unausgewogen ist oder „Bitte Lampe
auswechseln.“ auf der Leinwand erscheint,
ist möglicherweise die Lampe erschöpft.
Ersetzen Sie die Lampe unverzüglich durch
eine neue (nicht mitgeliefert).
Erforderliche Werkzeuge:
•
Projektorlampe LMP-H330 (optional)
•
Normaler
Kreuzschlitzschraubendreher
•
Tuch (für Kratzerverhütung)
• Die Lampe bleibt auch nach dem
Ausschalten des Geräts mit der Taste
?
/
1
(Ein/Bereitschaft) noch längere Zeit heiß.
Falls Sie die Lampe berühren, können Sie
sich die Finger verbrennen. Lassen Sie die
Lampe mindestens 1 Stunde lang
abkühlen, bevor Sie sie auswechseln.
• Berühren Sie nicht die
Objektivoberfläche. Falls Sie sie berühren,
wischen Sie Fingerabdrücke mit einem
weichen Tuch ab.
• Lassen Sie beim Lampenwechsel
besondere Vorsicht walten, wenn das
Gerät an der Decke montiert ist.
• Wenn Sie die Lampe in ein Gerät
einsetzen, das sich an der Decke befindet,
achten Sie darauf, dass Sie nicht
unmittelbar unter der Lampenabdeckung
stehen. Wenn Sie die Lampenklappe
(innere Abdeckung) abnehmen,
vermeiden Sie, diese zu drehen.
Wenn die Lampe explodiert, können ihre
Fragmente Verletzungen hervorrufen.
• Achten Sie beim Herausnehmen der
Lampeneinheit darauf, dass sie horizontal
bleibt, und ziehen Sie sie gerade nach
oben. Die Lampeneinheit nicht kippen.
Falls Sie die Lampeneinheit schräg
herausziehen und die Lampe bricht,
können die Bruchstücke verstreut werden
und Verletzungen verursachen.
1
Schalten Sie das Gerät aus, und ziehen
Sie das Netzkabel ab.
2
Wenn Sie das Gerät auf eine ebene
Fläche (z. B. einen Tisch usw.) stellen,
decken Sie die Fläche mit einem Tuch
ab, damit sie nicht verkratzt wird.
Stellen Sie das Gerät auf das Tuch.
Stellen Sie das Gerät auf eine stabile
Fläche.
3
Während Sie auf den Bereich
drücken, der in der Abbildung der
Lampenabdeckung angezeigt ist,
schieben Sie
1
und öffnen Sie
2
dann die Lampenabdeckung.
Wartung
Austauschen der Lampe
Vorsicht
Hinweis
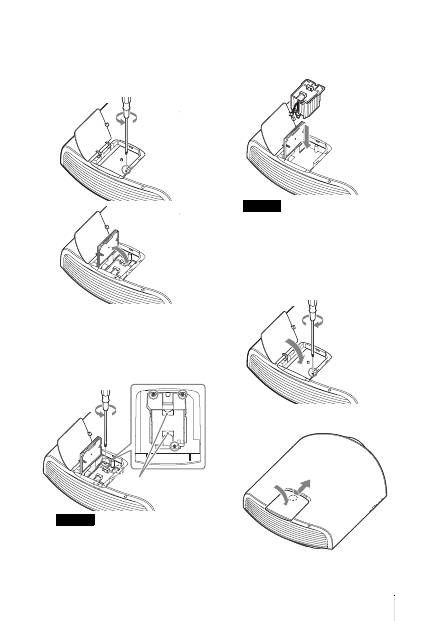
21
DE
4
Lösen Sie die Schraube der
Lampenklappe (innere Abdeckung)
mit einem
Kreuzschlitzschraubendreher, und
öffnen Sie dann die Lampenklappe.
5
Lösen Sie die 3 Schrauben an der
Lampe mit dem
Kreuzschlitzschraubendreher. Halten
Sie den Griff hoch, und ziehen Sie
dann die Lampe gerade heraus.
Halten Sie die Lampe am Griff, um sie zu
entfernen und einzusetzen.
6
Drücken Sie die neue Lampe mit dem
Griff sicher hinein, bis sie fest sitzt,
und ziehen Sie dann die 3 Schrauben
fest.
Achten Sie darauf, dass Sie nicht den
Optikblock im Inneren des Projektors
berühren.
7
Schließen Sie die Lampenklappe
(innere Abdeckung), und ziehen Sie
die Schraube an.
8
Schließen Sie die Lampenabdeckung.
Hinweis
Griff
Hinweis
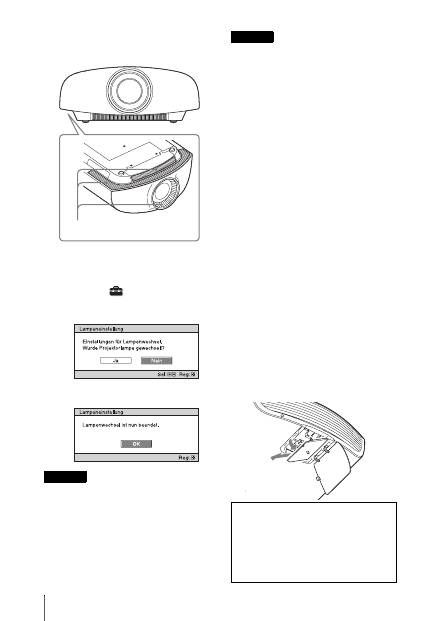
DE
22
9
Säubern Sie die Lüftungsöffnungen
(Einlass) mit einem weichen Tuch von
Staub.
10
Schalten Sie das Gerät ein, und
wählen Sie dann den gewünschten
Einstellungsposten im Menü
Einrichtung
aus.
Der folgende Menübildschirm wird
angezeigt.
11
Wählen Sie „Ja“.
Greifen Sie nicht in den Lampensteckplatz,
und achten Sie darauf, dass keine
Flüssigkeiten oder Fremdkörper in den
Steckplatz eindringen, um einen
elektrischen Schlag oder Brand zu
vermeiden.
• Verwenden Sie unbedingt eine
Projektorlampe LMP-H330 als Ersatz. Falls
Sie eine andere Lampe als LMP-H330
verwenden, kann es zu einer
Funktionsstörung des Geräts kommen.
• Schalten Sie unbedingt das Gerät aus, und
ziehen Sie das Netzkabel ab, bevor Sie die
Lampe auswechseln. Vergewissern Sie sich
dann, dass die Anzeige ON/STANDBY
erloschen ist.
• Das Gerät lässt sich nur einschalten, wenn
die Lampe vorschriftsmäßig installiert ist.
• Das Gerät lässt sich nicht einschalten, wenn
die Lampenabdeckung nicht einwandfrei
geschlossen ist.
• Um eine auf der Leinwand angezeigte
Meldung aufzuheben, drücken Sie entweder
die Taste an der Fernbedienung oder die
entsprechende Taste am Bedienfeld des
Geräts.
Hinweis zum Austauschen einer
schadhaften Lampe im Fall einer
Deckeninstallation
Bei einem Bersten der Lampe können
Lampensplitter umherfliegen und
Verletzungen verursachen.
Wenn sich das Gerät an der Decke befindet,
entfernen Sie die Lampenklappe (innere
Abdeckung), indem Sie sie langsam
horizontal verschieben, nachdem Sie sie mit
einer Öffnung von 30 Grad angehoben
haben. Vermeiden Sie, die Lampenklappe
(innere Abdeckung) zu verdrehen.
Vorsicht
Lüftungsöffnungen (Einlass)
Hinweise
Hinweis
Die Lampe enthält Quecksilber. Die
Entsorgungsvorschriften für verbrauchte
Leuchtstoffröhren hängen von Ihrem
Wohnort ab. Befolgen Sie die
Müllentsorgungsvorschriften in Ihrem
Gebiet.
30°

IT
2
La presente Guida rapida all’uso descrive l’installazione e le operazioni di base per la
proiezione di immagini. Inoltre, sono descritte note e precauzioni importanti a cui prestare
attenzione durante l’uso di questa unità.
Vedere “Spie di avvertenza” e “Sostituzione della lampada” in base alle necessità.
Per i dettagli sulle operazioni, consultare le Istruzioni per l’uso contenute nel CD-ROM in
dotazione.
Informazioni sulla Guida rapida all’uso
Preparazione
..........................................Pagina 8
Installazione dell’unità
....................Pagina 10
Collegamento dell’unità
..................Pagina 11
Selezione della lingua del menu
....................................................................Pagina 15
Proiezione
..............................................Pagina 16
Gestione degli
errori
Spie di avvertenza
.......................................Pagina 18
Manutenzione
Sostituzione della lampada
.........................Pagina 20
Punto 1 Punto 2 Punto 3 Punto 4 Punto 5
3
IT
Leggere attentamente questo manuale prima
di utilizzare l’unità, e conservarlo per
riferimenti futuri.
AVVERTENZA
Per ridurre il rischio di incendi o
scosse elettriche, non esporre
questo apparato alla pioggia o
all’umidità.
Per evitare scosse elettriche, non
aprire l’involucro. Per l’assistenza
rivolgersi unicamente a personale
qualificato.
AVVERTENZA
QUESTO APPARECCHIO DEVE
ESSERE COLLEGATO A MASSA.
AVVERTENZA
Durante l’installazione dell’apparecchio,
incorporare un dispositivo di scollegamento
prontamente accessibile nel cablaggio fisso,
oppure collegare la spina di alimentazione
ad una presa di corrente facilmente
accessibile vicina all’apparecchio. Qualora
si verifichi un guasto durante il
funzionamento dell’apparecchio, azionare il
dispositivo di scollegamento in modo che
interrompa il flusso di corrente oppure
scollegare la spina di alimentazione.
ATTENZIONE
Informazioni sul connettore LAN
Per ragioni di sicurezza, non collegare il
connettore per il cablaggio del dispositivo
periferico che potrebbe avere una tensione
eccessiva in questa porta.
AVVERTENZA
1
Utilizzare un cavo di alimentazione
(a 3 anime)/connettore per l’apparecchio/
spina con terminali di messa a terra
approvati che siano conformi alle
normative sulla sicurezza in vigore in ogni
paese, se applicabili.
2
Utilizzare un cavo di alimentazione
(a 3 anime)/connettore per l’apparecchio/
spina confrmi alla rete elettrica
(voltaggio, ampere).
In caso di domande relative all’uso del cavo
di alimentazione/connettore per
l’apparecchio/spina di cui sopra, rivolgersi
al personale qualificato.
Per i clienti in Europa
Questo prodotto è stato fabbricato da o per
conto di Sony Corporation, 1-7-1 Konan
Minato-ku Tokyo, 108-0075 Giappone.
Eventuali richieste in merito alla conformità
del prodotto in ambito della legislazione
Europea, dovranno essere indirizzate al
rappresentante autorizzato, Sony
Deutschland GmbH, Hedelfinger Strasse 61,
70327 Stuttgart, Germania. Per qualsiasi
informazione relativa al servizio o la
garanzia, si prega di fare riferimento agli
indirizzi riportati separatamente sui
documenti relativi all’assistenza o sui
certificati di garanzia.
Nota: Le seguenti frasi integrano il manuale
di istruzioni e, in caso di discordanza,
prevalgono sul manuale di istruzioni.
Indicazioni specifiche e avvertenze
per l’utilizzo di occhiali 3D in ambito
domestico, richieste dal Ministero
della Salute Italiano.
• L’utilizzo degli occhiali 3D è
controindicato per i bambini al di sotto dei
6 anni di età.
• L’utilizzo continuativo degli occhiali 3D
deve in ogni caso essere limitato a un
tempo massimo orientativamente pari a
quello della durata di uno spettacolo
cinematografico.
• L’utilizzo degli occhiali 3D deve essere
limitato esclusivamente alla visione di
contenuti in 3D.
• Gli occhiali 3D devono essere utilizzati
contestualmente agli strumenti correttivi
della visione (ad es., occhiali da vista/lenti
a contatto), qualora abitualmente utilizzati
dall’utente.
• E’opportuno interrompere
immediatamente la visione in 3D in caso
di comparsa di disturbi agli occhi o di
malessere generale e, nell’eventualità di
persistenza degli stessi, consultare un
medico.
IT

IT
4
• Gli occhiali 3D devono essere tenuti fuori
dalla portata dei bambini qualora vi sia la
presenza di piccole parti mobili ingeribili.
• La pulizia degli occhiali 3D deve essere
fatta utilizzando un panno leggermente
inumidito con una soluzione di sapone
delicato e acqua tiepida, non usare prodotti
a base alcolica.
• L’uso di sostanze disinfettanti può
danneggiare il prodotto o comprometterne
la funzionalità; è pertanto controindicato
l’uso promiscuo degli occhiali 3D in caso
di infezioni oculari o altre affezioni
trasmissibili per contatto (a titolo
meramente esemplificativo: congiuntivite,
infestazioni del capo ecc…) fino alla
completa scomparsa dell’infezione stessa.
Precauzioni
Sicurezza
• Verificare che la tensione di
funzionamento dell’unità corrisponda alla
tensione della rete elettrica locale.
• Se liquidi o solidi dovessero cadere nel
mobile, scollegare l’unità e farla
controllare da personale qualificato prima
di usarla nuovamente.
• Se l’unità non sarà utilizzata per diversi
giorni, scollegarla dalla presa di rete.
• Per scollegare il cavo, tirarlo fuori
afferrando la spina. Non tirare mai
direttamente il cavo.
• La presa di rete dovrebbe essere vicina
all’unità e facilmente accessibile.
• L’unità non è scollegata dalla sorgente di
alimentazione c.a. (rete elettrica) finché è
collegata alla presa di rete, anche se l’unità
stessa è stata spenta.
• Non guardare dentro l’obiettivo quando la
lampada è accesa.
• Non mettere le mani o degli oggetti vicino
alle prese di ventilazione. L’aria che ne
fuoriesce è calda.
Prevenzione del surriscaldamento
interno
Dopo aver spento l’alimentazione con il
pulsante
?
/
1
(accensione/attesa), non
scollegare l’unità dalla presa di rete mentre
la ventola di raffreddamento è ancora in
funzione.
Attenzione
Questa unità è dotata di prese di ventilazione
di aspirazione e di scarico. Non ostruire o
mettere alcun oggetto vicino a queste
aperture; potrebbe verificarsi
surriscaldamento interno, provocando un
peggioramento dell’immagine o
danneggiamento dell’unità.
Imballaggio
Conservare la scatola e il materiale di
imballaggio originale, poiché potrebbero
servire se fosse necessario spedire
l’apparecchio. Per ottenere la massima
protezione, imballare l’apparecchio nello
stesso modo in cui è stato imballato in
stabilimento.

5
IT
Precauzioni per la sicurezza
quando si utilizzano gli occhiali 3D
Avviso
• Non gettare gli occhiali 3D nel fuoco.
• Non smontare gli occhiali 3D.
• Non utilizzare, caricare, conservare o
lasciare gli occhiali 3D vicino al fuoco o in
luoghi con temperature elevate, per es. alla
luce diretta del sole o all’interno di auto
esposte ai raggi solari.
• Usare solo il cavo USB in dotazione.
• Non caricare gli occhiali 3D con
dispositivi diversi dall’alimentatore CA
per ricarica USB fornito in dotazione.
• Evitare l’ingresso di acqua e sostanze
estranee negli occhiali 3D.
Precauzioni per la sicurezza
• Usare solamente gli occhiali 3D inclusi
con questa unità. Gli occhiali 3D devono
essere utilizzati esclusivamente per
guardare immagini video in 3D. Non
utilizzare gli occhiali 3D con altre
apparecchiature, ad esempio i televisori.
• Se si notano tremolii o lampi, spegnere
l’illuminazione della stanza.
• Prodotto non destinato all’uso da parte di
bambini senza l’appropriata supervisione
di un adulto.
• Fare attenzione a non schiacciarsi le dita
durante la chiusura delle stanghette degli
occhiali 3D.
• Non lasciar cadere né modificare gli
occhiali 3D.
• In caso di rottura degli occhiali, evitare il
contatto di occhi e bocca con i frammenti.
Proiettore LCD
Il proiettore LCD è prodotto con una
tecnologia di alta precisione. Tuttavia
potrebbero essere visibili dei puntini neri e/o
luminosi (rossi, blu o verdi) che appaiono in
modo permanente sul proiettore LCD.
Questo è un risultato normale del processo di
fabbricazione e non costituisce un guasto.
Inoltre, usando più proiettori LCD per
proiettare su uno schermo, anche se sono
dello stesso modello, la risoluzione dei
colori dei vari proiettori può cambiare in
quanto il bilanciamento dei colori potrebbe
essere impostato diversamente da un
proiettore all’altro.
Informazioni sulla condensa
Se la temperatura dell’ambiente dove il
proiettore installato cambia rapidamente, o
se il proiettore viene improvvisamente
spostato da una stanza fredda a una calda, è
possibile che sul proiettore si formi
condensa. Dato che la condensa può
provocare malfunzionamenti, prestare
attenzione alle regolazioni delle
impostazioni di temperatura del
condizionatore d’aria. Se si forma condensa,
lasciare il proiettore acceso per circa due ore
prima dell’uso.
SONY NON SARÀ RESPONSABILE DI
DANNI DI QUALSIASI TIPO
RISULTANTI DALLA MANCATA
IMPLEMENTAZIONE DI MISURE DI
PROTEZIONE ADEGUATE SUI
DISPOSITIVI DI TRASMISSIONE, DA
INEVITABILI DIFFUSIONI DI DATI
RISULTANTI DALLE SPECIFICHE
TECNICHE DELLA TRASMISSIONE
O DA PROBLEMATICHE RELATIVE
ALLA SICUREZZA DI QUALSIASI
TIPO.
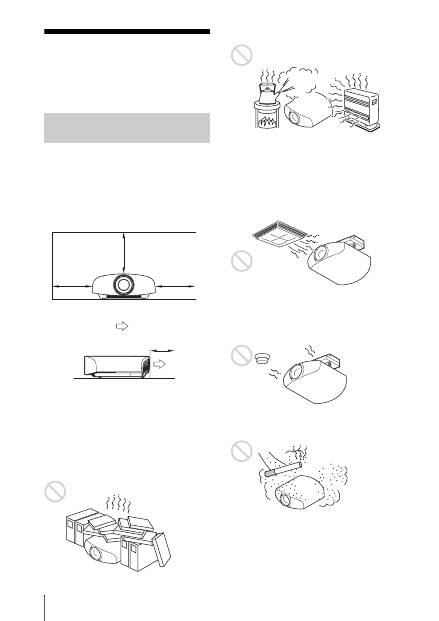
IT
6
Note sull’installazione e sull’utilizzo
Non installare l’unità nelle seguenti
condizioni, che potrebbero causare
malfunzionamenti o danneggiarla.
Vicino alle pareti
Per mantenere le prestazioni e la leggibilità
dell’unità, lasciare uno spazio tra le pareti e
l’unità, come illustrato.
Lasciare uno spazio di almeno 5 cm tra la
parete e il lato con la porta di scarico
dell’unità. Tenere presente che la parete
dietro l’unità può surriscaldarsi.
Posizioni con ventilazione
insufficiente
Lasciare uno spazio di almeno 30 cm intorno
all’unità.
Caldo e umido
Posizioni esposte a flusso diretto di
aria fresca o calda proveniente da un
condizionatore
Installando l’unità in tali posizioni, potrebbe
verificarsi un suo malfunzionamento
causato dalla condensazione dell’umidità o
dall’aumento della temperatura.
Vicino a un sensore di calore o di
fumo
Potrebbe verificarsi un malfunzionamento
del sensore.
Posizioni molto polverose o
estremamente fumose
Posizioni di installazione
inadatte
30 cm
30 cm
30 cm
5 cm
: Scarico
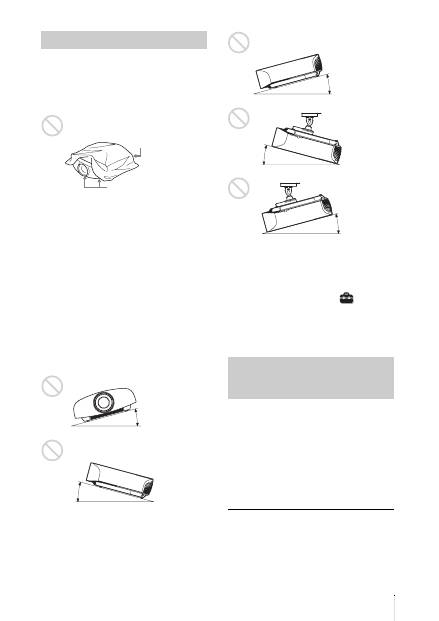
7
IT
Durante l’uso dell’unità, non effettuare
alcuna delle operazioni che seguono.
Ostruire le prese di ventilazione
(aspirazione o scarico)
Inclinare avanti/indietro e sinistra/
destra
Non usare l’unità inclinata di un angolo
superiore a 15 gradi.
Non installare l’unità altrove che su una
superficie in piano o sul soffitto. Installando
l’unità in tale posizione i colori potrebbero
apparire disuniformi oppure potrebbe
diminuire l’affidabilità dell’effetto della
lampada.
Se si inclina l’unità verso l’alto o il basso,
l’immagine sullo schermo potrebbe risultare
trapezoidale.
Posizionare l’unità in modo che l’obiettivo
sia parallelo allo schermo.
Installazione dell’unità a quota
elevata
Quando si usa l’unità a una quota di
1.500 m o superiore, impostare “Impostazione
ventil.” nel menu Impostazione
su “Alto”.
Se non viene impostata questo modo e l’unità è
usata a quote elevate, potrebbero verificarsi
degli effetti negativi, quale la diminuzione
dell’affidabilità di determinati componenti.
• Non montare mai il proiettore sul soffitto
né spostarlo da soli. Per l’installazione
rivolgersi a personale Sony qualificato
(a pagamento).
• Se si installa l’unità sul soffitto, accertarsi
di utilizzare un cavetto di sicurezza, ecc.,
per impedire la caduta dell’unità. Affidare
l’installazione a un installatore
specializzato.
Per rivenditori
• Se si installa il proiettore sul soffitto,
utilizzare per l’installazione una staffa
Sony o equivalente consigliata.
• Fissare saldamente il coperchio dell’unità
per una installazione sul soffitto sicura.
Condizioni non idonee
Prese di ventilazione
(aspirazione)
Prese di ventilazione
(scarico)
15° o più
15° o
più
Precauzioni di sicurezza per
l’installazione dell’unità sul
soffitto
15° o più
15° o
più
15° o più

IT
8
Verificare che la confezione contenga tutti
gli elementi indicati di seguito:
• Telecomando RM-PJ22 (1)
• Pile formato AA (R6) al manganese (2)
• Cavo di alimentazione CA per il proiettore
(1)
• Contenitore spina (1)
• Coperchio ingresso CA (1)
• Occhiali 3D (2)
• Astuccio per occhiali 3D (2)
• Alimentatore CA per ricarica USB
(AC-UD10) (1)
Specifiche
Tensione di ingresso: 100 - 240 V CA,
0,2 A, 50/60 Hz
Tensione nominale di uscita: 5 V CC,
1,5 A
Utilizzare i requisiti di alimentazione
indicati sopra.
• Cavo di alimentazione CA per
alimentatore CA per ricarica USB (1)
• Cavo USB caricamento (1,2 m) (1)
• Guida rapida all’uso (questo manuale) (1)
• Istruzioni per l’uso (CD-ROM) (1)
ATTENZIONE
Se una batteria non viene sostituita
correttamente vi è il rischio di esplosione.
Sostituire una batteria con una uguale o
simile seguendo le raccomandazioni del
produttore.
Per lo smaltimento della batteria, attenersi
alle norme in vigore nel paese di utilizzo.
Inserimento delle pile
Due pile formato AA (R6) sono fornite in
dotazione per il telecomando.
Per evitare il rischio di esplosione, utilizzare
pile formato AA (R6) al manganese o
alcaline.
Precauzioni per l’uso del
telecomando
• Maneggiare il telecomando con cura. Non
farlo cadere, calpestarlo o versarvi sopra
liquidi di alcun tipo.
• Non posizionare il telecomando in
prossimità di fonti di calore, né in luoghi
soggetti alla luce diretta del sole o in
stanze umide.
Preparazione Punto 1
Verifica degli accessori in
dotazione
Nota
Inserimento delle pile nel
telecomando
Premere e far
scorrere per aprire.
Inserire le pile dal
lato
E
.
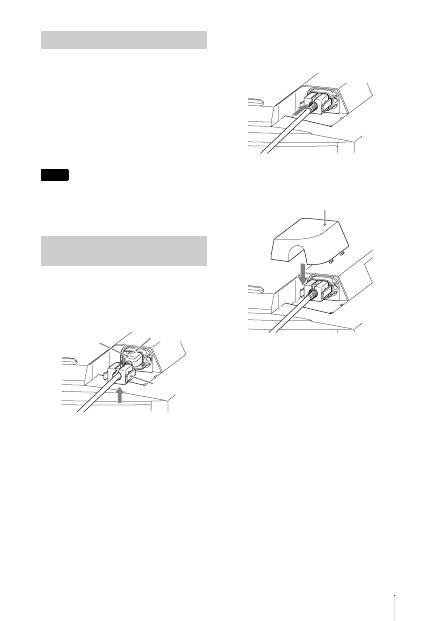
9
IT
Il manuale può essere letto esclusivamente
su un computer su cui è installato Adobe
Reader.
È possibile scaricare gratuitamente Adobe
Reader dal sito web di Adobe.
1
Aprire il file index. htm nel CD-ROM.
2
Selezionare e fare clic sul manuale che
si desidera leggere.
In caso di perdita o di danneggiamento del
CD-ROM, è possibile acquistarne uno
nuovo da un rivenditore Sony o rivolgendosi
all’assistenza Sony.
1
Collegare il cavo di alimentazione CA
alla presa AC IN, quindi inserire il
supporto per il connettore sul cavo di
alimentazione CA.
2
Fare scorrere il supporto per il
connettore sul cavo di alimentazione
CA per assicurarlo all’unità.
3
Fissare il coperchio della presa CA
all’unità.
Uso del manuale su CD-ROM
Nota
Collegamento del cavo di
alimentazione CA
Cavo di
alimentazione
CA (fornito)
Presa AC IN
Supporto per il
connettore (fornito)
Coperchio della presa CA (fornito)
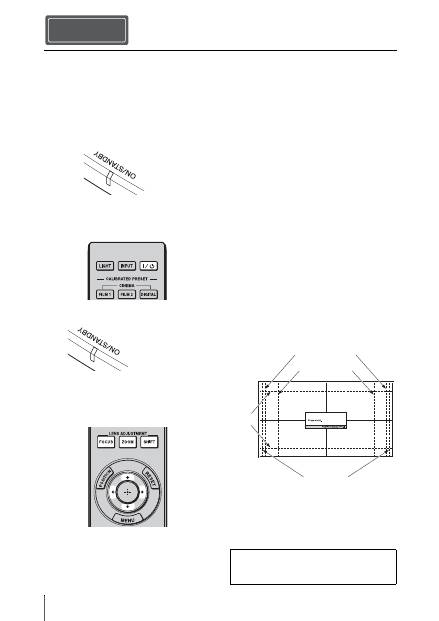
IT
10
1
Posizionare l’unità parallelamente allo
schermo.
2
Dopo aver collegato il cavo di
alimentazione c.a. all’unità, collegarlo
a una presa della rete elettrica.
3
Premere il pulsante
?
/
1
(accensione/
attesa) per accendere l’unità.
4
Proiettare un’immagine sullo
schermo, quindi regolare la messa a
fuoco, le dimensioni e la posizione.
a
Regolare la messa a fuoco.
Premere il pulsante LENS
ADJUSTMENT (FOCUS) per
visualizzare la finestra di regolazione
Fuoco obiett. (modello di prova).
Regolare quindi la messa a fuoco
dell’immagine premendo i pulsanti
M
/
m
/
<
/
,
.
b
Regolare la dimensione
dell’immagine.
Premere il pulsante LENS
ADJUSTMENT (ZOOM) per
visualizzare la finestra di regolazione
Zoom obiettivo (motivo di prova).
Regolare quindi la dimensione
dell’immagine premendo i pulsanti
M
/
m
/
<
/
,
.
c
Regolare la posizione
dell’immagine.
Premere il pulsante LENS
ADJUSTMENT (SHIFT) per
visualizzare la finestra di regolazione
Spost. obiett. (motivo di prova).
Regolare quindi la corretta posizione
dell’immagine premendo i pulsanti
M
/
m
/
<
/
,
.
Finestra di regolazione obiettivo
(modello di prova)
Installazione dell’unità Punto 2
Si illumina in
rosso.
Parte anteriore dell’unità
Lampeggia per
decine di secondi in
verde, quindi si
illumina in verde.
Parte anteriore dell’unità
Per i dettagli, consultare “Collegamenti e
preparazioni” nelle Istruzioni per l’uso sul
CD-ROM in dotazione.
1.78:1 (16:9)
2.35:1
1.85:1
1.33:1 (4:3)
Le linee tratteggiate mostrano le dimensioni
dello schermo per ogni formato.
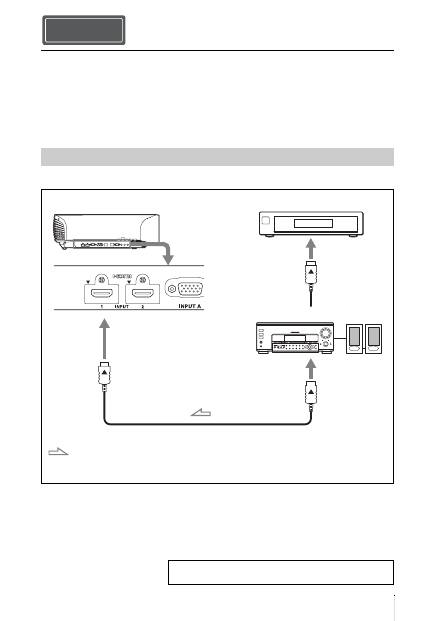
11
IT
Effettuare i collegamenti osservando quanto segue:
• Spegnere tutte le apparecchiature prima di effettuare qualsiasi collegamento.
• Usare cavi adatti a ciascun collegamento.
• Inserire correttamente le spine dei cavi; se il collegamento delle spine non è corretto,
potrebbe verificarsi un malfunzionamento oppure la qualità dell’immagine potrebbe essere
scadente. Per scollegare un cavo, afferrare la spina senza tirare il cavo stesso.
• Consultare le istruzioni d’uso dell’apparecchiatura collegata.
Collegamento ad apparecchiatura con connettori di uscita video HDMI
Collegamento dell’unità
Collegamento a un videoregistratore
Punto 3
Cavo HDMI (non in dotazione)
: Flusso del segnale video
Lato destro dell’unità
Apparecchiatura con
connettori di uscita HDMI
all’uscita HDMI
Amplificatore AV
Altoparlanti
Quando si usa un cavo opzionale HDMI, assicurarsi di
usare un cavo HDMI Sony o un altro cavo con logo HDMI.
Per i dettagli, consultare “Collegamenti e preparazioni”
nelle Istruzioni per l’uso sul CD-ROM in dotazione.

IT
12
Collegamento ad apparecchiatura con connettori di uscita video componenti
Cavo componente video (non in dotazione)
: Flusso del segnale video
Apparecchiatura con
connettori di uscita video
componenti
Lato destro dell’unità
Amplificatore AV
Altoparlanti
Per i dettagli, consultare “Collegamenti e preparazioni”
nelle Istruzioni per l’uso sul CD-ROM in dotazione.

13
IT
Collegamento a un computer
Cavo HD D-sub a 15 pin (non in dotazione) o cavo HDMI (non in dotazione)
: Flusso del segnale
video
Lato destro dell’unità
all’uscita del monitor
Computer
Quando si usa un cavo opzionale HDMI, assicurarsi di usare un
cavo HDMI Sony o un altro cavo con logo HDMI.
Per i dettagli, consultare “Collegamenti e preparazioni”
nelle Istruzioni per l’uso sul CD-ROM in dotazione.
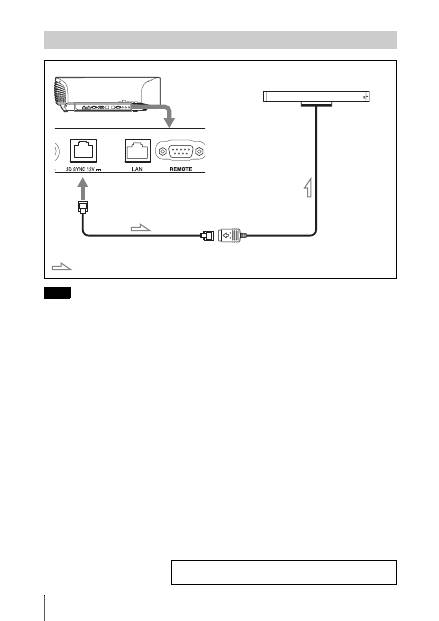
IT
14
Si può utilizzare un trasmettitore sincronizzato 3D separato dall’unità, mediante un cavo opzionale
LAN (di tipo diretto).
Se l’ambiente di utilizzo subisce continue interferenze di una particolare frequenza, i segnali
dell’immagine 3D e degli occhiali 3D di sincronizzazione potrebbero disperdersi. In tal caso,
utilizzare un cavo LAN classificato Categoria 7.
Per visualizzare immagini 3D in un ambiente con interferenze ancora maggiori, utilizzare il
trasmettitore incorporato.
Collegamento a un Trasmettitore Sincronizzato 3D
Nota
Lato destro dell’unità
Trasmettitore Sincronizzato 3D
(non in dotazione)
Cavo LAN (non in dotazione)
: Flusso segnale 3D sincronizzato
Per i dettagli, consultare “Collegamenti e preparazioni”
nelle Istruzioni per l’uso sul CD-ROM in dotazione.

15
IT
È possibile scegliere fra 16 lingue di
presentazione del menu e di altre
visualizzazioni su schermo. L’impostazione
predefinita di stabilimento è l’inglese. Per
cambiare la lingua del menu attuale,
impostare la lingua desiderata con la
schermata del menu.
1
Premere MENU.
Appare il menu.
2
Premere
M
/
m
per selezionare il menu
Setup
e premere
,
o
.
Vengono visualizzate le voci di
impostazione del menu selezionato.
3
Premere
M
/
m
per selezionare
“Language” e premere
,
o
.
4
Premere
M
/
m
/
<
/
,
per selezionare
una lingua, quindi premere
.
Il menu passa alla lingua selezionata.
Cancellazione del menu
Premere MENU.
Selezione della lingua del menu Punto 4
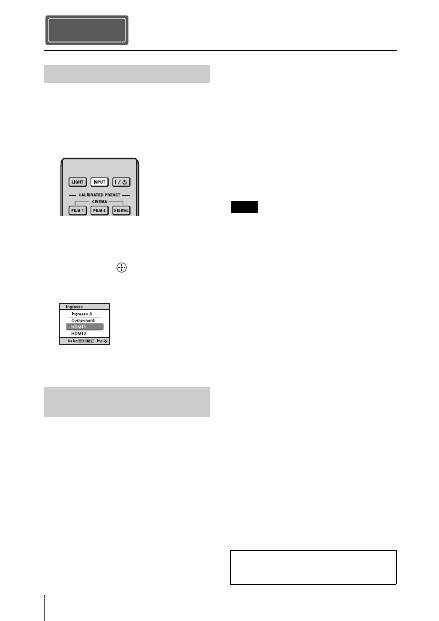
IT
16
1
Accendere l’unità e l’apparecchiatura
ad essa collegata.
2
Premere INPUT per visualizzare sullo
schermo gli ingressi disponibili.
3
Selezionare l’apparecchiatura della
quale visualizzare le immagini.
Premere ripetutamente INPUT oppure
premere
M
/
m
/
(invio) per
selezionare l’apparecchiatura di cui
proiettare le immagini.
1
Premere il pulsante
?
/
1
(accensione/
attesa).
Sullo schermo appare il messaggio
“DISATTIVARE?”.
2
Premere di nuovo il pulsante
?
/
1
(accensione/attesa) prima che il
messaggio scompaia.
La protezione della lente si chiude. Fare
attenzione che le dita o qualche oggetto
non restino incastrati.
La spia ON/STANDBY lampeggia in
verde e la ventola continua a girare per
ridurre il calore interno. Innanzitutto la
spia ON/STANDBY lampeggia
rapidamente e contemporaneamente non
sarà possibile illuminare la spia ON/
STANDBY con il pulsante
?
/
1
(accensione/attesa).
La ventola si arresta e la spia ON/
STANDBY passa da luce verde
lampeggiante a rosso fisso.
Questo indica lo spegnimento completo
dell’alimentazione. È ora possibile
rimuovere il cavo di alimentazione.
Non scollegare mai il cavo di alimentazione
mentre l’indicatore lampeggia.
È possibile spegnere l’unità tenendo premuto il
pulsante
?
/
1
(accensione/attesa) per circa 1
secondo, invece di eseguire la procedura
precedentemente indicata.
Proiezione Punto 5
Proiezione dell’immagine
Spegnimento
dell’alimentazione
Esempio: per visualizzare l’immagine
dall’apparecchiatura video collegata al
connettore HDMI 1 di questa unità.
Nota
Per i dettagli, consultare “Proiezione”
nelle Istruzioni per l’uso sul CD-ROM in
dotazione.
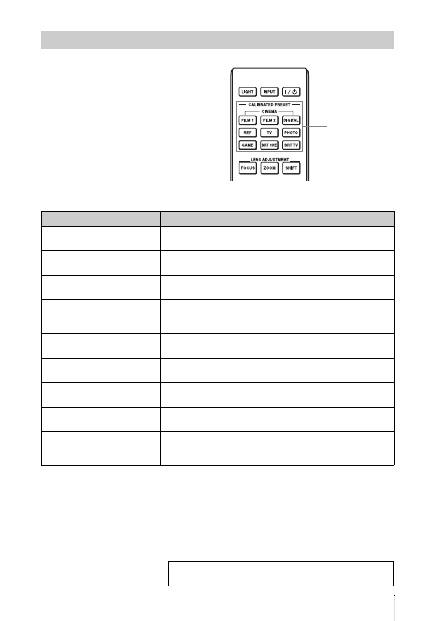
17
IT
Premere uno dei pulsanti CALIBRATED
PRESET.
Selezione della modalità di visualizzazione dell’immagine
Pulsanti
CALIBRATED
PRESET
Voci di impostazione
Descrizione
CINEMA FILM 1
Qualità dell’immagine adatta per riprodurre le immagini nitide e
altamente dinamiche tipiche della pellicola positiva master.
CINEMA FILM 2
Qualità dell’immagine adatta per riprodurre la ricca tonalità e il
colore tipici del cinema.
CINEMA DIGITAL
Qualità dell’immagine adatta per riprodurre immagini simili al
cinema digitale secondo le specifiche DCI.
REF
Un’impostazione di qualità immagine adatta per la riproduzione
fedele della qualità dell’immagine originale, oppure per ottenere
la qualità dell’immagine senza regolazioni.
TV
Qualità dell’immagine adatta per guardare programmi televisivi,
sport, concerti, e così via.
PHOTO
Ideale per proiettare fotografie scattate con una fotocamera
digitale.
GAME
Qualità dell’immagine adatta per giochi, con colori ben
modulati e rapidità della risposta.
BRT CINE
Qualità dell’immagine adatta per guardare film in un ambiente
luminoso, ad esempio un soggiorno.
BRT TV
Qualità dell’immagine adatta per guardare programmi televisivi,
sport, concerti e altri video in un ambiente luminoso, ad
esempio un soggiorno.
Per i dettagli, consultare “Proiezione” nelle Istruzioni per
l’uso sul CD-ROM in dotazione.

IT
18
La spia ON/STANDBY o LAMP/COVER si illumina o lampeggia in caso di problemi del
proiettore.
Gestione degli errori
Spie di avvertenza
Spia ON/STANDBY
Spia LAMP/COVER
Sintomo
Causa e rimedio
LAMP/COVER lampeggia
in rosso. (frequenza di
ripetizione di 2 lampeggi)
c
Chiudere saldamente il coperchio della lampada, quindi serrare
saldamente le viti.
LAMP/COVER lampeggia
in rosso. (frequenza di
ripetizione di 3 lampeggi)
c
La temperatura della lampada è insolitamente alta. Spegnere e
attendere che la lampada si raffreddi, quindi riaccendere
l’alimentazione.
c
Se il sintomo persiste, la lampada potrebbe essere giunta al
temine della durata utile. In questo caso, sostituire la lampada
con una nuova.
ON/STANDBY lampeggia
in rosso. (frequenza di
ripetizione di 4 lampeggi)
c
La ventola è guasta. Rivolgersi a personale Sony qualificato.
ON/STANDBY lampeggia
in rosso. (frequenza di
ripetizione di 2 lampeggi)
c
La temperatura interna è insolitamente elevata. Verificare che le
prese di ventilazione non siano ostruite oppure se l’unità viene
usata a quota elevata.
ON/STANDBY lampeggia
in rosso. (frequenza di
ripetizione di 6 lampeggi)
c
Premere il pulsante
?
/
1
(accensione/attesa) per accendere
l’unità. Se l’alimentazione non si accende, scollegare il cavo di
alimentazione c.a. e verificare che la spia ON/STANDBY sia
spenta. Dopo circa 10 secondi, ricollegare il cavo di
alimentazione c.a. e riaccendere l’alimentazione. Se le spie si
illuminano ancora, c’è un guasto dell’impianto elettrico.
Rivolgersi a personale Sony qualificato.
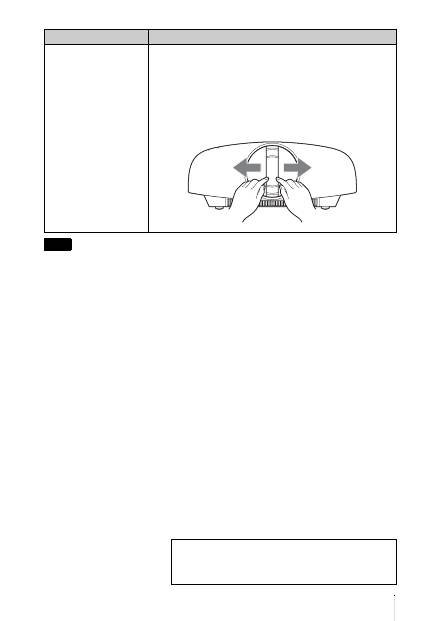
19
IT
Se dovesse lampeggiare una spia di avvertenza diversa da quelle citate e il problema persiste anche
dopo aver effettuato le precedenti operazioni, rivolgersi a personale Sony qualificato.
ON/STANDBY lampeggia
in rosso. (frequenza di
ripetizione di 5 lampeggi)
c
Il coperchio dell’obiettivo non è completamente aperto.
Spegnere e riaccendere l’unità. Se comunque il coperchio
dell’obiettivo non si apre completamente, rivolgersi a personale
Sony qualificato.
Suggerimento
In situazione urgente, fare riferimento all’illustrazione che segue per
aprire manualmente il coperchio dell’obiettivo. Premere il pulsante
?
/
1
(accensione/attesa) per accendere l’unità e utilizzarla.
Nota
Sintomo
Causa e rimedio
Per eventuali problemi o a seguito della comparsa di un
messaggio d’errore sullo schermo, consultare
“Risoluzione dei problemi” nelle Istruzioni per l’uso sul
CD-ROM in dotazione.
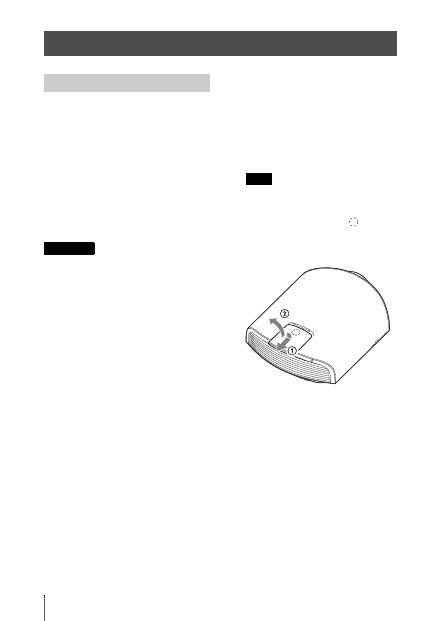
IT
20
La lampada che costituisce la sorgente
luminosa ha una determinata vita utile. Se la
luminosità della lampada diminuisce, il
bilanciamento del colore dell’immagine è
anormale, oppure appare sullo schermo
“Sostituire la lampada.”, la lampada
potrebbe essere esaurita. Sostituire subito la
lampada con una nuova (non in dotazione).
Attrezzatura necessaria:
•
Lampada per proiettore LMP-H330
(opzionale)
•
Normale cacciavite con punta a croce
•
Panno (per evitare i graffi)
• La lampada è ancora calda dopo aver spento
l’unità con il pulsante
?
/
1
(accensione/
attesa). Toccando la lampada, ci si potrebbe
ustionare le dita. Quando si sostituisce la
lampada, aspettare almeno 1 ora che si
raffreddi.
• Non toccare la superficie dell’obiettivo. Se
venisse toccata, pulire le ditate con un panno
morbido.
• Prestare particolare attenzione alla
sostituzione della lampada di un’unità
installata sul soffitto.
• Quando si sostituisce la lampada di un’unità
installata sul soffitto, non sostare
direttamente sotto il coperchio della
lampada. Quando si rimuove lo sportello
della lampada (coperchio interno), cercare di
non torcerlo.
Se la lampada esplode, i frammenti possono
provocare lesioni.
• Per rimuovere l’unità della lampada,
mantenerla orizzontale e tirare direttamente
verso l’alto. Non inclinare l’unità della
lampada. Se tirando fuori l’unità della
lampada in posizione inclinata la lampada si
rompe, i frammenti potrebbero disperdersi e
provocare lesioni.
1
Spegnere l’unità e scollegare il cavo di
alimentazione c.a.
2
Quando si posa l’unità su un piano
quale una scrivania ecc., usare un
panno per evitare di graffiarne la
superficie. Posizionare l’unità sul
panno.
Controllare che l’unità sia posata su un
piano stabile.
3
Quando si preme la parte
indicata
nell’illustrazione del coperchio della
lampada, far scorrere
1
quindi aprire
2
il coperchio.
Manutenzione
Sostituzione della lampada
Attenzione
Nota
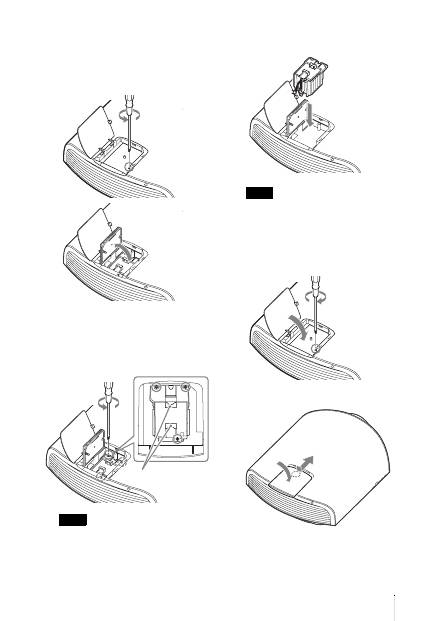
21
IT
4
Allentare la vite dello sportello della
lampada (coperchio interno) con un
cacciavite Phillips, quindi aprire lo
sportello.
5
Allentare le 3 viti sulla lampada con il
cacciavite Phillips. Sollevare la
maniglia, quindi tirare fuori la
lampada direttamente verso l’alto.
Tenere la lampada dalla maniglia per
rimuoverla e fissarla.
6
Spingere a fondo la nuova lampada
con la maniglia e stringere le 3 viti.
Prestare attenzione a non toccare il blocco
ottico all’interno dell’unità.
7
Chiudere lo sportello della lampada
(coperchio interno), quindi serrare la
vite.
8
Chiudere il coperchio della lampada.
Nota
Maniglia
Nota
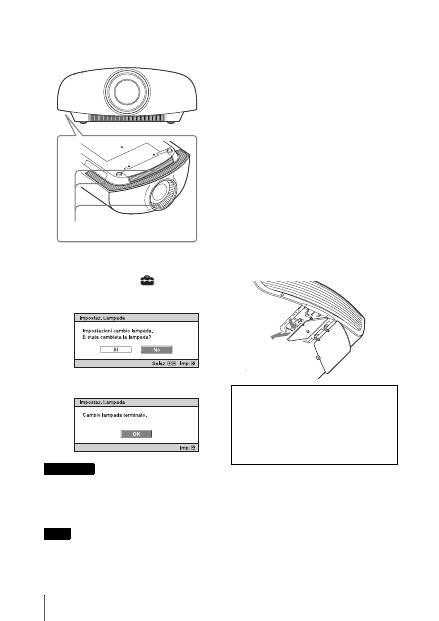
IT
22
9
Togliere la polvere dalle prese di
ventilazione (aspirazione) usando un
panno morbido.
10
Accendere l’unità, quindi selezionare
la voce di impostazione desiderata nel
menu Impostazione
.
Verrà visualizzata la schermata di menu
che segue.
11
Selezionare “Sì”.
Non infilare le mani nella sede di sostituzione
della lampada e fare in modo che non ci cadano
dei liquidi o degli oggetti per evitare scossa
elettrica o incendio.
• Per la sostituzione, usare unicamente una
lampada per proiettore LMP-H330. Usando
lampade diverse dalla LMP-H330, l’unità
potrebbe guastarsi.
• Prima di sostituire la lampada, spegnerla e
scollegare il cavo di alimentazione, quindi
verificare che l’indicatore ON/STANDBY si
sia già spento.
• L’unità non si accenderà se la lampada non è
montata saldamente in posizione.
• L’unità non si accenderà se il coperchio della
lampada non è chiuso saldamente.
• Per cancellare un messaggio visualizzato
sullo schermo, premere il pulsante sul
telecomando o sul pannello di controllo
dell’unità.
Nota sulla sostituzione di una
lampada rotta nel caso di
un’installazione a soffitto
Se la lampada si rompe, i frammenti possono
spargersi e causare lesioni.
Se l’unità è montata sul soffitto, rimuovere
lo sportello della lampada (coperchio
interno) facendolo scorrere lentamente in
orizzontale dopo averlo sollevato di 30
gradi. Cercare di non torcere lo sportello
della lampada (coperchio interno).
Attenzione
Note
Prese di ventilazione
(aspirazione)
Nota
La lampada contiene del mercurio. Le
norme per lo smaltimento dei tubi
fluorescenti esauriti dipendono dal paese di
residenza. Seguire le regolamentazioni di
smaltimento dei rifiuti applicabili nel
proprio paese.
30°

RU
2
В данном документе Краткое справочное руководство описана установка и
основные операции для проецирования изображений. В этом руководстве также
содержатся важные примечания и предупреждения, которым следует уделять
особое внимание при обращении с аппаратом и его эксплуатации.
При необходимости см. “Предупреждающие индикаторы” и “Замена лампы”.
Для получения дополнительной информации об операциях см. документ
Инструкция по эксплуатации, содержащийся на прилагаемом компакт-диске.
О документе Краткое справочное руководство
Подготовка
................................................Cтр. 9
Установка устройства
...................... Cтр. 11
Подключение устройства
...............Cтр. 13
Выбор языка меню
.............................Cтр. 17
Проецирование
.....................................Cтр. 18
Устранение
ошибок
Предупреждающие индикаторы ..................Cтр. 20
Техническое
обслуживание
Замена лампы................................................... Cтр. 22
Шаг 1. Шаг 2. Шаг 3. Шаг 4. Шаг 5.

3
RU
видеопроектор
VPL-VW1100ES
Внимательно прочтите настоящее
руководство перед началом
эксплуатации аппарата и сохраните
его для справки на будущее.
ПРЕДУПРЕЖДЕНИЕ
Для снижения риска возгорания и
поражения электрическим током
не допускайте воздействия на
аппарат влаги и сырости.
Чтобы исключить риск поражения
электрическим током, не
вскрывайте корпус.
Обслуживание аппарата должны
выполнять только
квалифицированные
специалисты.
ПРЕДУПРЕЖДЕНИЕ
ДАННОЕ УСТРОЙСТВО ДОЛЖНО
БЫТЬ ЗАЗЕМЛЕНО.
ПРЕДУПРЕЖДЕНИЕ
При установке устройства
используйте легкодоступный
прерыватель питания с
фиксированной проводкой или
подключите провод питания к
легкодоступной настенной розетка,
расположенной рядом с устройством.
Если в процессе эксплуатации блока
возникнет неисправность, с помощью
прерывателя отключите питание, или
отсоедините провод питания.
ОСТОРОЖНО
Разъем LAN
В целях обеспечения безопасности не
подключайте к этому порту
соединительные разъемы
электропроводки периферических
устройств, которые, возможно, имеют
чрезмерно высокое напряжение.
ПРЕДУПРЕЖДЕНИЕ
1
Используйте разрешенные к
применению шнур питания
(с 3-жильным силовым проводом) /
разъем для подключения бытовых
приборов / штепсельную вилку с
заземляющими контактами,
соответствующие действующим
нормам техники безопасности
каждой отдельной страны.
2
Используйте шнур питания
( с 3-жильным силовым проводом) /
разъем для подключения бытовых
приборов / штепсельную вилку,
соответствующие допустимым
номинальным характеристикам
(напряжение, сила тока).
В случае вопросов относительно
использования упомянутых выше
шнура питания / разъема для
подключения бытовых приборов /
штепсельной вилки, пожалуйста,
обращайтесь к квалифицированным
специалистам по сервисному
обслуживанию.
SONY
Сони Корпорейшн
1-7-1, Конан, Минато-ку, Токио,
Япония, 108-0075
Сделано в ЯПОНИИ
Импортер на территории стран
Таможенного союза
ЗАО «Сони Электроникс», Россия,
123103, Москва, Карамышевский
проезд, 6
Это устройство является проектором
для проецирования изображений с
подключенного компьютера или
видеооборудования.
Организация, уполномоченная
принимать претензии от
потребителей на территории
Казахстана:
ЗАО «Сони Электроникс»
Представительство в Казахстане,
050059, Алматы, улица Иванилова, д. 58
Год производства: см. паспортную
табличку на изделии.
Пример: (2013-01)
2013: означает год
01: означает месяц
RU

RU
4
Меры предосторожности
Безопасность
• Проверьте, соответствует ли
рабочее напряжение вашего
устройства напряжению питания
местной электрической сети.
• В случае попадания внутрь корпуса
каких-либо жидкостей или
посторонних предметов отсоедините
устройство от электрической сети и
обратитесь к квалифицированному
персоналу для его проверки перед
дальнейшей эксплуатацией.
• Выключите устройство из сетевой
розетки, если не планируете
использовать его в течение
нескольких дней.
• При отключении шнура тяните его
за вилку. Никогда не тяните
непосредственно за шнур.
• Сетевая розетка должна находиться
возле устройства и быть легко
доступной.
• Пока устройство подключено к
источнику переменного тока, на
него по-прежнему подается
электропитание, даже если само
устройство выключено.
• Не смотрите в объектив проектора
при включенной лампе.
• Не подносите руки или предметы к
вентиляционным отверстиям. Из них
выходит горячий воздух.
О предотвращении внутреннего
перегрева
После выключения питания с
помощью кнопки
?
/
1
(ON/STANDBY)
не отключайте устройство от сетевой
розетки, пока работает вентилятор.
Осторожно
Данное устройство оборудовано
вентиляционными отверстиями
(впускными и выпускными). Не
блокируйте и не располагайте ничего
возле этих отверстий, в противном
случае возможен внутренний
перегрев, что приведет к ухудшению
изображения или повреждению
устройства.
О повторной упаковке
Сохраните оригинальную
транспортировочную упаковку, она
потребуется при возможной
транспортировке устройства. Для
максимальной защиты повторно
упакуйте устройство так, как оно
было упаковано на заводе.
Правила техники безопасности
при использовании 3D-очков
Предупреждение
• Не подвергайте 3D-очки
воздействию огня.
• Не разбирайте 3D-очки.
• Не используйте, не заряжайте, не
храните и не оставляйте 3D-очки
рядом с источниками открытого
огня или в местах с повышенной
температурой, например под
прямыми солнечными лучами или в
машинах, стоящих на солнце.
• Используйте только прилагаемый
кабель USB.
• Не используйте для зарядки 3D-
очков любой адаптер переменного
тока, кроме прилагаемого зарядного
USB-адаптера переменного тока.
• Не допускайте попадания воды или
посторонних материалов в 3D-очки.
Правила техники безопасности
• Используйте 3D-очки только такого
типа, который включен в комплект
данного устройства. 3D-очки можно
использовать только для просмотра
3D-видеоизображений. Не
используйте 3D-очки с другим
оборудованием, например,
телевизором.
• Если вы ощущаете мерцание или
мигание света, выключите
освещение в комнате.
• Запрещается использование детьми
без присмотра взрослых.
• Соблюдайте осторожность, чтобы
при складывании дужек 3D-очков не
прищемить пальцы.
5
RU
• Не роняйте и не модифицируйте эти
3D-очки.
• Если очки разбились, не допускайте
попадания осколков в рот или в
глаза.
Жидкокристаллический
проектор
ЖК-проектор создан с
использованием высокоточных
технологий. Однако, на экране ЖК-
проектора могут периодически
появляться мелкие черные и/или
яркие (красные, синие или зеленые)
точки. Этот эффект является
нормальным результатом
производственного процесса и не
свидетельствует о неисправности.
Кроме того, при использовании для
проецирования на один экран
нескольких ЖК-проекторов, даже
одной модели, цветопередача разных
проекторов может отличаться, так
как баланс цвета на них может быть
настроен по-разному.
О конденсации
При быстром изменении температуры
в помещении, в котором установлен
проектор, или при быстром
перемещении проектора из холодного
в теплое место внутри него может
образоваться конденсат. Так как
конденсат может привести к
неисправности, соблюдайте
осторожность при изменении
настроек температуры кондиционера.
При образовании конденсата перед
использованием проектора оставьте
его включенным приблизительно на
два часа.
КОМПАНИЯ SONY НЕ НЕСЕТ
ОТВЕТСТВЕННОСТИ ЗА
КАКОЙ БЫ ТО НИ БЫЛО
УЩЕРБ, ВОЗНИКШИЙ
ВСЛЕДСТВИЕ
НЕСОБЛЮДЕНИЯ МЕР
ПРЕДОСТОРОЖНОСТИ ПРИ
ИСПОЛЬЗОВАНИИ
УСТРОЙСТВ ПЕРЕДАЧИ
ДАННЫХ, НЕИЗБЕЖНЫХ
УТЕЧЕК ИНФОРМАЦИИ,
СВЯЗАННЫХ СО
СПЕЦИФИКАЦИЯМИ
ПЕРЕДАЧИ ДАННЫХ, ИЛИ
ПРОБЛЕМ БЕЗОПАСНОСТИ
ЛЮБОГО РОДА.
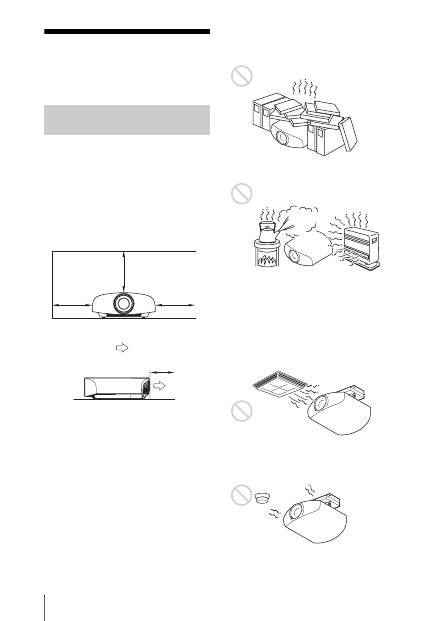
RU
6
Примечания по установке и эксплуатации
Не размещайте устройство в
следующих условиях, которые могут
привести к неисправности или
повреждению устройства.
Рядом со стенами
Для обеспечения производительности
и надежности устройства оставьте
место между стенами и устройством,
как показано на рисунке.
Оставьте как минимум 5 см между
стеной и стороной устройства с
выпускным отверстием. Имейте в
виду, что стена за устройством может
нагреваться.
Помещение с плохой вентиляцией
Оставьте вокруг устройства
минимальное пространство в 30 см.
Жаркое и влажное помещение
Помещения, подверженные
воздействию потока холодного
или теплого воздуха из
кондиционера
Установка в таком месте может
привести к неисправности устройства
вследствие конденсации влаги или
повышения температуры.
Рядом с датчиком тепла или дыма
Это может привести к ложному
срабатыванию датчика.
Недопустимые варианты
установки
30 см
30 см
30 см
5 см
: выпуск
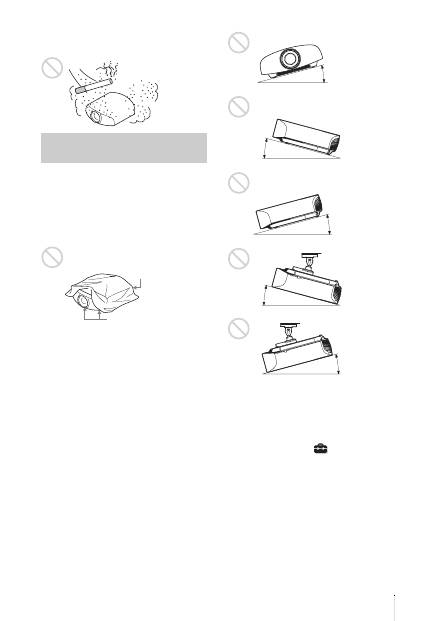
7
RU
Сильно запыленные или сильно
задымленные помещения
При использовании данного
устройства запрещается выполнять
следующие операции.
Блокировка вентиляционных
отверстий (впускные и
выпускные)
Наклон вперед/назад и вправо/
влево
Избегайте использования устройства
с наклоном под углом более 15
градусов.
Устанавливайте устройство только на
ровной поверхности или на потолке.
Установка устройства в таком месте
может привести к искажению цветов
или снижению надежности работы
лампы.
Если устройство наклонено вверх или
вниз, изображение на экране может
быть трапецеидальным.
Расположите устройство таким
образом, чтобы объектив находился
параллельно экрану.
Установка устройства на большой
высоте над уровнем моря
При использовании устройства на
высоте 1500 м или выше установите
для параметра “Установки охлажд” в
меню “Настройка”
значение
“Высокий”. Если не установить этот
режим при использовании устройства
высоко над уровнем моря, это может
привести к неблагоприятным
последствиям, например к
уменьшению надежности некоторых
компонентов.
Недопустимые условия
эксплуатации
Вентиляционные
отверстия (впускные)
Вентиляционные
отверстия
(выпускные)
15° или
более
15° или
более
15° или
более
15° или
более
15° или
более

RU
8
• Не пытайтесь установить проектор
на потолке или переместить его
самостоятельно. Обязательно
проконсультируйтесь с
квалифицированным персоналом
компании Sony, компетентным в
данном вопросе.
• Устанавливая устройство на
потолке, обязательно используйте
страховочный шнур или другие
средства для предотвращения
падения устройства. Доверьте
установку опытному специалисту по
монтажу.
Информация для дилеров
• Для установки проектора на потолке
необходимо использовать
кронштейн производства компании
Sony или аналогичное
рекомендованное крепление.
• При установке на потолок плотно
закрывайте крышку корпуса.
Меры предосторожности
при установке устройства
на потолке

9
RU
Проверьте упаковку на наличие
следующих элементов.
• Пульт дистанционного управления
RM-PJ22 (1)
• Марганцевые батарейки размера
AA (R6) (2)
• Кабель питания переменного тока
для проектора (1)
• Держатель штекера (1)
• Крышка входа переменного тока (1)
• 3D-очки (2)
• Чехол для 3D-очков (2)
• Зарядный USB-адаптер
переменного тока (AC-UD10) (1)
Спецификации
Входное напряжение: от 100 до
240 В переменного тока, 0,2 А,
50/60 Гц
Номинальное выходное
напряжение: 5 В постоянного тока,
1,5 А
Следуйте представленным выше
требованиям к источнику питания.
• Кабель питания переменного тока
для зарядного USB-адаптера
переменного тока (1)
• Зарядный USB-кабель (1,2 м) (1)
• Краткое справочное руководство
(данное руководство) (1)
• Инструкция по эксплуатации
(компакт-диск) (1)
ОСТОРОЖНО
При неправильной замене элементов
питания возникает опасность взрыва.
Используйте для замены только
идентичные или эквивалентные
элементы питания, рекомендуемые
изготовителем.
При утилизации отработанных
элементов питания необходимо
следовать правилам, действующим в
соответствующем регионе или стране.
Установка батарей
К пульту дистанционного управления
прилагаются две батареи размера AA
(R6).
Чтобы избежать опасности взрыва,
используйте марганцевые или
щелочные батареи размера AA (R6).
Подготовка Шаг 1.
Проверка аксессуаров из
комплекта поставки
Примечание
Установка батарей в пульт
дистанционного
управления
Нажмите и сдвиньте,
чтобы открыть.
Вставьте батареи
стороной
E
.
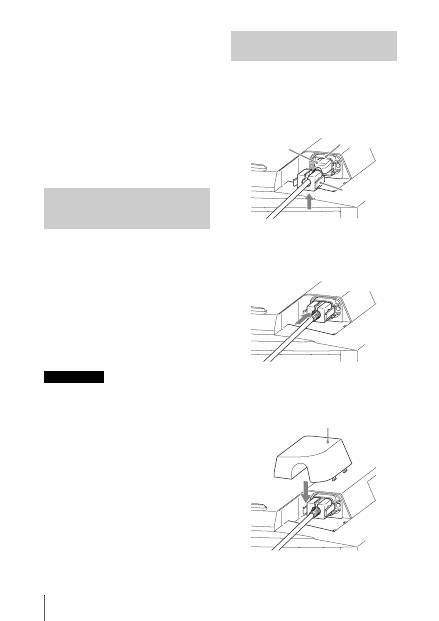
RU
10
Предупреждение относительно
использования пульта
дистанционного управления
• Бережно обращайтесь с пультом
дистанционного управления. Не
бросайте его, не наступайте на него
и не проливайте на него никакие
жидкости.
• Не оставляйте пульт
дистанционного управления вблизи
источников тепла или в месте,
подверженном прямому
воздействию солнечных лучей, или
во влажном помещении.
Руководство можно открыть с
помощью компьютера, на котором
установлена программа Adobe
Reader.Программу Adobe Reader
можно бесплатно скачать с веб-сайта
Adobe.
1
Откройте файл index.html на
компакт-диске.
2
Выберите нужное руководство и
щелкните по нему.
В случае утери или повреждения
компакт-диска новый диск можно
приобрести у ближайшего дилера Sony
или в сервисном центре Sony.
1
Вставьте кабель питания
переменного тока в гнездо AC
IN, затем подключите держатель
штекера к кабелю питания
переменного тока.
2
Сдвиньте держатель штекера по
кабелю питания переменного
тока для крепления к устройству.
3
Установите крышку входа
переменного тока на устройство.
Использование
руководства на компакт-
диске
Примечание
Подключение кабеля
питания переменного тока
Держатель
штекера
(прилагается)
Кабель питания
переменного тока
(прилагается)
Гнездо AC IN
Крышка входа переменного
тока (прилагается)
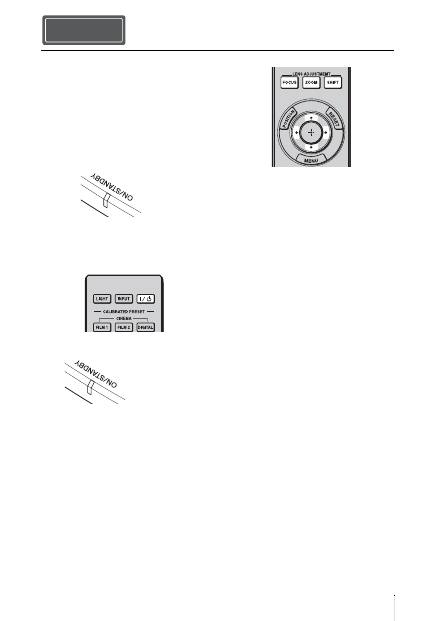
11
RU
1
Расположите устройство
параллельно экрану.
2
После подключения кабеля
питания переменного тока к
устройству подключите кабель
питания переменного тока к
сетевой розетке.
3
Нажмите кнопку
?
/
1
(ON/
STANDBY), чтобы включить
устройство.
4
Выполните проецирование
изображения на экран, затем
отрегулируйте фокус, размер и
положение.
a
Отрегулируйте фокусное
расстояние.
Нажмите кнопку LENS
ADJUSTMENT (FOCUS), чтобы
отобразить окно регулировки
“Фокус объект.” (тестовый
образец). Отрегулируйте затем
фокус изображения с помощью
кнопок
M
/
m
/
<
/
,
.
b
Отрегулируйте размер
изображения.
Нажмите кнопку LENS
ADJUSTMENT (ZOOM), чтобы
отобразить окно регулировки
“Вариообъектив” (тестовый
образец). Отрегулируйте затем
размер изображения с помощью
кнопок
M
/
m
/
<
/
,
.
c
Отрегулируйте положение
изображения.
Нажмите кнопку LENS
ADJUSTMENT (SHIFT), чтобы
отобразить окно регулировки
“Сдвиг объект.” (тестовый
образец). Отрегулируйте
надлежащее положение
изображения с помощью кнопок
M
/
m
/
<
/
,
.
Установка устройства Шаг 2.
Горит
красным
цветом.
Передняя часть устройства
Мигает зеленым в
течение
нескольких
десятков секунд,
затем горит
зеленым.
Передняя часть устройства
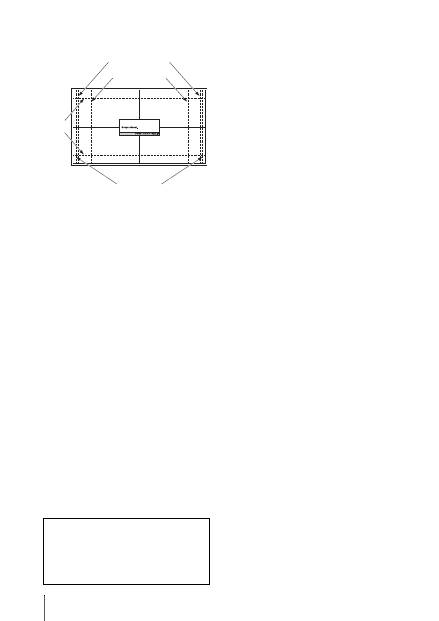
RU
12
Окно регулировки объектива
(тестовый образец)
1.78:1 (16:9)
2.35:1
1.85:1
1.33:1 (4:3)
Пунктирные линии указывают на размеры
экрана каждого форматного соотношения.
Для получения дополнительной
информации см. раздел “Соединения
и подготовка” в документе
Инструкция по эксплуатации,
содержащемся на прилагаемом
компакт-диске.
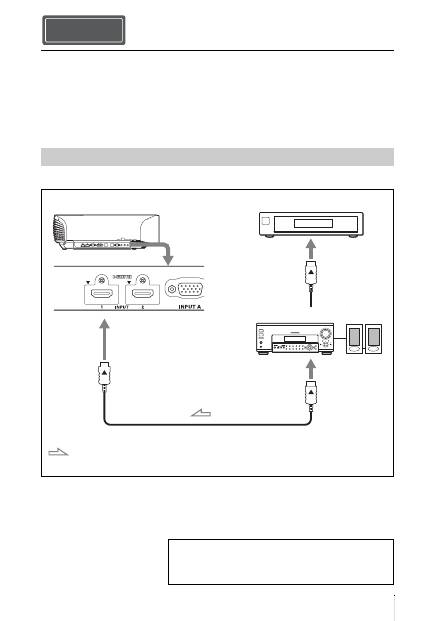
13
RU
При подключении выполните следующие действия.
• Выключите все оборудование перед выполнением любых подключений.
• Используйте соответствующий кабель для каждого соединения.
• Вставьте штекеры кабеля надлежащим образом; ненадежное соединение
штекеров может привести к неисправности или низкому качеству изображения.
При отсоединении кабеля тяните за штекер, а не за сам кабель.
• См. инструкции по эксплуатации подключенного оборудования.
Подключение оборудования с выходными разъемами HDMI
Подключение устройства Шаг 3.
Подключение к видеомагнитофону
Кабель HDMI (не прилагается)
: видеосигнал
Правая сторона устройства
Оборудование с выходными
разъемами HDMI
К выходу HDMI
Аудио-/видеоусилитель
Динамики
При использовании дополнительного кабеля HDMI
используйте кабель Sony HDMI или другой кабель с
логотипом HDMI.
Для получения дополнительной информации см.
раздел “Соединения и подготовка” в документе
Инструкция по эксплуатации, содержащемся на
прилагаемом компакт-диске.

RU
14
Подключение оборудования с компонентными выходными
видеоразъемами
Компонентный видеокабель (не прилагается)
: видеосигнал
Оборудование с
компонентными выходными
видеоразъемами
Правая сторона устройства
Аудио-/видеоусилитель Динамики
Для получения дополнительной информации см.
раздел “Соединения и подготовка” в документе
Инструкция по эксплуатации, содержащемся на
прилагаемом компакт-диске.

15
RU
Подключение к компьютеру
Кабель с 15-контактным разъемом HD-Dsub (не прилагается) или
кабель HDMI (не прилагается)
: видеосигнал
Правая сторона устройства
к выходу на монитор
Компьютер
При использовании дополнительного кабеля HDMI
используйте кабель Sony HDMI или другой кабель с
логотипом HDMI.
Для получения дополнительной информации см.
раздел “Соединения и подготовка” в документе
Инструкция по эксплуатации, содержащемся на
прилагаемом компакт-диске.
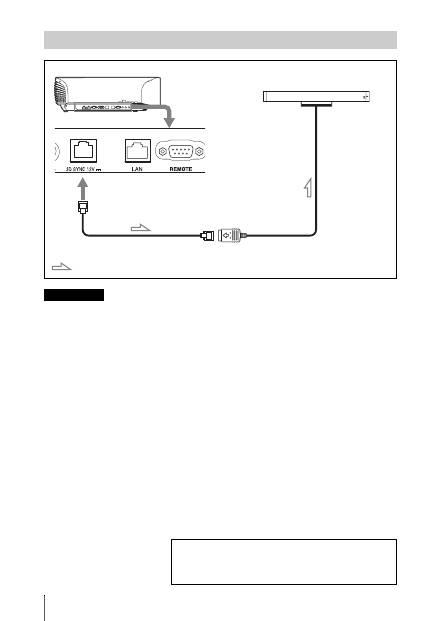
RU
16
Можно использовать передатчик 3D-сигнала отдельно от данного устройства с
помощью дополнительного кабеля LAN (прямой).
Если при использовании присутствуют помехи постоянных определенных частот,
синхронизация сигнала 3D-изображения и 3D-очков может быть потеряна. В данном
случае используйте кабель LAN категории 7.
При просмотре 3D-изображений в среде с большим количеством помех используйте
внутренний передатчик.
Подключение к передатчику 3D-сигнала
Примечание
Правая сторона устройства
Передатчик 3D-сигнала (не прилагается)
Кабель LAN (не прилагается)
: поток 3D-сигнала
Для получения дополнительной информации см.
раздел “Соединения и подготовка” в документе
Инструкция по эксплуатации, содержащемся на
прилагаемом компакт-диске.
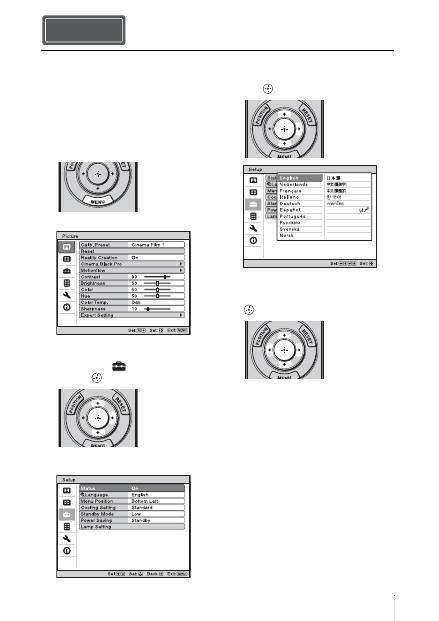
17
RU
Для отображения меню и других
экранных индикаторов можно
выбрать один из 16 языков. По
умолчанию установлен английский
язык. Для изменения текущего языка
меню выберите необходимый язык в
экране меню.
1
Нажмите кнопку MENU.
Появится меню.
2
Нажмите
M
/
m
, чтобы выбрать
меню Setup
, затем нажмите
,
или
.
Отобразятся настройки элементов
выбранного меню.
3
Нажмите
M
/
m
, чтобы выбрать
“Language”, затем нажмите
,
или .
4
Нажмите
M
/
m
/
<
/
,
, чтобы
выбрать язык, затем нажмите
.
Язык меню изменится на
выбранный язык.
Закрытие меню
Нажмите кнопку MENU.
Выбор языка меню Шаг 4.
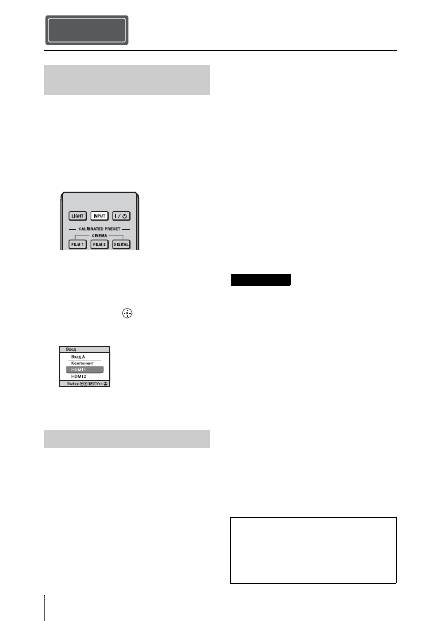
RU
18
1
Включите устройство и
оборудование, подключенное к
устройству.
2
Нажмите INPUT для
отображения панели входа на
экране.
3
Выберите оборудование, с
которого следует отображать
изображения.
Нажимайте повторно INPUT или
нажмите
M
/
m
/
(ввод) для
выбора оборудования, с которого
следует выполнять проецирование.
1
Нажмите кнопку
?
/
1
(ON/
STANDBY).
На экране отобразится сообщение
“ПИТАНИЕ ВЫКЛ?”.
2
Нажмите кнопку
?
/
1
(ON/
STANDBY) еще раз до того, как
сообщение исчезнет.
Закроется защитная крышка
объектива. Следите за тем, чтобы
не защемить пальцы или другие
объекты.
Индикатор ON/STANDBY будет
мигать зеленым, а вентилятор
продолжать работать для
внутреннего охлаждения. Сначала
индикатор ON/STANDBY мигает
быстро, при этом время не удастся
зажечь индикатор ON/STANDBY
нажатием кнопки
?
/
1
(ON/
STANDBY).
Вентилятор остановится, а
индикатор ON/STANDBY изменит
состояние, он перестанет мигать
зеленым и будет гореть красным.
Питание будет полностью отключено,
можно отсоединить кабель питания
переменного тока.
Никогда не отсоединяйте кабель
питания переменного тока, когда мигает
индикатор.
Можно отключить устройство,
удерживая кнопку
?
/
1
(ON/STANDBY) в
течение около 1 секунды, не выполняя
вышеуказанные действия.
Проецирование Шаг 5.
Проецирование
изображения
Выключение питания
Пример: для просмотра изображения с
видеооборудования, подключенного к
разъему HDMI 1 данного устройства.
Примечание
Для получения дополнительной
информации см. раздел
“Проецирование” в документе
Инструкция по эксплуатации,
содержащемся на прилагаемом
компакт-диске.
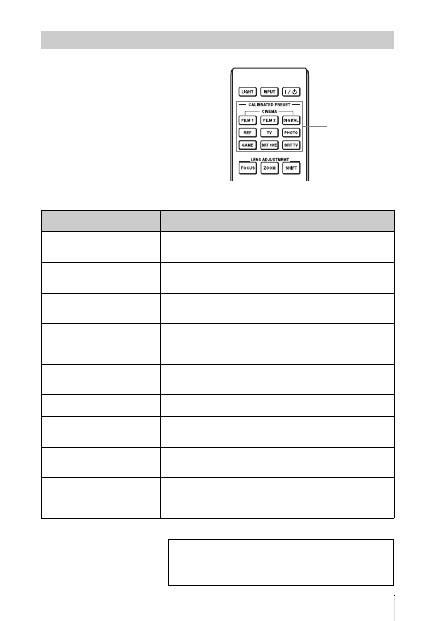
19
RU
Нажмите одну из кнопок
CALIBRATED PRESET.
Выбор режима просмотра изображений
Кнопки
CALIBRATED
PRESET
Настраиваемые
элементы
Описание
CINEMA FILM 1
Качество изображения, подходящее для
воспроизведения высокодинамичных и четких
изображений, типичных для позитивов.
CINEMA FILM 2
Качество изображения, подходящее для
воспроизведения насыщенных и цветных изображений,
типичных для кинотеатров.
CINEMA DIGITAL
Качество изображений, подходящее для
воспроизведения цифровых изображений с эффектом
изображения в кинотеатре со спецификациями DCI.
REF
Настройка качества изображения, подходящая для
воспроизведения достоверного оригинального
изображения или отображения качества изображения
без каких-либо регулировок.
TV
Качество изображения, подходящее для просмотра
телевизионных программ, спортивных мероприятий,
концертов и др.
PHOTO
Идеально подходит для проецирования фотоснимков,
снятых цифровой камерой.
GAME
Качество изображения, подходящее для игр с хорошо
модулированными цветами и малым временем
отклика.
BRT CINE
Качество изображения, подходящее для просмотра
фильмов в условиях яркого освещения, например в
гостиной.
BRT TV
Качество изображения, подходящее для просмотра
телевизионных программ, спортивных мероприятий,
концертов и других видеоизображений в условиях
яркого освещения, например в гостиной.
Для получения дополнительной информации см.
раздел “Проецирование” в документе
Инструкция по эксплуатации, содержащемся на
прилагаемом компакт-диске.
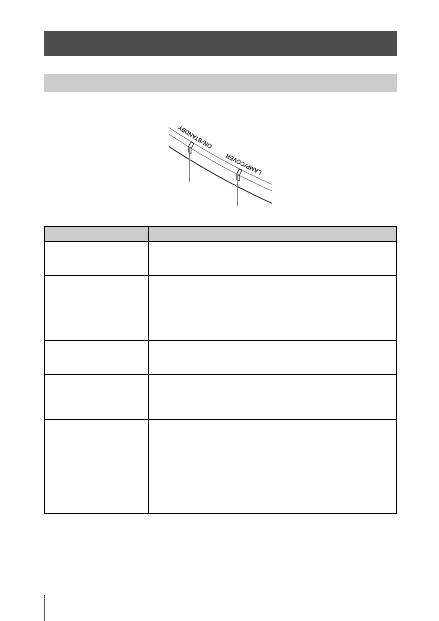
RU
20
Индикатор ON/STANDBY или LAMP/COVER загорается или мигает в случае
неисправности проектора.
Устранение ошибок
Предупреждающие индикаторы
Симптом
Вероятная причина и метод устранения
LAMP/COVER мигает
красным. (Мигает
сериями по 2 вспышки)
c
Надежно закройте крышку лампы, затем надежно
затяните винты.
LAMP/COVER мигает
красным. (Мигает
сериями по 3 вспышки)
c
Чрезмерно высокая температура лампы. Выключите
питание, дайте лампе остыть, затем снова включите
питание.
c
Если симптомы остались, возможно, подходит конец
срока службы лампы. В этом случае установите новую
лампу.
ON/STANDBY мигает
красным. (Мигает
сериями по 4 вспышки)
c
Вентилятор вышел из строя. Обратитесь к
квалифицированному персоналу Sony.
ON/STANDBY мигает
красным. (Мигает
сериями по 2 вспышки)
c
Необычно высокая внутренняя температура.
Убедитесь, что ничто не блокирует вентиляционные
отверстия и устройство не используется высоко над
уровнем моря.
ON/STANDBY мигает
красным. (Мигает
сериями по 6 вспышки)
c
Нажмите кнопку
?
/
1
(ON/STANDBY), чтобы
включить устройство. Если питание не включено,
отключите кабель питания переменного тока, затем
убедитесь, что индикатор ON/STANDBY выключен.
После 10 секунд заново подключите кабель питания
переменного тока и включите питание снова. Если
индикатор все еще горит, электрическая система
неисправна. Обратитесь к квалифицированному
персоналу Sony.
Индикатор ON/STANDBY
Индикатор LAMP/COVER
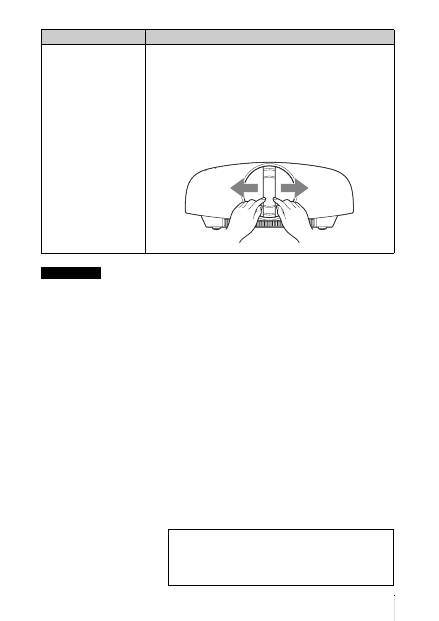
21
RU
Если начинает мигать предупреждающий индикатор, отличный от вышеуказанных, и
симптомы остаются даже после выполнения вышеуказанных действий, обратитесь к
квалифицированному персоналу Sony.
ON/STANDBY мигает
красным. (Мигает
сериями по 5 вспышки)
c
Защитная крышка объектива открыта не полностью.
Выключите питание устройства, а затем включите
снова. Если защитная крышка объектива открыта не
полностью, обратитесь к квалифицированному
персоналу Sony.
Совет
В экстренной ситуации см. иллюстрацию ниже для
открытия защитной крышки объектива руками. Нажмите
кнопку
?
/
1
(ON/STANDBY), чтобы включить устройство и
начать управление.
Примечание
Симптом
Вероятная причина и метод устранения
При возникновении каких-либо проблем или
отображении сообщения об ошибке на экране см.
раздел “Поиск и устранение неисправностей” в
документе Инструкция по эксплуатации,
содержащемся на прилагаемом компакт-диске.
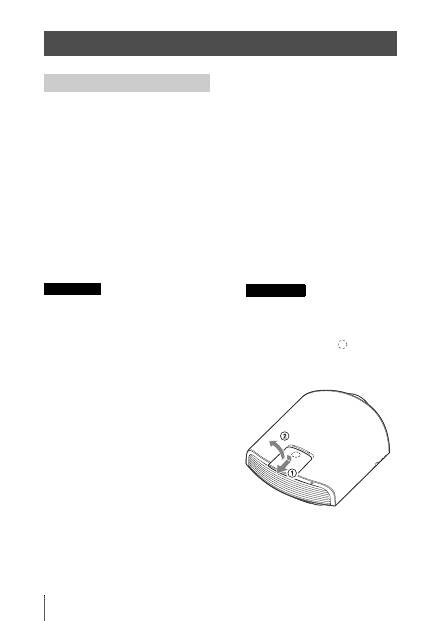
RU
22
Лампа, используемая в качестве
источника питания, имеет
определенный срок службы. Если
лампа тускнеет, баланс цвета
становится странным или на экране
отображается сообщение “Замените,
пожалуйста, лампу.”, подошел конец
срока службы лампы.
Незамедлительно замените лампу на
новую (не прилагается).
Потребуются следующие
инструменты:
•
Лампа проектора LMP-H330
(дополнительно)
•
Стандартная крестообразная
отвертка
•
Ткань (для защиты от царапин)
• После выключения устройства с
помощью кнопки
?
/
1
(ON/STANDBY)
лампа остается горячей. Касание
лампы может привести к ожогу
пальцев. Перед заменой лампы
подождите как минимум 1 час, чтобы
дать лампе остыть.
• Не прикасайтесь к поверхности
объектива. При касании сотрите
отпечатки пальцев мягкой тканью.
• Соблюдайте особую осторожность
при замене лампы, если устройство
установлено на потолке.
• При замене лампы устройства,
установленного на потолке, не
вставайте непосредственно под
крышкой лампы. При снятии дверцы
лампы (внутренняя крышка), следите,
чтобы она не крутилась.
В случае взрыва лампы фрагменты
могут стать причиной травмы.
• При извлечении лампы удерживайте
ее в горизонтальном положении, а
затем поднимите прямо вверх. Не
наклоняйте лампу. Если во время
извлечения лампы под наклоном
лампа разобьется, разлетающиеся
осколки могут причинить травму.
1
Выключите питание и
выключите из розетки вилку
кабеля питания переменного
тока.
2
При установке устройства на
плоской поверхности, например
на столе и т.д., положите ткань во
избежание появления царапин на
поверхности. Положите
устройство на ткань.
Убедитесь, что устройство
расположено на устойчивой
поверхности.
3
При нажатии части
,
указанной на рисунке крышки
лампы, сдвиньте
1
и откройте
крышку лампы
2
.
Техническое обслуживание
Замена лампы
Осторожно
Примечание
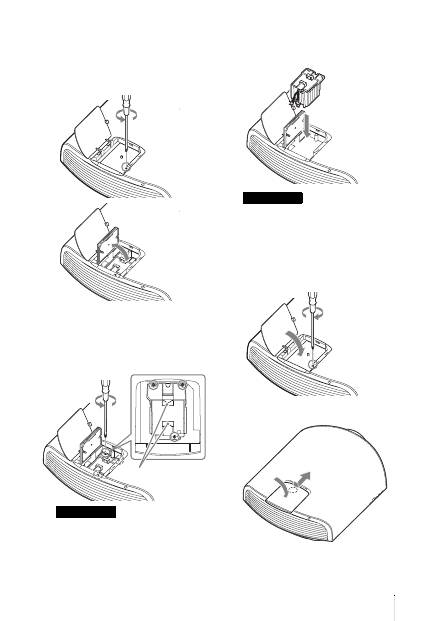
23
RU
4
Ослабьте винт дверцы лампы
(внутренняя крышка)
крестообразной отверткой,
затем откройте дверцу лампы.
5
Ослабьте 3 винта на лампе
крестообразной отверткой.
Удерживая зажим, извлеките
лампу без перекоса.
Удерживайте лампу за зажим при
извлечении и установке лампы.
6
Вставьте новую лампу, надежно
удерживая за зажим, до конца,
затем затяните 3 винта.
Соблюдайте осторожность, не
прикасайтесь к оптическому блоку
внутри устройства.
7
Закройте дверцу лампы
(внутренняя крышка), затем
затяните винт.
8
Закройте крышку лампы.
Примечание
Зажим
Примечание
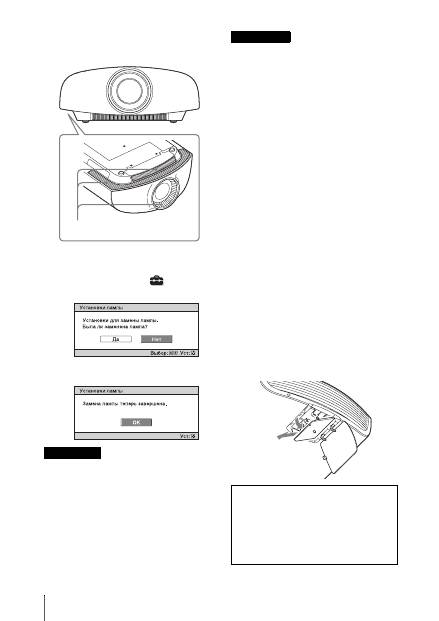
RU
24
9
Сотрите пыль с вентиляционных
отверстий (впускные) мягкой
тканью.
10
Включите устройство, затем
выберите требуемый элемент в
меню “Настройка”
.
Отобразится следующий экран.
11
Выберите “Да”.
Не засовывайте руки внутрь паза,
служащего для замены лампы, и не
допускайте попадания в паз жидкостей
или инородных предметов, чтобы
исключить риск возгорания и
поражения электрическим током.
• Используйте лампу проектора LMP-
H330 для замены. При использовании
ламп, отличных от LMP-H330, это
может привести к повреждению
устройства.
• Выключайте устройство и
отсоедините кабель питания перед
заменой лампы, убедитесь, что
индикатор ON/STANDBY не горит.
• Устройство не включится, пока лампа
не будет надежно установлена.
• Устройство не включится, пока не
будет надежно закрыта крышка
лампы.
• Для отмена отображения сообщения
на экране нажмите любую кнопку на
пульте дистанционного управления
или на панели управления устройства.
Примечание относительно замены
разбитой лампы при установке
устройства на потолке
Если лампа разобьется,
разлетающиеся осколки могут
причинить травму.
Если устройство установлено на
потолке, снимите дверцу лампы
(внутренняя крышка), медленно
сдвинув ее по горизонтали и подняв в
открытом положении на 30 градусов.
Следите, чтобы дверца лампы
(внутренняя крышка) не крутилась.
Осторожно
Вентиляционные отверстия
(впускные)
Примечания
Примечание
Лампа содержит ртуть. Правила
утилизации использованных
люминесцентных ламп зависят от
места проживания. Следуйте политике
утилизации отходов, применяемой в
области проживания.
30°

