Sony CDX-4000RV RU: Turning the unit on/off Setting the clock How to use the menu
Turning the unit on/off Setting the clock How to use the menu: Sony CDX-4000RV RU
Table of contents
- Welcome ! Precautions
- Notes on CDs
- Table of Contents
- Location of controls
- Resetting the unit Detaching the front panel
- Turning the unit on/off Setting the clock How to use the menu
- Listening to a CD
- Automatically scrolling a disc name Locating a specific track — Auto Scroll — Automatic Music Sensor (AMS) Locating a specific point in a track — Manual Search
- Playing a CD in various modes Memorising stations automatically — Best Tuning Memory (BTM)
- Receiving the memorised stations Memorising only the desired stations
- Overview of the RDS function Displaying the station name
- Retuning the same programme automatically
- Listening to traffic announcements
- Presetting the RDS stations with the AF and TA data
- Locating a station by programme type
- Setting the clock automatically Labelling the rotary commander (optional)
- Using the rotary commander (optional)
- Adjusting the sound characteristics
- Attenuating the sound Changing the sound and display settings
- Boosting the bass sound Maintenance
- Cleaning the connectors Dismounting the unit
- Specifications
- Troubleshooting guide General CD playback
- Radio reception RDS
Turning the unit on/off
Setting the clock
Turning on the unit
The clock uses a 24-hour digital indication.
Press (SOURCE) or insert a CD in the unit. For
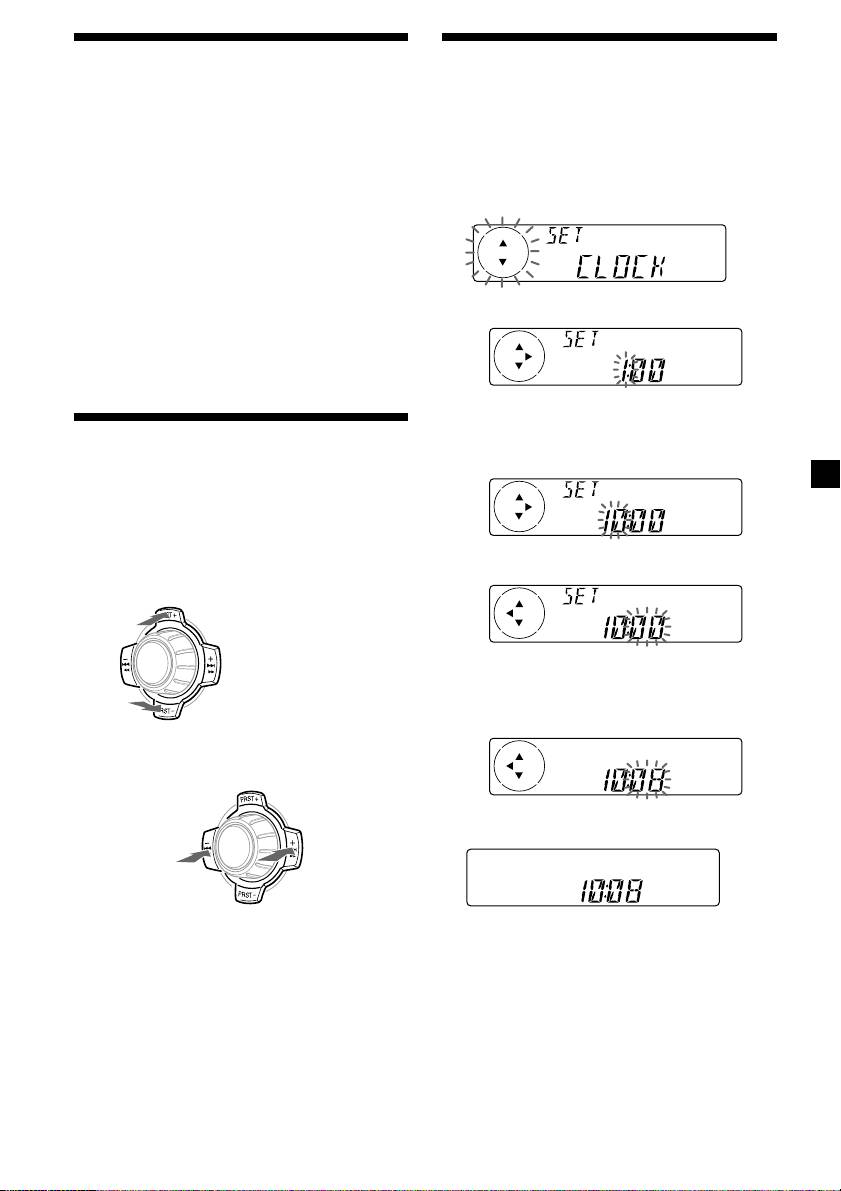
Example: To set the clock to 10:08
details on operation, refer to page 8 (CD) and
page 10 (radio).
1 Press (MENU), then press either side of
(PRST) repeatedly until “CLOCK”
Turning off the unit
appears.
Press (OFF) to stop CD playback or radio
reception (the key illumination and display
remain on.)
Press (OFF) for two seconds to completely
turn the unit off.
1 Press (ENTER).
Note
If your car has no ACC position on the ignition key
switch, be sure to turn the unit off by pressing
(OFF) for two seconds to avoid car battery wear.
The hour indication flashes.
How to use the menu
2 Press either side of (PRST) to set the
hour.
This unit is operated by selecting items from a
menu.
To select, first enter the menu mode and
choose up/down ((+)/(–) of (PRST)), or
choose left/right ((–)/(+) of (SEEK/AMS)).
3 Press the (+) side of (SEEK/AMS).
(PRST)
(+): to select upwards
SOURCE
The minute indication flashes.
4 Press either side of (PRST) to set the
(–): to select downwards
minute.
(SEEK/AMS)
2 Press (ENTER).
(–): to select
(+): to select
SOURCE
leftwards
rightwards
Note
The clock starts.
In Menu mode the “v” in the left of the display
indicates the selectable buttons of (PRST) and
After the clock setting is completed, the
(SEEK/AMS).
display returns to normal play mode.
Tip
You can set the clock automatically with the RDS
feature (see page 12).
Note
When the D.INFO mode is set to ON, the time is
always displayed, provided that the M.DSPL is set
to OFF (page 20).
7
