Canon GPS RECEIVER GP-E2 – страница 3
Инструкция к Canon GPS RECEIVER GP-E2

Conventions Used in this Manual
Meaning of Symbols
: Warning to prevent shooting problems.
: Supplemental information.
(p.**) : Reference page numbers for more information.
The icons and markings indicating the receiver’s controls and settings
used in the manual correspond to the icons and marking on the camera
and on the receiver.
Basic Assumptions
All operations in this manual assume that the power switches of both
the camera and receiver are set to <
ON
>.
The EOS 5D Mark III is used as an example for illustrations and
screens in this manual. Note that the screens displayed on your
camera may differ, depending on the camera model used.
Windows is a trademark or registered trademark of Microsoft
Corporation in the United States and other countries.
Macintosh is a registered trademark of Apple Inc. in the United
States and other countries.
Google™ , Google Maps™ , and Google Earth™ are
trademarks of Google Inc.
Map Utility uses Google Maps™ to display images and routes
traveled on a map.
All other corporate and brand names in this manual are
trademarks or registered trademarks of their respective owners.
7
COPY
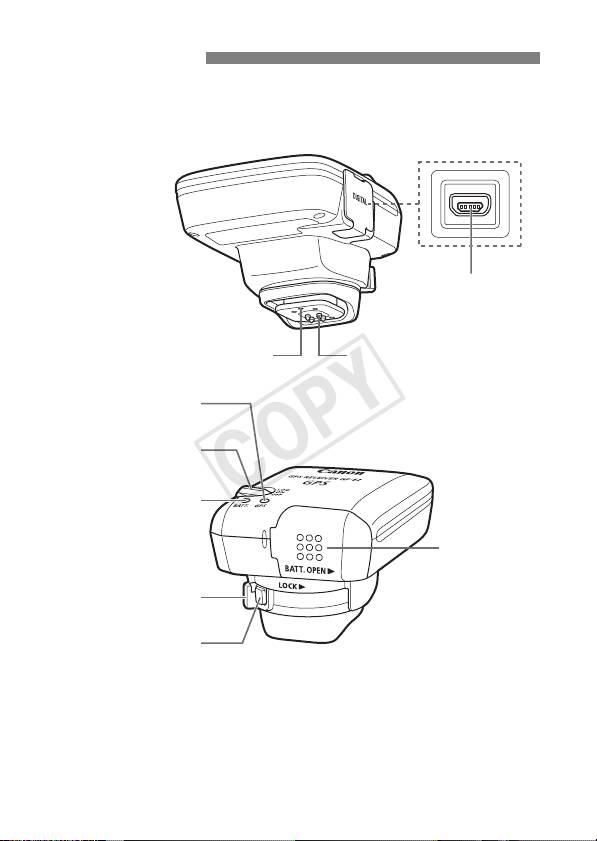
Nomenclature
<C> terminal
Mounting foot locking pin
Contacts
Signal acquisition
indicator
<
ON
>: Power switch/
<
LOG
>: Logging switch
Battery indicator
Battery
compartment
cover
Mounting foot locking
lever
Release button
8
COPY
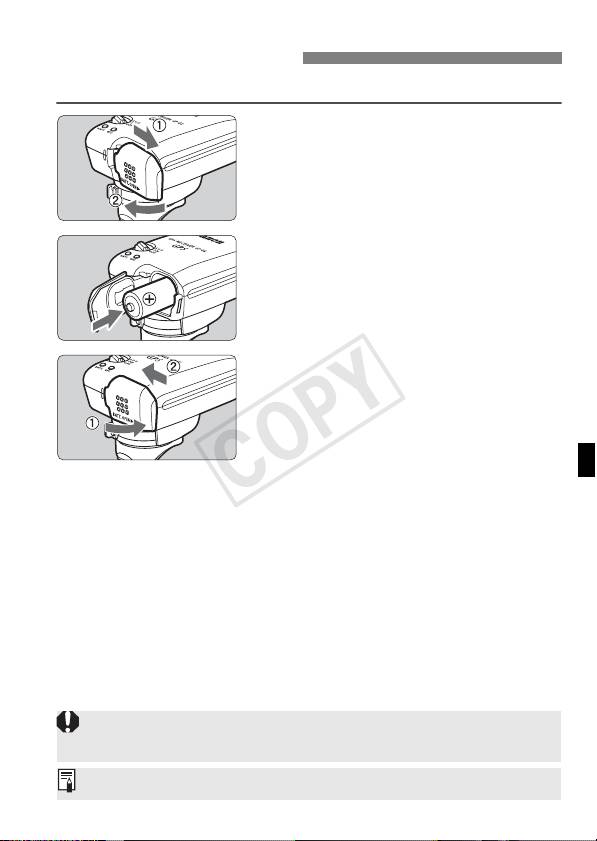
Inserting the Battery
Insert one AA/LR6 battery as follows.
Open the cover.
1
Slide the battery compartment cover
as shown by the arrows to open the
cover.
Insert the battery.
2
Insert the battery with the negative
terminal first, all the way in.
Close the cover.
3
Close the cover and slide it as shown
by the arrows.
Battery Life
The receiver can be used for about 39 hours under default settings with
a new AA/LR6 alkaline battery (based on Canon testing standards).
Battery life varies depending on the positioning interval for location
information, as well as GPS signal conditions (p.19).
Using AA/LR6 batteries other than the alkaline type may cause improper
battery contact due to the irregular shape of battery contacts.
NiMH and Li-ion AA/LR6 batteries can also be used.
9
COPY
Attaching and Detaching the Receiver
The receiver can either be attached directly to your camera or carried
with you in the carrying case.
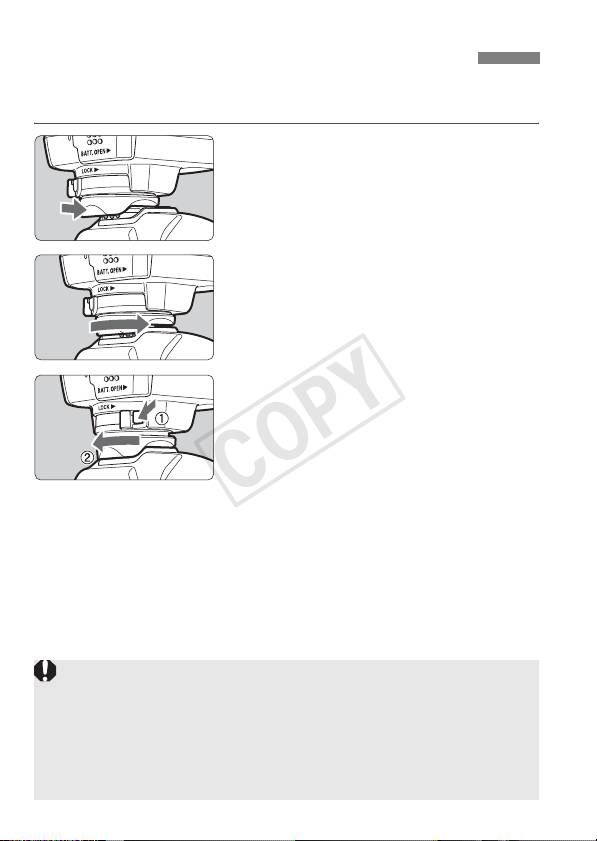
Attach the receiver.
1
Turn off the receiver.
Insert the receiver’s mounting foot
fully into the accessory shoe.
Secure the receiver.
2
Slide the mounting foot locking lever
to the right.
X The locking lever will click into place.
Detach the receiver.
3
Turn off the receiver.
While pressing the release button,
slide the mounting foot locking lever
to the left and detach the receiver
from the camera.
Always make sure to turn the receiver off before attaching or detaching
it.
Attaching the receiver directly to the camera will prevent you from using
the camera’s built-in flash or an external flash unit. To use flash, keep
the receiver in the carrying case and connect it to the camera with the
provided 1.5 m / 4.9 ft. cable, or attach the receiver to the Accessory
Bracket AB-E1 (sold separately, p.28).
10
COPY

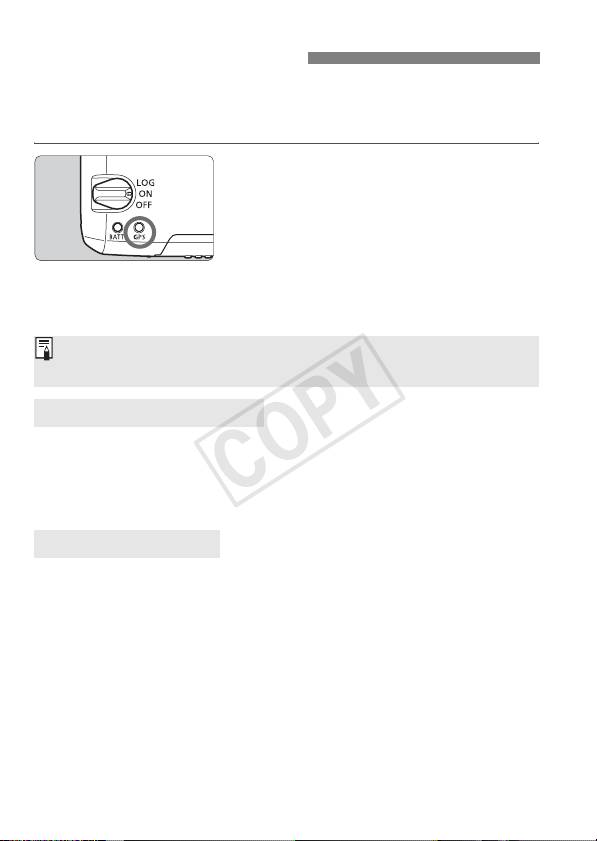
Turning the Receiver On
Checking the battery level
Check the battery level on the <
BATT.
>
indicator.
Slow blinking : Level OK
Fast blinking : Little power left
Off : Replace battery
<
ON
> Position
The receiver functions in this position only with EOS DIGITAL
cameras that display [GPS device settings] in the menu.
Shots taken while the receiver is attached to the camera are
geotagged, adding location information (latitude, longitude,
elevation, and shooting time) to images.
Images can also be tagged with the shooting direction, using the
receiver’s digital compass.
<
LOG
> Position
With the switch in this position, the receiver keeps a record of
location information along the route traveled.
The route can be viewed on a virtual map. Logs can also be used to
geotag images at a later time.
The images that can be geotagged after shooting with logging
information are JPEG and RAW images (file extension: CR2) shot
with EOS DIGITAL cameras.
Movie files can also be geotagged this way at a later time, when using
cameras that display [GPS device settings] in the menu (except with
the EOS 7D).
When the receiver is attached or connected to a camera that
displays the [GPS device settings] menu item, the receiver will
geotag images as you shoot, and periodically log location
information. Images can also be tagged with the shooting direction.
* EOS 7D does not support tagging of the shooting direction.
11
COPY
Acquiring GPS Signals
To acquire GPS signals, bring the receiver outdoors where the sky is
unobstructed and aim it up. Keep your hand or other objects off the top
of the receiver.
Turn the power switch to <
ON
> or <
LOG
>
to start automatic GPS signal acquisition.
To check the acquisition status, watch
the blinking of the red <
GPS
> indicator.
Fast blinking:
Signal not acquired yet
Slow blinking:
Signal acquired
Signal acquisition (indicated by slow blinking) takes about 30 – 60 seconds
under favorable conditions after you turn the receiver on.
Blinking after Acquisition
The receiver blinks every 3 seconds or every 6 seconds. In 6-second
blinking mode, although it blinks every 6 seconds as needed to
conserve battery power, the GPS functions are the same as usual
3-second blinking mode.
Camera <r> Icon
When the receiver is attached or connected to a camera that displays
the [GPS device settings] menu item, GPS signal status is also shown
on the camera LCD panel or LCD monitor (p.14).
Blinking <r>: Signal not acquired yet
Constant <r>: Signal acquired
*The <r> icon is only displayed when the receiver is communicating with the
camera.
12
COPY

Acquiring GPS Signals
Places with Poor GPS Coverage
Location information may not be recorded, or inaccurate information may be
recorded where GPS signal coverage is poor, such as in the following
places.
Indoors, underground, near buildings or in valleys, in tunnels or forests
Near high-voltage power lines or mobile phones operating on the
1.5 GHz band
When the receiver is inside a bag or suitcase
When traveling through different environments
Even in other places, GPS satellite movement may interfere with
geotagging and cause missing or inaccurate location information. The
information may also indicate that the camera has been used in a
different location, even if you are shooting at the same place.
13
COPY
Acquiring GPS Signals
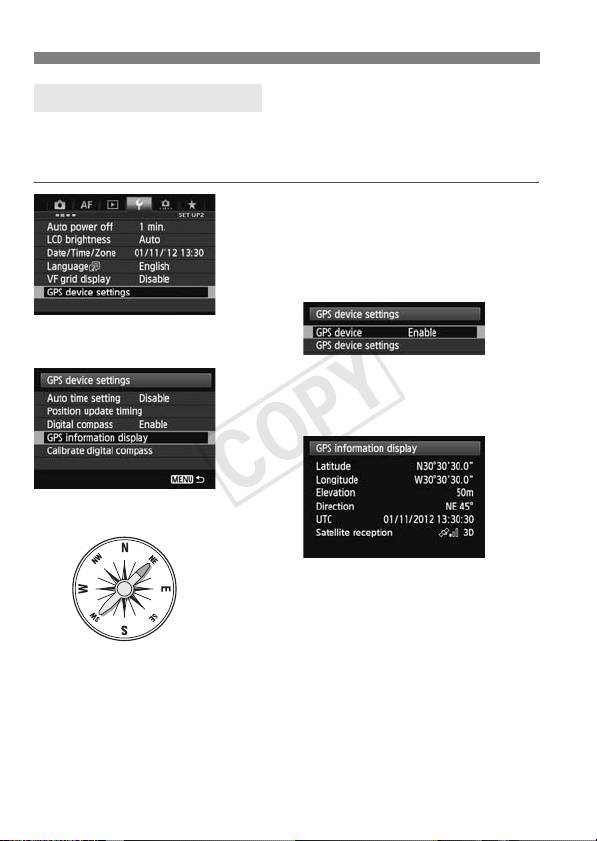
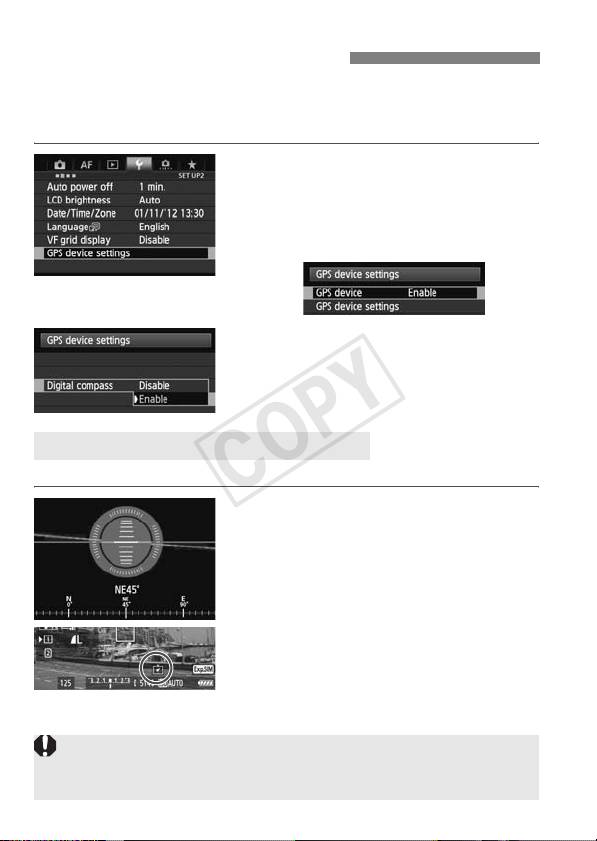
Viewing GPS Information
Check GPS information as follows when the receiver is attached or
connected to a camera that displays [GPS device settings] in the
menu.
Select [GPS device settings].
1
On the EOS-1D X and other models
that display the following screen, set
[GPS device] to [Enable], and then
select [GPS device settings].
Select [GPS information display].
2
X Detailed GPS information is
displayed.
North
0°
In this sample screenshot, [Direction:
West
East
NE 45°] indicates that the camera was
270°
90°
facing 45° northeast.
[UTC] (Coordinated Universal Time) is
South
essentially the same as Greenwich
180°
Mean Time.
The icon <A> indicates signal
conditions. When <C> is displayed,
elevation can also be recorded.
However, elevation cannot be
recorded when <B> is displayed.
14
COPY
Geotagging Images as You Shoot
When the receiver is attached or connected to a camera that displays the
[
GPS device settings
] menu item, images are geotagged as you shoot.
On cameras other than the EOS 7D,
simply shoot with the receiver
attached to your camera. Images can
also be tagged with the shooting
direction.
EOS 7D Users
Plug the end of the cable labeled
<
WFT GPS
> into the receiver’s
<C> terminal. Plug the other
end of the terminal, labeled
<
CAMERA
>, into the camera’s
<
WFT GPS
><
CAMERA
>
<C> terminal.
Do not plug the end of the cable
labeled <
WFT GPS
> into the
camera’s <C> terminal,
which may damage it.
Images cannot be tagged with the
shooting direction.
Geotagging Information
Direction
Latitude
Longitude
Elevation
UTC
For movies, the GPS information acquired when movie shooting starts is
recorded (except with the EOS 7D). Note that signal reception
conditions are not recorded.
When using the receiver at the same time as an external or built-in flash,
attach the receiver to the Accessory Bracket AB-E1 (sold separately, p.28).
15
COPY
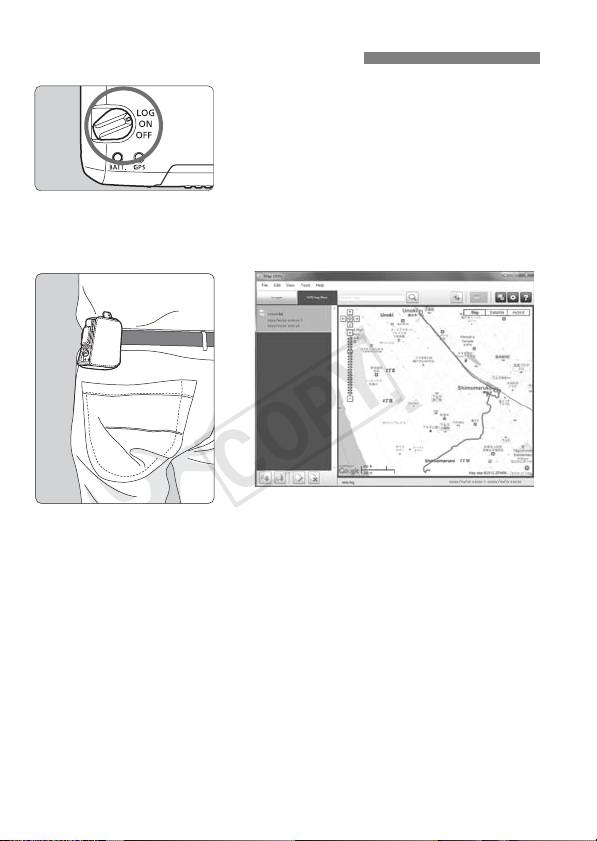
Logging the Route Traveled
Setting the power switch to <
LOG
> will
automatically record location information
along the route traveled on the receiver
itself. (There is no need to connect the
receiver to the camera.)
The recorded location information can be
viewed on a virtual map. Logs can also
be used to geotag images at a later time
(p.25).
Map data ©2012 ZENRIN -
When the receiver is attached or connected to a camera that displays
the [GPS device settings] menu item, the receiver will geotag images
as you shoot, and periodically log location information. Images can also
be tagged with the shooting direction.
* EOS 7D does not support tagging of the shooting direction.
16
COPY

Logging the Route Traveled
Location Information Logs
Location information is recorded at regular intervals along the route
traveled with the receiver, as shown in the positioning interval table.
Daily logs are saved on the receiver itself. The number of days for
which you can store logs depends on the positioning interval you
specify in [Position update timing] (p.18). Log files can be saved or
deleted using the provided software Map Utility.
When the receiver’s internal memory becomes full, the oldest log files
are overwritten with new information, one by one.
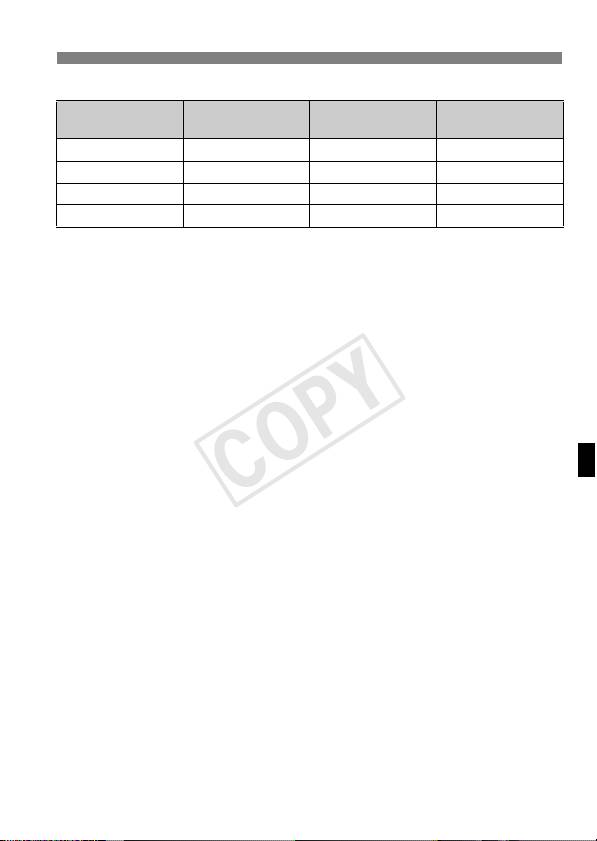
Log File Capacity, by Positioning Interval
Position Update
Position Update
Log Files (Approx.)
Log Files (Approx.)
Timing
Timing
Every second 4.5 days Every 30 sec. 128 days
Every 5 sec. 23 days Every minute 128 days
Every 10 sec. 45 days Every 2 min. 128 days
Every 15 sec. 68 days Every 5 min. 128 days
* Capacity when logging eight hours per day
When carrying the receiver in a bag or suitcase as you travel, make sure
the receiver faces upward and nothing is on top of it.
Set the camera time and date as accurately as possible. Also, on
cameras that support time zones and daylight saving time, use
appropriate settings for the shooting location.
When you use the provided software Map Utility, images are geotagged
by comparing image date/time tags to logged date and time information.
An incorrect date and time setting may prevent accurate geotagging.
Logging also enables subsequent geotagging of JPEG and RAW
images (file extension: CR2) shot with EOS DIGITAL cameras.
Movie files can also be geotagged this way at a later time, when using
cameras that display [GPS device settings] in the menu (except with
the EOS 7D).
17
COPY

Setting the Positioning Interval
You can specify the positioning interval when the receiver is attached or
connected to a camera that displays the [GPS device settings] menu
item. Shorter positioning intervals yield more accurate location
information for your images. However, this also consumes more battery
power.
On cameras without this menu item, the positioning intervals is every 15
seconds by default and can be changed using the provided software
Map Utility.
Select [GPS device settings].
1
On the EOS-1D X and other models
that display the following screen, set
[GPS device] to [Enable], and then
select [GPS device settings].
Select [Position update timing].
2
Select the time.
3
18
COPY
Setting the Positioning Interval
Estimated Battery Life, by Positioning Interval
Position Update
Battery Life
Position Update
Battery Life
Timing
(Approx.)
Timing
(Approx.)
Every second 10 hours Every 30 sec. 39 hours
Every 5 sec. 27 hours Every minute 54 hours
Every 10 sec. 37 hours Every 2 min. 63 hours
Every 15 sec. 39 hours Every 5 min. 92 hours
* With an AA/LR6 alkaline battery.
* At normal temperature (23°C / 73°F).
* Battery life will be shorter when signal conditions are unfavorable.
* The nature of GPS may cause some inconsistency between positioning intervals.
19
COPY
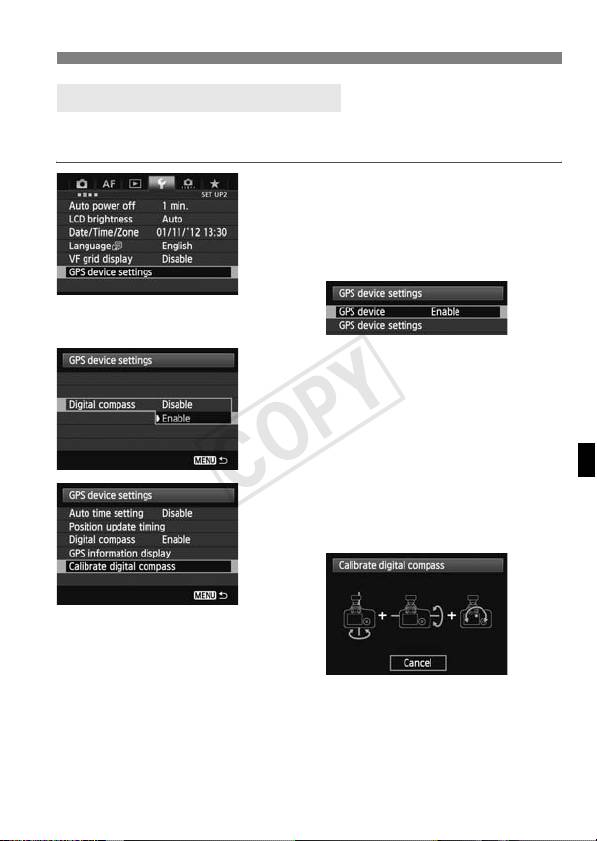
Using the Digital Compass
When the receiver is attached or connected to a camera that displays [
GPS
device settings
] in the menu or mounted on a bracket (p.28), images are
tagged with the direction the receiver is facing (except on the EOS 7D).
Select [GPS device settings].
1
On the EOS-1D X and other models
that display the following screen, set
[GPS device] to [Enable], and then
select [GPS device settings].
Enable the digital compass.
2
Select [Digital compass] and press
<0>.
Select [Enable] and press <0>.
Viewing the Compass When Shooting
You can see which direction the camera is facing as you shoot.
To view the compass, press the
<B> button or <B> button.
Cameras equipped with an electronic
level will display the compass with the
level.
The compass is also displayed in Live
View or movie shooting.
Images will not be tagged with the correct shooting direction unless the
camera and receiver are facing exactly the same direction.
The direction is not logged.
20
COPY
Using the Digital Compass
Calibrating the Digital Compass
Calibrate the digital compass at the shooting location. Also calibrate the
compass if the direction shown as you shoot seems incorrect.
Select [GPS device settings].
1
On the EOS-1D X and other models
that display the following screen, set
[GPS device] to [Enable], and then
select [GPS device settings].
Set [Digital compass] to [Enable].
2
Select [Calibrate digital
3
compass].
Press <0> to prepare for calibration.
Move the camera as shown on the
next page.
21
COPY
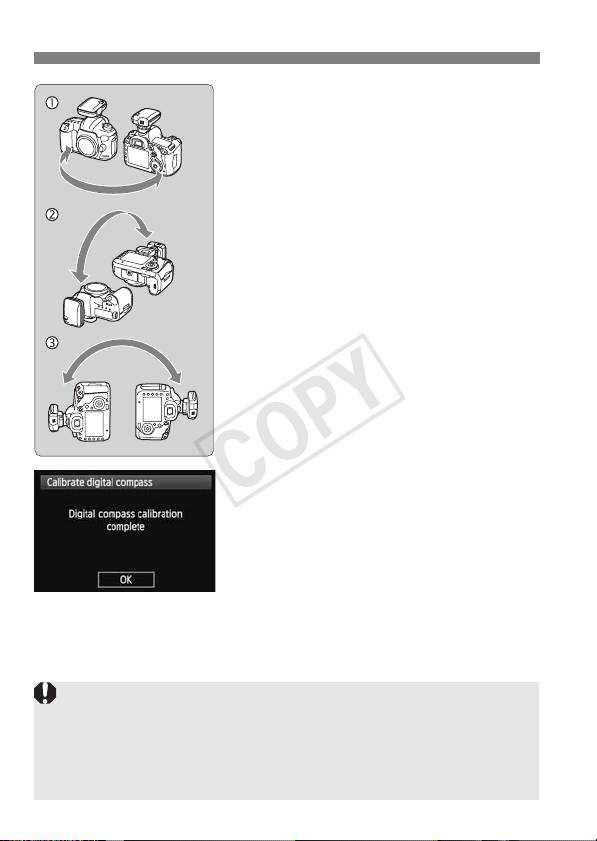
Using the Digital Compass
Move the camera.
4
c Wave the camera laterally in at least
a 180° arc.
d Wave the camera up and down in at
least a 180° arc.
e Rotate the camera in at least a 180°
arc as it faces the same direction.
Be careful not to drop the camera
during calibration.
Steps
c, d, and e can be done in
any order. Keep moving the camera
until calibration is finished.
If the compass is not calibrated after
you do this, turn your body to the right
or left and move the camera again.
Finish calibration.
5
A screen indicating completion is
displayed when calibration is finished.
Although this screen may be
displayed while you are still moving
the camera in a direction of step 4
(
c, d, or e), calibration has been
finished successfully.
For safety, remove the lens and other accessories before calibration.
Calibration may not be possible under the following conditions because
the digital compass uses geomagnetism: At high altitudes, near
magnetic fields, in steel-structure buildings, or underground. Even if
calibration is possible, the receiver may not be able to detect the
shooting direction correctly.
22
COPY
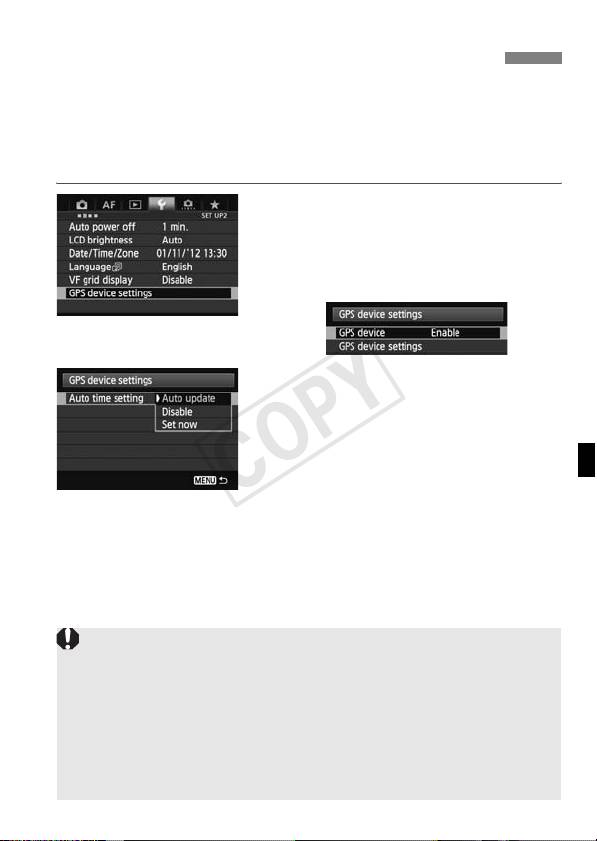
Setting Time from GPS on the Camera
You can set the time from GPS when the receiver is attached or
connected to a camera that displays the [GPS device settings] menu
item (except on the EOS 7D). The EOS-1D X performs high-precision
adjustment with a margin of error of approx. ±0.02 second relative to
UTC time. With other cameras, the margin is approx. ±1 second.
Select [GPS device settings].
1
On the EOS-1D X and other models
that display the following screen, set
[GPS device] to [Enable], and then
select [GPS device settings].
Select [Auto time setting].
2
Select an option and press <0>.
[Auto update] updates the time after
the camera and the receiver are
turned on and a GPS signal is
received.
If the GPS signal cannot be received from five or more satellites, time
setting is not possible. [Set now] will be unavailable.
Even if [Set now] is selected, auto time adjustment may not be possible,
depending on the timing of GPS signal acquisition.
When [Auto time setting] is set to [Auto update], the date and time
cannot be set manually using [Date/Time/Zone] in the menu.
If you prefer not to change the time (when using [Sync time between
cameras] with WFT series, for example), select [Auto time setting:
Disable].
23
COPY

GPS Precautions
Keep the following points in mind when using the receiver.
In certain countries and regions, the use of GPS may be restricted.
Therefore, be sure to use GPS in accordance with the laws and
regulations of your country or region. Be particularly careful when
traveling outside your home country.
Be careful about using GPS functions where the operation of
electronic devices is restricted.
Others may be able to locate or identify you by using location data in
your geotagged pictures or movies. Be careful when sharing these
images or GPS log files with others, as when posting them online
where many others can view them.
GPS signal reception may take longer after battery replacement, or
when you have not used GPS functions for some time.
Never leave the receiver near any equipment that generates a
strong magnetic field, such as magnets or electric motors.
24
COPY
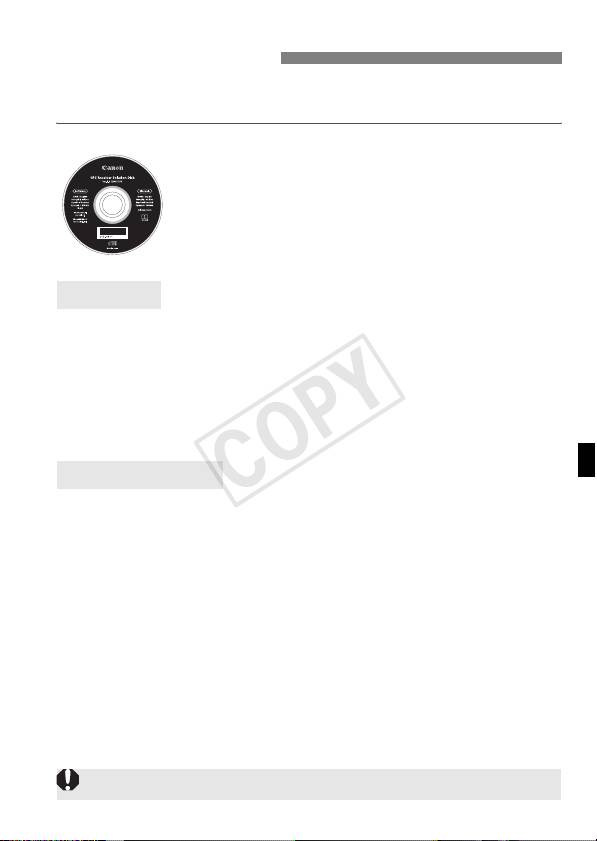
Provided Software
Software on the provided solution disc is described below, with
installations instructions.
GPS Receiver Solution Disk
Includes receiver software and the instruction manual.
Map Utility
This software uses location information recorded by the receiver to
show shooting locations, shooting directions, and routes traveled with
the receiver on a virtual map. Untagged images can be geotagged.
Additionally, when the camera is connected to a computer, you can
save log files on the computer, change the positioning interval, and
delete logs.
ImageBrowser EX
This software can update Map Utility.
For information on other features, refer to the ImageBrowser EX
instruction manual (provided as a PDF).
ImageBrowser EX must be installed to use Map Utility.
25
COPY

Provided Software
Installing the Software
Follow these steps even if an older version of the software is already
installed. (The previous version will be overwritten, as needed.)
1 Insert the GPS Receiver Solution Disk in the computer.
2 Double-click the CD-ROM icon.
Windows: This icon is displayed in [Computer] or [My Computer].
Macintosh: This icon is displayed on the desktop.
3 Double-click [Set up.exe].
4 Click [Easy Installation] and follow the on-screen
instructions to complete the installation process.
If install screen for “Microsoft Silverlight” is displayed during
installation, install “Microsoft Silverlight”.
5 Click [Finish], and then remove the disc.
Installation is now finished.
26
