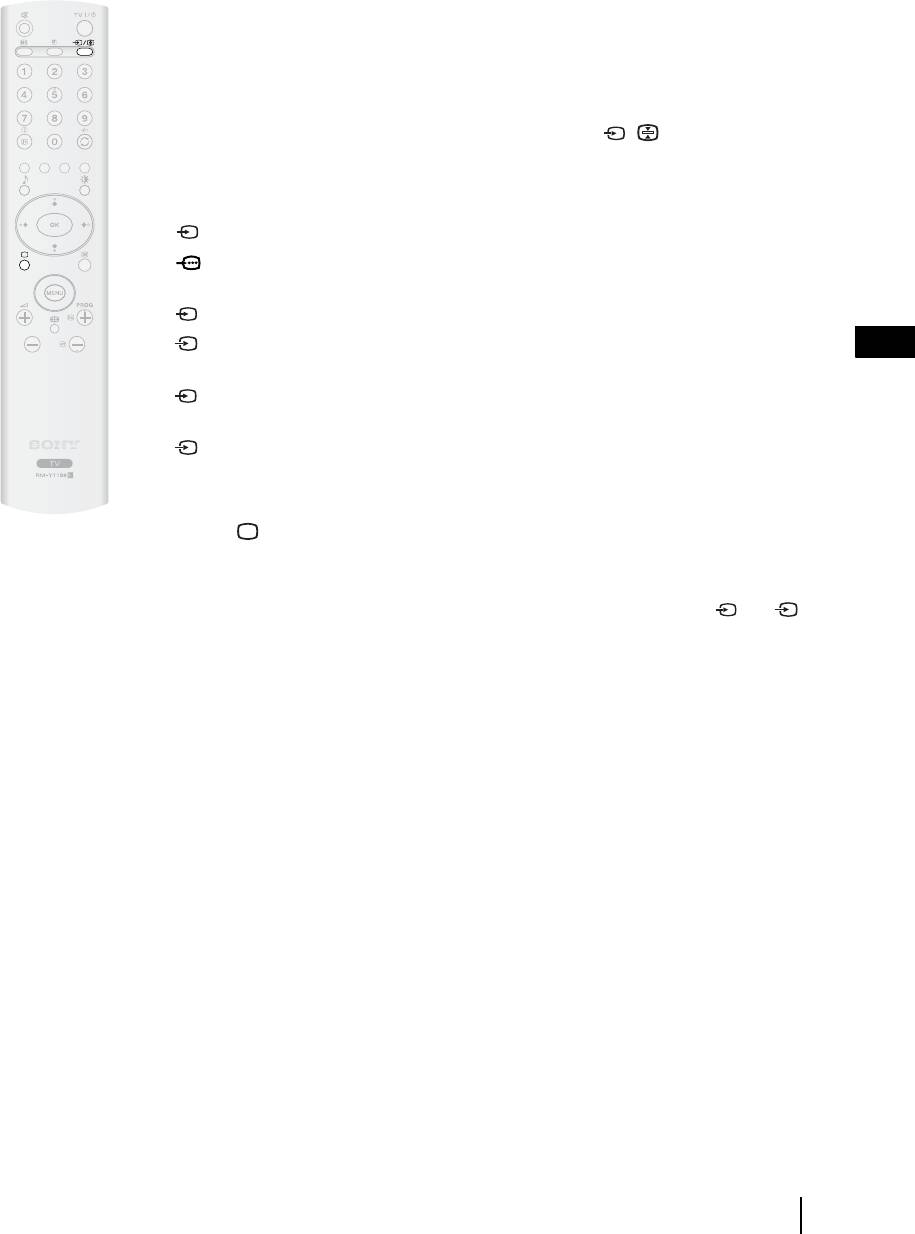
Sony KLV-27HR3 – page 2
Manual for Sony KLV-27HR3
Table of contents
AV2 OUTPUT
The "AV2 Ouptut" option allows you to select the source to be output from the Scart connector
2/ so that you can record from this Scart the signal coming from the TV or the signal that is being viewed on
S
the TV.
If your VCR or DVD recorder supports SmartLink, this procedure is not necessary.
To do this:
Once you have entered into the "Features" menu as it is explained in the previous page and after selecting the option,
press
OK. Then press
v
or
V
to select the desired output signal:
TV to output the aerial source.
AUTO to output the signal that is being viewed on the TV.
• If you select “AUTO”, the output signal will always be the same one that is displayed on the screen.
• If you have connected a decoder to the Scart 2/ 2 or to a VCR connected to this Scart, please
S
remember to change back the "AV2 Output" to “TV” for correct unscrambling. Alternatively, set the
"Decoder" option in the "Manual Programme Preset" menu to "On" for the scrambled programme. For more
details refer to page 26.
TV SPEAKERS
This option allows you to turn off the TV speakers e.g. to listen to the sound through external audio equipment con-
nected to the TV.
To do this:
Press the
v
or
V
buttons to select one of the following options, then press the OK button.
On The sound is output from the TV speakers.
One Time Off The TV speakers are temporarily turned off allowing you to listen to the sound from external
audio equipment.
The "TV Speakers" option automatically returns to "On" when the TV set is switched off.
Permanent Off The TV speakers are permanently turned off allowing you to listen to the sound from external
audio equipment.
To turn on the TV speakers again, change the "TV Speakers" option to "On".
RGB CENTER
This option is only available if an RGB source has been connected to the Scart connector 1/ on the
rear of TV.
When viewing an RGB signal, the picture may need some adjusting. This option allows you to adjust the horizontal
picture position so that the picture is in the middle of the screen.
To do this:
Once you have entered the "Features" menu as it is explained in on page 21 and while watching an RGB source select
the “RGB Center” option and press
OK. Then press B or b to adjust the centre of the picture between –5 and +5.
Finally press
OK to confirm and store.
22
TV Functions
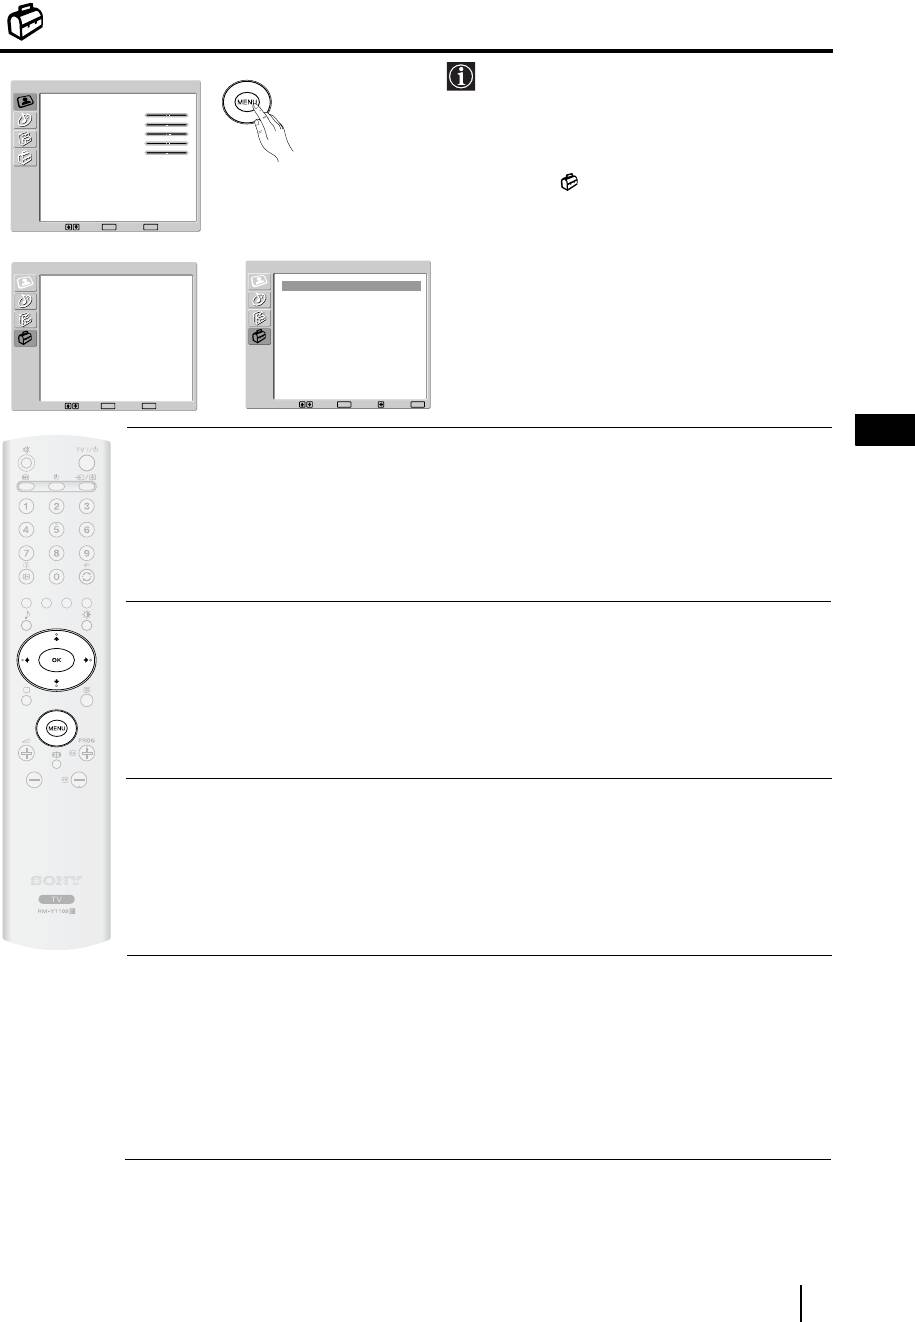
The Set Up Menu
The “Set Up” menu allows you to alter various
Picture Adjustment
options on this TV.
Picture Mode
Personal
Contrast
80
Brightness
50
Colour
50
Sharpness
50
To do this:
Backlight
70
Reset
Press the
MENU button and press
v
three times
Noise Reduction
Auto
Colour Tone
Normal
to select , then press OK to enter this menu.
Next, press
v
or
V
to select the desired option
Select: Set:
OK
End:
MENU
and press
OK. Finally, read below how to
m
operate into each option.
Set Up
Set Up
Language
English
Language
English
Country
United Kingdom
Country
United Kingdom
Auto Tuning
Auto Tuning
Programme Sorting
Programme Sorting
Programme Labels
Programme Labels
AV Preset
,
AV Preset
Manual Programme Preset
Manual Programme Preset
Select: Set:
OK
End:
MENU
Select: Set:
OK
Back:
End:
MENU
GB
LANGUAGE
This option allows you to select the language that menus are displayed in.
To do this:
After selecting the option, press
OK and then proceed in the same way as in step 3 of the section
"Switching On the TV and Automatically Tuning" on page 15.
COUNTRY
This option allows you to select the country in which you wish to operate the TV set.
To do this:
After selecting the option, press
OK and then proceed in the same way as in step 4 of the section
"Switching On the TV and Automatically Tuning" on page 15.
AUTO TUNING
This option allows you to automatically search for and store all available TV channels.
To do this:
After selecting the option, press
OK and then proceed in the same way as in the steps 5 and 6 of the
section “Switching On the TV and Automatically Tuning” on page 16.
PROGRAMME SORTING
This option allows you to change the order in which the channels (TV Broadcast) appear on the
screen.
To do this:
After selecting the option, press
OK and then proceed in the same way as in the step 7 of the section
“Switching On the TV and Automatically Tuning” on page 16.
continued...
TV Functions
23
PROGRAMME LABELS
This option allows you to name a channel using up to five characters (letters or numbers).
To do this:
1 Once you have entered the "Set Up" menu as it is explained in the previous page and after selecting this option,
press OK, then press v or V to select the programme number with the channel you wish to name. Next press OK.
2 With the first element of the Label column highlighted, press OK and
v
,
V
, B or b to select the letter, next
press
OK.
When you have finished, press
v
,
V
, B or b to select the word “End” on the screen and finally press OK to
turn off the menu from the screen.
• To correct a letter, select "
%" on the screen to go back and press OK.
• For a blank, select " " on the screen and press
OK.
AV PRESET
This option allows you to:
a) Designate a name to the external equipment you have connected to the input sockets of the TV set.
To do this:
1 Once you have entered the "Set Up" menu as it is explained in the previous page and after selecting this option,
press
OK, then press
v
or
V
to select the input source you wish to name: AV1 and AV2 for the rear Scarts
and AV3 for side connectors. Next press
OK twice.
2 A label automatically appears in the label column:
a) If you want to use one of the predefined labels, press
v or V to select the desired label and finally press OK.
The total predefined labels are: VIDEO, DVD, CABLE, GAME, CAM (camcorder) or SAT
(satellite).
b) If you want to set a different label, select Edit and press OK. Then, with the first element highlighted, press
v, V, B or b to select the letter, next press OK. When you have finished, press v, V, B or b to select
the word “End” on the screen and finally press
OK to turn off the menu from the screen.
• To correct the letter, select "
%" on the screen to go back and press OK.
• For a blank, select " " on the screen and press
OK.
b) Change the input sound level of the optional equipment connected.
To do this:
Once you have entered the "Set Up" menu as it is explained in the previous page and after selecting this option
press
OK, then press
v
or
V
to select the input source you want to alter the input sound level: AV1 and AV2
for the rear Scarts and AV3 for side connectors. Next press twice
b to highlight the Sound Offset column.
Finally press OK and
v
or
V
to alter the input sound level between -9 and +9.
24
TV Functions
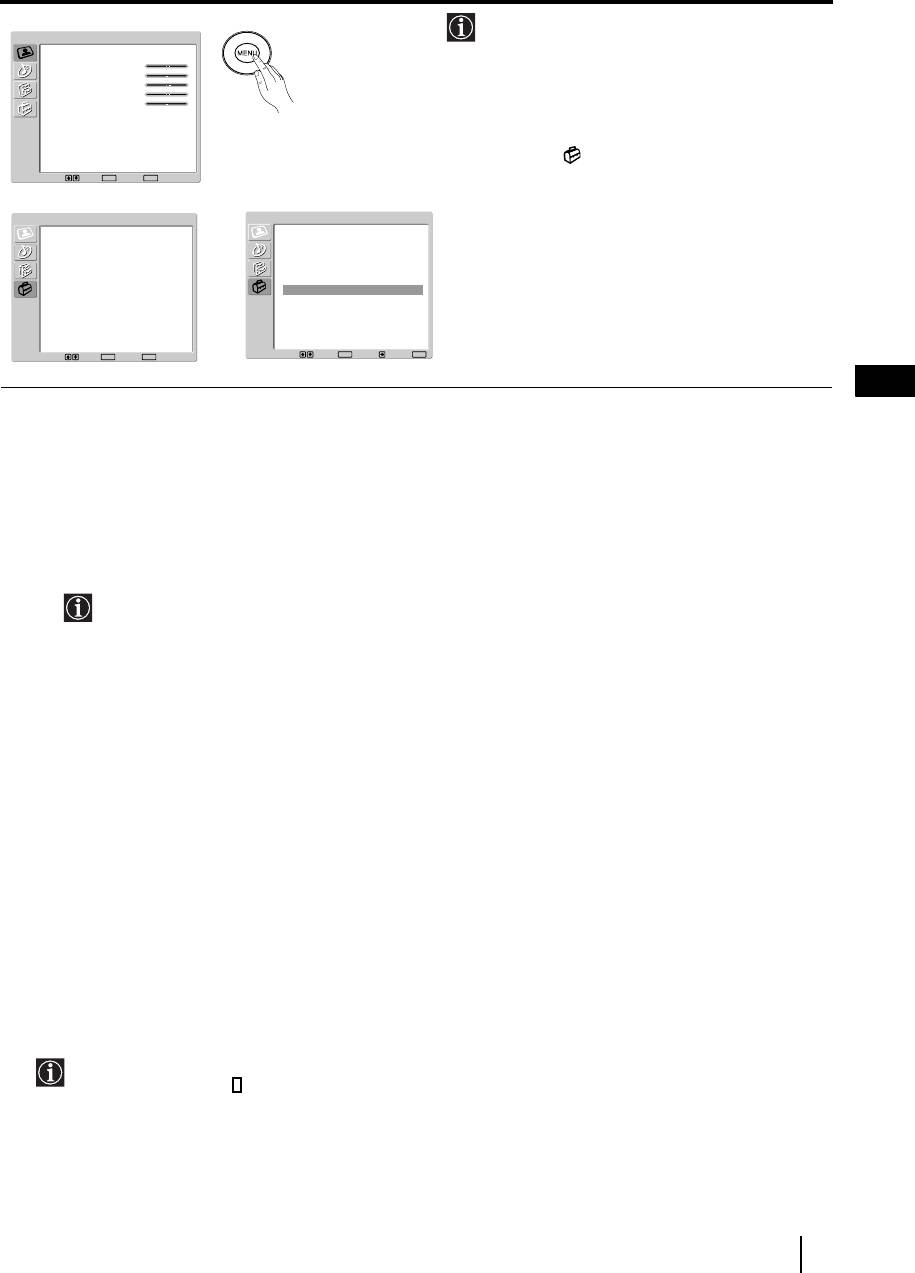
The Manual Programme Preset Menu
The “Manual Programme Preset” option in the
Picture Adjustment
"Set Up" menu allows you to manually tune
Picture Mode
Personal
Contrast
80
individual channels.
Brightness
50
Colour
50
Sharpness
50
Backlight
70
Reset
To do this:
Noise Reduction
Auto
Colour Tone
Normal
Press the
MENU button and press
v
three times
to select , then press
OK to enter the "Set
Select: Set:
OK
End:
MENU
Up" menu. Next, press
v
or
V
to select
m
"Manual Programme Preset" and press OK.
Set Up
Set Up
Finally, read below how to operate into each
Language
English
Language
English
Country
United Kingdom
Country
United Kingdom
option.
Auto Tuning
Auto Tuning
Programme Sorting
Programme Sorting
Programme Labels
Programme Labels
AV Preset
,
AV Preset
Manual Programme Preset
Manual Programme Preset
Select: Set:
OK
End:
MENU
Select: Set:
OK
Back:
End:
MENU
GB
The Manual Programme Preset option allows you to:
a) Preset channels or the VCR channel one by one to the programme order of your choice.
To do this:
1 Once you have entered the “Set Up”menu as it is explained on page 23 and after selecting the "Manual
Programme Preset" option, press
OK. Next with Programme option highlighted press OK.
Press
v or V to select which programme number you want to preset the channel on (for VCR, select
programme number “0”). Then press
B.
2 The following option is only available depending on the country you have selected in the “Country”
menu.
After selecting the System option, press
OK. Then press
v
or
V
to select the TV Broadcast system (B/G for
western European countries, D/K for eastern European countries, L for France or I for United Kingdom).
Then press
B.
3 After selecting the Channel option, press OK. Next press
v
or
V
to select the channel tuning ("C" for
terrestrial channels or "S" for cable channels). Then press the number buttons to enter directly the channel
number of the TV Broadcast or the channel of the VCR signal. If you do not know the channel number, press
b and v or V to search for it. When you have tuned the desired channel, press OK twice to store.
Repeat all the above steps to tune and store more channels.
b) Label a channel using up to five characters.
To do this:
Once you have entered the “Set Up”menu as it is explained on page 23 and after selecting the "Manual
Programme Preset" option, press
OK. Next with the Programme option, highlighted press the PROG +/- button
to select the programme number with the channel you wish to name. When the programme you want to name
appears on the screen, press
v
or
V
to select the Label option and press OK. Then, with the first element
highlighted, press
v
,
V
, B or b to select the letter, next press OK. When you have finished, press
v
,
V
, B or
b to select the word “End” on the screen and finally press OK to turn off the menu from the screen. Finally press
OK to store.
• To correct a letter, select "
%" on the screen to go back and press OK.
• For a blank, select " " on the screen and press
OK.
continued...
TV Functions
25
c) Fine tune the broadcast reception. Normally the automatic fine tuning (AFT) will give the best possible picture,
however you can manually fine tune the TV to obtain a better picture reception in case the picture is distorted.
To do this:
While watching the channel (TV Broadcast) you wish to fine tune, and once you have entered the “Set Up” menu
as it is explained on page 23 and after selecting the "Manual Programme" option, press
OK
.
Then press
v
or
V
to select the AFT option and press
b. Next press
v
or
V
to adjust the fine tuning between -15 and +15. Finally
press OK twice to store.
d) Improve the sound for individual channels in the case of distortion in mono broadcasts. (Not available when
“System” is set to “L”.)
Sometimes a non standard broadcast signal can cause sound distortion or intermittent sound muting when
watching mono programmes. The Audio Filter option allows you to reduce this effect.
If you do not experience any sound distortion, we recommend that you leave the Audio Filter option set
to the default setting of “Off”.
To do this:
Once you have entered the “Set Up” menu as it is explained on page 23 and after selecting the “Manual
Programme Preset” option, press
OK. Next, press
v
or
V
to select the Audio Filter option and press b. Next
press
v
or
V
to select Off, Low or High.
You can not receive stereo or dual sound when “Low” or “High” is selected.
e) Skip any unwanted programme numbers when they are selected with the PROG +/- buttons.
To do this:
Once you have entered the "Set Up" menu as it is explained on page 23 and after selecting the "Manual
Programme Preset" option, press
OK. Next with the Programme option highlighted, press the PROG +/- button
to select the programme number you want to skip. When the programme you want to skip appears on the screen,
press
v
or
V
to select the Skip option and press
b
. Next press
v
or
V
to select On. Finally press OK twice to
confirm and store.
To cancel this function afterwards, select “Off” instead of “On” in the step above.
f) View and record scrambled channels (e.g. from a pay TV decoder) when using a decoder connected to Scart
2/ directly or through a VCR.
S
This option is only available depending on the country you have selected in the “Country” menu.
To do this:
Once you have entered the "Set Up" menu as it is explained on page 23 and after selecting the "Manual
Programme Preset" option, press
OK. Next press v or V to select the Decoder option and press b. Next press
v or V to select On. Finally press OK twice to confirm and store.
To cancel this function afterwards, select "Off" instead of "On" in the step above.
26
TV Functions
Other Functions
Sleep Timer
This function allows you to set the TV to switch itself automatically to standby mode after a
specified time period. The following time periods can be selected: 30, 60, 90 and 120 minutes.
To do this:
Press the button on the remote control repeatedly until the desired time period appears on the
screen.
When the Sleep Timer feature is on, the (Standby/Sleep) indicator on the TV lights up in red.
To cancel the Sleep Timer feature:
Press the button on the remote control repeatedly until “Off” appears on the screen.
• If you switch off the TV and switch it on again, the Sleep Timer feature is reset to “Off”.
• Press the button on the remote control to display the time remaining before the TV
switches to standby mode.
GB
• The message “Sleep Timer will end soon. Power will be turned off.” Appears on the screen
1 minute before the TV switches to the standby mode.
Picture Freeze
This function allows you to freeze the TV picture (e.g. to make a note of a telephone number or
recipe).
To do this:
Press the button on the remote control to freeze the picture. A window is displayed in the
bottom left of the screen showing the currently selected channel. Press the button again to
remove the window. Press the button again to cancel the Picture Freeze and return to normal
TV mode.
Adjusting the position of the Picture Freeze window
The position of the window displaying the currently selected channel can be adjusted.
To do this
With the TV in Picture Freeze mode, press the
B,
b
,
v
or
V
buttons to adjust the position of the
window on the TV screen.
n
n
n
n
Other Functions
27
Teletext
Teletext is an information service transmitted by most TV stations. The index page of the
Teletext service (usually page 100) gives you information on how to use the service. To operate
Teletext, use the remote control buttons as indicated below.
Make sure you use a channel (TV Broadcast) with a strong signal, otherwise Teletext errors may
occur.
To switch on Teletext
After selecting the TV channel which carries the Teletext service you want to view, press .
Each time you press , the screen changes cyclically as follows:
Teletext mode Teletext Superimpose mode
t
TV mode
t
Teletext mode
t
(repeat).
To select a Teletext page
Input three digits for the page number, using the number buttons.
• If you make a mistake, retype the correct page number.
• If the counter on the screen continues searching, it is because this page is not available. In this
case, input another page number.
To access the next or preceding page
Press PROG + ( ) or PROG - ().
To freeze a Teletext page
Some Teletext pages have sub-pages which follow on automatically. To stop them, press
/ . Press it again to cancel the freeze.
To reveal concealed information (e.g. answers to a quiz)
Press / . Press it again to conceal the information.
To change brightness of Teletext:
Whilst you are viewing Teletext, press repeatedly to choose between four different options of
brightness.
To switch off Teletext
Press .
If wrong Teletext characters appear for Cyrillic languages, we recommend you set the
"Language" option in the "Set Up" menu to "Russia" if your country does not appear in the
list. For details, refer to page 23.
Fastext
The Fastext service lets you access pages with one push of a button.
Whilst you are in the Teletext mode and Fastext is broadcast, a colour coded menu appears
at the bottom of the Teletext page. Press the colour button (red, green, yellow or blue) to
access the corresponding page.
28
Other Functions
Additional Information
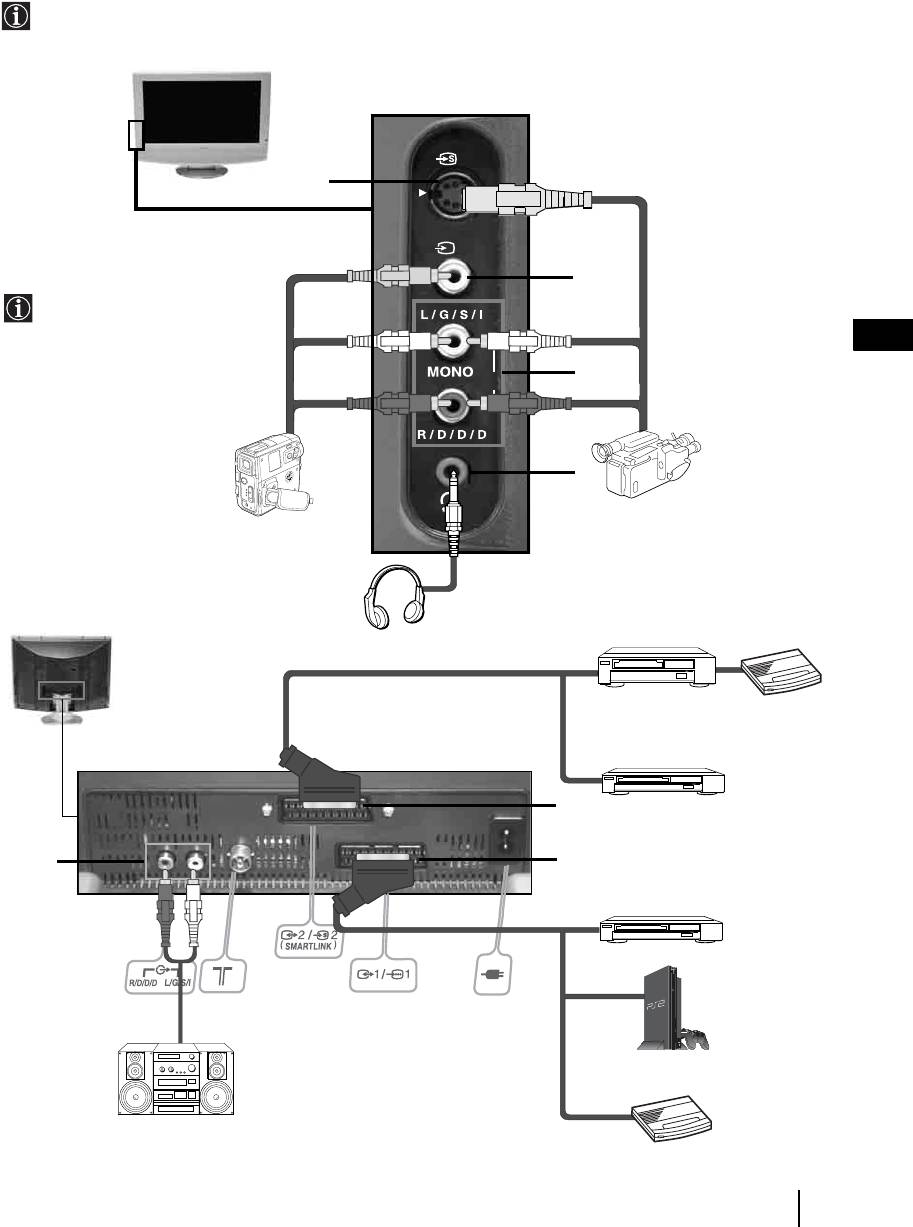
Connecting Equipment to the TV
• Using the following instructions you can connect a wide range of optional equipment to your TV set.
• Connecting cables are not supplied.
3
A
3
B
To avoid snowy
picture, do not connect
external equipment to
GB
connectors A and B
at the same time.
C
o3
D
S VHS/Hi8/
8mm/Hi8/
DVC
DVC
camcorder
camcorder
VCR
Decoder
F
DVD recorder
E
G
DVD
PlayStation
2
“PlayStation”*
*
“PlayStation” is a product of Sony
Computer Entertainment, Inc.
Decoder
Hi-fi
* “PlayStation” is a trademark of
Sony Computer Entertainment, Inc.
continued...
Additional Information
29
Connecting a VCR
To connect a VCR, please refer to the section “Connecting the aerial and VCR” of this instruction manual on page 14.
Connecting a VCR or a DVD recorder that supports SmartLink
SmartLink is a direct link between the TV set and a SmartLink compatible VCR/DVD recorder. For more
information on SmartLink, please refer to the instruction manual of your SmartLink VCR/DVD recorder.
If you use a VCR or a DVD recorder that supports SmartLink, please connect the VCR or the DVD recorder to the
TV using a Scart lead to the Scart 2/
S
F.
If you have connected a decoder or a Set Top Box to the Scart 2/ F or through a
S
VCR connected to this Scart
Select the “Manual Programme Preset” option in the “Set Up” menu and after entering in the “Decoder**” option,
select “On” (refer to page 26). Repeat this option for each scrambled signal.
**This option is only available depending on the country you have selected in the “Country” menu.
Connecting Audio Equipment to the TV
To listen to the sound from TV on Hi-fi equipment.
Connect your audio equipment to the audio output sockets E if you wish to amplify the audio output from the TV.
Next, using the menu system, select the “Features” menu and set the “TV Speakers” to "Permanent Off" (see page
22).
The volume of the external speakers can be altered by pressing the volume buttons on the TV remote control.
The treble and bass setting can also be altered through the “Sound Adjustment” menu (see page 20).
30
Additional Information
Viewing pictures from equipment connected to the TV
1 Connect your equipment to the designated TV socket, as indicated on page 29.
2 Switch on the connected equipment.
3 To watch the picture from the connected equipment, press the / button repeatedly until
the correct input symbol appears on the screen.
Symbol Input Signals
1 • Audio / video input signal through the Scart connector G
1 • RGB input signal through the Scart connector G. This symbol appears only if
an RGB source has been connected.
2 • Audio/video input signal through the Scart connector F.
S
2 • S Video Input signal through the Scart connector F. This symbol appears only
GB
if an S Video source has been connected.
3 • Video input signal through the phono socket B and Audio input signal through
C.
S
3 • S Video Input signal through the side S Video input jack A and Audio signal
through C. This symbol appears only if an S Video source has been connected.
4 Press the button on the remote control to return to the normal TV picture.
For Mono Equipment
Connect the phono plug to the L/G/S/I socket on the side of the TV and select 3 or 3
S
input signal using the instructions above. Next, refer to the “Sound Adjustment” section of this
manual and set “Dual Sound” option to “A” on the sound menu screen (see page 20).
Additional Information
31
Technical Specifications
Panel System:
LCD (Liquid Crystal Display) Panel
Rear Terminals:
TV System:
• AV1: 1/ 1
(Depending on the Country/region selection)
21-pin Scart connector (CENELEC standard)
B/G/H, D/K, L, I
including audio/video input, RGB input, TV audio/
Colour System:
video output.
PAL, SECAM
NTSC 3.58, 4.43 (Only Video In)
• AV2: 2/ 2 (SMARTLINK)
S
21-pin Scart connector (CENELEC standard)
Aerial:
including audio/video input, S video input, selecta-
75 ohm external terminal for VHF/UHF
ble audio/video output and Smartlink interface.
Channel Coverage:
• Audio Outputs (left/right) – phono jacks.
(Depending on the Country/region selection)
VHF: E2-E12
• Aerial connector (RF In)
UHF: E21-E69
CATV: S1-S20
Side Terminals:
HYPER: S21-S41
• AV3:
D/K: R1-R12, R21-R69
S
3 S video input (4-pin mini DIN)
L: F2-F10, B-Q, F21-F69
3 Video input (phono jack)
I: UHF B21-B69
3 Audio input (phono jacks)
Screen Size:
27": 27 Inches (approx. 68 cm. measured diagonally)
• headphones jack
23": 23 Inches (approx. 58 cm. measured diagonally)
Display Resolution:
Accessories supplied:
27": 1280 dots (horizontal) x 720 lines (vertical)
One Remote Control (RM-Y1108),
23": 1366 dots (horizontal) x 768 lines (vertical)
Two Size AA batteries (R6 type),
Power Requirement:
One Mains lead (Type C-6)
220-240V AC; 50/60 Hz
Optional Accessory:
Power Consumption:
Wall-Mount Bracket SU-LW1.
27": 110 W
TV Stand SU-PG100 (only for 27").
23": 90 W
Other Features:
Standby Power Consumption:
• Teletext, Fastext, TOPtext (depending on
0.7 W
availability)
• Sleep Timer
Sound Output:
• Picture Freeze
27": 10 W + 10 W (RMS)
• Smartlink (Direct link between your TV and a
23": 5 W + 5 W (RMS)
compatible VCR or DVD recorder. For more
information on Smartlink, please refer to the
Dimensions (w x h x d):
instruction manual of your VCR or DVD recorder.)
27": With stand, approx. 698 x 574 x 245 mm.
• TV system autodetection
Without stand, approx. 698 x 526 x 119 mm.
23": With stand, approx. 604 x 502 x 169 mm.
This TV is compatible with the VESA universal wall
Without stand, approx. 604 x 459 x 114 mm.
stand system.
Weight:
Design and specifications are subject to change
27": With stand, approx. 14 Kg.
without notice.
Without stand, approx. 12 Kg.
This instruction manual has been printed on:
23": With stand, approx. 11 Kg.
Ecological Paper - Totally Chlorine Free
Without stand, approx. 9.5 Kg.
32
Additional Information
Troubleshooting
Here are some simple solutions to problems which may affect the picture and sound.
Problem Possible solution
No picture
No picture (screen is dark) and no sound. • Check the aerial connection.
• Connect the TV to the mains, and press the power switch on the
top side of the TV set.
• If the (standby) indicator is on, press TV on the remote
control.
The TV turns off automatically. (The TV
• Check if the Sleep Timer is activated (page 27).
enters the standby mode.)
No picture or no menu information from
• Check that the optional equipment is on and press the /
equipment connected to the Scart
button repeatedly on the remote control until the correct input
connector.
symbol is displayed on the screen (page 31).
• Check the connection between the optional equipment and the TV.
GB
Poor picture/Unstable picture
Double images or ghosting. • Check aerial/cable connections.
• Check the aerial location and direction.
Only snow and noise appears on
• Check if the aerial is broken or bent.
the screen.
• Check if the aerial has reached the end of its serviceable life (3-5
years in normal use, 1-2 years at the seaside)
Dotted lines or stripes. • Keep the TV away from electrical noise sources such as cars,
motorcycles, or hair-dryers.
No colour on colour programmes. • Using the menu system, select the “Picture Adjustment” menu and
select “Reset” to return to the factory settings (page 19).
• If you set the “Power Saving” function to “Reduce,” picture colours
may become dimmer (page 21).
Some tiny black points and/or bright
• The picture of the display is composed of pixels. Tiny black points
points on the screen.
and/or bright points (pixels) on the screen, do not indicate a
malfunction.
The picture is too bright.
• Using the menu system, select the “Picture Adjustment” menu and
select “Picture Mode” Then select the desired picture mode (page
18).
Picture (stripe) noise.
• Make sure that the aerial is connected.
• Keep the aerial cable away from other connecting cords.
• Do not use 300-ohm twin lead cables as interference may occur.
continued...
Additional Information
33
Problem Possible solution
Stripe noise during playback/recording
• Video head interference. Keep your VCR away from the TV.
of a VCR.
• Leave a space of 30 cm between your VCR and the TV set to avoid
noise.
• Avoid installing your VCR in front or at the side of the TV set.
Poor or no picture (screen is dark), but
• Using the menu system, select the “Picture Adjustment” menu and
good sound.
select “Reset” to return to the factory settings (page 19).
Noisy picture when viewing a TV
• Using the menu system, select the “Manual Programme Preset”
channel.
option in the “Set Up” menu and adjust Fine Tuning (AFT) to
obtain better picture reception (page 26).
• Using the menu system, set the "Noise Reduction" option in the
“Picture Adjustment” menu to reduce the noise in the picture (page
19).
Distorted picture when changing
• Turn off any equipment connected to the Scart connector on the rear
programmes or selecting teletext.
of the TV set.
Cannot operate the menu
• If the item you want to select appears in a pale colour is because you
cannot select it.
Wrong characters appear when viewing
• Using the menu system, enter the “Country” option in the “Set Up”
teletext
menu and select the country in which you operate the TV set (page
23).
No sound/Noisy sound
Good picture, no sound. • Press the 2 +/- or
% (mute) on the remote control.
• Check that “TV Speakers” option is set to “On” in the “Features”
menu (page 22).
Audio noise.
• Make sure that the aerial is connected.
• Keep the aerial cable away from other connecting cables.
• Do not use 300-ohm twin lead cables as interference may occur.
• Communication problems may occur if the infrared communication
equipment (e.g. infrared cordless headphones) is used near the TV.
Please use headphones other than infrared cordless headphones,
move the infrared transceiver away from the TV until the noise is
eliminated, or move the transmitter and receiver of the infrared
communication equipment closer together.
• Using the menu system, select “Audio Filter” from the “Manual
Programme Preset” menu. Next select “Low” or “High” (see page
26).
Unable to receive a stereo or dual sound
• Check that the “Audio Filter” option in the “Manual Programme
broadcast
Preset” menu is set to “Off”.(see page 26).
34
Additional Information
Problem Possible solution
Strange sound
The TV cabinet creaks. • Changes in room temperature sometimes causes the TV cabinet to
expand or contract, which can make slight noises. This does not
indicate a malfunction.
The TV buzzes. • There might be a surge sound when turning on the TV. This does
not indicate a malfunction.
Remote Control
Remote control does not function.
• Replace the batteries.
The (standby) or TV (power on)
• Contact your nearest Sony service centre.
indicators on the TV flashes
• If you continue to experience problems, have your TV serviced by qualified personnel.
• Never open the casing yourself.
GB
Additional Information
35
Введение
• Благодарим Вас за то, что Вы выбрали этот телевизор Sony .
• Перед первым включением телевизора внимательно ознакомьтесь с данной инструкцией по
эксплуатации и сохраните ее для консультаций в будущем.
• Символы, используемые в настоящей инструкции:
• Важные сведения.
• Кнопки, показанные белым цветом на пульте
ДУ, соответствуют тем кнопкам, которые
• Сведения о той или иной функции
следует нажимать для выполнения указанной
• 1, 2... Указанная последовательность
последовательности операций.
операций.
• Этот символ сообщает Вам о результате
указанной последовательности операций.
Содержание
Введение ............................................................................................................................................................ 3
Общие правила техники безопасности........................................................................................................ 4
Меры предосторожности ............................................................................................................................... 7
Описание и установка телевизора
Проверка комплекта поставки ..................................................................................................................... 8
Описание кнопок пульта ДУ ......................................................................................................................... 9
Описание кнопок телевизора и разъемов, находящихся сбоку от экрана ....................................... 11
Описание индикаторов телевизора............................................................................................................ 12
Установка батареек в пульт ДУ.................................................................................................................. 12
Снятие задней крышки ................................................................................................................................. 13
Подключение антенны и видеомагнитофона .........................................................................................14
RU
Первое включение
Включение телевизора и автоматическая настройка............................................................................ 15
Функции телевизора
Знакомство с системой меню и ее использование .................................................................................. 17
Меню "Настройки изображения" ....................................................................................................... 18
Меню "Настройка звука"........................................................................................................................ 20
Меню "Функции" ...................................................................................................................................... 21
Меню "Установка" ................................................................................................................................... 23
Меню "Руч. настройка программ" ....................................................................................................... 25
Прочие функции
Таймер выкл.................................................................................................................................................... 27
Замораживание изображения ..................................................................................................................... 27
Телетекст............................................................................................................................................................ 28
Дополнительные сведения
Подключение дополнительных устройств к телевизору .......................................................................29
Просмотр изображения с устройства, подключенного к телевизору .................................................31
Технические характеристики .......................................................................................................................32
Поиск неисправностей ...................................................................................................................................33
Содержание
3
Общие правила техники безопасности
Сетевой шнур
Медицинские учреждения
Перед тем как переносить
Не устанавливайте этот
телевизор, отсоедините
телевизор в местах, в
сетевой шнур от розетки. Не
которых используется
перемещайте телевизор при
медицинская аппаратура.
подсоединенном сетевом
Это может привести к
шнуре. При этом возможно
неверной работе
повреждение сетевого шнура, что может привести
медицинских приборов.
к возгоранию или поражению электрическим
Переноска телевизора
током. В случае падения телевизора или его
повреждения немедленно обратитесь в сервисную
Перед переноской телевизора отключите от него
службу для проверки его специалистами.
все соединительные кабели.
Повреждение, требующее обращения в
Флуоресцентная лампа
сервисную службу
В данном телевизоре в качестве источника света
Если на поверхности экрана телевизора появились
используется флуоресцентная лампа. Если
трещины, не касайтесь ее ранее, чем отсоедините
изображение на экране темнеет, мерцает или не
сетевой шнур. В противном случае возможно
появляется совсем, это означает, что
поражение электрическим током.
флуоресцентная лампа выработала свой ресурс и
нуждается в замене. Для ее замены обращайтесь к
Вентиляция
квалифицированным специалистам.
Оставляйте свободное место вокруг телевизора. В
противном случае может не обеспечиваться
должная циркуляция воздуха, что может привести
к возгоранию или выходу телевизора из строя.
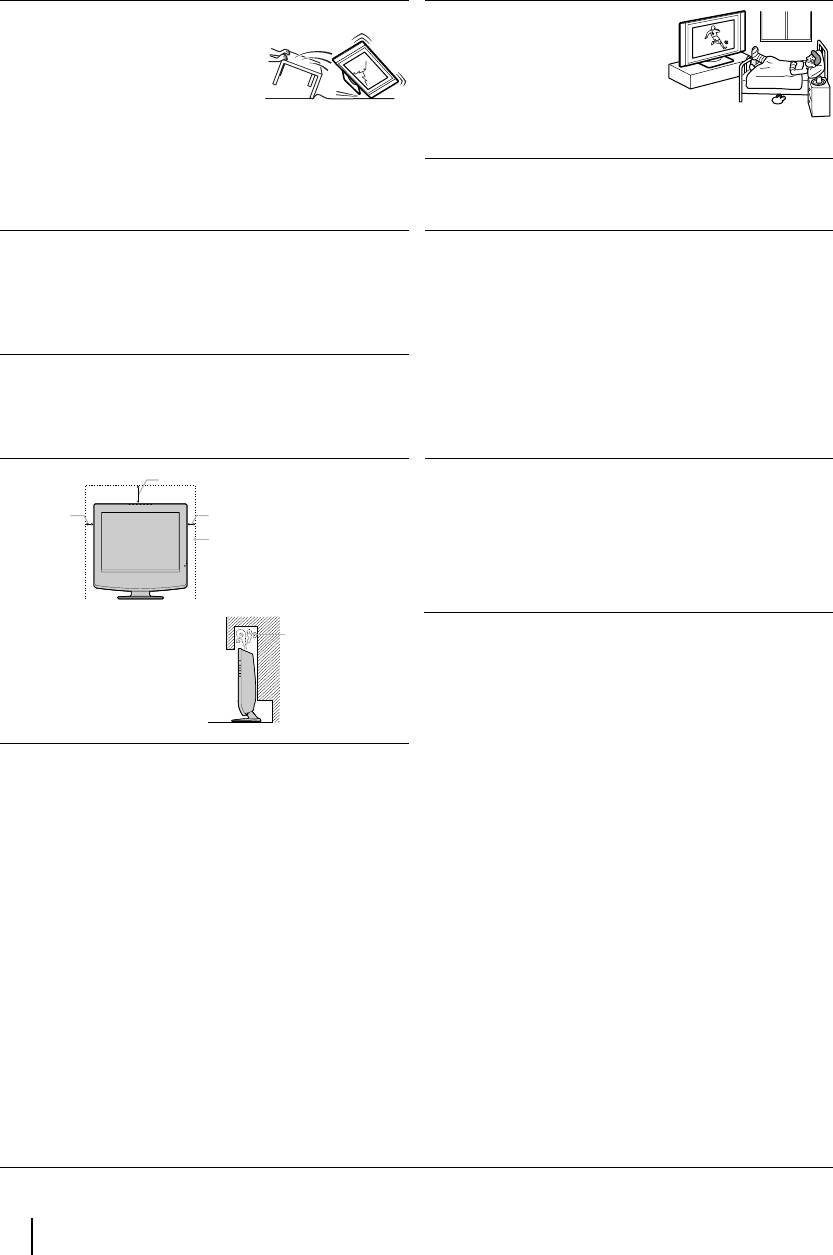
Регулировка угла просмотра телевизора
30 см
При регулировке угла просмотра придерживайте
10 см
10 см
подставку рукой, чтобы она не высвободилась и не
упала.
Оставляйте
Будьте осторожны, чтобы не прищемить пальцы
расстояния не
между подставкой и телевизором.
меньше указанных.
Циркуляция
воздуха
Ни в коем случае не
заблокирована.
устанавливайте телевизор
следующим образом:
Стена
ЖК экран
•
Хотя ЖК экран выполнен с использованием
высокоточных технологий и имеет 99.99% или более
эффективных пикселей, черные или яркие световые
(красные, синие или зеленые) точки могут постоянно
присутствовать на ЖК экране. это - свойство
структуры ЖК экрана и не является неисправностью.
• Не допускайте, чтобы поверхность ЖК экрана
подвергалась воздействию солнечных лучей. Это
может привести к повреждению поверхности экрана.
• Не давите на передний фильтр и не царапайте его; не
кладите на телевизор какие-либо предметы. Это
может вызвать неравномерность изображения или
повреждение ЖК экрана.
• Если телевизор установлен в холодном помещении,
может появиться пятно на изображении, или же
изображение может потемнеть. Это не означает
неисправность. С повышением температуры эти
явления исчезают.
• Ореол может возникнуть при постоянном выводе на
экран неподвижных изображений (фотографий). Это
явление может вскоре исчезнуть.
• Экран и корпус могут нагреваться во время
эксплуатации. Это не является неисправностью.
4
Общие правила техники безопасности
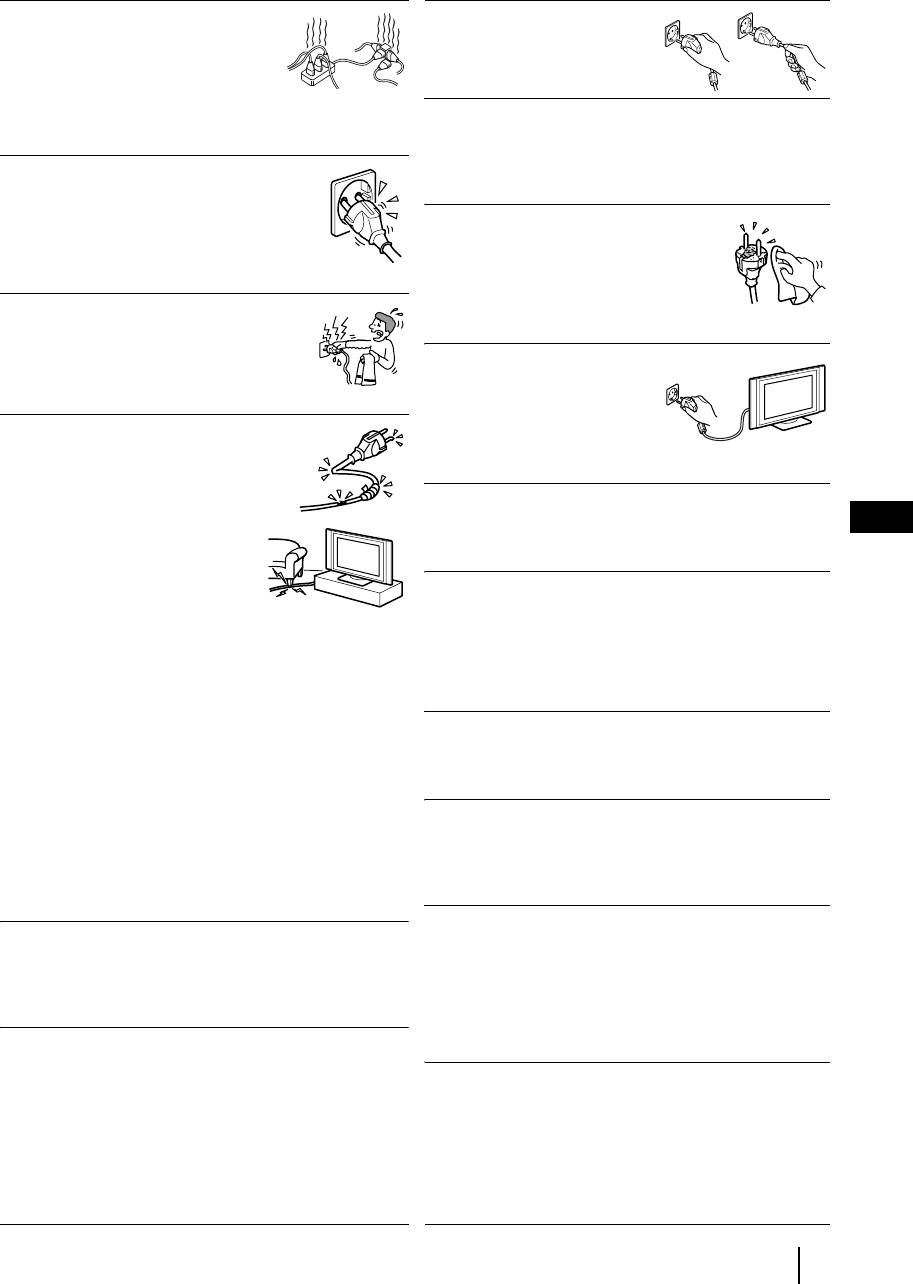
Сеть питания
Перегрузка
Сетевой шнур
Данный телевизор предназначен
Тяните сетевой шнур,
для питания только от сети
взявшись за вилку. Не тяните
переменного тока напряжением
за сам шнур.
220-240 В. Не подключайте
слишком много устройств к одной
и той же розетке - это может привести к возгоранию
Подключение кабелей
или поражению электрическим током.
Выньте сетевой шнур из розетки при подключении
соединительных кабелей. Обязательно выньте
Сетевая розетка
сетевой шнур из розетки перед тем, как производить
Не используйте плохо держащуюся
подключение соединительных кабелей.
розетку. Вставляйте вилку в розетку
полностью. Если она будет вставлена
Чистка
неплотно, это может привести к искрению
Регулярно чистите вилку сетевого
и далее к возгоранию. Вызовите
шнура. Если вилка покрывается пылью
электрика для замены розетки.
и аккумулирует влагу, это может
привести к нарушению изоляции и
Влага
возгоранию. Регулярно вынимайте
Не касайтесь сетевого шнура мокрой
вилку из розетки и чистите ее.
рукой. Вставляя сетевой шнур в розетку
и вынимая его из нее мокрой рукой
В случае неиспользования
можно получить поражение
Из соображений безопасности
электрическим током.
и охраны окружающей среды
рекомендуется в случае
Сетевой шнур
неиспользования телевизора
Повреждение сетевого шнура
выключать его, а не оставлять
может привести к возгоранию или
в дежурном режиме. Отсоедините его от сети.
поражению электрическим током.
•
Не передавливайте, не сгибайте
Укладка кабелей
и не перекручивайте чрезмерно
RU
Будьте осторожны, чтобы не зацепить ногами за
сетевой шнур. Жилы кабеля
кабели. Это может привести к повреждению
могут быть при этом оголиться
телевизора.
или порваться - это может
вызвать короткое замыкание и
Установка
привести к поражению
Не устанавливайте дополнительные устройства
электрическим током или
слишком близко от телевизора. Держите
возгоранию.
дополнительные устройства на расстоянии не менее
•
Не допускайте повреждений сетевого шнура и не
30 см от телевизора. Если видеомагнитофон
пытайтесь переделывать его.
установлен перед телевизором или справа от него,
•
Не кладите никакие тяжелые предметы на сетевой
изображение может оказаться искаженным.
шнур. Не тяните за сам шнур.
•
Держите сетевой шнур вдали от источников тепла.
Нагрев
•
При отсоединении сетевого шнура от розетки
беритесь за вилку.
Не касайтесь поверхности телевизора. Она остается
•
В случае повреждения сетевого шнура прекратите
горячей даже в течение некоторого времени после
его эксплуатацию и обратитесь к своему дилеру Sony
выключения телевизора.
для его замены.
• Не используйте входящий в комплект сетевой
Растительные масла
провод с другим оборудованием
.
Не устанавливайте телевизор в ресторанах, а
• Используйте только оригинальный сетевой шнур
которых готовят на масле. Масло, вместе с
Сони, не используйте шнуры других
поглощенной им пылью, может попасть внутрь
производителей.
телевизора и вывести его из строя.
Вода и влага
Поражение электрическим током
Не эксплуатируйте телевизор вблизи воды, –
Не касайтесь телевизора мокрыми руками. Это
например, рядом с ванной или в душевой. Не
может привести к поражению электрическим током
допускайте, чтобы телевизор подвергался
или выходу телевизора из строя.
воздействию дождя, влаги или табачного дыма. Это
может привести к возгоранию или поражению
электрическим током. Не эксплуатируйте телевизор
Коррозия
в таких местах, где в него могут попасть насекомые.
При использовании телевизора у морского побережья
соль может разъесть его металлические части и
Утилизация телевизора
привести к возгоранию или выходу его из строя. Это
• Не выбрасывайте телевизор вместе с бытовыми
может сократить срок службы телевизора. Следует
отходами.
предпринять меры по понижению влажности и
• ЖК экран содержит небольшое количество жидких
температуры в том месте, где установлен телевизор.
кристаллов и ртути. Применяющаяся в данном
телевизоре люминисцентная лампа также содержит
ртуть. Соблюдайте местные нормы и правила
утилизации.
продолжение...
Общие правила техники безопасности
5
Установка и переноска
Вентиляция
Использование на открытом
Никогда не перекрывайте
воздухе
вентиляционные отверстия в корпусе.
Не устанавливайте этот
Это может вызвать перегрев и привести
телевизор на открытом
к возгоранию. При отсутствии должной
воздухе. В случае попадания
вентиляции на телевизоре может
телевизора под дождь
скопиться пыль и грязь. Для
возможно возгорание или
обеспечения должной вентиляции соблюдайте
поражение электрическим
следующие правила:
током. В случае попадания телевизора под
• Не устанавливайте телевизор опрокинутым на
воздействие прямых солнечных лучей возможен его
заднюю панель или боком.
перегрев и выход из строя.
• Не устанавливайте телевизор вверх дном.
• Не устанавливайте телевизор на полке или в шкафу.
• Не кладите телевизор на ковер или кровать.
• Не накрывайте телевизор тканью, например
шторами, или газетами и т.д.
Автомобили или потолок
Корабли и суда
Не устанавливайте этот телевизор в
Не устанавливайте этот
автомобиле. При тряске
телевизор на кораблях и судах.
автомобиля телевизор может
Воздействие морской воды
упасть и нанести травму. Не
может привести к возгоранию
подвешивайте этот телевизор к потолку.
или выходу телевизора из строя.
Предотвращение падения телевизора
Сервисное обслуживание
Не открывайте корпус
Устанавливайте телевизор на устойчивую ровную
телевизора. Доверяйте свой
подставку. Не вешайте никаких предметов на
телевизор только
телевизор.
квалифицированным
специалистам.
Влага и огнеопасные материалы
Вентиляционные отверстия
• Не допускайте намокания
Не вставляйте ничего в вентиляционные
телевизора. Не допускайте
отверстия. Попадание в них
попадания каких-либо жидкостей
металлических предметов или
на телевизор. Если внутрь
огнеопасных веществ может привести к
телевизора попала жидкость или твердое тело, не
возгоранию или к поражению
эксплуатируйте его. Это может привести к
электрическим током.
поражению электрическим током или к
повреждению телевизора. Немедленно обратитесь в
Место установки
сервис для его проверки.
Никогда не устанавливайте
телевизор в жарких, влажных или
• Во избежание пожара держите огнеопасные
сильно запыленных помещениях.
вещества и открытое пламя (например, горящие
Не устанавливайте телевизор в
свечи) в стороне от телевизора.
таких местах, где он может
оказаться подверженным
Выступающее положение
механической вибрации.
Не устанавливайте телевизор так, чтобы он
оказывался в выступающем положении. Установка
Чистка поверхности экрана
телевизора в следующих положениях может привести
Поверхность экрана обладает специальным
к травме.
покрытием для предотвращения сильного отражения
• Не устанавливайте телевизор так, чтобы он
света. Во избежание повреждения покрытия
оказывался в выступающем положении, например,
необходимо соблюдать следующие
на колонне или за ней.
предосторожности.
• Не устанавливайте телевизор в таких местах, где Вы
• Для удаления пыли с экрана бережно протирайте его
можете удариться о него головой.
мягкой тряпкой. Если пыль плохо удаляется,
протрите экран мягкой тряпкой, слегка смоченной в
растворе мягкого моющего средства. Вы можете
Чистка
стирать эту тряпку и использовать ее неоднократно.
Вынимайте сетевой шнур из розетки перед чисткой
• Не используйте абразивные губки, щелочные/
телевизора. В противном случае возможно
кислотные моющие средства, чистящие порошки,
поражение электрическим током.
растворители, такие как спирт или бензин.
Рекомендуемое место установки
телевизора
Устанавливайте телевизор на
устойчивую ровную поверхность. В
противном случае телевизор может
упасть и нанести травму.
6
Общие правила техники безопасности

Меры предосторожности
Комфортный просмотр телевизора
• Для обеспечения комфортного просмотра телевизора рекомендуется выбирать положение для
просмотра на расстоянии от телевизора, равном четырех-семикратному размеру его экрана по
вертикали.
• Смотрите телевизор в умеренно освещенной комнате, так как его просмотр в плохо освещенном
помещении может привести к утомлению глаз. Если непрерывно смотреть на экран в течение
продолжительного времени, это может привести к утомлению Ваших глаз.
Установка телевизора
• Не устанавливайте телевизор в местах, подверженных действию высоких температур, например
там, где на него может попадать прямой солнечный свет, вблизи радиатора отопления или
теплового вентилятора. Если телевизор подвергается воздействию очень высокой температуры,
он может перегреться; вследствие этого возможны деформации корпуса или выход его из строя.
• Для получения четкого изображения не подвергайте экран прямому освещению или воздействию
прямых солнечных лучей. Если возможно, применяйте источники освещения, направленные с
потолка вниз.
• Телевизор не отключается от сети при установке выключателя питания в положение Off. Для
полного обесточивания телевизора выньте вилку сетевого шнура из розетки.
Регулировка громкости
• Регулируйте уровень громкости, чтобы не беспокоить соседей. Звук очень легко распространяется
в ночное время. Поэтому, рекомендуем закрывать окна или использовать наушники.
• При использовании наушников отрегулируйте громкость во избежание ее чрезмерного уровня,
который может привести к ухудшению слуха.
RU
Обращение с пультом ДУ
• Бережно обращайтесь с пультом ДУ. Не бросайте его, не становитесь на него и не лейте на него
никаких жидкостей.
• Не оставляйте пульт ДУ вблизи источников тепла или в месте, подверженном прямому
воздействию солнечных лучей, или во влажном помещении.
Чистка корпуса
• Перед чисткой удостоверьтесь, что Вы отсоединили сетевой шнур от розетки.
• Чистите корпус мягкой слегка увлажненной тряпкой. Не используйте абразивные губки,
щелочные моющие средства, чистящие порошки, растворители, такие как спирт или бензин, или
антистатические спреи.
• Следует иметь в виду, что свойства материала или покрытия экрана могут ухудшиться в
результате воздействия летучих растворителей, таких как спирт и бензин, или инсектицидов или в
случае продолжительного контакта с резиной или виниловыми материалами.
• В вентиляционных отверстиях со временем может скапливаться пыль, что может привести к
снижению эффективности охлаждающего действия вентилятора. Во избежание этого мы
рекомендуем периодически (раз в месяц) удалять пыль с помощью пылесоса.
Чистка и уход за поверхностью экрана
Во избежание ухудшения состояния экрана соблюдайте нижеследующие положения. Не давите на
экран, не царапайте его твердыми предметами и не бросайте в него никакие предметы. Это может
привести к повреждению экрана.
• Перед чисткой удостоверьтесь, что Вы отсоединили сетевой шнур от розетки.
• Не касайтесь телевизора после того, как он проработал в течение продолжительного времени, т.к.
его экран при этом сильно нагревается.
• Мы рекомендуем как можно реже касаться поверхности экрана.
• Протирайте экран мягкой, слегка увлажненной тряпкой. Протирка грязной тряпкой может
привести к выходу телевизора из строя. Никогда не используйте абразивные губки, чистящие
порошки или растворители, такие как спирт или бензин. Их контакт с экраном может привести к
повреждению его поверхности.
Общие правила техники безопасности
7
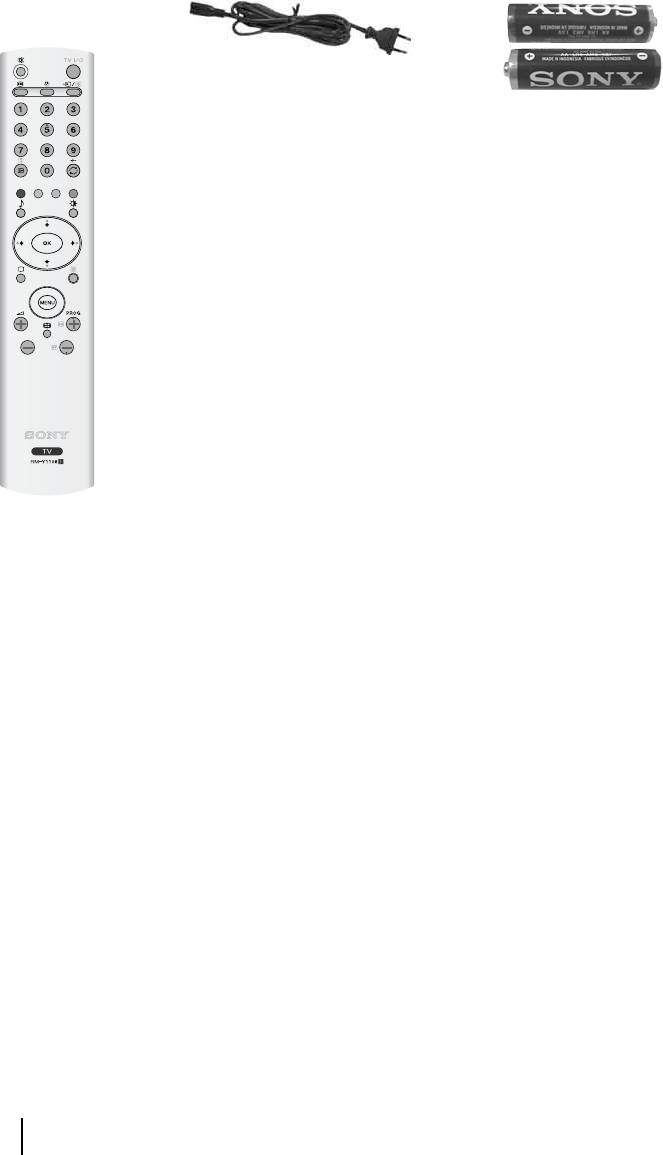
Описание и установка телевизора
Проверка комплекта поставки
1 Пульт ДУl
1
Сетевой шнур (типа
C-6):
2 Батарейки (размер AA)
(RM-Y1108):
8
Описание и установка телевизора
